

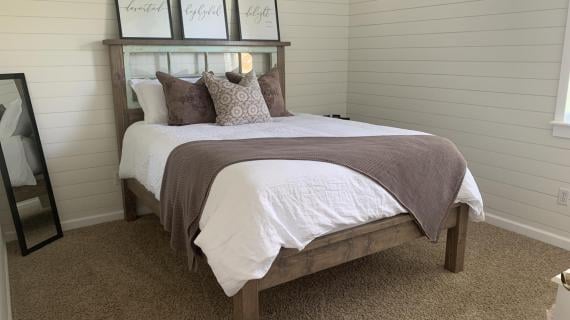
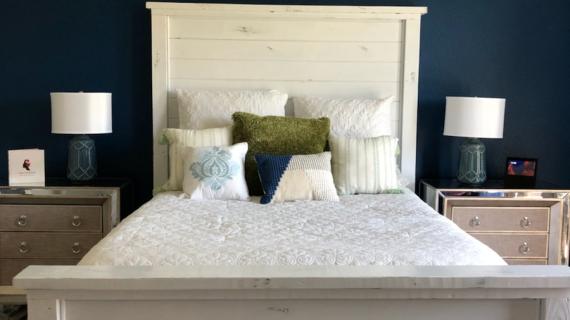
This beautiful farmhouse bed can be made for just a fraction of the cost to buy - all from standard, off the shelf lumber! You won't need a pocket hole jig or any special tools to build.
This bed has been built thousands of times and is a reader favorite. You can also find the twin version, king version, and all our farmhouse bed plans here.
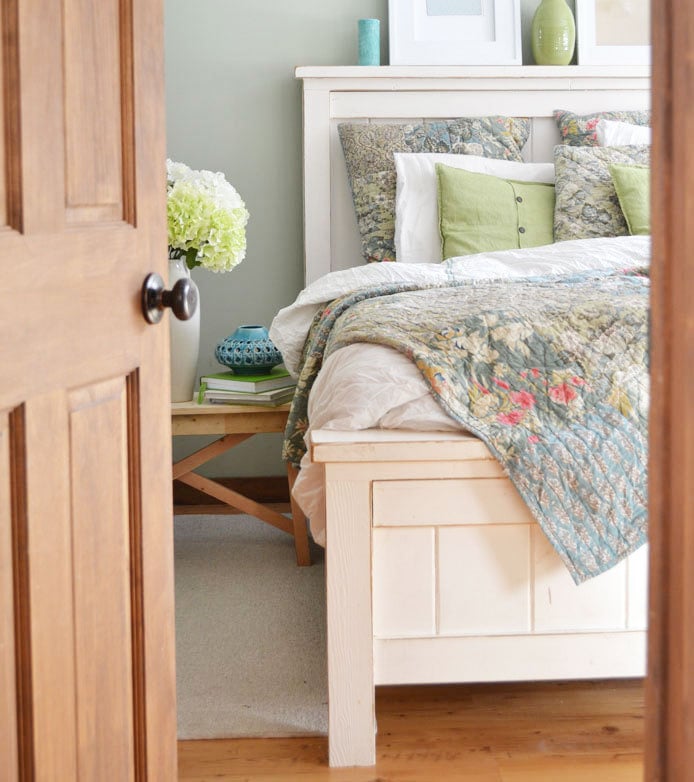
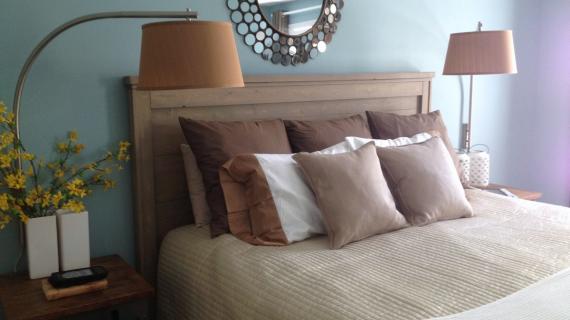
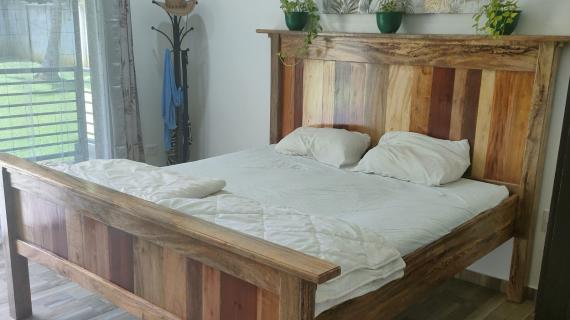
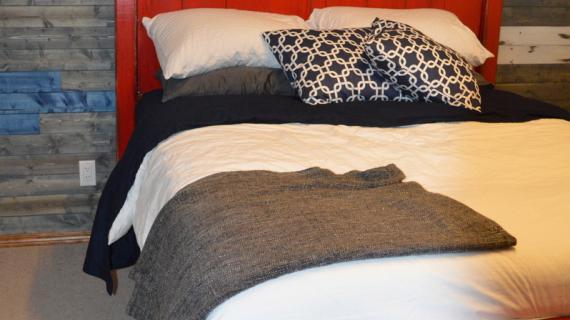
Reader submitted photo by KARAPOTHIER
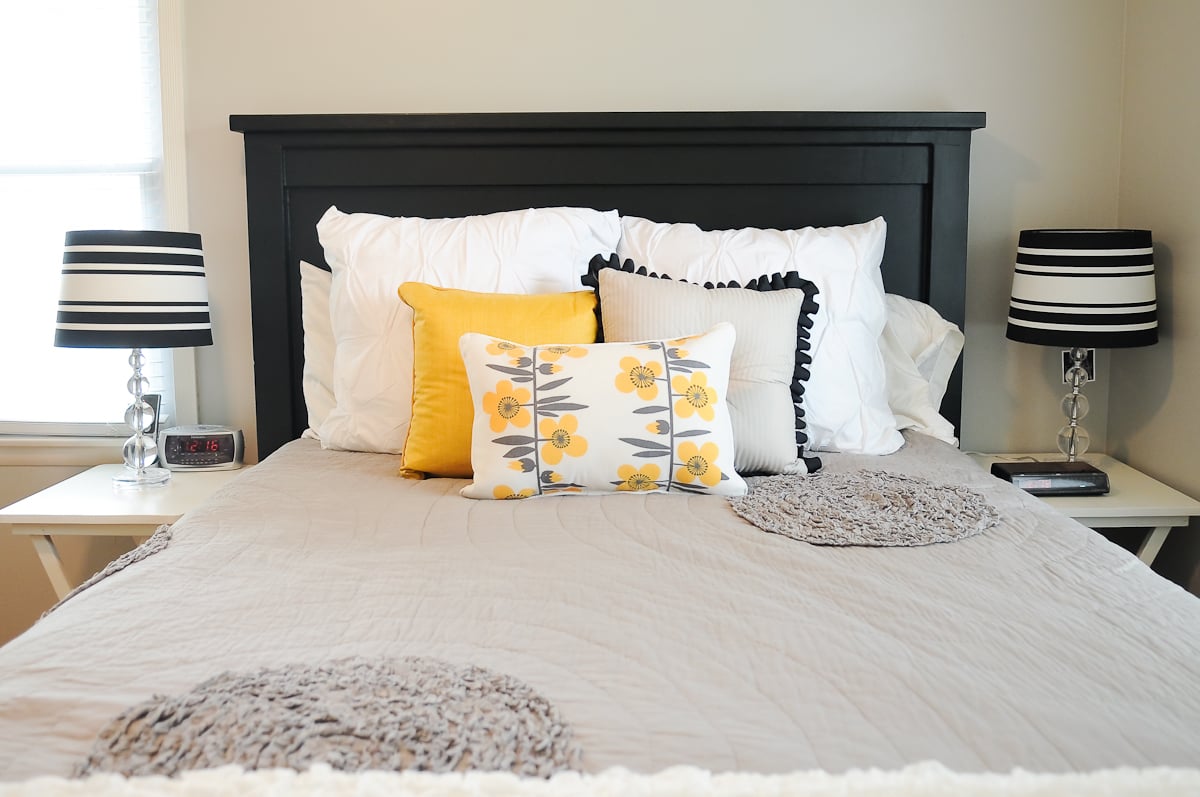
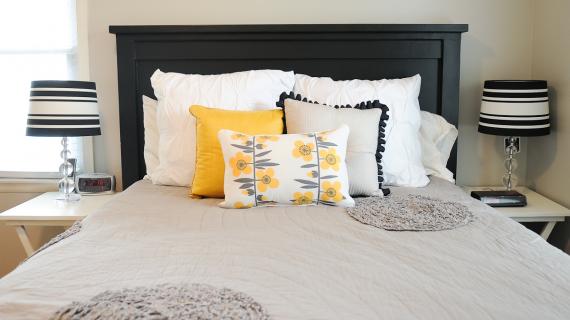
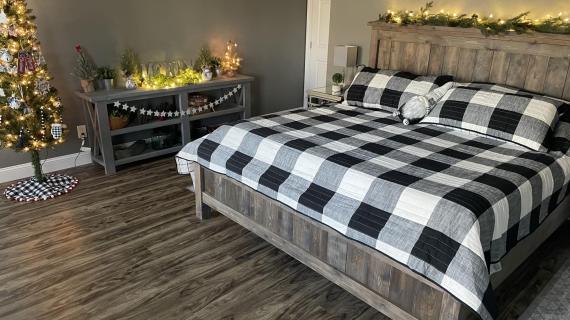
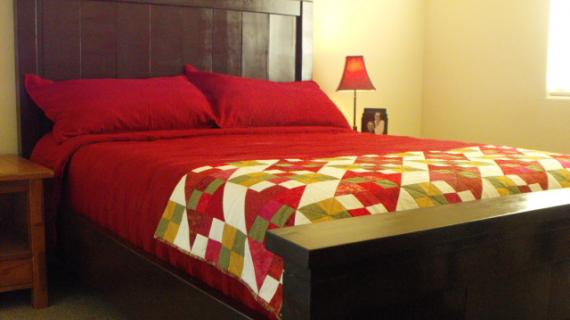
Having a beautiful bed can transform any bedroom. It's the most important piece in your bedroom, but can also be the most expensive.
Over a decade ago, I built my first farmhouse bed (pictured above). We still use it today, it's still as strong and sturdy and beautiful as ever. And it only cost about $120 to build then - thousands less than buying!
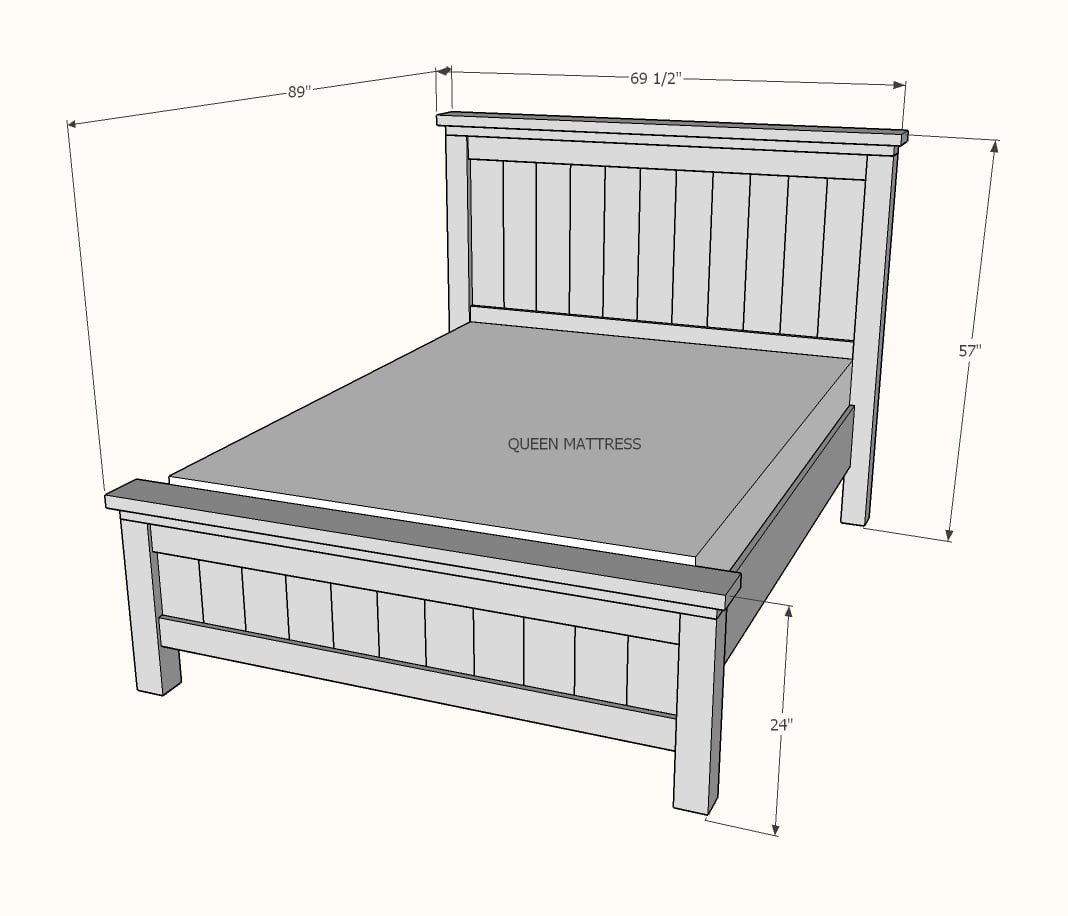
Farmhouse Bed Plans
We updated the original farmhouse bed plans to use less tools, less materials, but be just as beautiful! You won't need a pocket hole jig - just a drill, nailer and a saw, to tackle this project.
The plans are below. Please let us know in the comments or add a brag post on how your farmhouse bed turned out. Thank you for using our plans.
NOTE: This bed plan has been updated and improved. If you need the original plans, we have created a printable PDF for your convenience.
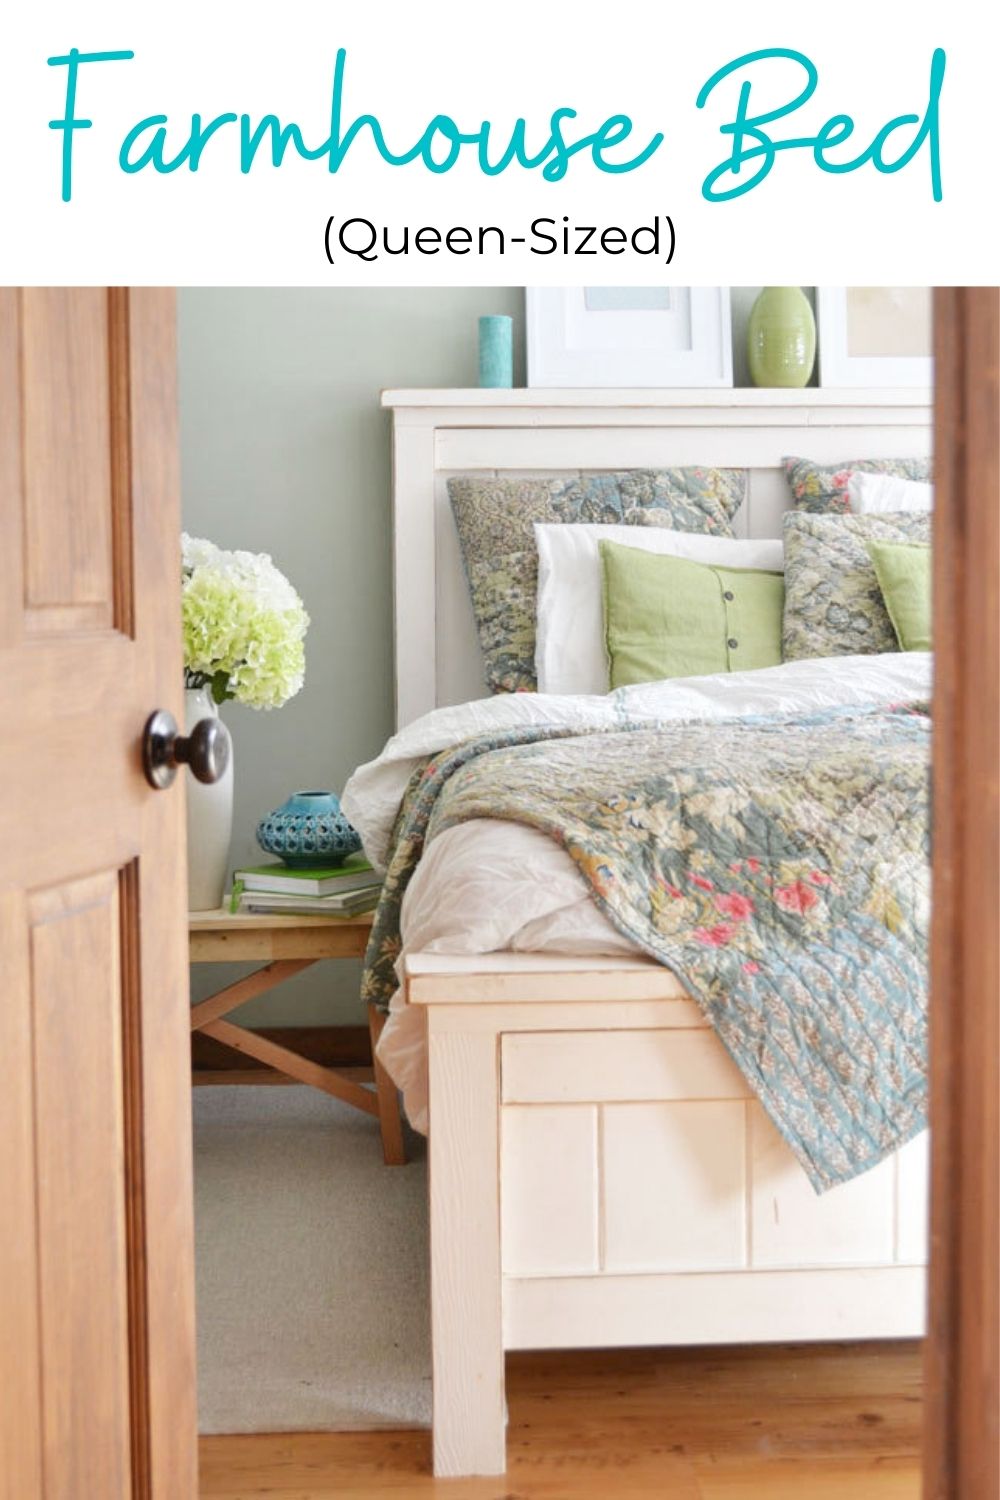
Pin For Later!
Preparation
- 12 - 2x4 8 feet long
- 2 - 2x6 8 feet long
- 2 - 1x10 8 feet long
- 2 - 4x4 8 feet long
- 1 - 2x2 8 feet long
- 6 - 1x6 8 feet long
- 4 - 1x4 8 feet long
- 100 - 1-1/4" long brad nails
- 75 - 2-1/2" long self tapping wood screws (#8 star bit recommended)
HEADBOARD CUT LIST
- 2 - 4x4 @ 54"
- 2 - 2x2 @ 30"
- 11 - 1x6 @ 30"
- 2 - 1x4 @ about 60-1/2" - measure and cut to fit
- 1 - 2x4@ 67-1/2" - measure and cut to fit
- 1 - 2x6 @ 69-1/2" - measure and cut to fit
FOOTBOARD CUT LIST
- 2 - 4x4 @ 21"
- 2 - 2x2 @ 8"
- 2 - 2x2 @ 3"
- 11 - 1x6 @ 15"
- 2 - 1x4 @ about 60-1/2" - measure and cut to fit
- 1 - 2x4@ 67-1/2" - measure and cut to fit
- 1 - 2x6 @ 69-1/2" - measure and cut to fit
MATTRESS SUPPORT FRAME/SIDERAILS
- 3 - 2x4 @ 83-1/2"
- 1 - 2x4 @ 60-1/2"
- 2 - 2x4 @ 12-1/2"
- 2 - 1x10 @ 80"
- 20 - 2x4 @ 32" - can be as short as 30" if you need to burn up scraps
Cut all boards except as noted to measure and cut. We recommend using a compound miter saw for the straightest cuts, but you can also use a circular saw and a carpenter's square - just make sure your cut ends are nice and straight.


Instructions
Step 1
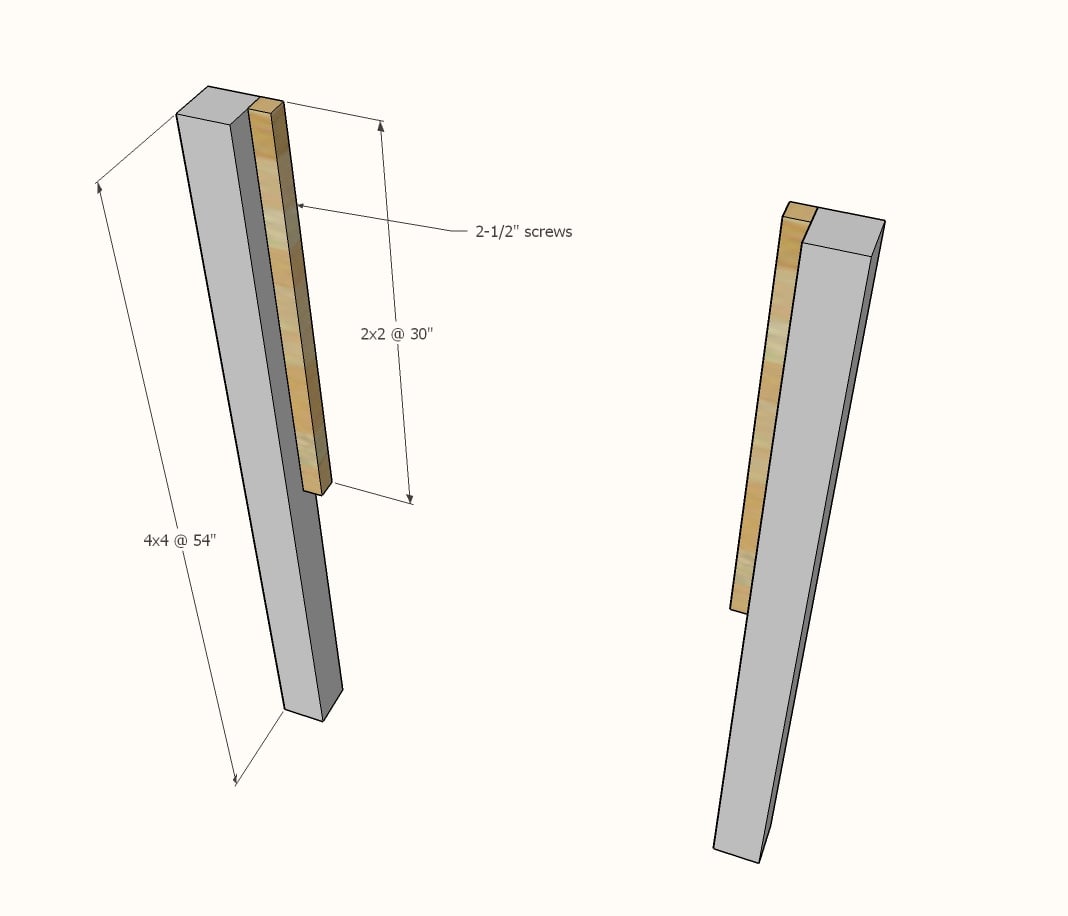
Attach the longest 2x2s to the longest 4x4s, flush to the back edge with 2-1/2" self tapping screws.
Step 2

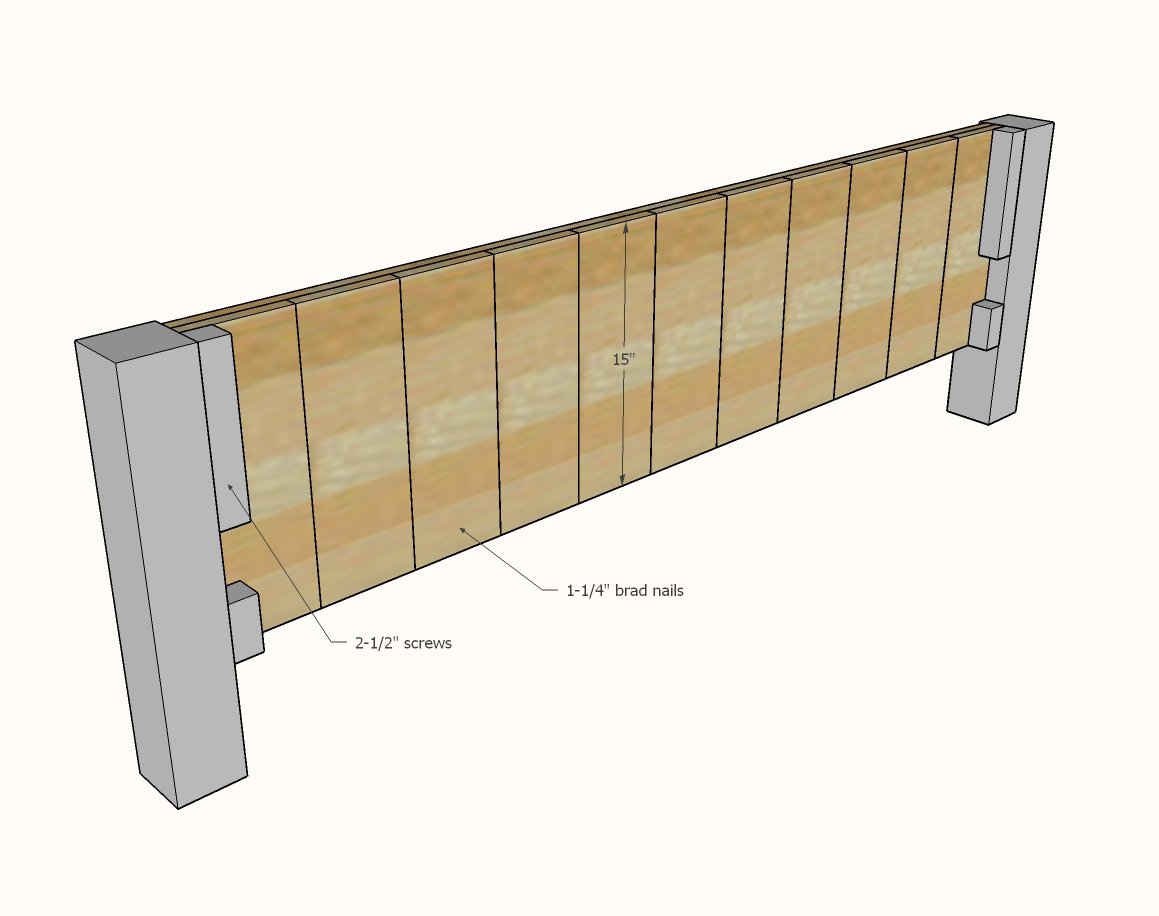
Layout the 30" 1x6 boards flat, side by side. Measure the overall width of all the 1x6 boards. Cut two 1x4s to this measurement.
Nail the 1x6 boards with glue to the 1x4s. Apply glue between the 1x6 boards as you go.
Make sure the panel is built square by measuring opposite diagonals (outside top corner of 1x4 to outside bottom corner of opposite 1x4) and adjusting so the opposite diagonals match.
Step 3
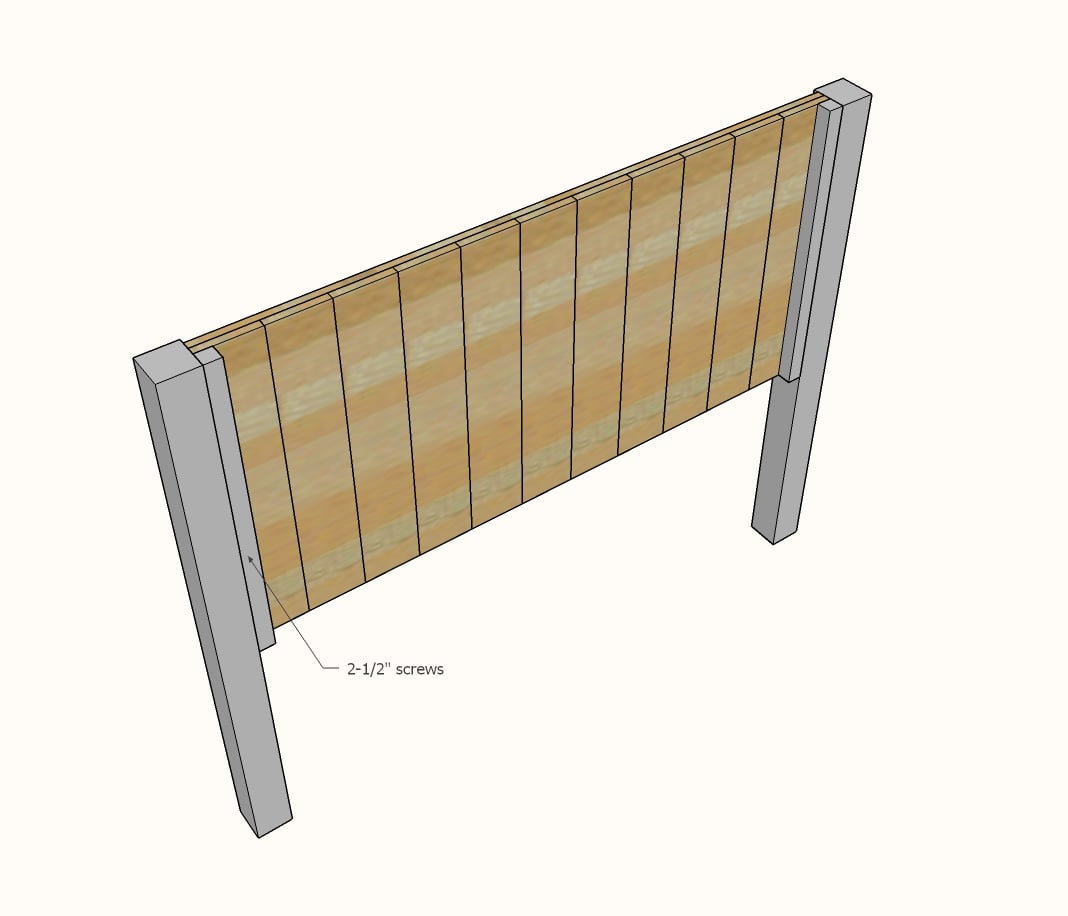
Attach the headboard panel to the 2x2s on the legs with 2-1/2" screws. Only screw to the headboard panel at the top and bottom portion backed by the 1x4s.
Also attach the panel from the front 1x6s to the 2x2s with 1-1/4" brad nails.
Step 4
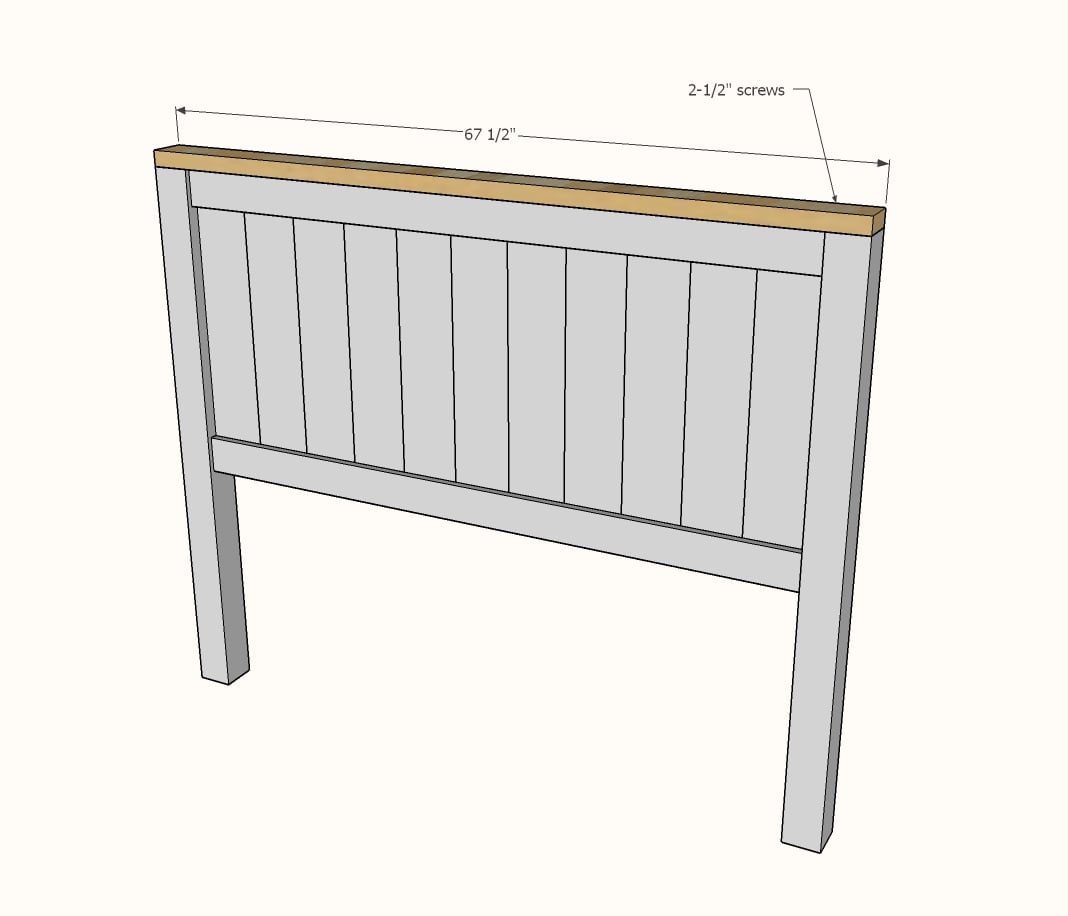
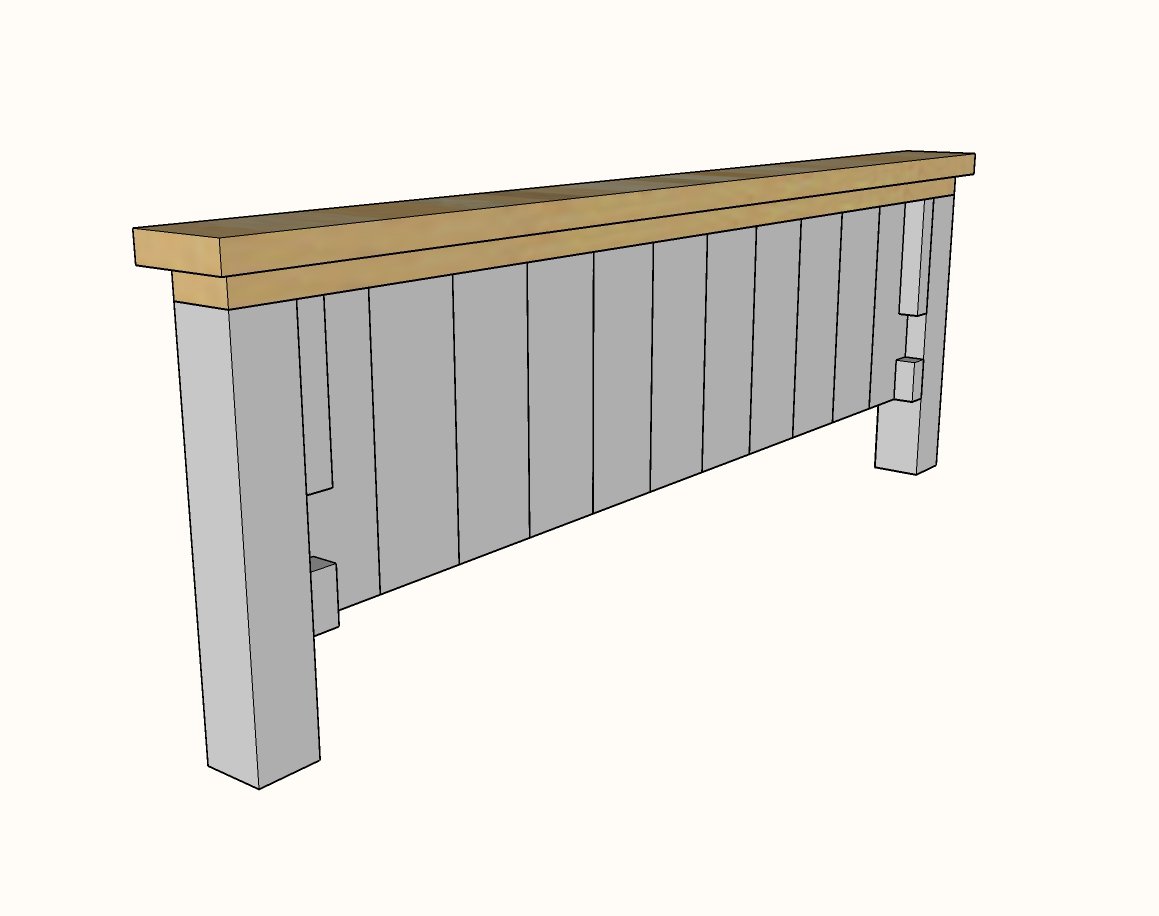
Measure and cut the 2x4 for the top. Attach with 2-1/2" screws.
Step 5
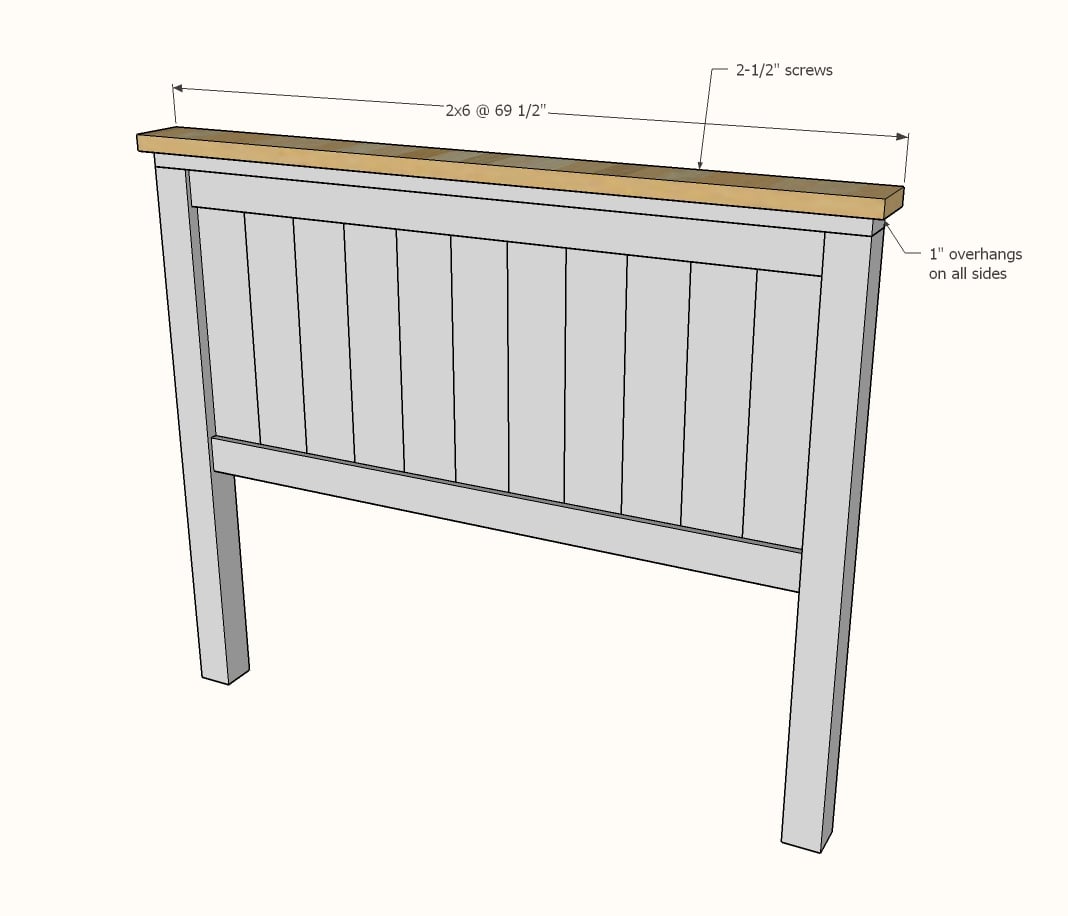
Repeat steps for the 2x6 top, leaving a 1" overhang on all four sides.
This completes the headboard build.
Step 6
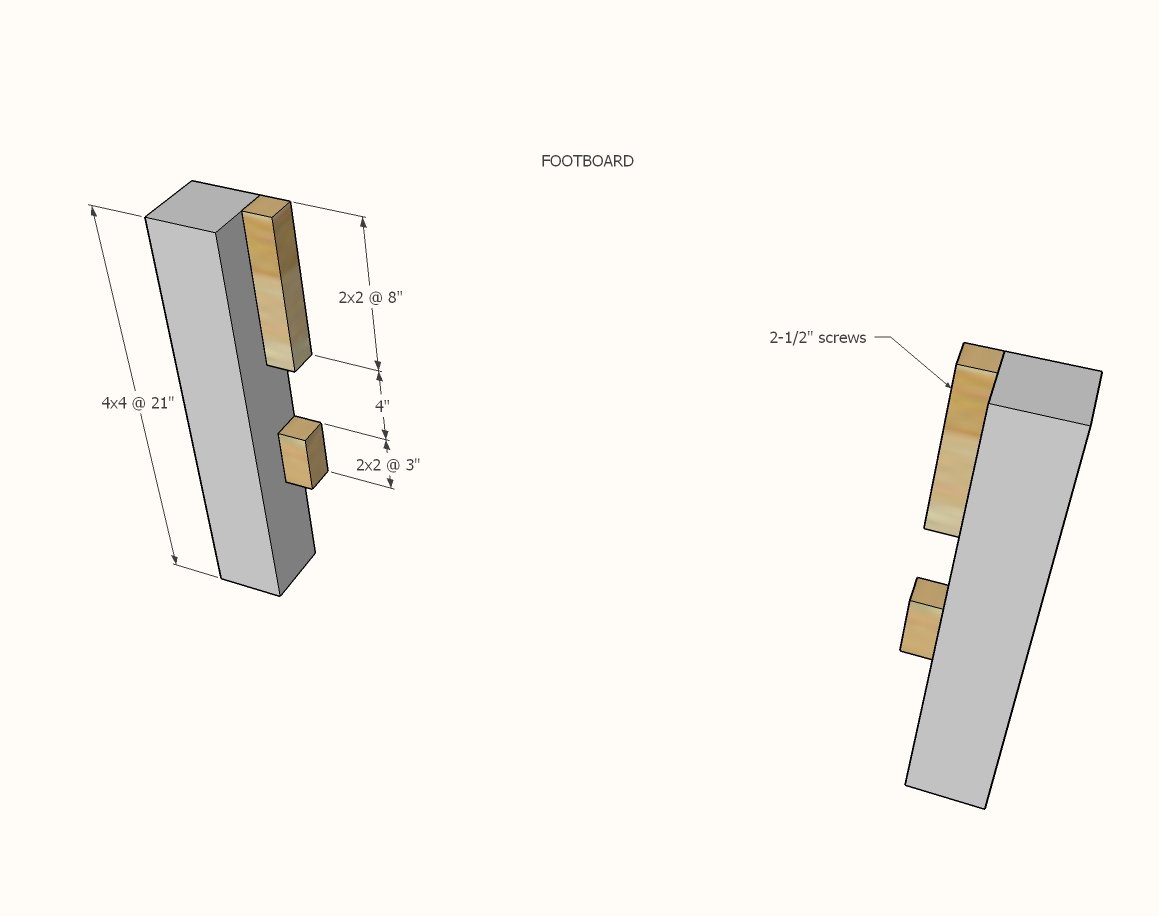
The footboard is constructed exactly as the headboard, with the exception of the 2x2 cleats and the overall height.
Attach the 2x2 cleats with 2-1/2" screws. The smaller cleat may split on you since the wood piece is so small. You can predrill holes to help prevent wood from splitting.
Step 7
Build the panel and attach to the 2x2 cleats.
Step 8
Attach top 2x4 and 2x6 to the footboard with 2-1/2" screws.
Step 9

Attach the 2x4 cleat to the footboard, set in the 2x2 cleats, resting on the bottom cleat. Use 2-1/2" screws to attach the 2x4 to the 4x4 legs.
Mark the headboard legs as shown in the diagram, and attach 2x4 cleat to the 4x4 legs with 2-1/2" screws.
Step 10
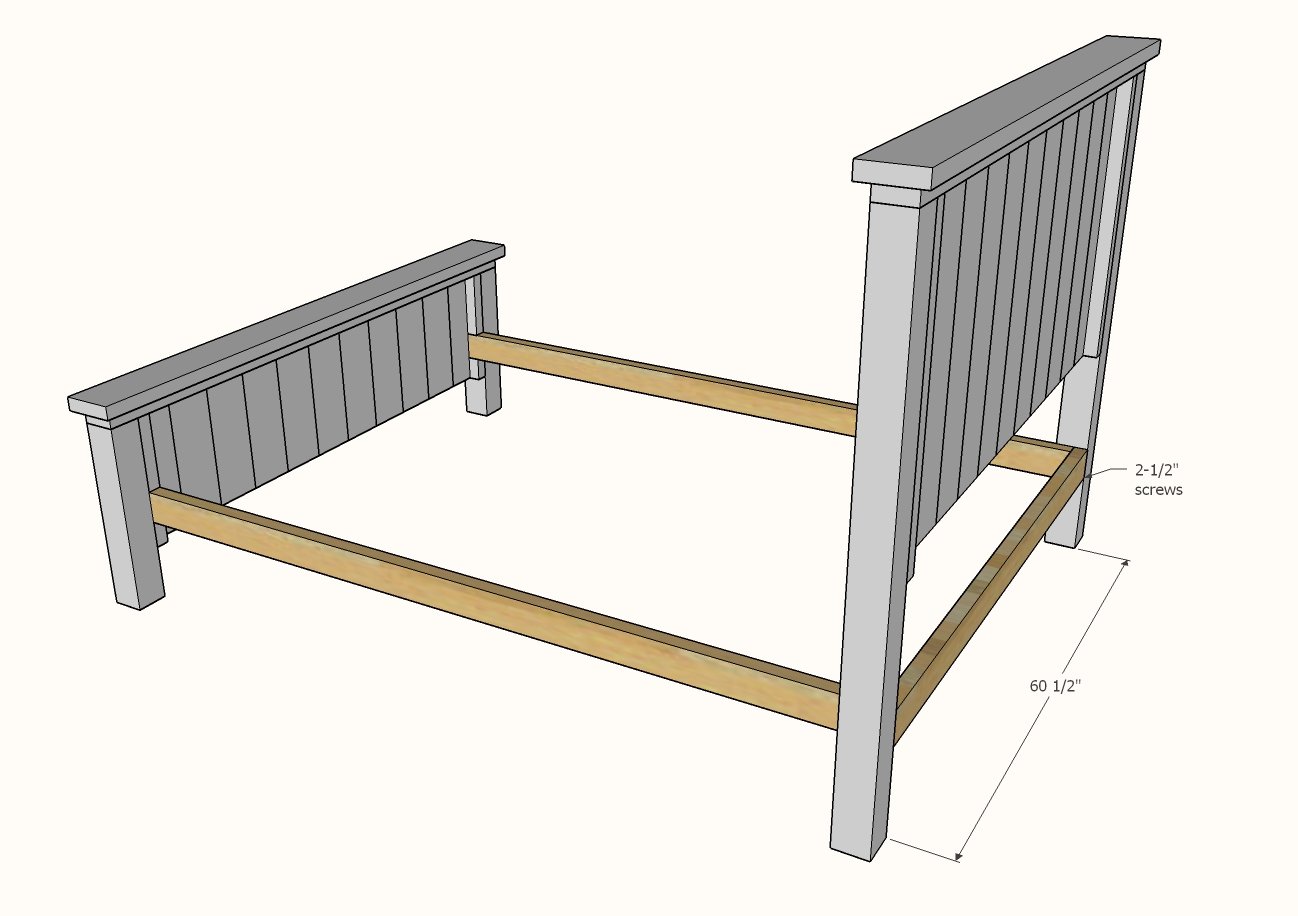
Use 2-1/2" screws to attach the headboard support between the cleats.
Step 11
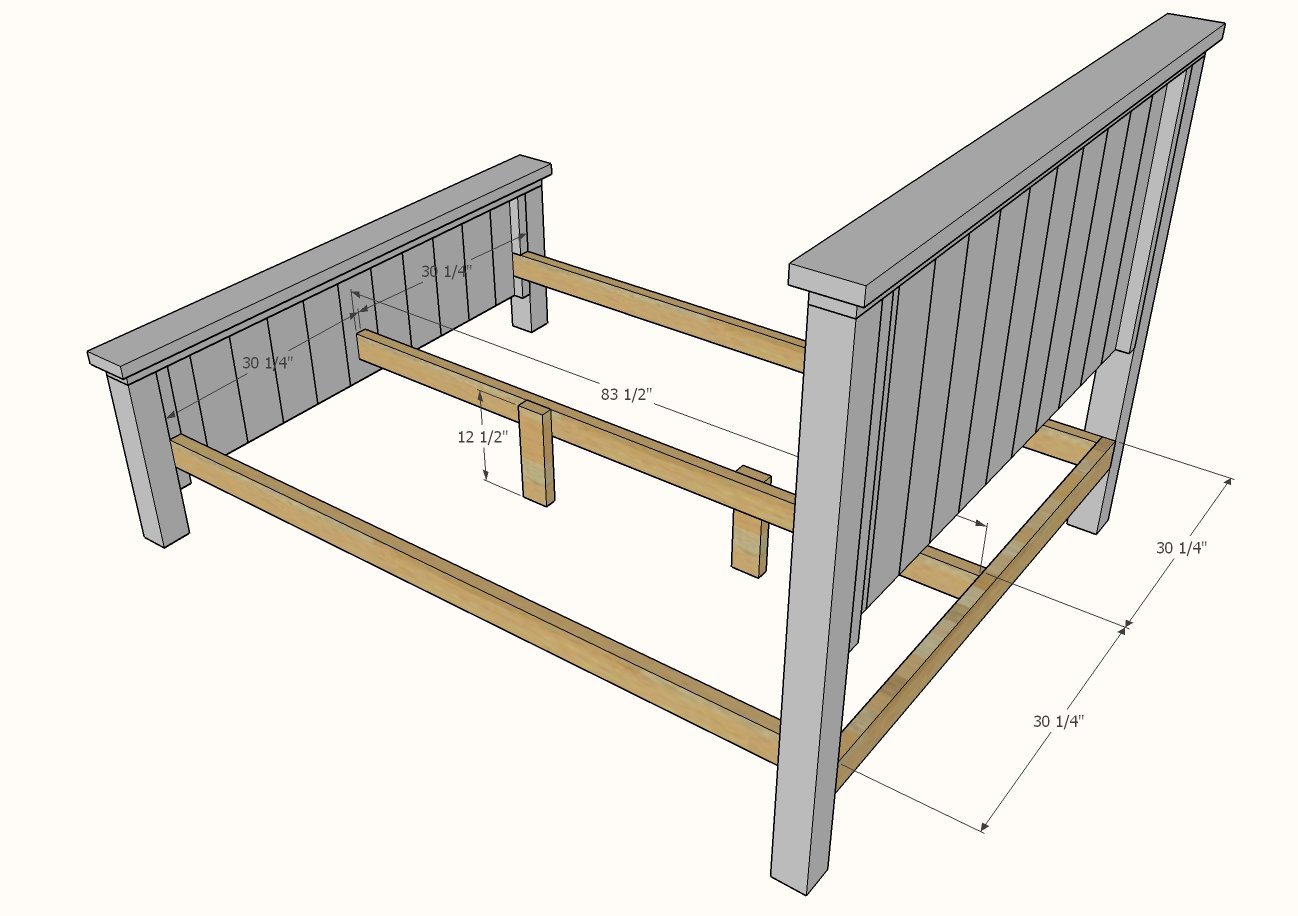
Center legs add a ton of support and strength to the bed.
First attach the shorter 2x4 "legs" to the center 2x4. Then place the center 2x4 in place inside the bed, and attach to the footboard and the headboard 2x4.
Step 12

Measure and cut to fit the 1x10 siderails.
Attach with 1-1/4" brad nails and glue.
NOTE: If you find your 1x10s need to be attached at the top, you can buy small L brackets and use to attach
Step 13
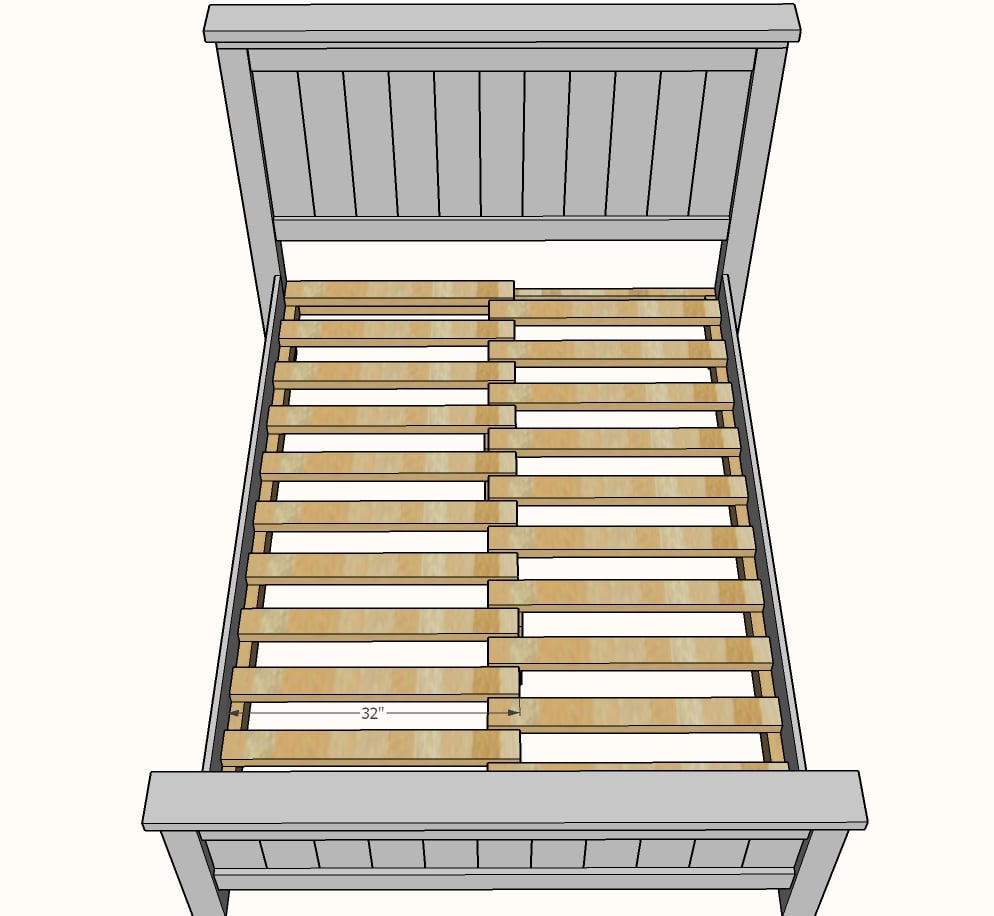
Cut the wood slats from remaining 2x4s and set inside the bed with about a 1/2" gap in between each slat. You only need one screw on the siderail cleat to attach - but you can also add screws to the center support.

Comments
Ana White (not verified)
Thu, 10/29/2009 - 08:06
See new post on changing the
See new post on changing the plan to fit a full size mattress. I hope this works for you - please post a photo of the completed project!
Love, Ana
Michael C. (not verified)
Thu, 05/17/2012 - 16:14
Quick question for Anna/Anyone
First let me say that I love this site. I have made several things already and keep running across the same issue. Where is everyone getting the 2x lumber. I have lowes and home depot and any 2x4, 2x6, and 2x2 is twisted, knotted and chewed up. Any suggestions? Thank you again anna. My wife thanks you as well!
In reply to Quick question for Anna/Anyone by Michael C. (not verified)
KoryJohnson
Sun, 02/18/2018 - 10:21
I have found the local lumber
I have found the local lumber company has higher prices but generally has better quality wood i.e less twists and bends. Check local!
good luck!
Newbuilder86 (not verified)
Wed, 12/19/2012 - 23:06
Box spring use
How does this bed work if you're using a box spring? This will be the first bed I've built, and I'm wondering how you support the box spring without the optional frame, or how you would modify it.
mfloyd
Thu, 06/16/2016 - 12:06
I can not see a repsonse to
I can not see a repsonse to this comment. How does it work if you have a box spring?
justinsane
Thu, 10/03/2019 - 04:23
Platform bed
Platform beds do not normally require a box spring. Think of the base like a futon. The mattress just lays on top of the platform.
mantenimiento … (not verified)
Thu, 01/17/2013 - 22:11
Farmhouse Queen Plans | Ana White
Thanks on your marvelous posting! I really
enjoyed reading it, you are a great author. I will be sure to bookmark your blog and will come back at some point.
I want to encourage continue your great posts, have a nice morning!
In reply to Farmhouse Queen Plans | Ana White by mantenimiento … (not verified)
mikepattenson
Mon, 05/25/2015 - 18:19
This farmhouse bed is awesome
This farmhouse bed is awesome! Materials are easily be found in local depot and measurements are correct.
Your goal of making your own furniture doesn't end here. Make your home looks gorgeous. Prepare things for the future, download woodworking plans:
kpax35
Thu, 10/17/2019 - 15:29
what type of wood did you…
what type of wood did you use?
Scott@Steelers
Mon, 10/21/2019 - 13:19
bedding
I hope to build the queen size farmhouse bed that you provided plans for. My wife likes the linens on the bed. Where might one be able to buy those items?
thanks,
scott
sclerner
Thu, 01/16/2020 - 07:37
full size plans
Hey Ana - can you point me to where the full size plan is for this bed? Love your website by the way!
Barton (not verified)
Sun, 11/01/2009 - 17:59
I love this! I have wanted
I love this! I have wanted this bed for a while. I need a new bed and wanted the farmhouse one.. but who seriously pays that much?! I considered it, but couldn't bring myself to it. I think me and my husband will try this! Do you have any tips for a california king?
Ana White (not verified)
Sun, 11/01/2009 - 19:18
Hi Barton, thanks for the
Hi Barton, thanks for the comment! A california king measures 72" wide x 84" long (as opposed to a standard queen of 60x80). To adjust the plan for a california king, you would increase all width measurements by 12" and all length measurements by 4" (length measurements only apply to the frame and the sideboards).
For the panel, I would recommend building the panel 75" wide, using (10) 2x8's cut at 30" for the headboard and 15" for the footboard. Also cut the 1x4 trim boards to 75". Build the panesl at 75", then trim the panels down to 72" by taking 1 1/2" off either side, as demostrated in the post on converting the bed to a full size. This will ensure the boards are centered.
For the greatest success, cut as you go and take exact measurements. Also make sure to fully understand what you are building and why each board is of what length before you begin the project.
Hope this works for you. If you still have questions, please comment and I will post some diagrams to help explain better.
Best Luck! Love, Ana
In reply to Hi Barton, thanks for the by Ana White (not verified)
EadieC2
Fri, 03/04/2016 - 10:24
Standard King
Ana, My bed is a standard king, and I know the dimensions are 76x80, and I know I must add 16" to the width pieces. The problem is: after looking over the shopping and cutting list, I'm not sure I understand (yet) which pieces are the width pieces. Can you be more detailed on which pieces are width and which are length? For example, do I need more panel pieces or wider ones? I know the joists are width pieces, but I guess the panel part is confusing me.
Thanks!
EadieC2
In reply to Standard King by EadieC2
EadieC2
Fri, 03/04/2016 - 10:30
Oh!
I see you answered my questions about standard kings in another comment. Ignore my question!
The Boone Family (not verified)
Mon, 11/02/2009 - 09:50
Hi Ana. How would you do a
Hi Ana. How would you do a regular king? I'm thinking of doing the black distressed look? Thanks, Rebekah
Ana White (not verified)
Mon, 11/02/2009 - 12:49
Hi Boone Family!The bed shown
Hi Boone Family!
The bed shown in the photo is a standard king. The measurements for a standard king are 76x80, meaning the standard king is the same as a queen, just 16" wider. So the frame and the side rails would remain the same, the only difference is you would make the headboard and footboard 16" wider.
What you could do to keep things simple is use 1x10s for the panel instead of 1x8s. Using (8) 1x10s in the panels, the total distance would be exactly 76". Make your cuts for the panel trim (the 8 1x4s) at 76", the 2x4 topper at 83" and the 2x6 overall header at 85".
In the bed in the picture, I ended up using 1x8 T&G leftover from a wood ceiling because it was what I had on hand, but it would be simpler to use the 1x10s.
Just a word of caution, there are actually 4 different types of king mattresses, so be sure to take the exact measurements of your mattress before building anything. Then use the overall width to figure your dimensions.
I hope I haven't confused you further. Let me know if you have any more questions. Best Luck!
Love, Ana
Ana White (not verified)
Mon, 11/02/2009 - 12:52
One more thing to the Boone
One more thing to the Boone Family -
The black distressed look is one of my absolute favorites! I've done alot of finishes, and the black is beautiful and classic. Once I delivered a furniture order to a retailer, and every black piece was sold within days!
Keep checking back, I will post on how to get that distressed finish.
Love, Ana
Sarah (not verified)
Thu, 11/26/2009 - 15:39
I just found your blog and
I just found your blog and LOVE it! Thanks for all of the great plans. Makes me want to break out my saw right this very second!
SAHMamacita (not verified)
Sun, 11/29/2009 - 22:07
Ana,Do you still accept
Ana,
Do you still accept orders? I've read through this blog and find it inspiring... Although I intend to attempt a few of these projects, was curious if you still sold your work? If so, please advise. Specifically, I was interested in the kid's table - Land of Nod and Thanksgiving table. Please post plans for the chairs or any kid chair, if possible. Would love to order a storage system for my kids' rooms, armoire, and Farmhouse bed (full size). Thanks!! Kathy
Ana White (not verified)
Mon, 11/30/2009 - 08:50
Hi Kathy, I would love to
Hi Kathy, I would love to work on your order, but we live in Alaska - and the shipping is very expensive. I am not sure it would be economically feasable - this is a big part of the reason I became a furniture builder/designer - Pottery Barn, Restoration Hardware, Crate and Barrel, iKea - no body ships to Alaska!
You can build it, I promise! Just start with an easy project, like a kid's project. Take your time. It's just like quilting or scrapbooking, but 3D and the tools are a little louder. :)
I'm here to help. Just shoot me an email or comment if you have any questions.
Love, Ana
and amenities (not verified)
Mon, 12/07/2009 - 19:58
I was so excited to find you
I was so excited to find you blog! We just built a new house and now we can afford to put some furniture in it by building it! :)
How would you construct the canopy for a queen bed? You may have already posted that somewhere, but I didn't see it. Thanks!
Ana White (not verified)
Sun, 12/13/2009 - 22:50
And Ammenities - I haven't
And Ammenities - I haven't forgotten about posting plans for a canopy - I'm just thinking about the safest and securest way to build the canopy without requiring special tools. Thank you so much for reading my blog! Ana
Family at the … (not verified)
Sun, 12/20/2009 - 18:27
Wow! I stumbled on this site
Wow! I stumbled on this site just a little while ago and have been enjoying every bit of it! Our home should be completed this Spring, and I've been looking forward to putting furniture in it, but can't afford to buy what I want. Your plans could make those dreams a reality! Unfortunately, my husband isn't "handy" and I didn't grow up building...do you have any recommendations for where/how to learn the basic skills I'll need? Thanks, Ana!
~Kelly
Bill (not verified)
Sun, 01/03/2010 - 16:01
This site is amazing, thank
This site is amazing, thank you for all of the effort that you must put into it. One question, is there a particular reason you chose pine? Doesn't that tend to be too soft? Just asking, since I am a complete and utter novice at this.
Thanks!
Ana White (not verified)
Sun, 01/03/2010 - 19:43
Hi Bill, Thanks for reading
Hi Bill, Thanks for reading my blog!
I use pine primarily because it's cheap and it's readily available in all kinds of dimensional sizes.
Also, stores like Pottery Barn, West Elm, Restoration Hardware, and others are using lots of pine these days. The rustic modern look is in, and pine is perfect for this type of furniture. Check out Restoration Hardware's Farmhouse Table and Pottery Barn's Hyde Collection, and Sumner Buffet, among many many other pieces. All made of pine.
My house is also made of pine. And all the trim. And doors. And window frames. And yours most likely is too.
I have made lots of furniture with pine, and it lasts just fine. My bed is a few years old, and it's still beautiful, functional, and sturdy.
Pine is also easy to work with because it is softer. Nails don't split the wood. It cuts without burning.
Of course, if you have the money to spend on hardwoods (like maple or oak), buy it. But if you are like me and are very concerned about saving money, pine might just be your choice.
Plywood and MDF are also good choices for tight budgets. There is a post on this in the HOW-TO section.
Whew, I didn't mean to be so long winded!
Ana
Shanty 2 Chic (not verified)
Mon, 01/04/2010 - 17:16
Your site is AMAZING:) You
Your site is AMAZING:) You are one talented girl!! I can't believe I have just found it but so glad I did. Love the detailed plans... Great Job!!!
~Whitney
GT (not verified)
Mon, 01/04/2010 - 20:22
Hi Ana!You have a great site!
Hi Ana!
You have a great site! Thank you so very much for sharing your knowledge and expertise.
I have been searching for plans on how to make this bed since my wife saw it in the PB catalog as well as the PB store, but we couldn't really justify spending $1600+ on it. :) By chance would you also have the plans or instructions for making the canopy to go with it? It will greatly be appreciated if you do! Thanks again for sharing knowledge with us!
-GT
Ana White (not verified)
Mon, 01/04/2010 - 20:33
Hi GT, this is something that
Hi GT, this is something that has been on my mind for quite some time . . . how to safely build the canopy for the farmhouse bed. I know how I would do it, but I'm reserved about recommending it. What happens if it falls, and someone gets hurt?
The other thing is the posts are tapered, and you need a bandsaw to taper the posts. Of course you could rent a bandsaw or keep the posts untapered.
I am still thinking about this, and will post as soon as I feel right about recommending a plan.
In the meantime, you are going to love the farmhouse bed. It's my bed, and I LOVE IT! I am so happy you stopped by are enjoyed these plans.
GT (not verified)
Tue, 01/05/2010 - 05:24
Ana, Thanks for the quick
Ana,
Thanks for the quick reply, and I totally understand about the safety concerns especially in a lawsuit minded society these days. :) From what I have seen in the PB store and such they're using dowels or hanger bolts to attach them. It's definitely not something you can swing on. :)
In my personal opinion, I would keep the posts straight for an easier build/construction. Not everyone has a woodworking shop like Norm Abrams. :) I think by using at least 5 1/2 inch hanger bolts with tee nuts would be more than sufficient in anchoring the 4 posts. Plus the 4 rails at the top (1x2s) will add stability and strength to them. I think the canopy just add a special look to it and it's not made to be a jungle gym to hang from.:) LOL At least that is how I would approach it.
Thanks again for a great site and providing us with excellent building plans to start from!
-GT
Hendersons (not verified)
Sat, 01/09/2010 - 14:05
Ana, just stumbled across
Ana, just stumbled across your site from Ucreate and I am so impressed! Love this Farmhouse bed and have just called my husband from upstairs to show him our next project! Question: do these plans accommodate both the box spring and mattress? I would love to see some plans for a Cal King! Keep up your amazing talent! Thanks so much for sharing!!
Steff (not verified)
Tue, 01/12/2010 - 14:20
Hi Ana,Since all of the
Hi Ana,
Since all of the pieces to this bed are nailed or screwed together, did you have to put it together in your bedroom? Will it be ruined if you had to take it apart to move it?
Thanks!
eli (not verified)
Fri, 01/15/2010 - 02:57
Ana,I was looking at the
Ana,
I was looking at the picture with the 4x4 leg posts. I do not see any screw holes, what do you use to cover the screw and nail marks?
Wood putty never looks good for me after I paint over it?
Ana White (not verified)
Fri, 01/15/2010 - 08:30
Screw Holes. I can see the
Screw Holes. I can see the screw holes, but no one else has ever noticed them. I'm slightly a perfectionist when it comes to my furniture.
From my experience, you need to overfill the screw holes with wood putty. Let dry completely. Then sand evenly. If you do this correctly, you should not even see the screw holes.
If you have a chance, look at the Kids Storage Chair I built. This shows the chair sanded, and the chair was screwed together.
Anonymous (not verified)
Fri, 01/15/2010 - 18:42
Thank you for these plans.
Thank you for these plans. You do great work. What kind of wood did you use for the frame and for the 4x4s.
Laura (not verified)
Sun, 01/17/2010 - 10:17
Hi Ana!First, I just have to
Hi Ana!
First, I just have to say that I LOVE your site and am so glad you have shared your plans! I have not built anything before but can't wait to try a number of your plans!
I just have one question... The tool list says to use a brad nailer...is it possible to just nail the nails in with a hammer? or is it not as good? This is all new to me so I need all the help I can get ;) thanks so much!!!
Ana White (not verified)
Sun, 01/17/2010 - 10:22
Hi Laura, I am going to
Hi Laura, I am going to recommend not using a hammer and nails. The biggest reason is that the nails will be very evident because of the larger head size for standard nails. Also, it is very difficult to hold your piece steady and straight while nailing.
If you can get your hands on a nailer, please do. My sister has always hated any DIY and this past week, I had her build with my nailgun. She's in love! It's like hand sewing vs a sewing machine. I'm not saying it cannot be done . . . it's just that you will face a mcuch greater challenge.
You may be able to rent a nailer from Home Depot or Lowes for a day. You can also purchase refurnbished nailers cheap. I've seen a good nailer for as low as $40. But you will also need a air compressor.
I wish you could just come over to my shop and build with me!
Ana
Kara Pothier (not verified)
Mon, 01/18/2010 - 09:30
I came across your site from
I came across your site from younghouselove.com and fell in love. Your furniture is beautiful.
I have some (perhaps a few!) questions regarding the bed. It looks as though it is meant to be used without a box, is that right? Do you alter it to use a box? How high from the ground do you screw the rails into the head and footboard? How do you recess the screws in the post so you can putty them? And is this a bed that can be taken apart and put back together if we move, do we need to screw new holes?
I'm so excited about this project! Thanks
Ana White (not verified)
Mon, 01/18/2010 - 15:24
Hi Kara,You can use a
Hi Kara,
You can use a boxspring if you have one, or if you don't have a box spring, you can add the slats. I suggest looking through the other bed plans to see the different methods for constructing the bed frame. If you have a boxspring, you will simply lower the inside cleats. If you do not have a box spring, then you will need to add the framing. Depending on your desired mattress height, fasten the rails to the footboard and headboard. Make sure you fasten the same height.
You will need to use a countersink bit to hide your screw holes on the 4x4 posts.
You can use the same screw holes for several times over, especially since the screws are so long, but if you plan on assembling and reassembling this bed repeatedly, you should look into purchasing brackets designed for headboards to connect to side rails.
Hope this helps! Ana
eli (not verified)
Mon, 01/18/2010 - 15:36
One more question...When you
One more question...
When you say 4 1/2" screw, you mean Lag Bolt right? I've been to many stores and they do not make a
4 1/2 screw.
Thanks
Anonymous (not verified)
Sat, 01/23/2010 - 13:28
This site is amazing! Very
This site is amazing! Very excited to get my husband working on our new King bed! You make a great name for women - love your style and energy... fabulous blog!
Brandi (not verified)
Mon, 01/25/2010 - 10:22
Just finished making this bed
Just finished making this bed and I just love it. Made a couple of simple mistakes but nothing that coildn't be fixed. Now it is time to paint.
eli (not verified)
Mon, 01/25/2010 - 13:52
I also just finished making
I also just finished making the bed, I used treated 4x4's since the ceder and fir 4x4's were $40 a peice. Wondering if anyone has does this? For they seem pretty wet (not dried out yet) I'm wondering if I paint them (wet) will it affect anything? Rot or discoloring ect...It sure added a lot of weight.
Kim (not verified)
Wed, 01/27/2010 - 06:01
I'm having the same problem -
I'm having the same problem - I've called around and Home Depot & Lowes only have TREATED 4x4 posts. The lumber yards only have cedar and fir which are very expensive. Are there any alternatives? Is using treated wood for just the posts a possibility or is there a workaround? Thanks!
eli (not verified)
Wed, 01/27/2010 - 06:15
From what my friend tells me,
From what my friend tells me, you should not use treated because they will shrink and twist. Two bad for me, because I will have to throw the head and foot board in the trash. For they are not coming off.
Kristin (not verified)
Wed, 01/27/2010 - 08:29
AN ALTERNATIVE TO THE 4x4
AN ALTERNATIVE TO THE 4x4 POSTS:
I used 2-2x4s. I was in a fully equipped wood shop so you may not have access to all the tools and machinery. Try to find squared-off ones instead of the rounded ones. I couldn't so I trimmed the rounded edges off with a table saw, making my boards 3x3s when put together. (I don't think it will really matter if they are still rounded, maybe you can use putty in the seam. Somebody correct me if I am wrong on that as I haven't actually done it.)
I then glued two boards together and clamped them over night to dry. Make sure to get glue all over the parts that will touch. Also make sure the edges are flush. Mine were a little off so I sanded them down real well after I scraped the glue off that dripped out. (Dripping glue is good...it means you had enough glue in between the boards!)
I then put my seams facing the sides so they are not as noticeable. If you join the two boards well enough, you won't be able to notice at all. On one leg I had a hard time finding the seams to put on the outside and I was looking for it!
Ana, I hope you don't mind me jumping in here! I almost didn't build a bed because I could not find the 4x4s untreated! I am so glad you told me I could use 2-2x4s!
Candace @ Cand… (not verified)
Thu, 01/28/2010 - 14:46
I just found your blog
I just found your blog through Made with love and Glue, and I'm hooked! Thanks so much for this bed tutorial! I really hope my husband can make this for me! I mean us!
And perhaps adapt the design to make a twin size version for my daughter!
Kristin (not verified)
Thu, 01/28/2010 - 17:53
Candace, Ana posted a
Candace, Ana posted a modified plan for a twin size of the farmhouse. So you don't have to do it!!
Anonymous (not verified)
Fri, 01/29/2010 - 18:11
First of all, Nice blog, Love
First of all, Nice blog, Love it! I just have a one thing. when you select your 1x8 boards you want to try to find 7 1/2" boards. I, not knowing better got 7 1/4 boards and it only came out to 57 3/4" not 60" so the bed turned out a little less wide. Anybody else run into this problem?
Anonymous (not verified)
Fri, 01/29/2010 - 18:18
Oh yeah 4x4s. I found 8' fir
Oh yeah 4x4s. I found 8' fir for like 12$ each at menards. My total was like 130$ minus paint and plywood, still cheap enough.