
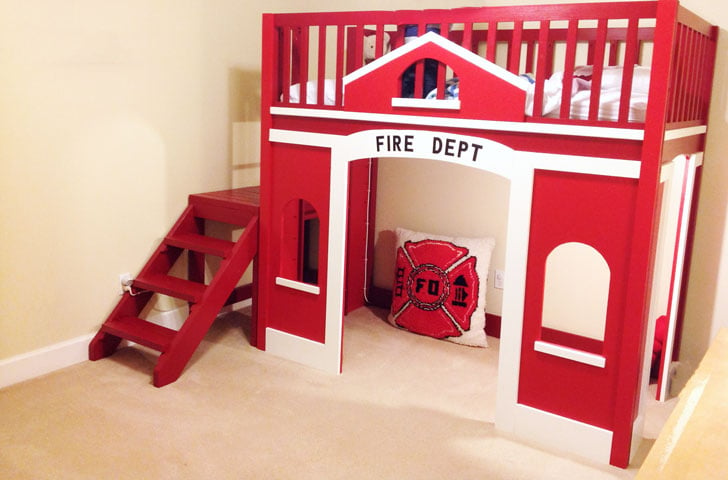

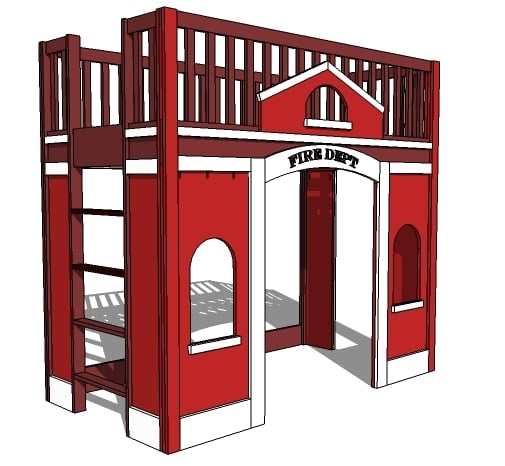
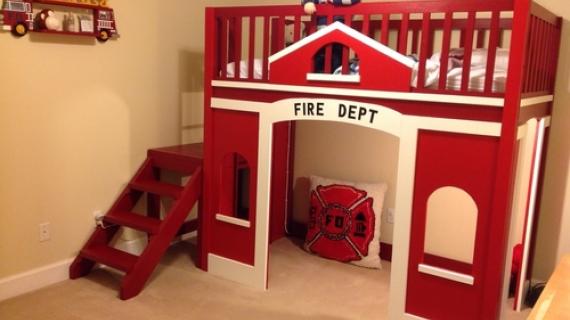
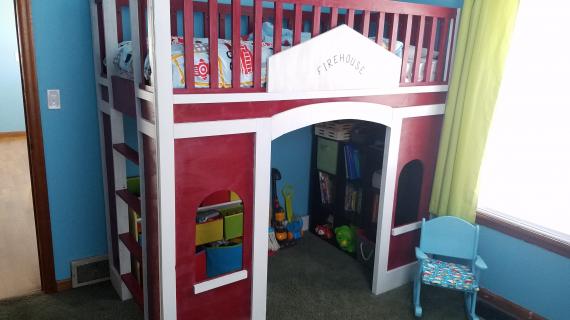
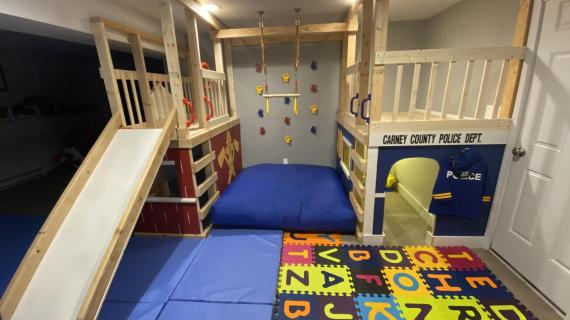
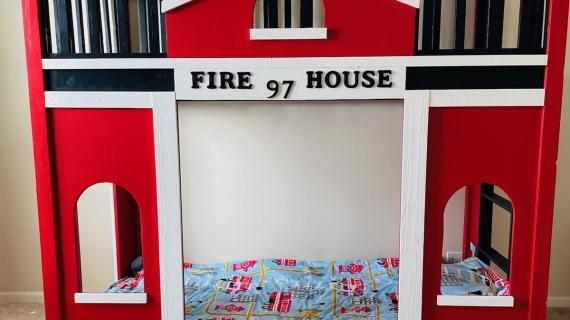
DIY a Fire Station loft bed. This bed features solid wood construction, clever use of materials, and easy panel design for moving and storing. The ladder can be placed on either side, an open back and wide entryway. Create extra room in your child's room on the tightest of budgets by making your own Fire Dept Loft Bed!
Our free step by step plans include full diagrams, shopping and cut list, and readers submitted photos.


Preparation
- 14 - 1x3 Boards @ 8 feet long
- 3 - 1x8 @ 8 feet long
- 10 - 1x2 @ 8 feet long
- 2 - 1x6 @ 8 feet long
- 1 - 1x4 @ 10 feet long
- 1 - sheet 3/4" plywood, 8'x4'
- slats not accounted for in cut list
- 2 1/4" or 2 3/8" screws (about 50) for assembly
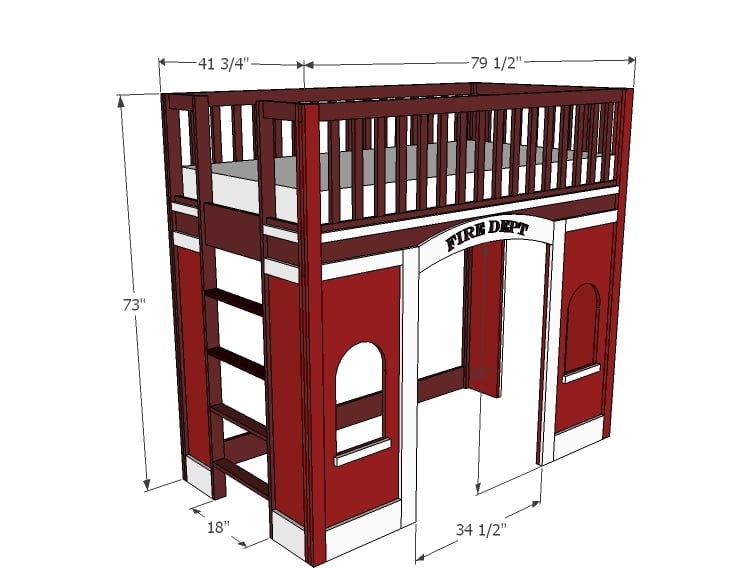
- 2 - 1x3 @ 79 1/2"
- 2 - 1x8 @ 79 1/2"
- 44 - 1x2 @ 15 1/4" (Railing)
- 4 - 1x3 @ 15 1/4" (Railing)
- 10 - 1X3 @ 73" (Legs)
- 1 - 1x6 @ 79 1/2"
- 2 - 1x3 @ 42 1/2"
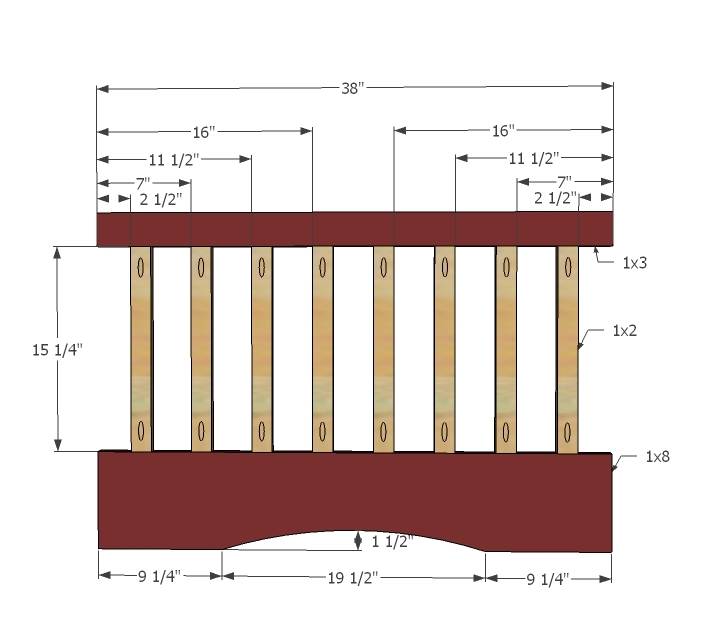
- 1 - 1x3 @ 38"
- 1 - 1x8 @ 38"
- 2 - 1x3 @ 9 1/4"
- 2 - 1x8 @ 9 1/4"
- 4 - 3/4" Plywood @ 48" x 9 1/4"
- 2 - 3/4" Plywood @ 48" x 22 1/2"
- 2 - 2x4 @ 74 1/2"
- Slats cut at 39 1/2"
TRIM (Full Side)
- 2 - 1x6 @ 6 3/4"
- 2 - 1x3 @ 6 3/4"
- 2 - 1x3 @ 49"
- 1 - 1x2 @ 38"
TRIM (Ladder Side)
- 2 - 1x6 @ 9 1/4"
- 2 - 1x3 @ 9 1/4"
- 2 - 1x2 @ 9 1/4"
- 1 - 1x8 @ 18"
- 4 - 1x3 @ 18"
TRIM (Front)
- 1 - 1x2 @ 74 1/2"
- 2 - 1x3 @ 16 1/2"
- 2 - 1x6 @ 16 1/2"
- 2 - 1x4 @ 49 1/2"
- 2 - 1x2 @ 11 1/2"
- 1 - 1x8 @ 34 1/2" - cut arch shape out


Please read through the entire plan and all comments before beginning this project. It is also advisable to review the Getting Started Section. Take all necessary precautions to build safely and smartly. Work on a clean level surface, free of imperfections or debris. Always use straight boards. Check for square after each step. Always predrill holes before attaching with screws. Use glue with finish nails for a stronger hold. Wipe excess glue off bare wood for stained projects, as dried glue will not take stain. Be safe, have fun, and ask for help if you need it. Good luck!
Instructions
Step 1
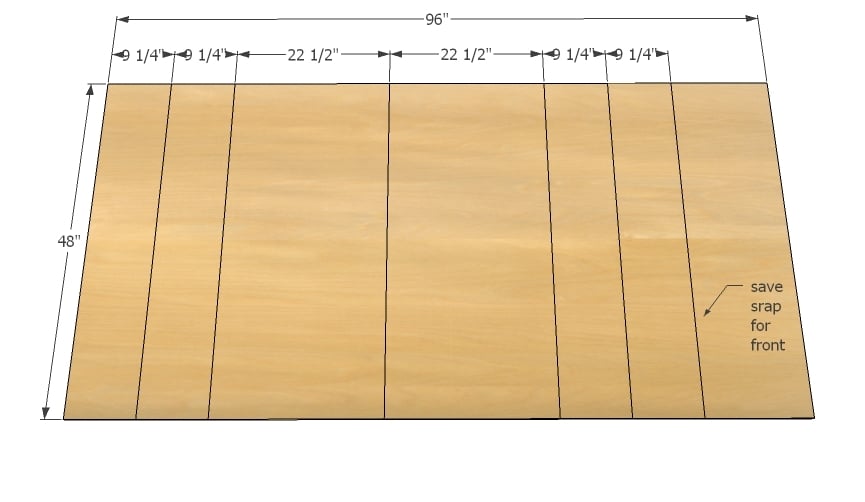
This bed is shown built with PureBond Formaldehyde Free Plywood in Birch. You will need one sheet of plywood, cut carefully as shown above. Make sure you consider the saw blade width as you cut. Cut, measure, cut, measure and so on. Save the scrap piece to use as a decorative front.
Step 2
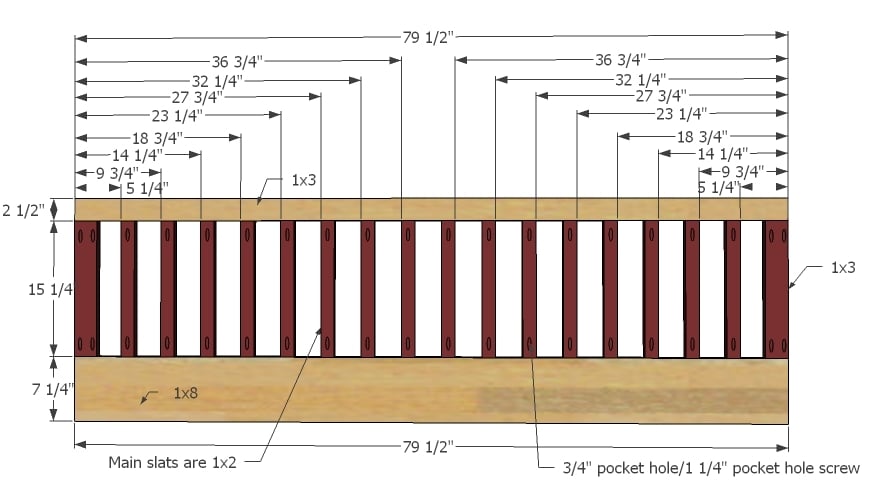
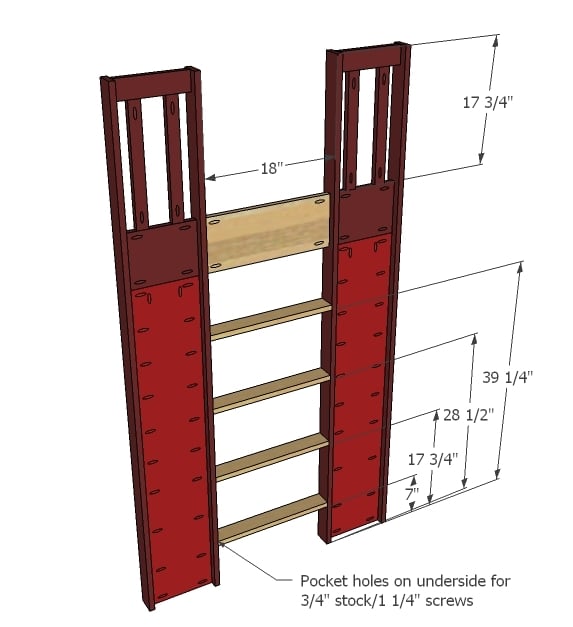
You will need to build two of these. Mark the tops and bottoms as shown in diagram. Drill Kreg Jig pocket holes on each end of each slat, as shown in diagram. Attach with pocket holes and glue.
Step 3
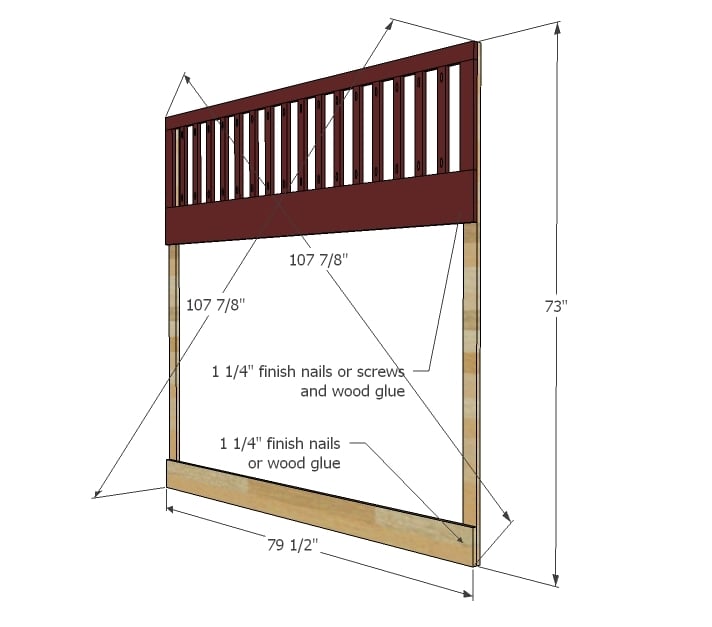
Take one of the completed railings and attach it to 1x3 legs with 1 1/4" finish nails and wood glue. Then attach the bottom 1x6 to the bottom as shown in diagram. Take a diagonal to make sure the back is square and adjust if necessary - this is very important to ensuring your bed is square.
Step 4
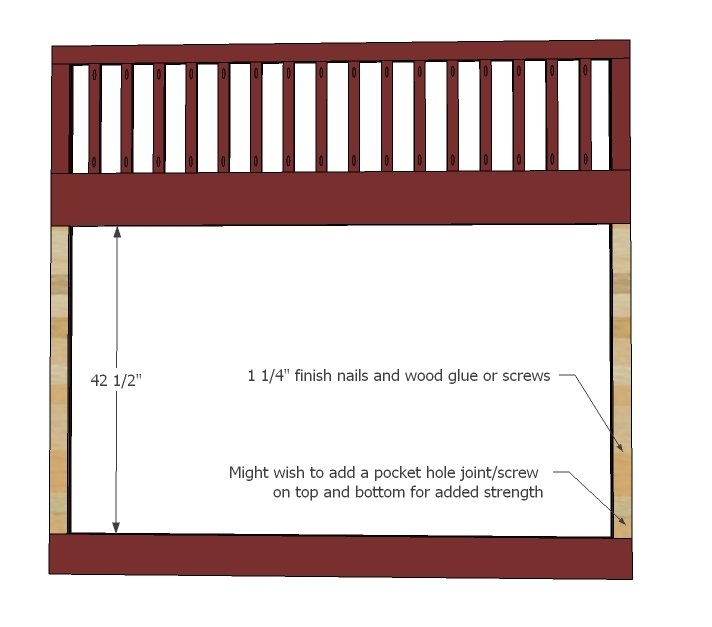
Now simply fill in the empty spaces with 1x3s and 1 1/4" finish nails. Keep the outside edge flush to make the legs look like solid blocks. This completes the back, set aside.
Step 5
Step 6
Attach smaller pieces of plywood to bottoms of the 1x8 as shown in diagram.
Step 7
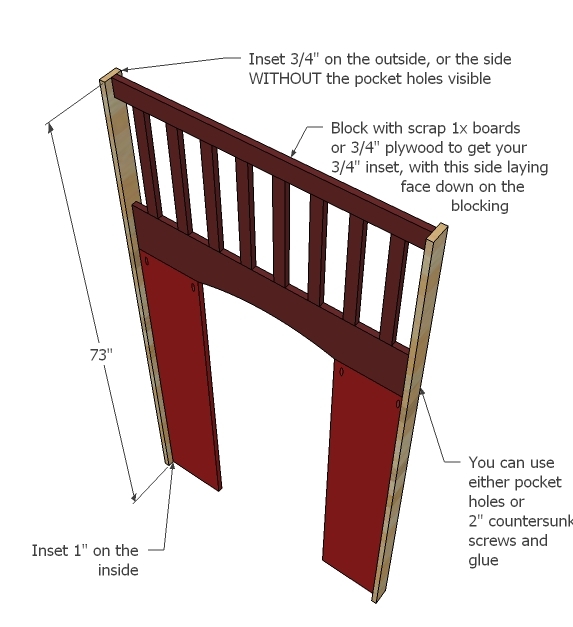
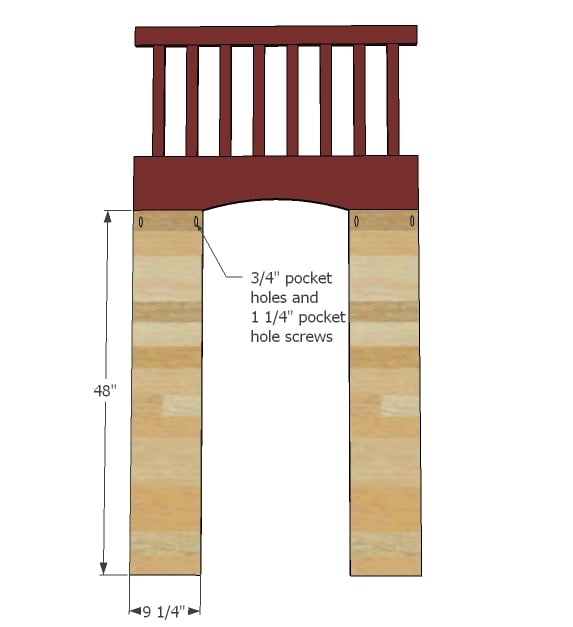
With pocket holes facing up, lay the panel down on top of 1x boards, to raise 3/4" above your work surface. Attach sides with either 3/4" pocket holes and 1 1/4" pocket hole screws or 2" screws or finish nails from outsides and glue.
Step 8

Add trim as shown in diagram, using 1 1/4" finish nails and wood glue. This completes the full side, set aside.
Step 9

On the ladder side, construct two panels as shown above.
Step 10
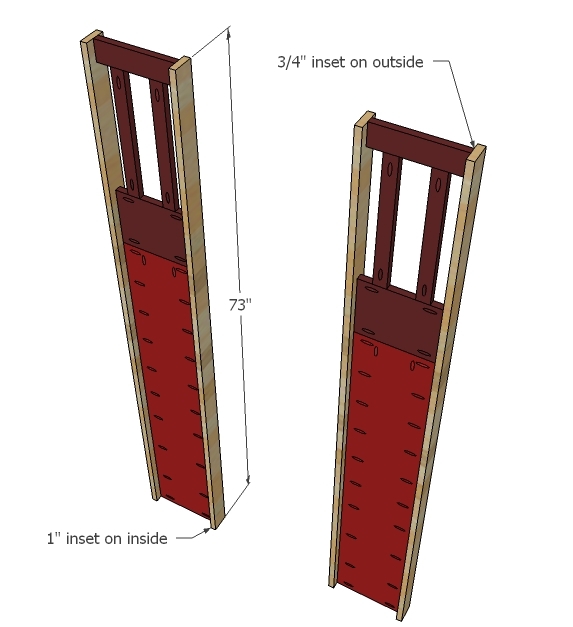
With pocket holes facing upward, elevate 3/4" using 1x boards and attach sides with either pocket holes or 2" fasteners and glue.
Step 11
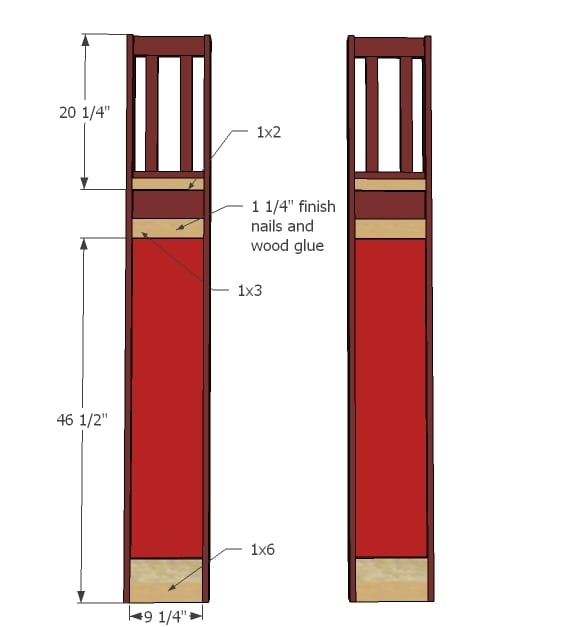
Followed by trim.
Step 12
And then add the ladder pieces to create the ladder. This completes the ladder side panel, set aside.
Step 13
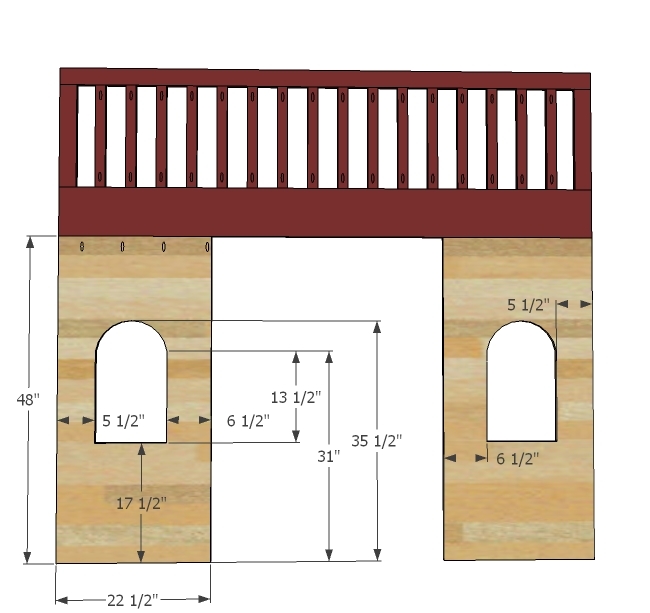
For the front, use the remaining top railing and attach to the large pieces of plywood. You may wish to cut the windows out prior. Use 1 1/4" pocket holes through 3/4" pocket holes to attach. Note that the windows are not exactly centered on the panels, with the smaller margin to the outsides.
Step 14
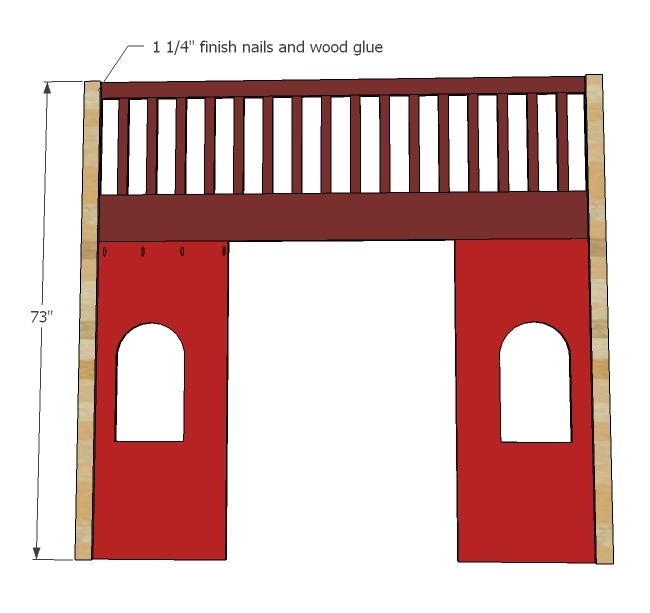
Lay remaining 1x3 legs on top with outside edges flush and glue and nail down with 1 1/4" finish nails.
Step 15
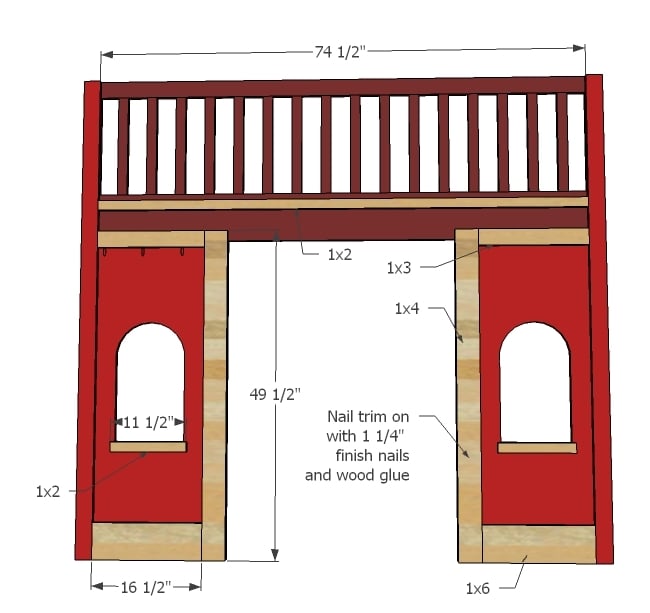
Fun step time for trim!
Step 16
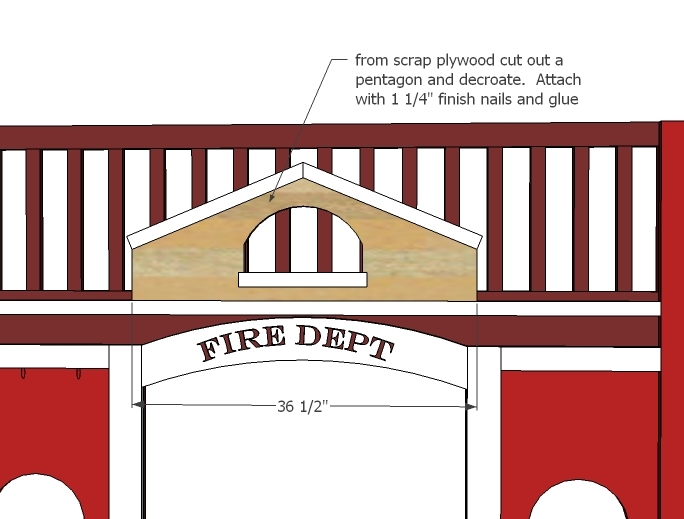
With your scrap piece of plywood cut out a decorative gable end, with window, and trim with 1x2s. Attach above doorway to railing with 1 1/4" finish nails and glue. This completes the front panel, it's time to assemble!
Step 17

From the insides of the bed, use 2 1/4" screws to attach panels to each other, keeping outside edges flush to create the illusion of a solid leg. Screws should be every 6-8 inches, from bottom all the way to top. Predrill holes.
Step 18

You can actually do this on the ground before assembly - add 2x4 cleats to front and back panels. This will create considerable strength and give you something to set your bunkie board or slats on.
Step 19

When it comes to slats, you should always refer to the mattress recommendations or use a bunkie board. Make sure you screw slats down if you choose to use slats. To further beef up the bed, add two more 2x4s running parallel to the cleats on either side of the ladder (for example, you wish to create a full size loft bed).
It is always recommended to apply a test coat on a hidden area or scrap piece to ensure color evenness and adhesion. Use primer or wood conditioner as needed.

Comments
jcmcclure77
Fri, 11/11/2011 - 15:24
Thanks Ana!
Hey there Ana, very neat fire station loft bed, have not seen that. Thanks for the share of the firetruck bed again! Thanks again for everything!
Jeff
Robohead
Fri, 11/11/2011 - 22:17
So Cool!
I absolutely loved the firetruck bed when I first saw it a week ago. I wish I could build it, but it looked like quite a bit of work for a novice. So, I had planned on building the playhouse bed and painting it red like a firetruck. Now I can go one step further and build this bed instead. Such a cool design. My son is going to go nuts!
beansurfin
Sun, 11/13/2011 - 13:12
Love this bed!
My wife and I saw this bed in the Pottery Barn catalog and instantly fell in love with it as I am fire fighter. We cannot wait to get our first home (not to mention our first kids) to be able to build this bed. We also love the Beach Hut bed.
Jenni (not verified)
Sat, 11/19/2011 - 12:06
This is amazing!
I love this bed. Hubby is a firefighter, so our little boy is getting this as soon as he's big enough!
Lindsey B (not verified)
Tue, 01/03/2012 - 18:43
Plan
I would love the plan to the Fire Truck be. We decorated our sons room that way as my husband is a FF and I have been looking for a bed to follow his room theme. If you are willing to share the plans, my email is [email protected]
I would appreciate it as it is absolutely wonderful. Oh and to make things a little more Ironic, my husbands name is Jeff! :)
Allison (not verified)
Wed, 01/11/2012 - 17:14
Fire truck bed
D you have the plans for the firetruck bed? My hubby is a fireman and my son loves anything to do with firetrucks! Thanks.
Pam the Goatherd
Wed, 01/11/2012 - 21:15
Lindsey and Allison you can
Lindsey and Allison you can find more info about Jeff's Firetruck Bed on his blog. Start here: http://www.atouchofarkansas.com/2011/04/fire-truck-bed-is-done.html
5 tater tots (not verified)
Sat, 01/28/2012 - 07:58
My big boys are too big and
My big boys are too big and my little boy is too little for now, but these plans are tucked away for use in a few years. Love it!!
Guest (not verified)
Sat, 01/28/2012 - 12:09
Fire Truck bed
I Love this bed. We dont have a need for it in my sons room but I have been looking for outside forts/playhouses and/or tree houses to build. I would like to know if this could be modified for outdoor play and if so what would the modifications be. Would really love your help with this.
Thanks for all your insoiration,
Michelle
angelgrand34
Tue, 05/21/2013 - 21:54
Ideal One
Thanks Anna for this one wonderful outline, this is great firetruck bed very ideal for sons bed room. It seems they love the design and they want to try this design. Good job!
----------------------------------------------------------------------------------------------
sims 3 seasons
paul smith
Thu, 01/02/2014 - 19:36
Lovely structure. Would be
Lovely structure. Would be perfect in a fire station too.