
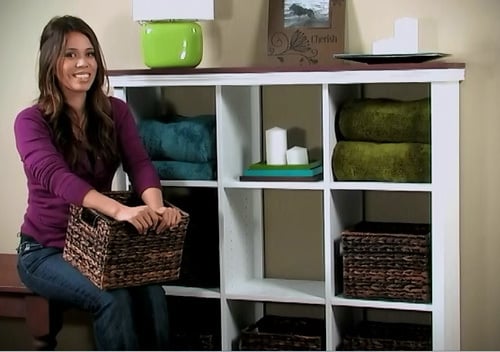

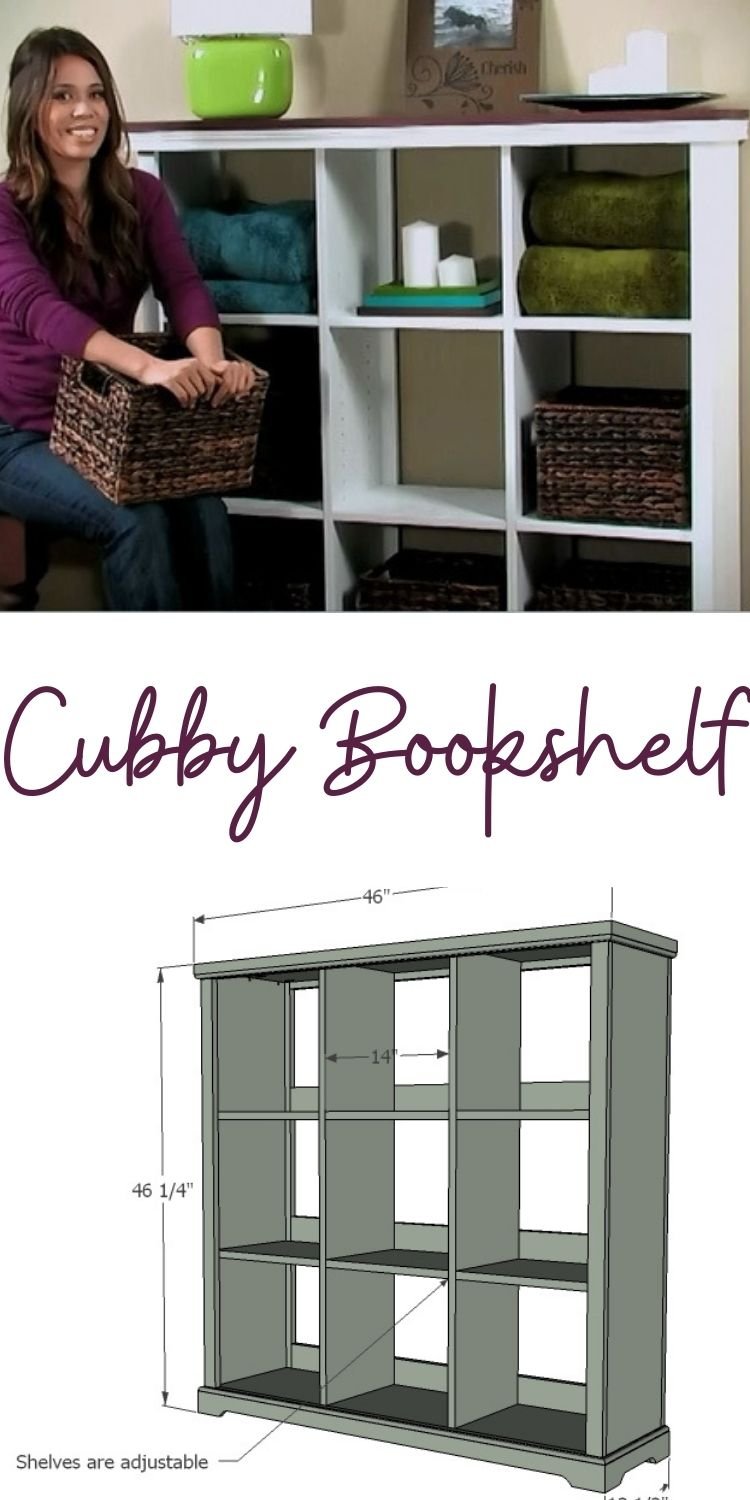
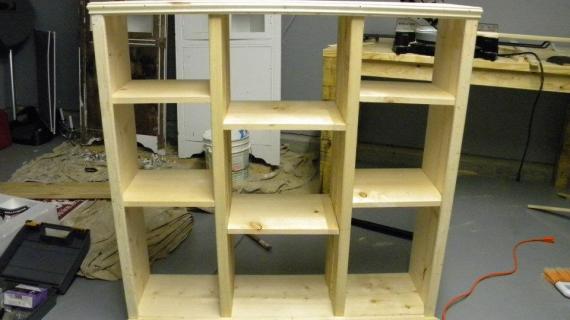
How to build a cubby bookshelf with adjustable shelf. Free plans for beginners with full video project tutorial.
Pin For Later!
Preparation
3 - 1x12 @ 8 feet long
5 - 1x2 @ 8 feet long optional moulding shelf pins
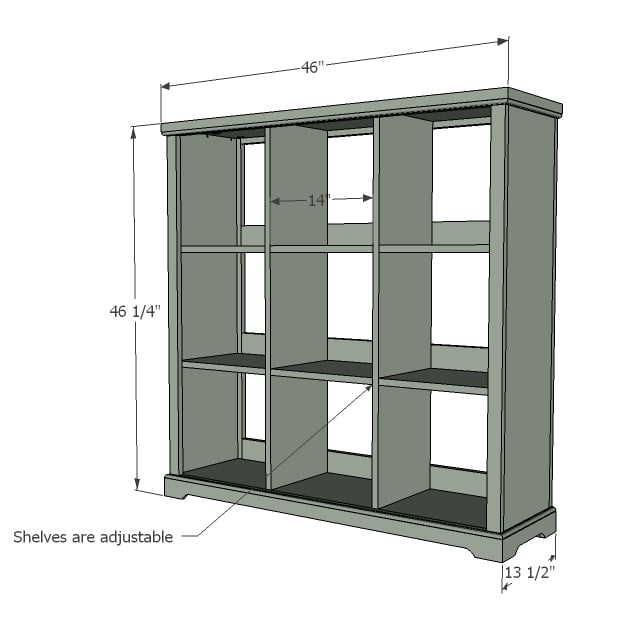
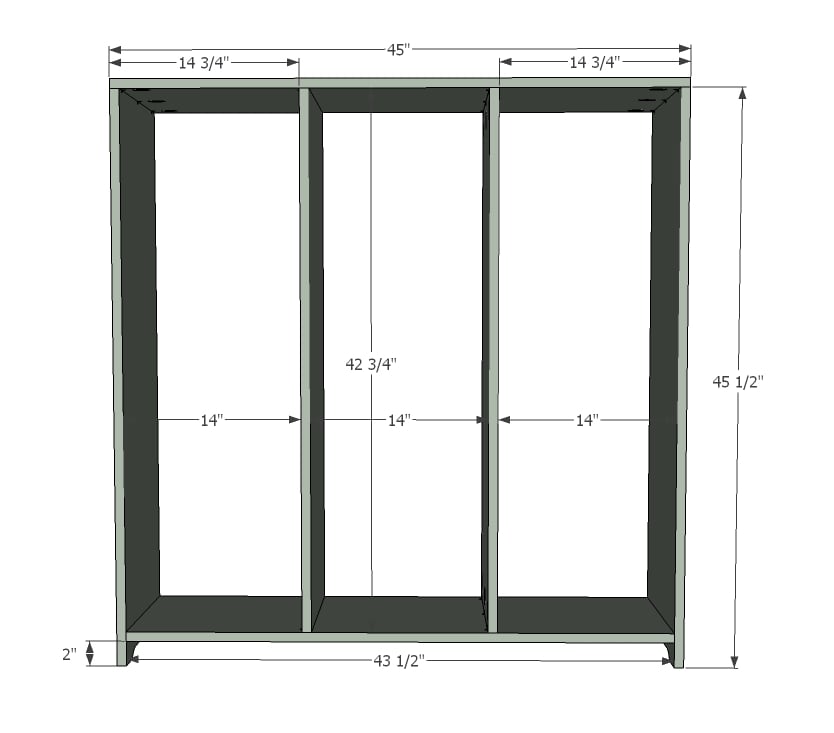
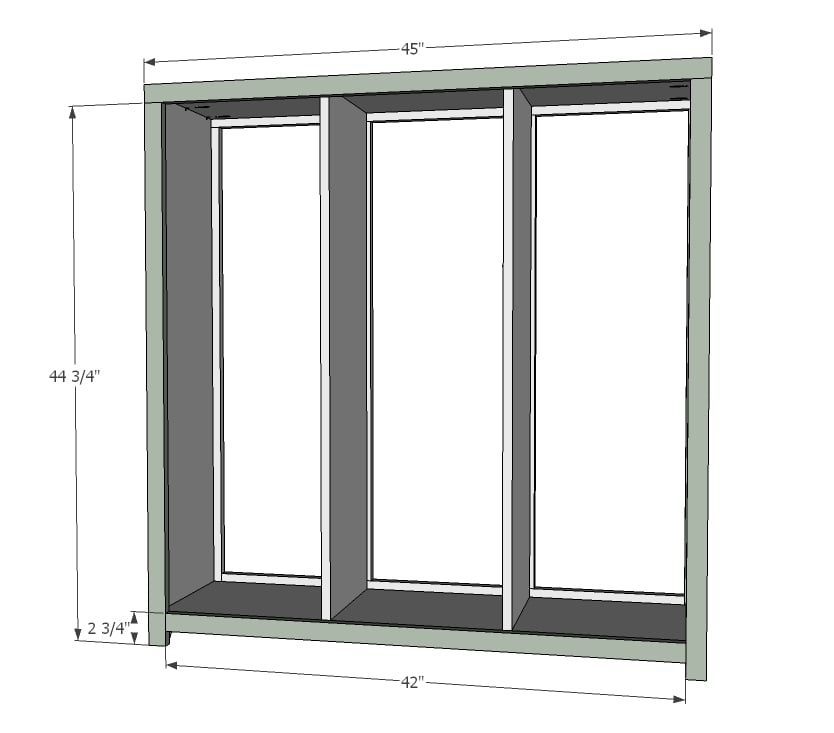
BOX 2 - 1x12 @ 45 1/2" (sides)
1 - 1x12 @ 45" (top)
1 - 1x12 @ 43 1/2" (bottom)
2 1 x 12 @ 42 3/4" (middle uprights)
6 - 1x12 @ 14" (shelves)
BACK FACE FRAME 2 - 1x2 @ 44 3/4"
1 - 1x2 @ 45"
1 - 1x2 @ 42"
2 - 1x2 @ 41 1/4"
FRONT FACE FRAME 1 - 1x2 @ 45"
2 - 1x2 @ 44 3/4"
1 - 1x2 @ 42"
Optional moulding is cut to fit


Please read through the entire plan and all comments before beginning this project. It is also advisable to review the Getting Started Section. Take all necessary precautions to build safely and smartly. Work on a clean level surface, free of imperfections or debris. Always use straight boards. Check for square after each step. Always predrill holes before attaching with screws. Use glue with finish nails for a stronger hold. Wipe excess glue off bare wood for stained projects, as dried glue will not take stain. Be safe, have fun, and ask for help if you need it. Good luck!
Instructions
Step 1
Build the box. I used 3/4" pocket holes and 1 1/4" pocket hole screws and glue.
Step 2

Build back face frame first with Kreg Jig, then attach with 1 1/4" finish nails and glue.
Step 3
Now build the front face frame as you did the back face frame, and attach with pocket holes to back with 1 1/4" finish nails and glue.
Step 4

Add optional moulding if desired ...
Step 5
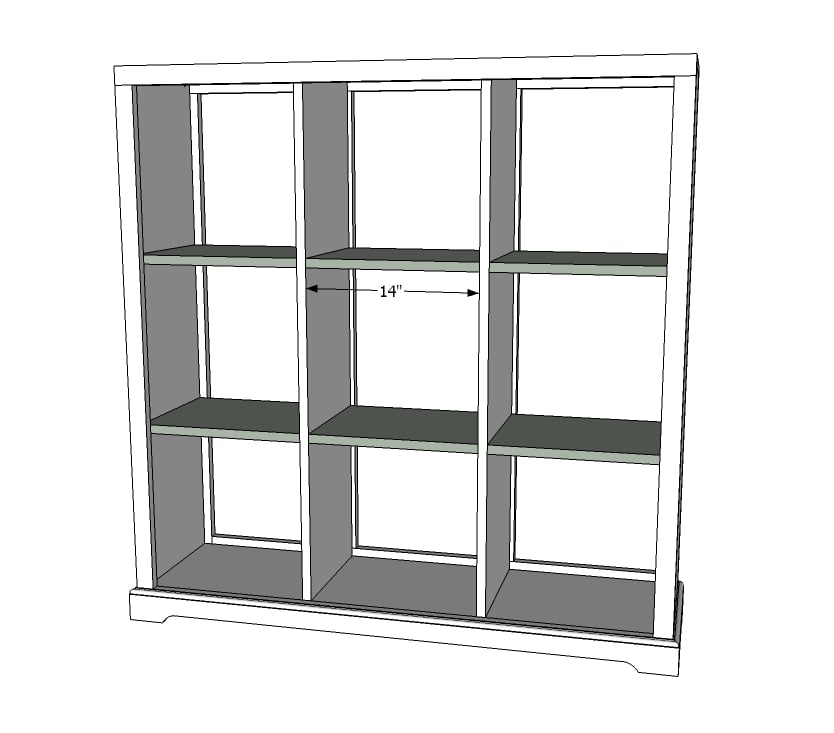
You can add the shelves with either pocket holes on the underside or using shelf pins.
If using pocket holes, drill two per end of each shelf (close to the outside edges) and attach with 1-1/4" pocket hole screws.
If using the shelf pins, drill shelf pin holes using a shelf pin jig. Use shelf pins to set shelf in place.
It is always recommended to apply a test coat on a hidden area or scrap piece to ensure color evenness and adhesion. Use primer or wood conditioner as needed.


Comments
Guest (not verified)
Tue, 03/13/2012 - 12:41
Doors?
Do you think it would be terribly difficult to add doors? We moved into a townhouse with an itty, bitty kitchen and I need some overflow storage. I like that these are adjustable. :)
DH is a bit OCD though and will not be ok with my crockpot and cans out for all to see!
engineering guide (not verified)
Wed, 03/14/2012 - 06:45
re
no it would be easy
michael_b101
Wed, 02/03/2021 - 06:01
doors & adjustment.
might need to add 1x14" as top and bottom to get that 3/4" overhang for the doors to fit well?
Also seems like all of the 40-ish boards would require quantity 4 not 3?
babysteps
Tue, 03/13/2012 - 13:18
Lovely Photo
Is the photo going to be featured in your book? It should be.
Oregon SuNsHiNe (not verified)
Tue, 03/13/2012 - 13:57
Ana White TV Show in the future?? :-)
Amazing! I love how you know what I need at the moment I need it. And a video like this is wonderful, and you're very tv-genic :-).
how fast is 4g (not verified)
Wed, 03/14/2012 - 06:43
re
Youre so cool! I dont suppose Ive learn something like this before. So very good to locate somebody with some exclusive concepts on this subject. realy thank you for beginning this up. this internet site is something that is needed on the net, somebody with somewhat originality. valuable job for bringing something new to the internet!
claydowling
Wed, 03/14/2012 - 06:55
Nailing options
I've experienced the pain first hand of nails from a brad nailer that pull out. I didn't know about glue coated nails. Those might be necessary for a future project.
If you don't have a nailer, I read a good article a couple weeks ago about using cut nails: http://www.popularwoodworking.com/woodworking-blogs/chris-schwarz-blog/…
They're supposed to have a better gripping power than a regular nail. The article also has some good points about how to choose the right nail for the job, something I'd never known before. I'll be picking up a box of the trim nails with my next Lee Valley order.
Guest (not verified)
Wed, 03/14/2012 - 07:49
The color purple
You really like your purple long tee don't you?
Cindy from Indiana (not verified)
Wed, 03/14/2012 - 09:56
Any color looks good on Ana!
Listen, Ana could present these projects in a potato sack and look fabulous!
There aren't too many who can wield a power tool or two, build great looking stuff with seemingly no effort and still look drop dead gorgeous.
Love ya, Ana! Love your site! Love your projects! Keep up the great work.
In reply to Any color looks good on Ana! by Cindy from Indiana (not verified)
Ana White
Wed, 03/14/2012 - 10:38
Hi Cindy, thank you! Really
Hi Cindy, thank you! Really appreciate the nice comment!
In reply to The color purple by Guest (not verified)
claydowling
Wed, 03/14/2012 - 10:31
Power tools are the secret
She had us all at power tools. At least the guys. We never look past the drill.
In reply to The color purple by Guest (not verified)
Ana White
Wed, 03/14/2012 - 10:36
Living up here in remote
Living up here in remote Alaska, all my clothes has to be ordered, and I own like maybe 10 tops I wear repeatedly ... and I tend to stick to the same colors because sending clothes back is so inconvenient :( And yes, I like purple :)
Guest (not verified)
Wed, 03/14/2012 - 13:37
I apologize, I didn't intend
I apologize, I didn't intend to sound mean. It was just an observation, in that purple must be in your top favorite colors.
It just goes to show that I visit your site often enough to make comments on your clothing.. apparently you're doing something right..
Ana. (not verified)
Wed, 03/14/2012 - 16:27
I apologize too did not mean
I apologize too did not mean to come off so defensive! What is up with me??? Thank you for reading and visiting!
Lol I'm actually wearing the purple top right now!
bhoppy
Wed, 03/14/2012 - 19:08
I love purple:-)
You always look like a supermodel Ana:-) Even in cold weather gear!!
Guest (not verified)
Wed, 03/14/2012 - 19:20
Ana I find that when I use my
Ana I find that when I use my kreg jig pocket hole thingy that the wood splits when I am attaching the screws. Am I putting the holes too close the end or am I putting the screws in too far? Thanks for you help.
claydowling
Thu, 03/15/2012 - 04:38
Over-tightening
Chances are you're over-tightening the screws. If that's a persistent problem for you, try switching to a doweling jig and use dowel tenons to attach your joints. It's a little harder than a pocket hole jig, but not a lot, and it won't split out the wood. Most hardware and home improvement stores sell doweling jigs.
If you want to go really hard core, you could learn to cut dados and rabbets to capture the uprights in the top and bottom. That takes more expensive tools, but is very strong and will look very sharp. You can cut those with a router, which is expensive, or a hand saw and a chisel or router plane. I've done both and found the hand tools easier for getting a good accurate cut. Plus, it's just fun to watch the wood roll away from the chisel.
bhoppy
Thu, 03/15/2012 - 07:42
RE: wood splits
My wood split on the dream dollhouse project that I made... Like you, it was normally when the holes were drilled too close to the end. I just put wood glue where it split and clamped it til it was dry. Then sanded it down before painting it. I redrilled the holes on the second floor so they were about 2 inches from the end and it made a world of difference.
Tina Garza
Thu, 03/15/2012 - 11:18
No need for Ikea
I was just about to buy the cube self from Ikea but I wasn't happy with the thought of that. I love your version so much better. I love the adjustable selves. And I can make it the exact size that I want it to be. You always come up with what I need. First I need to build a storage self in my daughters room for her books, tv, and toys. That should be really easy with this same method. BTW I love your new videos!! You are so encouraging!!
MarisolinAustin (not verified)
Thu, 03/15/2012 - 14:22
Too Cool!
Seriously, could you be any cooler? Awesome website! Can't wait to try this!
Daly @ ShadeSeed (not verified)
Fri, 03/16/2012 - 07:49
Instead of doors
I would simply put a nail at each side of the opening and tie a piece of rope on them, so that I can hang a cute little curtain to cover the inside.
Guest (not verified)
Sat, 03/17/2012 - 12:46
Thanks for the videos!
I really appreciate you posting videos here and there about the projects. It really gives me the visual boost needed to accomplish jobs. I recently bought a kreg jig but have yet to use it. Seeing someone else handling one really helps me see how its done. Maybe I can attempt something when the kids go to bed tonight :) Thank you so much for your site.
Guest (not verified)
Sat, 03/17/2012 - 14:42
Cut list error?
Ana,
Great project, I'm hoping mine turns out as nice. Just a note, your cut list doesn't mention the two inside 1x12's, it looks like they are 42 3/4 long?
ferbit
Fri, 03/30/2012 - 09:44
Ana, what kind of wood...
Ana, what kind of wood did you use for the 1x12 boards? In your video, you mentioned using poplar for the trim - which I'm definitely doing.
Did you use poplar for the 1x12's as well or did you use a softer wood there? I am heading to HD (either today or tomorrow) to buy wood for a tall version of this (2 cubbies wide x 4 cubbies tall). So kind of a mix of your two plans put together. :)
Pine is cheaper, so that's why I was wondering. :) The whole thing will be painted so mixing the woods won't be that big of a deal. Just curious what you used in your video.
solomonson
Fri, 04/13/2012 - 12:33
Does anyone know how I could
Does anyone know how I could attach this to the wall?
claydowling
Fri, 04/13/2012 - 14:56
A cleat
If you want to hang it on the wall, there are a couple of things you can do:
1) A french cleat makes it easy to move. http://www.newwoodworker.com/frenchcleat.html These are great for cabinet systems in workshops or craft rooms, because it's easy to rearrange your cabinets as your needs change.
2) You could screw through the back and into studs with very long screws. There are special cabinet screws that are designed not to pull out easily. I think I've seen them at Lowes and Home Depot, but I'm not sure.
solomonson
Sun, 04/15/2012 - 11:58
Thanks for the link, I took
Thanks for the link, I took at it and it looks like something to add to the arsenal. I assume for the second option that you're talking as if I added a back to it.
ktkadoo (not verified)
Tue, 05/22/2012 - 09:34
Is it possible to just make
Is it possible to just make this without a pocket hole drill? Can you just use regular screws? I definitely can't afford to buy one right now, but we do have a regular drill.
Joyful (not verified)
Sat, 12/29/2012 - 17:44
Smaller KregSet
I just wanted to let you know I use a small Kreg jig that only cost around $35' I have to use separate clamps but until I can get the mack daddy master set I will use this one.
Doris R (not verified)
Mon, 06/04/2012 - 20:44
How do you think you would modify to do a step cubby bookcase?
You are so inspiring! We want to build a couple of step cubby bookcases (something like this: http://fromthesourceny.com/blog/2010/05/railroad-step-shelving/). the plan is to have a left and right shelfing unit with a space between to divide our loft into an office area and a sitting area.
Can you give a few pointers on how you would modify the plans to do the steps?Thanks again for your great website!!
Doris
Saved By Grace (not verified)
Sun, 11/25/2012 - 11:34
Shelf Pin Jig Holes
Did anyone else build this using the Kreg Shelf Pin Jig? I am in the middle of building this project now, and on the two 1 x 12's in the middle of the bookshelf, you end up with holes that go all the way through the board when you drill both sides. I didn't see anything about this issue on the Kreg site or in this post, so I was wondering if this happened for anyone else? Maybe no one else considers this an issue? Or maybe it won't really be very noticeable?
Saved By Grace (not verified)
Sat, 12/22/2012 - 10:19
Just wanted to let people
Just wanted to let people know that I "solved" this "issue" by adjusting the fence on the jig. I used the 1" inset for the two outer columns, and the 2" inset on the middle column.
Eric (not verified)
Fri, 12/21/2012 - 16:24
Help! What Am I Missing??
First, I love this website!
Second,
I purchased the materials and tools listed above, made all the cuts and was ready to start pre-drilling holes using the Kreg Jig when I noticed something.
None of the steps ever mention the two center vertical boards. The ones the shelves actually need to sit on. I was looking around like I had lost a whole 1x12 wondering what I did wrong. The materials list says you only need three 1x12x8 and none of the cuts listed mention the two 42 3/4 inch center boards. Did I read something wrong or do I need to go buy a fourth 1x12x8? I hate having to stop right in the middle when it was going so smoothly.. Thanks!
Saved By Grace (not verified)
Sat, 12/22/2012 - 10:15
Hello Eric, Yes, you do need
Hello Eric,
Yes, you do need four 1 x 12 x 8's because the cut list does not include the two inside boards. I ran into the same problem and I tried to send Ana a message through the Facebook page, but I probably should have left a comment on here as well, sorry!
cubroadcastgrad
Tue, 03/19/2013 - 07:31
Ditto!
I ran into this problem as well, but it was a quick fix and got everything went smoothly after that. Finished assembly yesterday, and will begin sanding and painting tonight!
Love the site Ana!!
Joyful (not verified)
Sat, 12/29/2012 - 17:37
Love this site!!!
I am totally loving this site. Way to go Ana! I am in the process of building this cubby shelf and I love the plans available. Thank you for all you do!
Rajesh (not verified)
Wed, 01/02/2013 - 19:33
Joining instructions
The box frame picture seems to indicate that the top rests on the side panels , however the pocket holes seem to attach from the top towards the side panel. Should it not be the other way around?.
In reply to Joining instructions by Rajesh (not verified)
Saved By Grace
Wed, 01/02/2013 - 19:37
Yes, you should put the
Yes, you should put the pocket holes on the vertical boards, not on the top.
Rajesh (not verified)
Sun, 01/06/2013 - 09:53
Pocket hole on vertical board.
Hello Saved By Grace.
Thanks for the suggestion. Just wondering if the joint would last long if the pocket hole were put on the vertical board. The reason I say that is because
the pocket hole will be the direction of pull (if one were to lift it move etc..)
I am considering reducing the lenght of the top horizontal board to 431/2 inches
and also reducing the middle vertical boards by 42 inches. Will update when
done.
In reply to Pocket hole on vertical board. by Rajesh (not verified)
Saved By Grace
Sun, 01/06/2013 - 11:08
I hadn't thought of that, and
I hadn't thought of that, and I am not sure if one way is better than the other for that purpose. I built it with pocket holes on all vertical boards, and I also used glue. Because the unit is also fully framed, it is extremely strong/sturdy.
Vblunt
Wed, 10/30/2013 - 01:36
Shelf size
Hey Ana...not sure if I missed it but what are the measurements and size of wood used for the actual shelves?
ant17r
Tue, 02/18/2014 - 19:41
Shelf-Pin holes and Paint???
Can anyone who painted this project lend some advice as to which you did first and why...paint or drill the shelf-pin holes? My concern for painting first is the possibility of maring the painted surface when drilling the holes. Conversely, I'm worried about drilling the shelf-pin holes first and then having the holes get "filled" with paint and having to take the time to clean each and every one of them out! Not sure if this is really an issue but I've never used shelf pins so I just want to make sure.
By the way...for a beginning woodworker (and advanced woodworkers I'm sure) this site is incredible! Thank you so much for the valuable tips, videos, and plans. Top notch!
Kate_14
Wed, 01/03/2018 - 12:30
Shopping list error
Hello,
When I plan my cutting list, I calculate 4 1x12 instead of 3...
Can't wait to build this!
jen12
Mon, 01/15/2018 - 16:04
I started the large cubby
I started the large cubby bookshelf project and the shopping list calls for 3 1x12 @8 ft long. By the time I made the required cuts 2 @ 45 1/2", 1 @ 45", 1 @ 43 1/2" and 2 @ 42 3/4" for the box I had used up all 3 1x12's. Is that a typo and you're suppose to have 4 boards? Now I don't have wood for the shelves and I'm hoping I didnt do that wrong.
johnnnnn
Fri, 08/09/2019 - 19:09
carpentry
Thanks!It is very helpful. I would like to share with you something that has worked for me. A huge thanks to my friend who suggested me: https://bit.ly/31tsaI2 me through which I could access the world's largest collection of wood plans for every project imaginable. It's very very detailed expalanation helped me build projects with no waste of time searching or thinking for a plan. Searching in the internet has been a time cosnsuming thing for me, with very incomplete details that they provide. It saved a lot of my money too. Oh Gosh! I just can't recommend this enough and trust me, it's worth every penny.
eimomma
Wed, 11/18/2020 - 10:34
ran out of wood!
I had to go buy another 1x12 for the shelves. Perhaps the buy list should read 4-1x12's instead of 3?
roaddawg3
Sat, 06/26/2021 - 12:26
Buy an extra 1X12
The plan shorts you one 1X12X8. Three 1X12s will make the unit, you need an additional 1X12 to make the shelves.