Kitchen Island
The plans were easy to follow. I modified my island to fit my space and cut it down to 44 inches in length.
My second building project... this one took quite a while, building in the evenings after the kids went to bed.
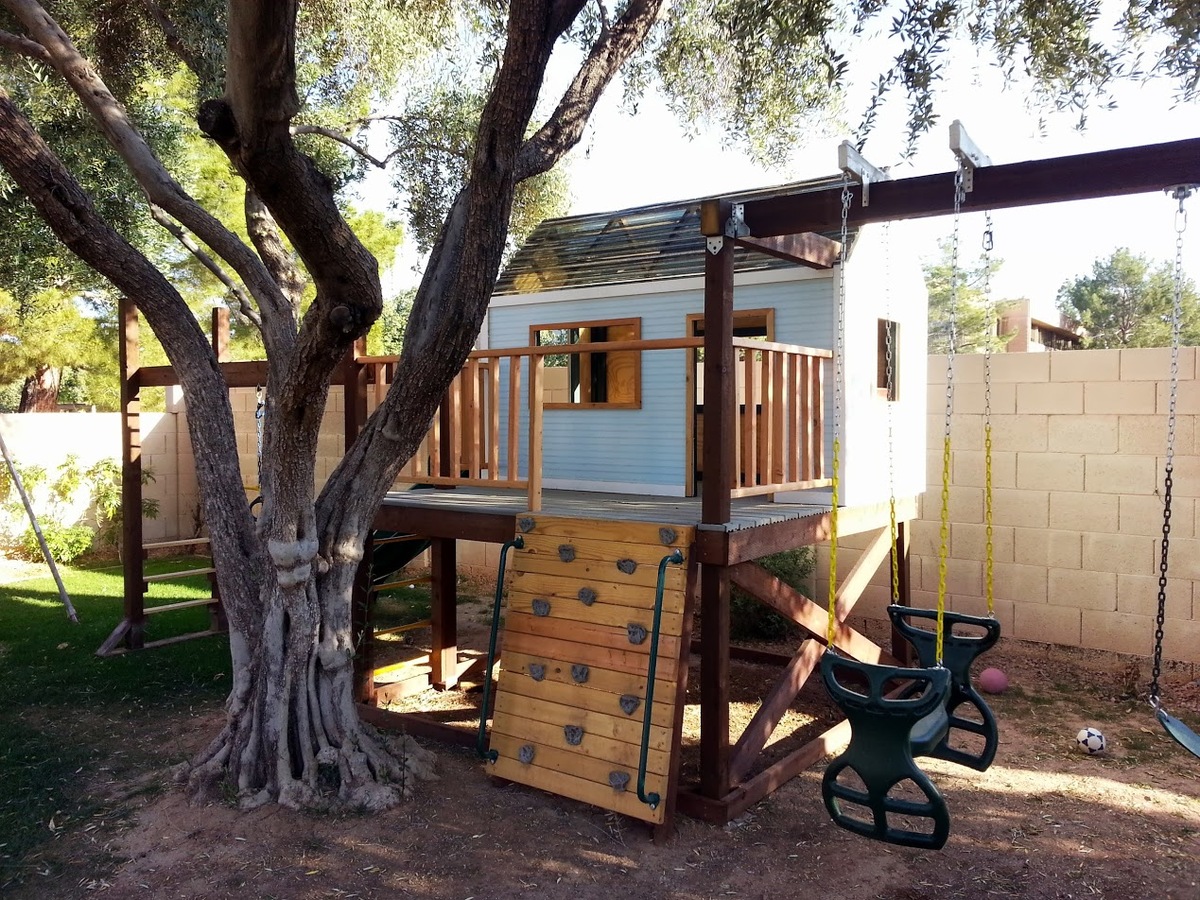
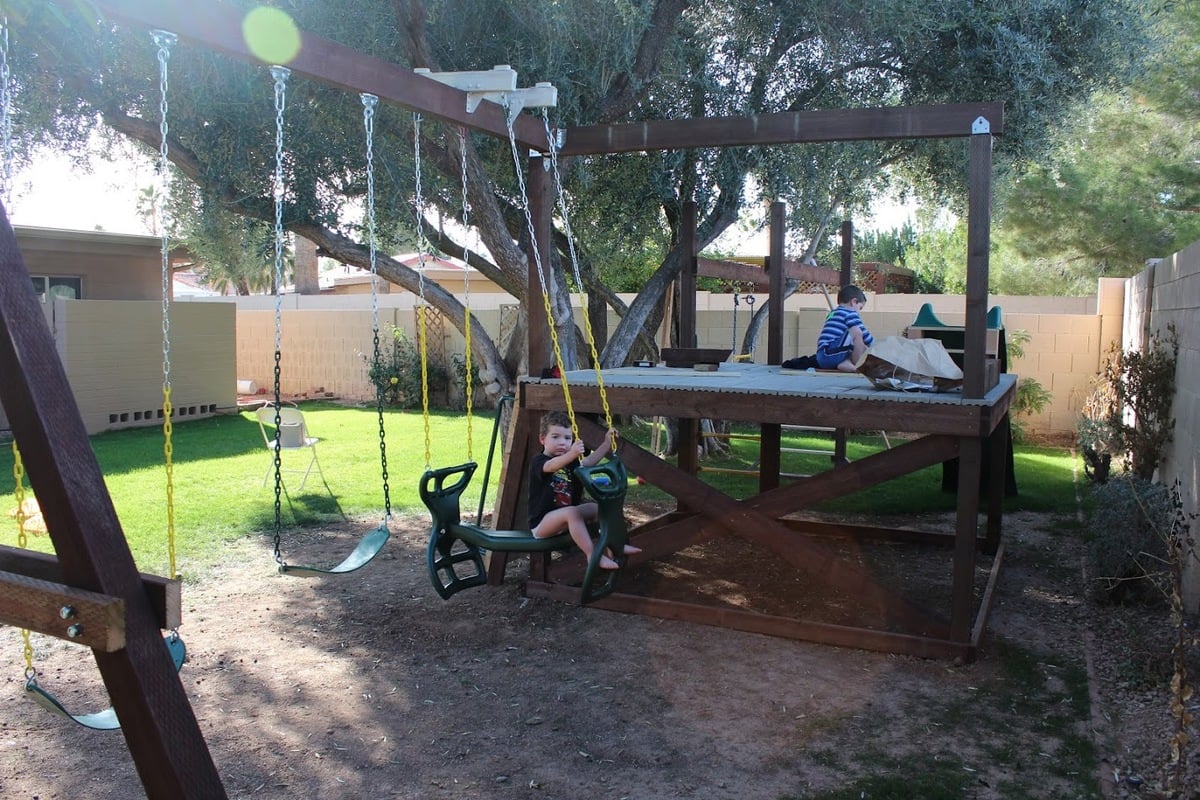
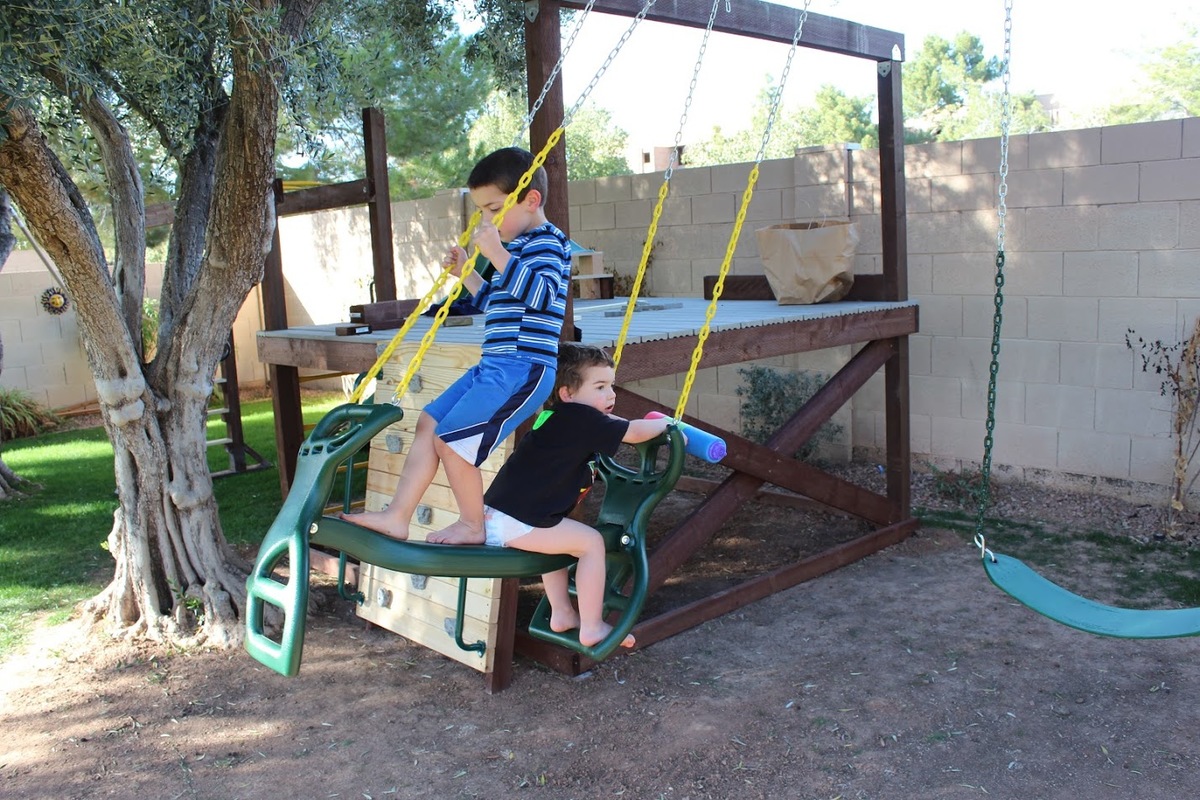
The playhouse is based off of Ana's Playhouse Building series, with some modifications to fit the space in my backyard and accommodate climbing wall, monkey bars, and slide.
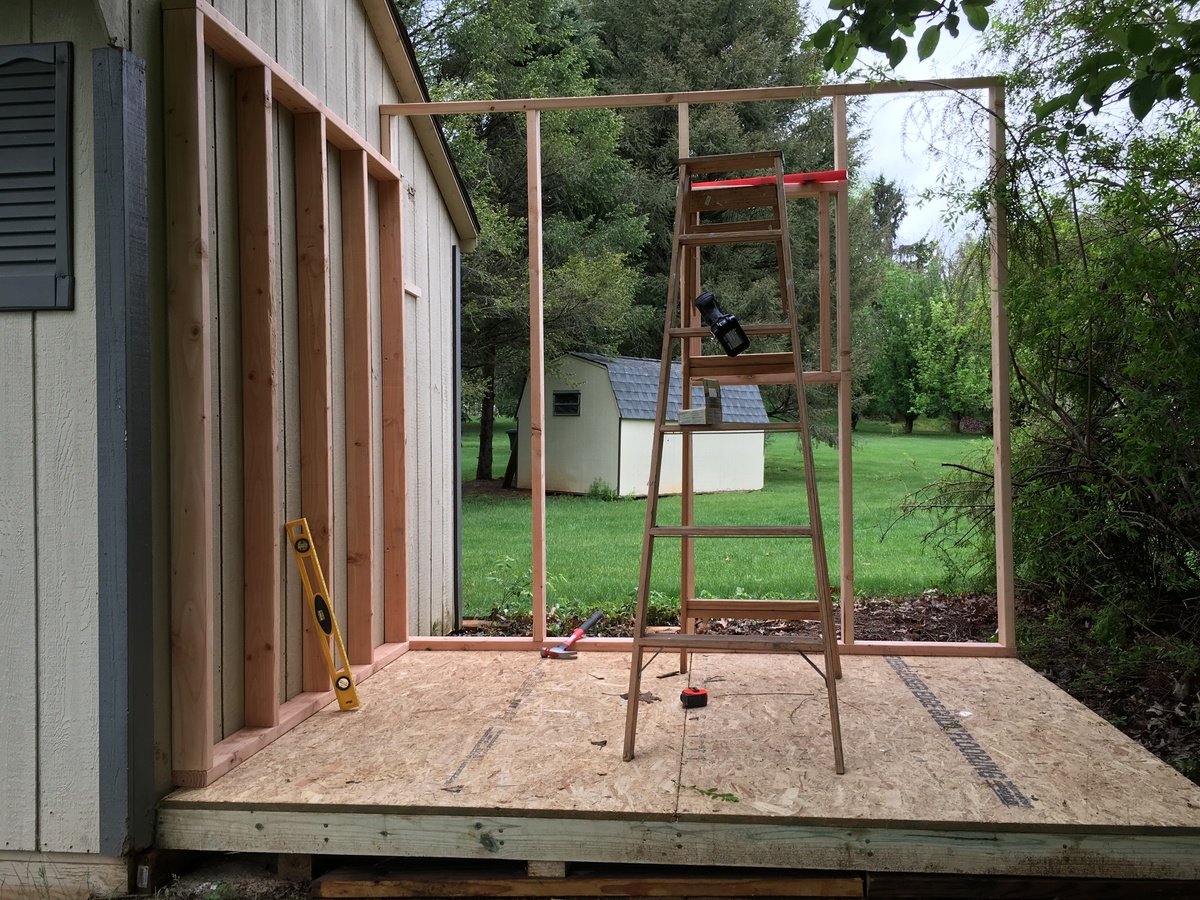
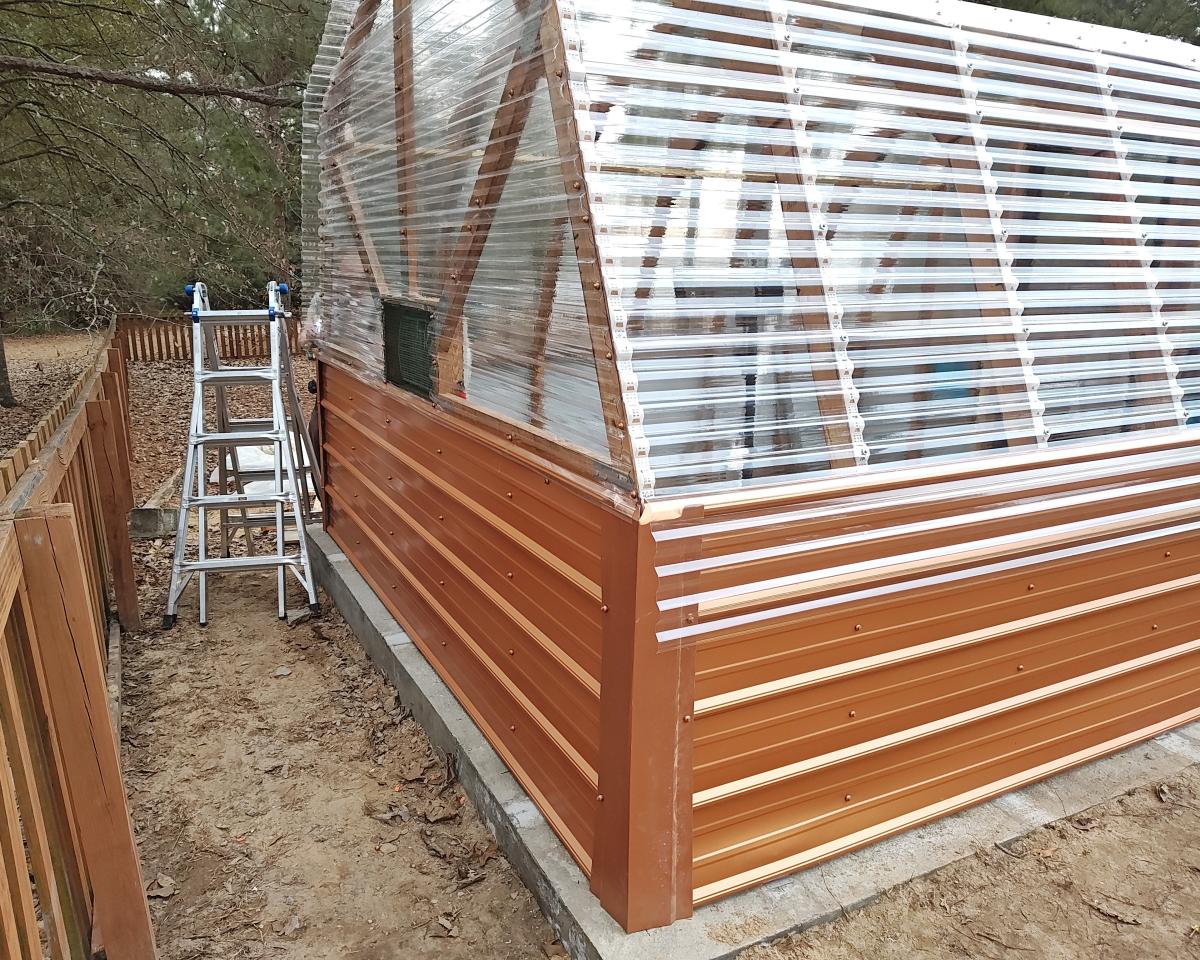
To put the main deck structure into the ground for sturdiness while protecting from moisture, I dug out 5 holes to fit single hole cinder blocks (4 corners plus an extra 4x4 for the monkey bars; you can see an leftover block on the ground in one of the pictures). I placed some brick in the holes, then the cinder blocks on top. I then partially filled the cinder blocks with sand, put the pre-built deck in the cinder block holes (with help - it's heavy!), and then filled the rest of the cinder block holes with sand. It's worked remarkably well - the deck has been up for about a year now. I also sprayed some clear waterproof sealant on the bottom part of each beam near the ground for extra protection (deck, monkey bars, climbing walls, and swingset A-frame). This has allowed me to still run sprinklers near/around the playset and even grow grass underneath the swings!
Materials used:
* Playhouse: pine, plywood, Suntuf solar grey polycarbonate corrugated roofing panels (I live in Arizona, so little rain to worry about but lots of heat - the sheeting lets light in but blocks most of the UV rays, corrugated shape also provides venting at top when placed sideways)
* Deck/Swingset/Monkey bars: treated lumber, composite decking, pine for railings, monkey bars purchased from Amazon
* Climbing wall: pine, treated lumber, handholds/railing bought off ebay/Amazon
* Swings/slide/bongos/wheel, telescope: purchased from Amazon
Modifications:
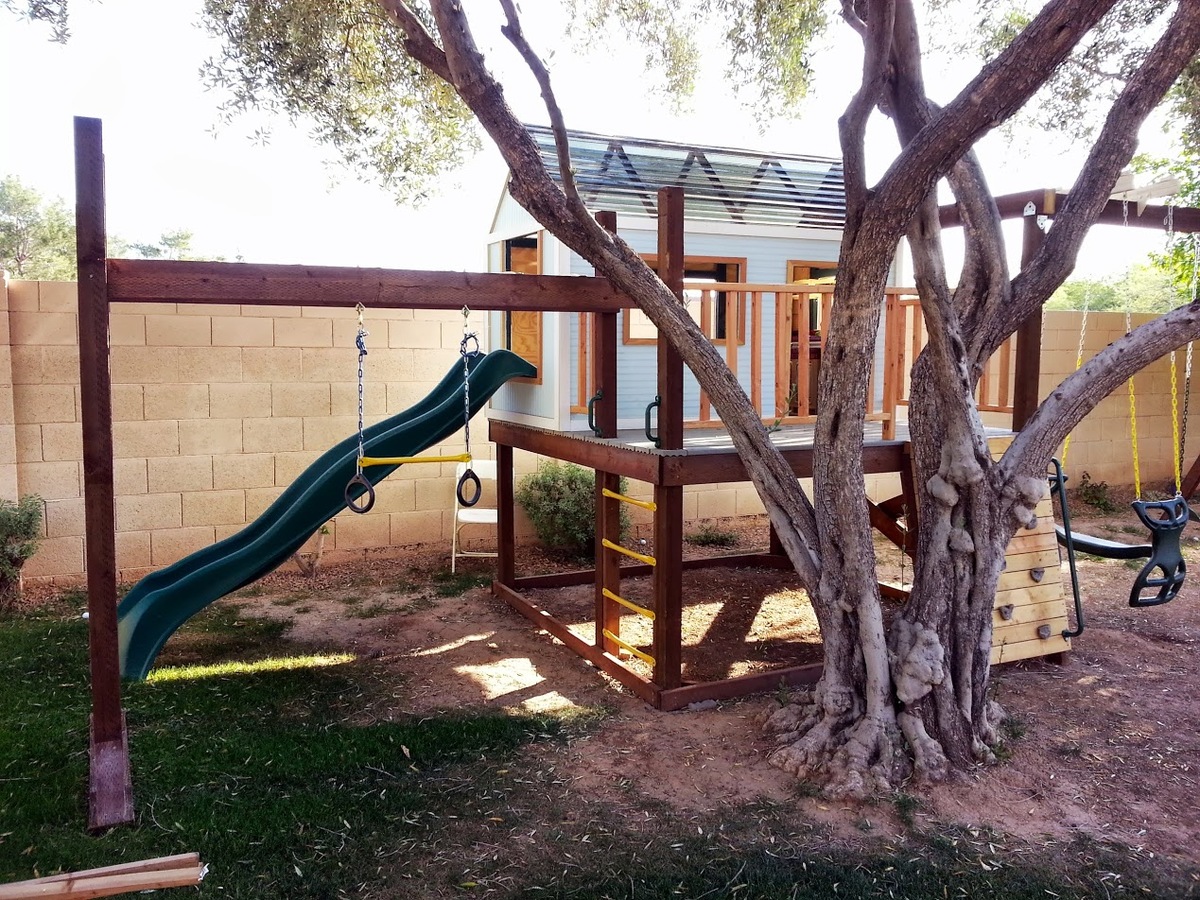
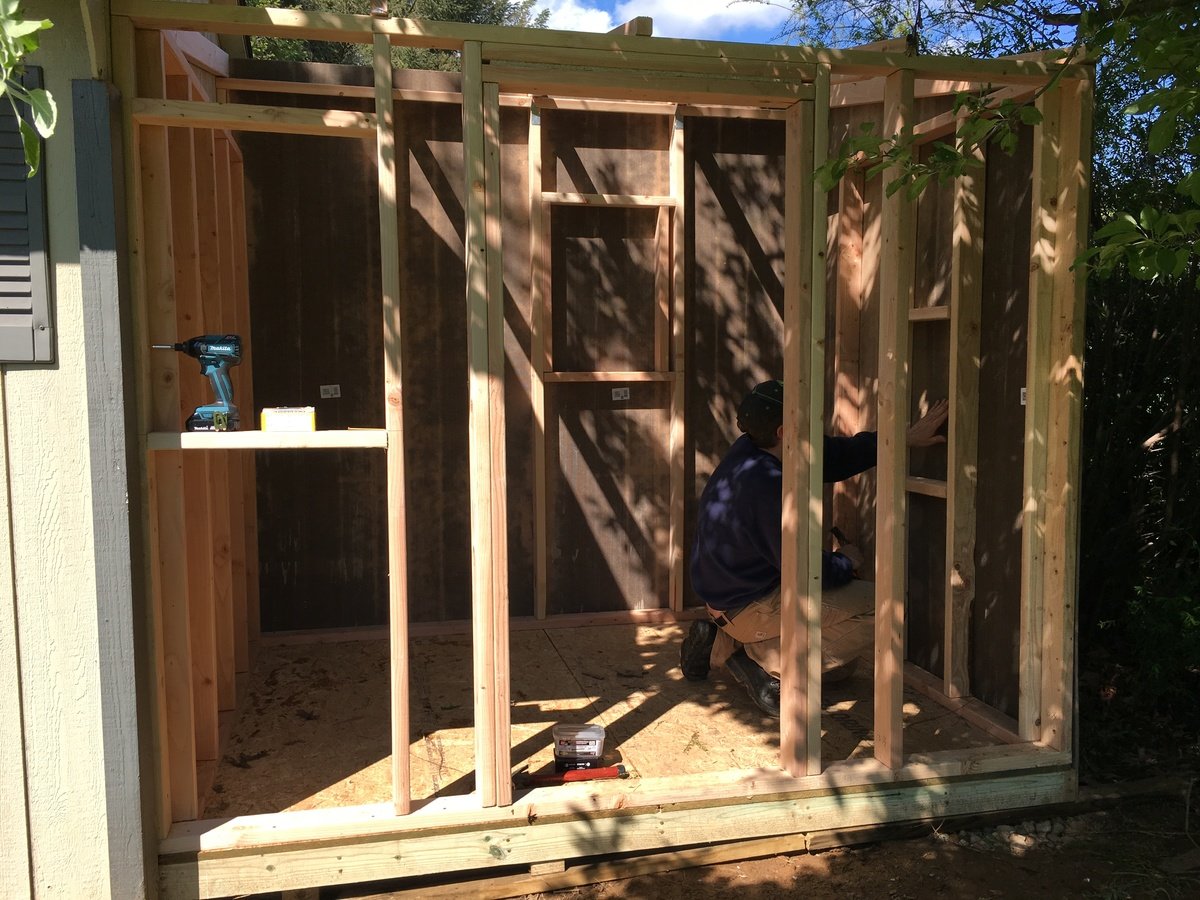
* Turned playhouse 90 degrees to be in back of the deck, with swingset coming off the side. This meant the support beam for the swingset had to pass through the playhouse - modified the frame for that wall slightly and created a notch for the beam to pass through.
* Slide comes out one end of playhouse - made the "window" on that end larger than the plans called for in order to give room for the slide.
* Monkey bars come off one side of the deck - used extra 4x4 here to create support for the bars, and used extra bars to make a ladder on this side
* Climbing wall instead of ladder for main entrance
* Put large window in back wall of the playhouse
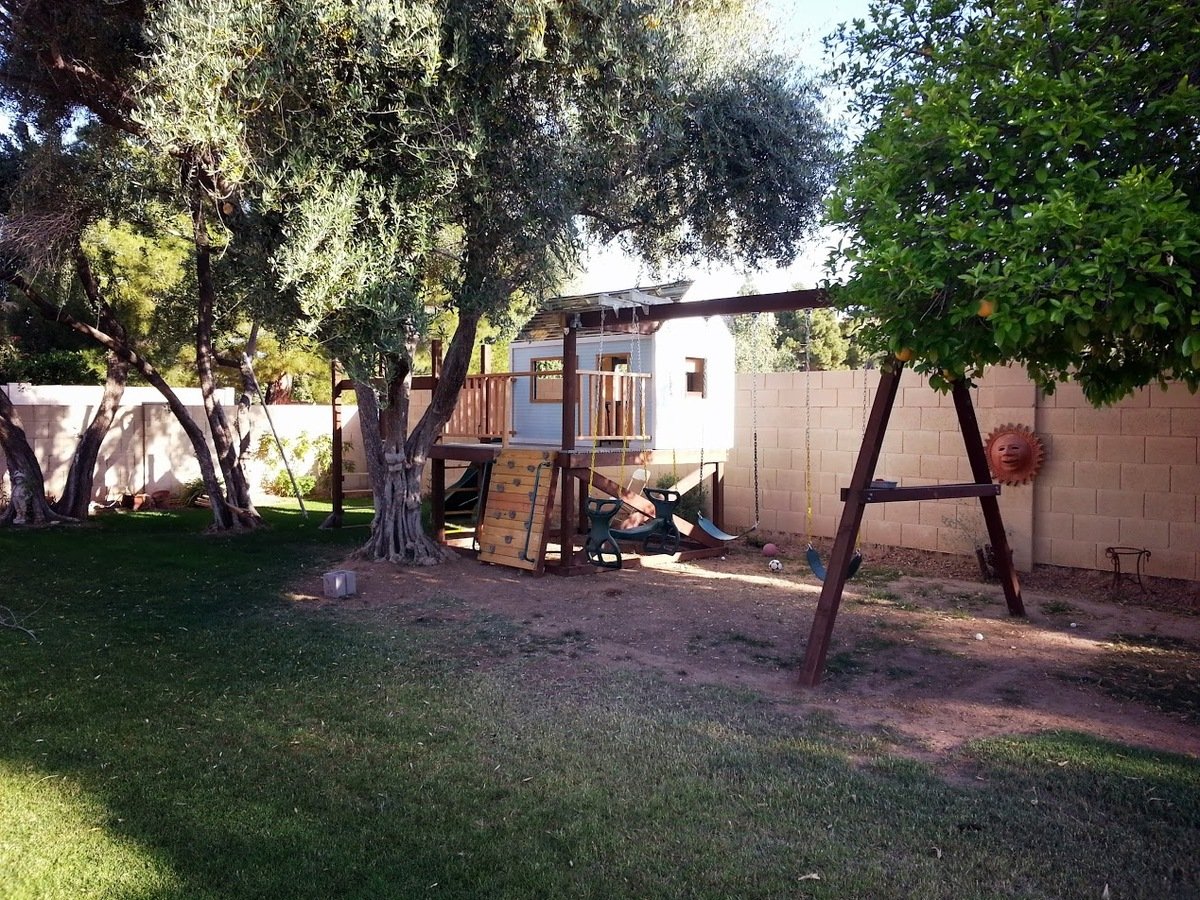
* Added cross bracing to side of decking on swingset end to make it more solid/cut down on sway when swinging
Tue, 04/29/2014 - 20:41
This is phenomenal - just the plan & design we've been looking for. Can you upload a few more pictures? Any sketches you can provide? Shopping list? Really great job - I hope your kids love it. It looks awesome.
Wed, 09/10/2014 - 14:03
Thanks! It's certainly nestled in right behind that tree - I originally was going to place it in between that tree and another one but then decided to just place it behind them in order to take better advantage of shade (critical in AZ) and fit in everything I wanted to put on it (monkey bars, swings, slide, climbing wall)
Mon, 07/08/2019 - 00:48
We've been looking at these type of players for our son, and good grief! Prices are astronomical for playsets that are NOTHING like this. This absolutely an amazing place for those boys to make memories. You're amazing! Do you mind if I ask what it cost once it was finished? I never imagined that it would cause a tic in my eye to look at the kids from Lowe's or anywhere else for that matter.
Tue, 08/20/2019 - 10:14
I don't remember how much it cost in the end... but probably around $900? That may include getting some tools that I needed but didn't have at the time. The slide was the most expensive single piece I bought - I think I got it from Amazon.
When it was all done, I remember thinking that what I got for my money was *way* beyond what I would have gotten by purchasing a kit or a pre-built play structure. Plus, by going my own way, I was able to build it to fit my space and the needs/abilities of my kids.
While the whole thing is big and looks like an intimidating build, it really isn't bad - the platform is a fairly blank base to design everything else off of, and is incredibly sturdy. Everything else is a discrete part that branches off of the platform and can be planned out as you need. Adding the monkey bars required putting in a 5th upright (the first 4 are the corners), but that was an easy modification since I knew I wanted it before building the platform. The playhouse just sat on top of the platform (screwed down, of course).
Sat, 08/01/2020 - 20:40
Hello. This is pretty cool, probably the best modification that I am looking for from Ana's default plans. Could you please add some more detail on the right side wall, and how you incorporated the support beam through the playhouse? (with maybe a picture from inside of that wall). And secondly, if you can add the dimensions for the monkey bar setup on the left side of the deck? Thanks, much appreciated
This project was quite easy and did not require many tools. The plan allowed me to adjust the measurements easily so it could fit in that space. I used regular 2x4’s and treated the wood with Mountain Ash colour in a semi-transparent stain from Sherwin Williams, I just love the colour! I build 2 - 2 seaters exactly the same. The one side has no arm, as I wanted it to look like a lounge chair. I love to sit in the corner and stretch my legs 😊. I bought the cushion covers from IKEA, and got good quality foam.
A frame chicken coop with a few modifications- metal roof, insulation and slightly larger second floor.
By Chrystal
My new garden shed built from your premium plans! I'm 62, never built a shed before, and worked mostly alone. My sons helped with some of the wall and roof sheathing. In the end, I did everything except for the shingling. I painted it to match my house main color and trim.
The video is very helpful - I watched it several times. My major change to the plans was using Simpson Strong Ties and hurricane ties to secure the rafters to the ridge pole and the top plates. Otherwise, I used all other methods. I recommend cutting the front wall sheathing before cutting the panels for the doors. I do not have a trim saw and thought my standard circular saw was too heavy for me to make the cuts like Jacob did.
Tue, 06/13/2023 - 13:57
Really impressive, thank you so much for sharing and good for you to just go for it!!!
Thank you! My favorite & first is from your mud kitchen! I put in running water!😂 For the GrandLuvs!”
@penny.vanderlugt
Thanks for the simple plans Anna, they worked out great!. I resized the table to make maximum use of the material, still within the same quantity you specified in your plans. I glued the legs along the lengths of the table, and kept the table top and shelf screwed in, for easy dismantling, if necessary.
Finally I added pop down heavy duty wheels allowing me to move the table (not shown in this pic) easily. When the wheels are not being used they pop up, making the table very stable. The height of the table is about 1/2” lower than the table saw, making it an ideal outfeed table as well.
Great design, and fun build.
I recently built this for a fundraiser for a friend, who suffered from a stroke, people loved it.
The project was used using the same plans but I extended the floor to be 6 feet wide vice 4 feet the additional 2 feet provided the perfect amount space I wanted. I also added an extra windows to get cross ventilation. I also insulated the coop and put paneling on the walls and lenolium on the floors. I dropped the back wall sheeting 1.5 inches for additional airflow since the shed doesn't have a ridge vent. The plans are easy to follow and easily adaptable.
Thu, 07/02/2020 - 11:29
Great job! We are getting ready to build a coop for our chickens which arrive in 3 weeks!
I built this outdoor daybed to add a cozy and inviting space to my backyard. It was a fairly easy build, which I managed to tackle by myself. Head over to the blog for more details.
My wife had begged and begged for something like this, so I took the plunge. This was my first build and I’m getting the itch to try other things! We built the ship lap wall and sign together as well!
I went from a 6 x 8 Harbor Freight Greenhouse to this one 10 x 12. I added a few windows...
This is my more traditional take on the modern craft table (I guess that means it isn't technically "modern"!). We call it the "Lego Table" at our house. I doubled up the ends like others have so that my two daughters can have their own sides. My wife asked that the there be backs on the side shelves so that items aren't pushed off. I also added trim around the tabletop and molding to give it a bit more traditional appearance. Finally, I made the shelves adjustable.
Entire wall fireplace built-in!
Loving this furniture! We modified it slightly by raising the height of the couches. Added some height and a slight tilt in the back. The chairs are super comfortable as the plans are done. We used 6” 25x25 cushions. We plan on staining soon.
Jaime Sallis
A variation on your barn style greenhouse. I included a cooling fan with intake louvers, temperature controlled heater and grow lights. Also used anchor bolts embedded in concrete footer.
David Buckmaster d [email protected]
Am a big fan of Ana's work, and have used several of her plans in prior builds including the more traditional Adirondack chairs. Those stayed with my old house, and I wanted something different for my new house. Really liked her Modern Adirondack design with the floating arm rest. However, plans are like recipes to me--a guideline. I wanted the back boards to run up and down, and I am a bit more robust than the lovely and petite Ms. White, so they would need to be wider after I built the first one at 19 1/2" wide per plan. The next three I made 22" wide and that worked well without throwing off the geometry and angles of the other parts. Since I ran the backboards up and down, I needed some cross beams for stability and to give an attachment point for the middle of the boards. Cut some 2x4s at 15" wide, drilled pocket holes in both ends, and attached in between the back supports with the pockets facing up to be hidden by the back boards. All of the 2x4s were leftover cut-offs from the houses being built in my neighborhood. Since the frames were free, I splurged and went with cedar boards for the backs and bottoms. With the wider frames, I had to use 1x12s ripped down to 10 3/4" to get the right look (about a board's width in between). Needed some color, so I painted the frames Teal Seaglass from Menards. Cedar was stained with a natural deck stain from Sherwin Williams. I experimented with salt paint (mixing unsanded grout with the paint) to give a heavily textured and weathered finish but this was unecessary--the wood was distressed enough and I am a terrible painter. It also toned down the color so I skipped that step and just went with 2 coats of plain paint. It looks like outdoor furniture should up close. As always, am pleased with Ana's plans. Thank you for doing all the hard work!
Fri, 08/21/2020 - 16:59
I absolutely love how the back was done!! Thank you so much for sharing!
Ana doesn’t have a plan for a catio but she does for a playhouse and a cedar shed made from 2x2’s. I sort of combined my knowledge from making her plans over the last 10 years and came up with this for my cats. It was fun to make!! My baby kitten is loving it. I used garden fencing and stapled it to the outside and pocket holes for the walls. I made each wall individually like the playhouse then connected them once in place.
Wed, 06/09/2021 - 12:36
Thank you for sharing! My daughter wants a cat for her birthday but it can't be inside due to our son's allergies. Roaming outside isn't really an option because we have coyotes. We are going to use one of these in combination with an underground electric fence.
Great plans - thanks so much! Started with two chairs, and kept going...
MODS: Once built, we felt there wasn't enough back support, so added a 2x4 then 4x4 on top. Also added a 2x2 in back of the seat bed, so our 25" x 25" seat cushions didn't float around.
Recommend paint gun vs. painting by hand.
Comments
twinmom2
Fri, 07/22/2011 - 14:13
i was looking for THE PERFECT
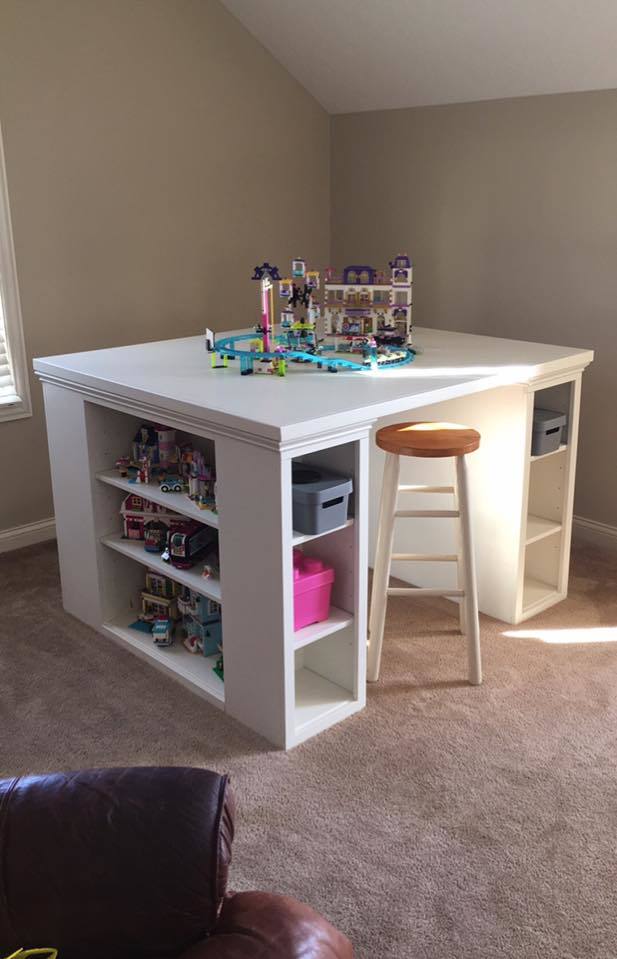
i was looking for THE PERFECT ISLAND.. thank you so much for posting this. love it and can't wait to start building it. where did you find the shelves?
Emily Jo (not verified)
Mon, 10/31/2011 - 15:33
Shelving support
Your island is gorgeous, and I love the modification you made to the original plans on the shelving support! I would like to know what size the boards are that you used so that I can duplicate. Thank you!
Lisa Tamaye (not verified)
Sun, 02/05/2012 - 18:10
stools?
This is great! ANyone know how I could extend one side in order to put stools for an eating area?
Would love to do that!
Alice (not verified)
Tue, 02/07/2012 - 19:43
I would think it would be
I would think it would be basically the same build, just add brackets to support the extra wood.
Guest (not verified)
Mon, 03/05/2012 - 15:20
Small Kitchen Island
I want to make this Kitchen Island but if can't find the Supply List. Would you mind posting it or emailing me please! This will work perfect in my Kitchen
Katia57
Mon, 03/05/2012 - 17:46
Small Kitchen Island!
Wow! Just a wonderfully simple project! I can figure it out by looking at it. I have a piece of Rock Maple Counter Top 24"x6'that needs legs. I'll probably use 4x4' for legs, six of them. But the shelves will be just like this. Thank you!
Katia57
Mon, 03/05/2012 - 17:50
Small Kitchen Island!
Wow! Just a wonderfully simple project! I can figure it out by looking at it. I have a piece of Rock Maple Counter Top, 24in.x6ft., that needs legs. I'll probably use 4x4s for legs, six of them. But the shelves will be just like this. Thank you!
Guest (not verified)
Mon, 03/05/2012 - 18:59
I have enjoyed what I have
I have enjoyed what I have seen so far. You are an awesome designer.
Guest (not verified)
Mon, 03/19/2012 - 11:57
Do you have instructions on
Do you have instructions on how to build this? It's awesome!
Guest (not verified)
Wed, 04/04/2012 - 11:58
How To Find The Instructions
Just click on the link for the instructions. It's under the heading 'About This Project' titled as 'From Plan: Easy Kitchen Island Plans'.
Click where it says 'Easy Kitchen Island Plans'. When you hover your cursor over the words, you will see that is a hyperlink.
Lindsey Adams (not verified)
Sun, 05/20/2012 - 06:48
I love your island and I also
I love your island and I also have a small kitchen...would you happen to know the sizes of the boards you used? Thanks
??? (not verified)
Wed, 07/25/2012 - 14:31
Could you send how you made this
Yours looks so different and so much better then the one that show how to make it, how did you do it? I really would love to build it but have no idea how...
Thanks so much!
CBsMama (not verified)
Wed, 08/15/2012 - 13:08
Gorgeous and perfect!
This island is perfect. I love the shelves and the size. Any chance you could send me the dimensions of this island and details on how you did the shelves? Great job!
lizzy1299
Mon, 02/04/2013 - 15:03
Love!
I'm SO glad I stumbled acrossed your website! I LOVE that island and getting ready to get all the stuff to make it. Did you use the Kreg Jig thing the original person used...? If not, how did you cover the screw heads?
Thanks!
ameliam
Wed, 12/31/2014 - 07:37
Modifications to original plans
Hi, this is my first time building anything. I really like the modification made to the original plans. I like the legs facing the other way. I can't figure out how to modify the cuts on the sides and front and back supports for the top to adjust for turning the legs the other way. Are there modified plans. LOL I need instructions, I’m not quite there yet on doing it myself. Thank you
djbeenie
Wed, 02/04/2015 - 15:03
1 x 2s
How did you mount the 1 x2s since its on the side of the 1 x 4s. Did you tac them in. I really like the way that looks. Thanks!
MBuckson
Mon, 03/16/2015 - 08:00
Finishing
Amazing island! I am in the middle of building this and looking ahead to the finishing aspect of it and I have a question: What tool did you use to apply the oil on the counter top? A cloth or a certain type of brush?
wiri0302
Sat, 06/06/2015 - 18:33
Material
Hello, i love this island but maybe i missed it. What kind of wood is everyone using? Frosting said $47 but that could only be for pine right? Are people using pine to build this? I would like it to look just like the picture. Any help would be appreciated! thanks!
Eversolejess35
Fri, 08/14/2015 - 14:34
How Di I get these plans
I wnat to kow how much wood and what size I need ans the saws i need to build this project
Eversolejess35
Fri, 08/14/2015 - 14:35
How do I get these plans
I need to know how much wood and what size wood and also what kind of saws do I need for this job
Eversolejess35
Fri, 08/14/2015 - 14:35
How do I get these plans
I need to know how much wood and what size wood and also what kind of saws do I need for this job
Eversolejess35
Fri, 08/14/2015 - 14:36
I also want it about 3ft long
I also want it about 3ft long and 2ft wide