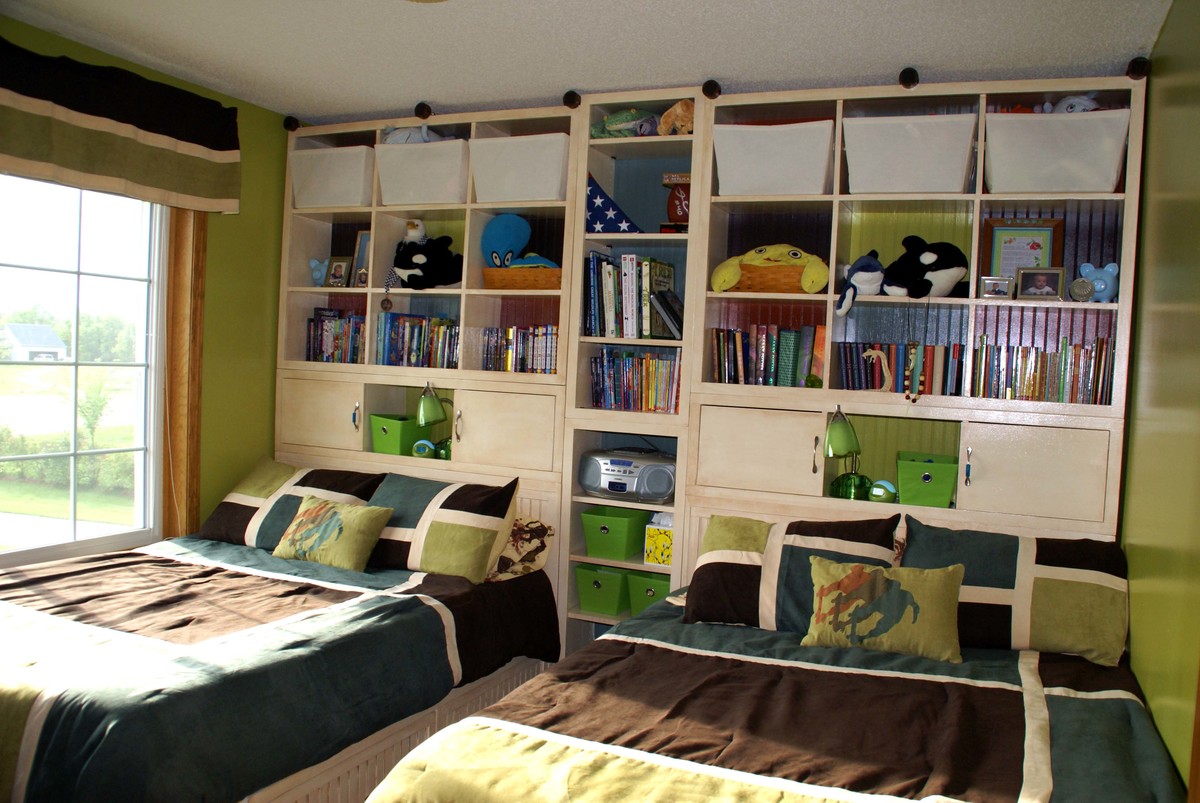
When my sons outgrew their twin sized beds and primary colored room, I had already fallen in love with Ana's storage bed collection. I was happy to see that a full size bed was included in the plans. Building it yourself means you can adjust any plans to fit your room exactly, and I planned to squeeze storage out of every inch of their 11.5 foot wide room. The first adjustment I made was to make the headboard taller, so that their pillows would not rest against the small hutch with doors. I also added height to the cubby hutch, making it a 9 cubby unit. The entire bed unit is 92 inches tall. The center tall bookcase is actually two 47 inch tall units stacked. I have watched too many home improvement shows where tall units are built off site only to not fit up stairs or around corners. The center unit is 94 inches tall and 19 inches wide, filling the wall exactly with only an inch of wiggle room to spare. I also added drawers to the open cubbies in the bed base. This was my first time making drawers, but Ana has instructions on the site, so it was no problem.The sides of the bed base facing the walls are just open cubbies as in the original plan. Beadboard paneling faces the drawer fronts, cabinet backs and the face of the headboards. Did I mention how much storage these beds have? The hollow headboards are not accessible once the center bookcase was in place, but that didn't stop me from filling them up. I had 6 Rubbermaid bins (18 gallon) in our basement full of stored Hot Wheels, Little People and other sets. All of the contents fit in the headboards alone. I also put some large saved toys in the under bed cubbies that face the wall. Yes, the Little People Garage will fit! My favorite modification was added an extra crosswise 1x3 that ties together a large section of the slats that support the mattress. This makes an easy lid allowing that you can lift to access even more storage under the mattress. We store their camping gear and off season clothes under the mattresses. I can't total the hours, I worked on this project on and off for about 9 months. When the building was nearing completion I started looking for bedding so I could match the paint colors to the bedding. I painted all the plywood back panels before attaching them to the cabinets. This was especially a life saver with back of the 9 cubby unit, as there are four colors in this section. After painting, everything was glazed with Valspar Translucent Color Glaze in Mocha. When this layer was dry I coated everything with a protective coat of Minwax Polycrylic. If you are wondering about dark circles are at the top of the unit near the ceiling, I had a great idea to use solar landscaping lights up there for a soft lighting effect. It looked great for a few nights until the batteries wore out. There is not enough natural light in the room to charge them. They have since been replaced with a couple strings of cheap colored lights. They are shoved way back towards the wall where you can't see the wires, but are on a timer, so at night they give a nice glow on the ceiling.


Main Color: Homestead Resort Cameo White
Accent Colors to match Jacobson Bedding from JC Penney:
Gilded Pesto
Rusted Earth
Brown Velvet
Redstone Blue Spruce
Valspar Translucent Color Glaze in Mocha
Minwax Gloss Polycrylic
Gatehouse brand satin nickel hardware from Lowes
Comments
kelleer
Sat, 04/20/2013 - 07:42
WOWZER
This is AMAZING! I will be moving to HI soon and will not be able to take any of my furniture with me. Was concerned about storage and usability issues, but you have sent my concerns totally out the window. I also like the idea with the solar lights. Props to you !!!!!