Community Brag Posts

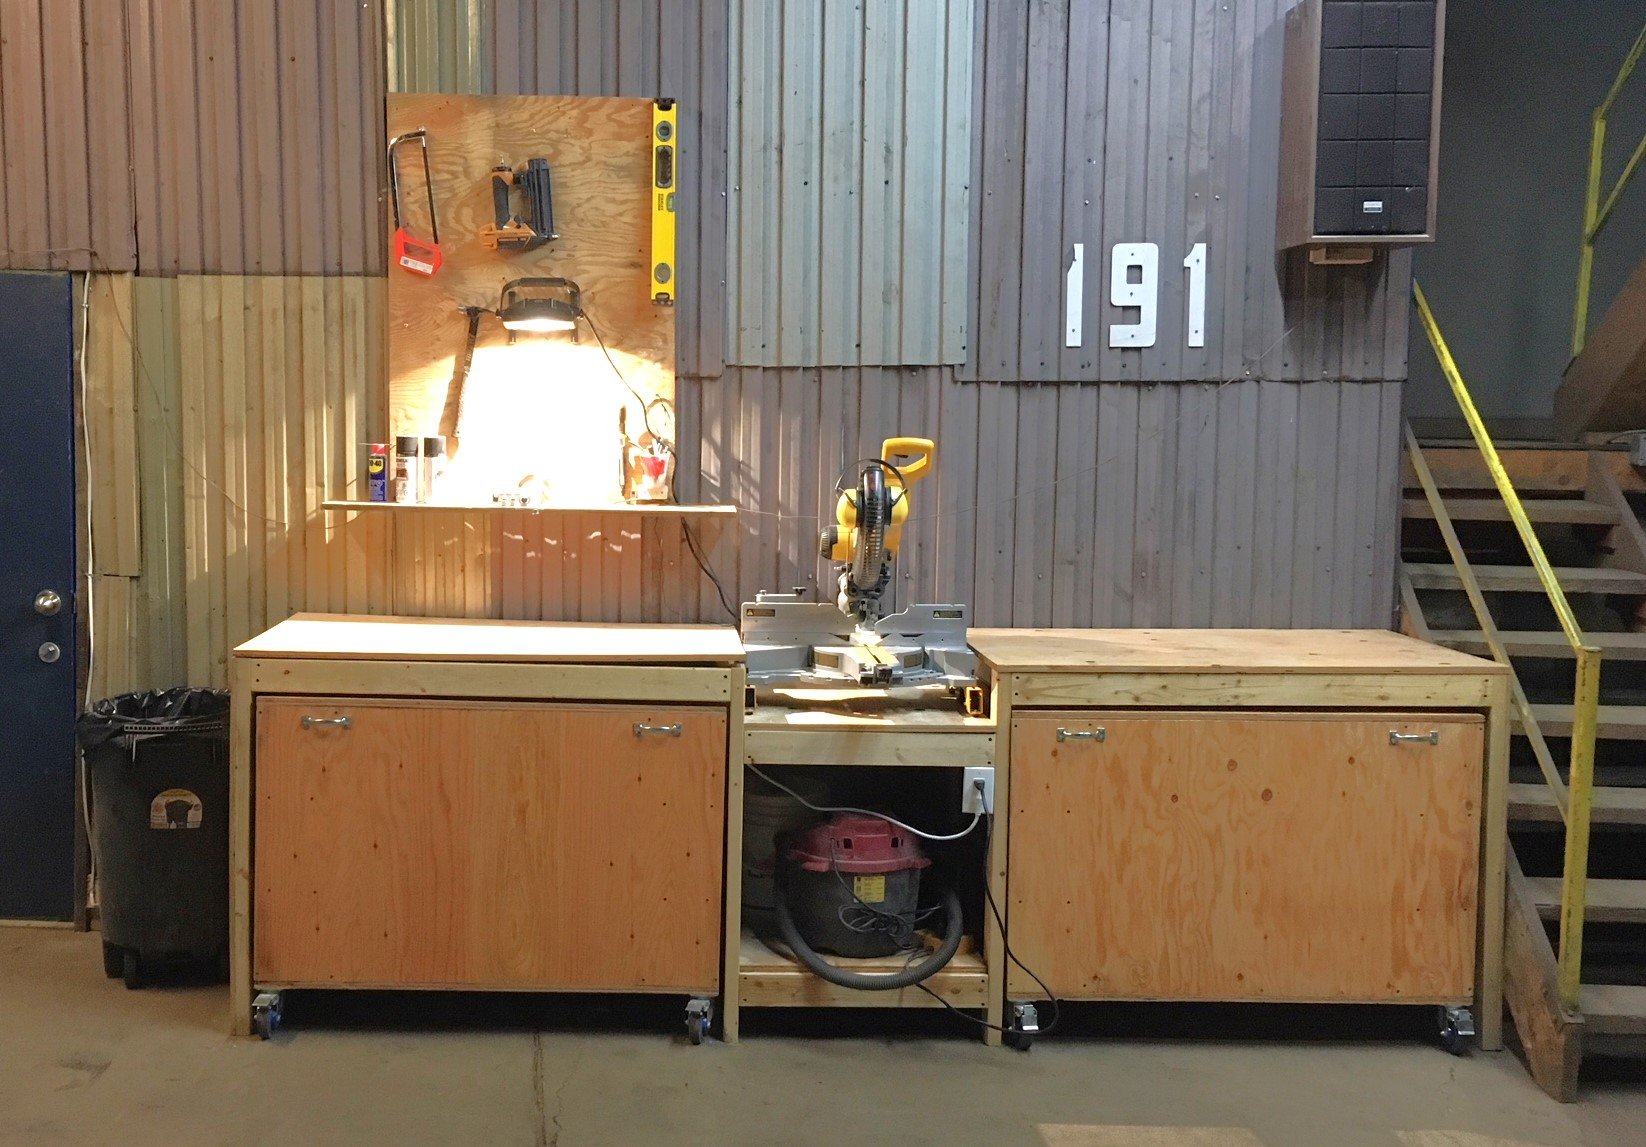
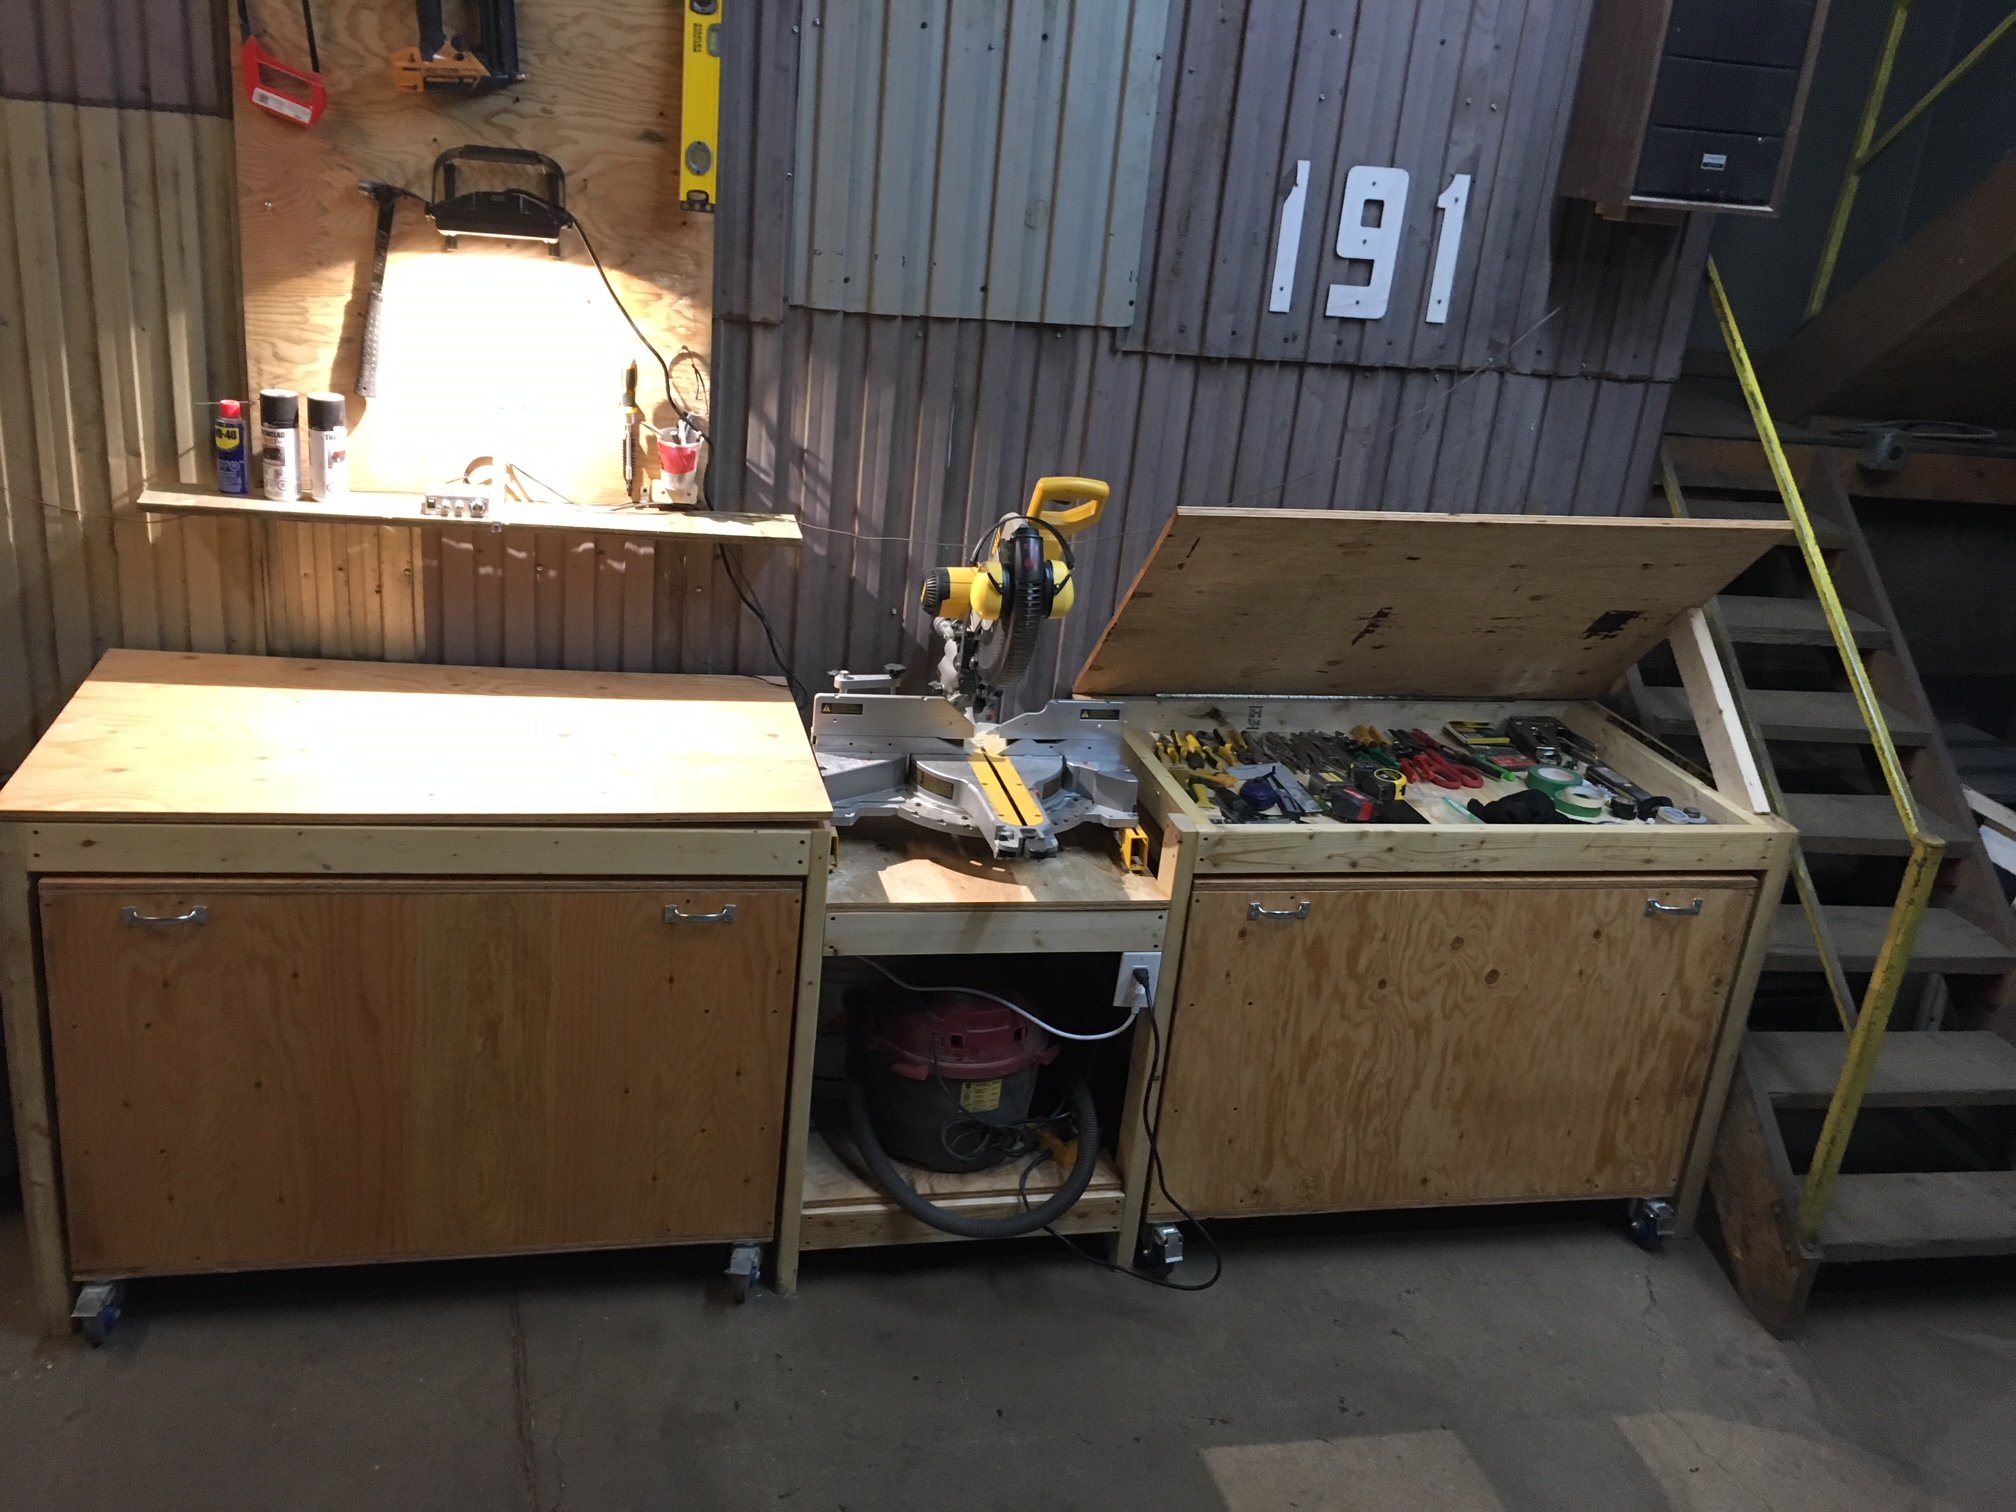
Ana's ultimate workbench (Ryobi)

Submitted by CABANE on Fri, 01/12/2018 - 13:38

This is the perfect workbench for my needs.

I upgraded the casters to bigger ones as my shop's floor is in rough shape.

I also added storage under the two work surface next to the miter saw. This was just a matter of closing under the 2X4 frame and making the two sections on casters a little shorter. The only downside for that mod is that the plywood can bend a bit since it is not screwed to the frame. I don't mind since it falls flat as soon as there is weight on it. Also, this mod makes it hard to include fence system (it would need to be removable, like fixed with dowels only, no glue) and almost impossible to include a precise fence system since it would need to be removable. In my case, I do rough, non-repetitive cuts, so there is no need. 

TIP : Pay a little extra for smooth plywood. I lost a lot of time sanding mine :(

Estimated Cost
$150 CAD
Estimated Time Investment
Weekend Project (10-20 Hours)
Finish Used
Linseed oil
Recommended Skill Level
Beginner

Comments

groche

Tue, 02/04/2020 - 08:21

Awesome! Do you have pictures/info for the cart that has the Dewalt table saw? I have the same one and would love to build the cart for it.

Bench with soft-close drawers for Front Entry

Submitted by drickstan on Tue, 08/11/2020 - 10:43

We needed a bench to fill the space in our front entry and provide some storage for seasonal gear. We couldn't find anything to buy that would work for us, so when my wife found these plans, I had to try it! Couldn't be happier with the results. We widened the bench by a foot to 84" to fill the space. Basically, it just made each drawer 4" wider. Everything else was built to plan. The most expensive thing was the soft-close 24" drawer slides (~$100). As soon as you go above that 24" depth, they get pricier! It was also tricky to get the drawers to catch properly on the soft-close mechanisms, but I made sure to take the time to get it right before closing it all in. Now I just open and close the drawers for the pure satisfaction of it! I used premium pine plywood for the top and I find it still doesn't give that smooth finish I like, even after sanding. I think I'll create a new top out of joined knotty pine planks later and just attach it to the top.

Built from Plan(s)
Estimated Cost
$300 CAD
Estimated Time Investment
Week Long Project (20 Hours or More)
Finish Used
Primer and pearl finish paint.
Recommended Skill Level
Intermediate

Modern Farmhouse Bed Frame

Submitted by SofiaTaz on Thu, 01/06/2022 - 23:15

I love how this bed frame turned out! Everywhere that has stain is cedar and the rest is all scrap spruce. Thanks for another great plan Ana!

Built from Plan(s)

Comments

Modern Park Bench

Submitted by TaylorMade on Tue, 03/08/2016 - 18:42

HI Ana! Just wanted to tell you thank you for sharing all your knowledge. I really got inspired reading your book and looking through your website. I was quite intimidated but I finally completed my first build. It feels amazing and I am so grateful for your help! XO Sarah Taylor

Built from Plan(s)
Recommended Skill Level
Intermediate

Comments

DIY Outdoor Sofa, Chairs and Coffee Table

Submitted by Anonymous (not verified) on Thu, 07/27/2023 - 13:22

I decided to build my patio furniture and built a couch, with cushions, coffee table, 2 Adirondack adult chairs and one child’s Adirondack chair. It was so much fun to plan and build all of the furniture and so enjoy going out there on cool days! Thanks to Ana White for all of the plans! This is my 20th Ana White project! On to my next project! Plans were outdoor modern sofa, modern Adirondack chair, kids Adirondack chair, 2x4 outdoor coffee table.

JoAnne

Seasonal And Holiday

DIY Sofa - Storage Sectional

Submitted by LittleG on Thu, 08/09/2012 - 15:38

Basically I took Ana's plan and tweaked it to create a diy sofa, a love seat, and a corner piece to make a sectional. All 3 pieces have the same basic design and function (they all have a storage compartment), although the corner piece, because of its placement and the thickness of the seating cushions, doesn't open unless the couch is opened first. We purchased custom cut, 6" thick foam cushions for the seats (we bought the XL-38 foam from https://www.buyfoam.com/, but if we had to do it again, we'd go with the XL-28 as the 38 is VERY firm). We also used upholstery fabric instead of a paint drop-cloth to cover the couches. The foam and upholstery fabric upped the overall cost significantly. Other changes from Ana's plan, I used 15/32" OSB because the 1/4" plywood just felt too flimsy (I'm a large guy). I also added I bolts to the underside of the seat before the foam and upholstery so I could add a stress relief rope to prevent the kids from opening the top and dropping it and ripping out the hinges. I used piano hinges as they seemed to me to provide the most support. Finally, I ended up using 1x2s for the base trim since I couldn't find any 2x2s that were straight and finish-ready, then I added router detailing to provide some visual interest. I used 3" pieces of 4x6 for the feet and added matching router detail. Additionally, I used T-Nuts and bolts to make the feet and base trim completely removable.


Built from Plan(s)
Estimated Cost
$1300
Estimated Time Investment
Week Long Project (20 Hours or More)
Finish Used
Minwax PolyShades Espresso
Recommended Skill Level
Intermediate

Comments

masmith38

Fri, 10/23/2015 - 11:11

Love this!  Totally want to think hard about doing this instead of buying when time for a new couch comes. Job well done, and the storage is a total plus.  

Chased

Sun, 05/15/2016 - 21:15

Where can I find the plans to this or the cut list

mikeyb

Mon, 10/03/2016 - 18:11

Awsome job!!! question? is that a typo on the cost to build??

mikeyb

Mon, 10/03/2016 - 18:12

Awsome job!!! question? is that a typo on the cost to build??

albertmick30

Mon, 08/17/2020 - 07:46

It is superb blog and i really appreciate your blog. It is because i always like the informative blogs. You did a great job and thanks for sharing.I am impressed by your post. It contains very informative data and i gain a lot information from it. It is very useful for me. Thanks for sharing and keep on sharing that type of posts.The Mobile App Developer Dubai provides good service you visit here site https://www.mistersaad.com/

Laundry Station

Submitted by Anonymous (not verified) on Mon, 02/27/2017 - 10:03
We followed these plans, but instead of building two cabinets, we combined them with one side in the middle. We also used pine planks on top. The sides are painted with chalk paint, and the top is finished in dark wax. 
Built from Plan(s)
Estimated Cost
$200
Estimated Time Investment
Afternoon Project (3-6 Hours)
Recommended Skill Level
Beginner

Comments

Bookshelf Hidden Doors Over Closet

Submitted by Anonymous (not verified) on Mon, 10/23/2017 - 10:13

Hidden door bookshelves hide a furnace closet.  Built by Kraig Faulkner

Built from Plan(s)
Recommended Skill Level
Advanced

Comments

charkue

Thu, 09/17/2020 - 08:01

I'm currently working on a basement renovation project. I'm probably going to incorporate a feature like this for my mechanicals, too.

One important safety note for anyone who wants to do this: It's recommended that your furnace be a minimum of 30" away from any combustible materials. That includes walls and partitions. The image of this project displayed is right next to the furnace, which is not a good idea.

Fantastic Garden Beds

These garden beds are fantastic! They were so easy to build and look great in our backyard. We have always found ourselves with a garden covered in weeds or plants out of control. Our garden this year looks wonderful and we have hardly any weeds in the beds. Thanks for the great plans!

Estimated Cost
$15 each
Estimated Time Investment
An Hour or Two (0-2 Hours)
Finish Used
None
Recommended Skill Level
Starter Project

Comments

Seasonal And Holiday

A-Frame Hen House

Submitted by Anonymous (not verified) on Mon, 04/22/2024 - 10:22

Great easy project to get the bigger chicks out of the garage to integrate with the older hens. Made some modifications because we have a lot of critters trying to kill the chickens/chicks.

Built from Plan(s)

modern park bench

Submitted by debinmi on Sun, 09/28/2014 - 11:50

Spent an hour or so an evening after work to make this bench .  Also made the umbrella stand but haven't drilled the hole for the umbrella yet so it' s still in the garage.  Love the bench, it's long & deep enough to lay down upon.  Made the arms from a 2x6 and rounded the front w/ a jig saw, made the other end the same size as the 2x4, and made them longer than the plan. Pretty simple, did use pocket holes in places. First major build & 1st brag.

Built from Plan(s)
Estimated Time Investment
Day Project (6-9 Hours)
Finish Used
Pittsburg exterior stain in Oxford Brown
Recommended Skill Level
Starter Project
Seasonal And Holiday

Firewood Shed

When I decided to build a woodshed I was freaked out because I've never done anything even remotely like this.  I struggle with precision and patience, which made this project seem overwhelming as I knew I had to do a lot of prep work to properly level the ground, measure the wood, learn how to operate a saw, calculate angles to cut, etc...  I did a lot of research online and found this simple blueprint a great starting point.   I made some adjustments since i needed a much bigger shed, it's 11.5' x 7' x 7'.  Also, I already had the wood resting on pallets so I just build this shed around the wood with no built in floor.  Overall, I'm thrilled with how it turned out!

Built from Plan(s)
Estimated Cost
$500
Estimated Time Investment
Weekend Project (10-20 Hours)
Recommended Skill Level
Beginner

Comments

Storage beds (twin) with Corner unit

Submitted by Dinabu on Tue, 05/03/2011 - 08:48

We made these beds for my daughters, who were ready to pass on the bunkbeds to their little sisters. We have 4 girls in one room, so use of space is crucial! I originally wanted the hutch as well, but as you can see in the picture, we had to work around a wall cut out, so we modified the corner unit to have a larger shelf area to fit the space. We also left the sides open to be able to slide containers in to store out of season clothes and blankets, though the ends have a backing.

Estimated Cost
$250-$300.
Estimated Time Investment
Weekend Project (10-20 Hours)
Finish Used
Gloss white paint.
Recommended Skill Level
Beginner

Fancy Herringbone Farmhouse Table

Submitted by Anonymous (not verified) on Sat, 02/17/2024 - 10:01

Your beautiful Fancy X farmhouse table. We wanted to seat 8. Used your plan with the top idea from Hint of Home. We used cedar tongue and groove for the top. We are so pleased with it! Now for chairs!

Built from Plan(s)

Slatted double vanity - FINALLY finished!

I was a bit over my head with this one but I am so far very happy with the project. It is not quite finished. The marble was installed last week and we are awating the plumber to come back to hook up the sinks. I will install the second slatted shelf once the plumbing is in. Will post finished pictures soon. The mirror is made from 6x6 posts from the lumber yard. We had a friend cut them to size using a band saw. We made the mirror frame based on a picture I found on Houzz.com. The mirror glass was something I picked up off of craigslist for next to nothing and removed from the original frame. It is HEAVY (~200lbs) and attached to the wall with metal brackets. We purchased the sinks/faucets on ebay. 


Estimated Cost
For the vanity alone: $200-250
Estimated Time Investment
Weekend Project (10-20 Hours)
Finish Used
I used Hilary's vinegar/steel wool solution to age the wood, then sanded and finished with the vermont natural coatings polywhey in satin.
Recommended Skill Level
Intermediate

Comments

Simple Outhouse

I built this outhouse to go with a dry cabin I'm working on, and also as an emergency backup for my house. I used treated lumber on the base/deck and splurged on T-111 for the siding. I wanted to use greenhouse polycarbonate for the roof, but found a piece of metal roofing in my shed that was exactly the right size so I used that instead. I thought about doing a fancy cutout on the door but ended up going with a half moon because it was easy. I'm thinking about cutting out stars of different sizes all over the rest of the door to let in more light. I'll trim and stain it next summer.

Built from Plan(s)
Estimated Cost
$450 - I used T-111 which is $40/sheet here in Alaska. I also used treated lumber where recommended and stainless steel screws.
Estimated Time Investment
Weekend Project (10-20 Hours)
Recommended Skill Level
Beginner

Comments

CH

Mon, 01/13/2020 - 15:25

WHAT HAPPENS TO THE 'STUFF' THAT YOU DEPOSIT IN THE TOILET?  I DIDN'T READ ANYTHING ABOUT DIGGING A PIT/TREATMENTS, ETC.  PLEASE LET ME KNOW.  THANK YOU!  CH.

DIY Lego Table

Submitted by hstreat on Mon, 05/01/2017 - 19:39

This is a Lego Table that I built my Grandson for his birthday.  I found the plans for it on Rogueengineer.com

https://rogueengineer.com/free-diy-lego-table-plans/


I switched things up a bit by routing all of the edges to soften them, and I added the little mover men casters under each of the legs.


It's one of the better projects that I done recently, and nothing beat the look on his face when he saw it...

Estimated Cost
Approximately $60.00, mostly cost of wood.
Estimated Time Investment
Weekend Project (10-20 Hours)
Finish Used
Minwax Golden Pecan & Winwax Clear Glossy Polyurethane
Recommended Skill Level
Intermediate

Mini console table

Submitted by Mikegarrod on Sun, 02/21/2016 - 21:50

First table built by us. I think it turned out pretty good! Custom built to avoid baseboard heater. 

Built from Plan(s)
Estimated Cost
$30-50 depending on if you need stain or not.
Estimated Time Investment
Afternoon Project (3-6 Hours)
Finish Used
Minwax stain, water based paint and Minwax Polycrilic.
Recommended Skill Level
Beginner

Comments

kg112677

Tue, 06/28/2016 - 19:09

The plans catalog link does not work. Can you please repost these plans? Thanks

Dunnie

Sun, 01/15/2017 - 21:24

I am in desperate need of instructions for

this mini console table.  I can't find them anywhere. I won't be able to modify other plans, lol I need it all planned  out.

theUgly_bear

Tue, 01/17/2017 - 12:35

i plan on making this next week, so i can update you with the plans, the only thing i am doing different is the way i am doing my cross in the back. 

stay tuned 

theUgly_bear

Tue, 01/17/2017 - 12:35

i plan on making this next week, so i can update you with the plans, the only thing i am doing different is the way i am doing my cross in the back. 

stay tuned 

Mrs.tash

Sat, 02/04/2017 - 13:12

This is beautiful and simple! Great job!

You costum built it to fit the baseboard, were the original plans Ana White's? Can you link it or tell me the name to find it?

I'm new to the site and not navigating very well. I'm trying to save plans for a console similar to this to my profile/account and looking for the little "save to plans" to easily find this again

Mudroom Bench with Easy Drawers

Submitted by GeekAthair on Mon, 01/06/2020 - 20:12

We've been desperate for more storage in our little house and this build really helped. The whole bench is 103“ wide and each drawer gives us 24"x17" of usable space. We had to do some custom shaping for the benchtop (two joined fir 2x12's) fit as the walls are not square but in the end we were really pleased.

The hardest part of the project was getting all of this built and in place while working around a busy family as this is our only meal space and the majority of cutting/forming was done either on the weekends or after bedtimes. If I were to do this again I'd prioritize sending the kids to grandparents for the weekend and know king everything except for paint out in one go. 

We could have spent less time with the benchtop by using plywood like in the plans but we wanted the look of a separate benchtop. We may replace the fir with stained oak down the line but this should be plenty sturdy for the next several years. 

Built from Plan(s)
Estimated Cost
$300
Estimated Time Investment
Week Long Project (20 Hours or More)
Finish Used
Valspar paint, minwax clear poly
Recommended Skill Level
Intermediate

Comments