DIY Home Gym Storage
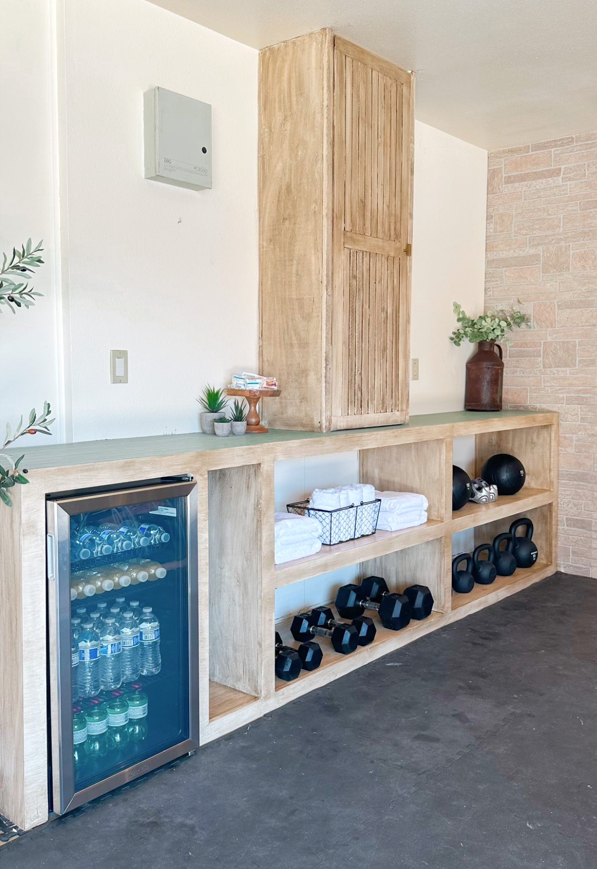
Fabulous home gym by Nailgun Nelly!
*Incorporated and modified the grand waterfall console plan
Built from Plan(s)
Fabulous home gym by Nailgun Nelly!
*Incorporated and modified the grand waterfall console plan

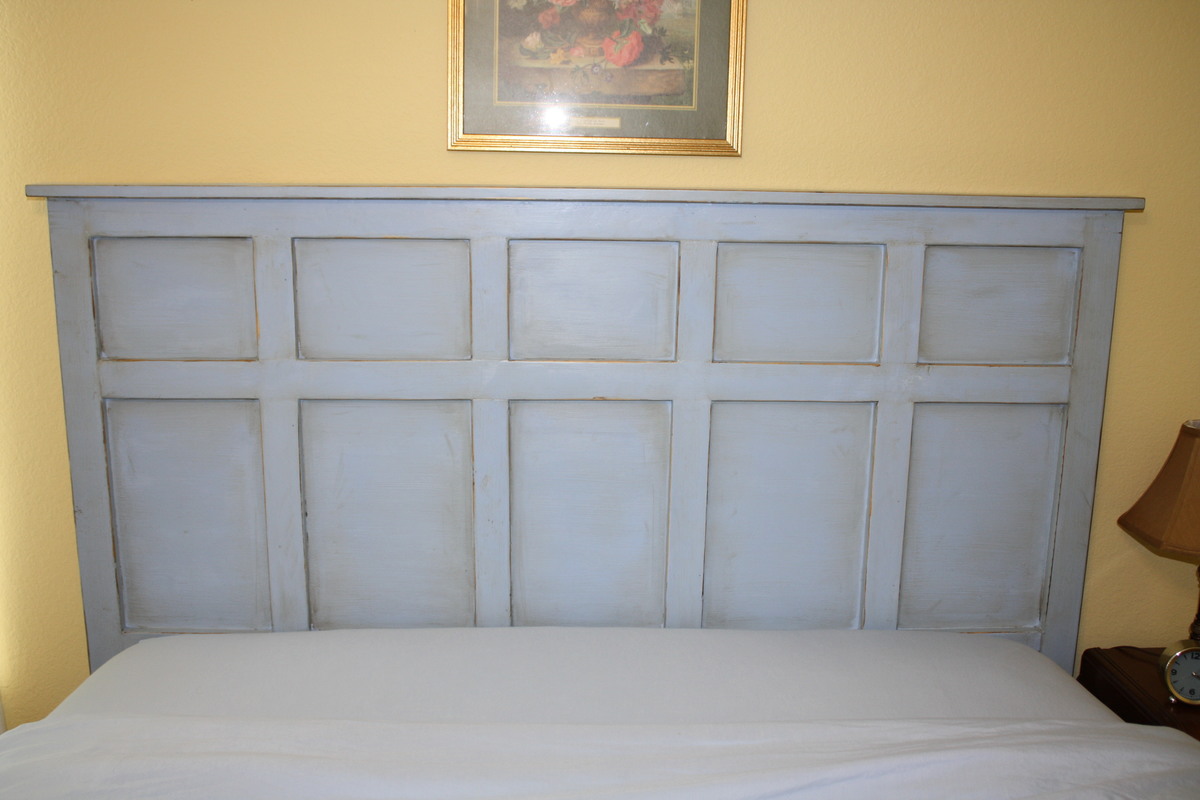
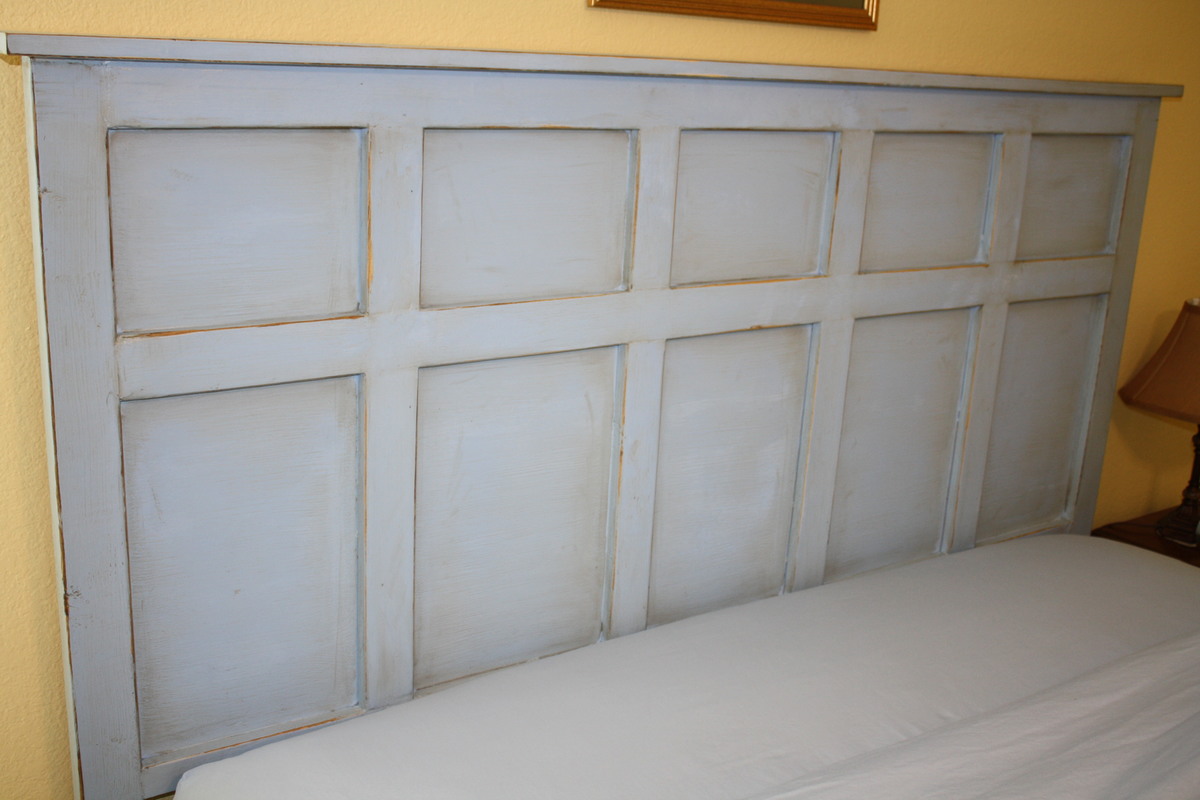
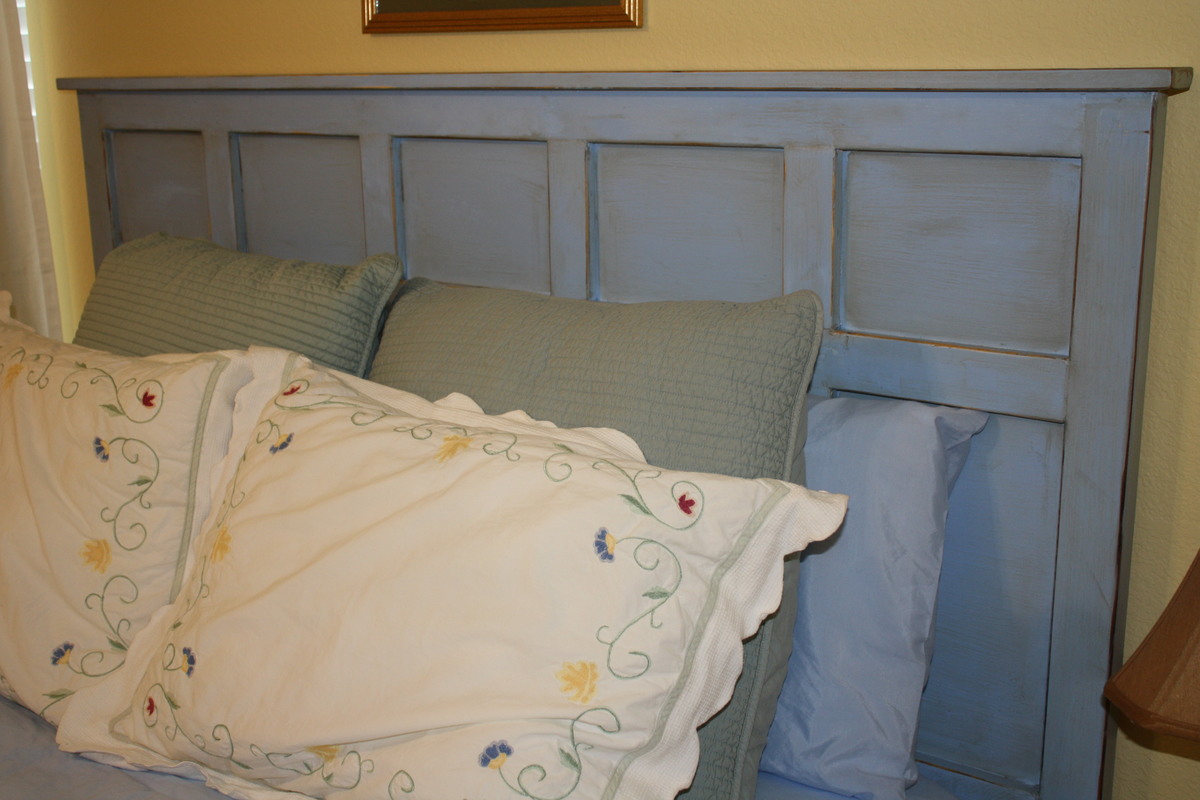
Our guest room finally has a headboard! I put together this queen size headboard using what I had learned building my daughter's headboard (and consulting the plans for the Reclaimed Wood Headboard) using the remainder of the plywood sheet from her headboard project, 2x3s for the legs, a 2x4 to join the legs (and connect to the metal bed frame), furring strips, and a 1x3 to top it off.
Our plywood had been cut to fit our car, so the first vertical furring strip was placed to hide the seam where I joined the two pieces back together. Then we evenly placed them from center as just looked right to us.
We had a great time seeing this come together as we didn't follow a specific plan, but were able to be a bit more creative inspired by various plans.
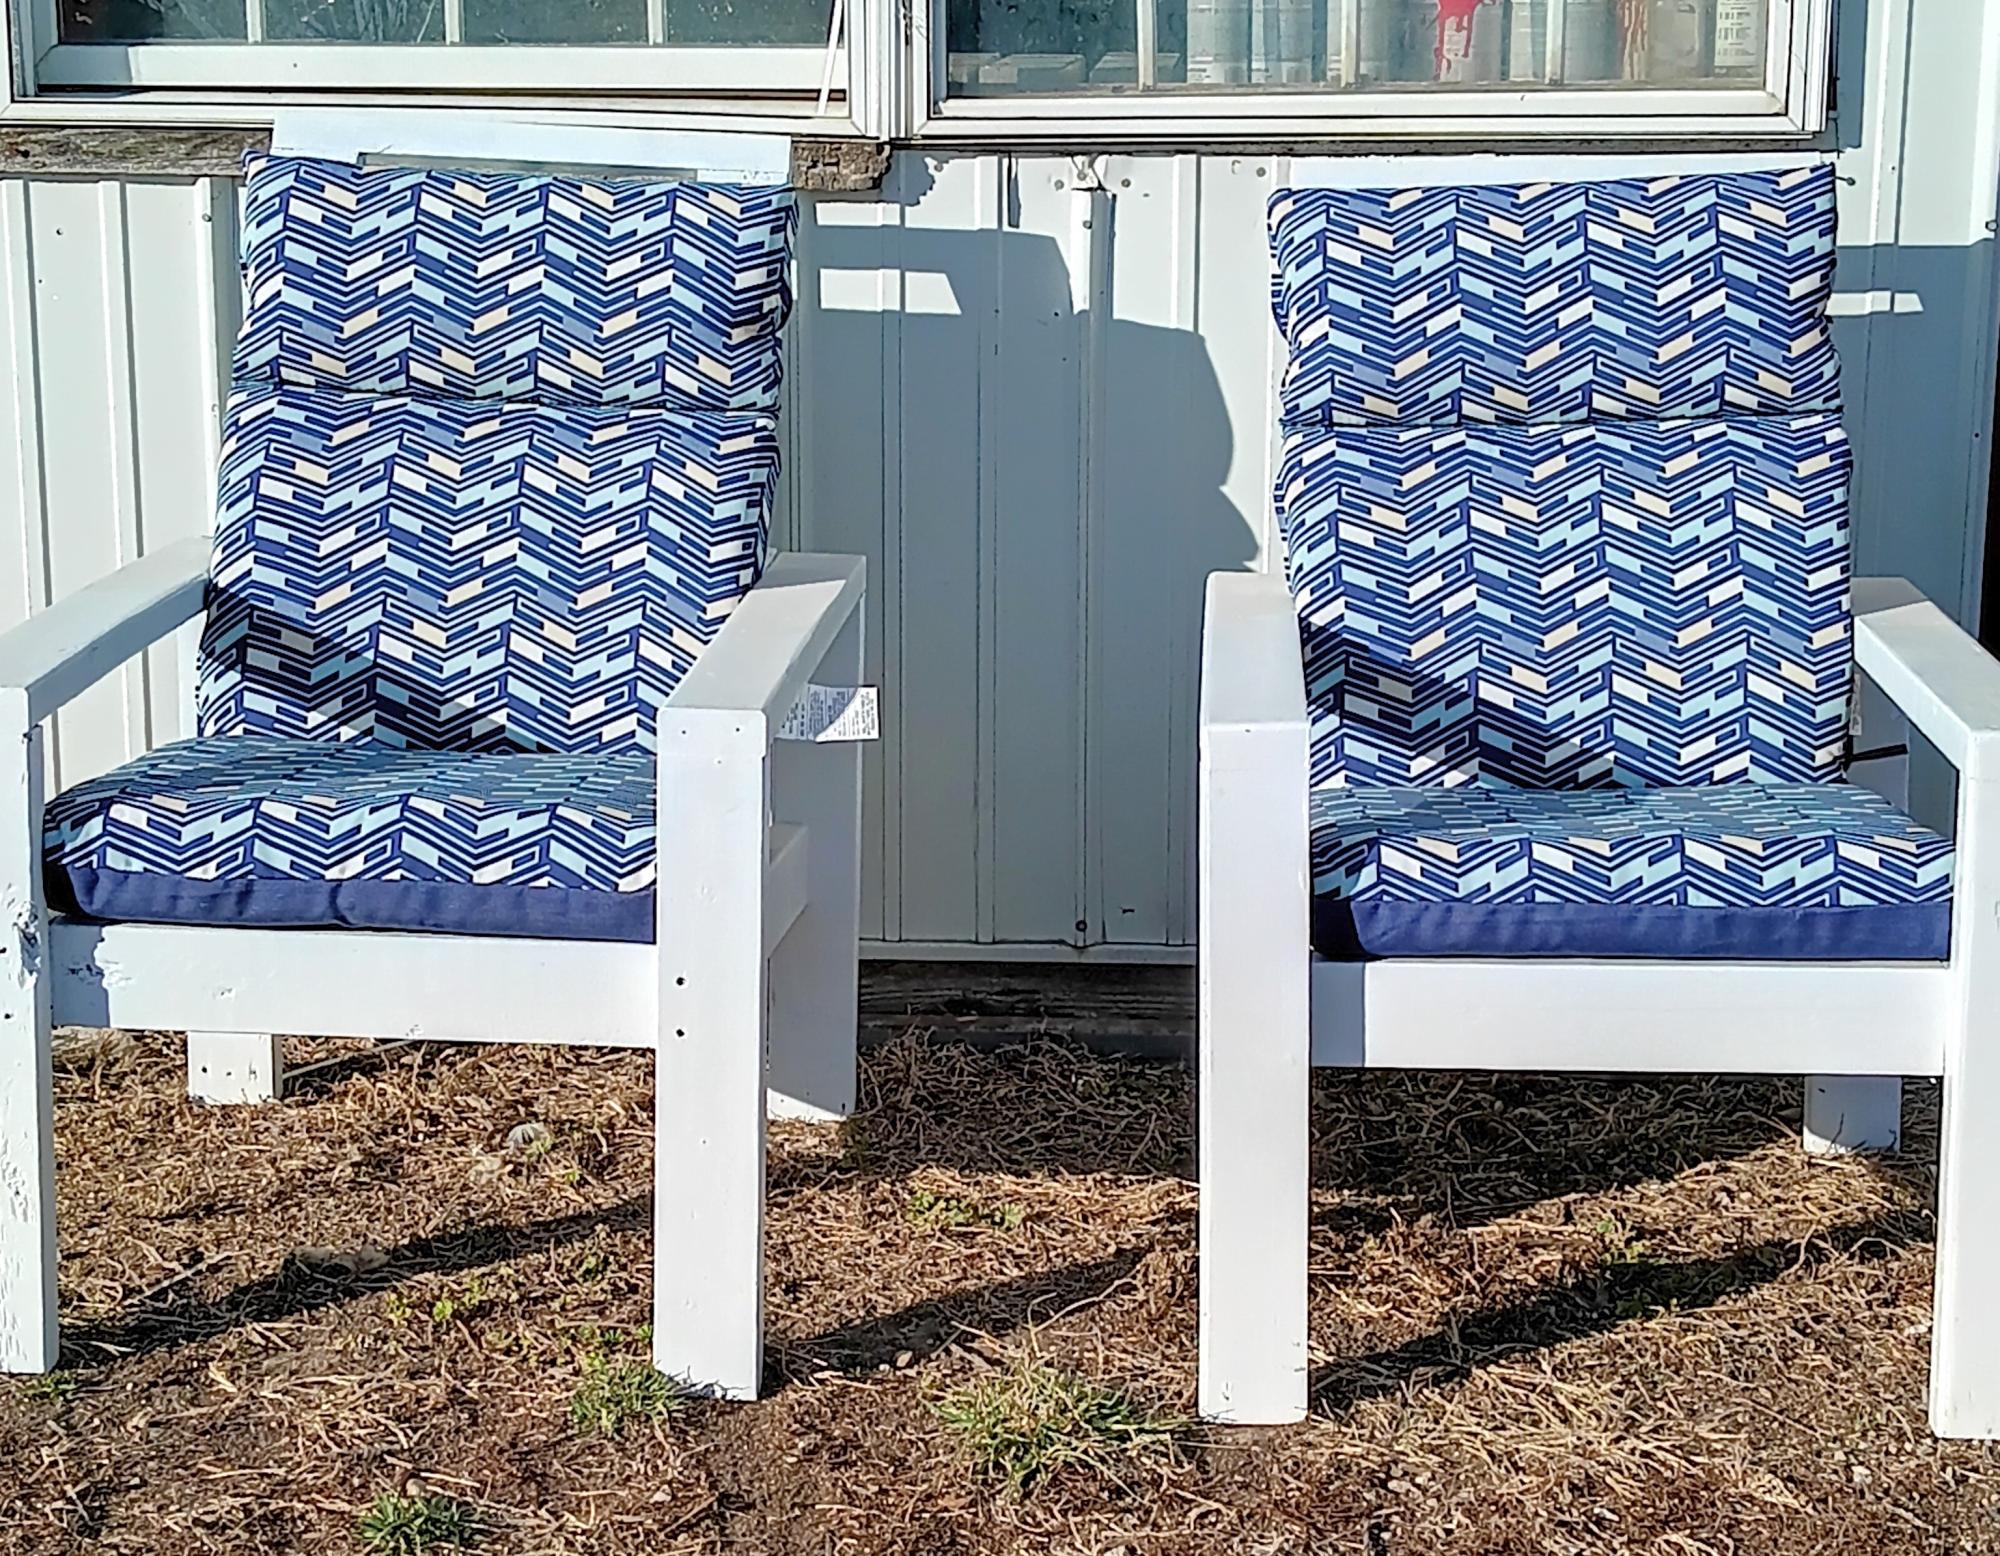
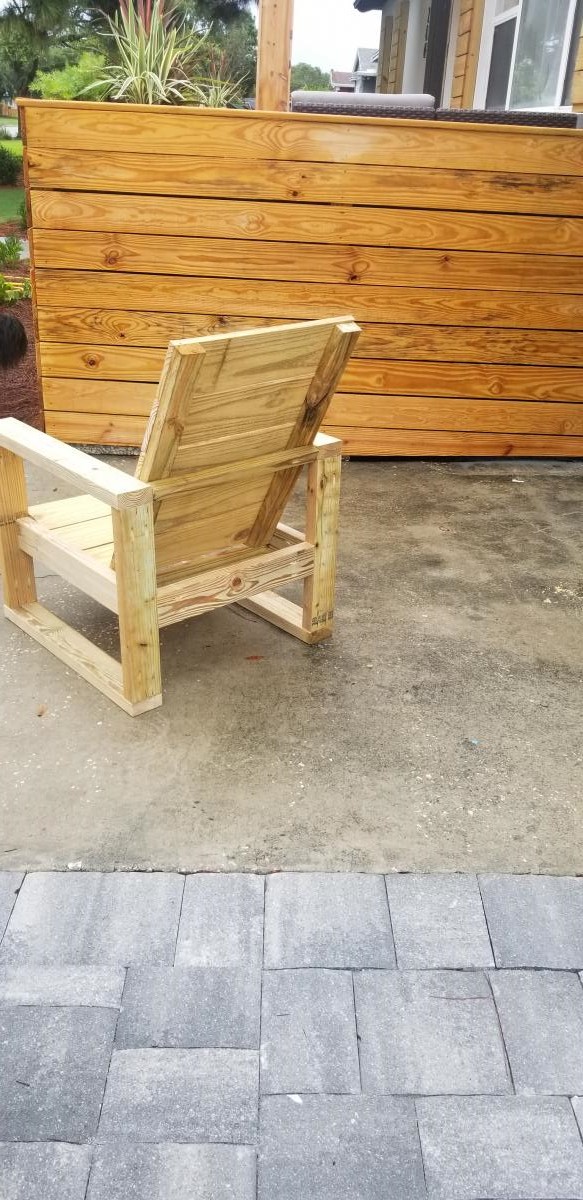
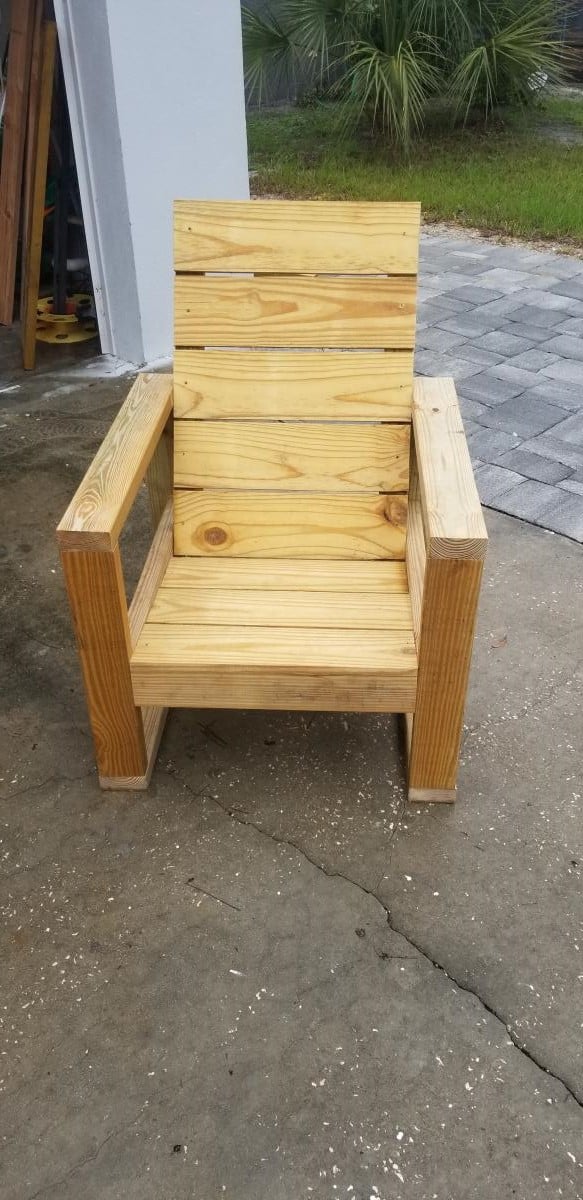
Thanks to your clear plans it was easy to make these two chairs from scrap 2x4s. Found the cushions at Lowe's. I'm a grandfather with eight grandchildren live in Iowa.
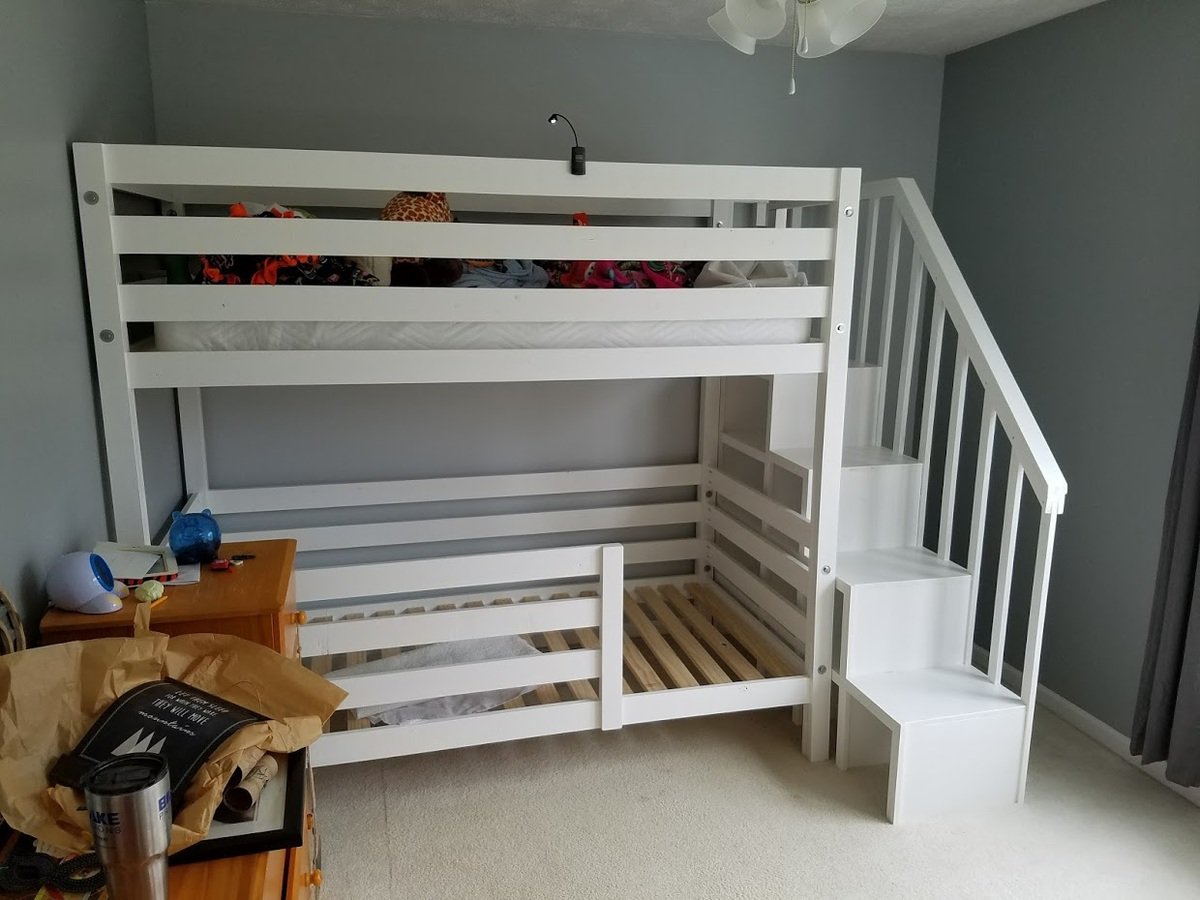
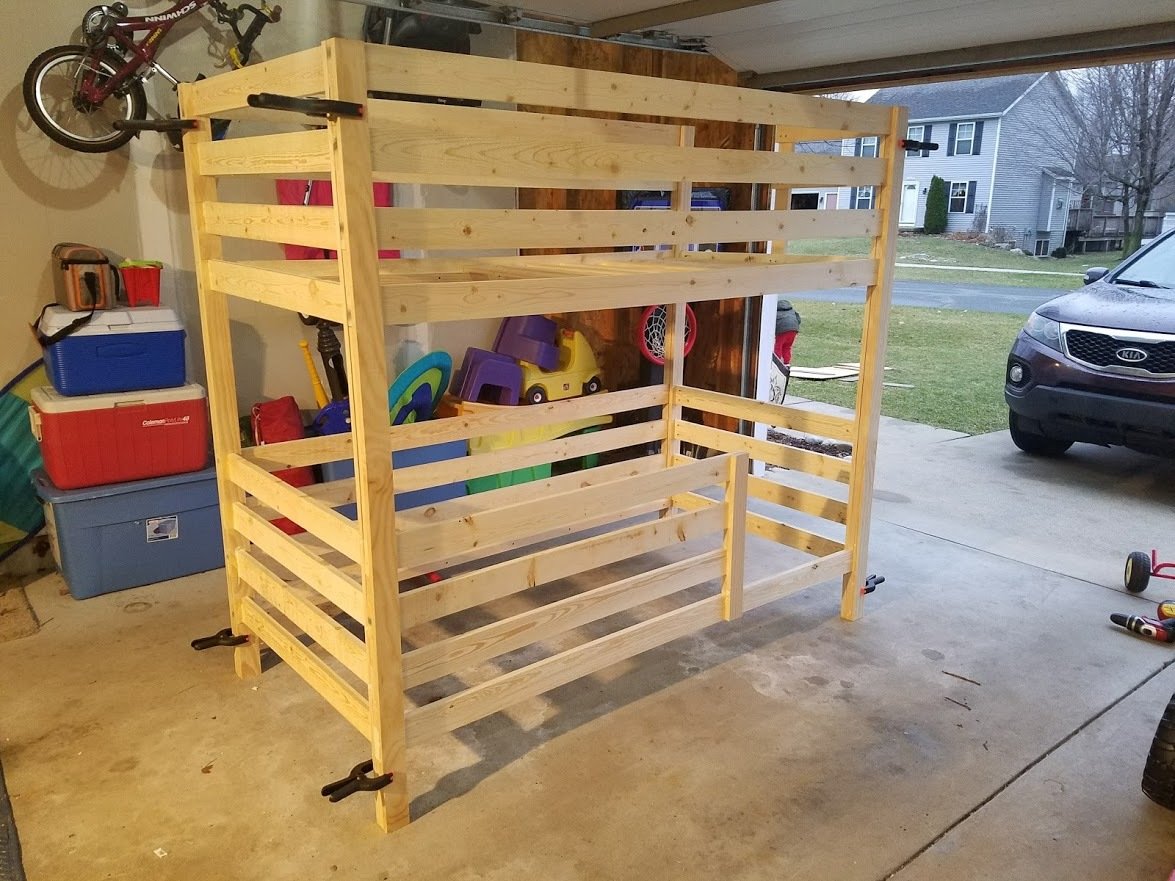
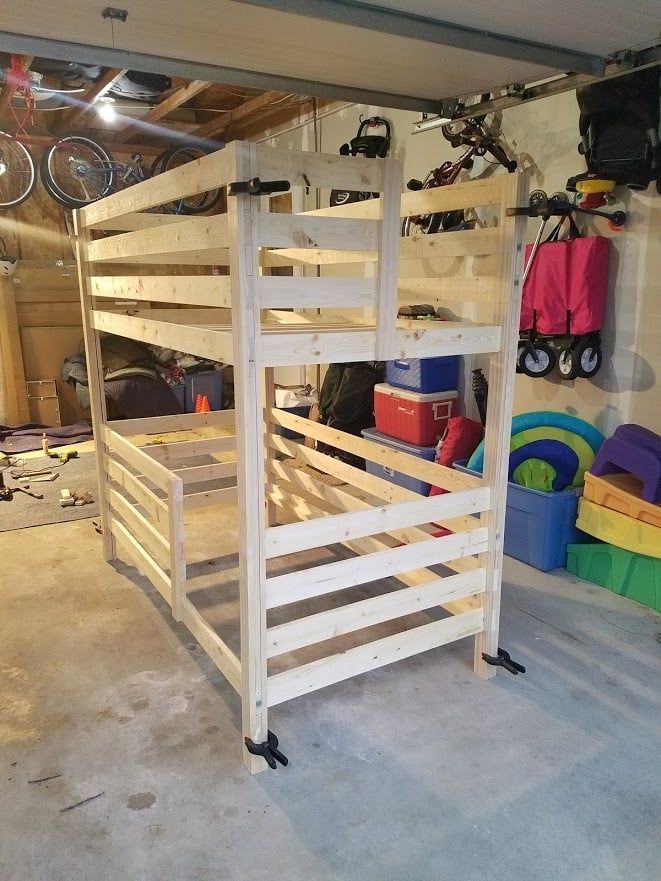
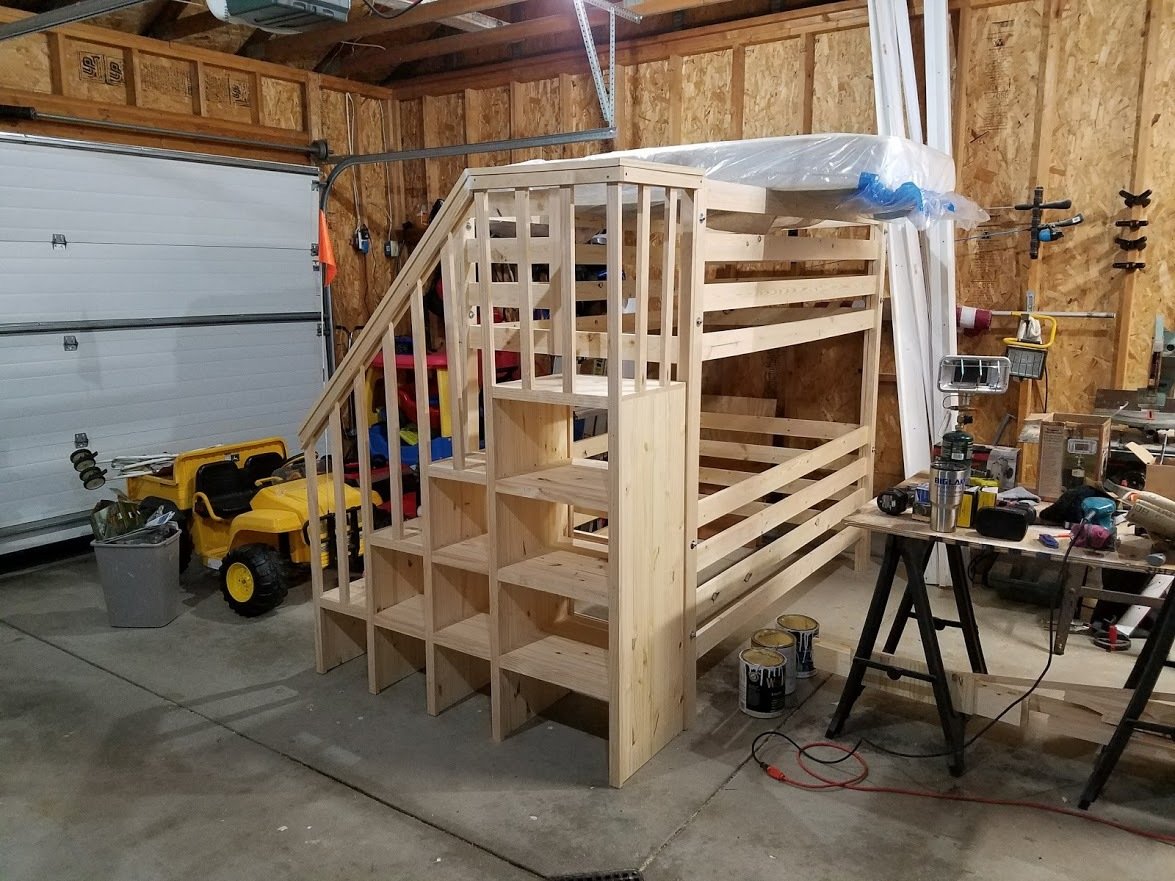
I modified the plans for the Classic Bunk beds by making them 74" tall instead of 63" and added a fourth slat all the way around to add more protection from potential falls. I created one opening in the front for my youngest to get into the bottom bunk, and built slats about 2/3's across the front to act as a gaurd rail. I created another opening on the side for my oldest to get into the top bunk with stairs instead of ladders to again prevent falls. I had to modify the Sweet Pea stairs to accomodate for the extra height in the bunk beds, simplified the railings, and I created each cubby to be big enough to use cloth storage totes that were 11x11x11. Sanded the whole bed and stairs so the corners and edges were all rounded and smooth, and put two coats of white Deck and Porch paint to stand up to the the boys running up and down. I used brackets to secure the stairs to the bed, and sixteen 3" bolts to bind the bed together. Precut and drilled 17 slats for each bed seperated them 2" apart. Spent a few hours every night during the week measuring, cutting, glueing, drilling and assembling the bed and stairs. Spent an entire weekend sanding and painting. Very happy with the way these beds turned out. Overall cost of the project including the paint was around $400.

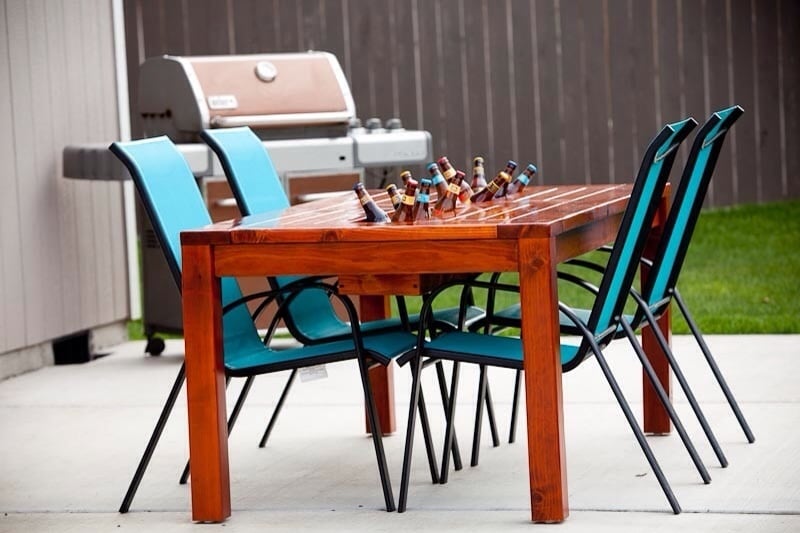
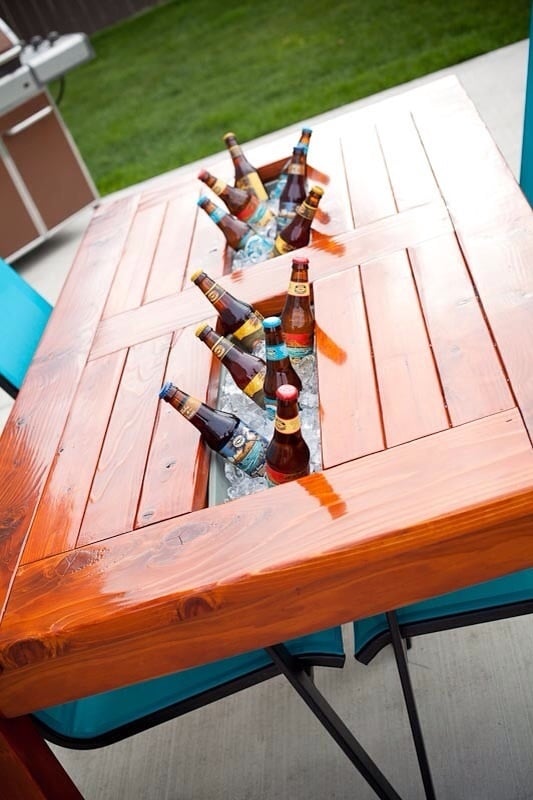
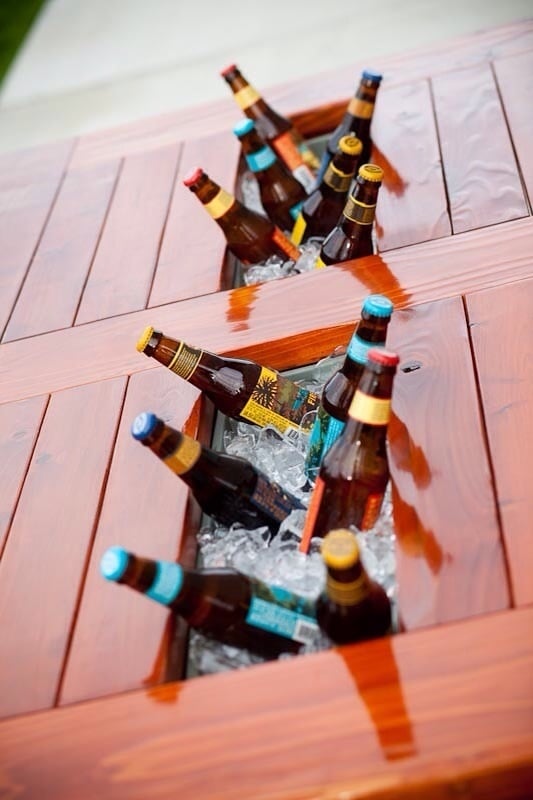
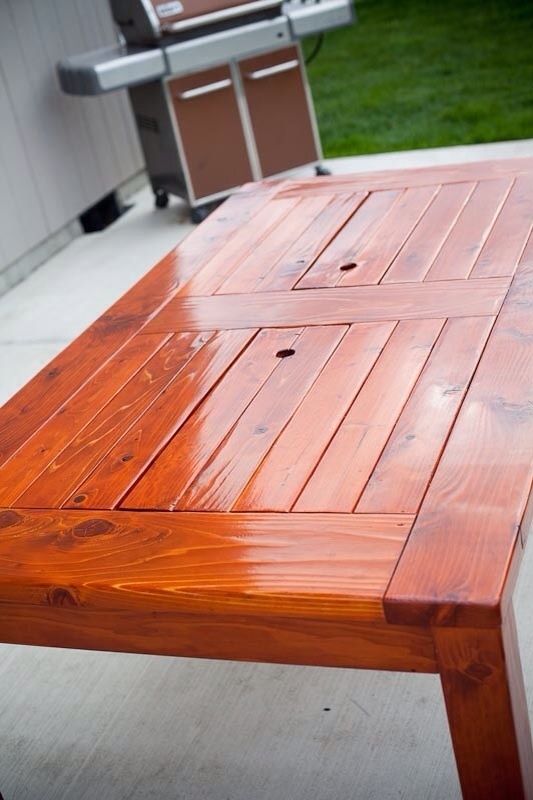
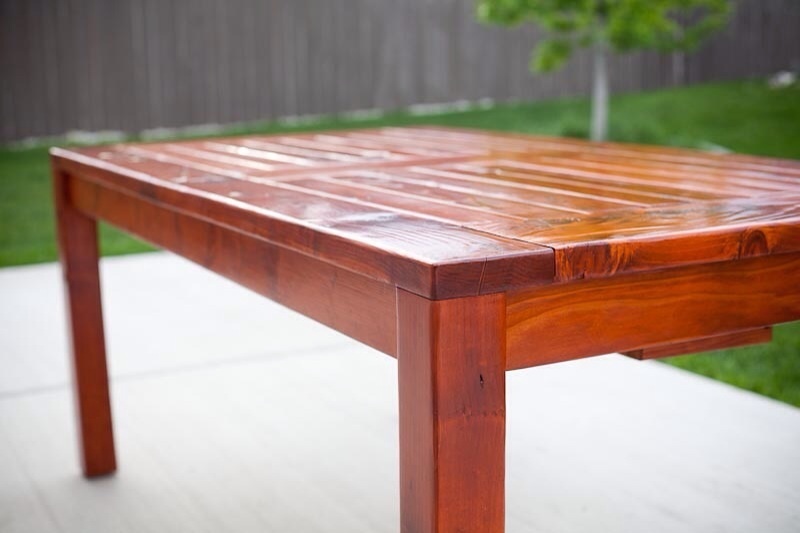
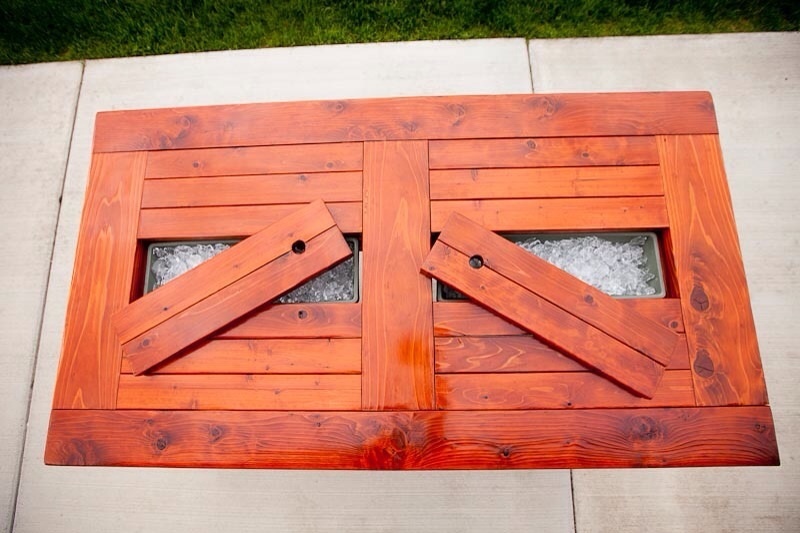
After seeing the patio table with beer/wine cooler, I wanted to build this for my brother and wife who recently bought a house. I asked them if they were interested and of course they said yes. I modified the original plans by adding a 2x4 on each side of the cooler to make the table wider. I also made the legs out of 4x4 vs the 2x4s that were originally called for. I used redwood and then stained it and used a varnish for the final coating. I probably wouldn't use the varnish again for an outdoor table, because it looks like it should be an indoor table vs outdoor. Overall, I'm pleased with the results and the best part about it, I get to enjoy it every time I go over for a BBQ.

Wed, 07/03/2013 - 13:04
Awesome table, do you happen to have the measurements you used. I'd like to make the same table but I need the lumber yard to make the cuts.
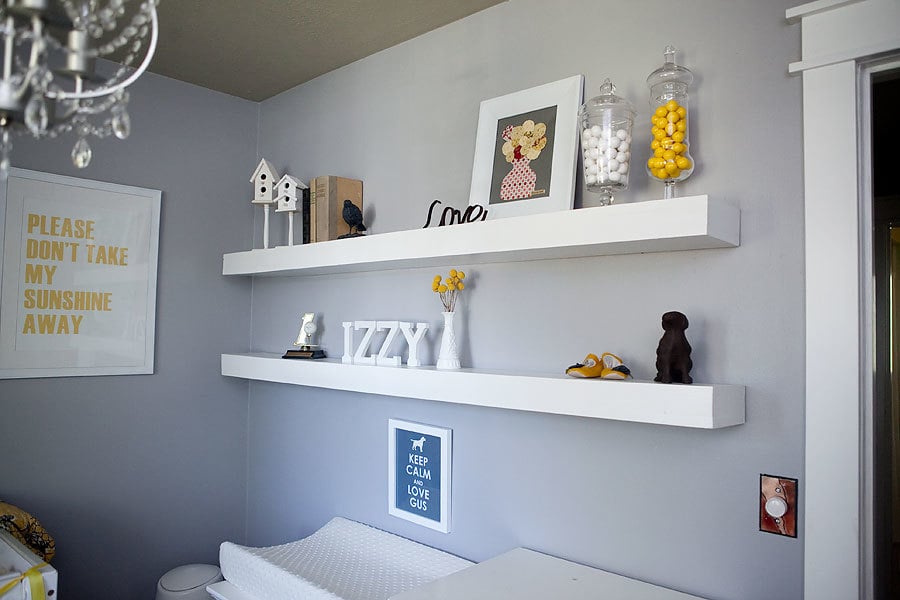
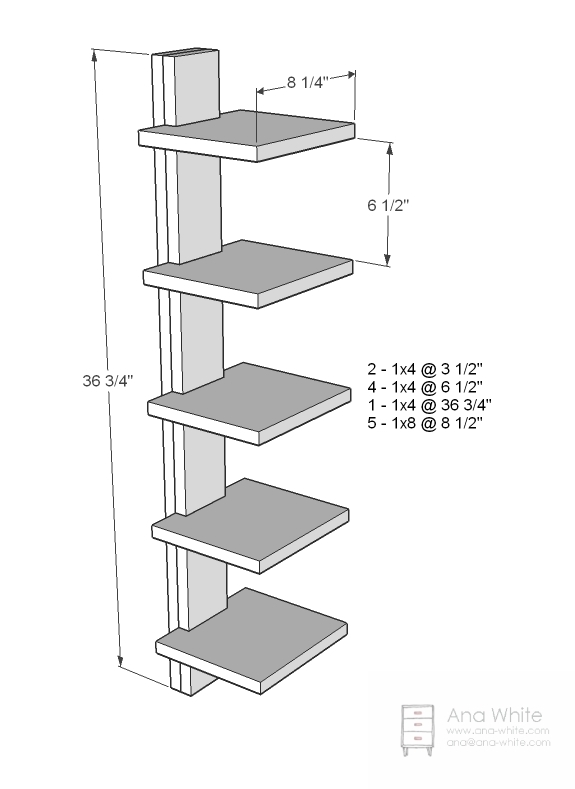
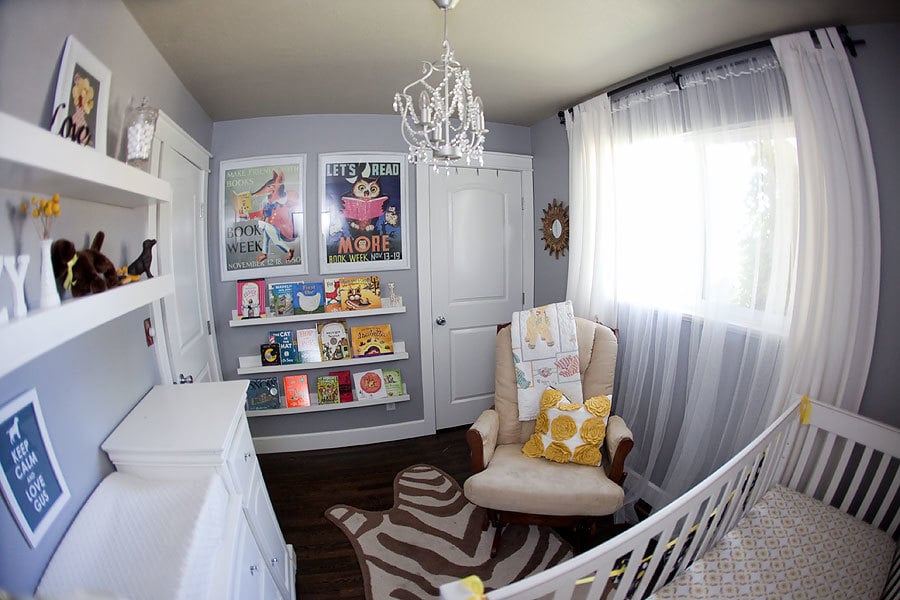
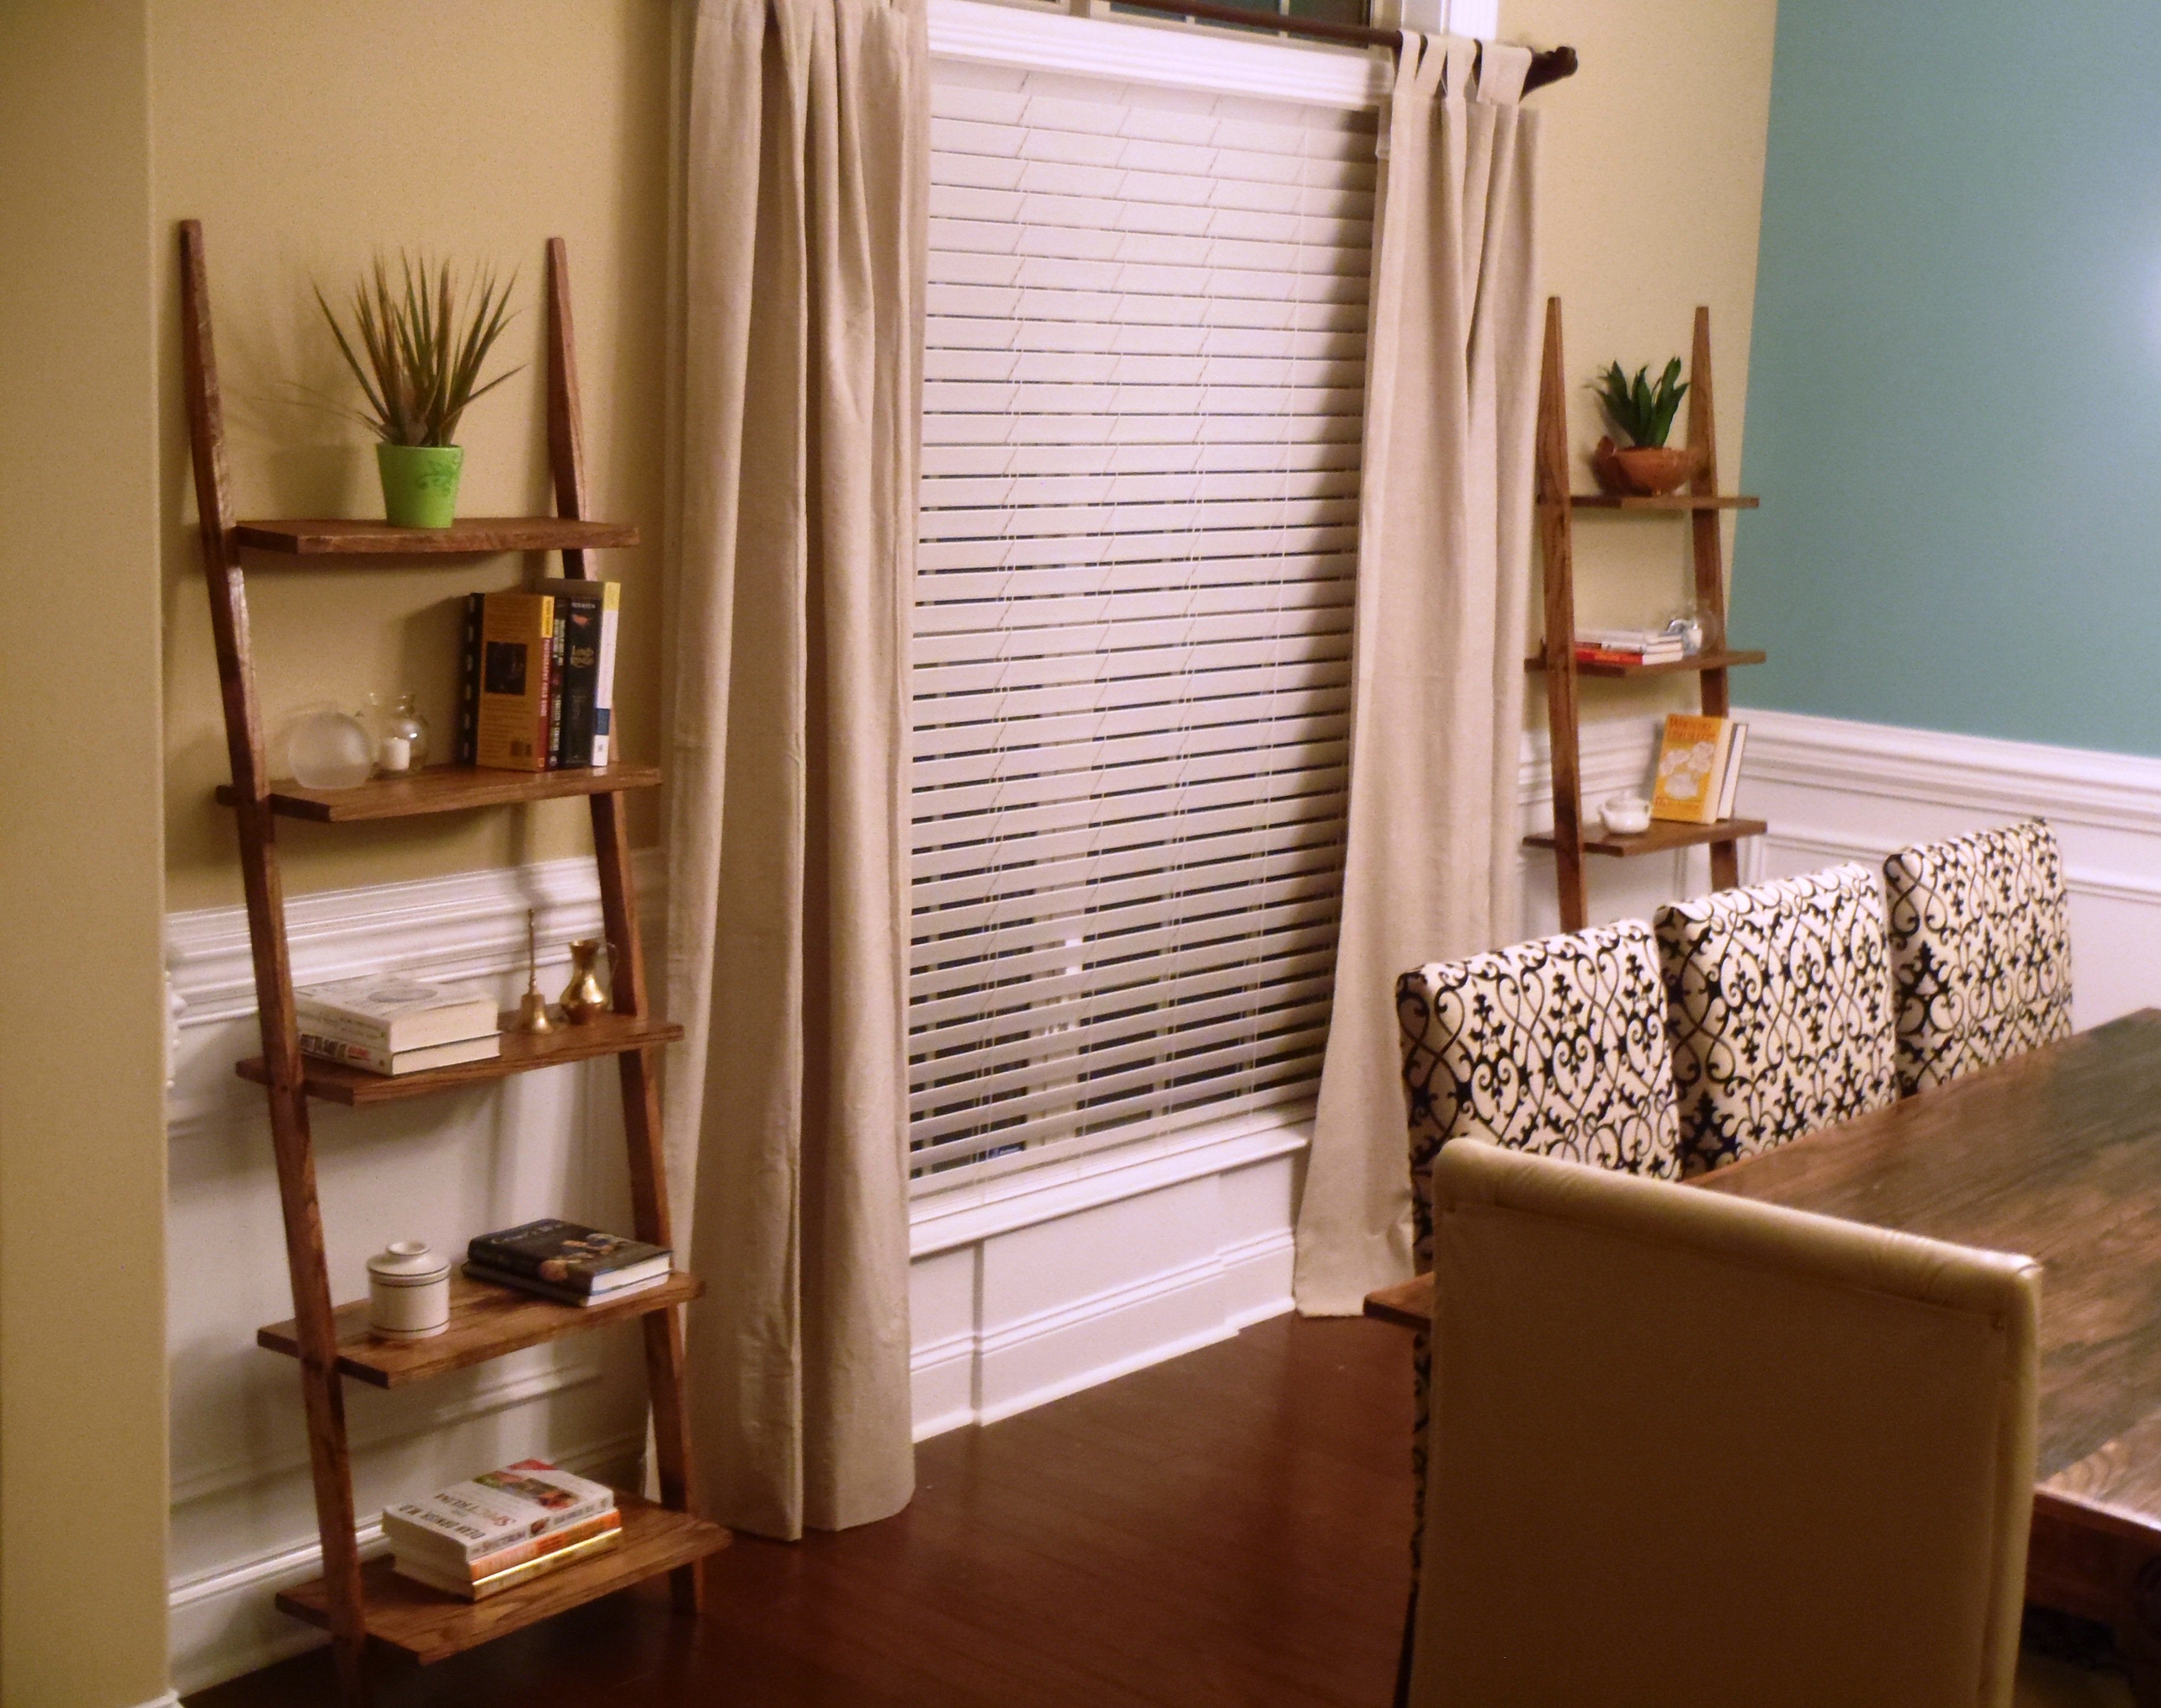
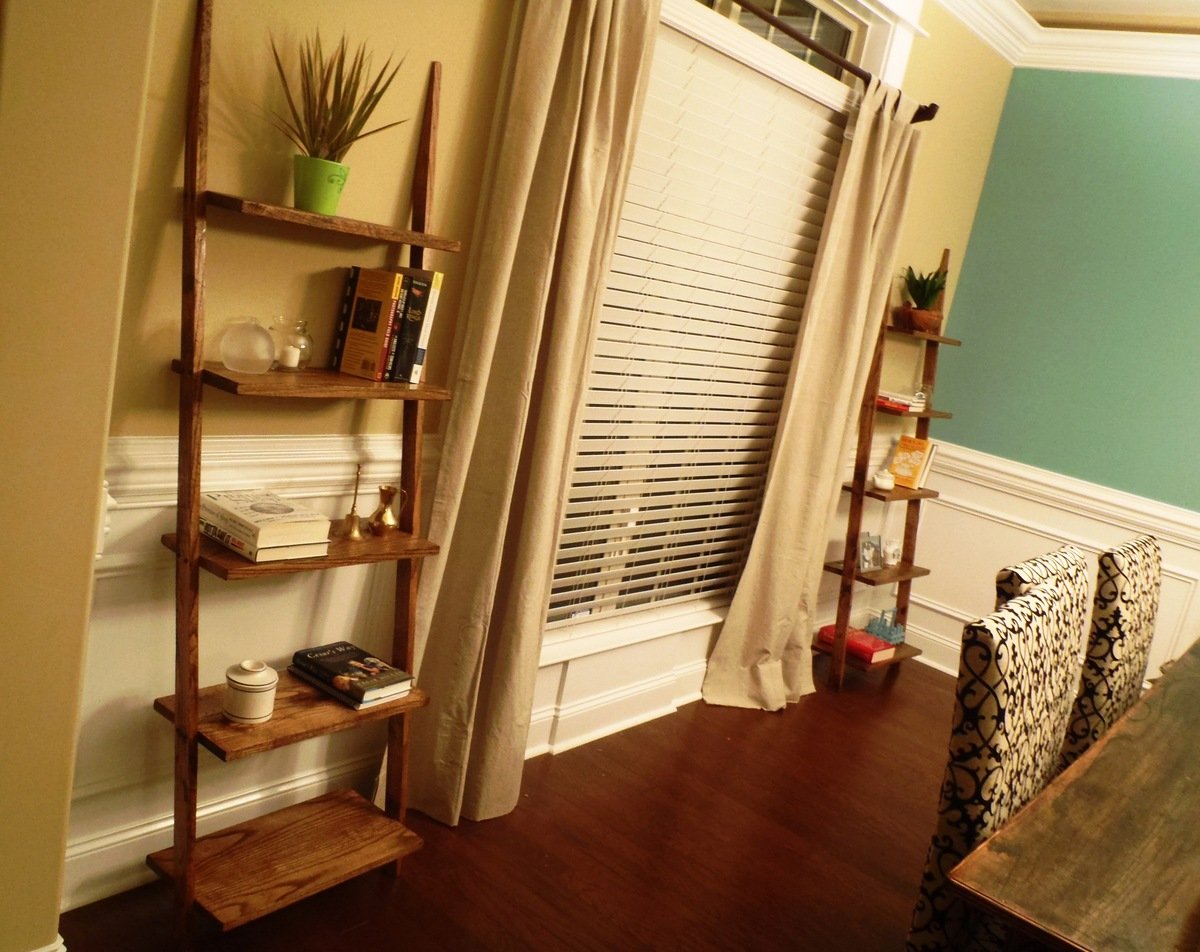
I used Ana's plans to build floating shelves and the ledge shelves for my nursery.


Sun, 07/24/2011 - 09:03
It looks great! Also, where did you find the vintage reading week posters? I'd LOVE to know! Thanks!
Tue, 07/26/2011 - 08:10
What a beautiful nursery!! Nice job on the shelves!
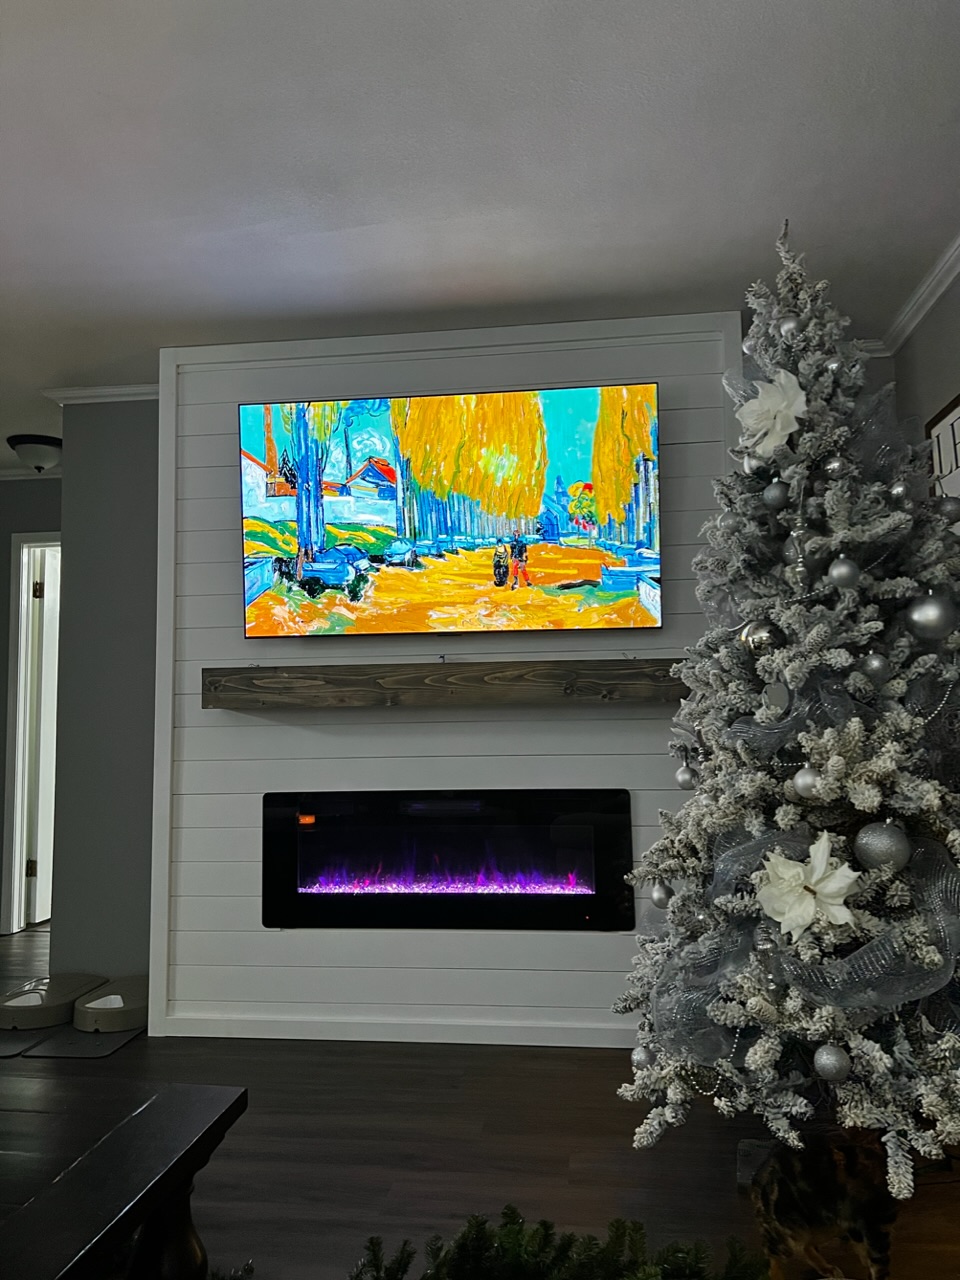
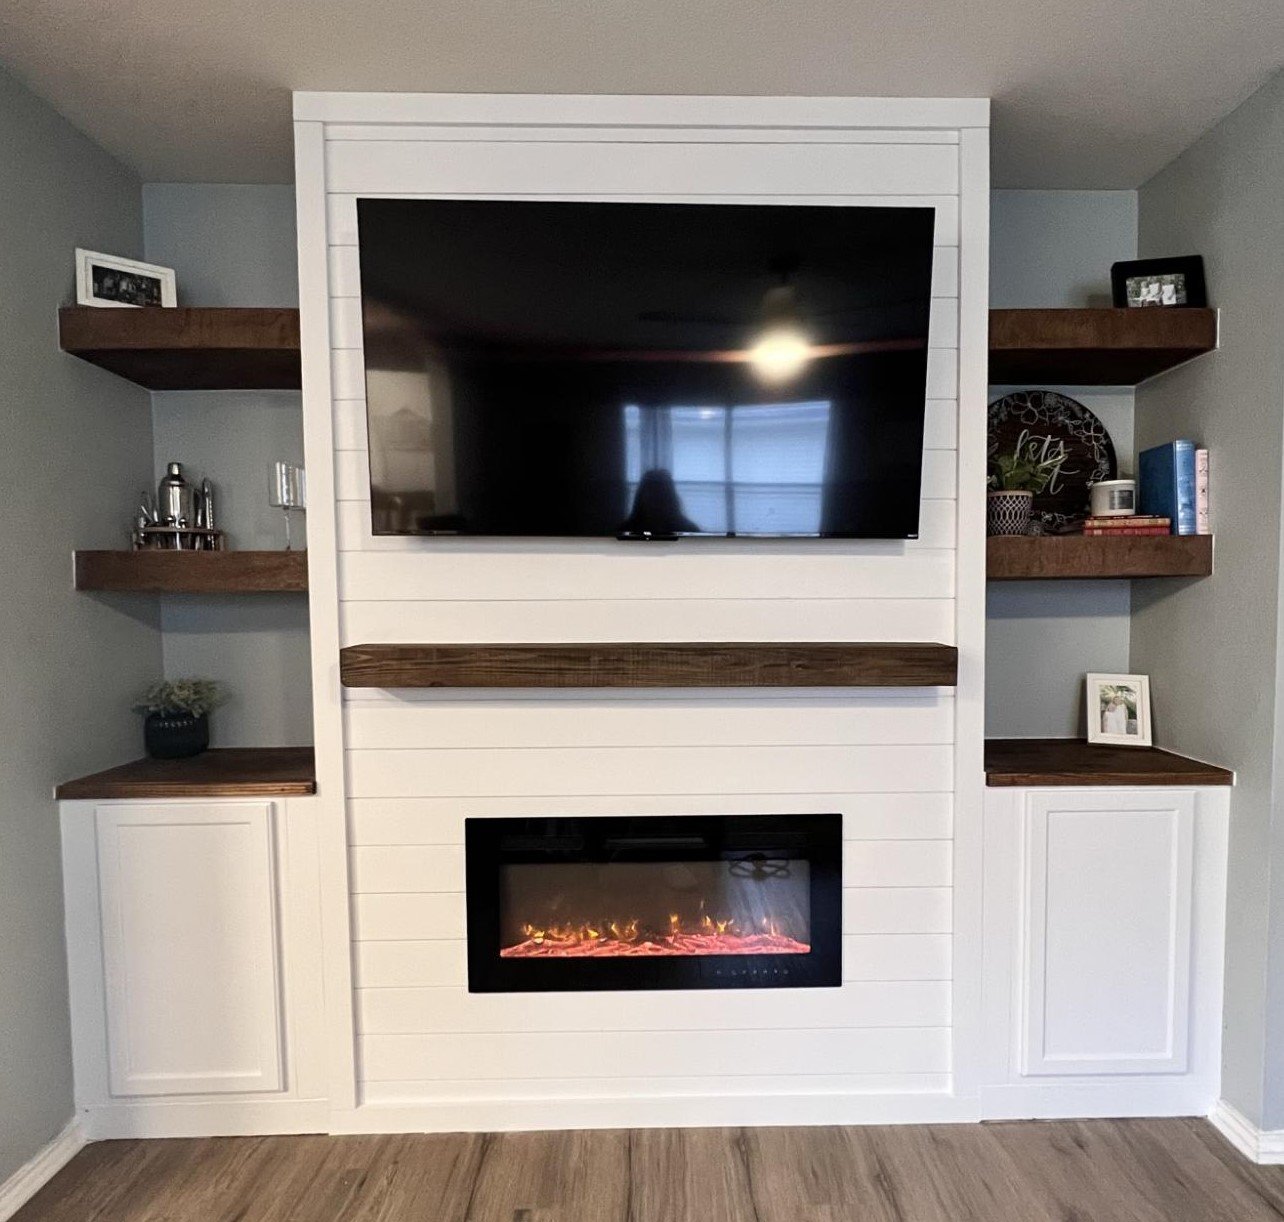
We did the Easiest Shiplap Fireplace in a weekend, thanks to Ana’s plans. I convinced my husband to help me build this by upgrading to a 65” tv and adjusting the dimensions. We also built a shelf behind the tv to hold our receiver and Xbox that is hidden when the tv is in place. Ana’s tutorial was amazingly and gave us the confidence to finally build something that’s been on our list for 2 years!
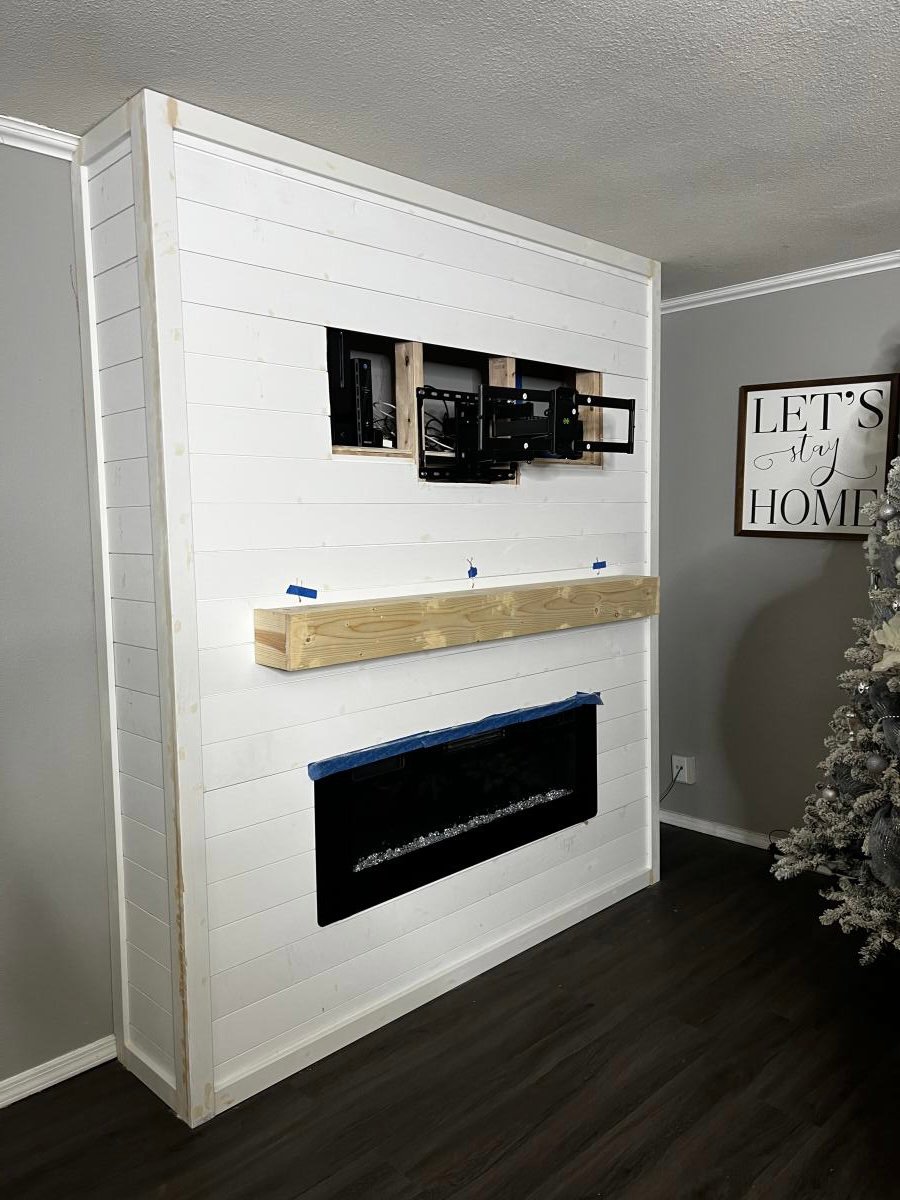
This project was fun to build with hubby said the shopping list and the cut list was perfect! Love all your designs! King bed is next!
Fri, 04/28/2023 - 09:15
Very well done, thank you for sharing your beautiful space and build!
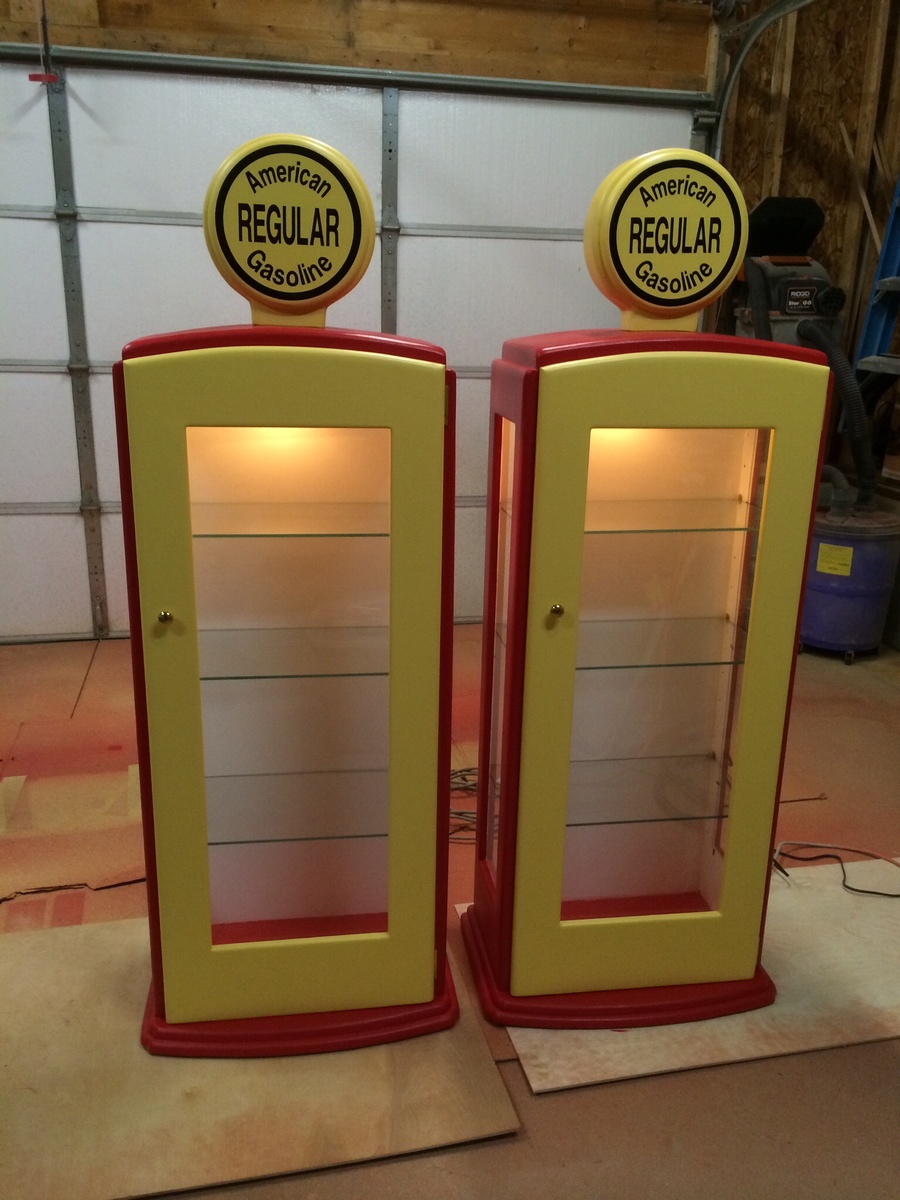
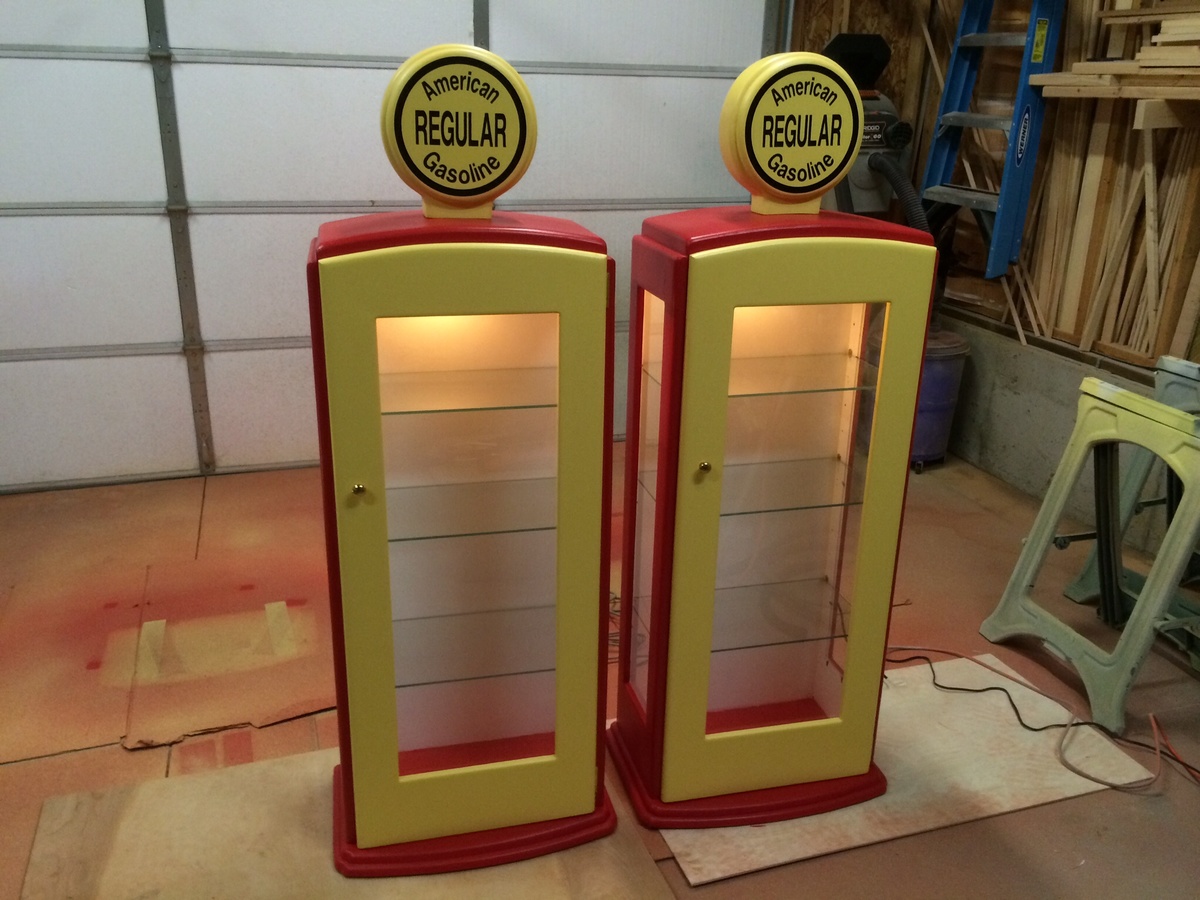
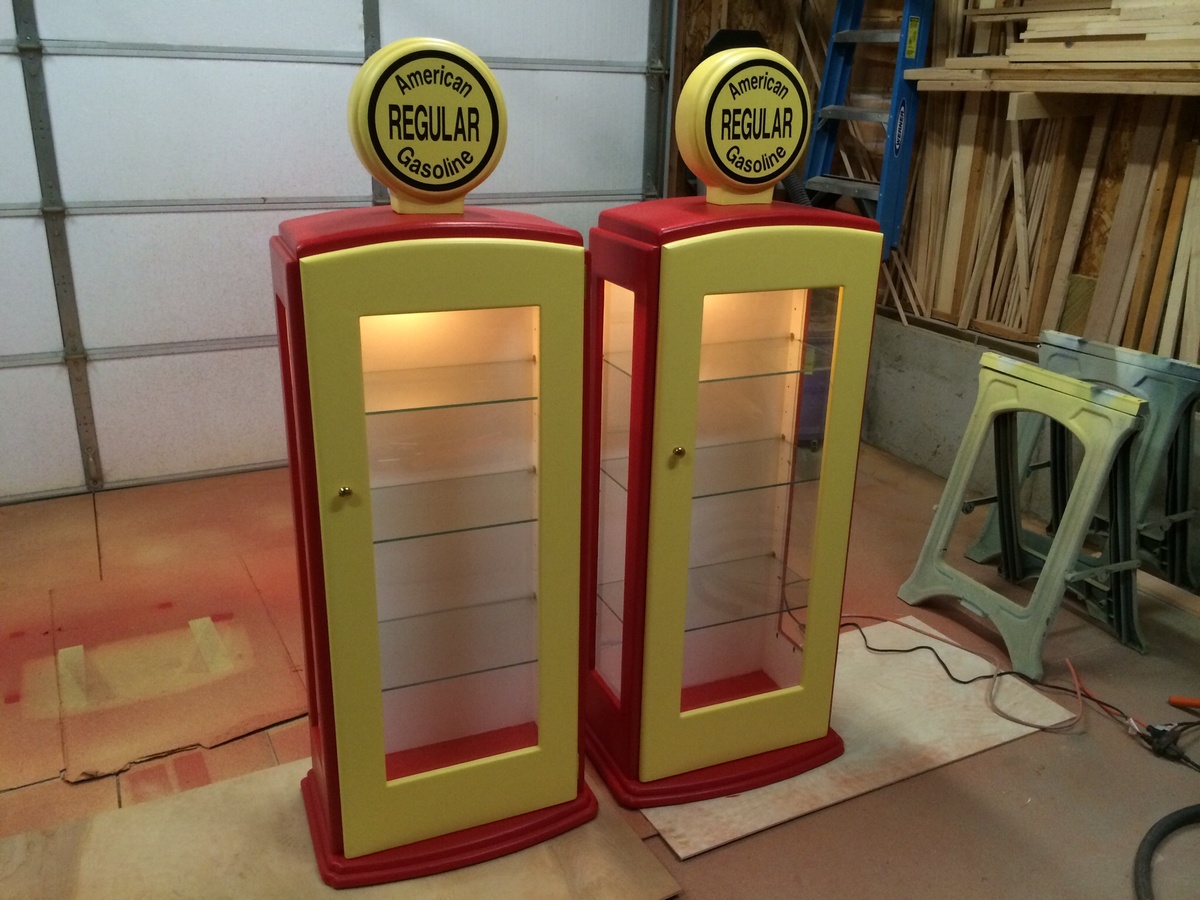
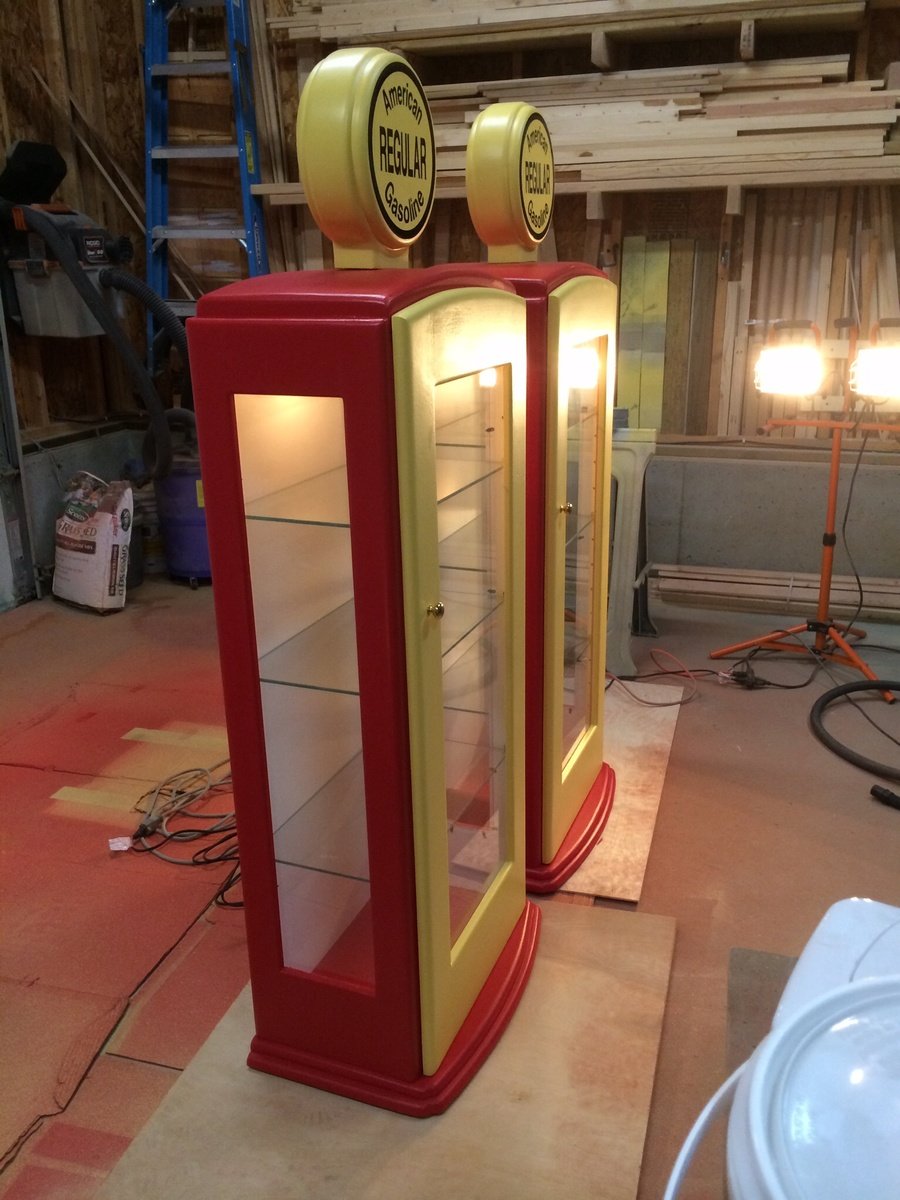
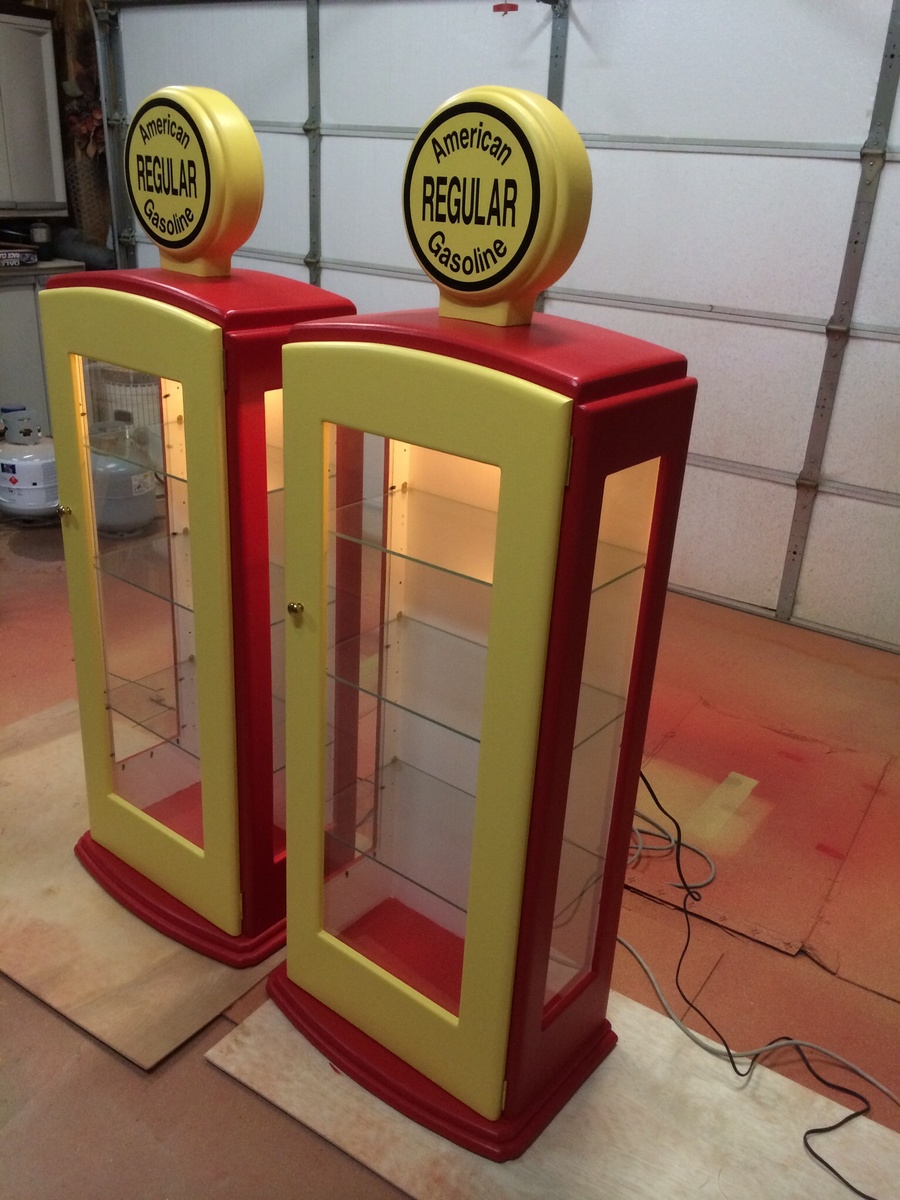
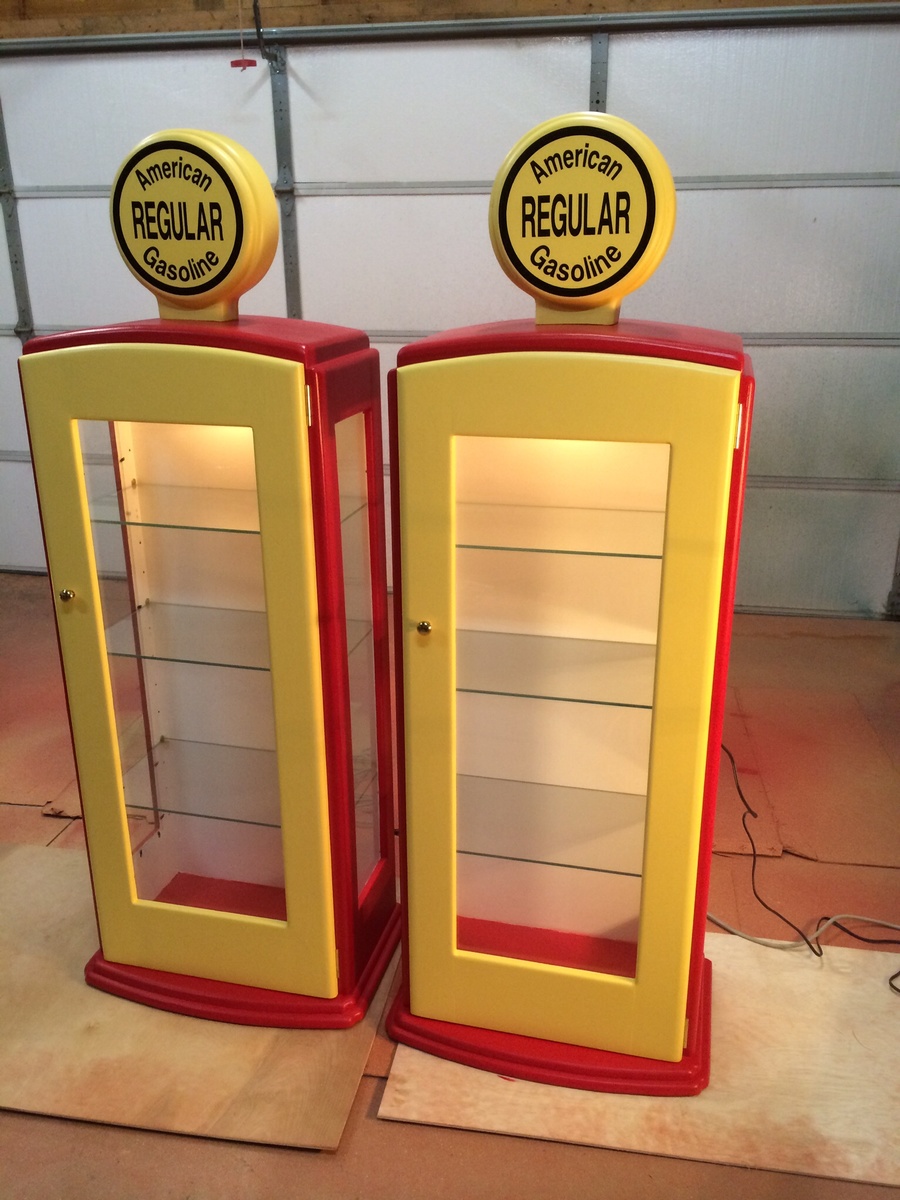
Theses cabinets were built for a customer from plans they had found online. The hardware was ordered with the plans for an extra expense and the glass was made to order. Hope you enjoy them thanks for looking.
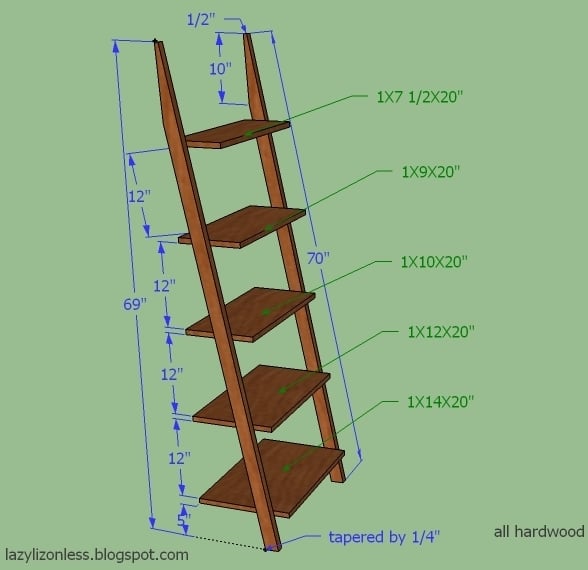
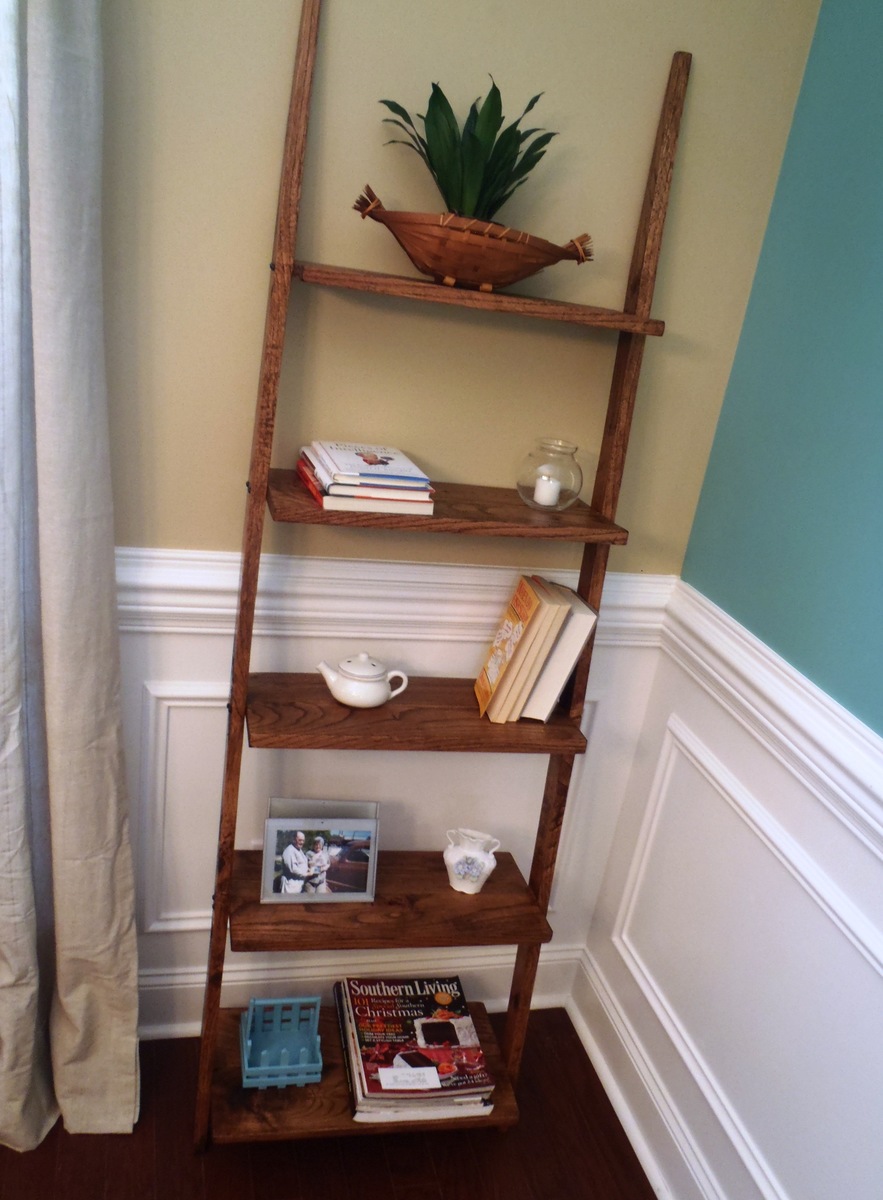
Since I used hardwood (red oak) I have to modify the plan and eliminate the sides of the shelves. Modifications and measurement is on the additional photo. Thanks again Ana, you're the best!


In reply to Well, those are just by birdsandsoap
Fri, 05/11/2012 - 08:22
..and very very easy to build:)
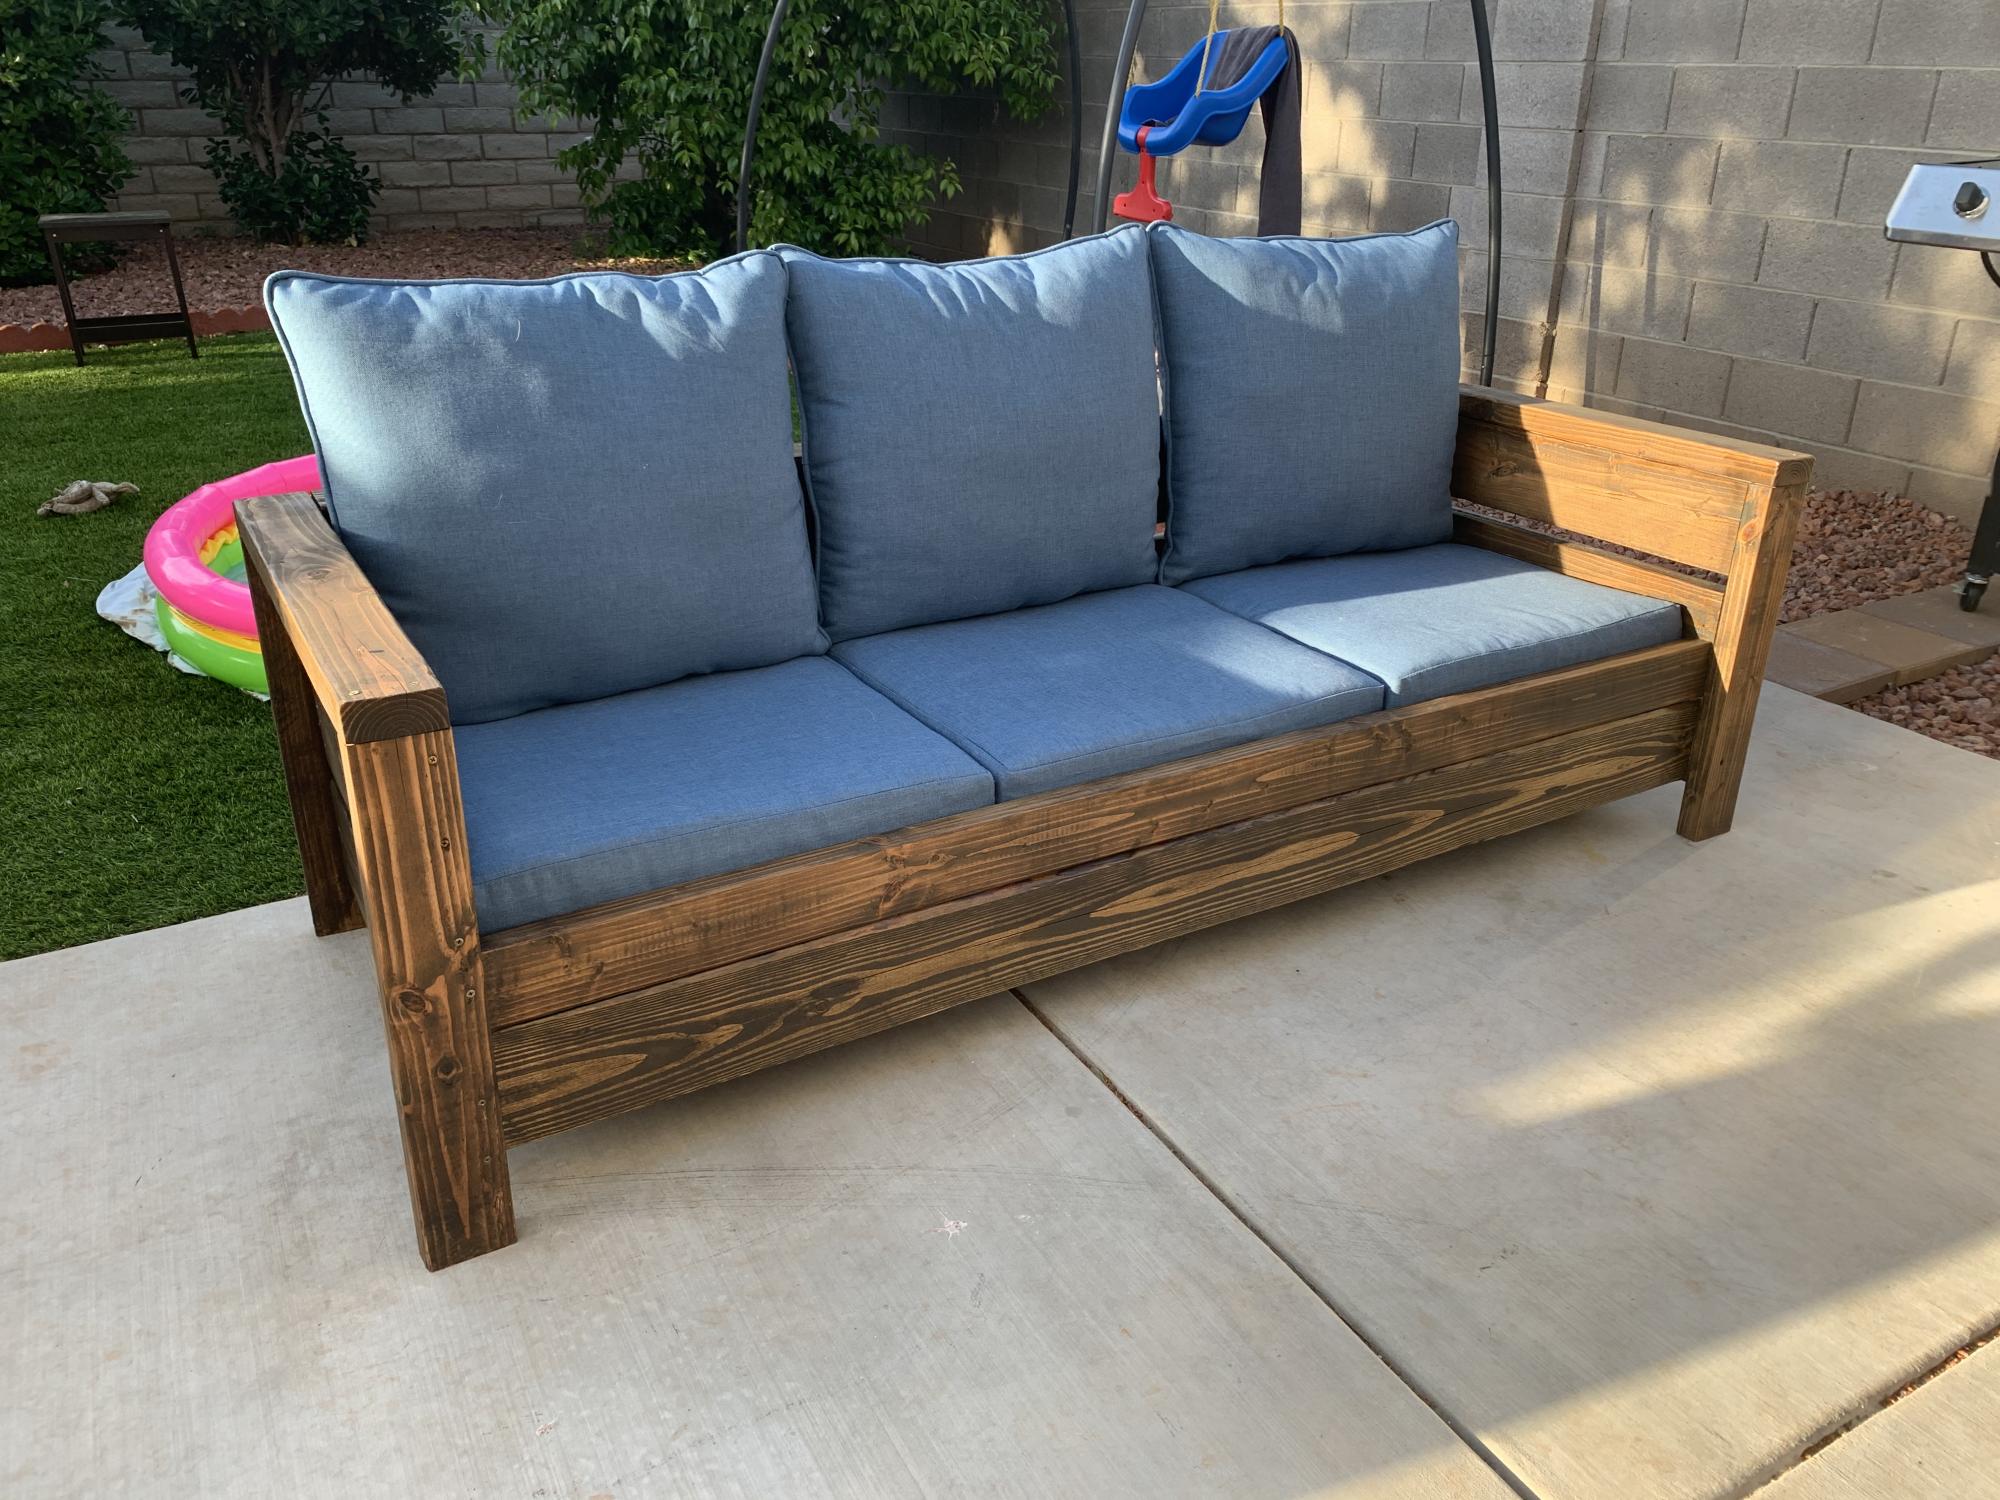
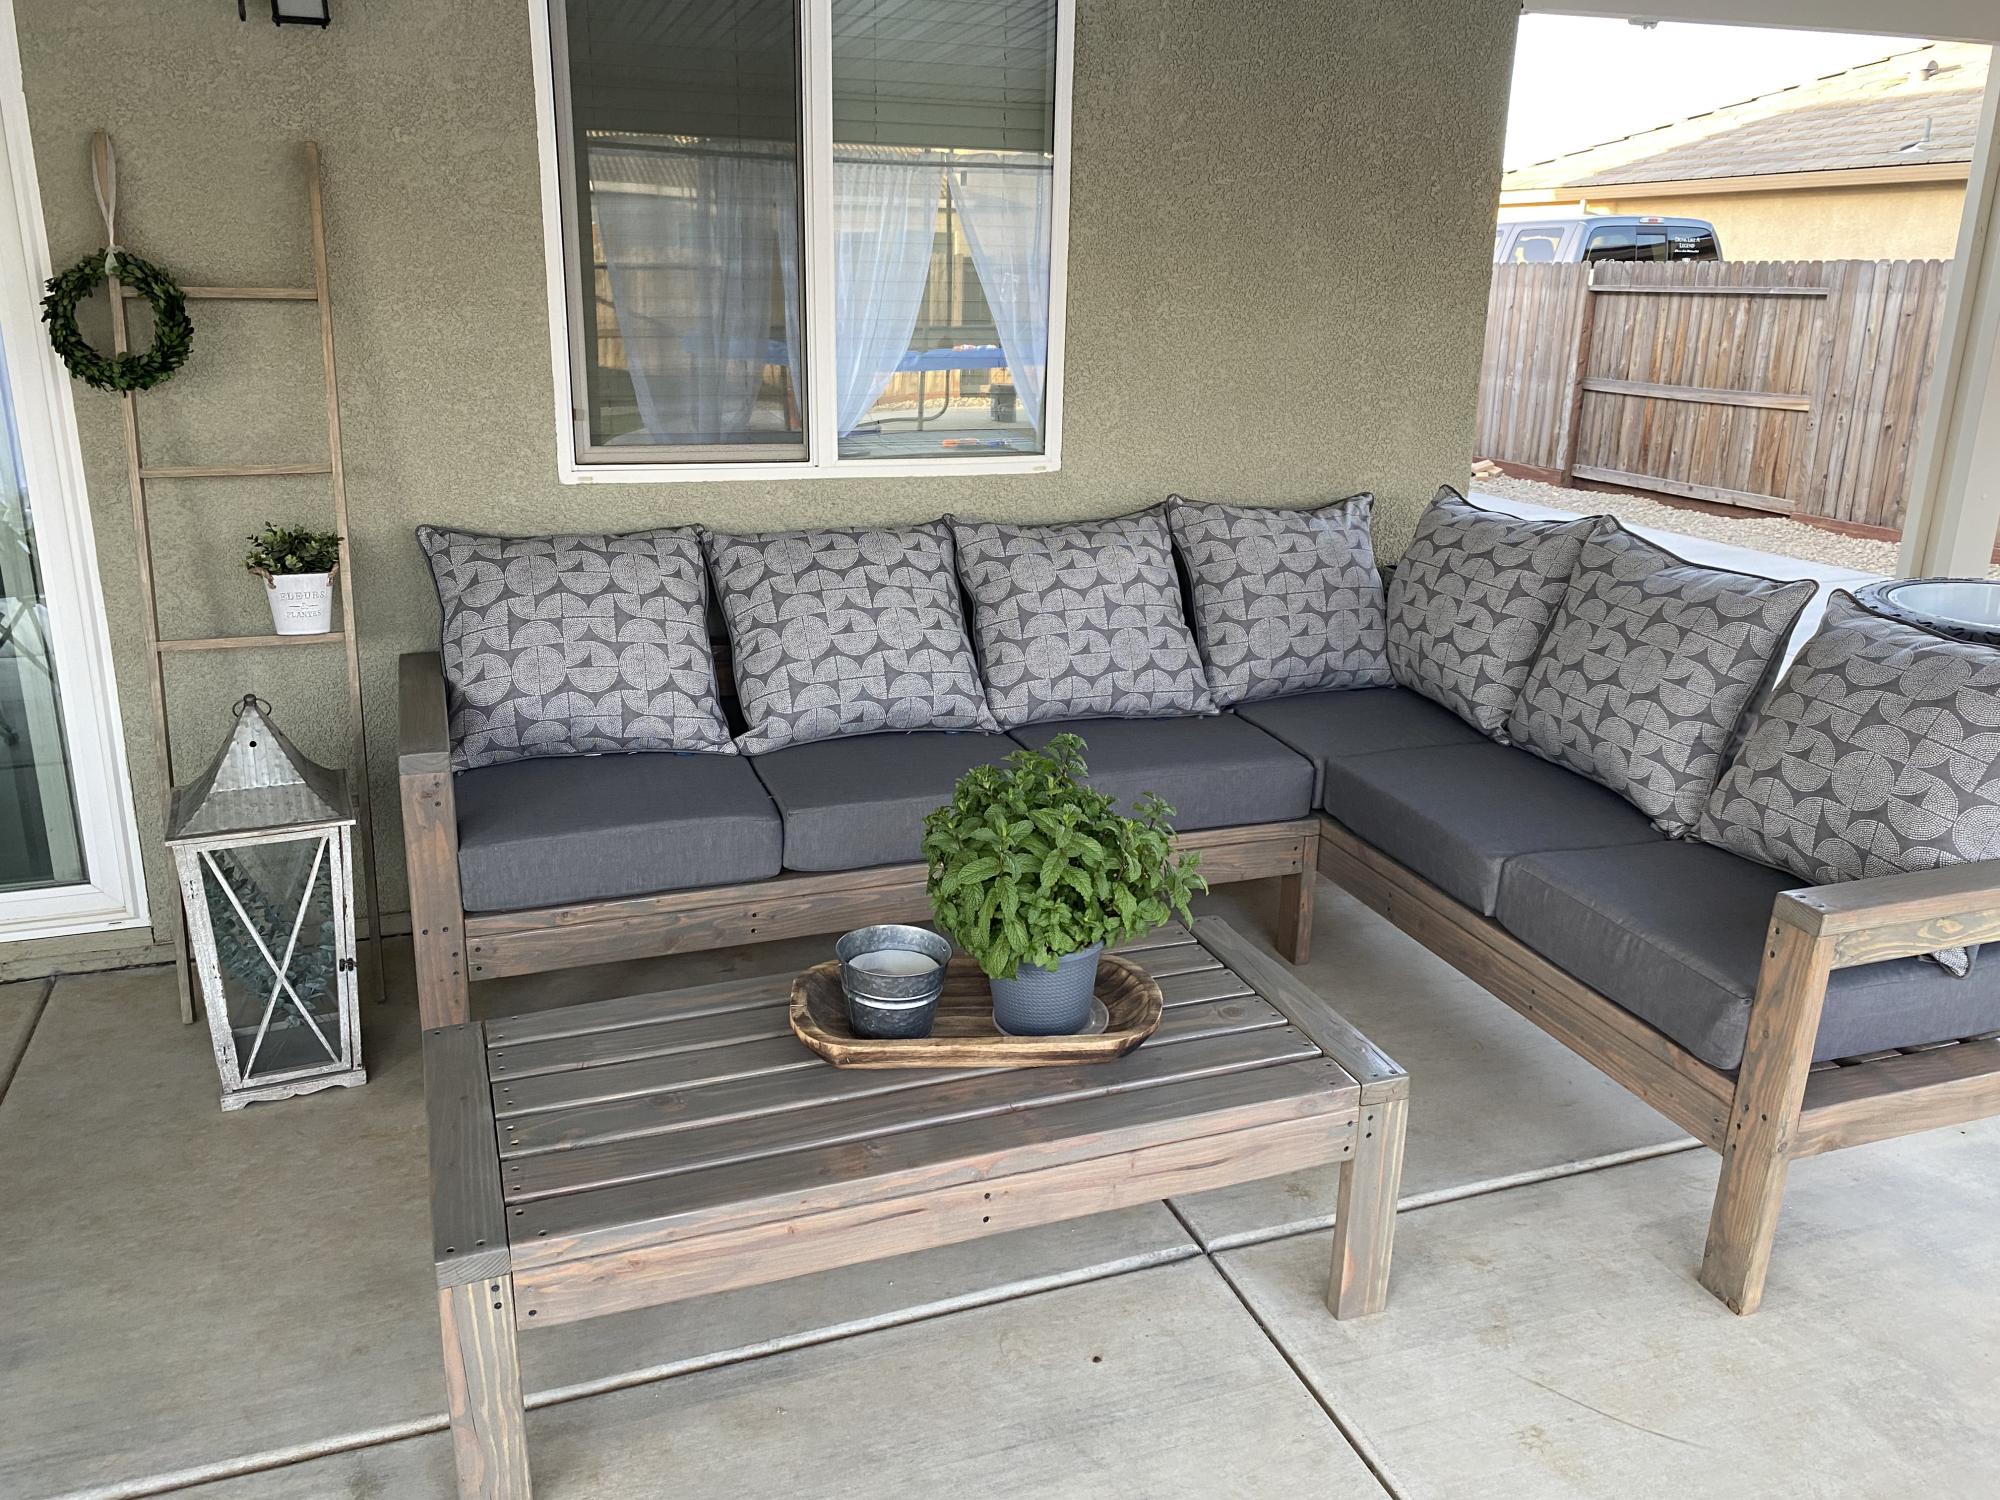
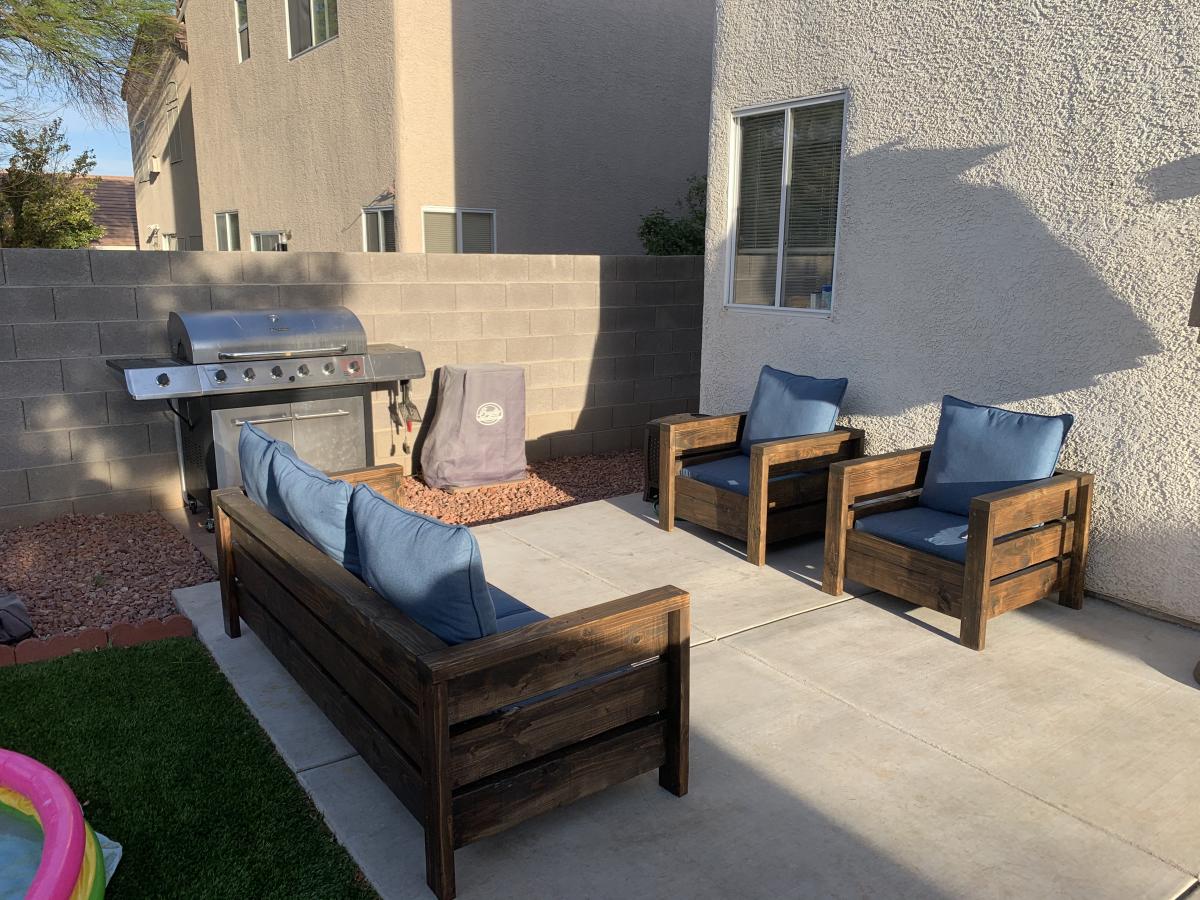
I used the Modern Outdoor Chair from 2x4s and 2x6s plans and slightly modified then to make a 3 seater couch. My cushions(most expensive part) were 24 in x 24 in and purchased from Lowes for $40 per seat. The couch is 79 inches in total length. I also dropped the seat down to the lower level to allow more room for my cushion backs to sit further down into the seat.
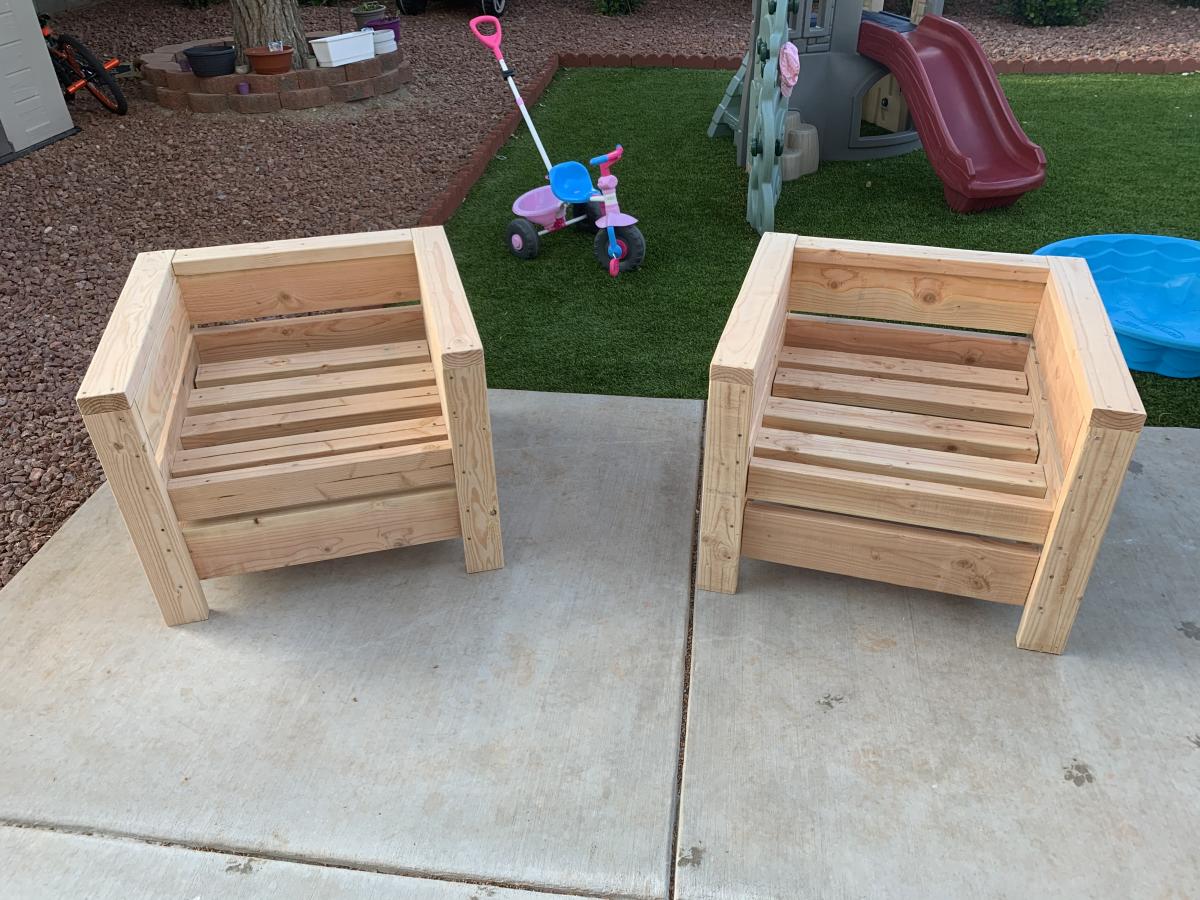

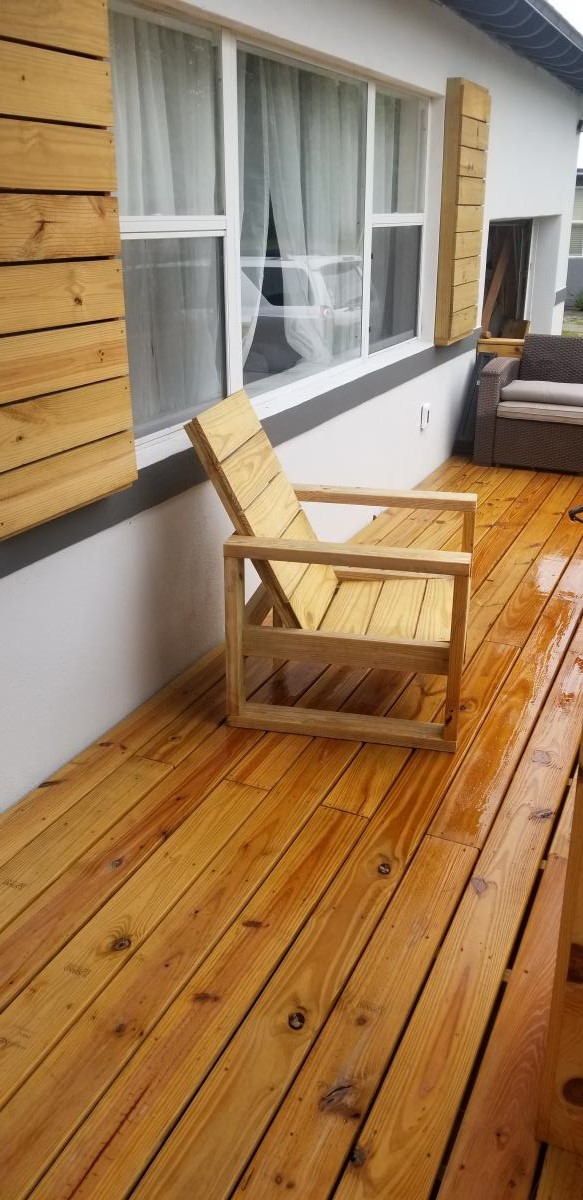
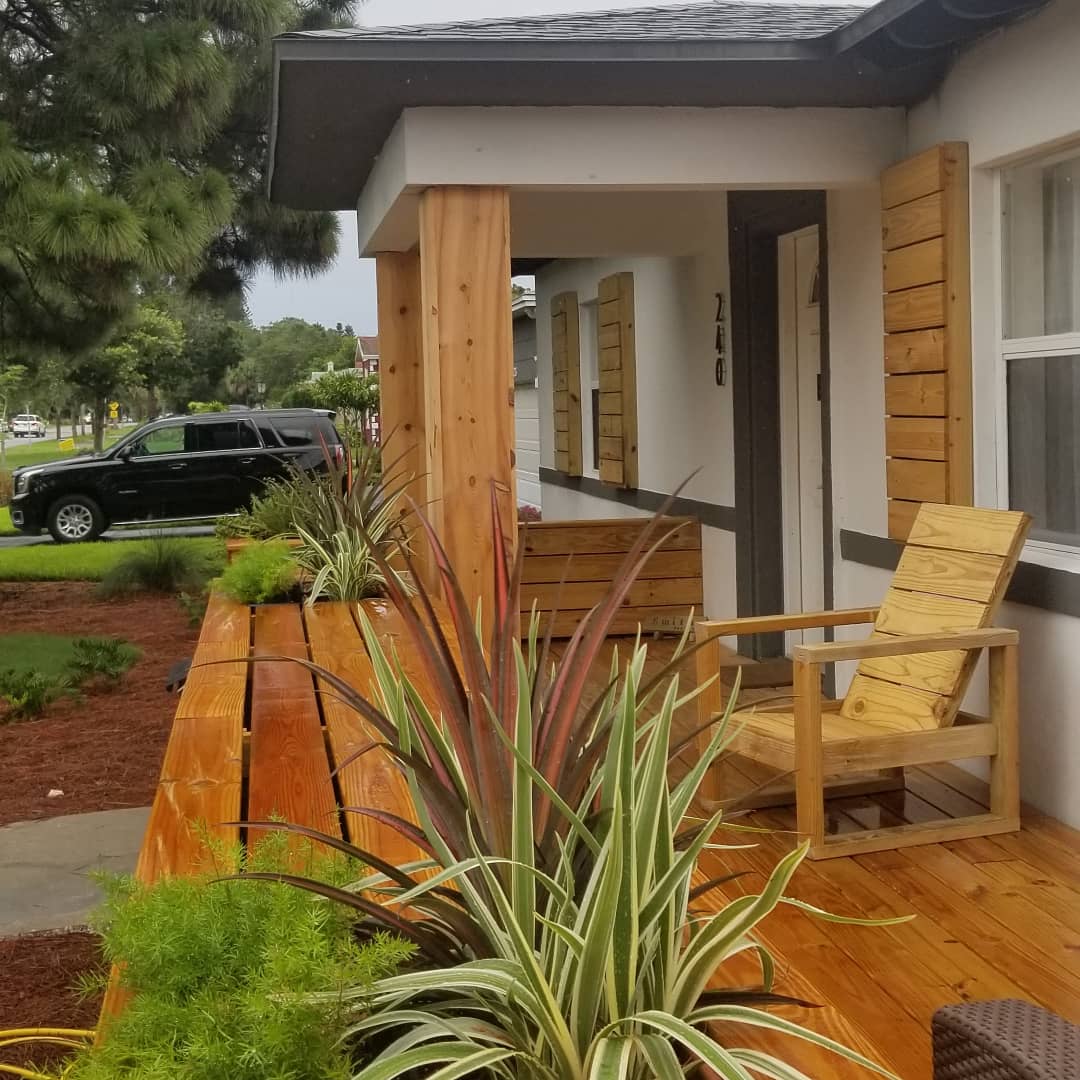
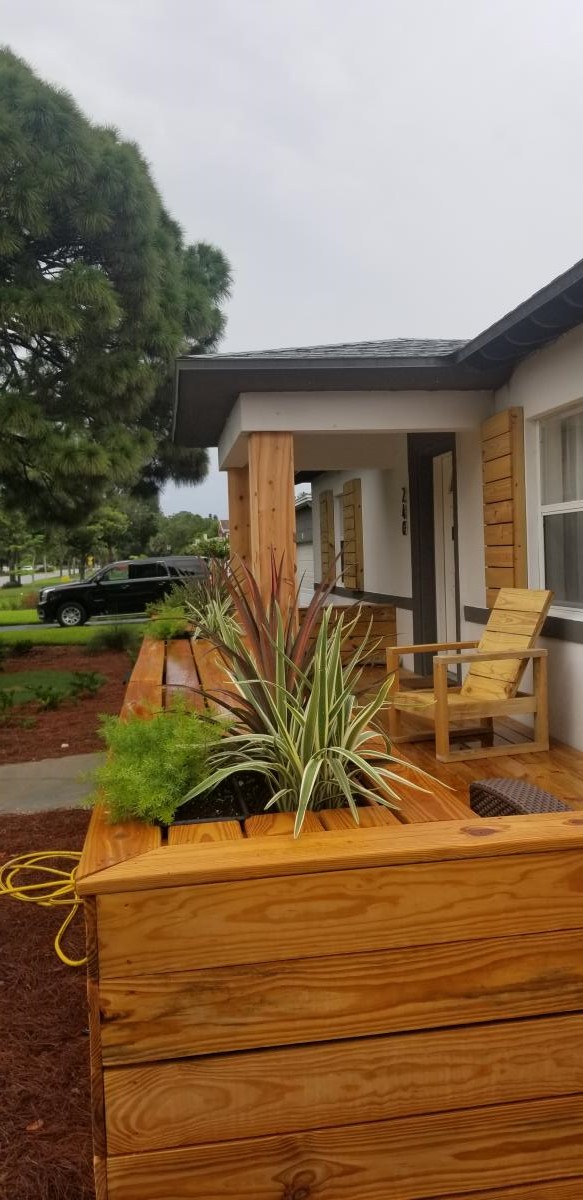
I built a set of these chairs based on Ana's simple modern outdoor chair. I wanted it to match my front porch which I built a few weeks ago. Thank you for the plans.

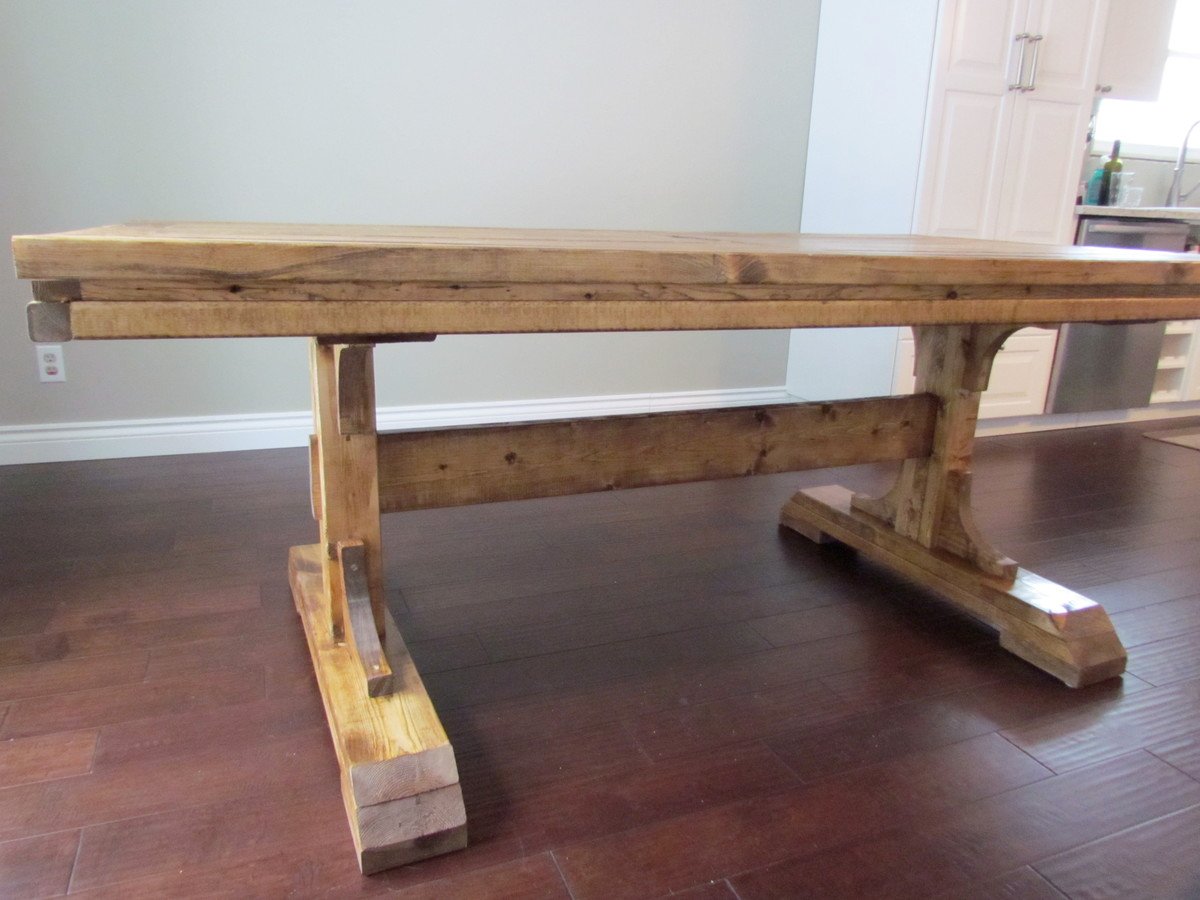
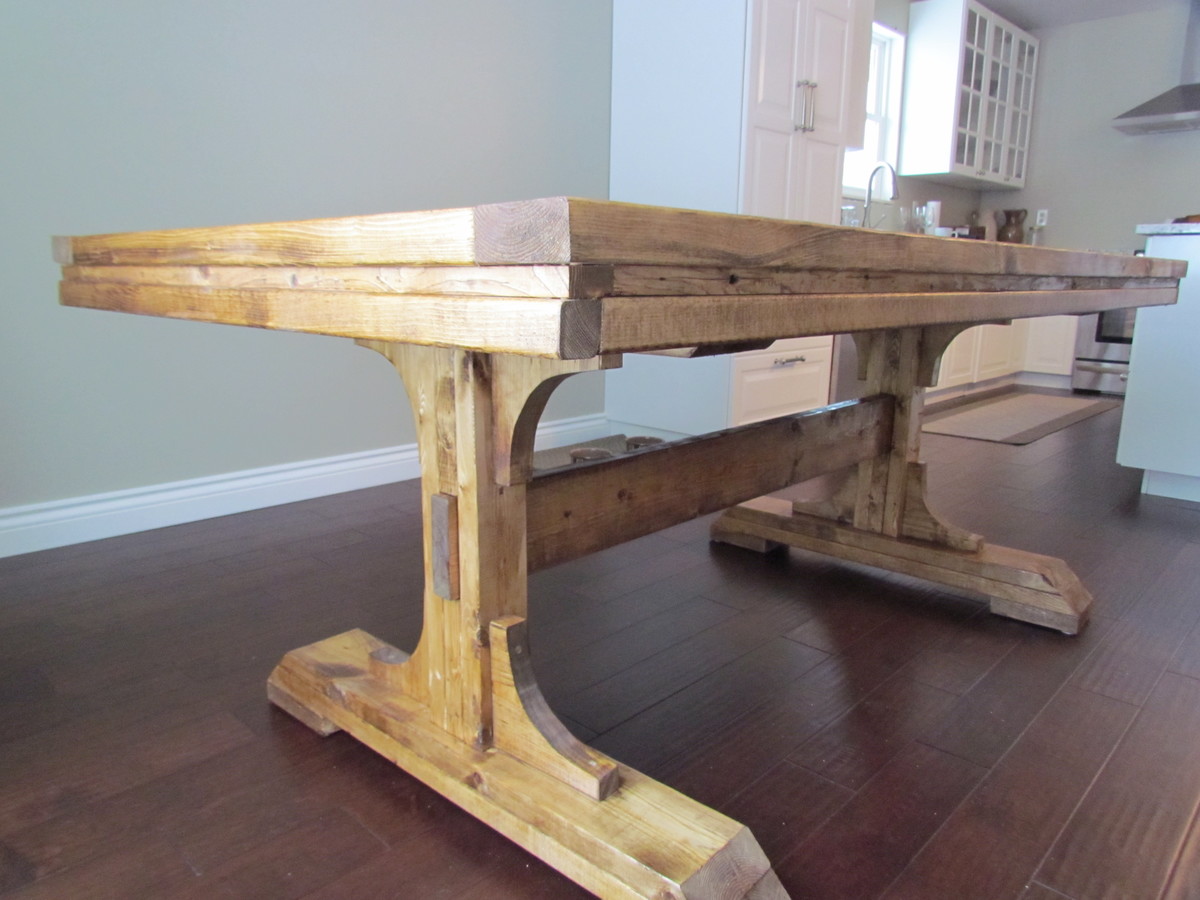
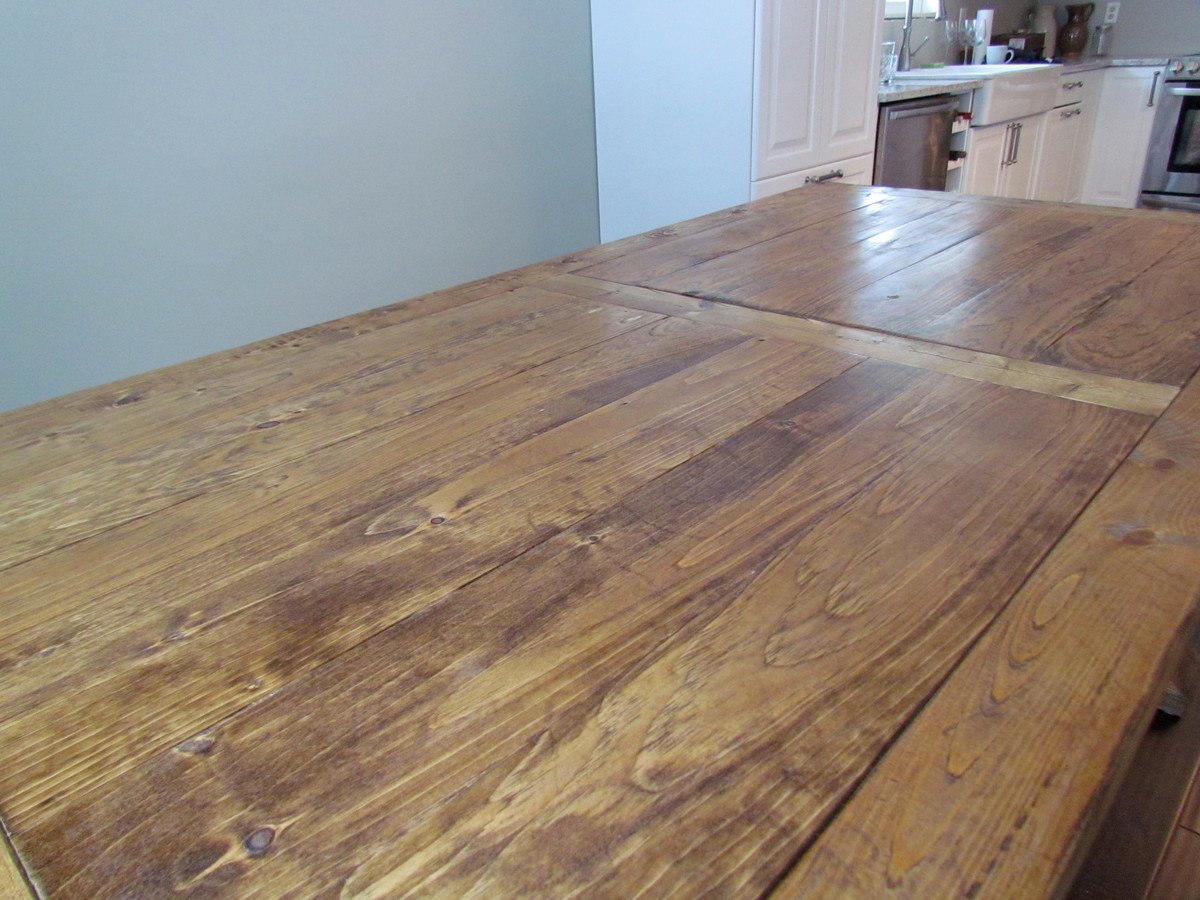
My hubby took the plans from the Triple Pedestal Farmhouse Table and altered it to make it just over six feet. It is perfect and accommodates our smaller dining area space.


Fri, 02/15/2013 - 07:23
hi! could u post/share how he altered this from the larger plan? love it!
Wed, 10/09/2013 - 10:09
I love this. I planned on reducing mine to 6 feet. Do you have the altered plans? Thanks.
Wed, 10/09/2013 - 10:14
Hi. I went to martha.anna blog. This is the comment she posted on the dimensions.
From martha.anna:
I've had many emails and inquiries about the dimensions of this table. So, here's what I've been sharing with everyone...
Our dining room is 11 x 10 and there is a lot of room around it to fit in a hutch and still walk around easily. (Just for size reference.)
The overall length of the table is 6' 4.5". It is such an odd measurement so that the strips of board (1x6) on the tabletop would look in proportion. They are 33" long (the 1x6).
The beam across the bottom is 55.5" from outside edge to outside edge and my husband left 1/2" showing.
The pedestals are 10.5" from the end of the table.
Phew! I hope all of the information helps everyone out there! :)
Sat, 11/16/2013 - 09:27
Hi there what would the revised materials needed list be? Also did u notify the benches? Do u have the dimension on that? My step dad is building this for me it's my job to get plans and supplies. Thank you for your help I appreciate it!!
Mon, 01/13/2014 - 14:20
Oh my. After several months I'm able to get all the material needed to do this table. I did the legs a couple of months ago. Now it's time to complete the rest. Hopefully, I can do it in a day's time - hopefully :).
Fri, 01/12/2018 - 09:04
Ill be making this table whcih is in the same design as the original triple pedestal table but Ill be making it smaller. Are you able to give me the measurements for this modified table? Do I make my top first and then the pedestals? I feel like if I make the same pedestals, then Im forced to make this a 40" wide table, and I only want it about 35-37".
Thanks!
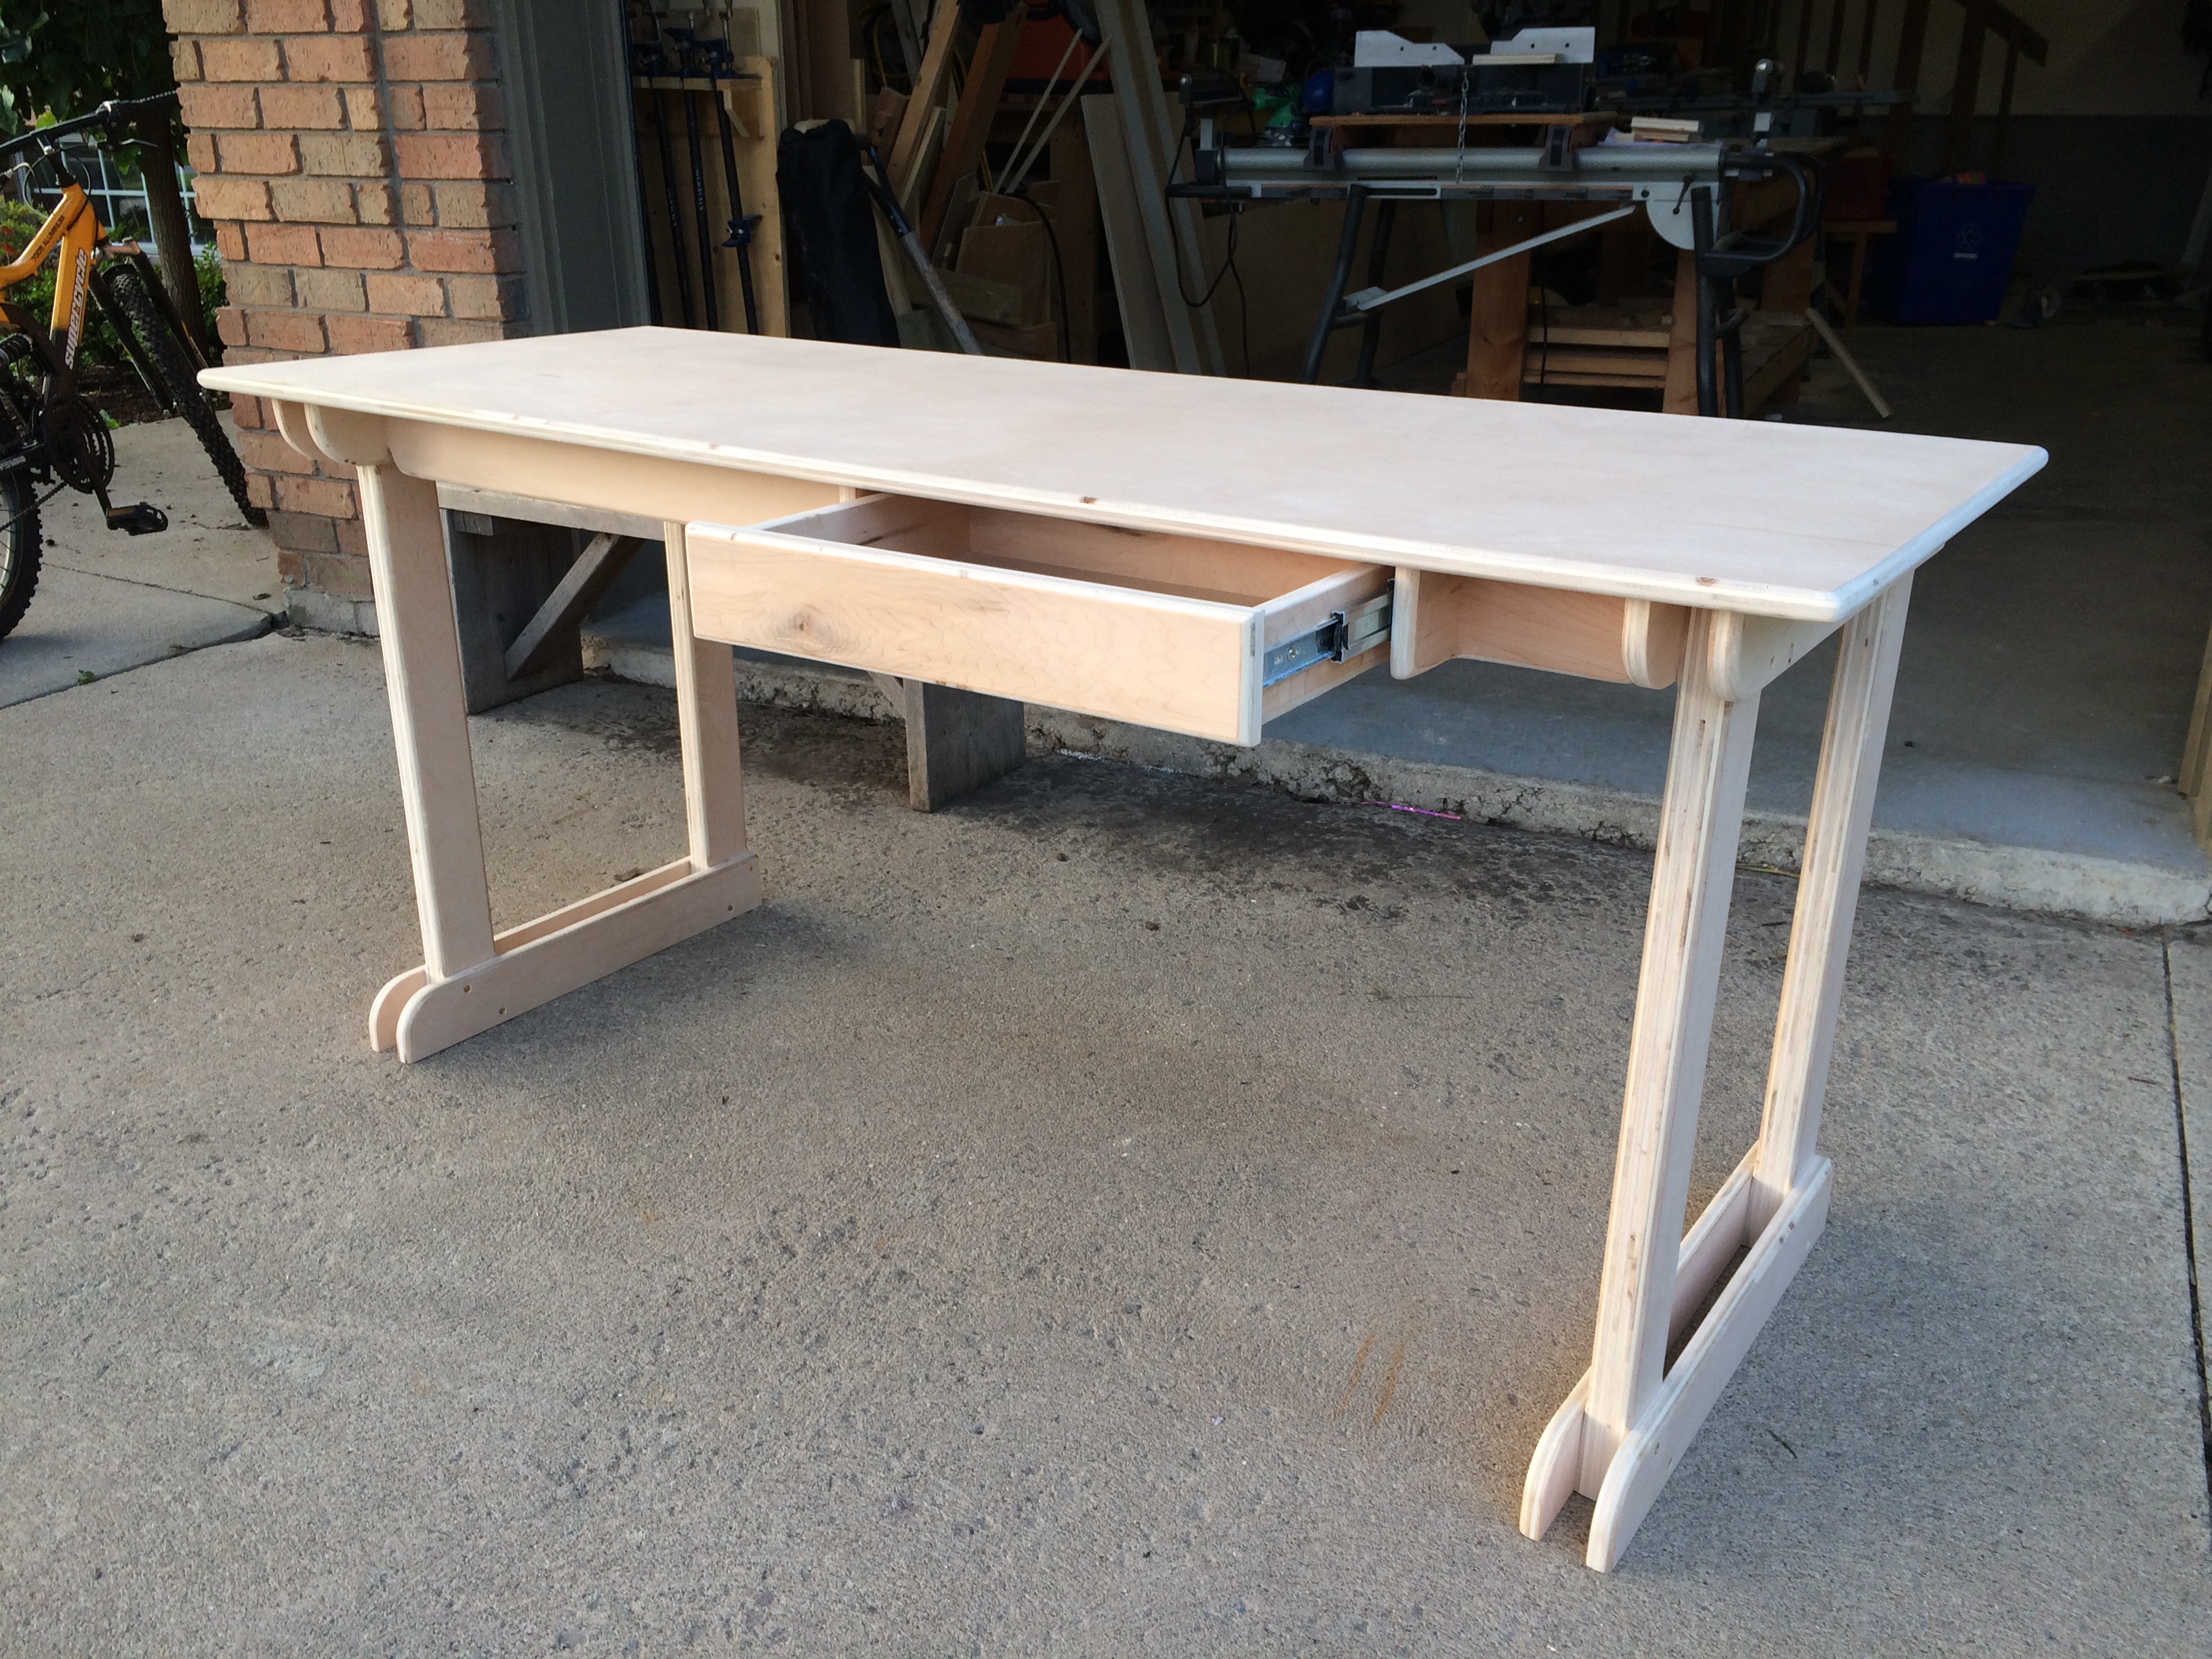
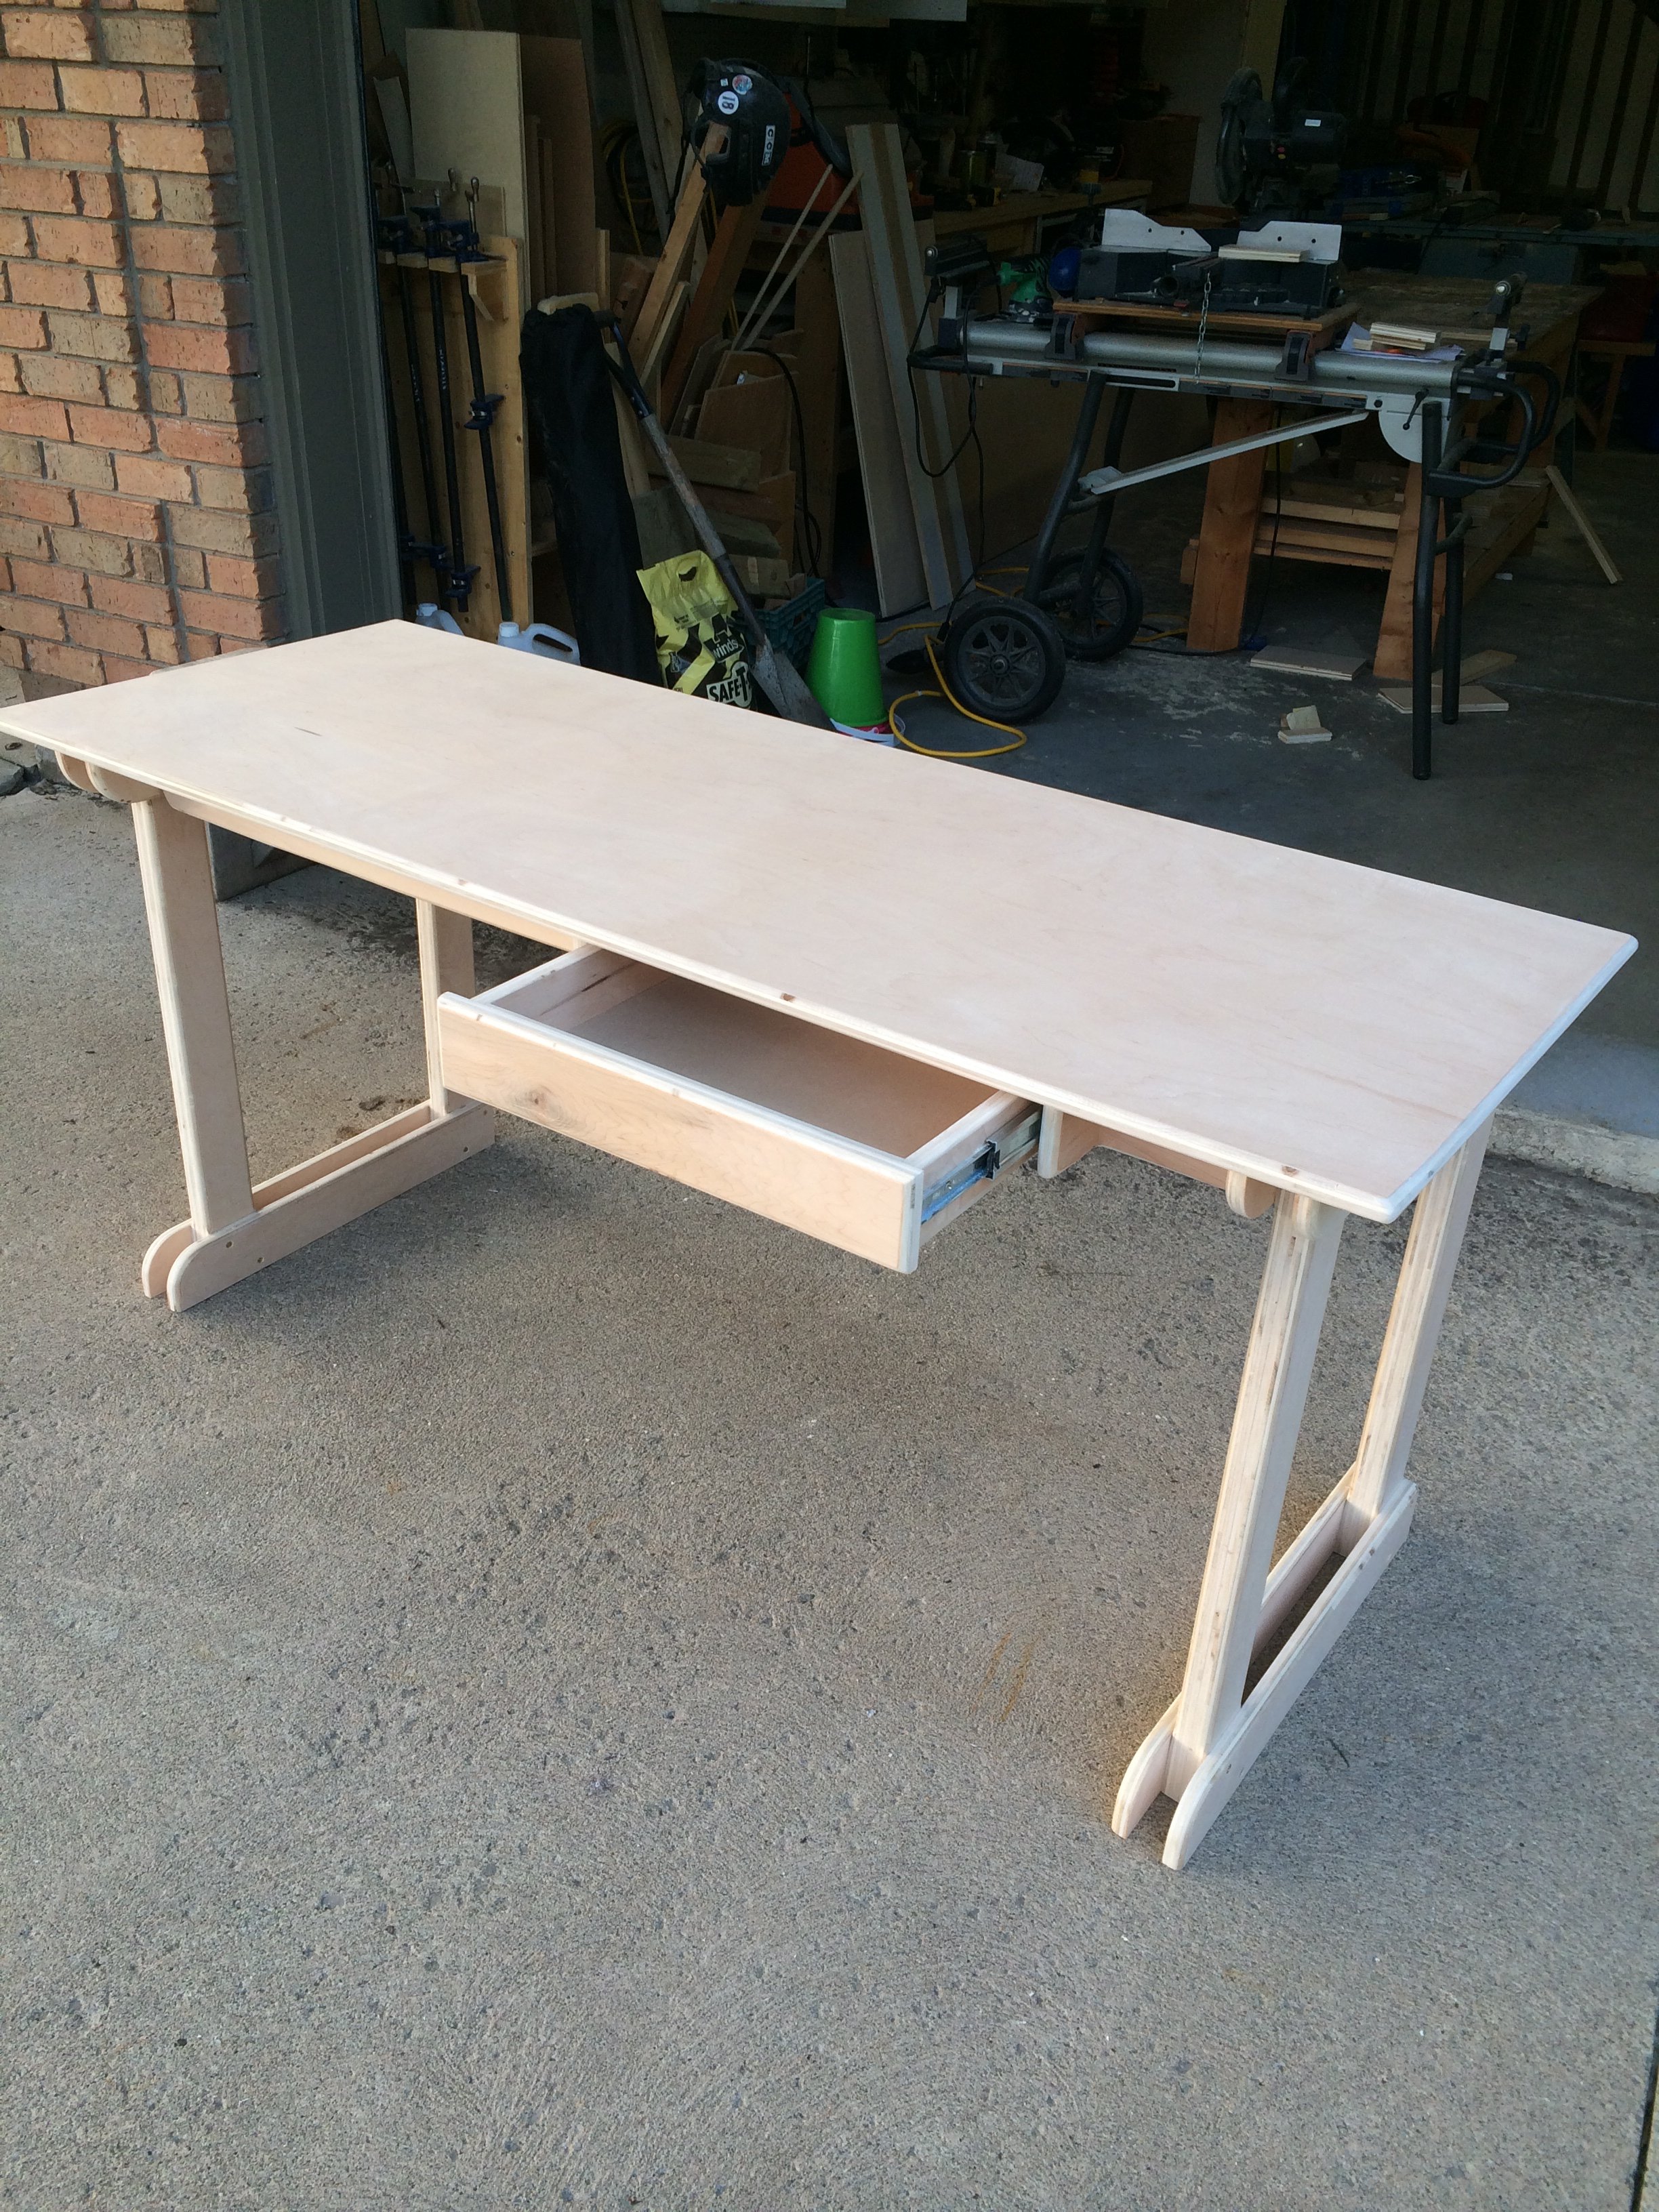
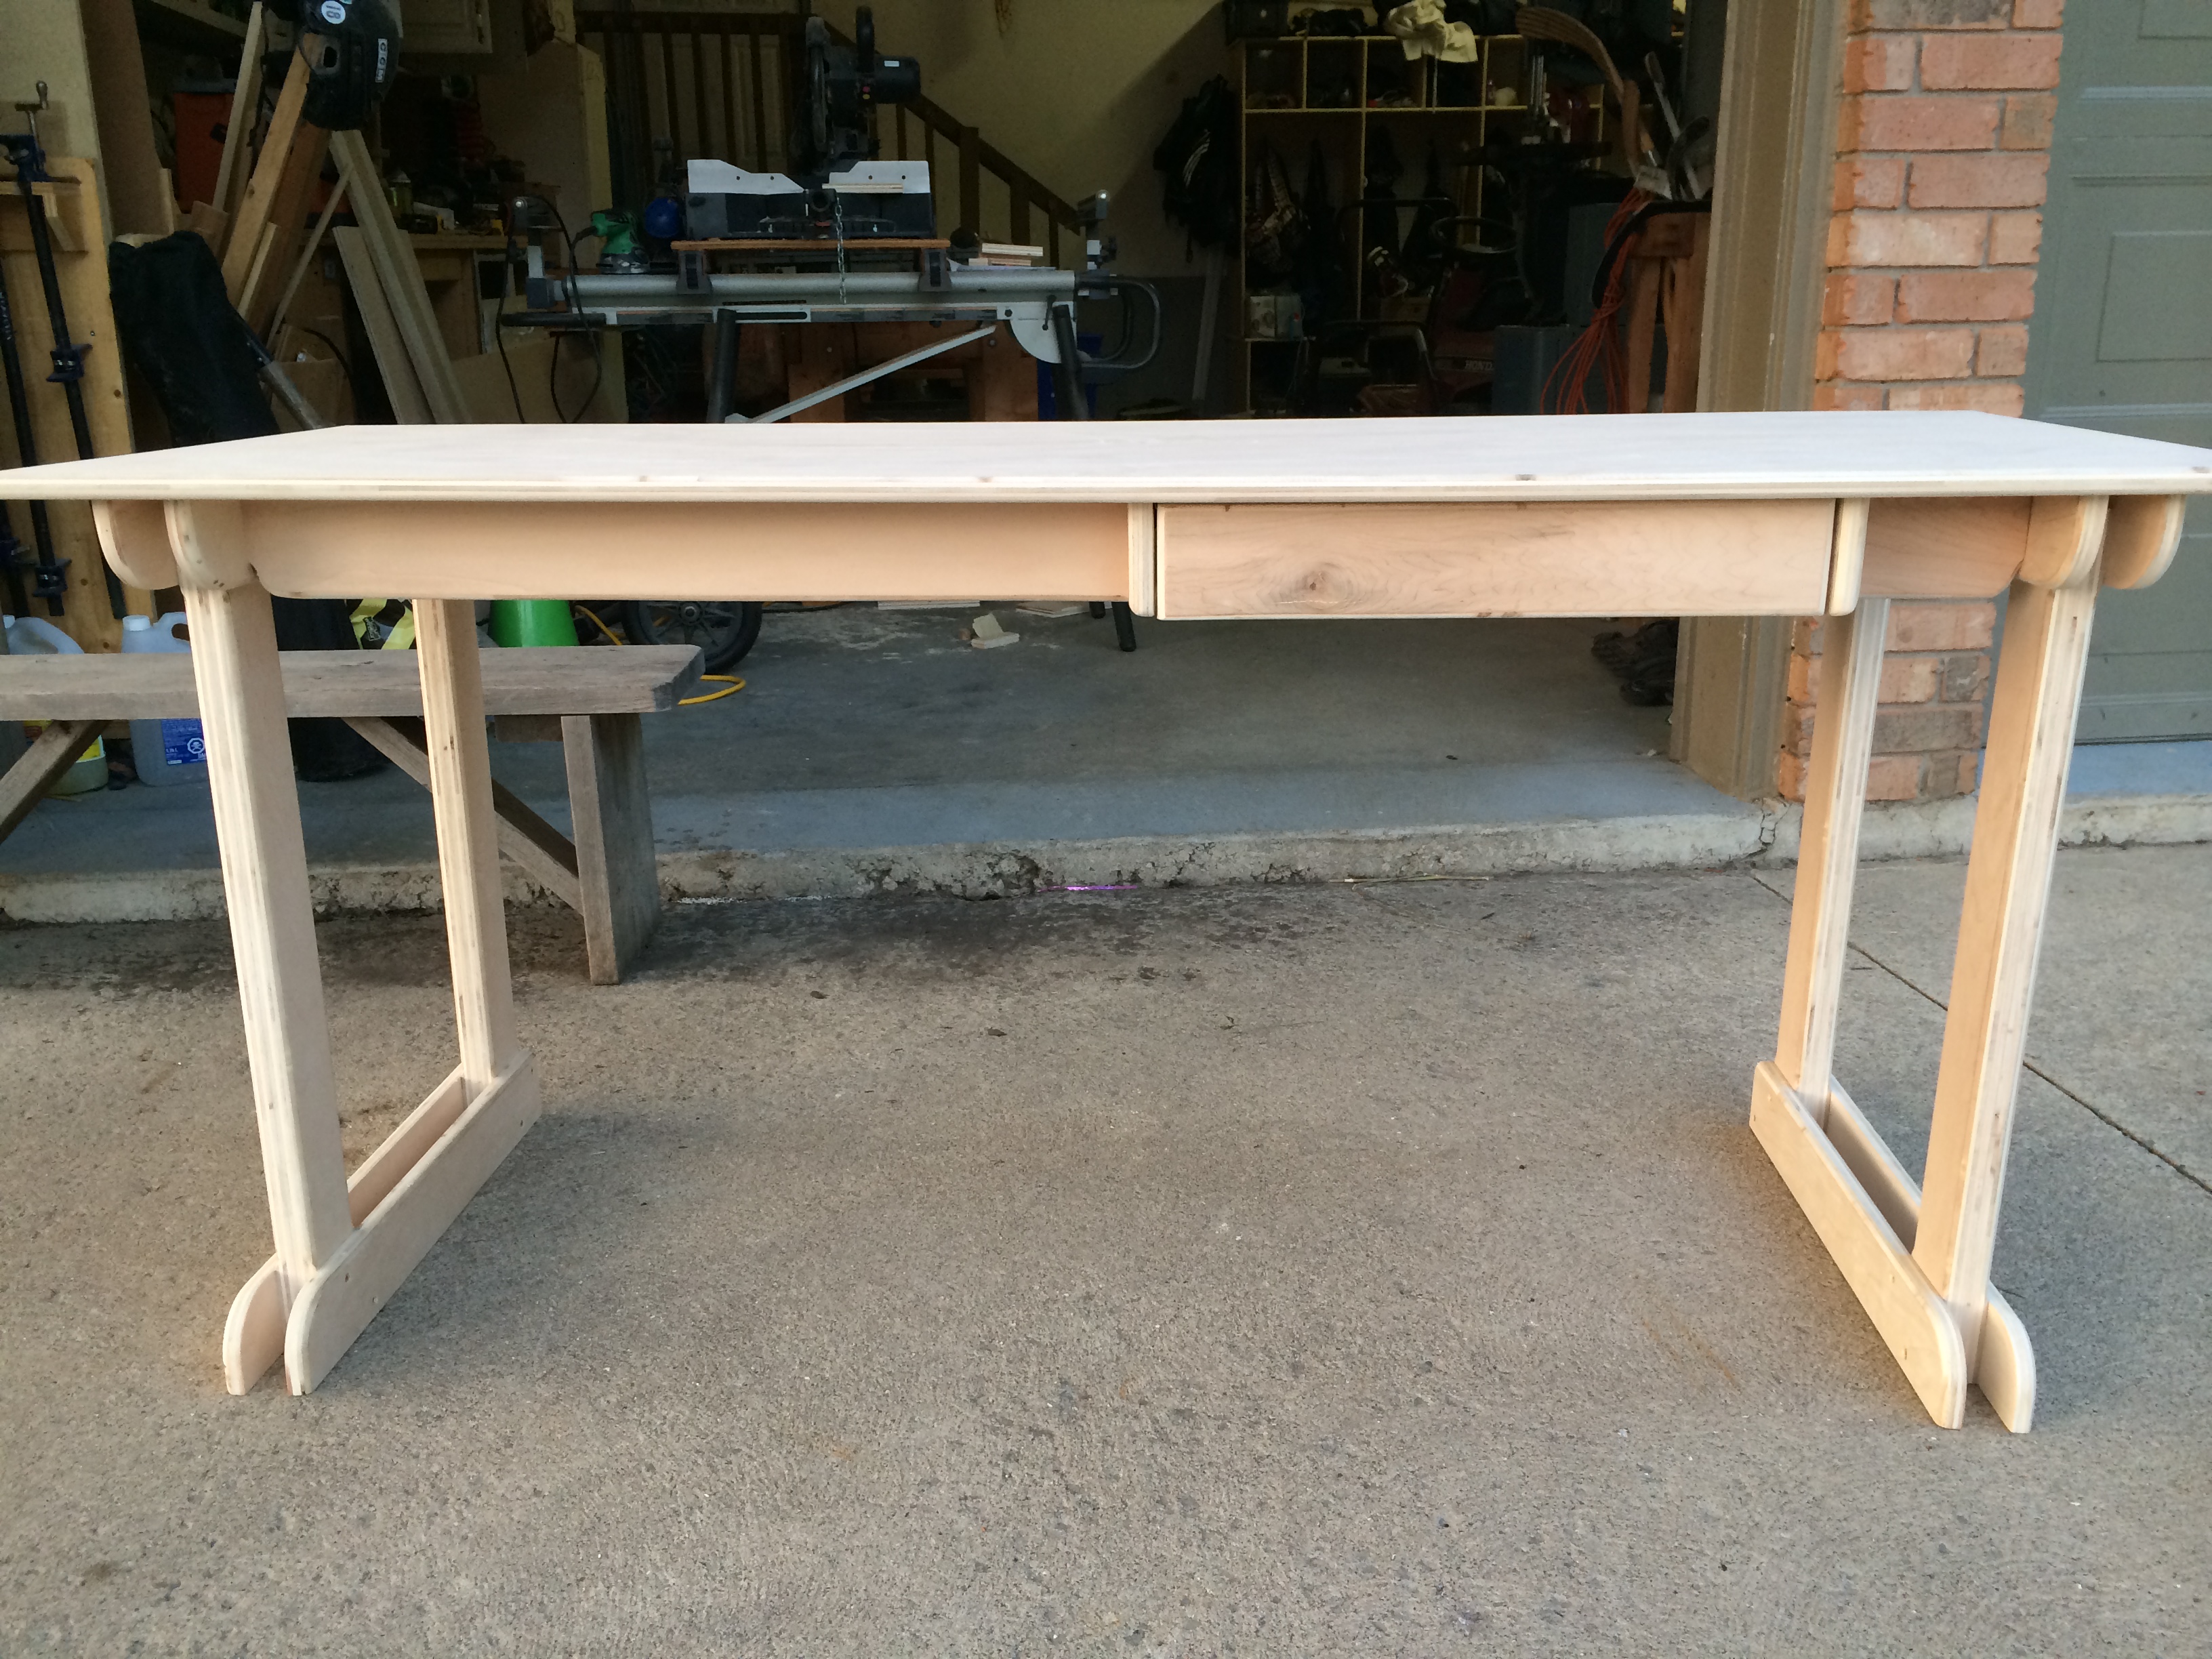
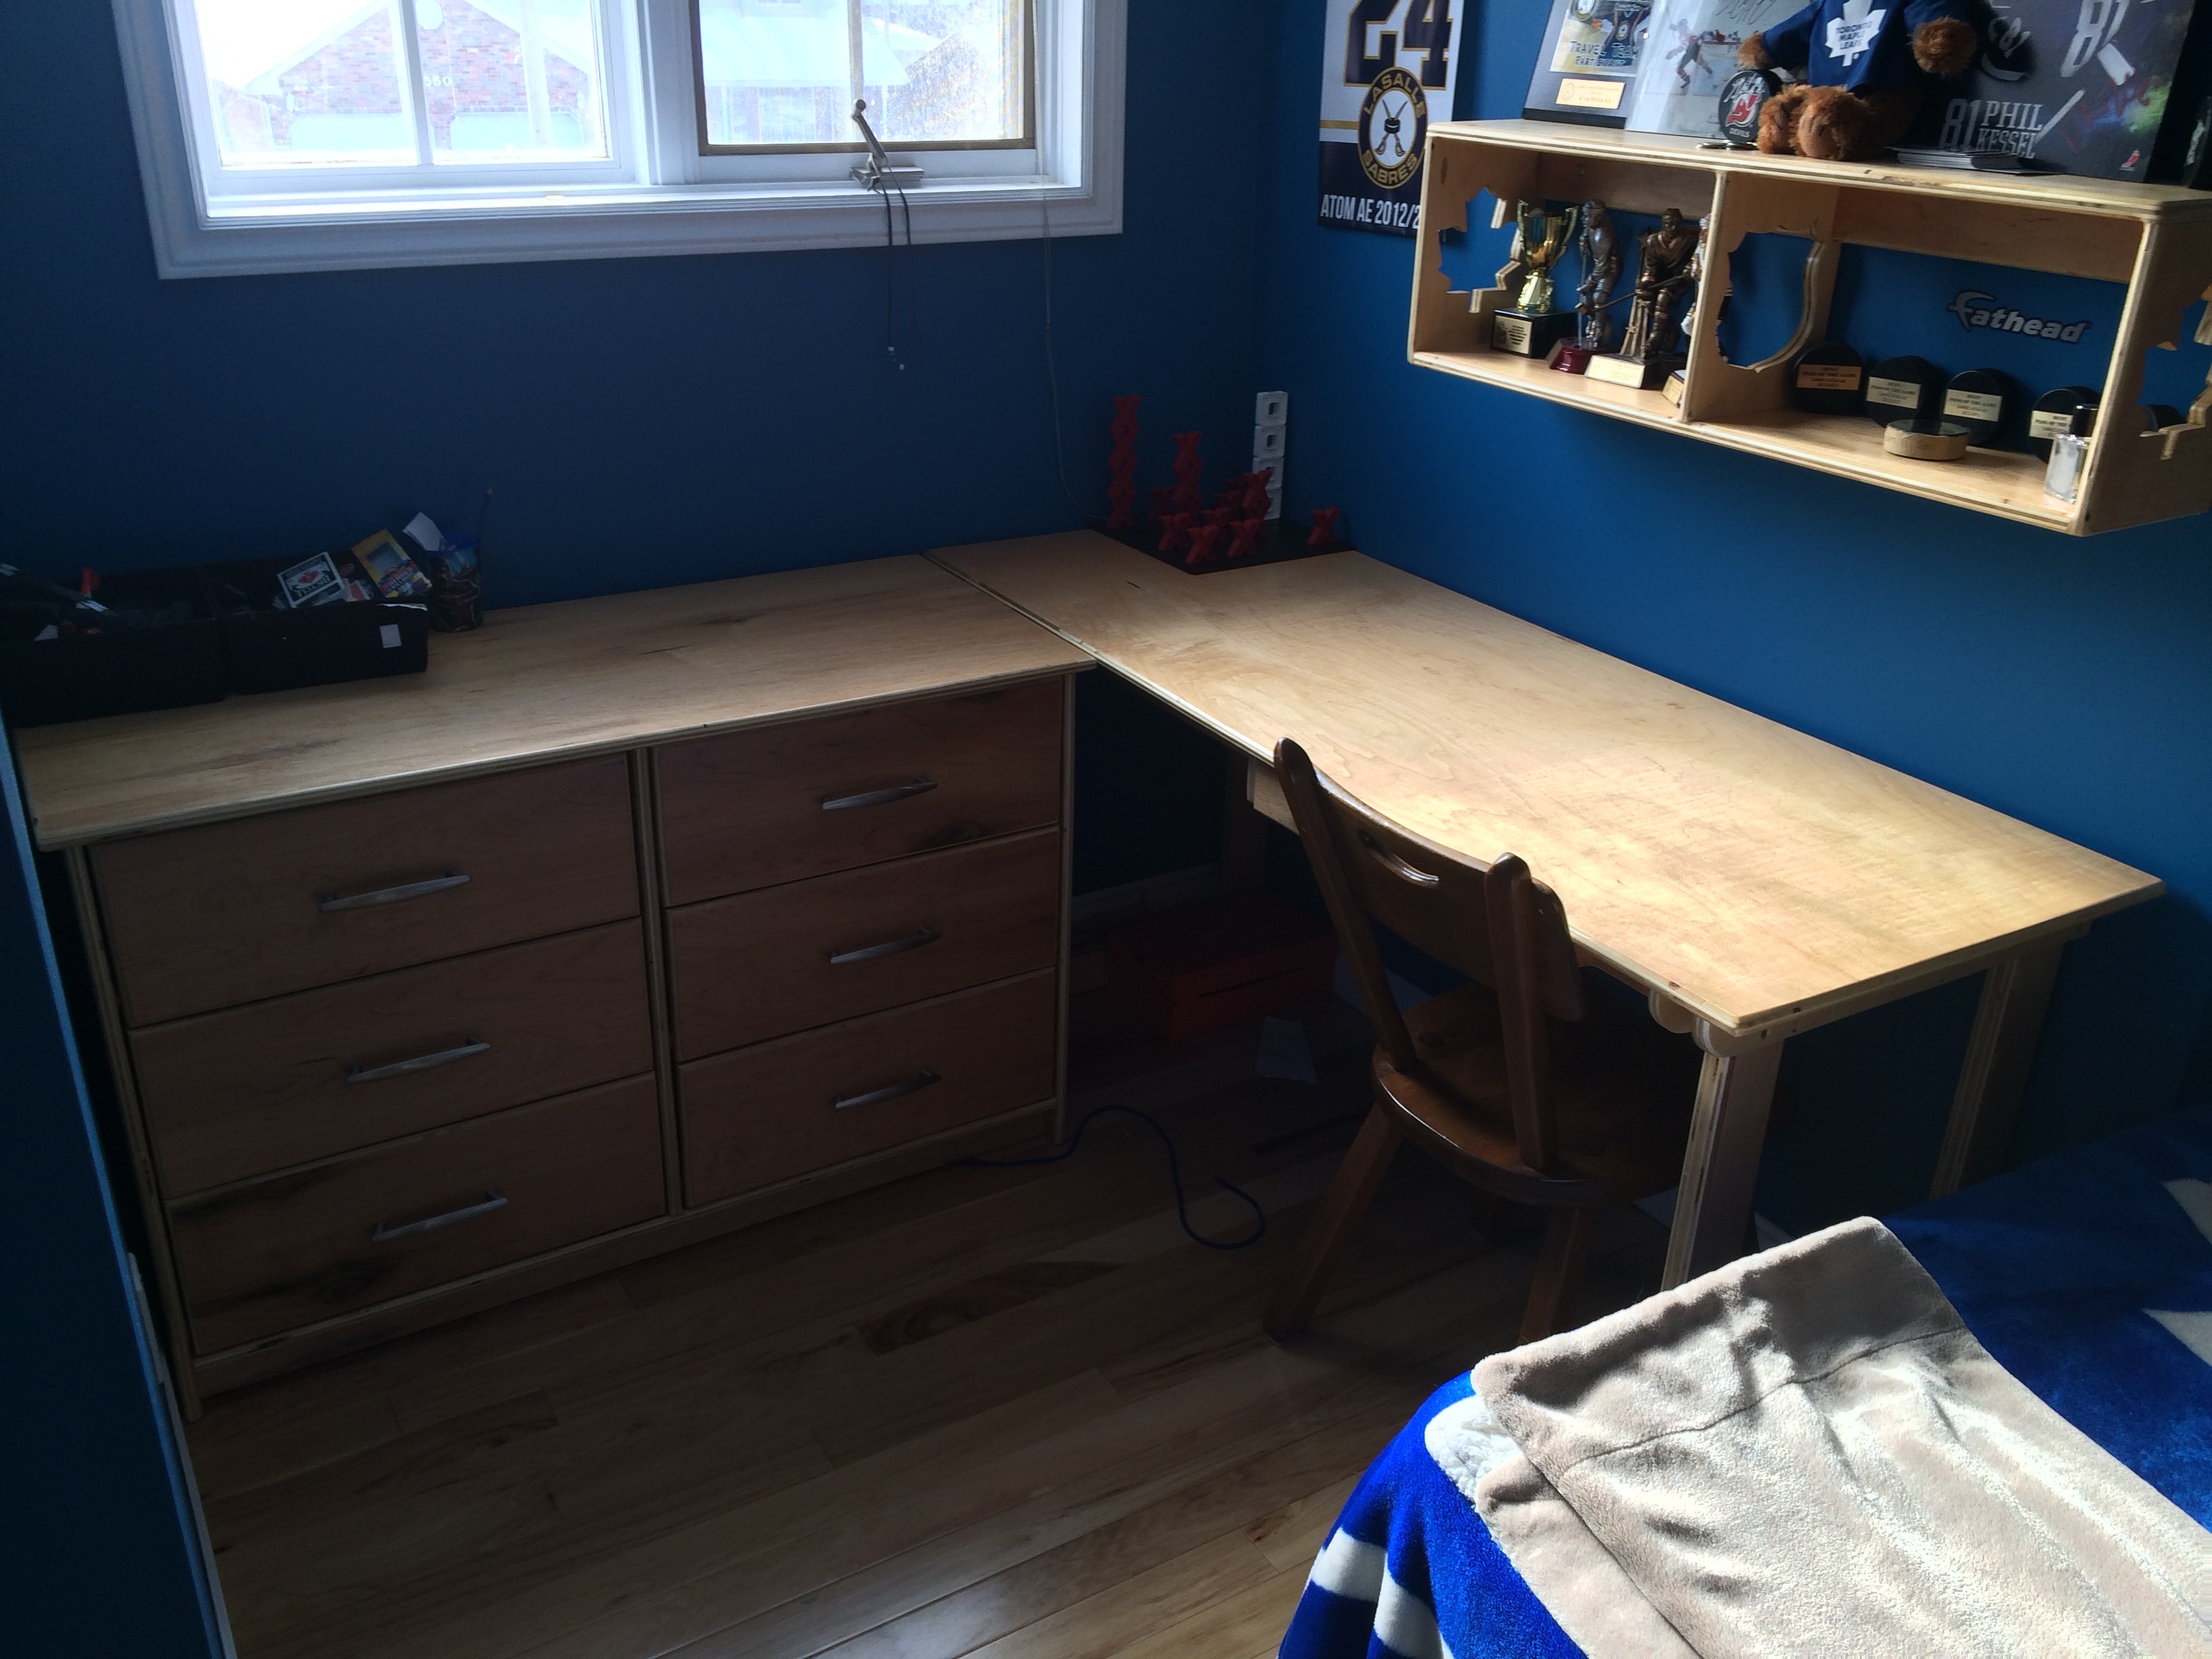
Simple desk made from maple veneer paint grade plywood. It's very sturdy and looks great. The last photo shows a matching dresser that I made as well. So far I've made two of these identical desks and another with 3 large drawers underneath to one side. You don't have to have alot of fancy tools and expensive wood to make great looking, sturdy, and functional furniture. As always, sketchup plans available!

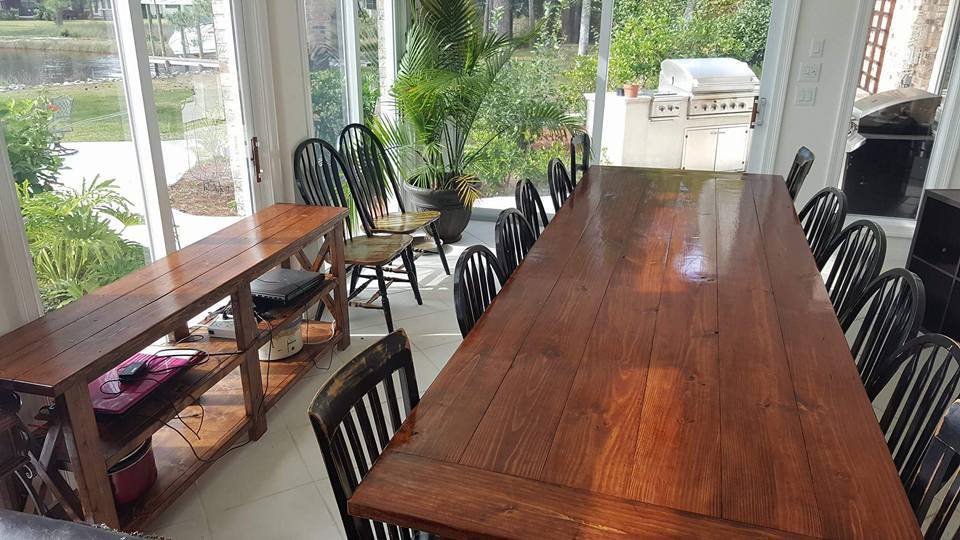
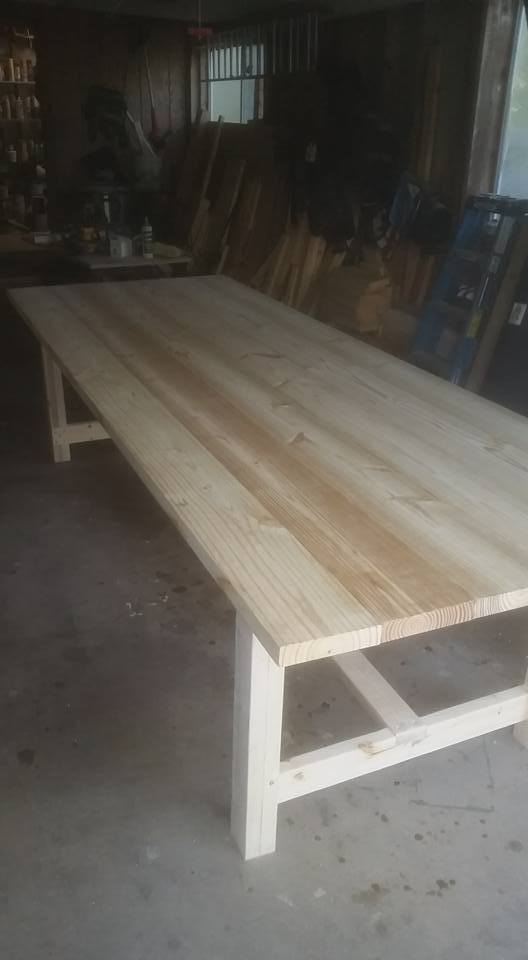
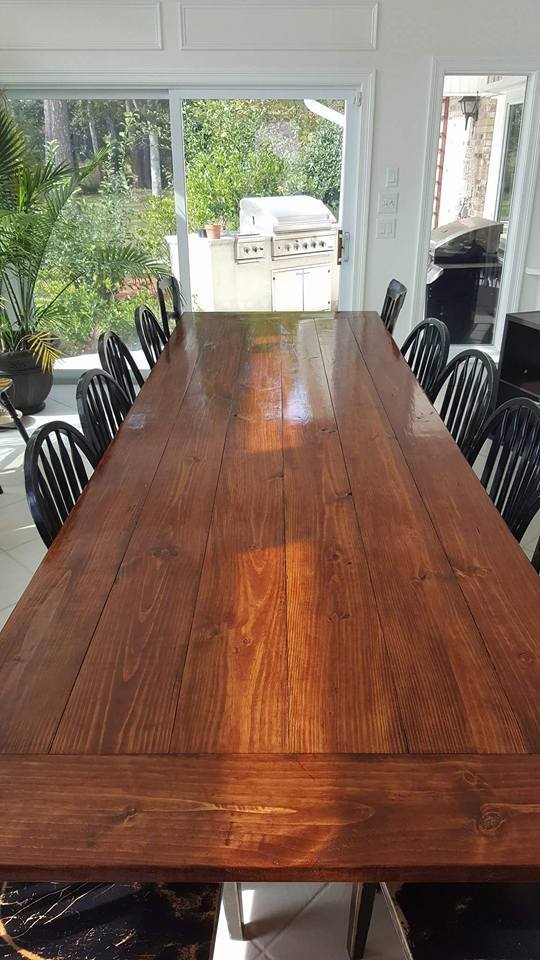
I used Ana's plans for this project, but had to deviate since I built it for a friend who needed a table for 14!! This thing is huge, 12 feet long, and about 44 inches wide. I made it out of pine, 2x8s for the top but stuck to the plans for the frame. It weighs about 200lbs or more, and had to move it with 4 guys...used an enclosed trailer to move it from my house to theirs. They love it so that's all that counts! Oh ya, in the picture, you will see Ana's rustic X console table too!
Built this fire place using Ana’s plans and bought the same insert she had. Loved the way it turned out! I added the cabinets and shelving to each side.
Mon, 02/13/2023 - 13:39
Love the open shelves and side cabinets, beautiful work! Thank you for sharing.

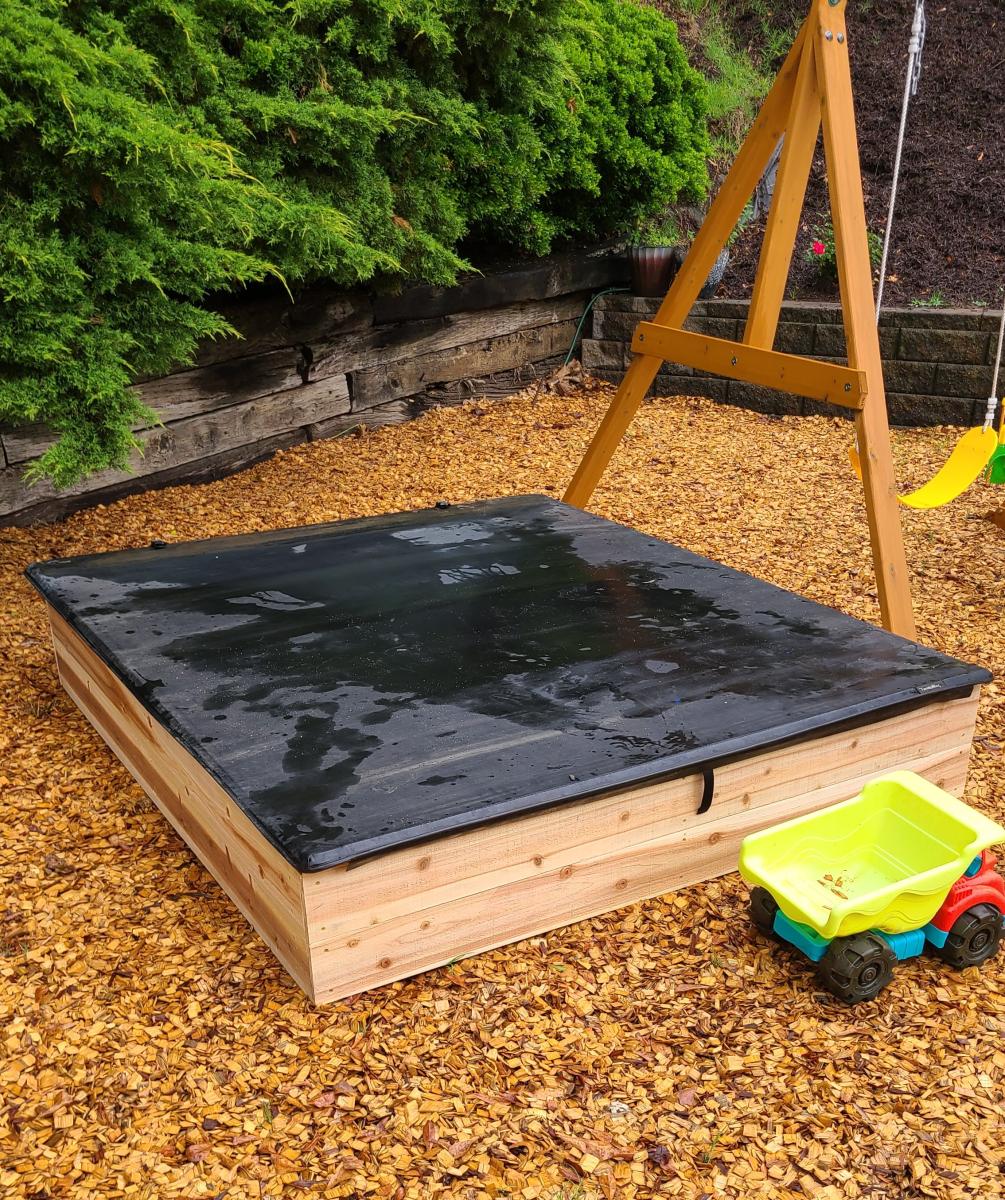
The cover is a tonneau cover for a pickup truck. It's for a 6.5' truck bed so if you notice, I had to ad a 2x4 and one more picket on top to accommodate the extra length.
The cover would add a ridiculous amount of money to the project but it was repurposed. I found it on a truck that was in an accident and going to the scrap yard. I think it it came out great and my grandson loves it.
John

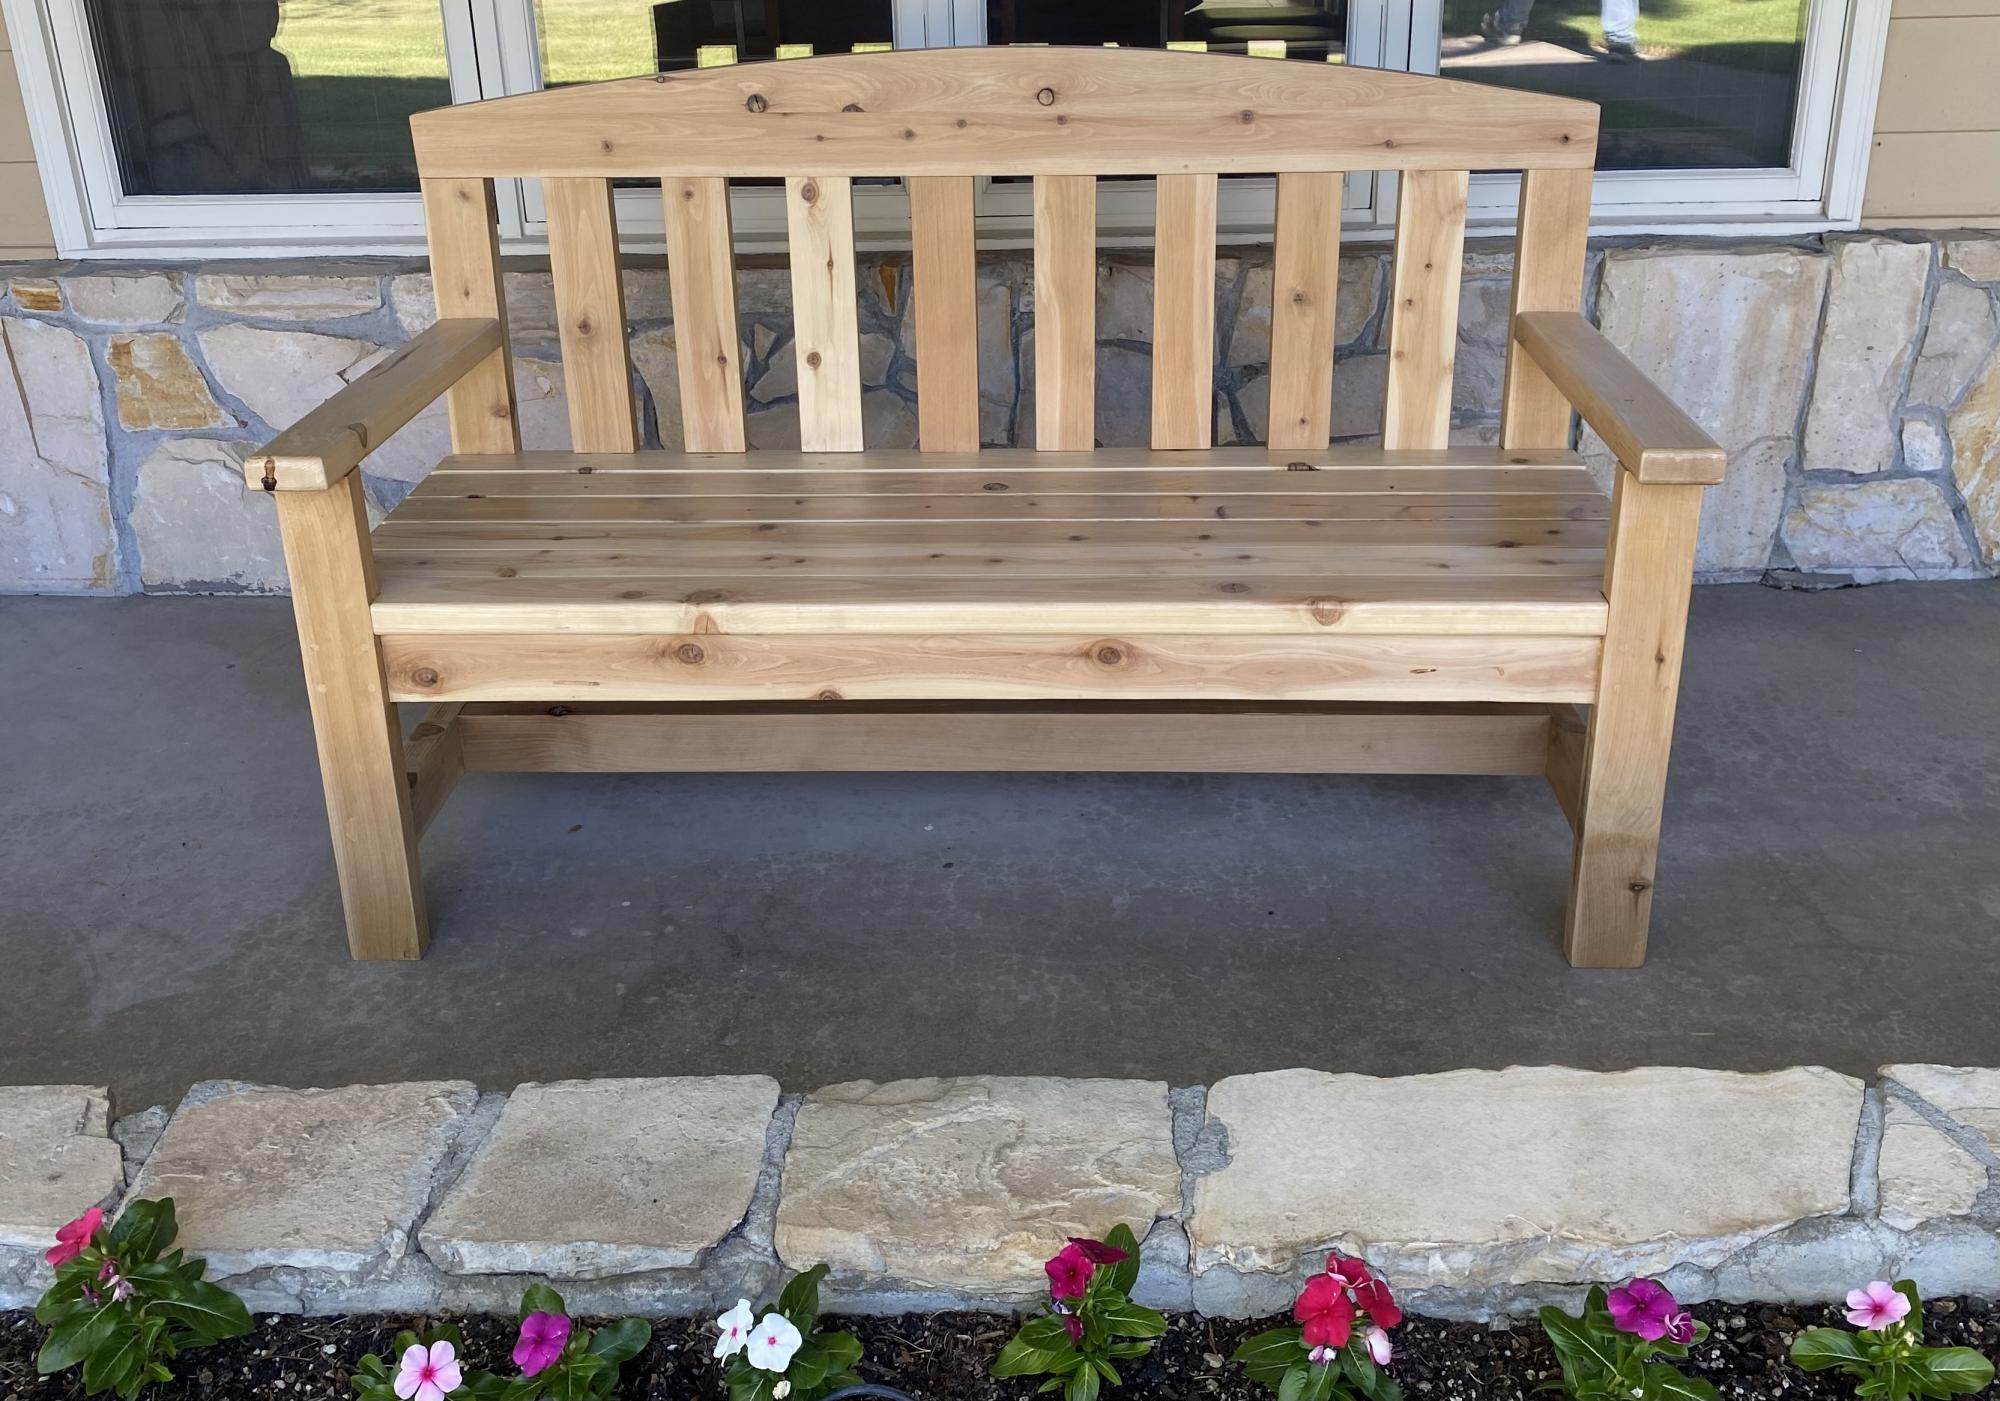
I took a woodworking course through the community college and built this cedar bench for my front porch. I learned so much throughout this process and am proud of how it came out. I am now building up my own arsenal of tools and supplies. I can’t wait to choose my next project!
Plans from myoutdoorplans.com/2x4benchplans
Mon, 06/19/2023 - 17:39
Such a great first project, thank you for sharing. Can't wait to see your next project!
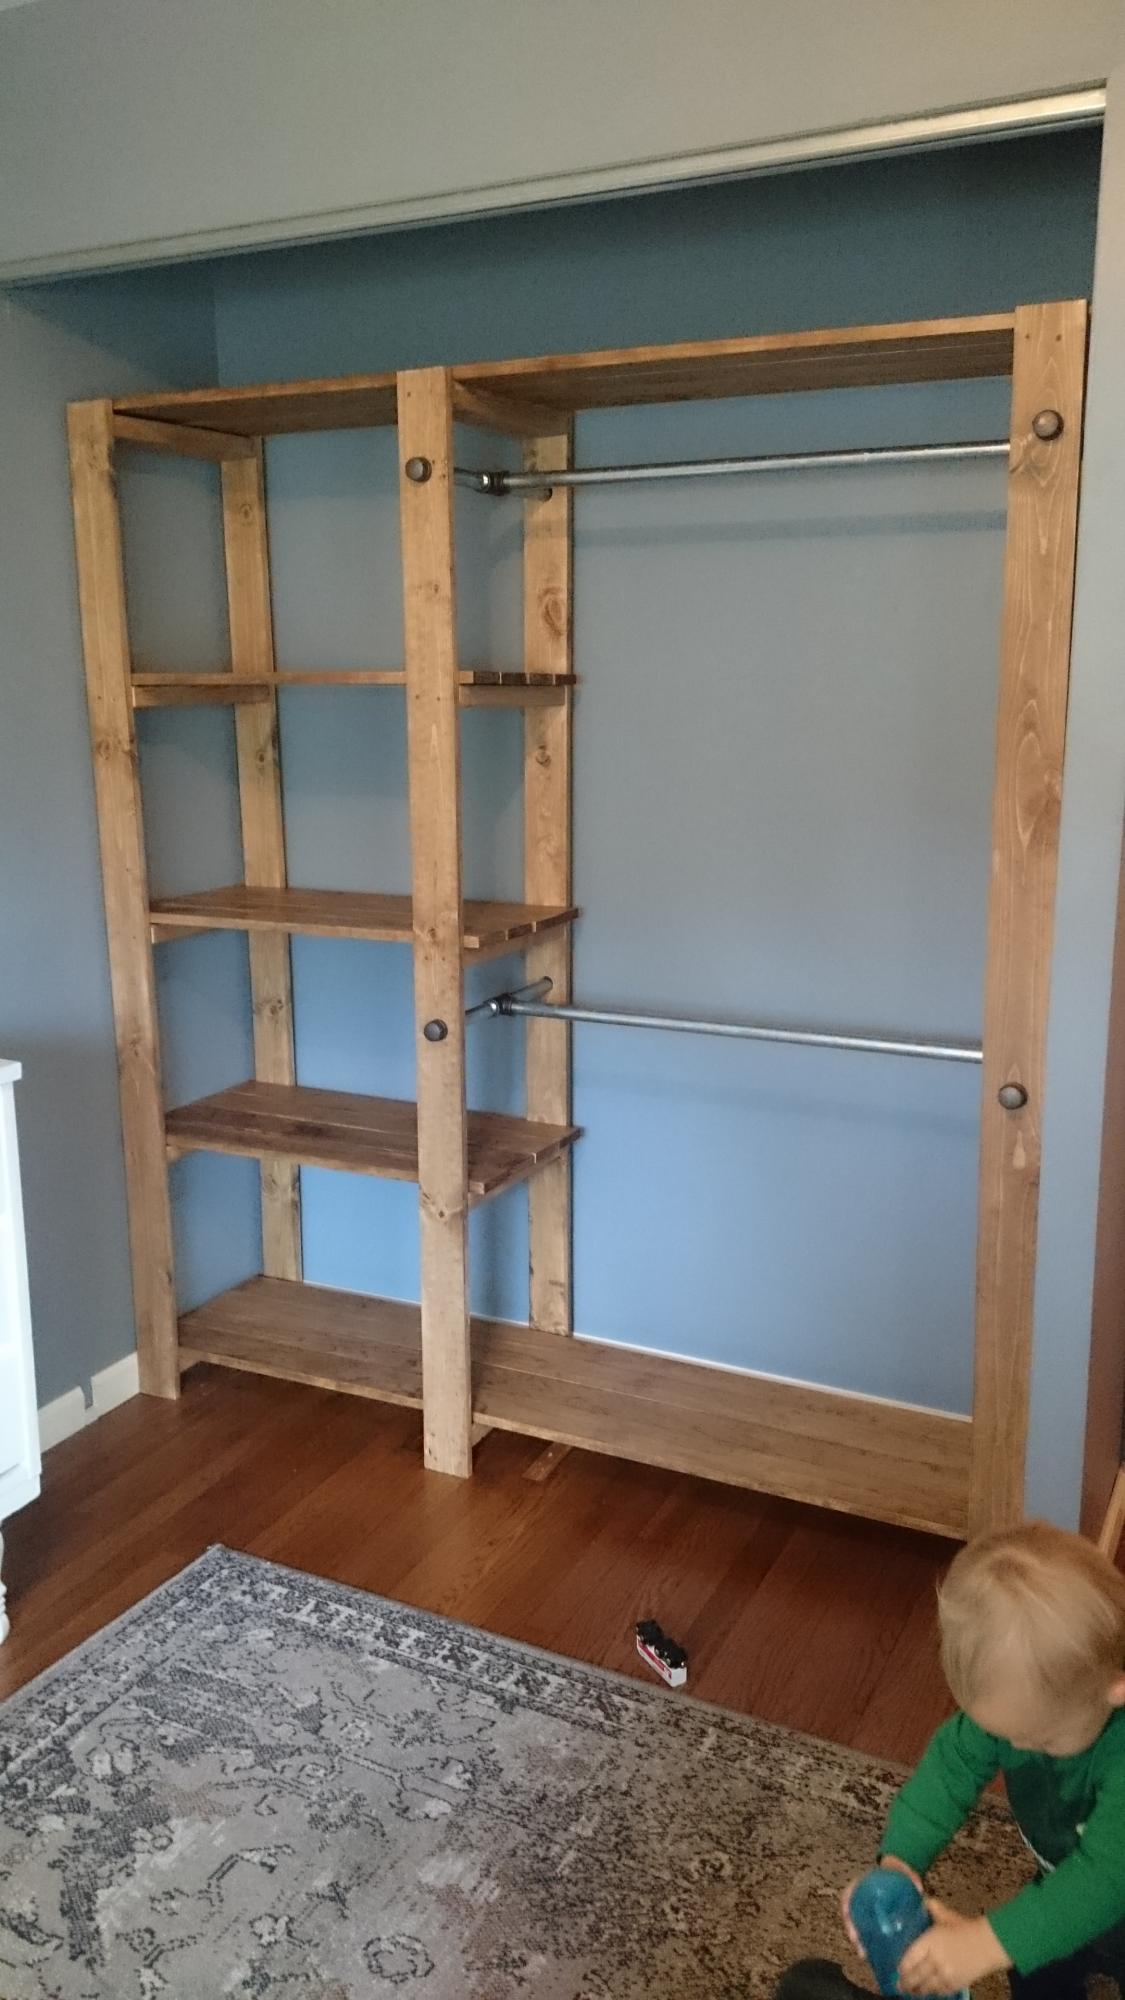
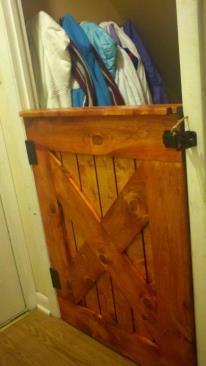
This was the second building project I've ever completed. I had to make a few adjustments to make it fit the size of ray's closet, but it was totally worth it. most of the work was in the measuring, sanding, and sealing of the wood. Ftting the frames can be a little tricky if your planks aren't perfectly straight. Otherwise, this project was pretty straight forward and can be done in just a few days depending on how much time you have to dedicate to it. Thanks Ana!

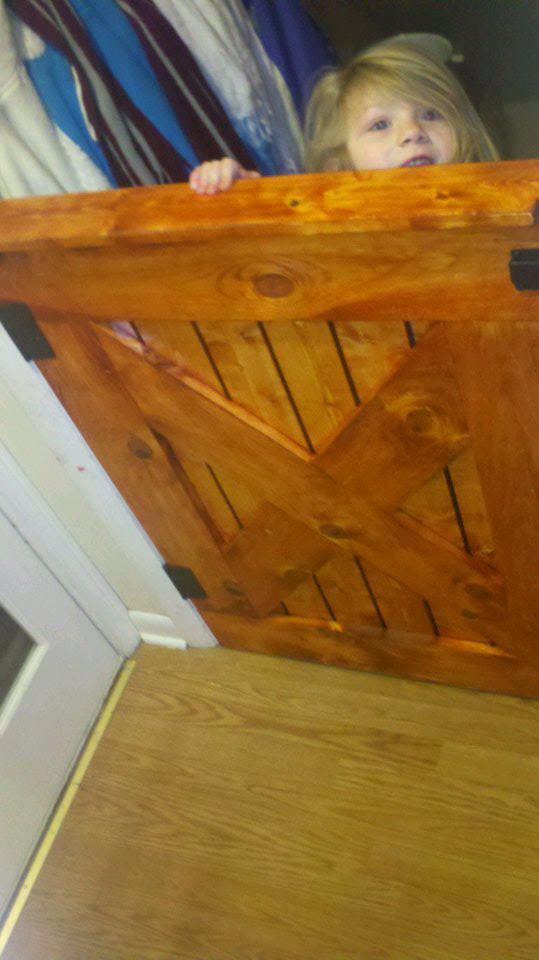
Our 6 month old is crawling now and we had to hurry up and baby proof the house. As an added bonus this dog proofs the down stairs at our house as well. The "barn door" side is made from 1x6 and the back is 1x3. The stain is called Gunstock which my wife is obsessed with. She is talking about staining every piece of wood in the house with the stain which I will NOT be doing. It took me around 4 days to finish it completely and put it together. I built the frame in about an hour. I let the wood glue set for a day, then stained one side. I gave that stain 24 hours to dry and stained the other side. Then I followed the same process to clear coat it. I clear coated it three times and sanded between each coat. I had bought a latch kit and installed it. I am very happy with how it came out.

Sat, 01/19/2013 - 05:09
What a great piece, nice job! I love how you put this inside the house, I have been wanting to do a gate like this. Now it's on my list for sure after I see yours.
Click the blog link for a full description of this project. Thanks for looking! - Clint