Modern Farmhouse Bed
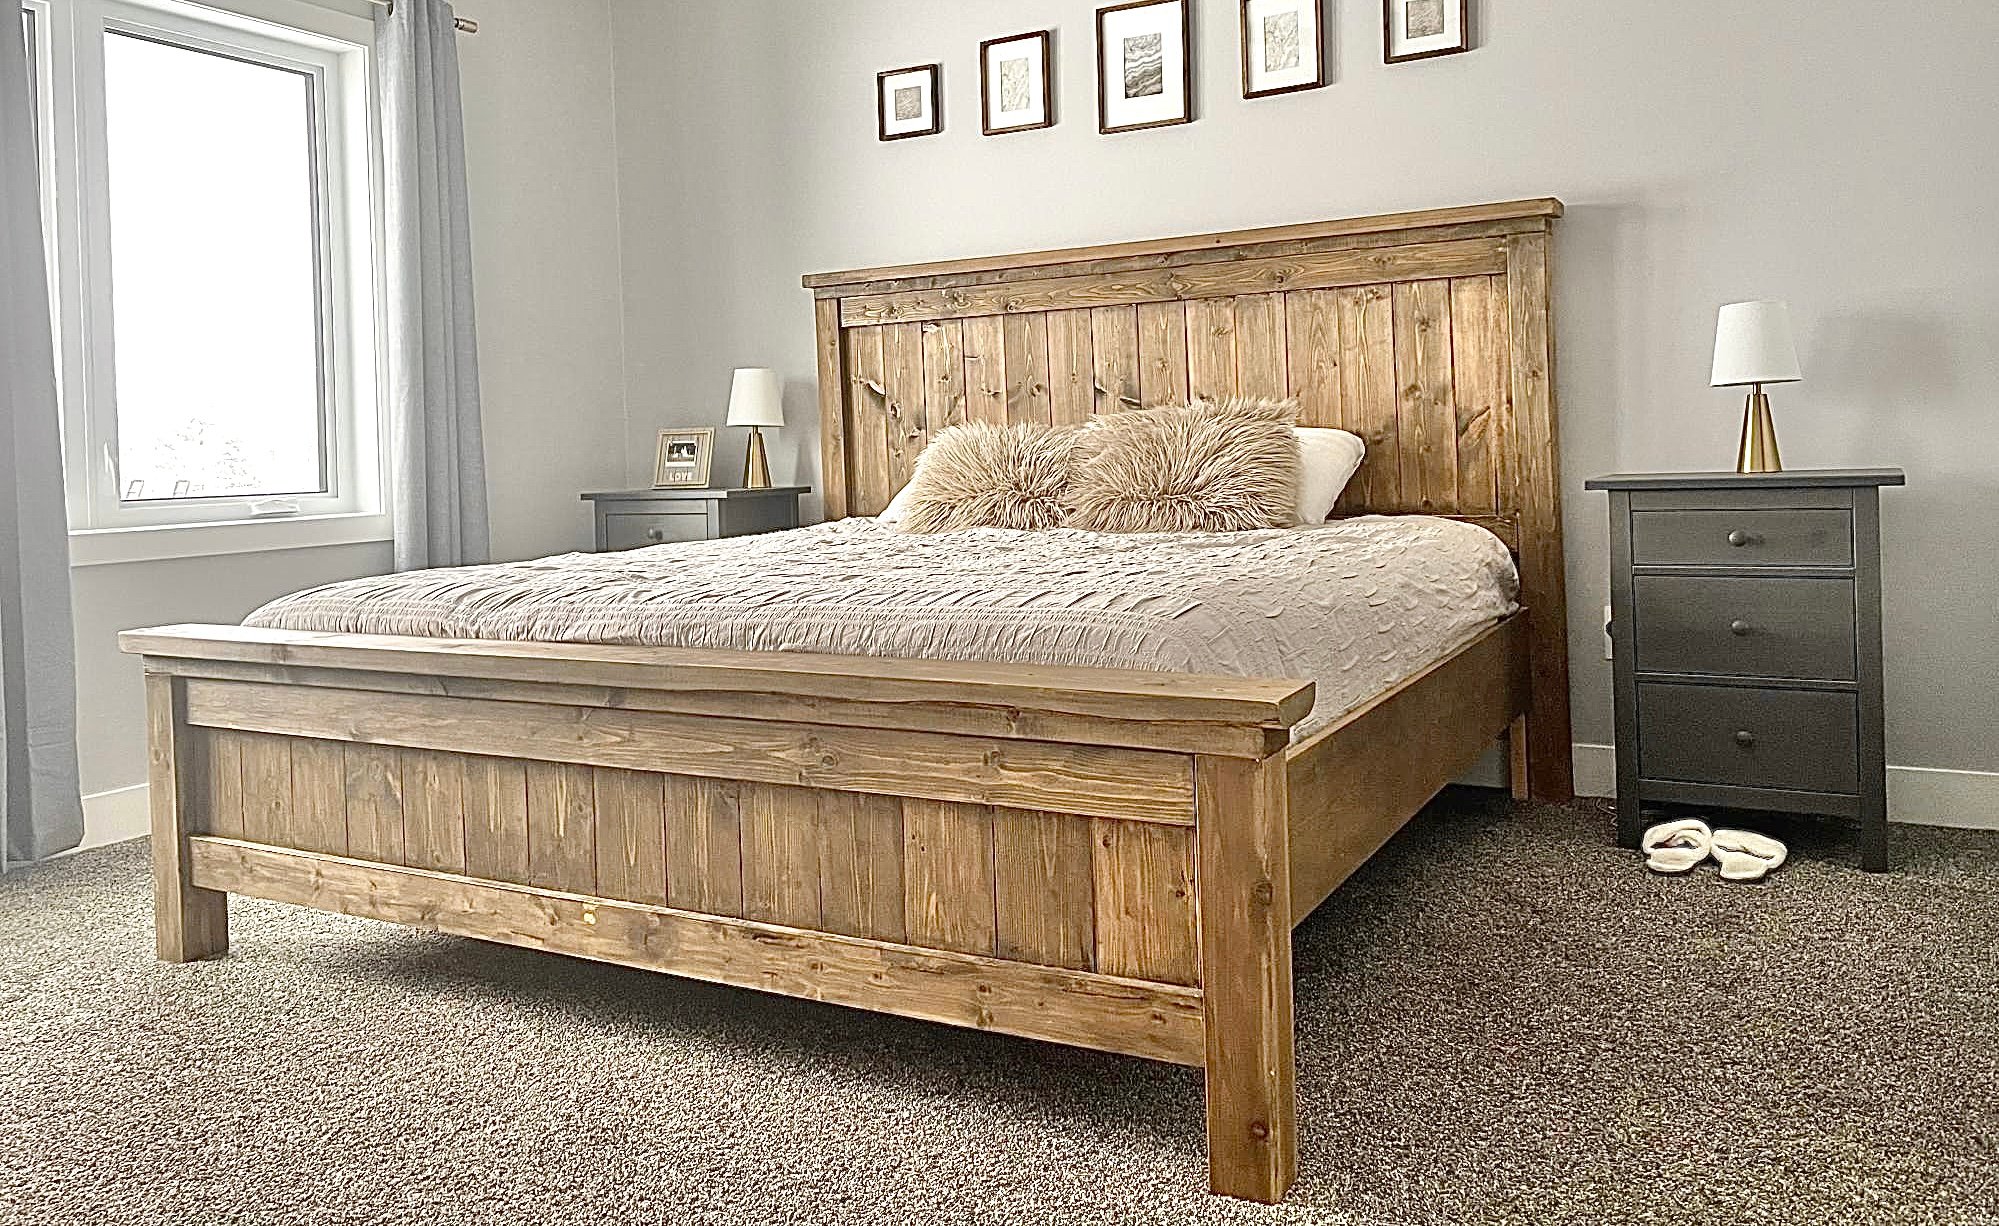
My husband and I had worked on this bed together, and we are so happy with it! We went with taller side tables that we purchased, and just stained the wood instead of painting it.
Built from Plan(s)
My husband and I had worked on this bed together, and we are so happy with it! We went with taller side tables that we purchased, and just stained the wood instead of painting it.
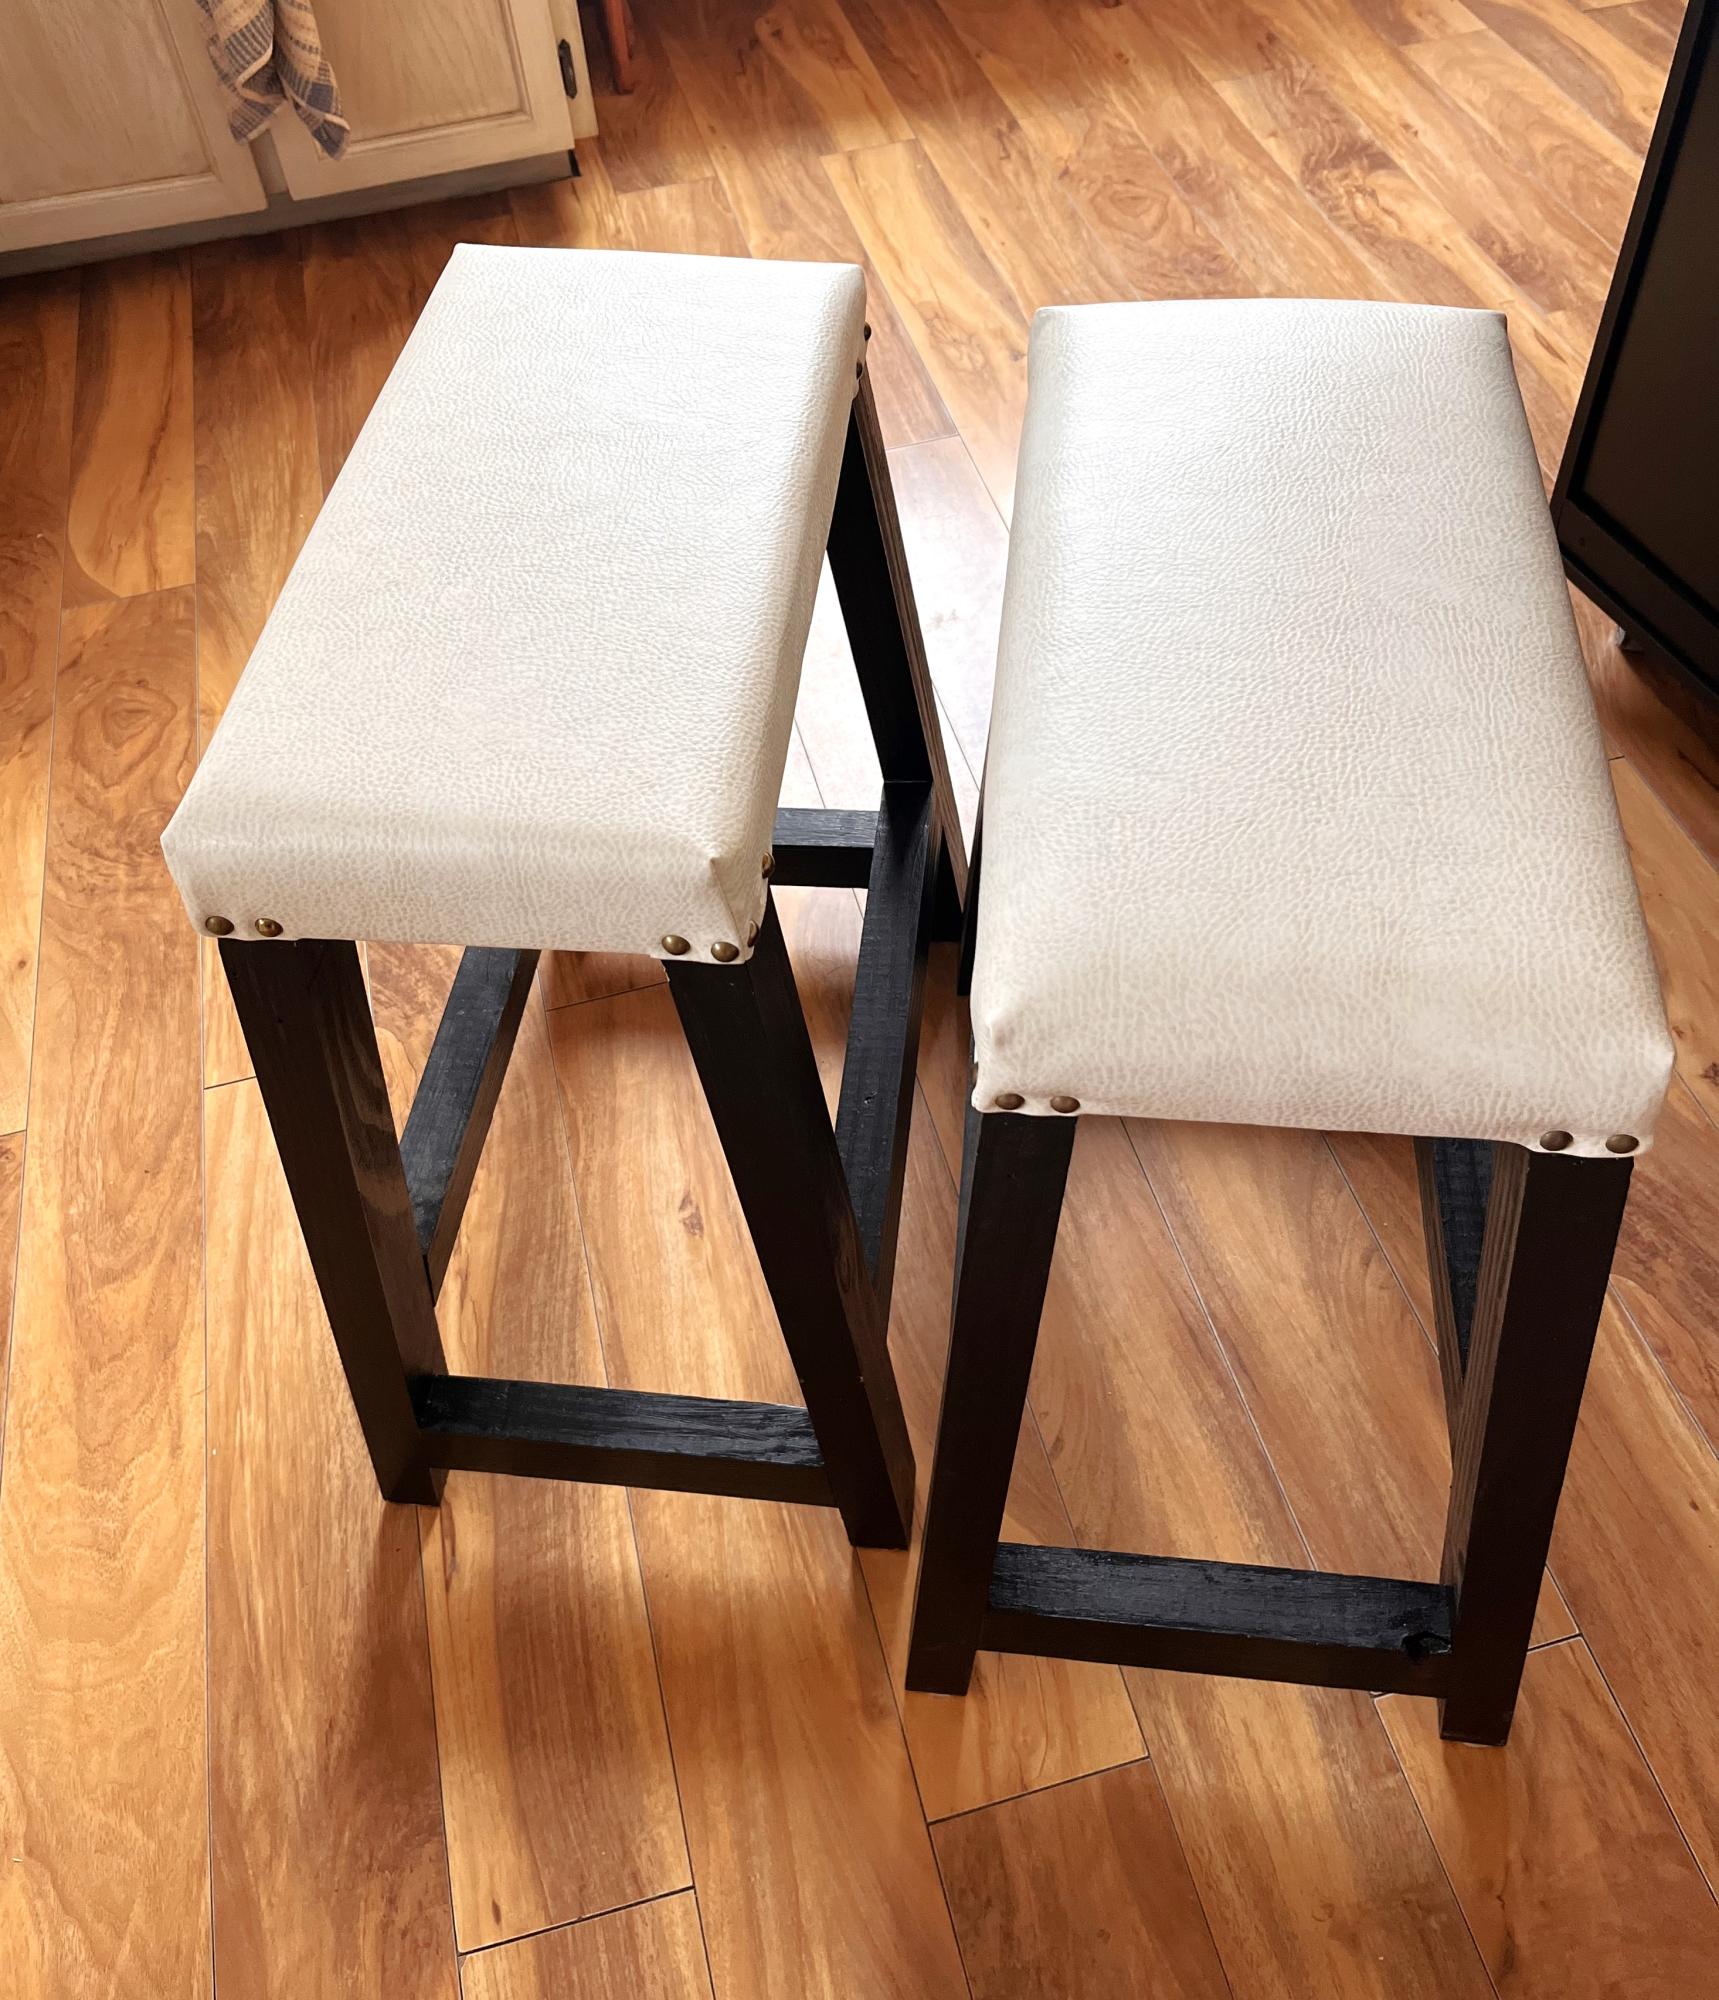
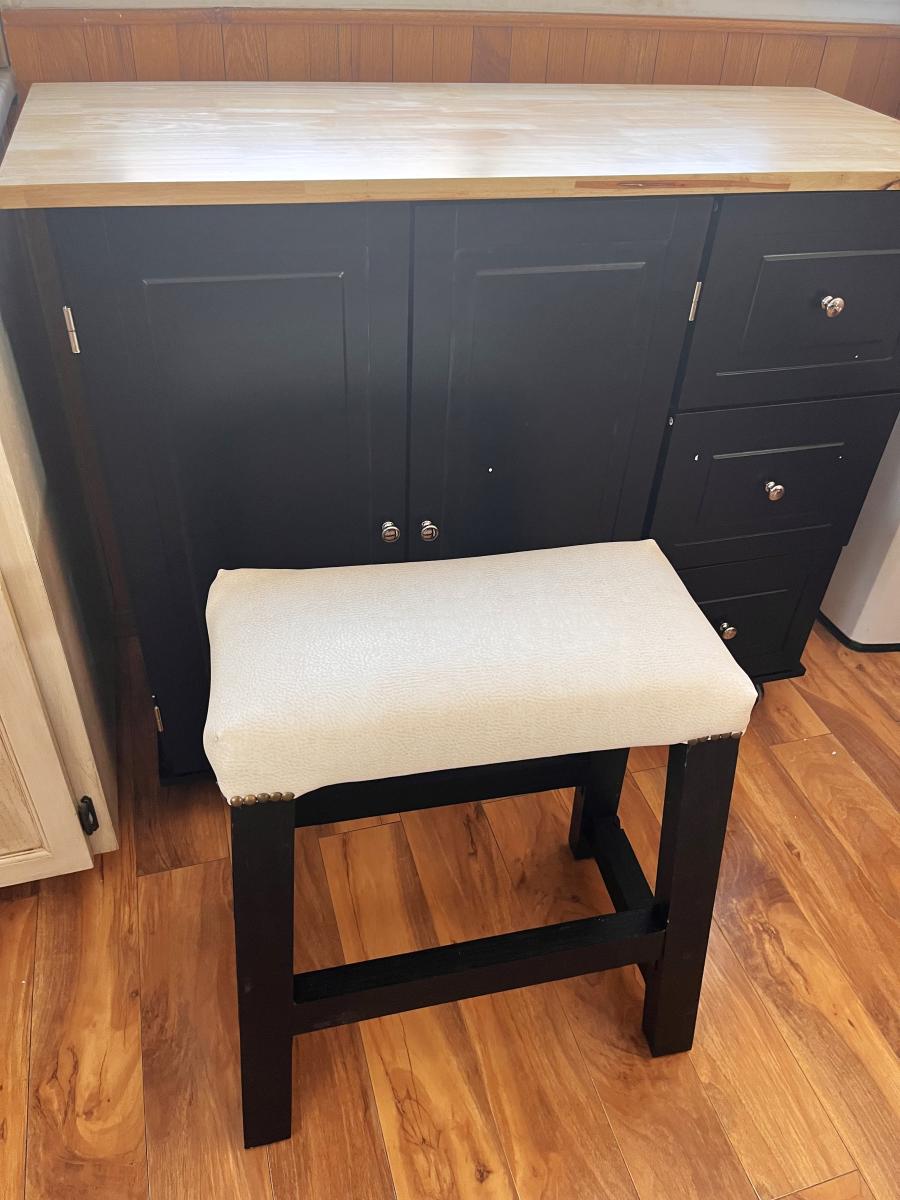
We just purchased a rolling island to replace our old kitchen table. We wanted to make stools to fit under it properly at the right height. We used all recycled wood and it’s painted with and exterior black semi-gloss paint that I had on hand that I use for my outdoor barn quilts. I covered it with 1” foam, a layer of Dacron and some off white(to match our kitchen cupboards) heavy vinyl. We really like our new look❤️Thank you Ana for sharing all of your plans. We are going to be using more in the future. I just know it.
Mississippi Lakeside Creations.

I reduced the size of the 2x4 coffee table to make 2 end tables. They can be used as additional seating when needed.

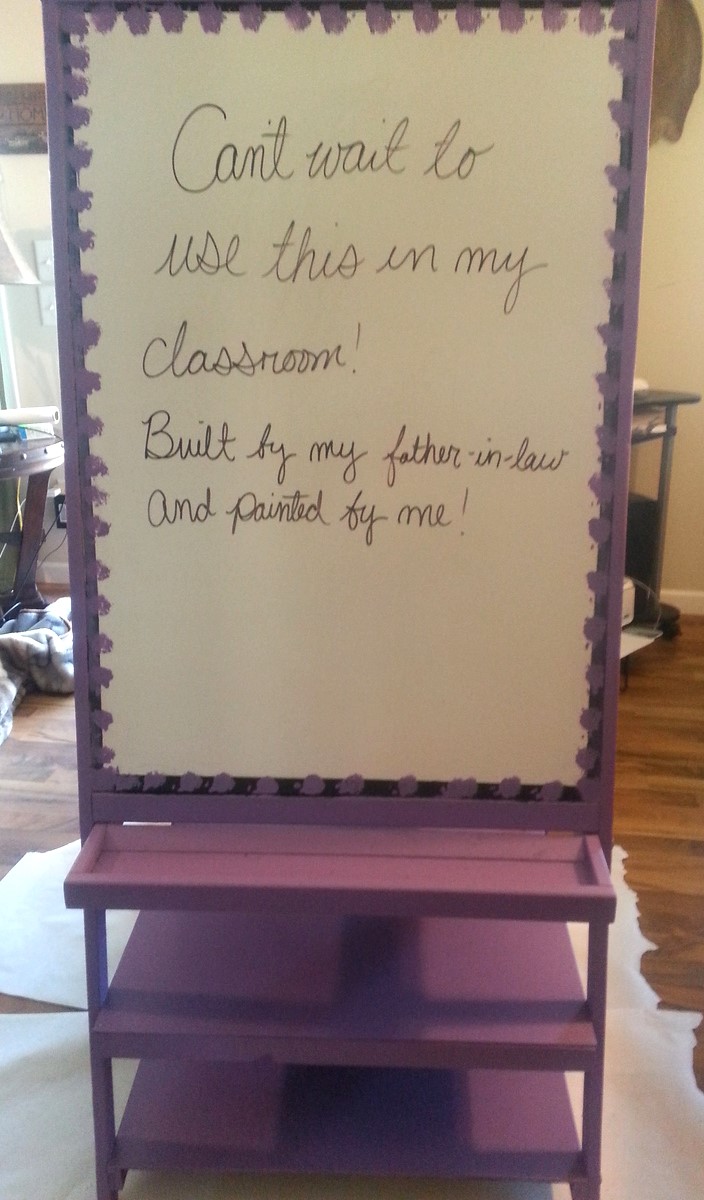
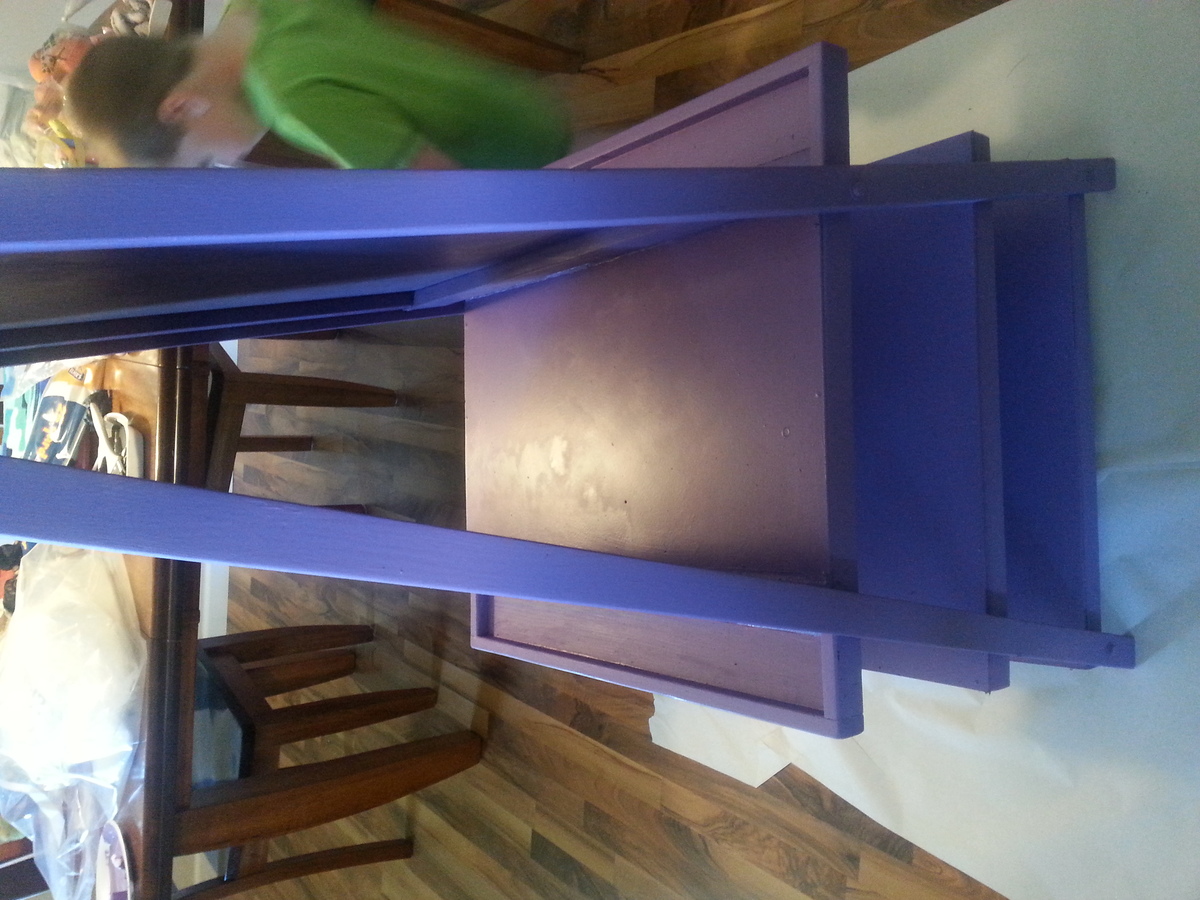
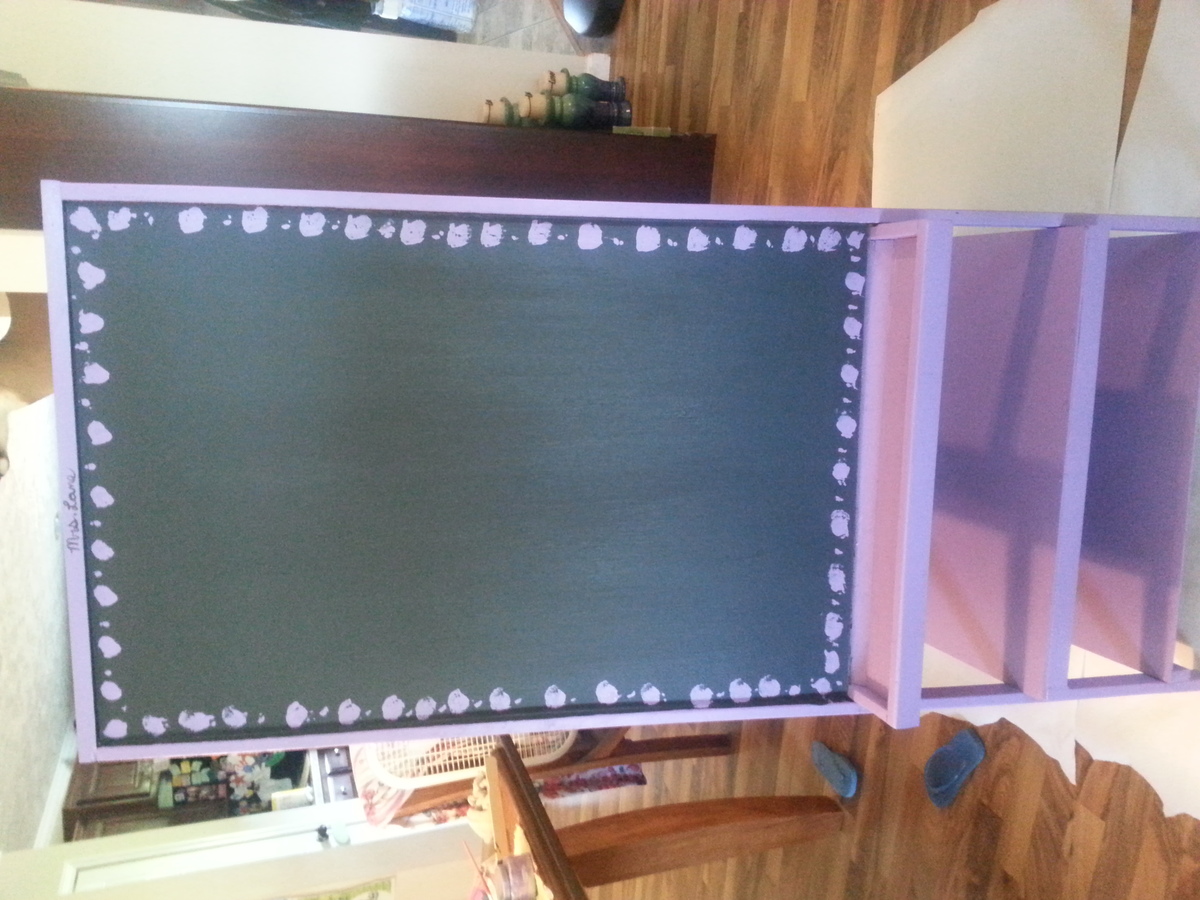
My father-in-law built this for me using Anna White's plans. He tweeked a few things to add somethings I wanted to add. A huge sheet of white board bought from Lowes was used to make both easel sides and the shelves. Once he had it built for me, I painted the lilac paint color onto the wood and whiteboard shelves. The black chalk board side was made by using black chalboard paint. I wanted it to look cute so, I added a black boarder on the white board, and then used a cotton ball with the lilac paint to make the paint blotch style on both sides. I cannot wait to use this in my classroom!

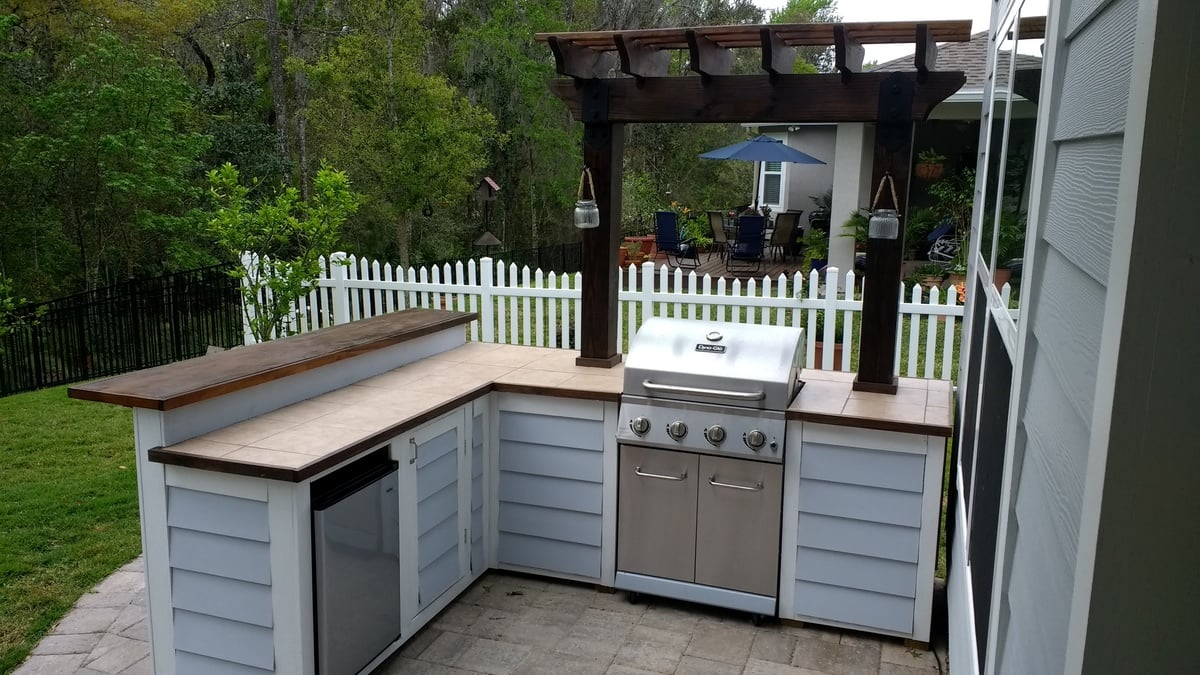
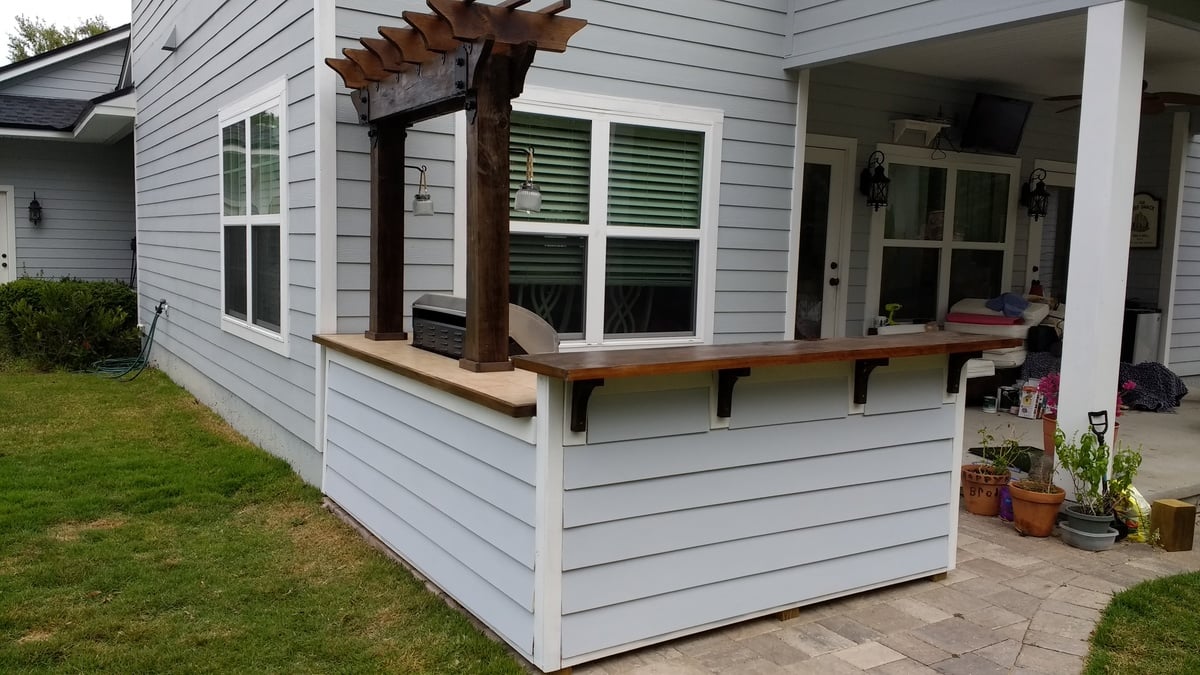
I wanted to build an L shaped outdoor bar with a 2 post pergola over the grill. I couldn't find any plans online that would fit the space I had, so I decided to build it myself with custom dimensions. The top bar is approx. 7'3" across, and 15" wide, while the distance from the right edge (next to the house) to the end of the bar is approx. 9'1".
I framed it with PT lumber and the 2 pergola posts are sitting on top of the pavers and supported internally within some of the framing studs. Since the pavers sit on top of concrete, I didn't feel the need to dig up the existing pavers and achor them in the ground.
I used hardiboard for the exterior and tiled the lower section of the bar.
For the actual high bar top, I wanted to do something unique, and found a 900 year old scrap slab of Cypress at a local lumber yard. One side was smooth, but underneath was gouged out from different saw cuts and very uneven. I screwed a piece of 3/4" PT plywood underneath and trimmed it with 1-1/2" Cypress. I stained the whole thing with a dark honey colored stain and put a generous amount of poly on it once it was dry. There are a few cracks and nicks on it, but once it was stained, it looked awesome.

Wed, 06/19/2019 - 13:23
Looks awesome. I have been wanting something like this for a while now. Where can we can plans for this?

This table was made with Cedar but the base was pressure treated wood. The legs were Cedar 4x4s and very sturdy. I used a mix of designs and altered each to fit my needs. Getting the lumber from a lumber yard vs. big box cut my costs in half. Used stainless steel finish screws, Kreg Weather Treated Screws, and Deck Screws.


Sun, 03/17/2013 - 16:23
I love this! I'm planning on starting this project once the weather warms up and I was wondering if you could tell me how you attached the legs to the table top without visible bolts.
Sun, 08/11/2013 - 22:45
Absolutely Gorgeous! The photography is stunning as well! Great make!
Tue, 07/08/2014 - 17:02
Very nice looking table. I'm looking to make similar. What are your dimensions? I like the plank in the middle. Tks.
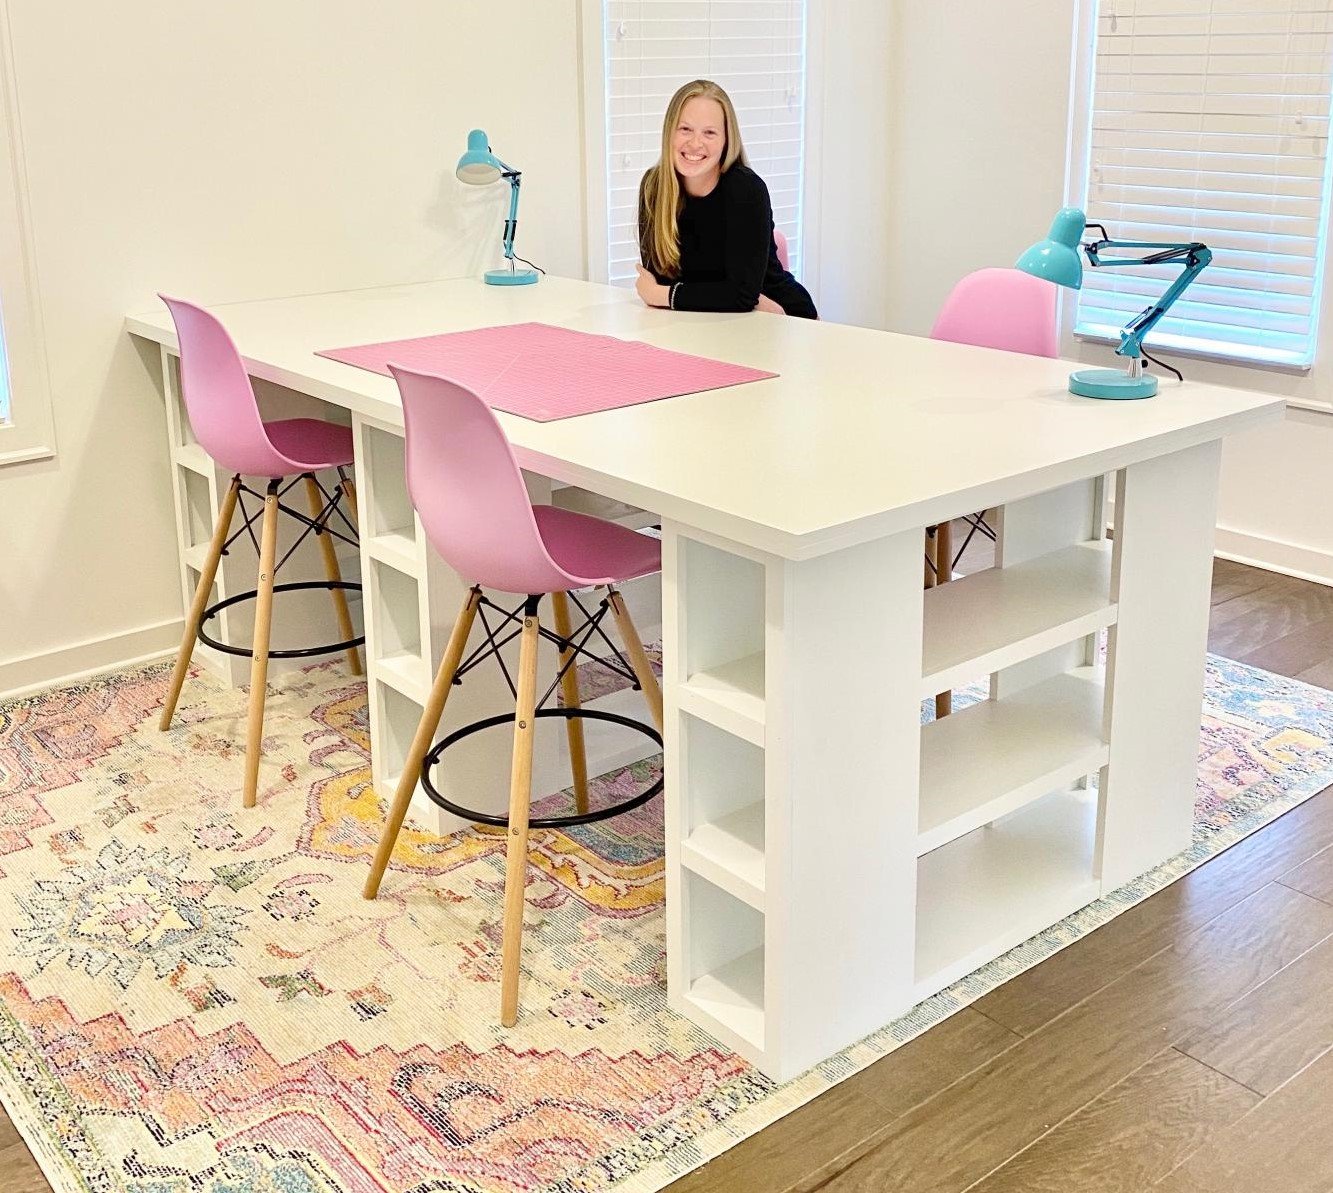
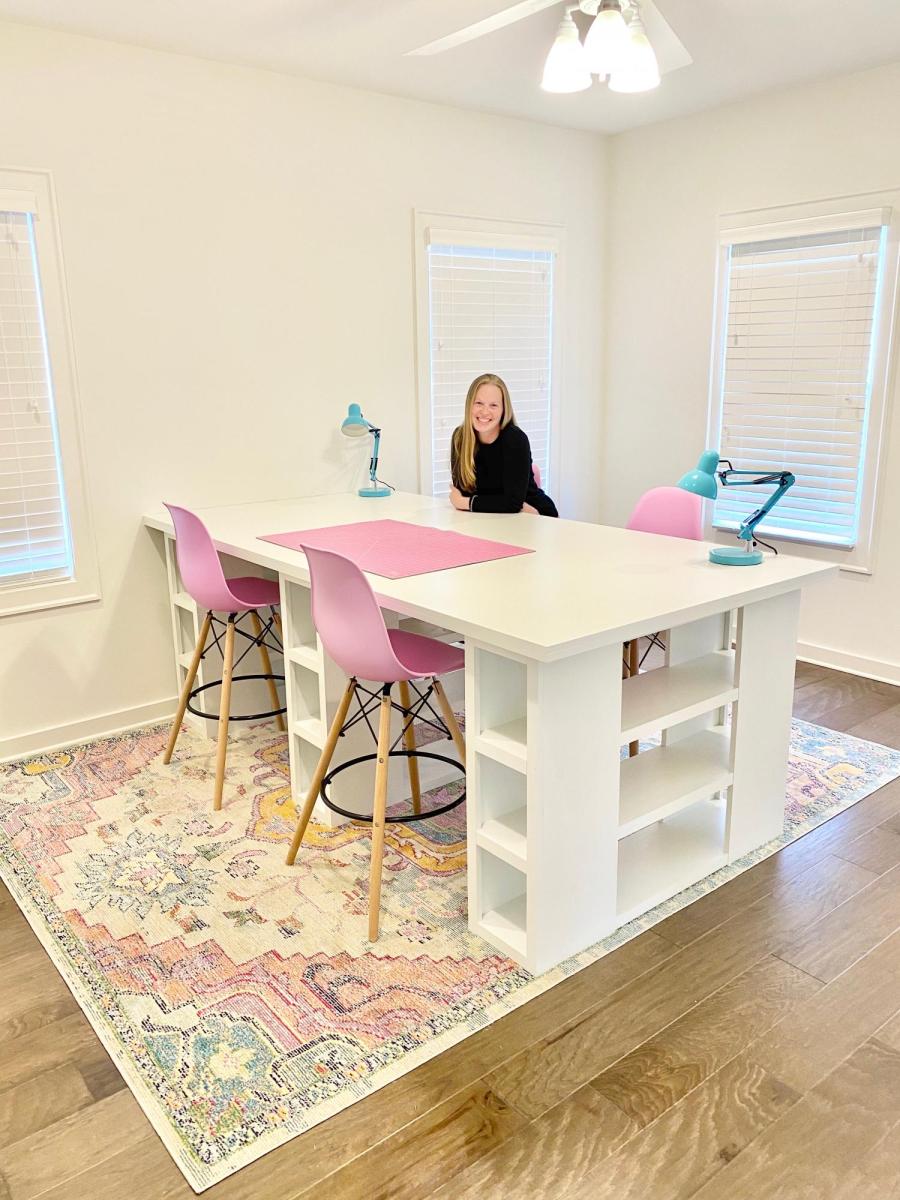
I modified this plan so I could have 4 total work areas. Total Size: 48" x 96"
Tue, 09/08/2020 - 19:42
Is there anyway you can share these plans with me!? I drew out some plans for an identical table but I think my cuts may be off! It would be so helpful.
Fri, 11/06/2020 - 12:47
Is there a full update post with instructions for the table shown?
Tue, 12/20/2022 - 22:03
LOVE this! Just what I'm looking for! Can you tell me what you used for the top?
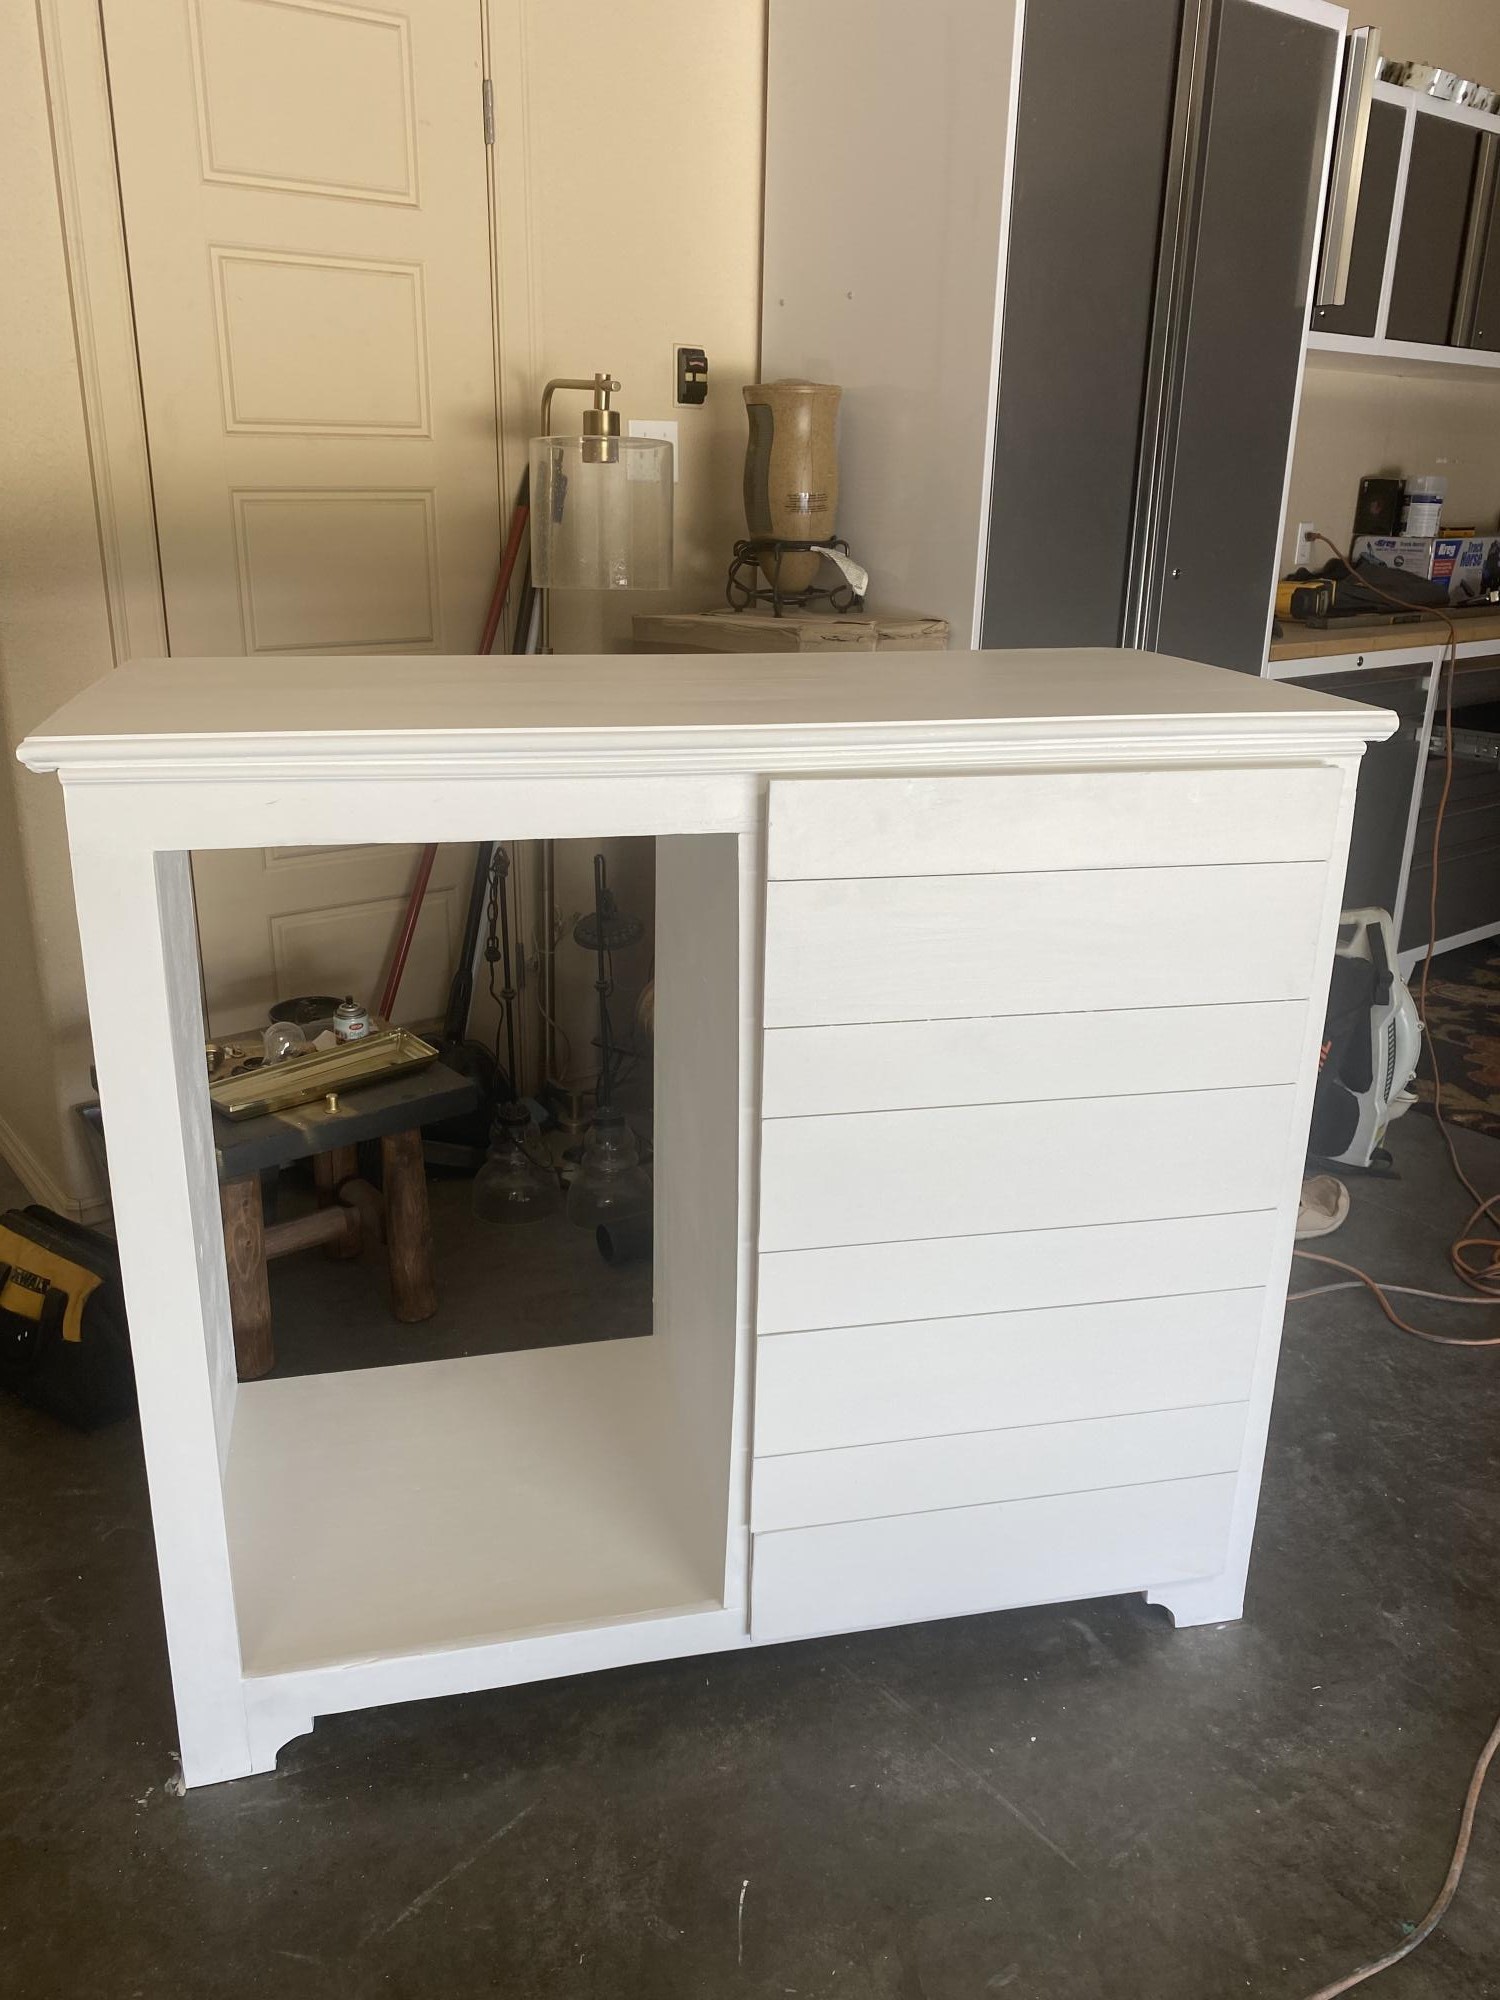
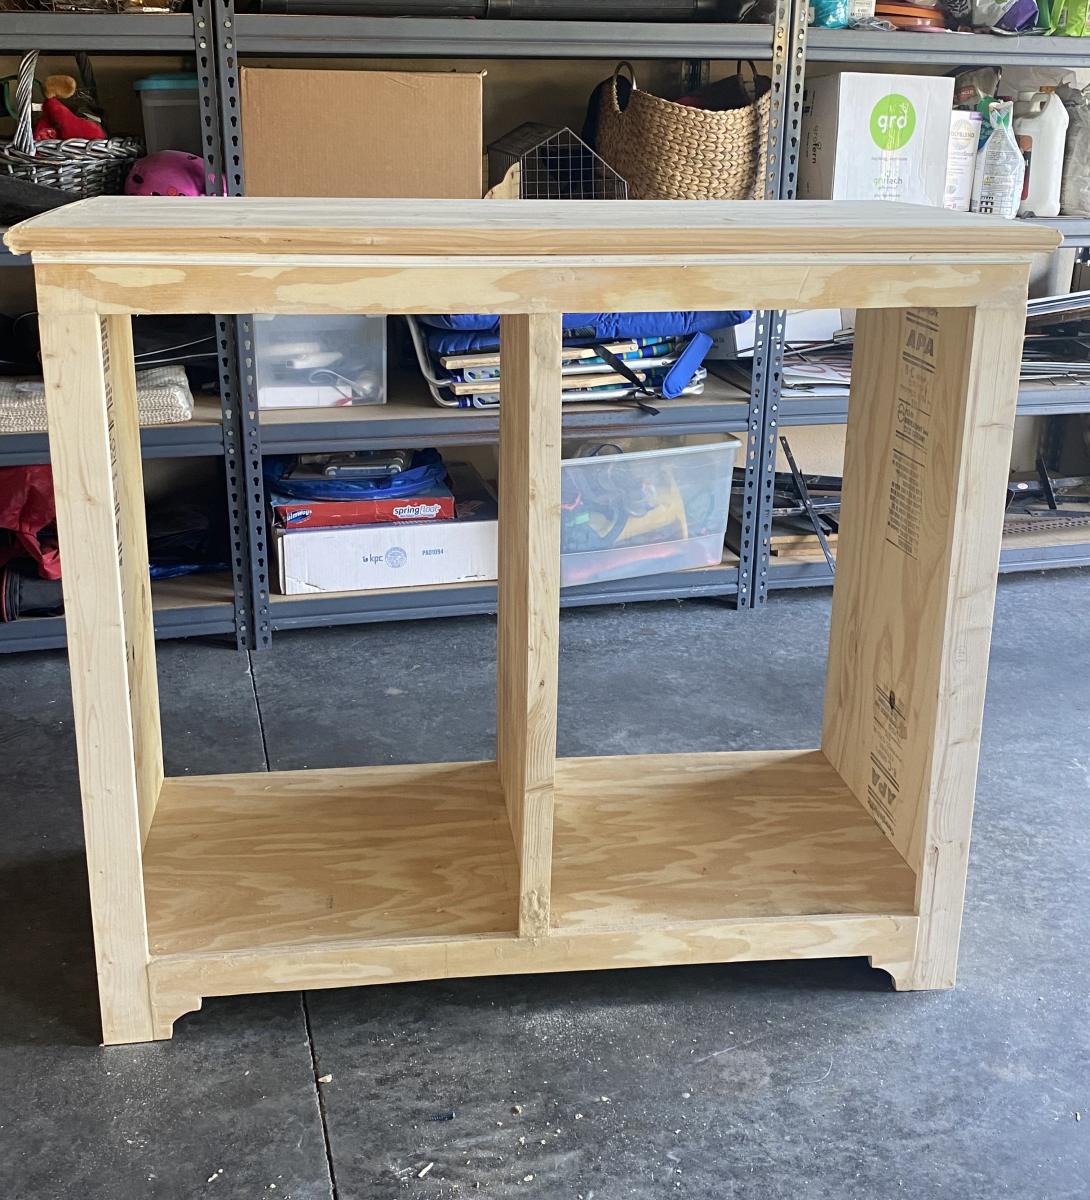
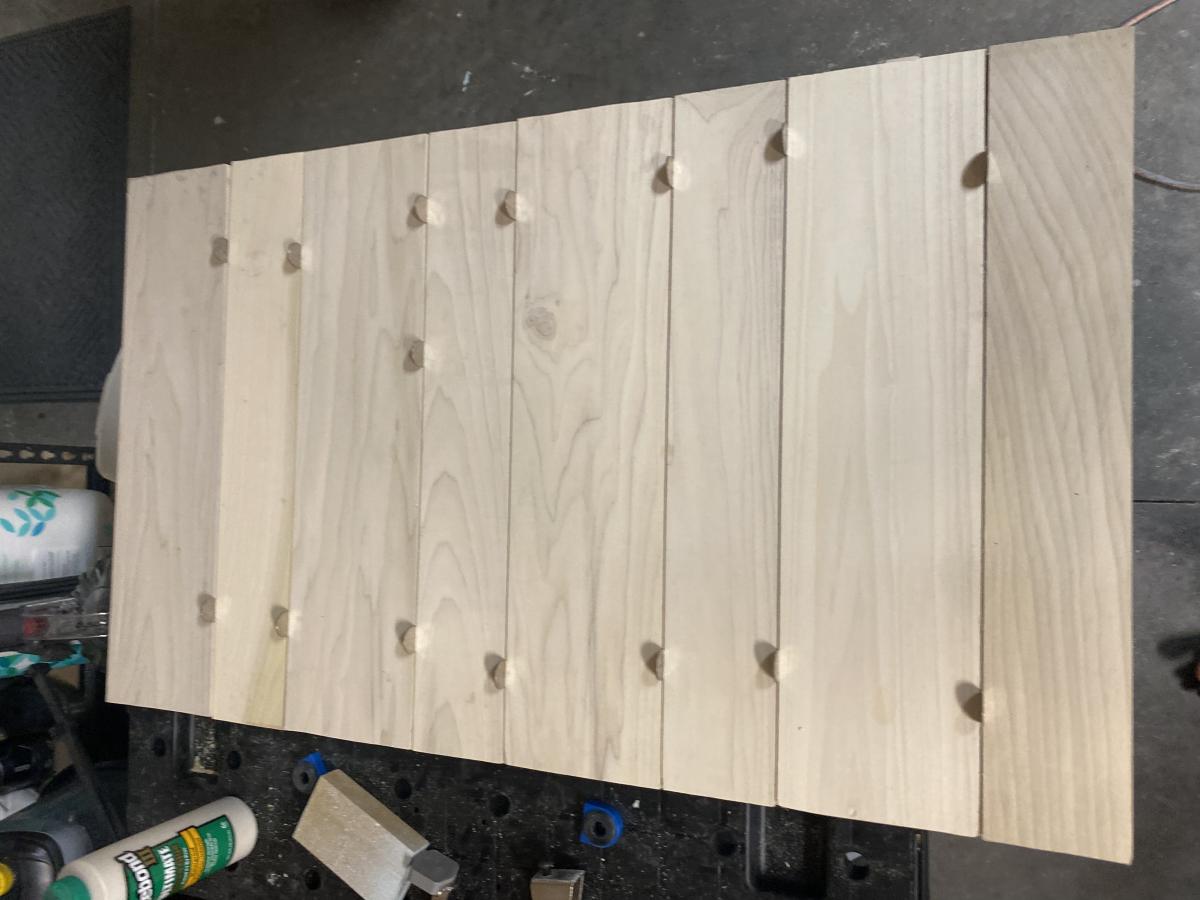
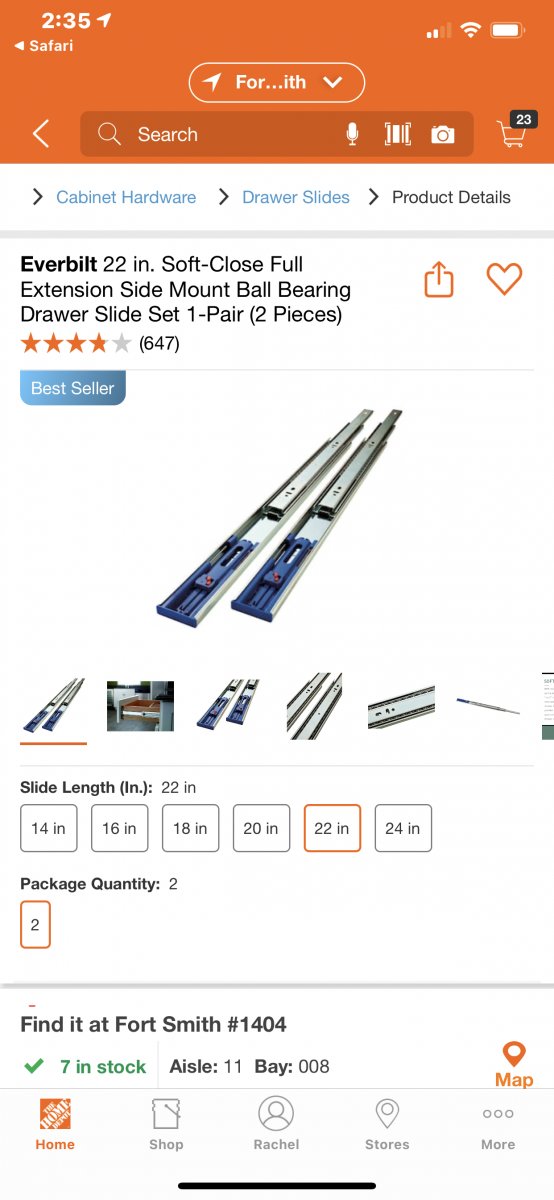
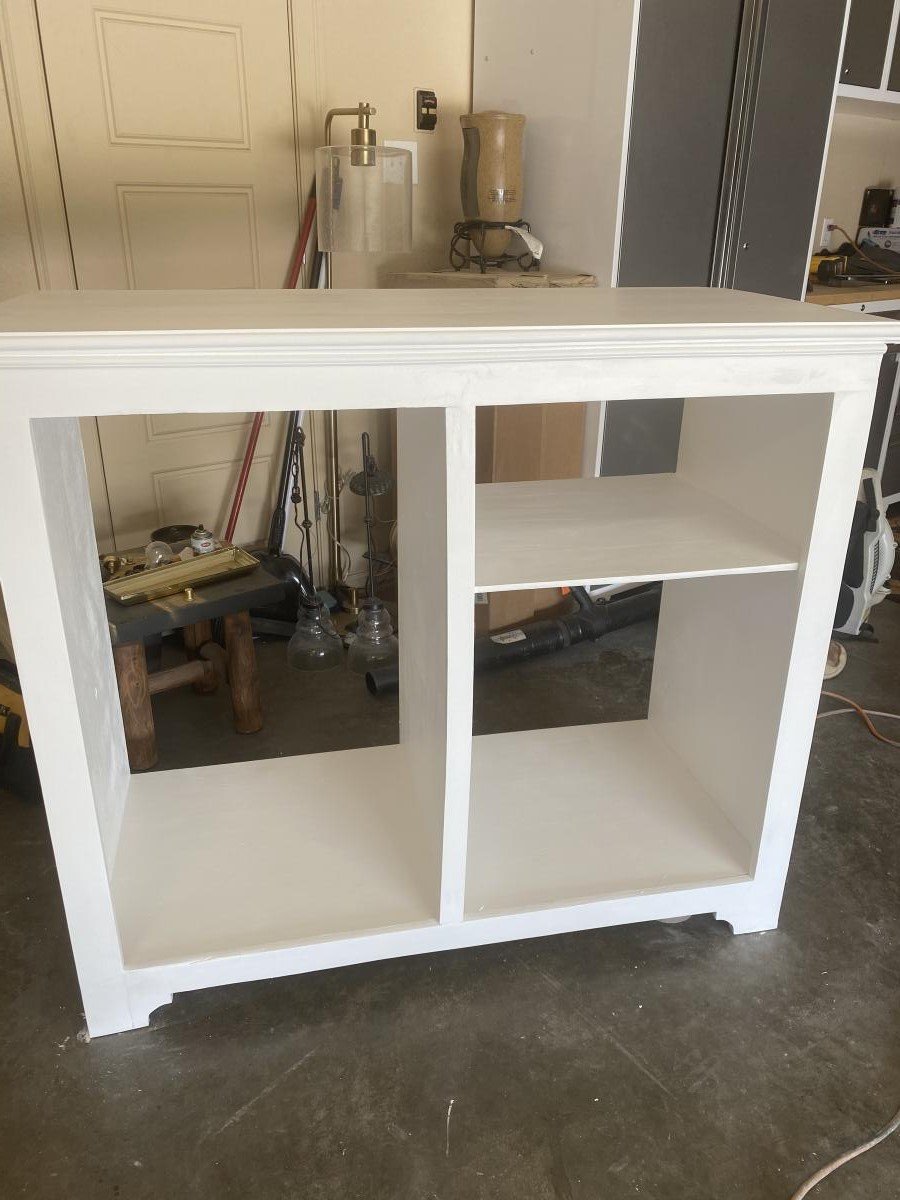
I changed plan to make deeper. I also modified the bottom trim and top. I put a ball bearing soft door drawer guide on modern door so it can slide back and forth. I feel we need more modern plans on here but with a bit of creativity and using plans you can make anything. I have never built anything before. I love General Finishes Milk Paint in Snow White and I brushed rolled it on (sanded between 3 coats). It’s basically self leveling and leaves a nice matte finish. Used door glide in picture bought from homedepot in the 24 inch and that’s how wide door was and it was 36” tall. Door glide I only used one on top of the door not on bottom as well. Door piece of fiberboard with just strips glued on and quarters spacing them correct.

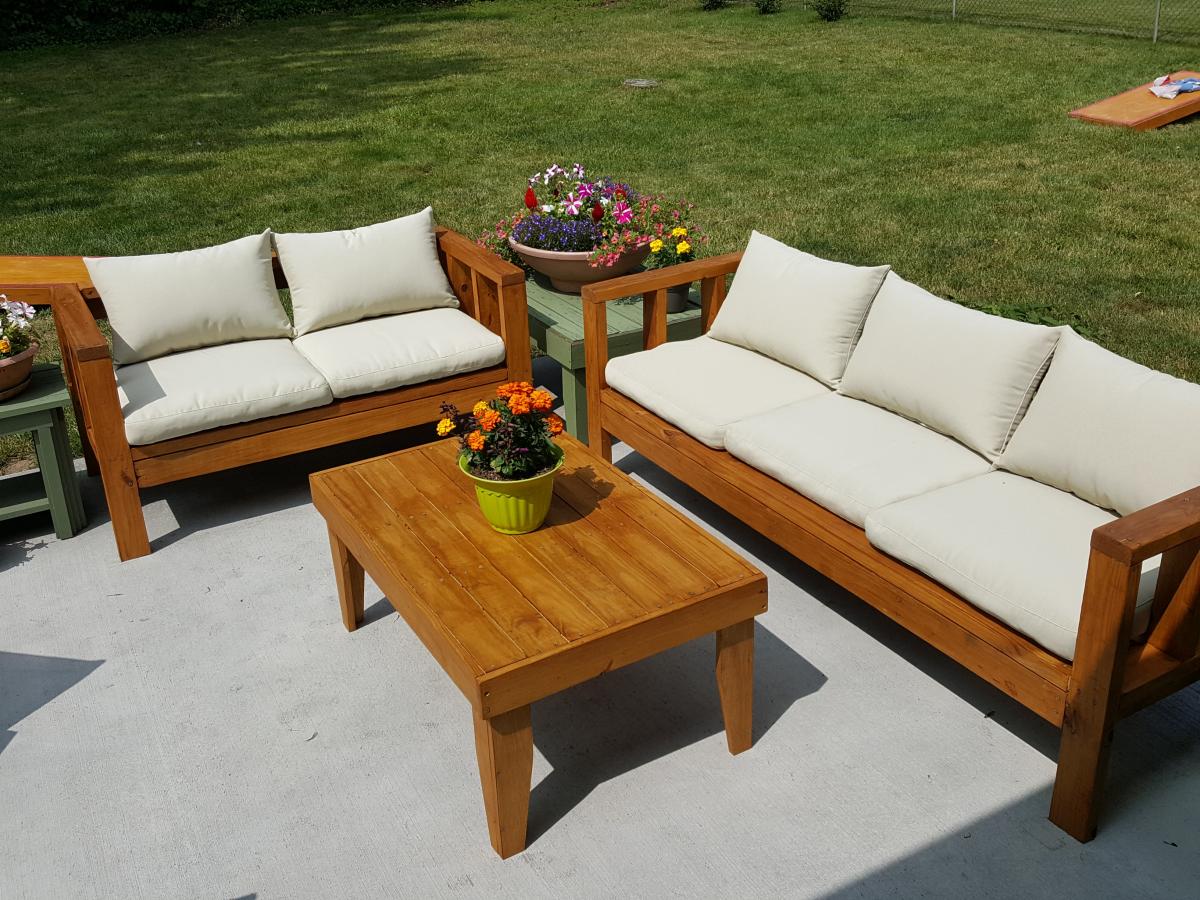
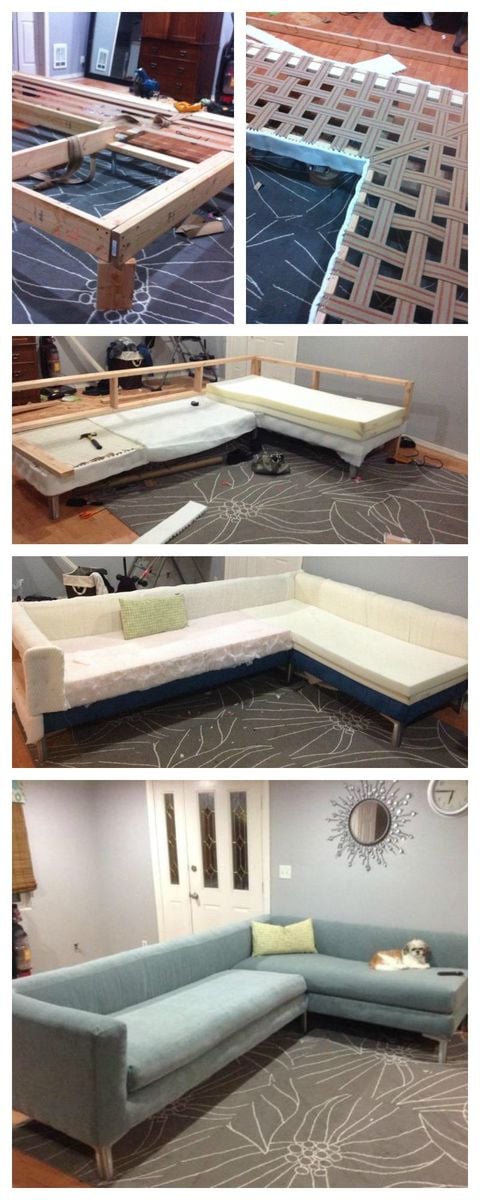
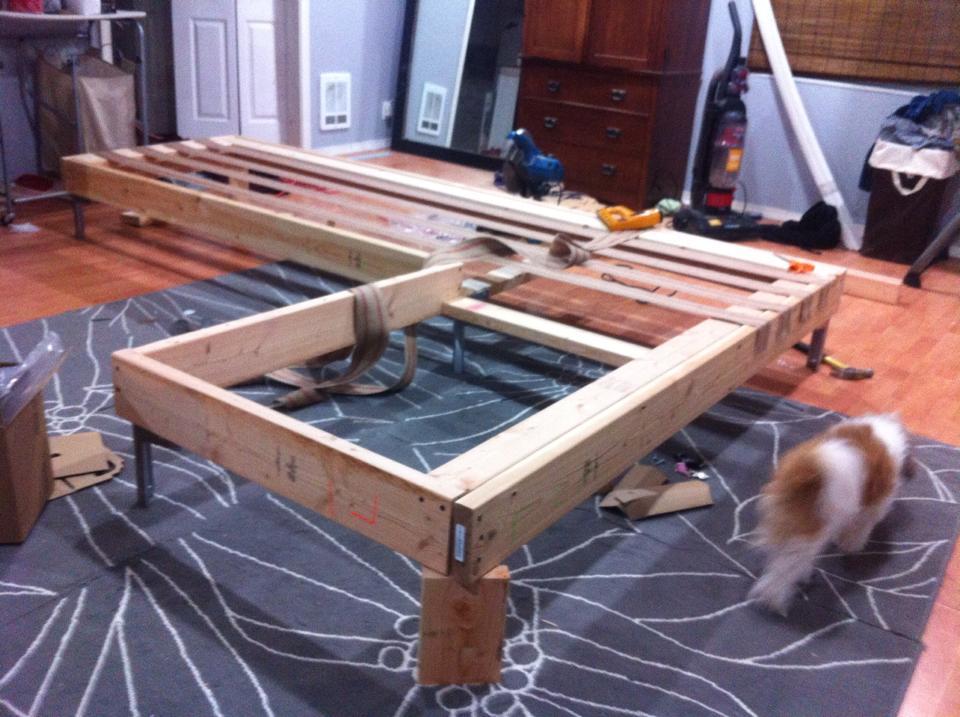
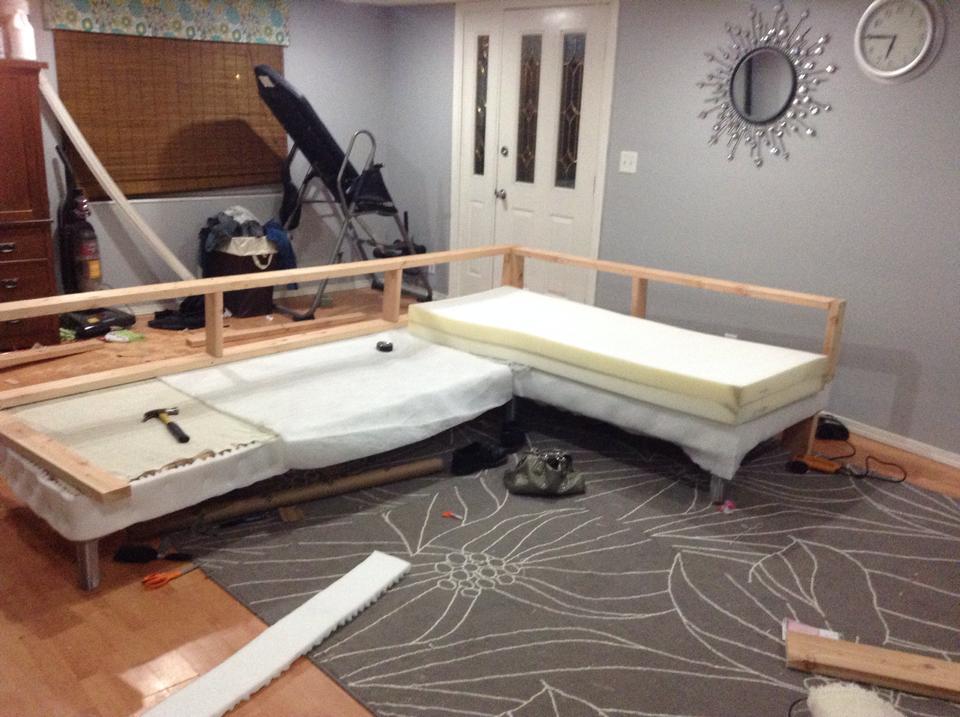
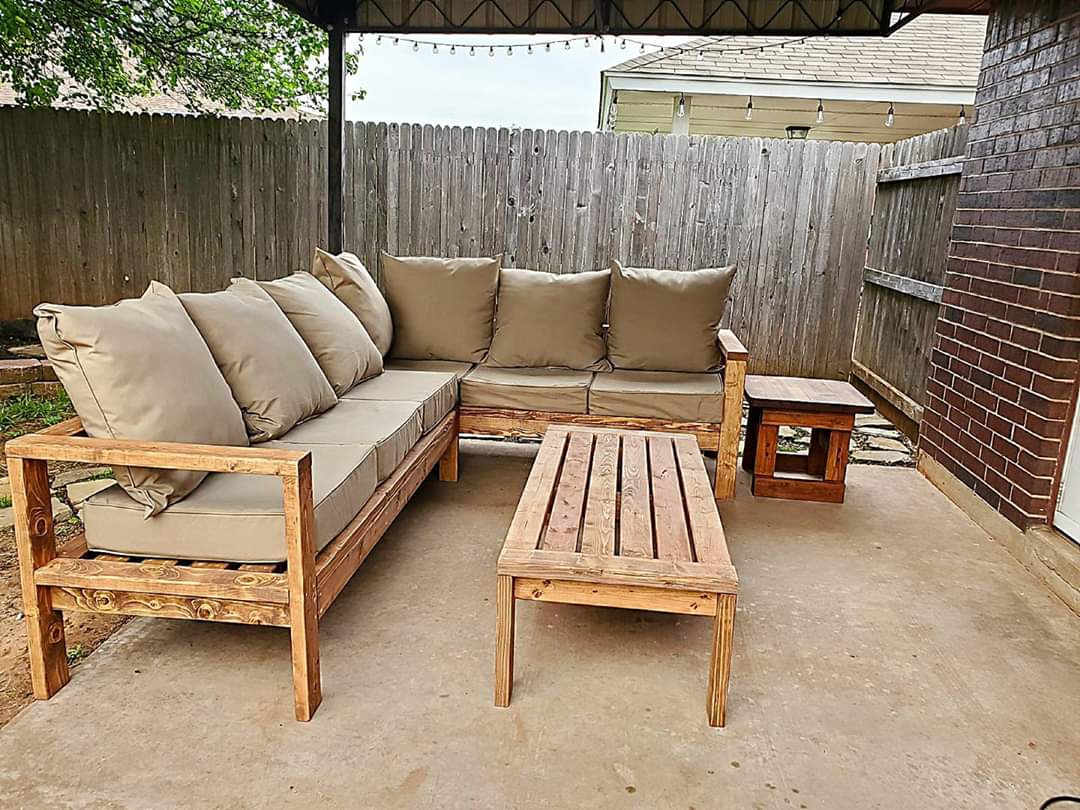
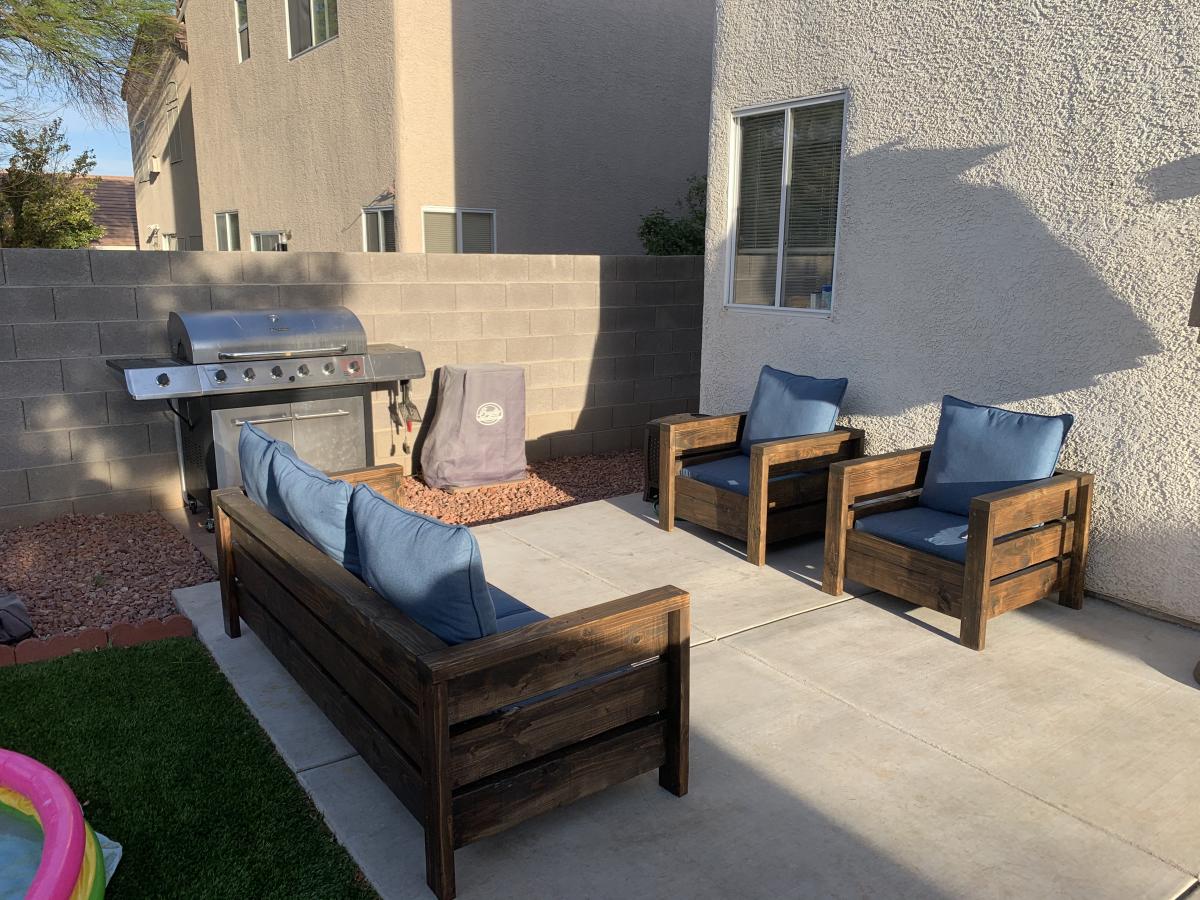
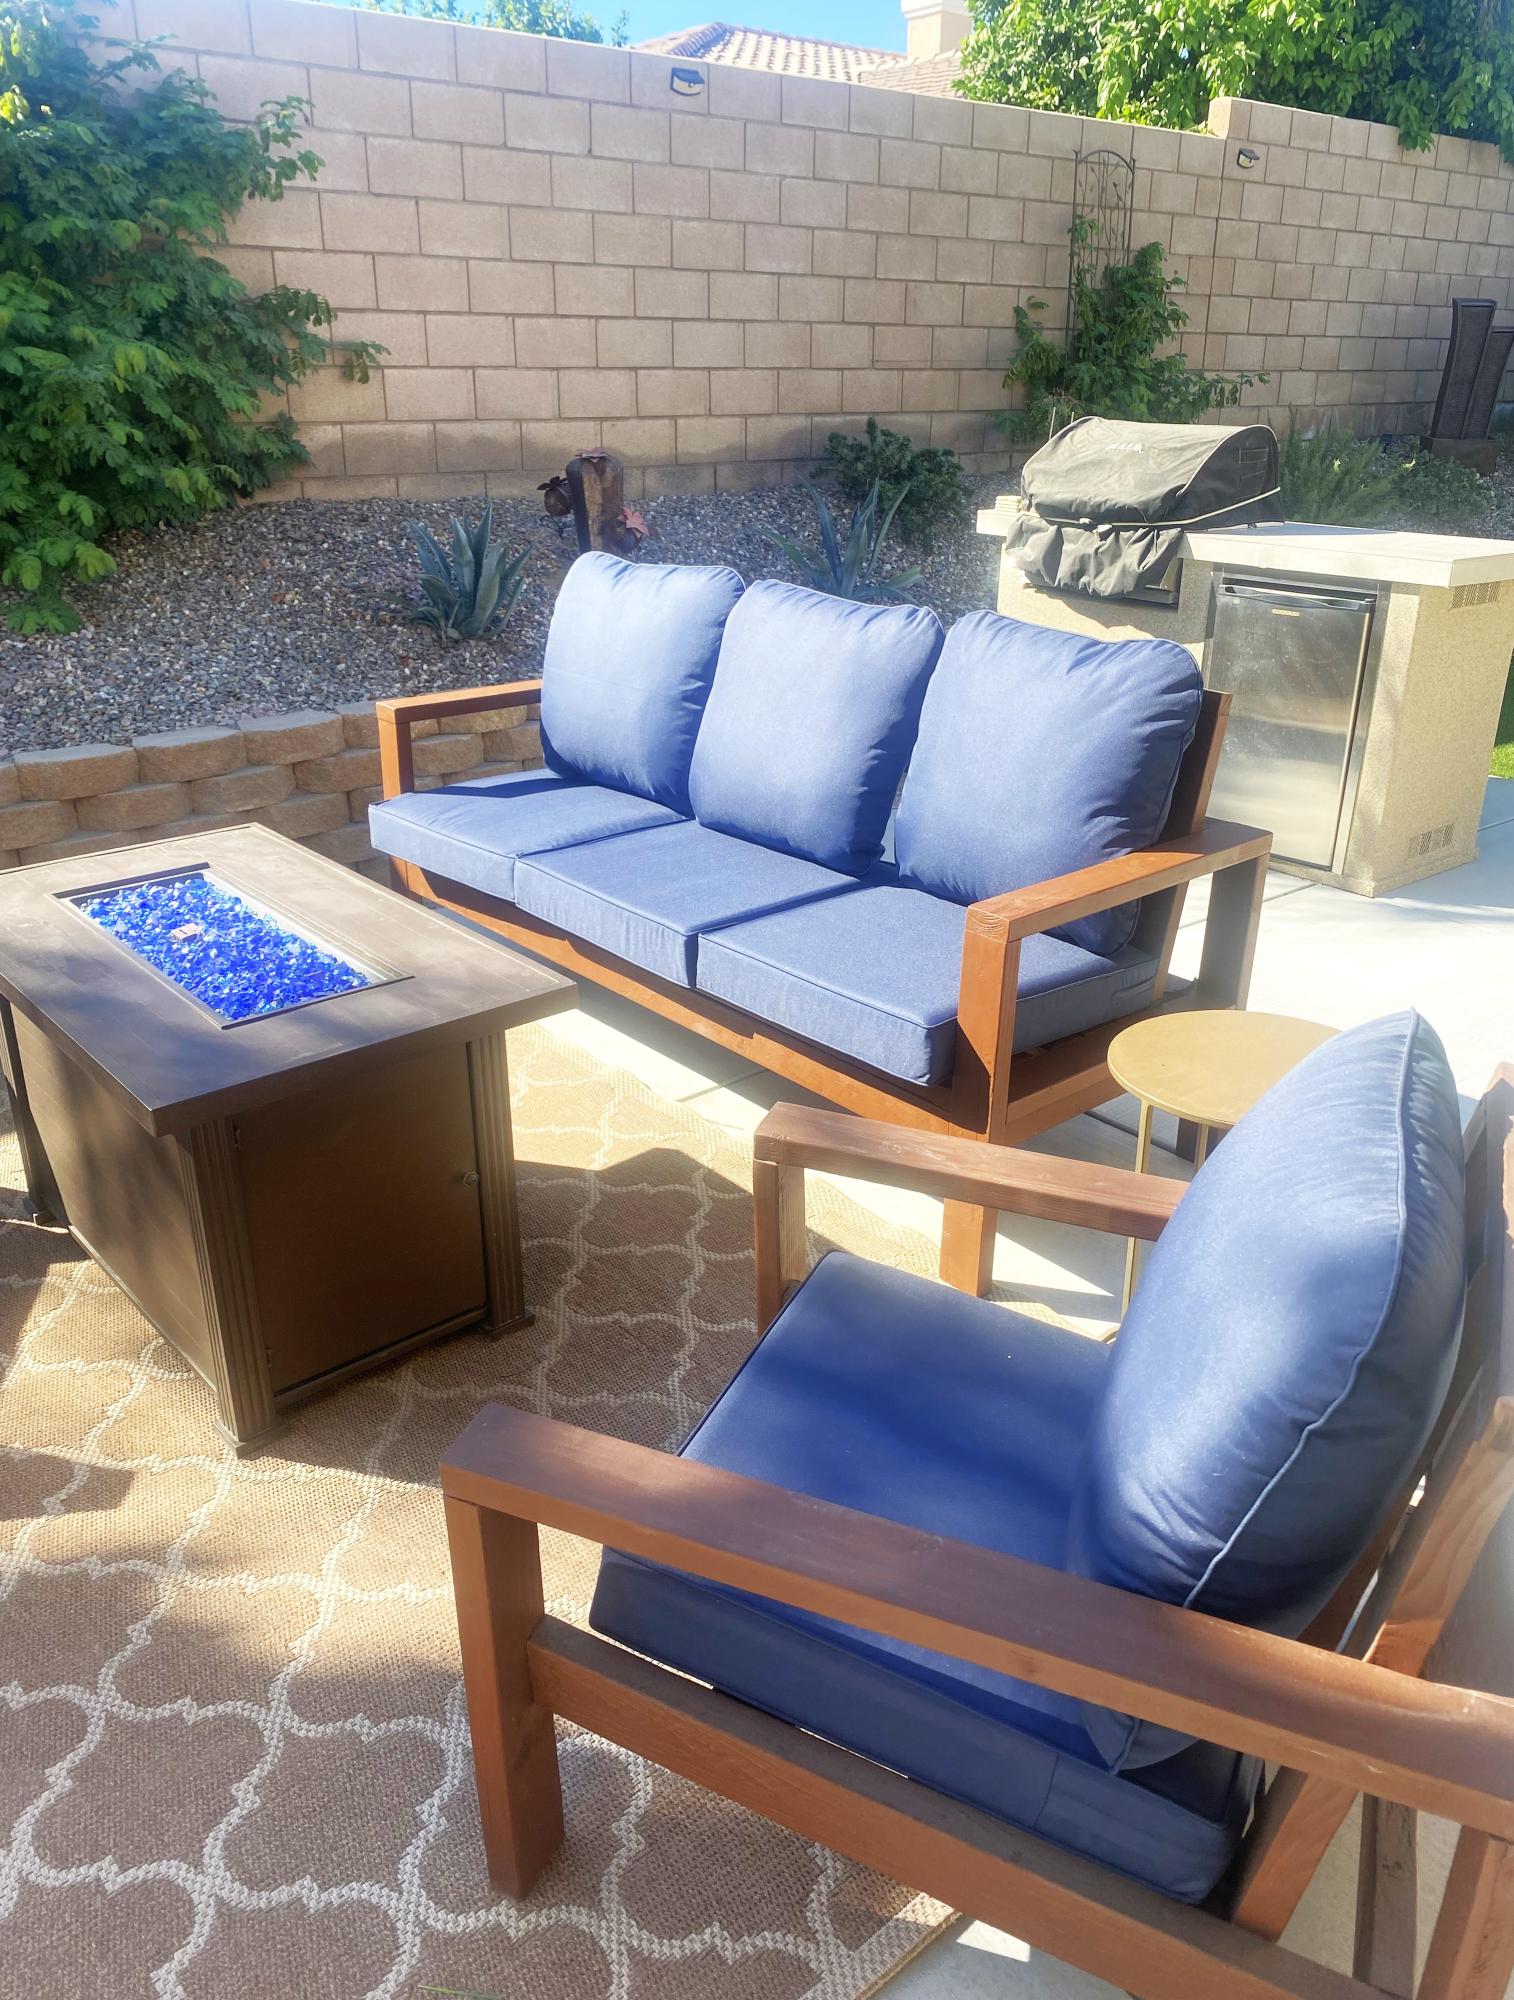
I decided for my patio a love seat/sofa combo would work better than the sectional. It was easy to make both and modify the plans to have arms at both ends of the pieces.
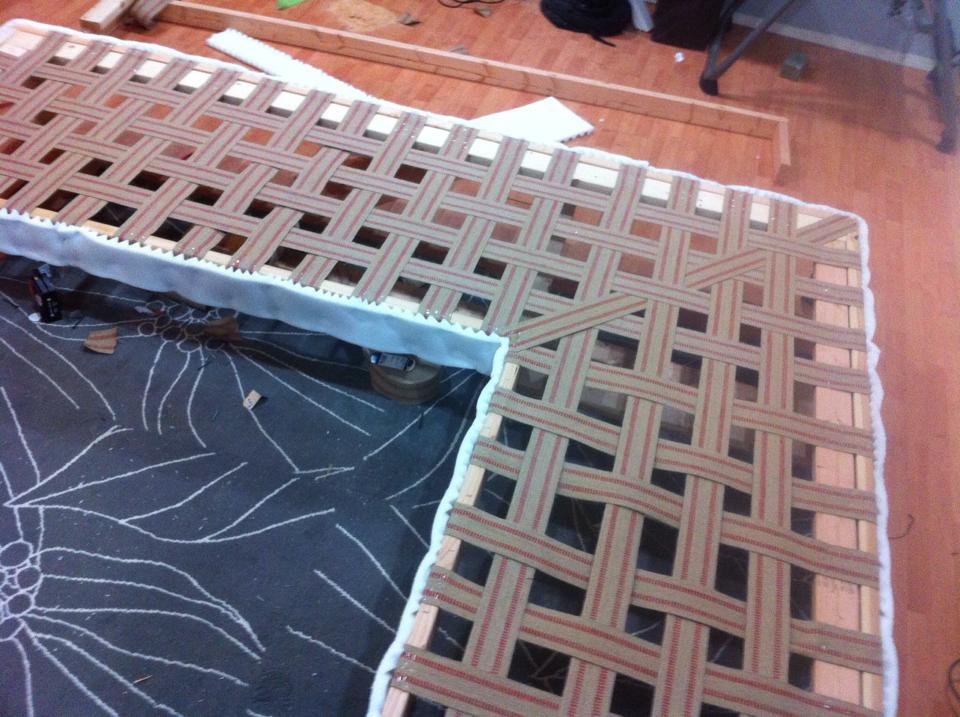
Getting inexpensive cushions was a challenge. I ended up getting IKEA HÅLLÖ cushions. I added more foam to the back cushions as was suggested in another post since the IKEA cushions were a little flimsy and tend to fall through the back of the sofa. I might add some bigger cushions at some point
Wed, 07/10/2019 - 17:06
I want to try this as soon as we get into our house.
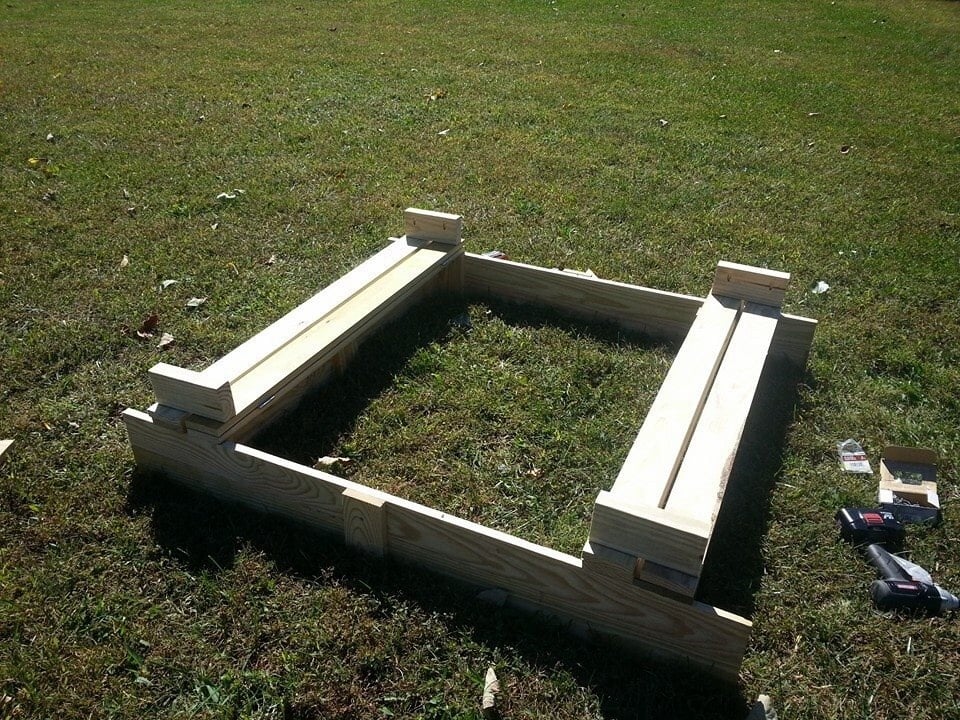
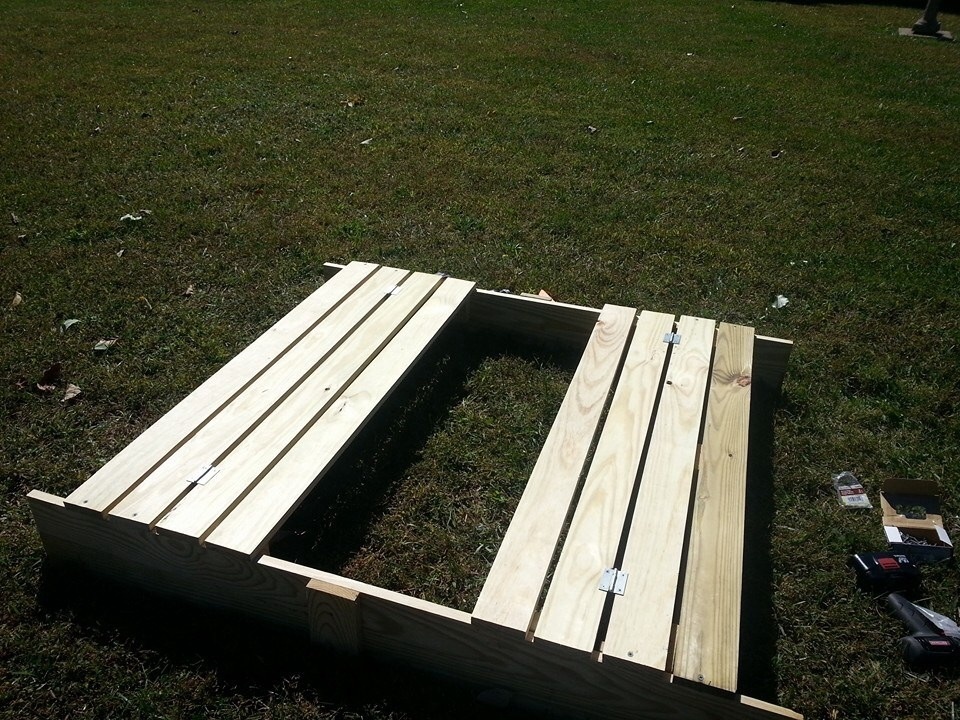
I modified this a tad from the original plans to suit my needs. I will eventually be adding a platform with attached slide and swing set.
Plans were easy to follow. My store didn't have 1x8's so I stacked 1x4's and used my Kreg jig to join them together and then I added extra bracing.
I had seen this on Pinterest a couple years ago and thought it was the coolest thing! Io excited I was able to build it myself!

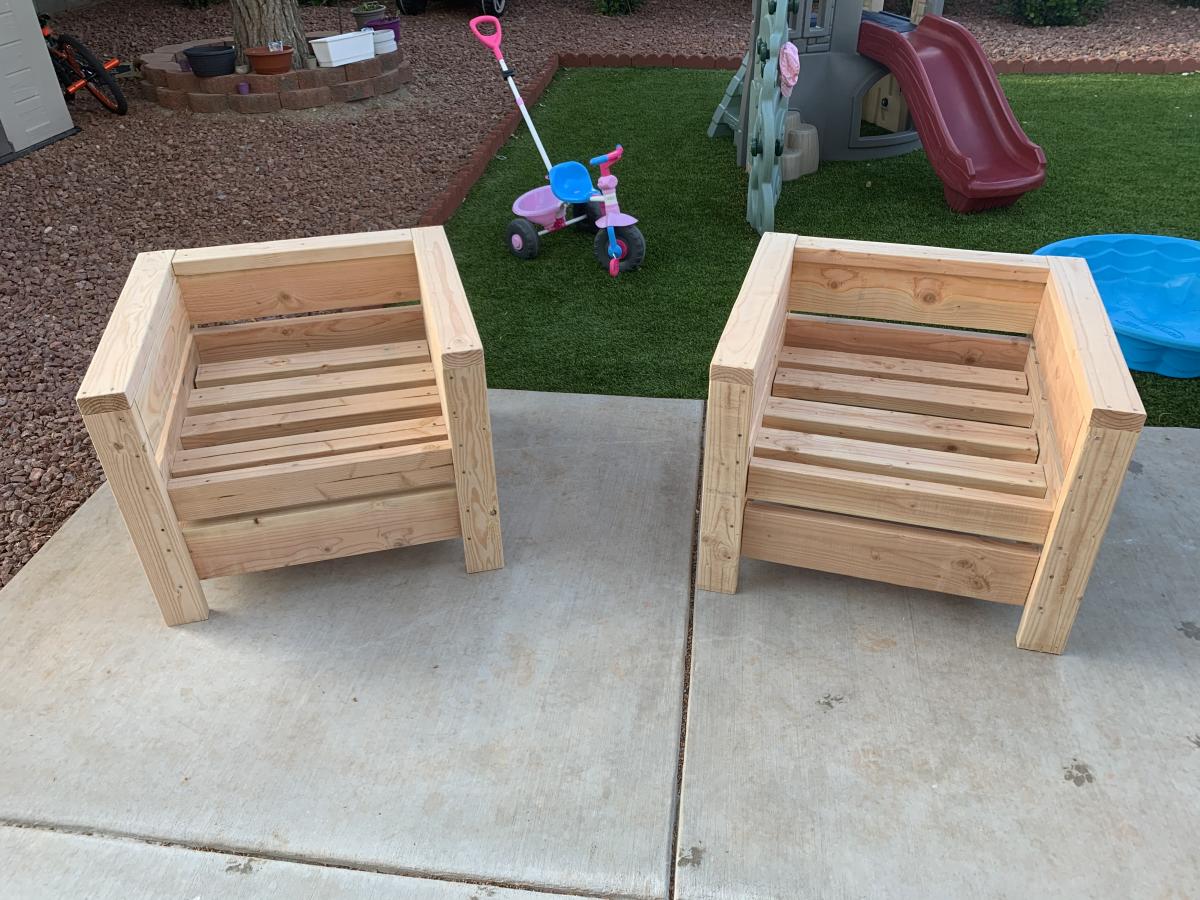
I modified this chair with 2x4's as the base and 2x2 for decoration on arms, this is prior to sanding and finishing

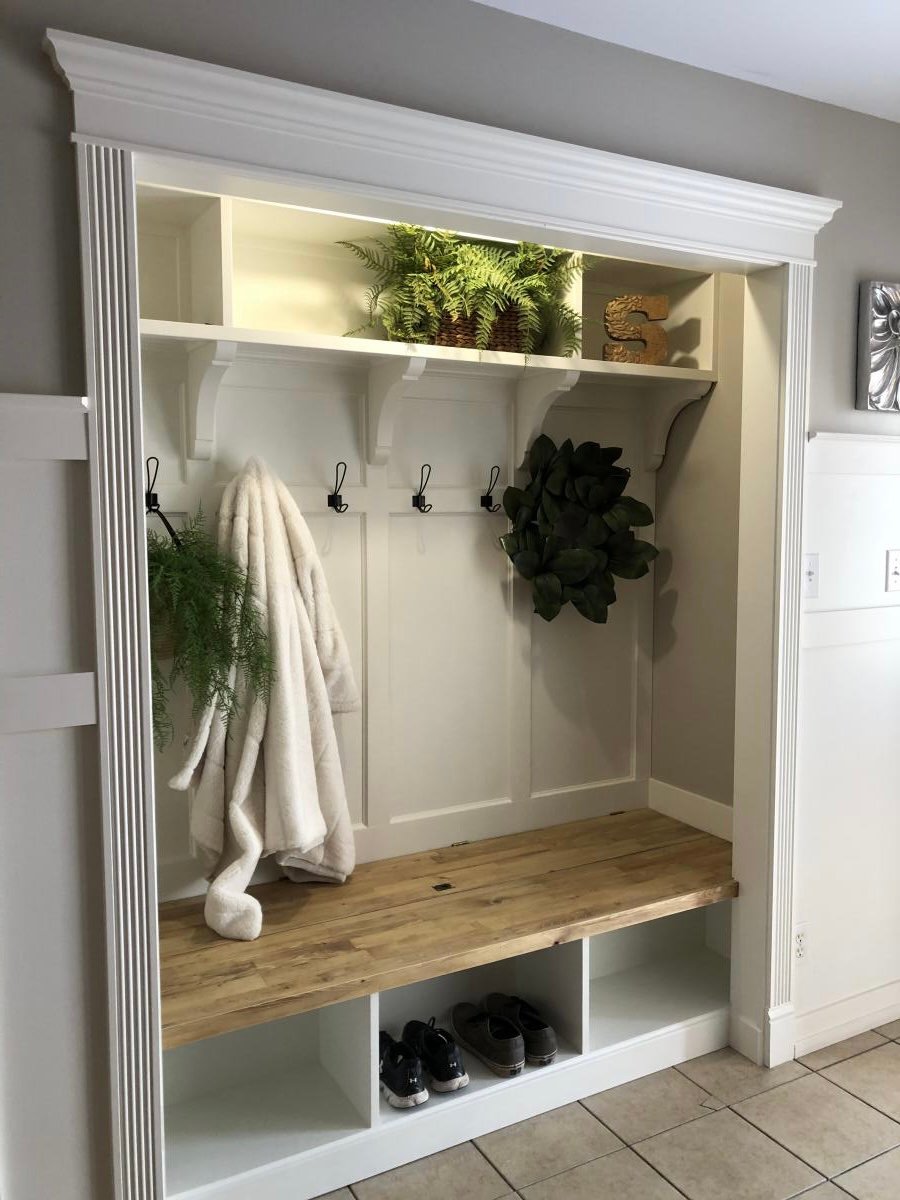
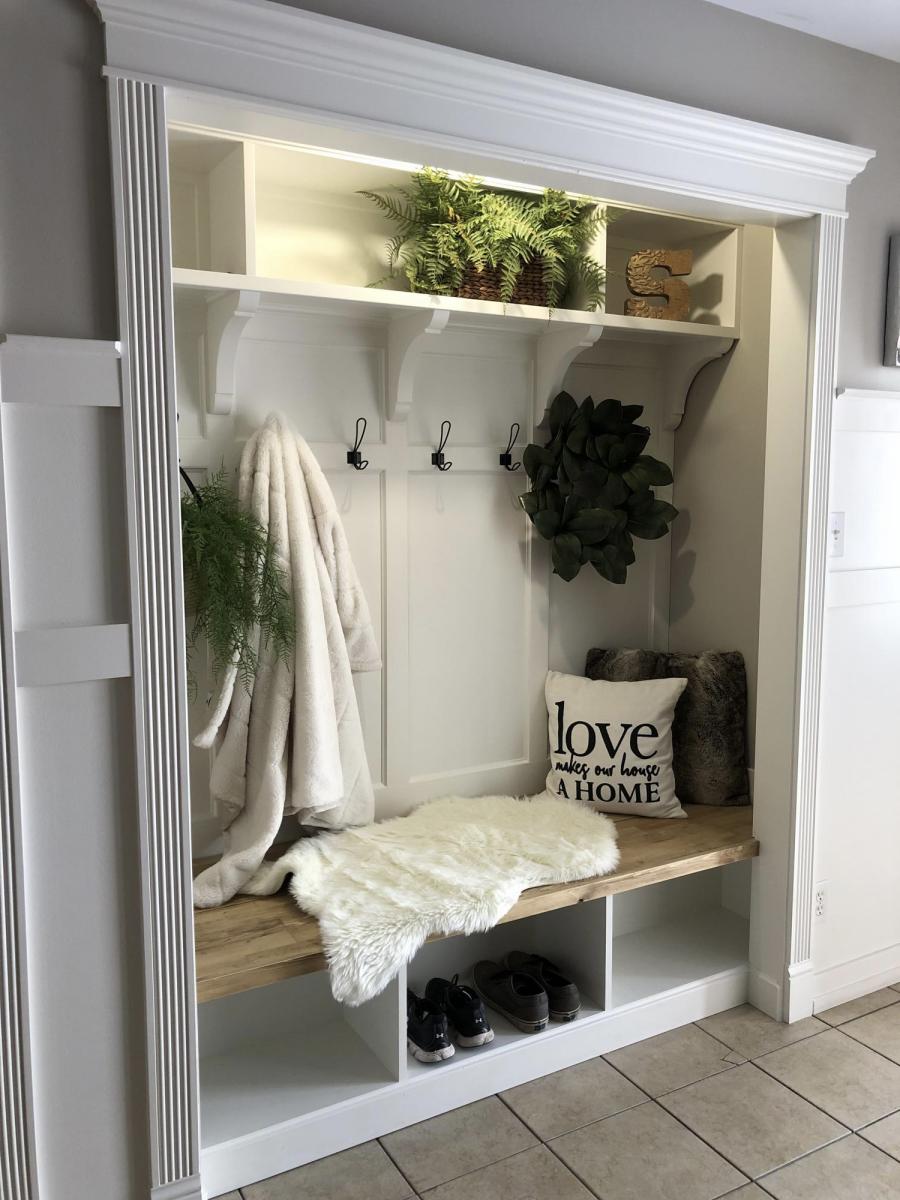
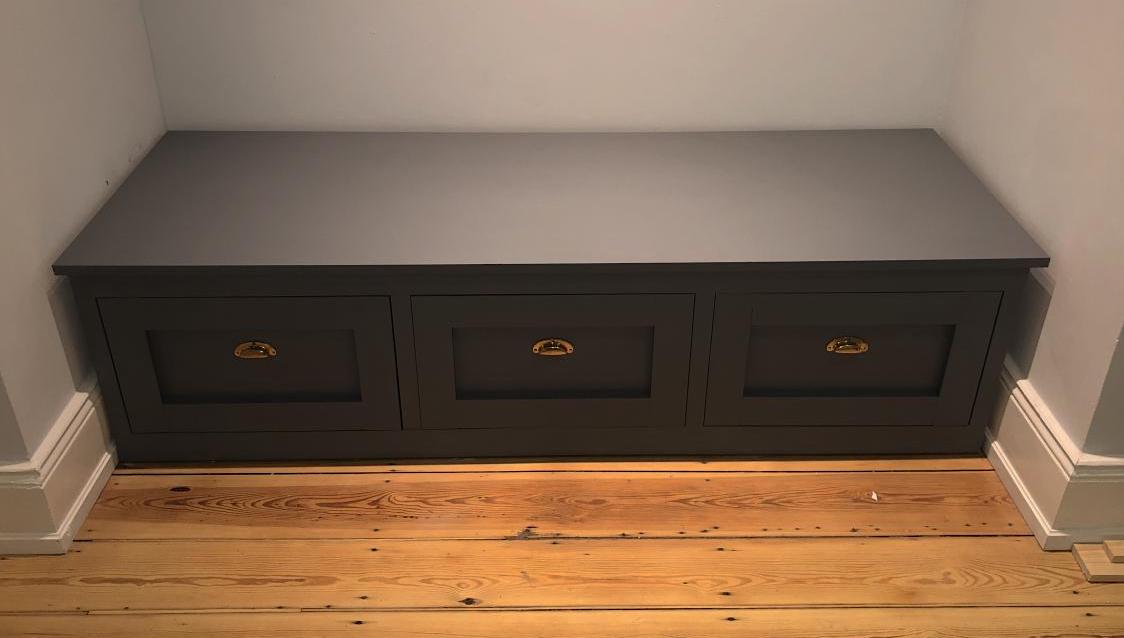
The concept of hidden boot storage at the back is genius!!! I knew as soon as I saw your plan that I needed that in this space! Thank you so much for what you do!
Fri, 01/22/2021 - 11:42
May I ask how you would assemble if you wanted the hinge in the back as in this picture?
Thank you.
Wed, 08/25/2021 - 04:51
Hello, can you tell me how to find the plans for the Mudroom Closet makeover? I’m interested in doing the one pictured on this page.
Thank you
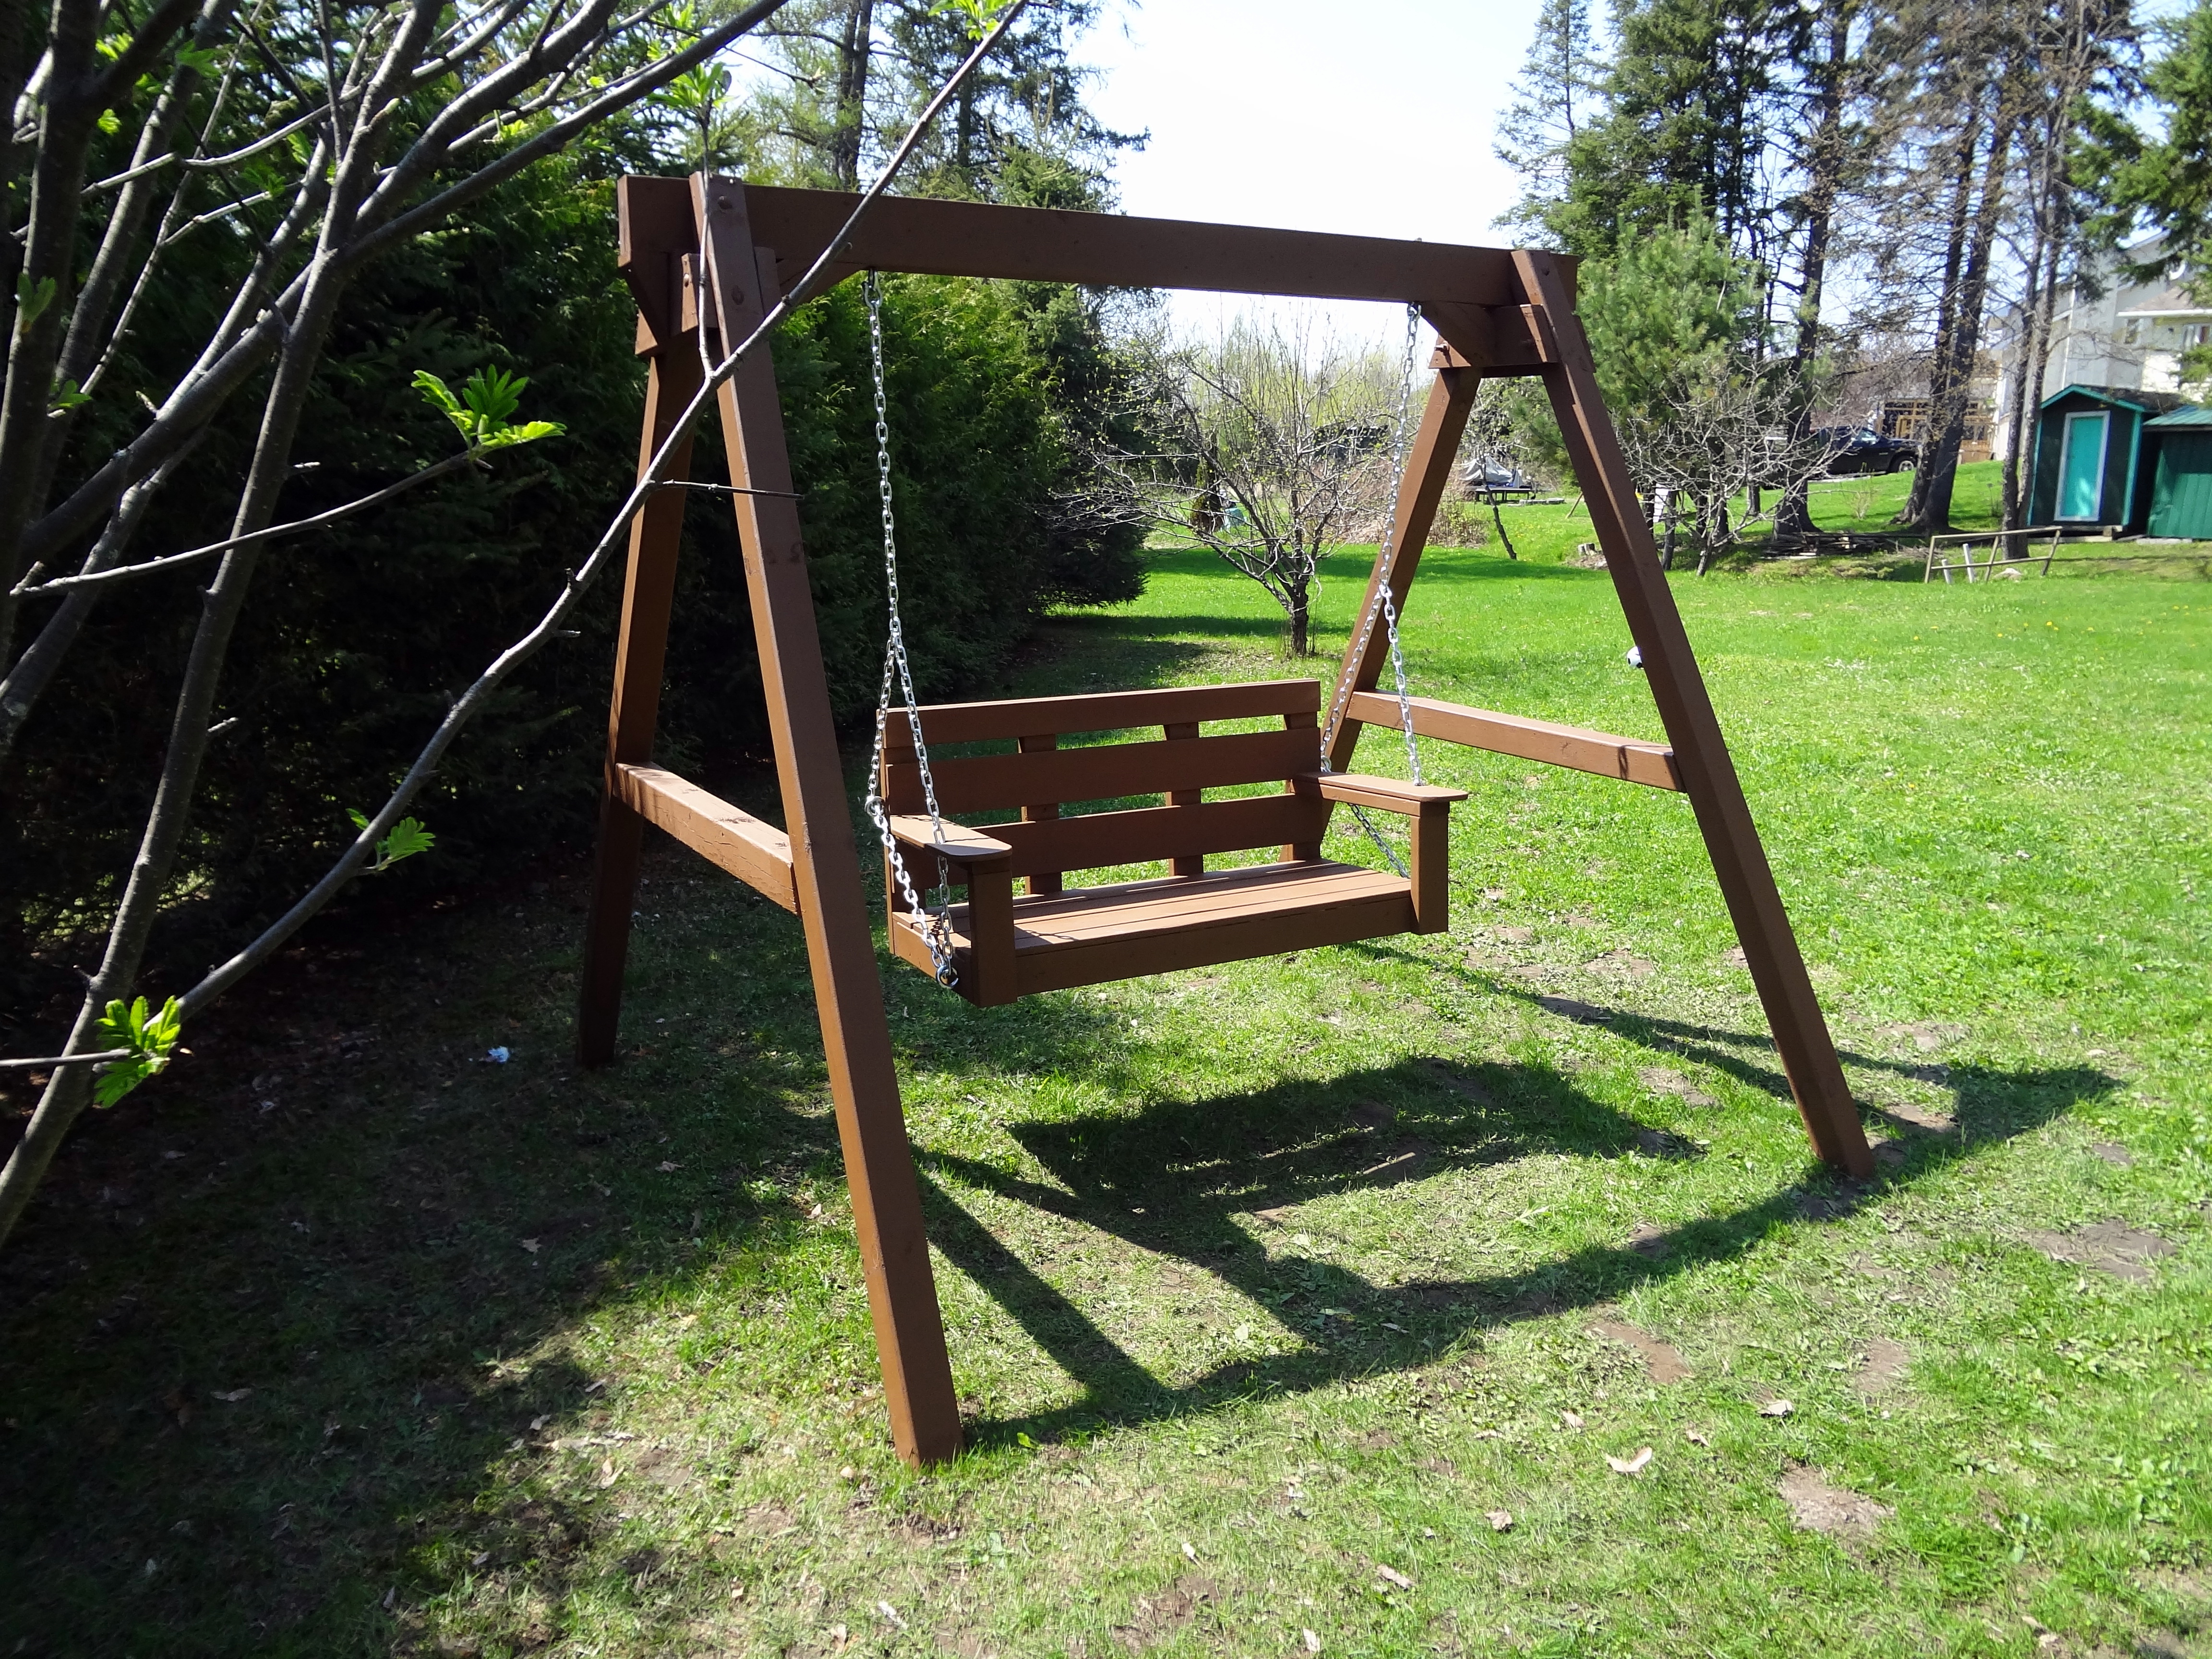
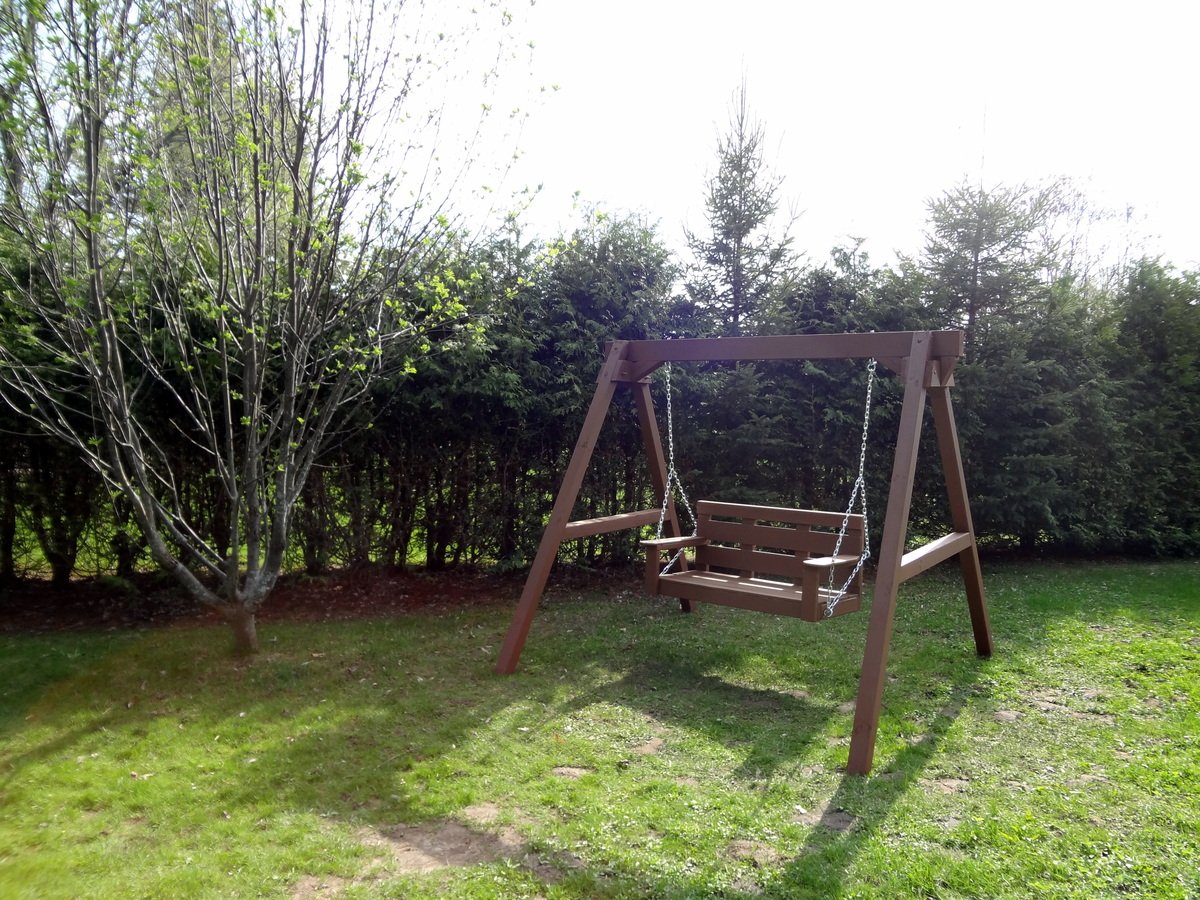
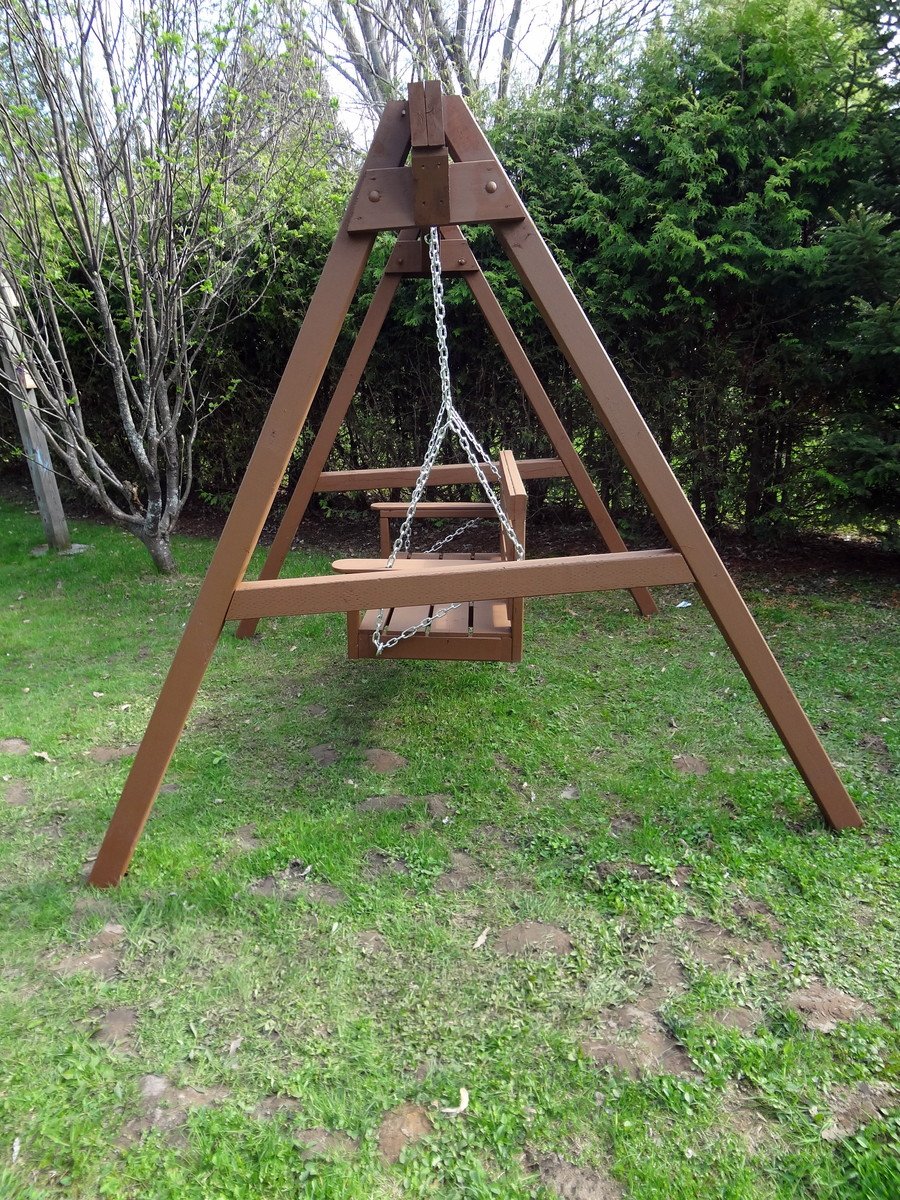
A great weekend project...the "love swing"! I used the plan from Ana for the swing seat and added two arm rests from left over 1x6, rounded them off and sanded.
I cobbled together an A-frame to hang everything, made from five 8 foot 4x4s and two 8 foot 2x6s laminated together for the stretcher. Assembled with 1/2" galvanized carriage bolts and hung with 1/4" chain.
Definitely going to want a good miter saw for the A-Frame angles (the top ones are a bit tricky to get everything lined up)
Love it! Thanks for another great plan Ana..and of course..Shanty2Chic!
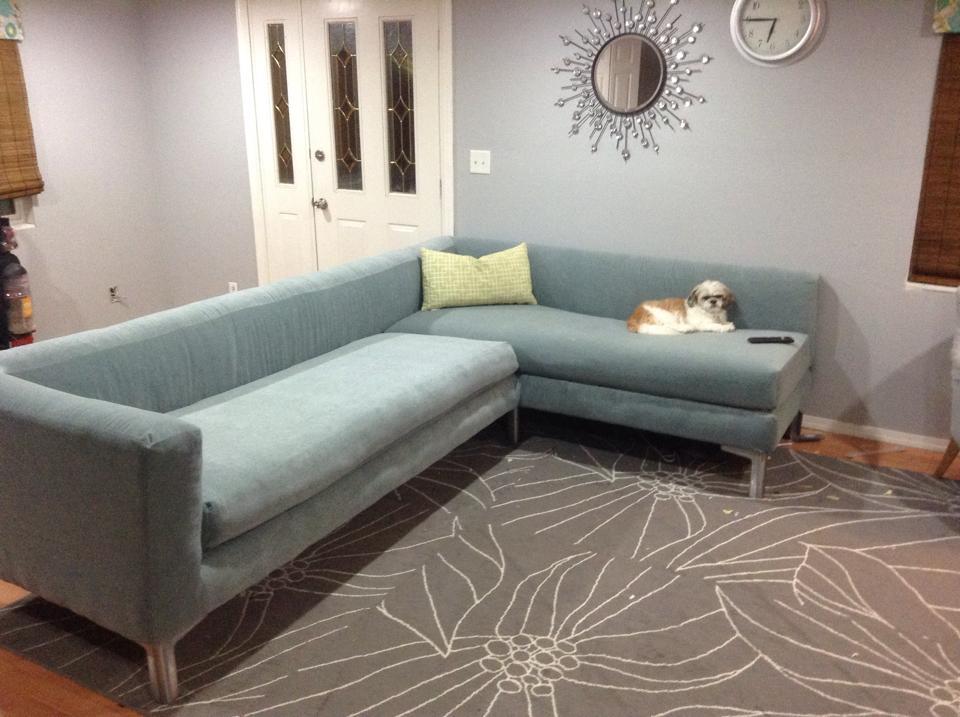
I looked all around my town for a sofa that meet my needs. I wanted something with tall legs, modern lines and fit my living room. I did not have $3,000 to buy one online so I said to myself why not???


Sat, 07/25/2015 - 12:28
You are my hero ! Your modern diy sectional is amazing, love the blue fabric! Thank you so much for sharing! Ana
Mon, 08/03/2015 - 14:52
I've been looking for plans for a big sectional this would be perfect!
Loved these plans! Was my first project I tackled trying my hand with a new hobby of wood working to stave off quarantine craziness :-) finished project looked awesome and got me started working on other plans on the site.
**note**
Side table was just sanded and refinished, wasn't built just tried to match.
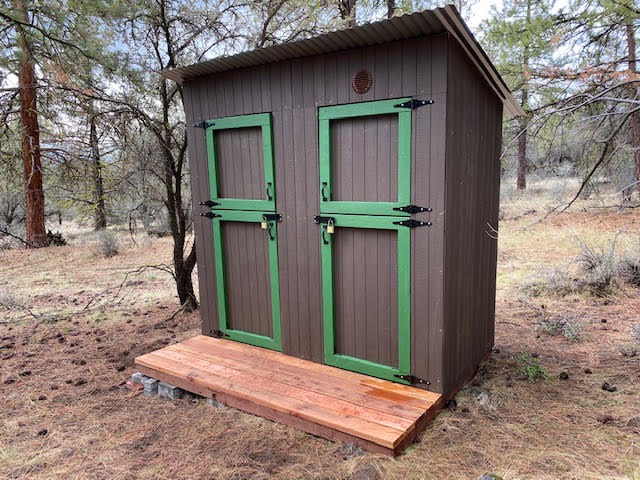
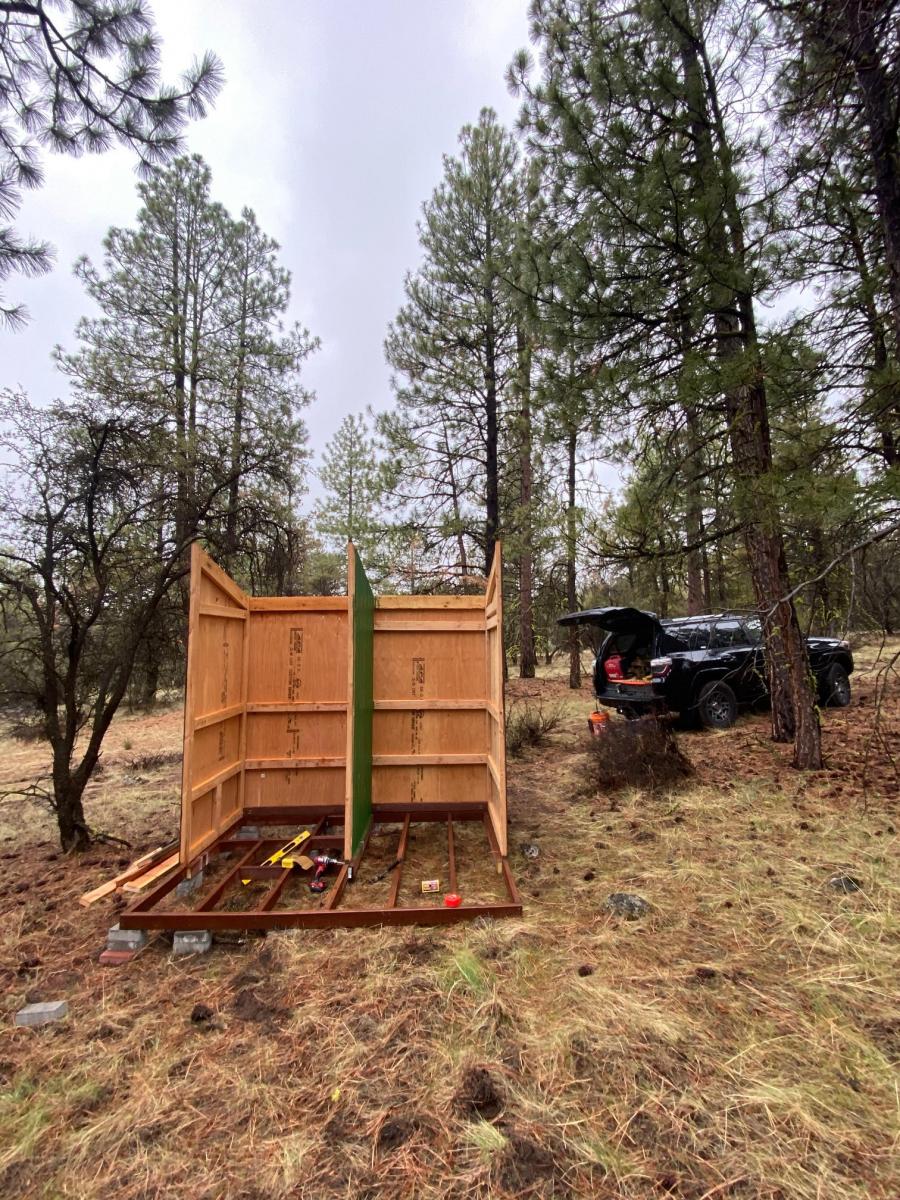
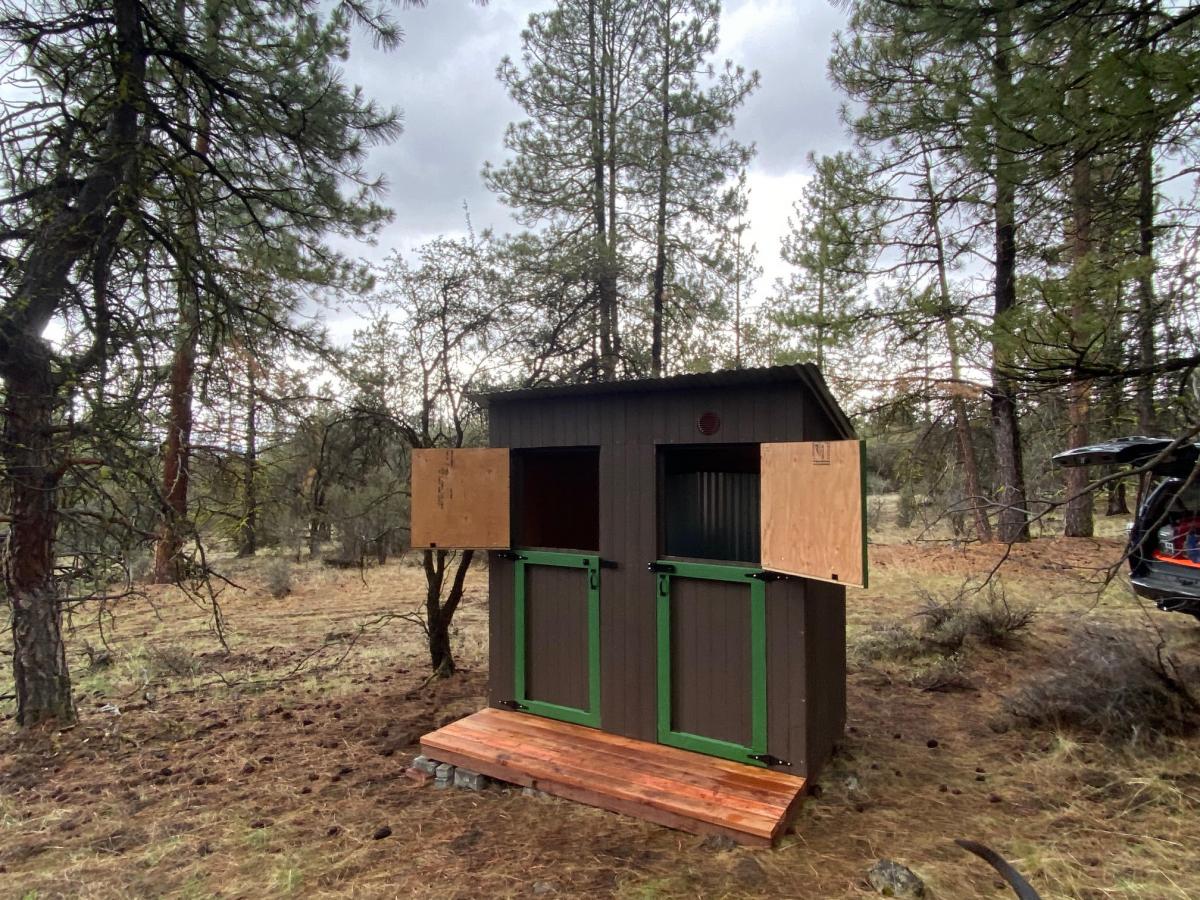
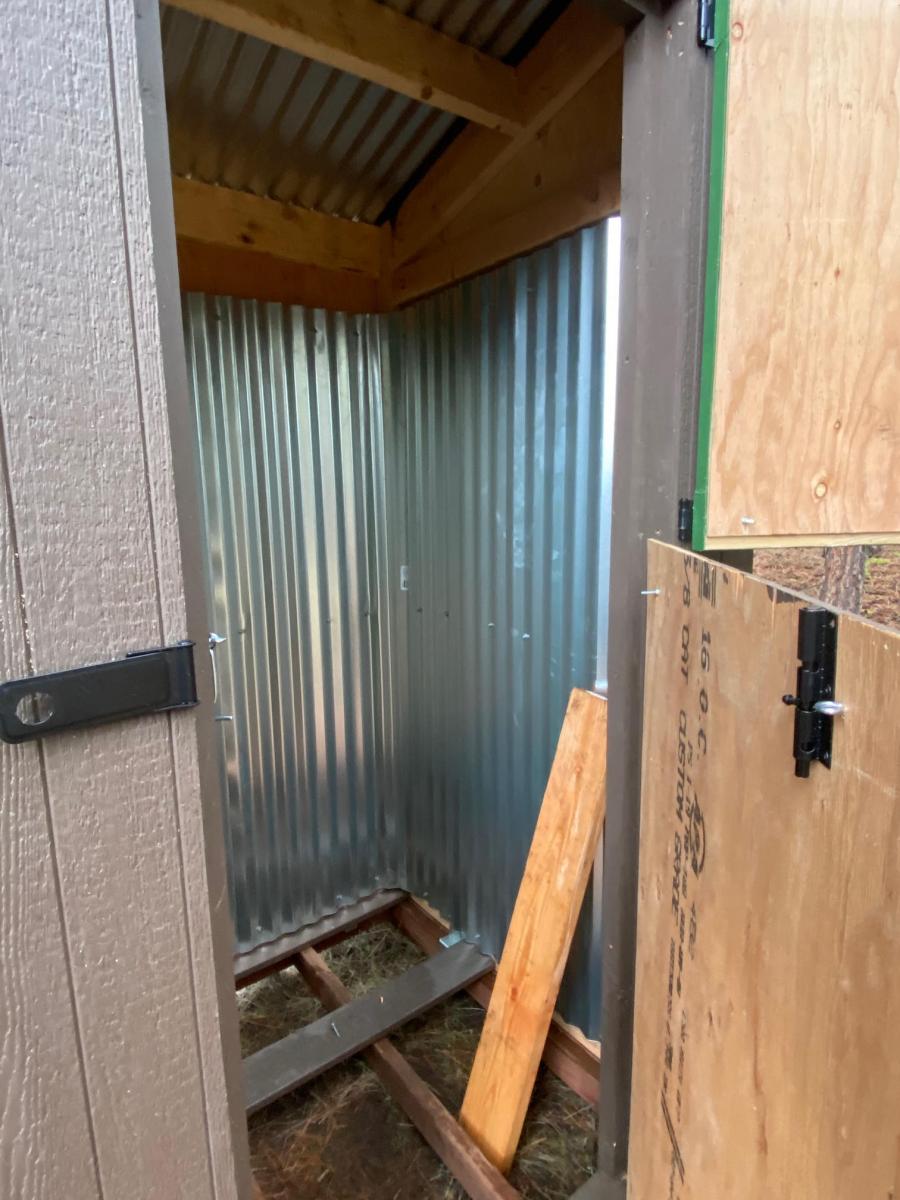
I built an an outhouse for my camping property in the PNW. The plans were great and easy to follow.
I did take the liberty of extending the the front wall to 8' still using the 15 degree roof line. I also wanted the option to shower during extending camping trips so I extended the floor and added one more back and side wall to create a shower house. With this design, I basically duplicated the side and back wall. Since I am in the middle of the woods, the Dutch doors were a last minute embellishment that I'm glad that I implemented in order to take advantage of the view!
For the shower, I used composite decking with 1/2" gaps for drainage and lined the inside with 6' lengths of corrugated metal roofing.
One additional note: I did build this on my back patio over a couple of weekends since my property is a fairly long drive from my home and about 2 hours round trip from the nearest hardware store. It broke down easily in about 30 minutes with 2 people and fit perfectly in the back of a full size pick up truck for the trip.
In summary, great plans and I love this site. Much appreciated and happy building!
Thu, 04/29/2021 - 16:44
Thank you so much for sharing, what a great addition to your property!
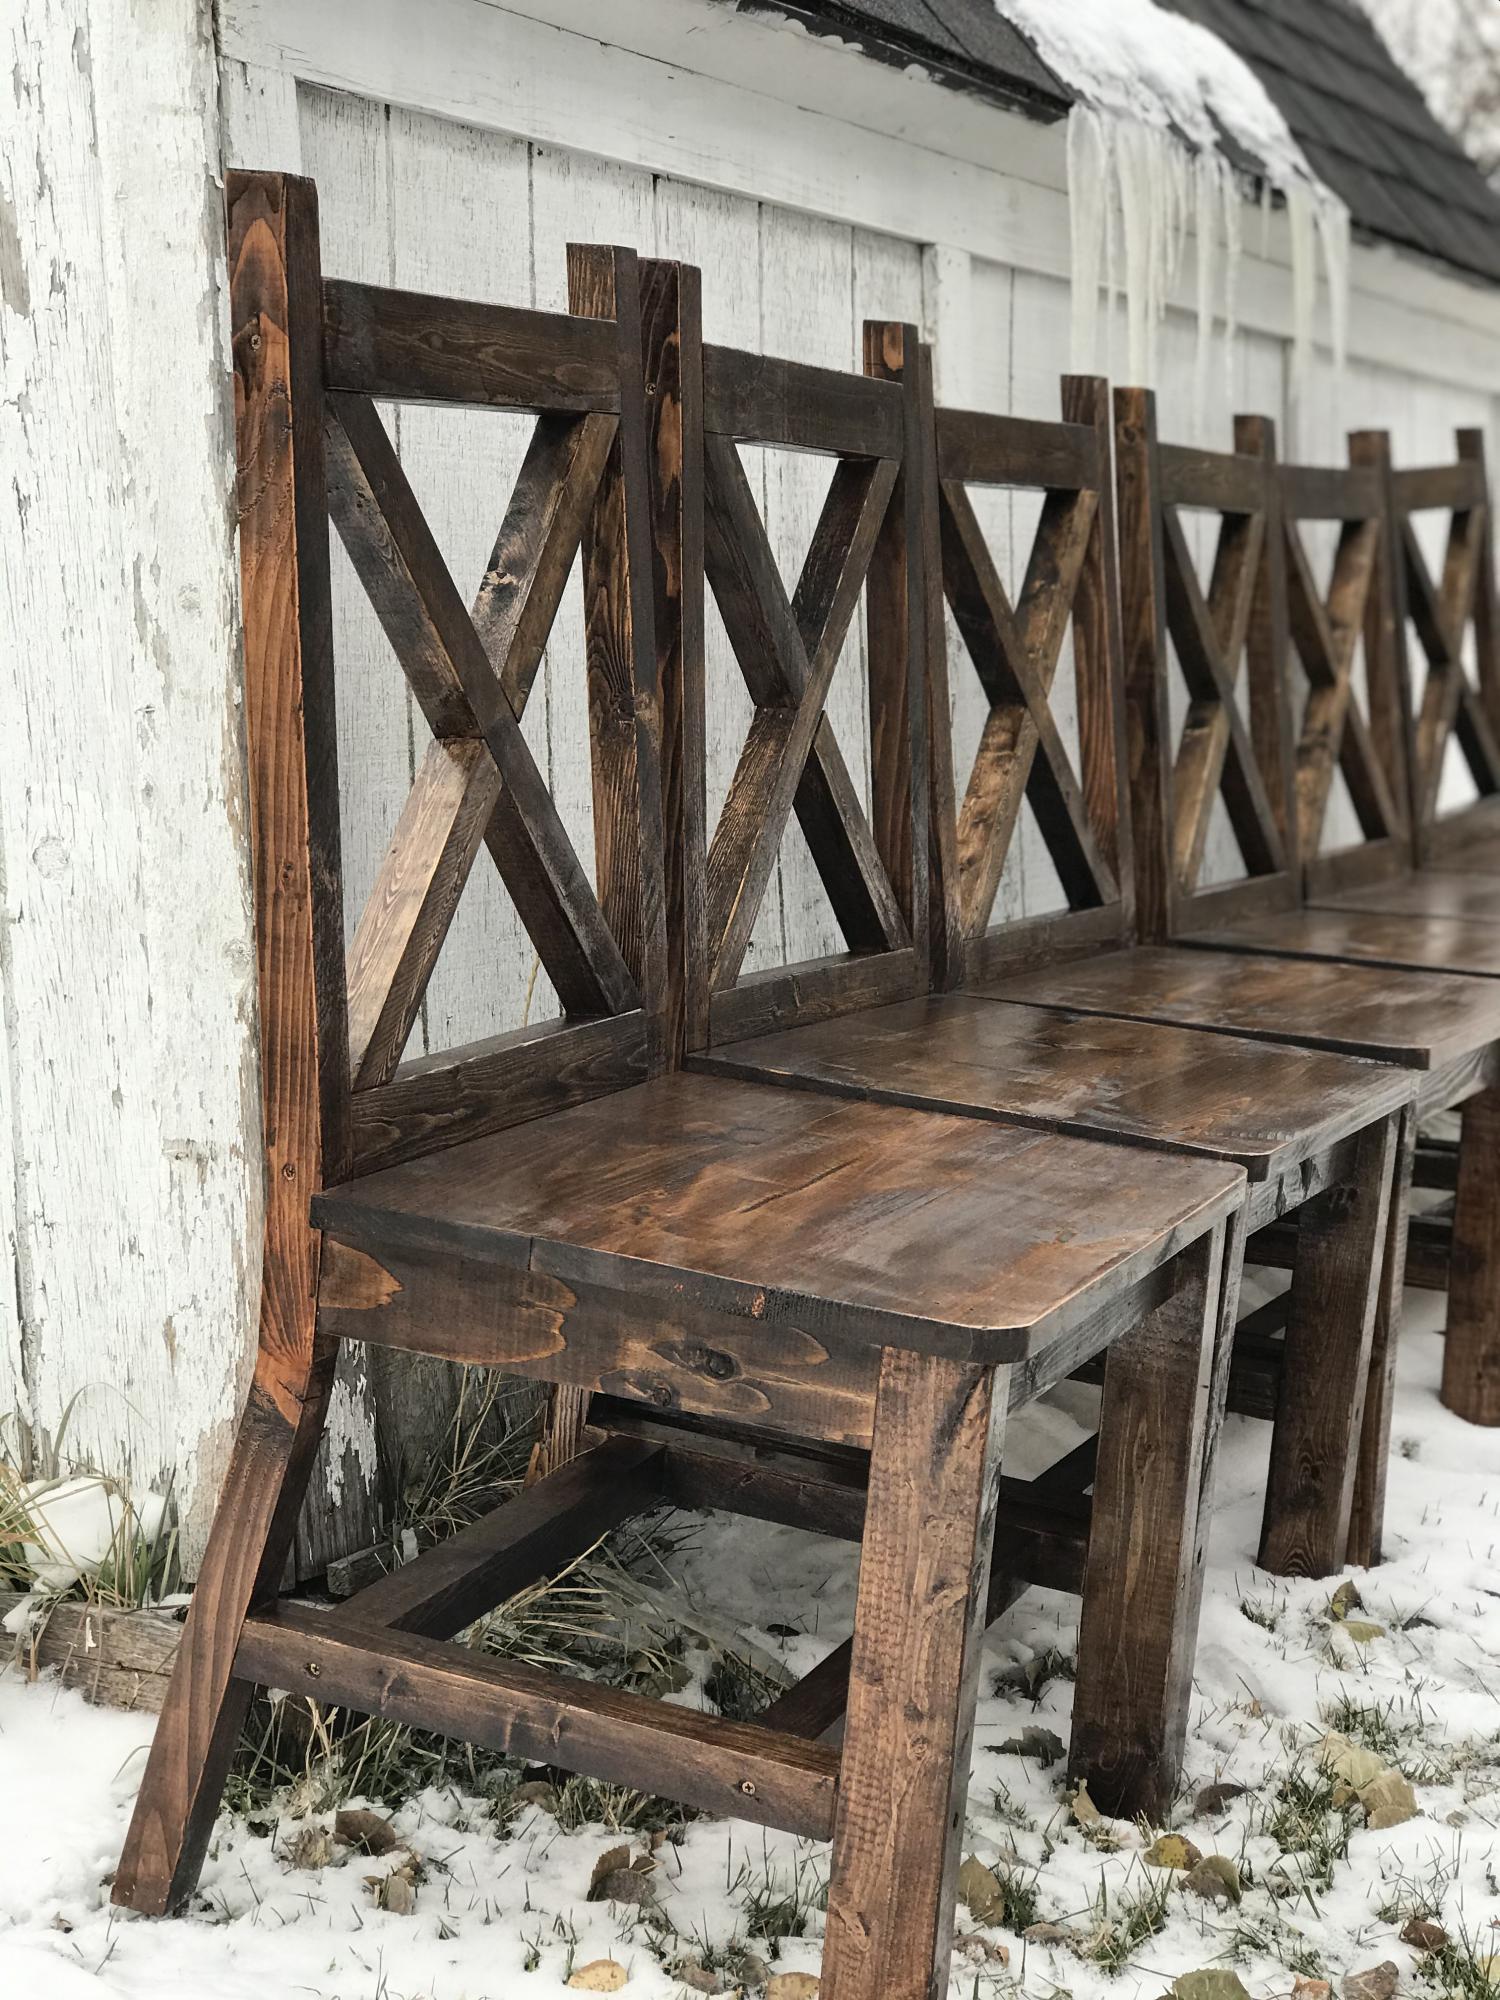
I found a picture of this style of chairs, and I really wanted to make them for my table. I created my own plans and adjusted them until they were perfect. I’ve since made several sets of chairs for other people including this set of 6.
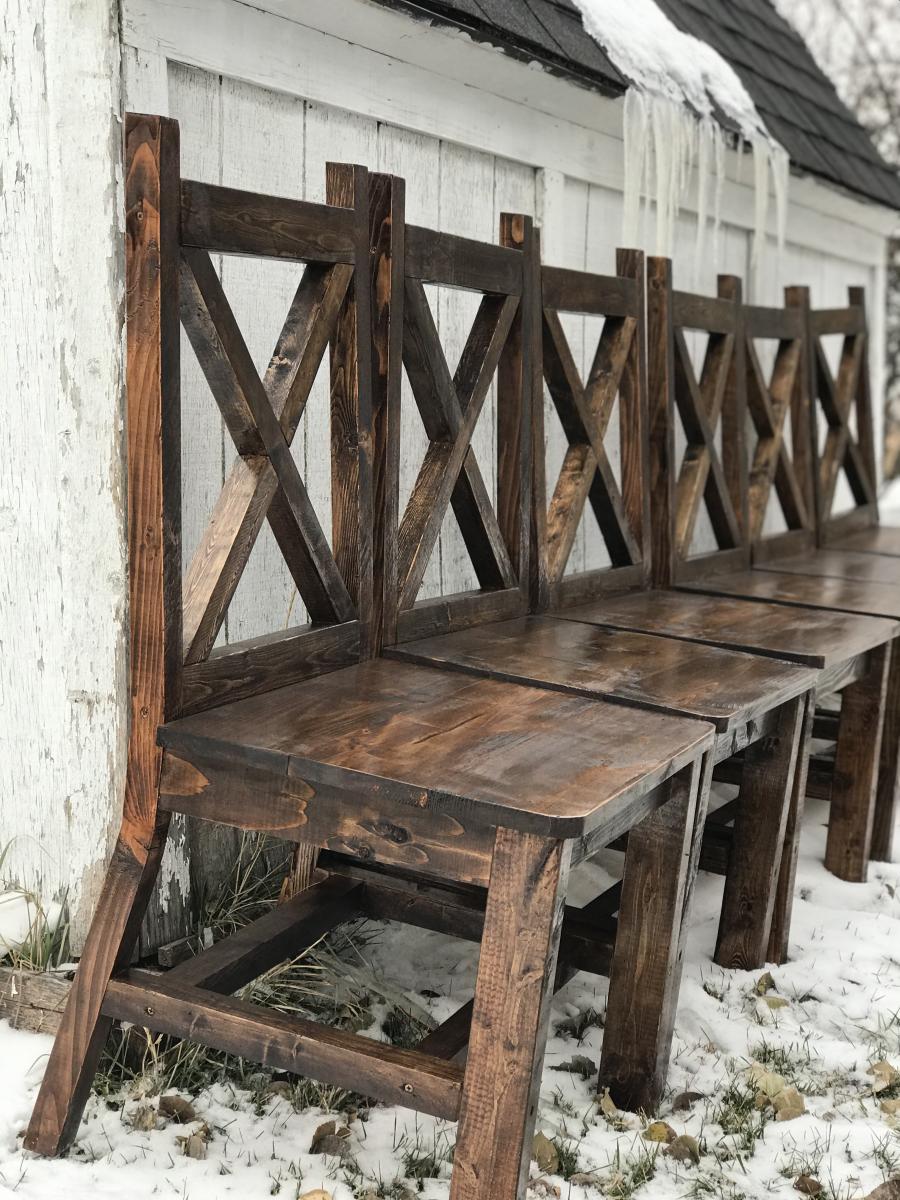
Wed, 12/18/2019 - 07:57
I'd love to make these for my parents, do you have the plans?
Not as easy at it seems... but also, this was one of my very first woodworking projects.
Tue, 06/11/2019 - 09:25
This is an amazing first project! I love how it fits perfect in your space and the color. What a beautiful floor too.
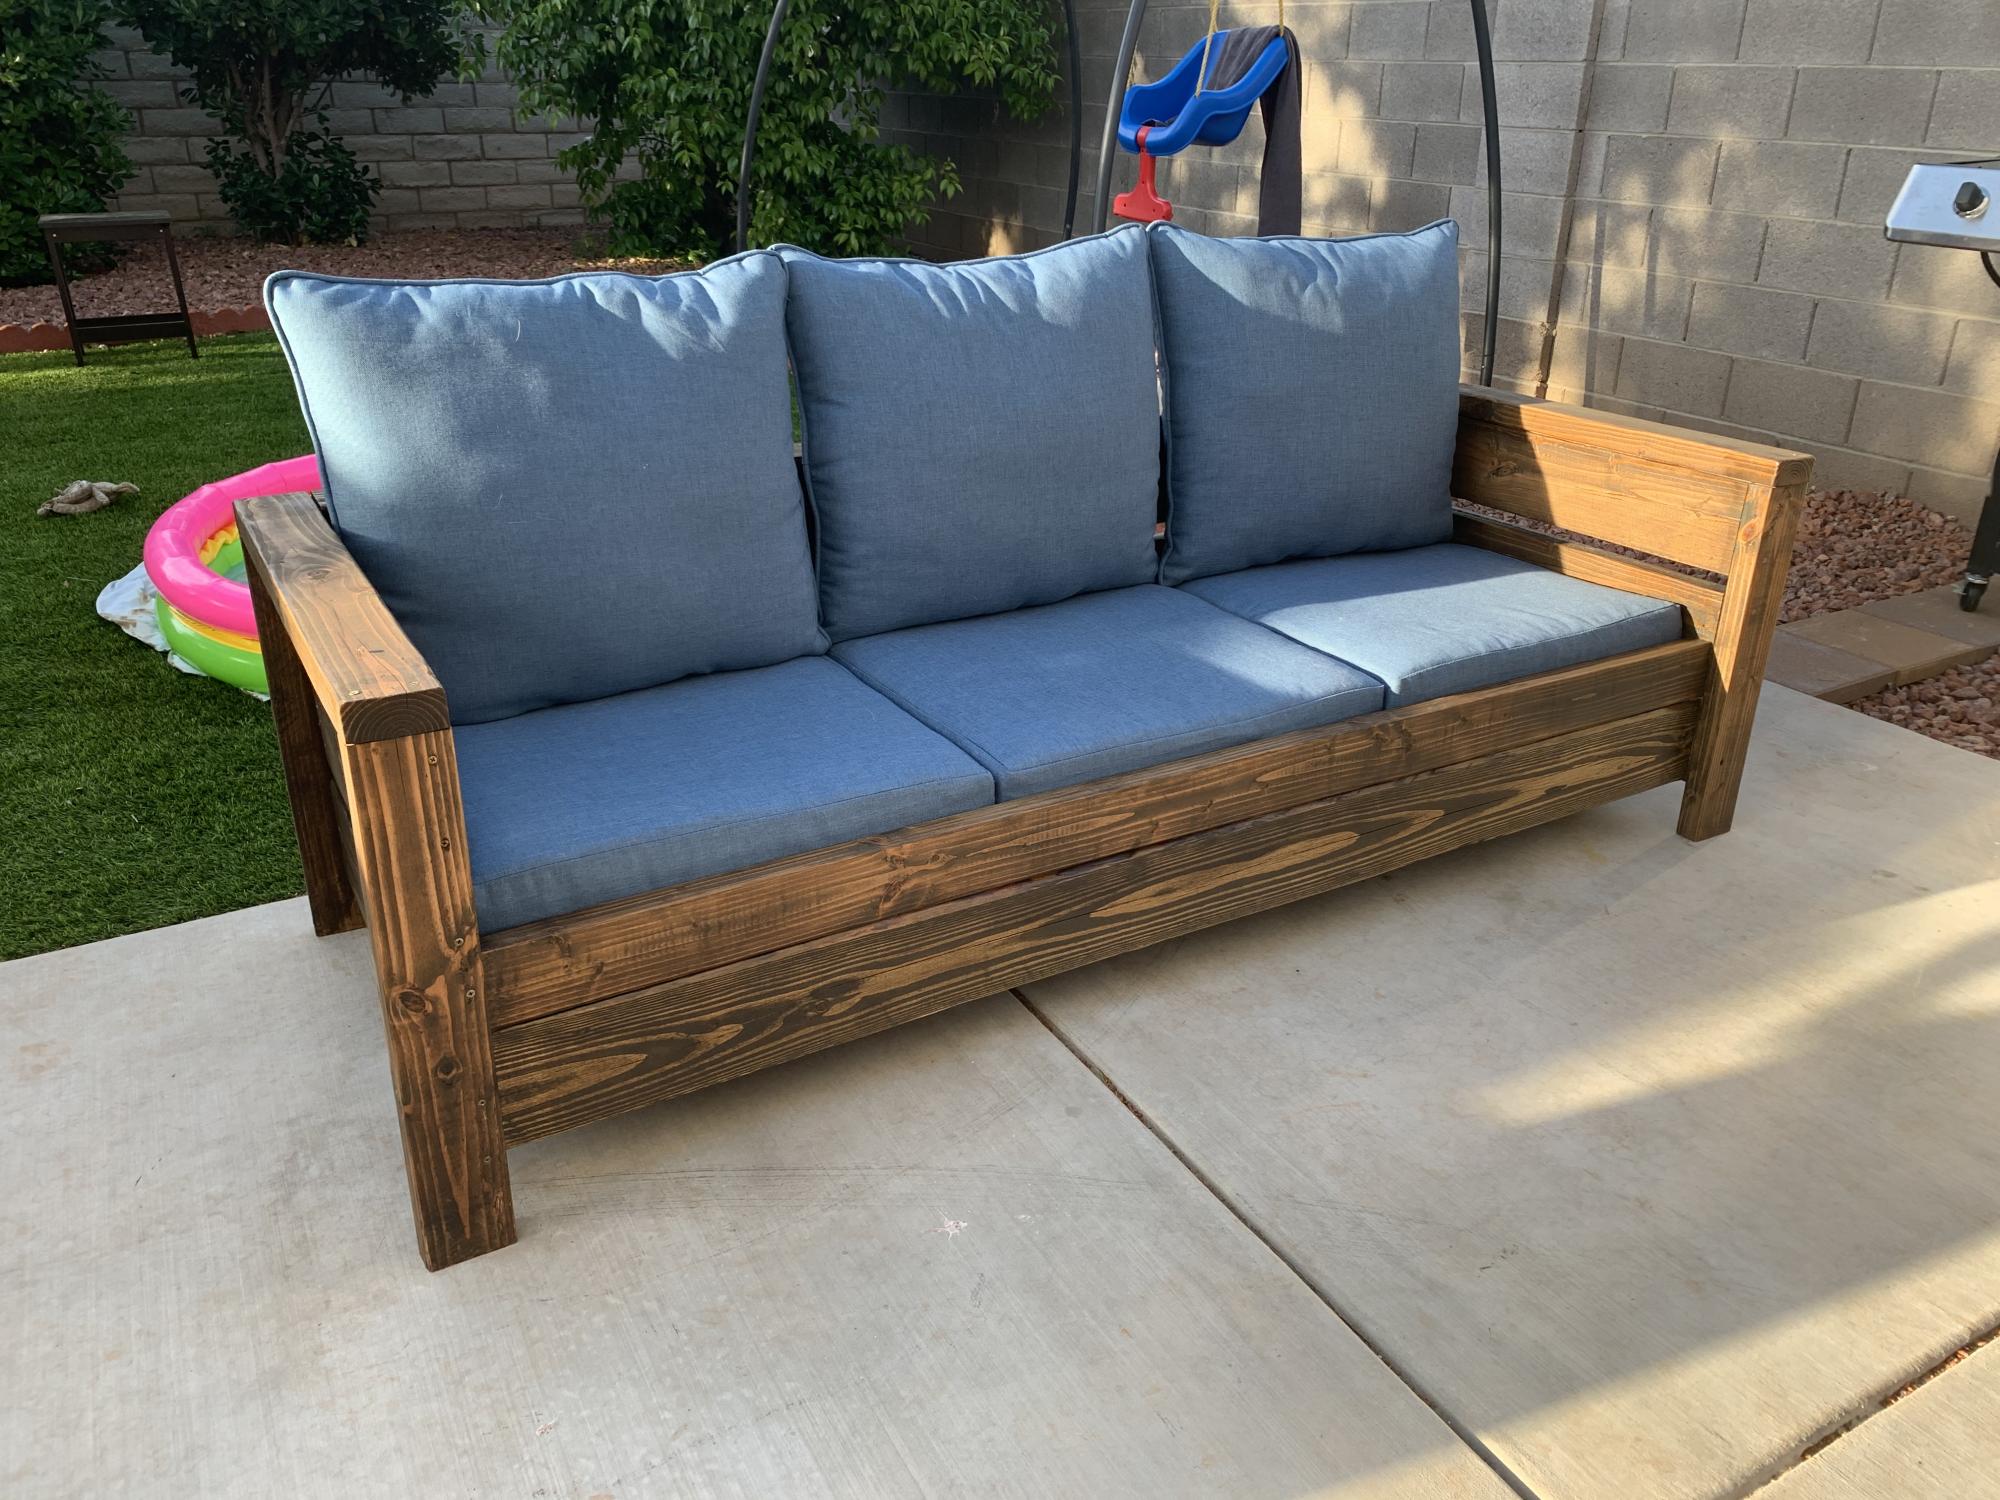
I used the Modern Outdoor Chair from 2x4s and 2x6s plans and slightly modified then to make a 3 seater couch. My cushions(most expensive part) were 24 in x 24 in and purchased from Lowes for $40 per seat. The couch is 79 inches in total length. I also dropped the seat down to the lower level to allow more room for my cushion backs to sit further down into the seat.

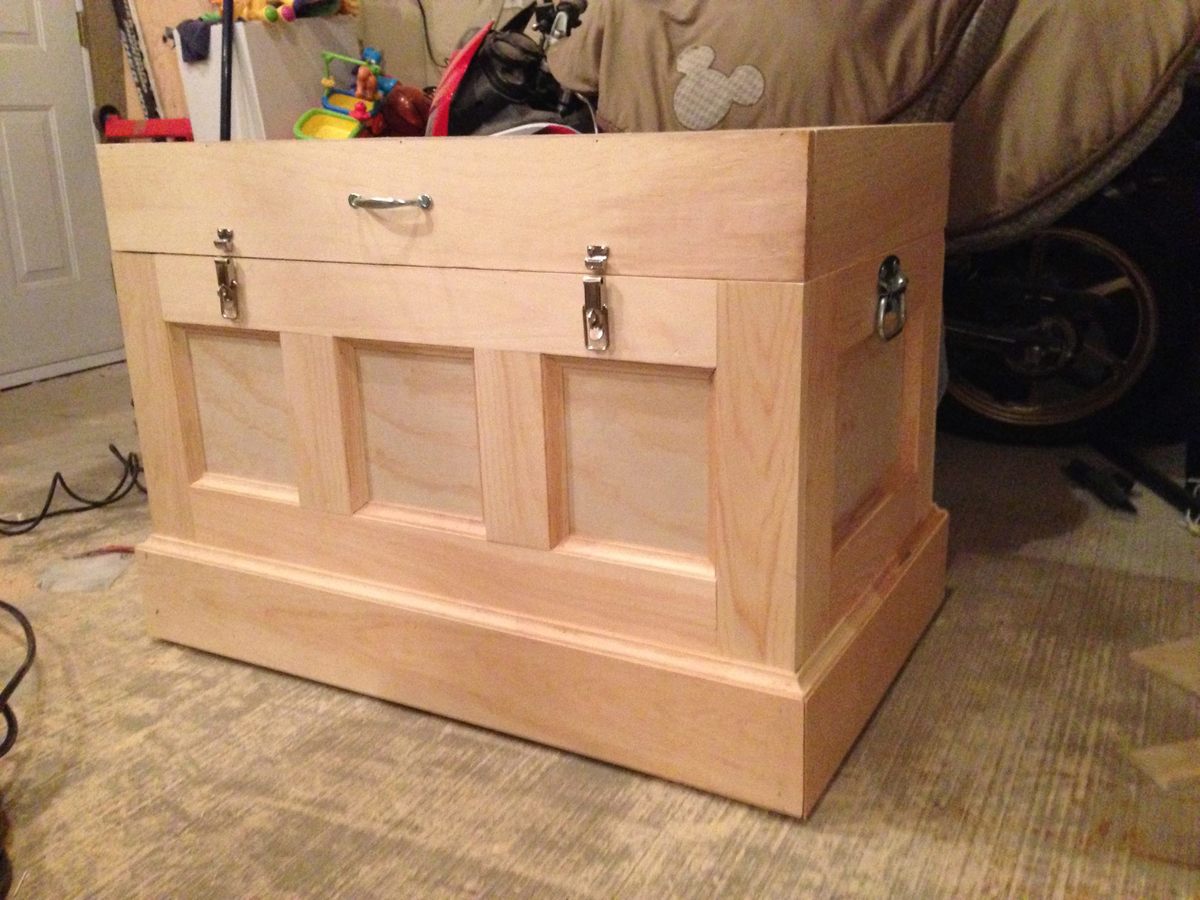
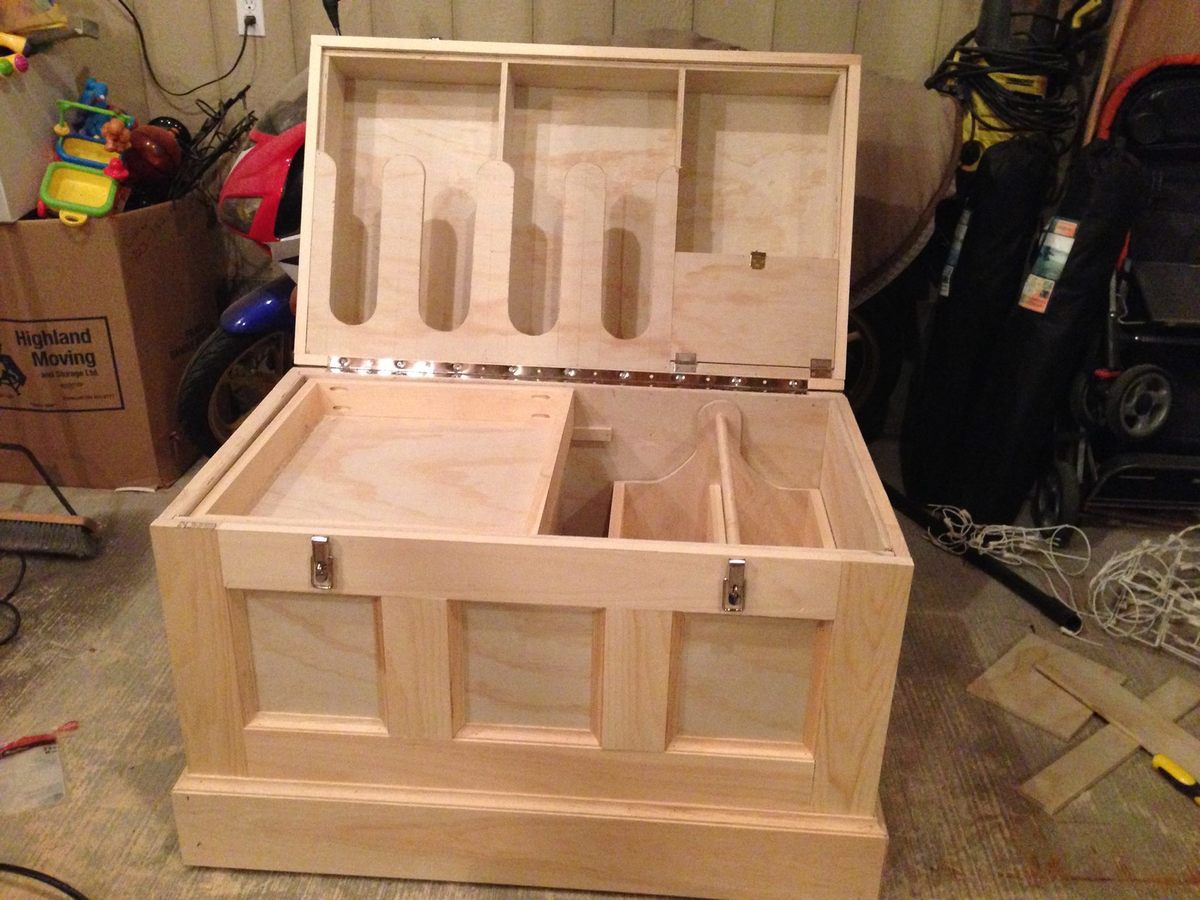
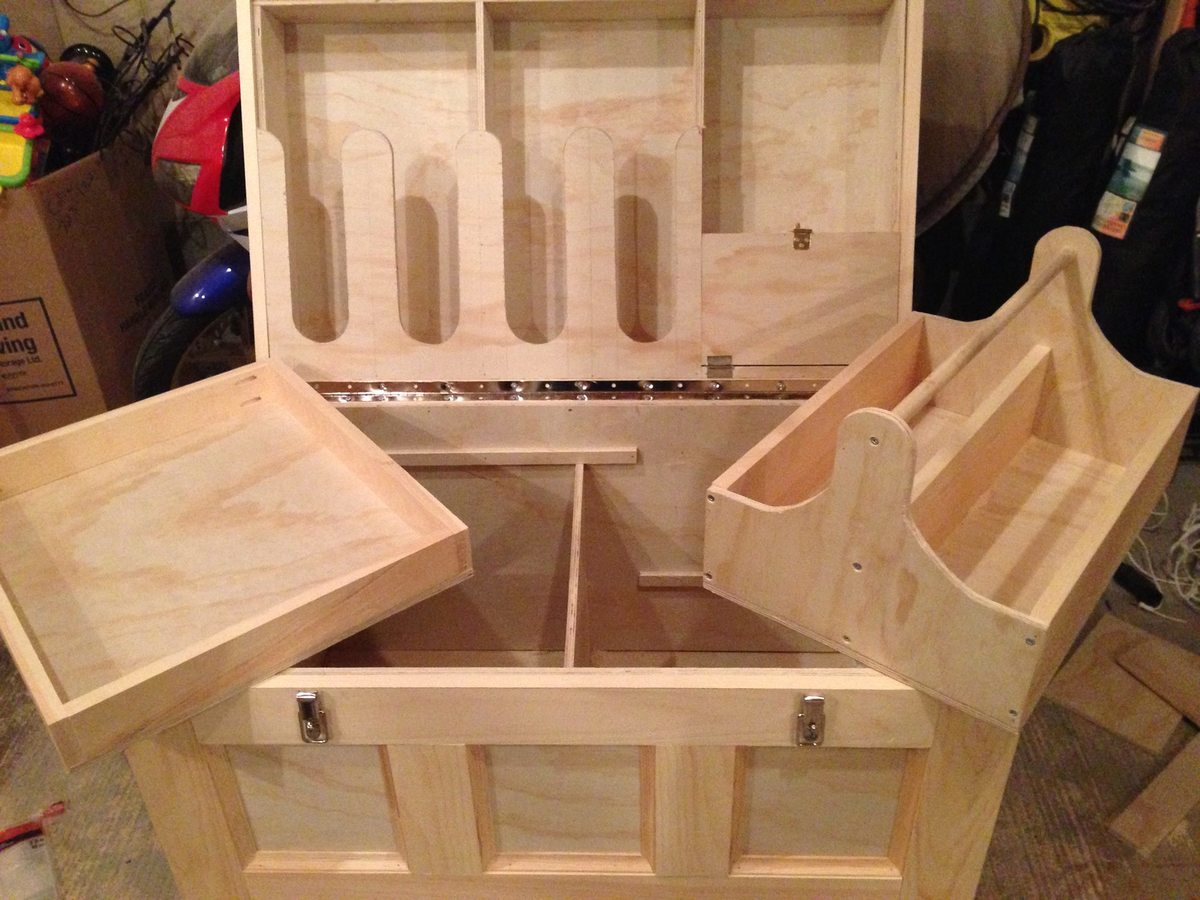
I made this box for my wifes christmas present. She has been riding horses for sometime and is planning on doing some shows. I built this box from Mimi's storage bench design, made it bigger, added a deeper box top and created the rest from looking at pictures online. Its all made of pine plywood and pine boards to keep it light. I added 4 castors to the bottom to make it easily moveable and hid them with the moulding around the bottom. Still has to be sanded and stained before it hits the barn. Its 39W X 24D X 29H. I used a piano hinge and routered the back to set the hing in. Added cove moulding around the bottom and to all the boxes around the front and side. Used a lot of pocket holes and finsh nails. Took me longer than it could have, because I planned everything as I went. I will add more pictures when its finsihed. I would rate it intermediate to advanced depending on your skills with certain tools.

Wed, 12/31/2014 - 09:02
Wow - that's a lot of work and well done. Great job! I'm sure your wife adores it.
Really easy to follow instructions. Thank you!


Comments
Ana White Admin
Sun, 01/15/2023 - 20:21
Thank you!
Gorgeous, thank you for uploading a brag post!