Community Brag Posts

Modern Craft Table *tweaked*
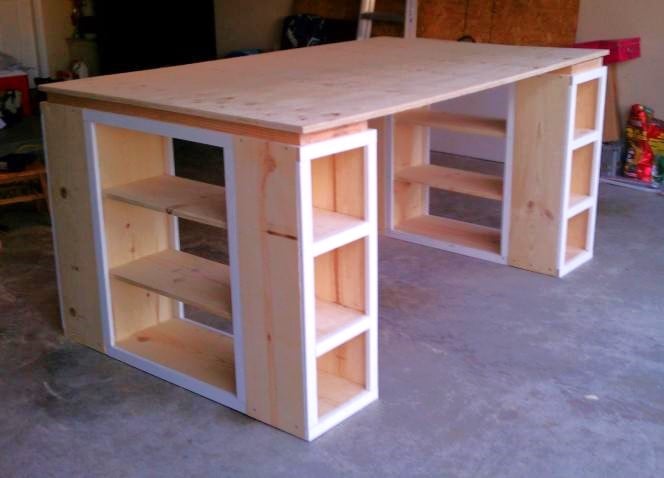
Completed Modern Craft Table! We tweaked the plans a bit because I was looking for a larger table top. The top now measures 48" x 76". We simply did this by adding an extra set of cubbies to the other side of the shelves. Absolutely LOVE how this turned out! All I need now is 4 counter height stools built and lots of shelves to complete my craft room! Will be sure to post those once they are completed!
Built from Plan(s)
Estimated Time Investment
Weekend Project (10-20 Hours)
Finish Used
Ultra White Latex Paint
Recommended Skill Level
Beginner
Comments

Thu, 11/17/2011 - 01:10
Darn I was so excited to see
Darn I was so excited to see you craft table! I apologize that your brag post did not show images. If you can send me images at knockoffwood(at)gmail.com I'd be happy to post. Thanks so much for submitting a brag post. Ana
Sun, 03/04/2012 - 07:31
Craft Desk
I LOVE LOVE LOVE your craft table. I want one! Looks like my husband wil have to get busy! Thanks for sharing!
Kristina
Houston, TX
Tue, 05/29/2012 - 00:05
Question about Middle support
This is great!! I am planning something similar, but what is your idea or the plan you used for the middle support to keep it from sagging over time? My idea is to run another cubby in the middle from side to side. What do you think?
Mon, 01/21/2013 - 09:54
I love the modern craft
I love the modern craft table, just what I have been looking for, do you share instructions, dimensions, etc.? thanks, Laura
Thu, 05/12/2016 - 15:14
Are plans for the tweaked version?
I'm loving this and would love to have FIL build it for me but the plans look like its for the regular modern craft table but not the tweaked? Also is there support for the middle? Can you send me a link for the tweaked supply list please, can't seem to find it. Love what you do!
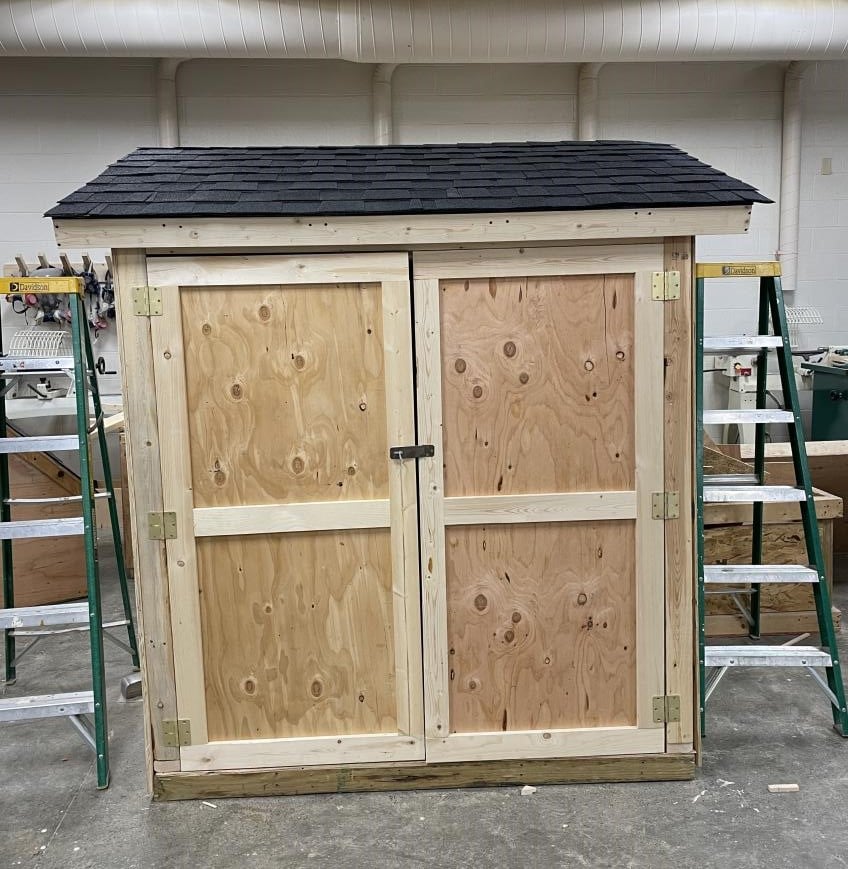
Lean-To Shed
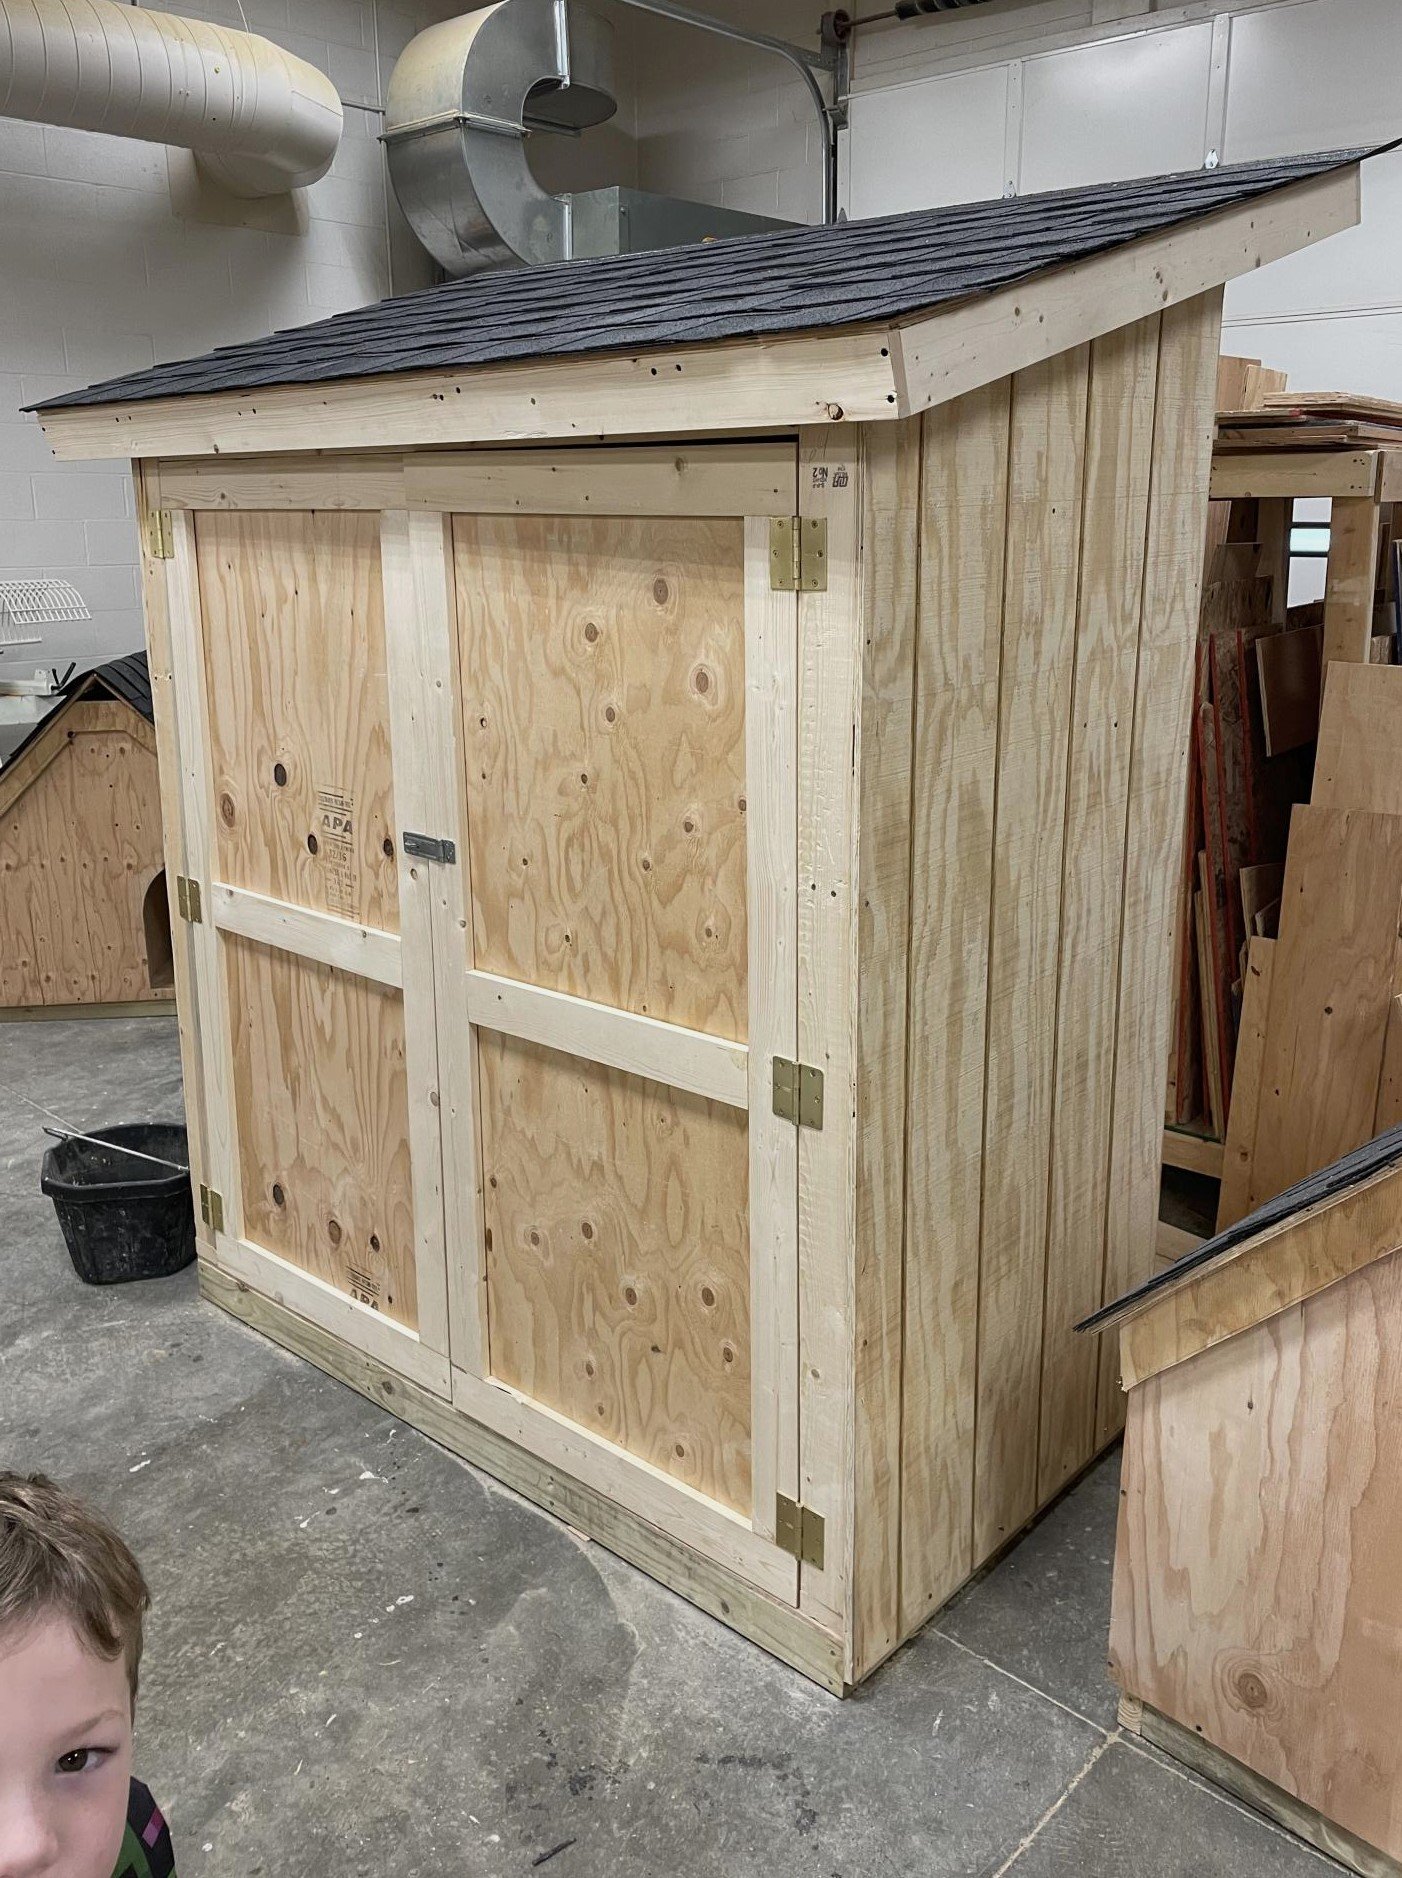
I’m a first year teacher of construction class at Waterloo High School in Illinois. We recently used your Small Cedar shed instructions with some modifications for a class project. It’s a bear getting cedar right now, so we used T1-11 for the outside and 2x4 for the frame.


Built from Plan(s)
Comments
Sat, 03/25/2023 - 09:14
Great project for your class!
Very fun and job well done! Thank you for sharing.
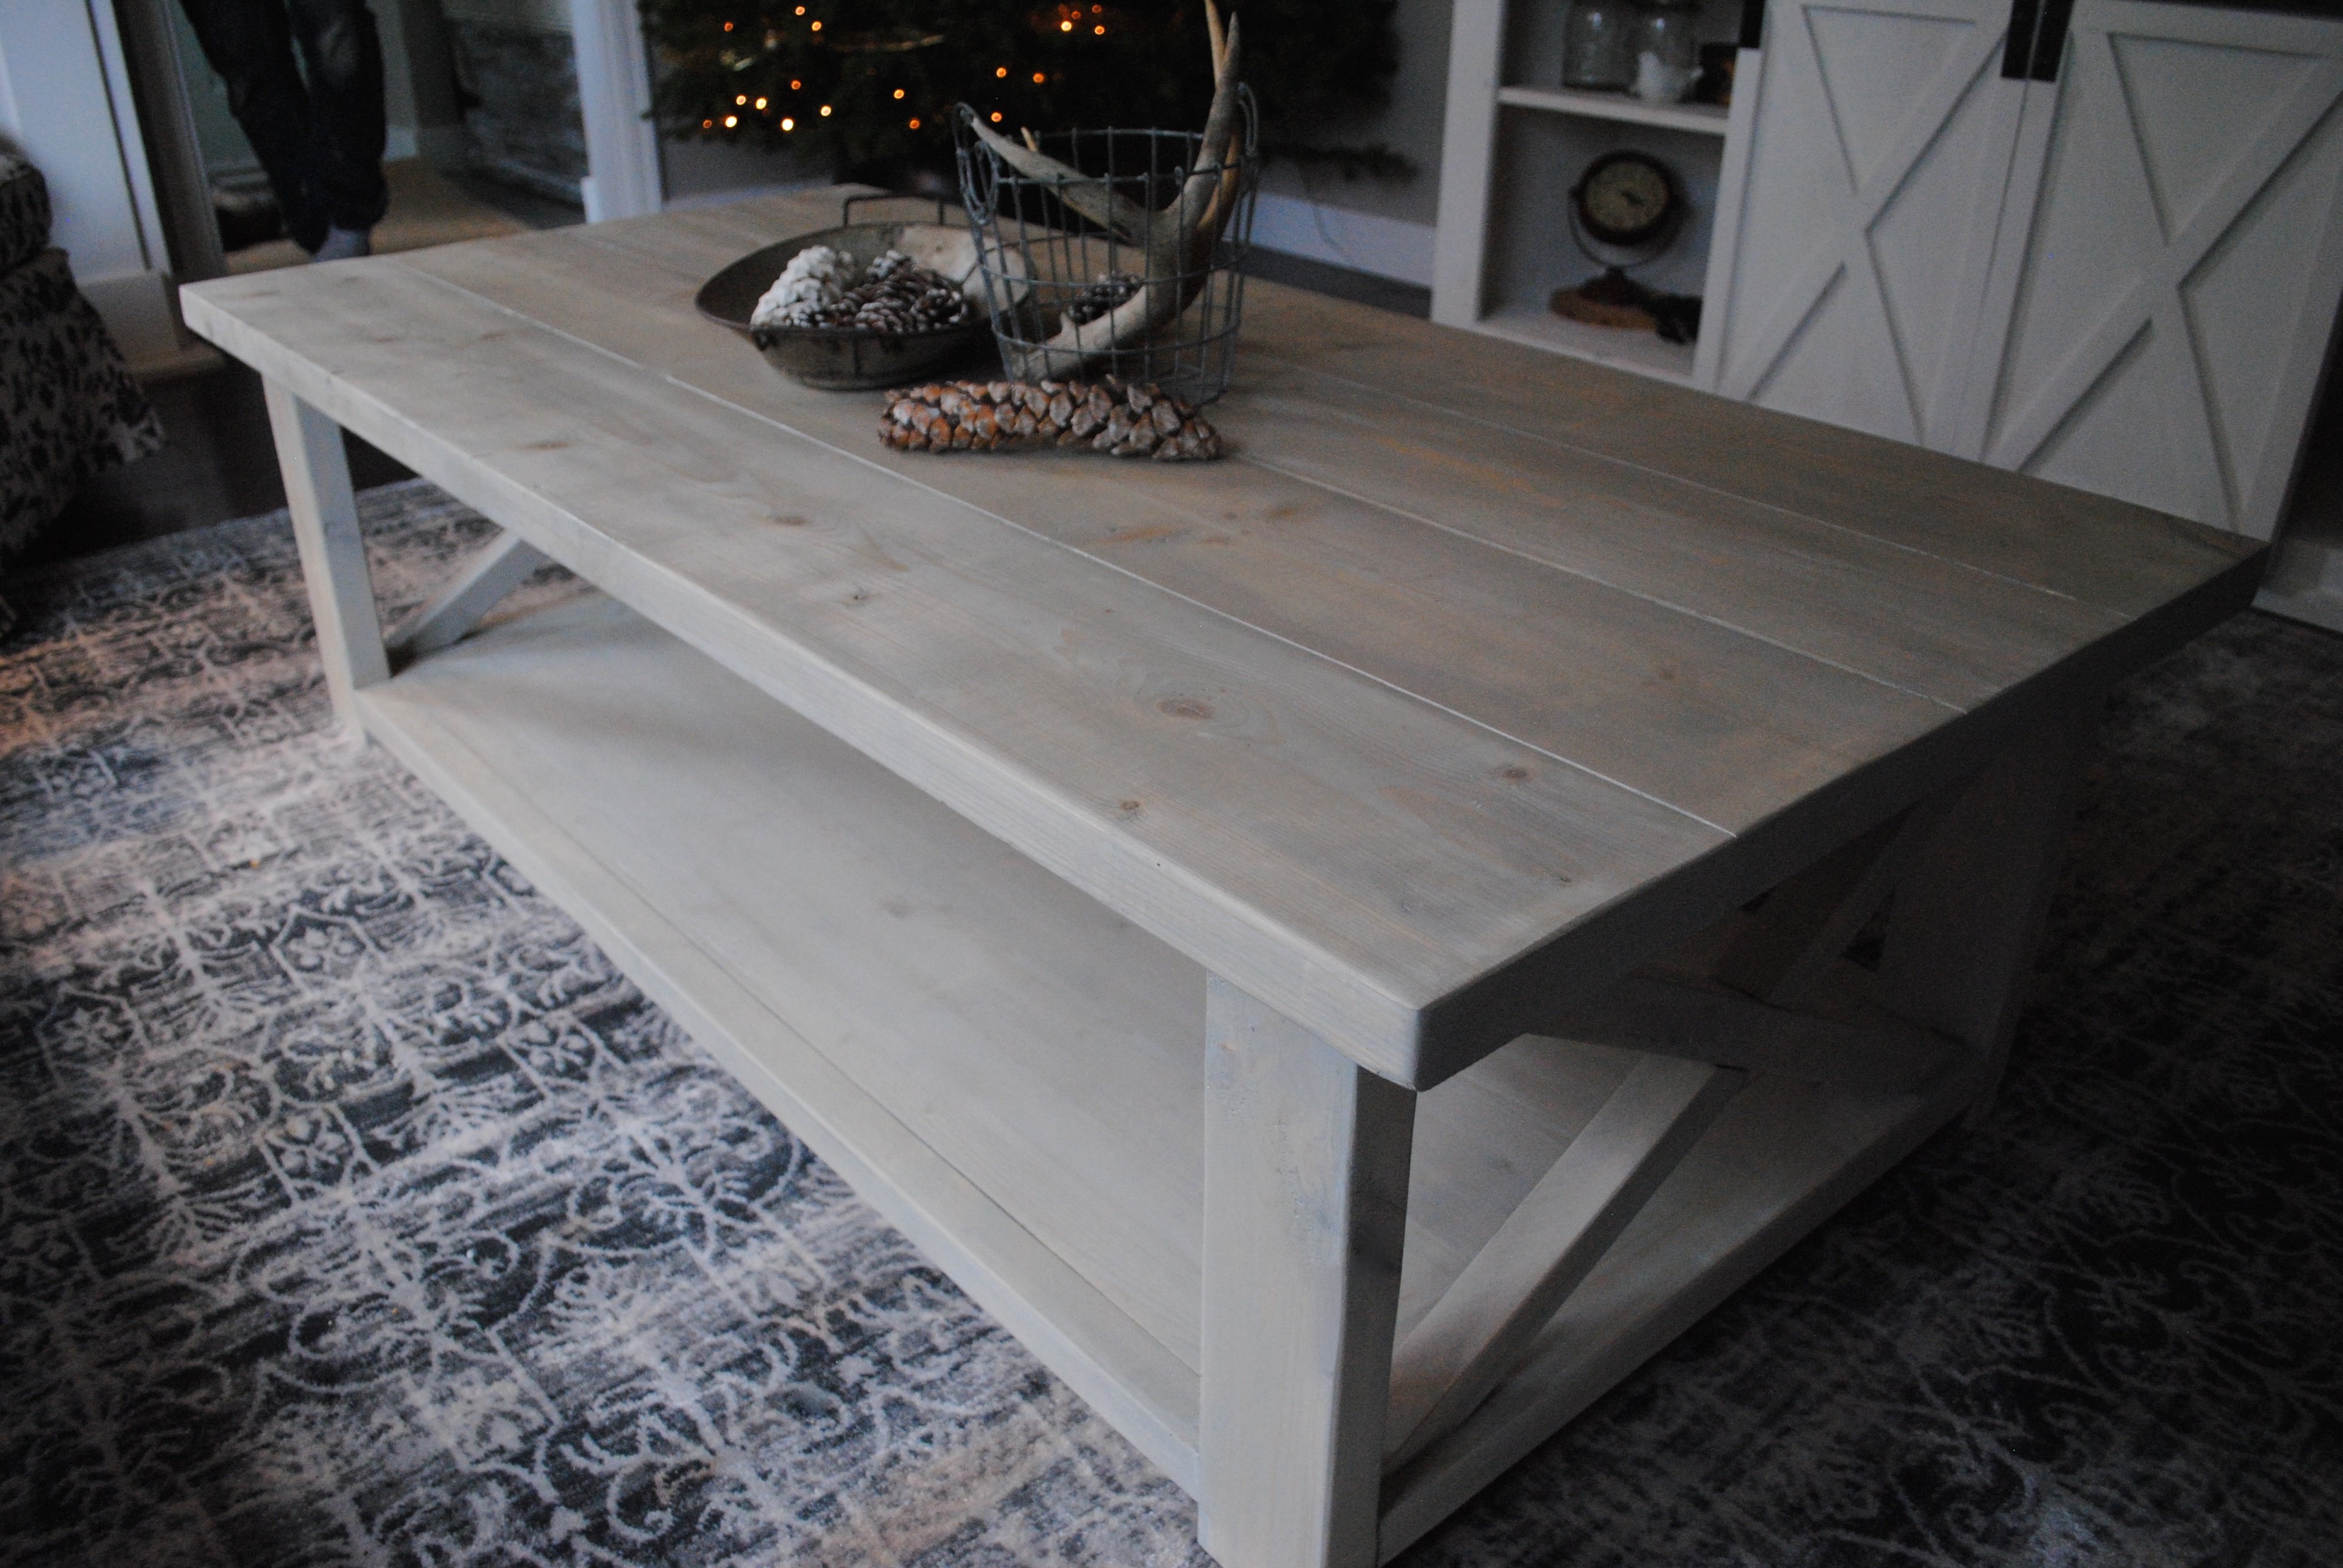
Rustic X-Frame Coffee Table
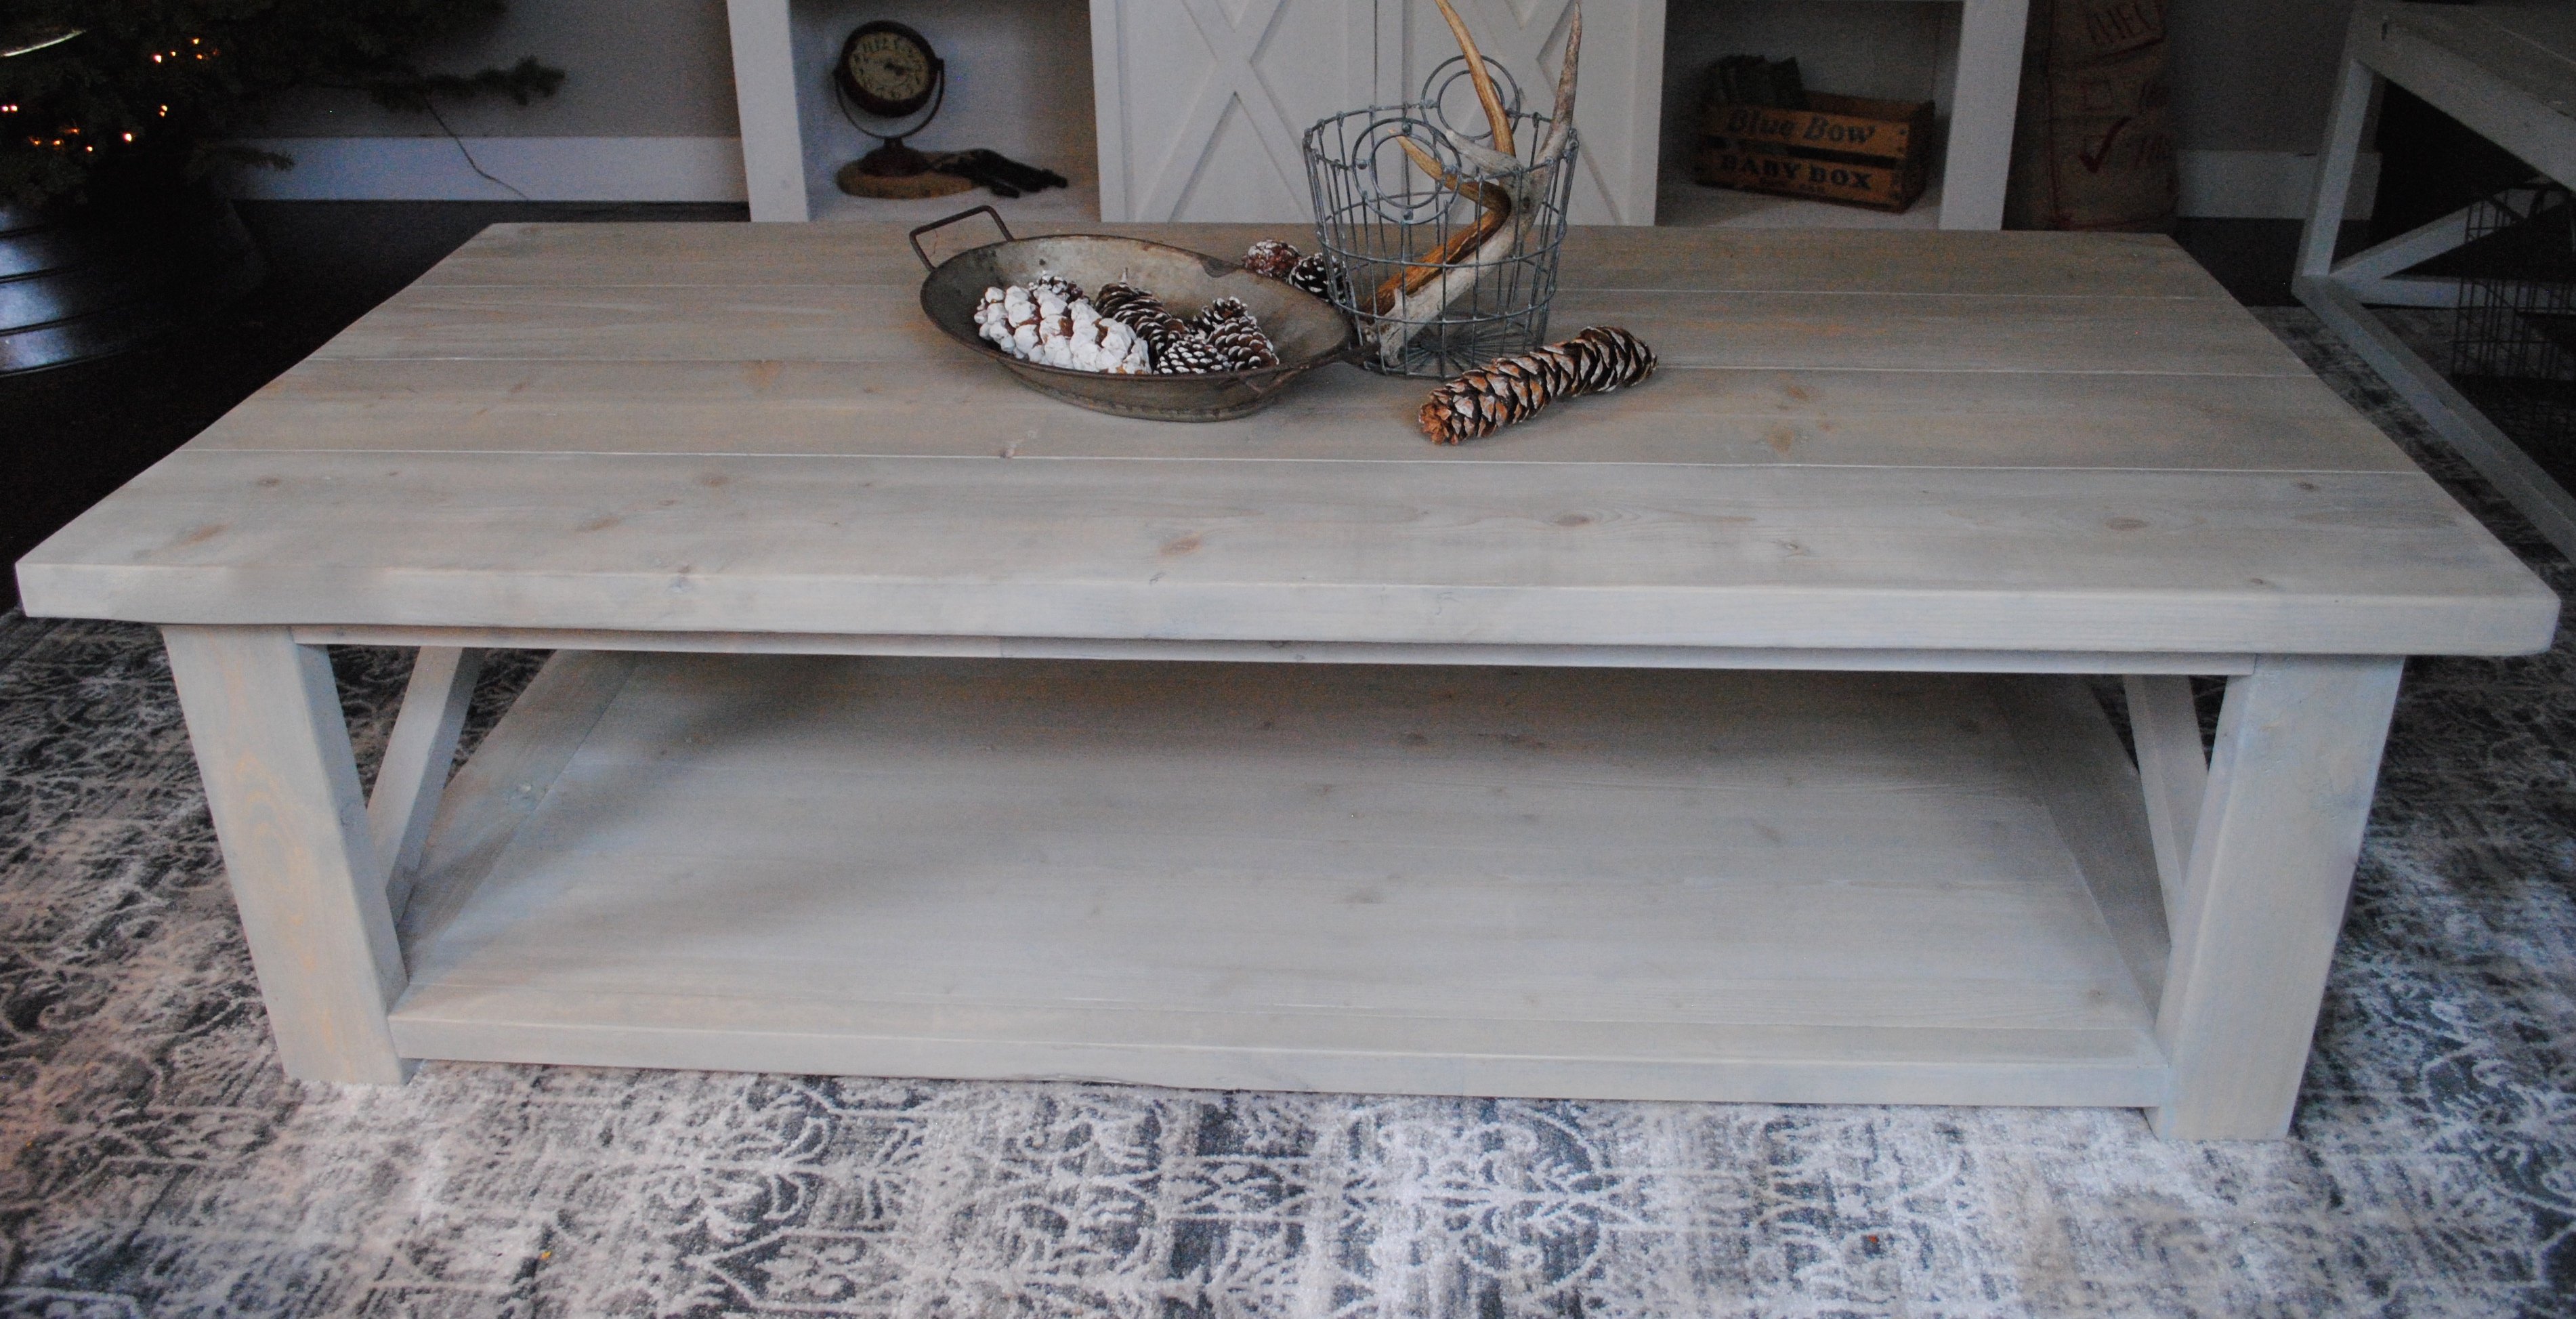
We've built so many of these coffee tables, but this one has got to be my favorite. Isn't the stain so dreamy?
I think the biggest thing about this coffee table is to finish it properly. We like to plane our boards down so it gives it a bit more of a seamless look - but real rustic lovers don't need to do this.
We sanded the coffee table down with 120 grit paper & then stained this table in Sunbleached Oak by Varathane. It's literally the most stunning color. Blends with almost any decor.
Once that was dry, we applied two coats of polyurathane
Built from Plan(s)
Estimated Cost
75.00 CA
Estimated Time Investment
Afternoon Project (3-6 Hours)
Finish Used
We sanded the coffee table down with 120 grit paper & then stained this table in Sunbleached Oak by Varathane. It's literally the most stunning color. Blends with almost any decor.
Once that was dry, we applied two coats of polyurathane
Once that was dry, we applied two coats of polyurathane
Recommended Skill Level
Starter Project
Pokemon Center

My son is obsessed with Pokemon, and has amassed quite the collection of Pokemon plush toys. I wanted a simple way to keep them contained but accessible, and this was the perfect solution! I changed a few things in my build to make it shorter and square, and used shock cord instead of rope for more give. My son loves it!
Built from Plan(s)
Estimated Time Investment
Afternoon Project (3-6 Hours)
Recommended Skill Level
Starter Project
Jelly Cupboard
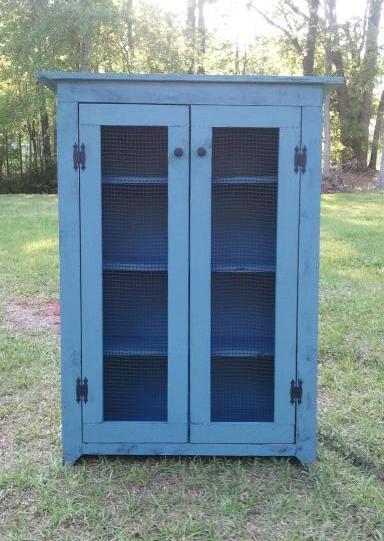
Ever since I saw this cupboard, I wanted it. So when I got a free day I jumped at the chance to build it. I love it! The only problem is trying to figure out where I want to put it.
Built from Plan(s)
Estimated Cost
$30-40
Estimated Time Investment
Afternoon Project (3-6 Hours)
Finish Used
Porter's Prussian Blue and black spray paint
Recommended Skill Level
Beginner
Comments
Fri, 11/02/2012 - 19:29
Great Build and So Fast
In an afternoon? I would have taken a couple of days. You did a great job.
Thu, 02/19/2015 - 19:11
Estimated Cost?!
Hi Ana - I dont mean any disrespect but how do you figure this project costs $30-40. I bought just the boards no hardware or plywood and its cost me $60. Pine #2.
Please let me know your thoughts and where you buy your wood from.
Fri, 02/20/2015 - 12:00
The cost estimate is from
The cost estimate is from emilyr, posted almost three years ago. Lumber prices fluctuate, but $30-40 is still quite low. I estimate about $100 to buy the lumber (pine) on the shopping list from Ana's plan at current prices in my area.
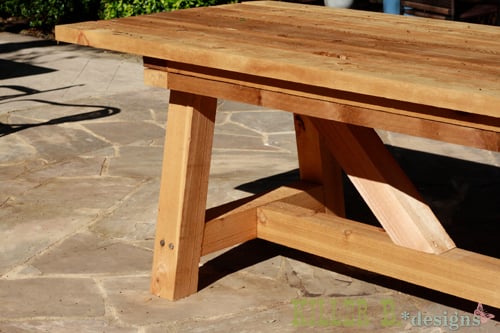
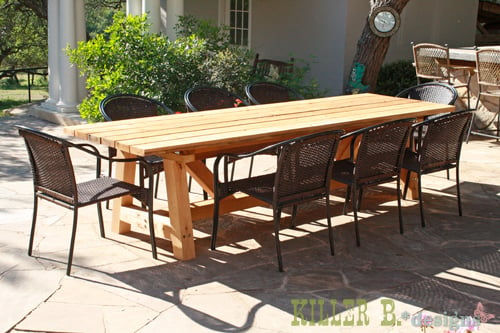
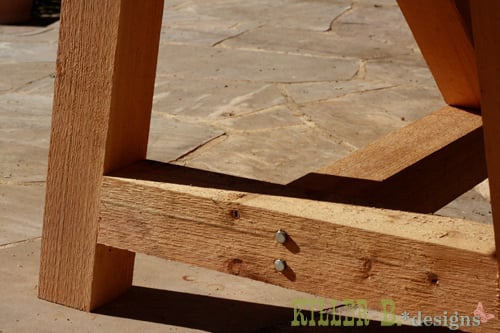
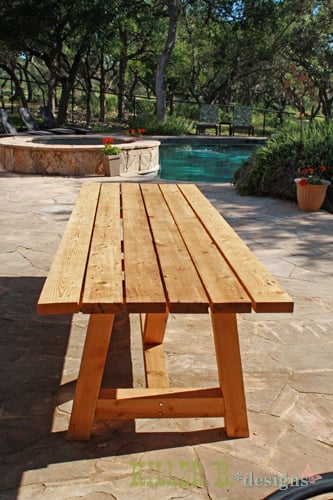
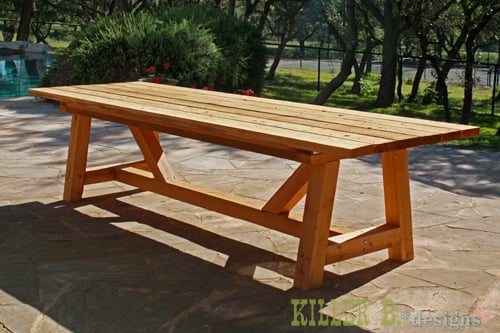
10 foot long Provence Table with 4x4's
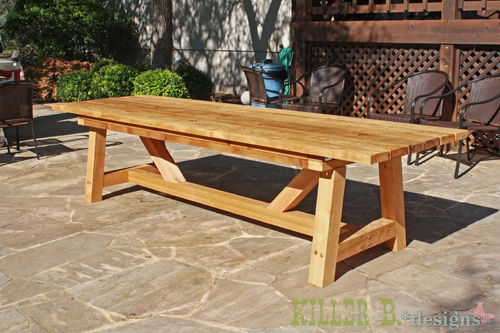
My mom was looking for a new outdoor table, and asked me to come up with something. I found the link for these plans (http://www.thedesignconfidential.com/2011/04/free-diy-furniture-plans-t…) to knock off Restoration Hardware's $4000 Provence Beam outdoor table. Overall I liked the plan, with the chunkier look of the 4x4's. But there were a lot of errors in the diagrams, and the finished height is 34" which is ridiculously tall for a table. So we took it apart and cut the legs back down to change the finished height to 30". We chose rough-cut cedar for it's look and outdoor properties, not wanting to use treated lumber for a dining table. We couldn't find 2x10's like the plan, so we substituted seven 2x6's just like Ana's plan, but left a 1/2" gap in between so water can drain and not pool on top and rot the wood. Also, since we were working with 4x4's for the legs, we chose heavy duty lag bolts instead of screws to join them together. I love the finished look they give. Overall it's a sturdy, yet lightweight table that my mom loves and has already used for entertaining!
Built from Plan(s)
Estimated Cost
$230
Estimated Time Investment
Day Project (6-9 Hours)
Finish Used
outdoor sealer
Recommended Skill Level
Advanced
Comments

Wed, 04/25/2012 - 10:02
Thank you!
Thanks Brook! It was so much fun to build. I put my dad and husband to work while I was the "project manager" ;)
Small Kitchen Storage Pantry
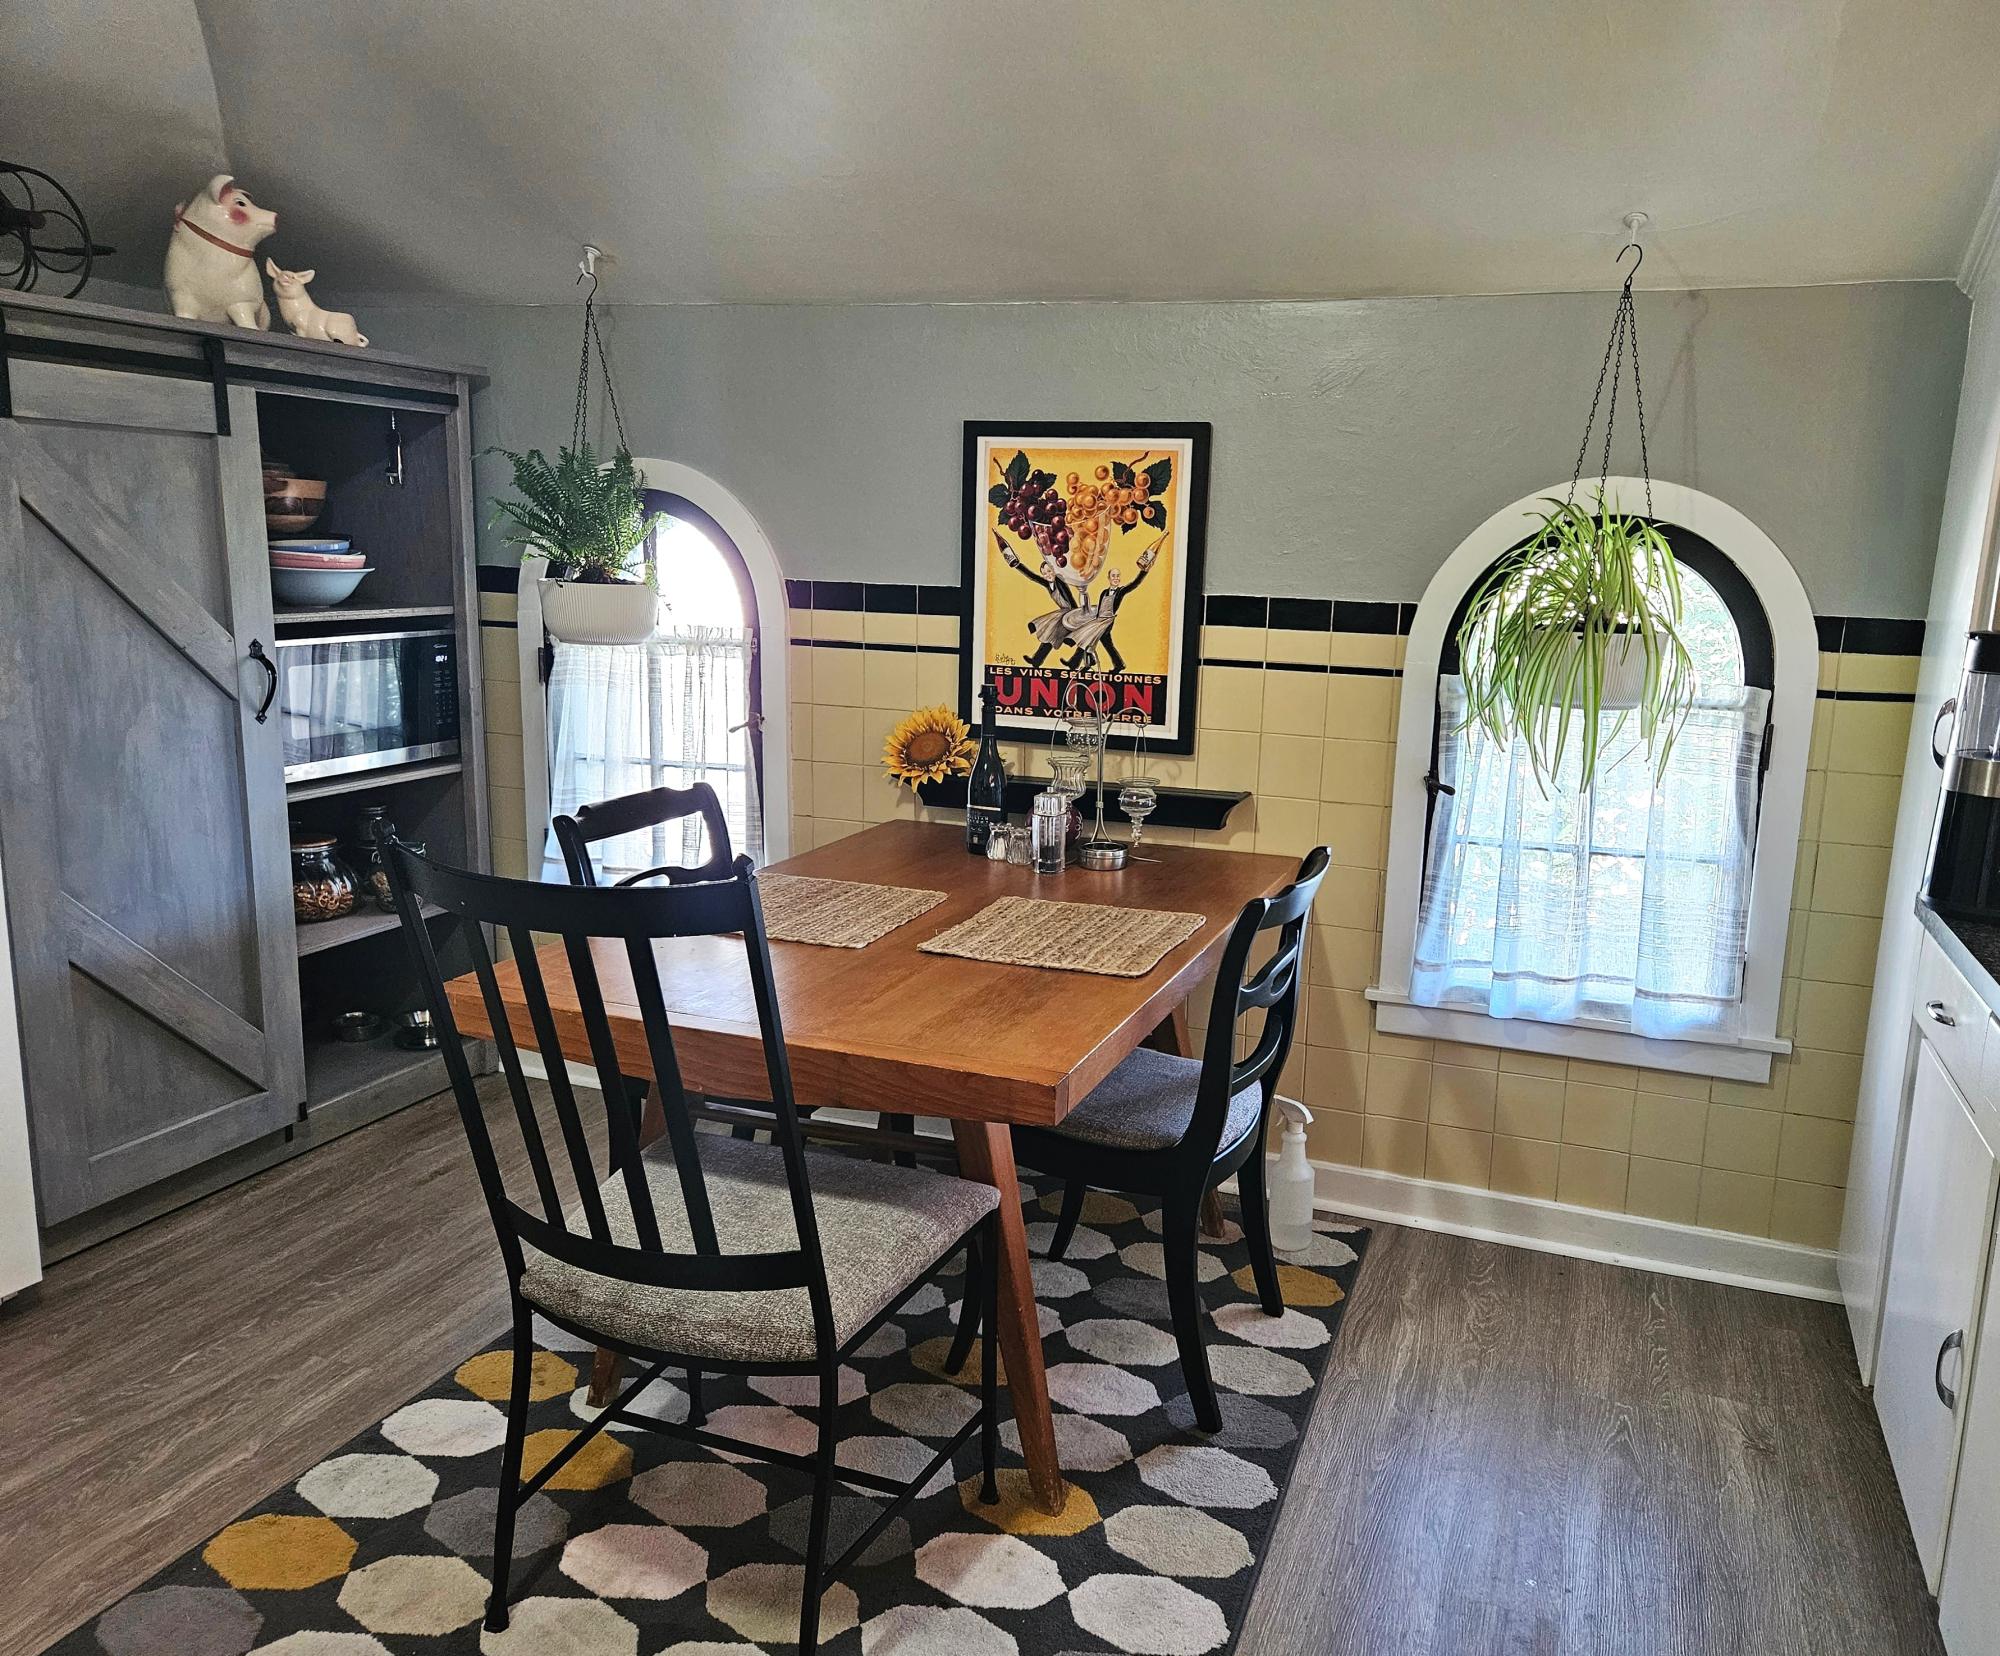
I adjusted your Barndoor l Pantry plans to utilize repurposed lumber from a Murphy bed. The shelves are 22" deep for my microwave, toaster oven, etc. It's so functional and much easier to work in my small kitchen.
Cheryl G
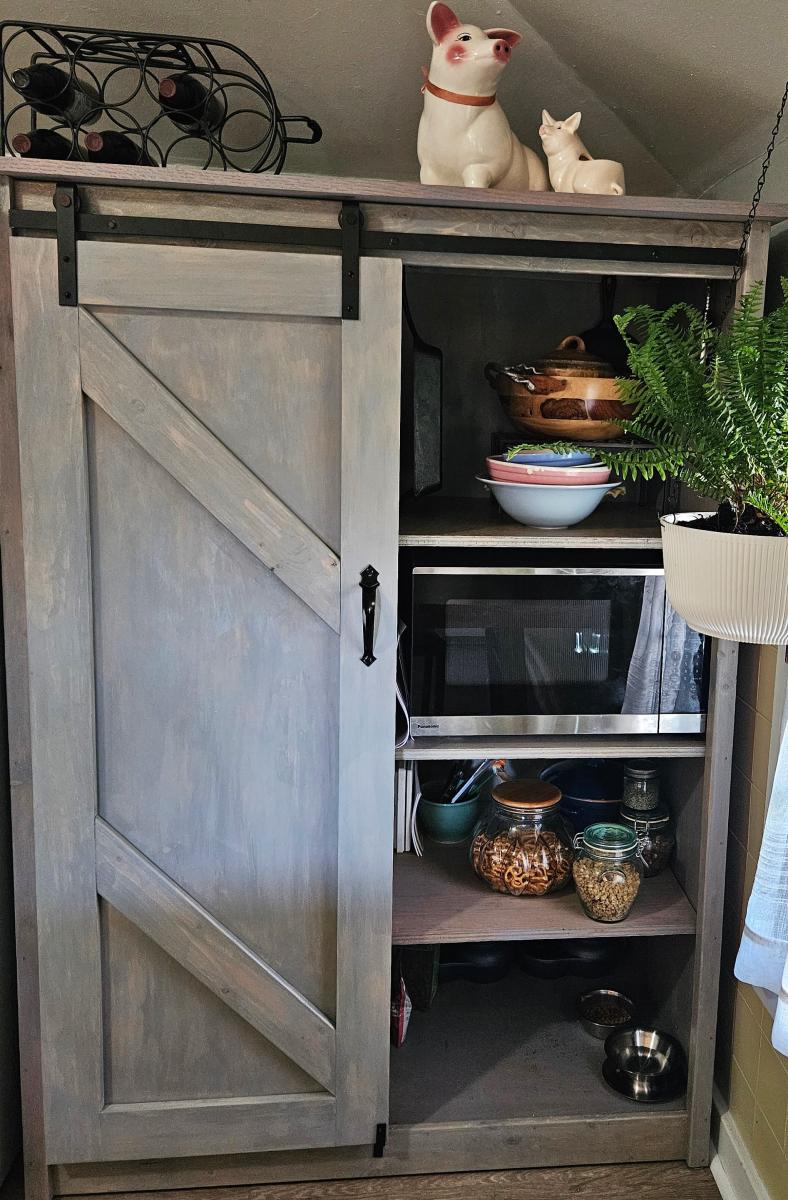
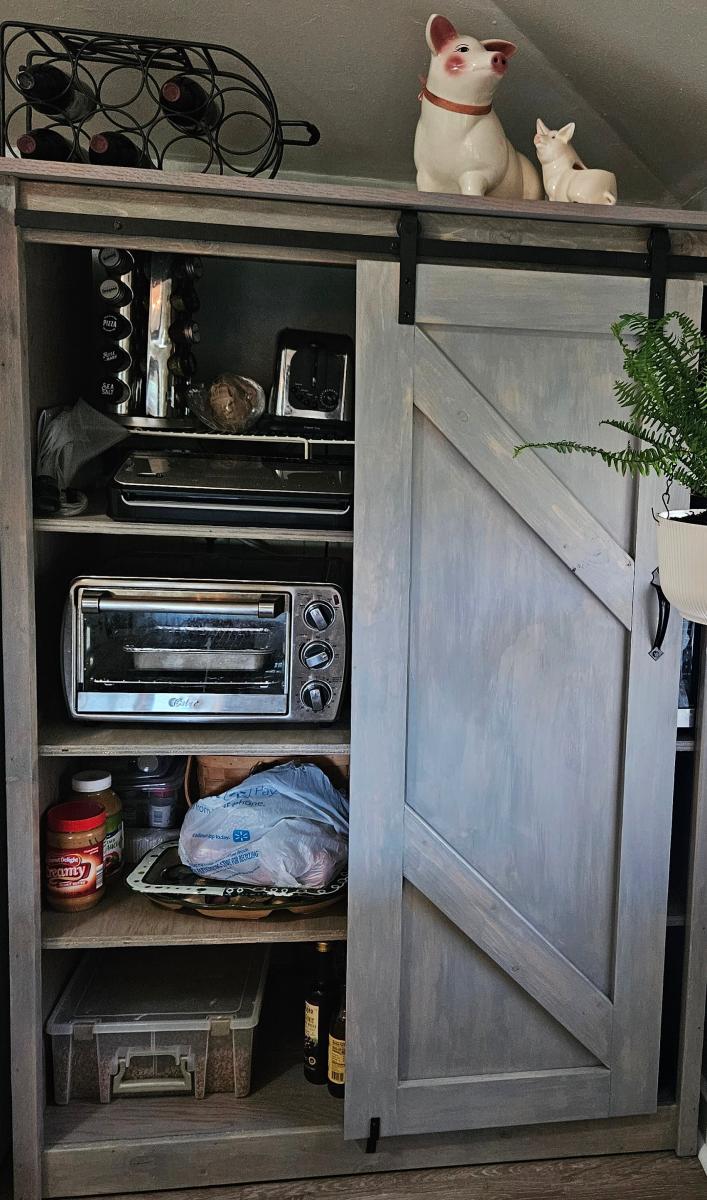
Built from Plan(s)
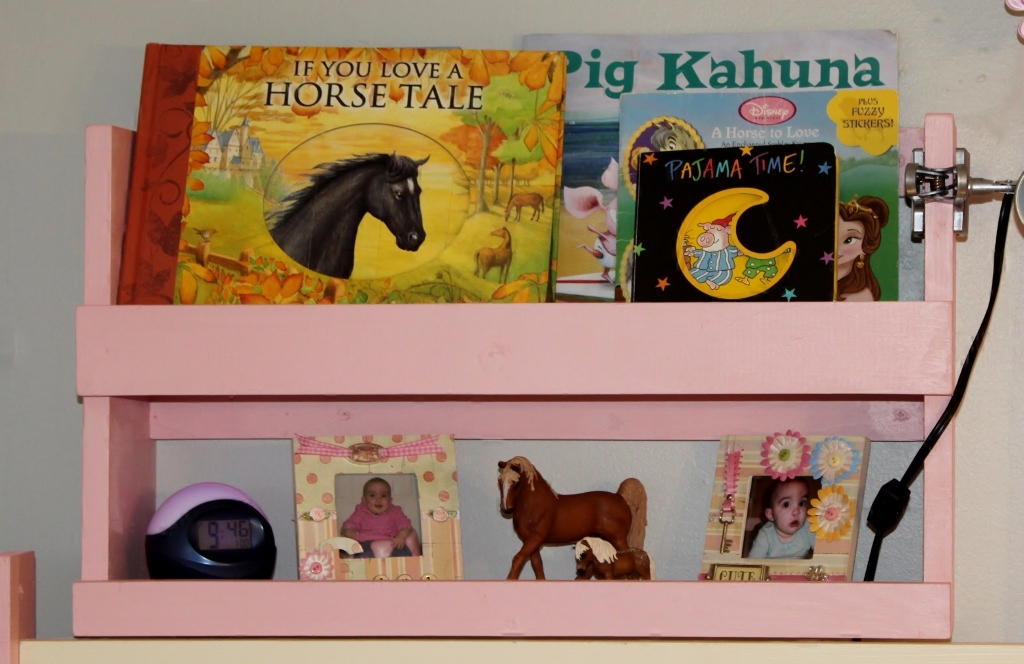
Bunk Bed Shelf Organizer
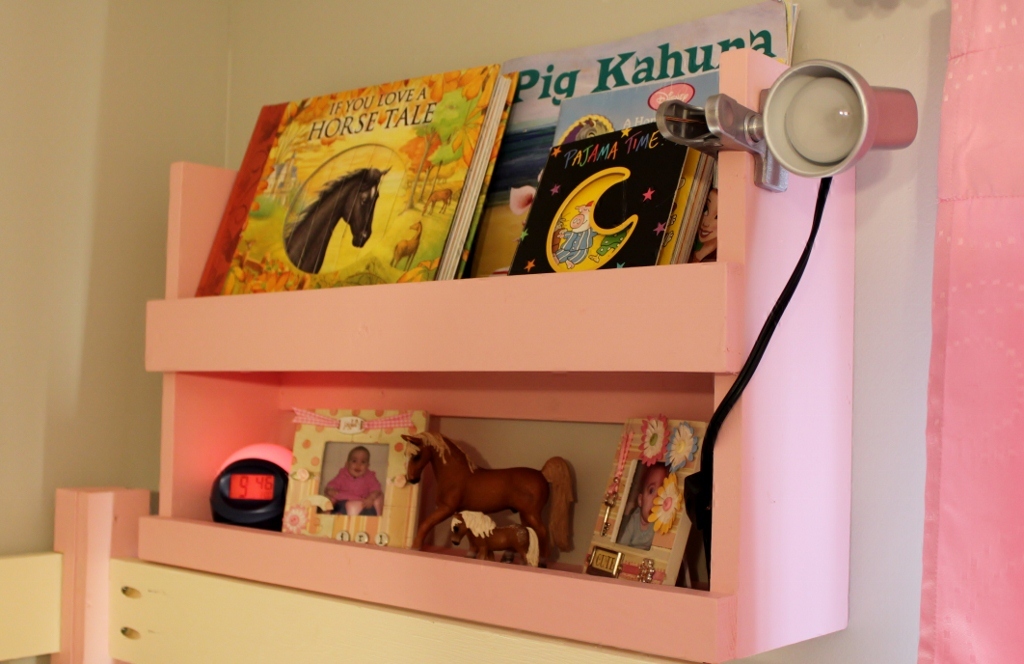
I had just finished my daughter's playhouse loft bed when I saw this plan. It was super easy to build and I used all left over wood from the playhouse. I used 6-inch boards for the sides and shelves since that was what I had left over. Other than that, I followed this plan exactly. Thanks for posting!
Built from Plan(s)
Estimated Time Investment
An Hour or Two (0-2 Hours)
Recommended Skill Level
Beginner
Comments

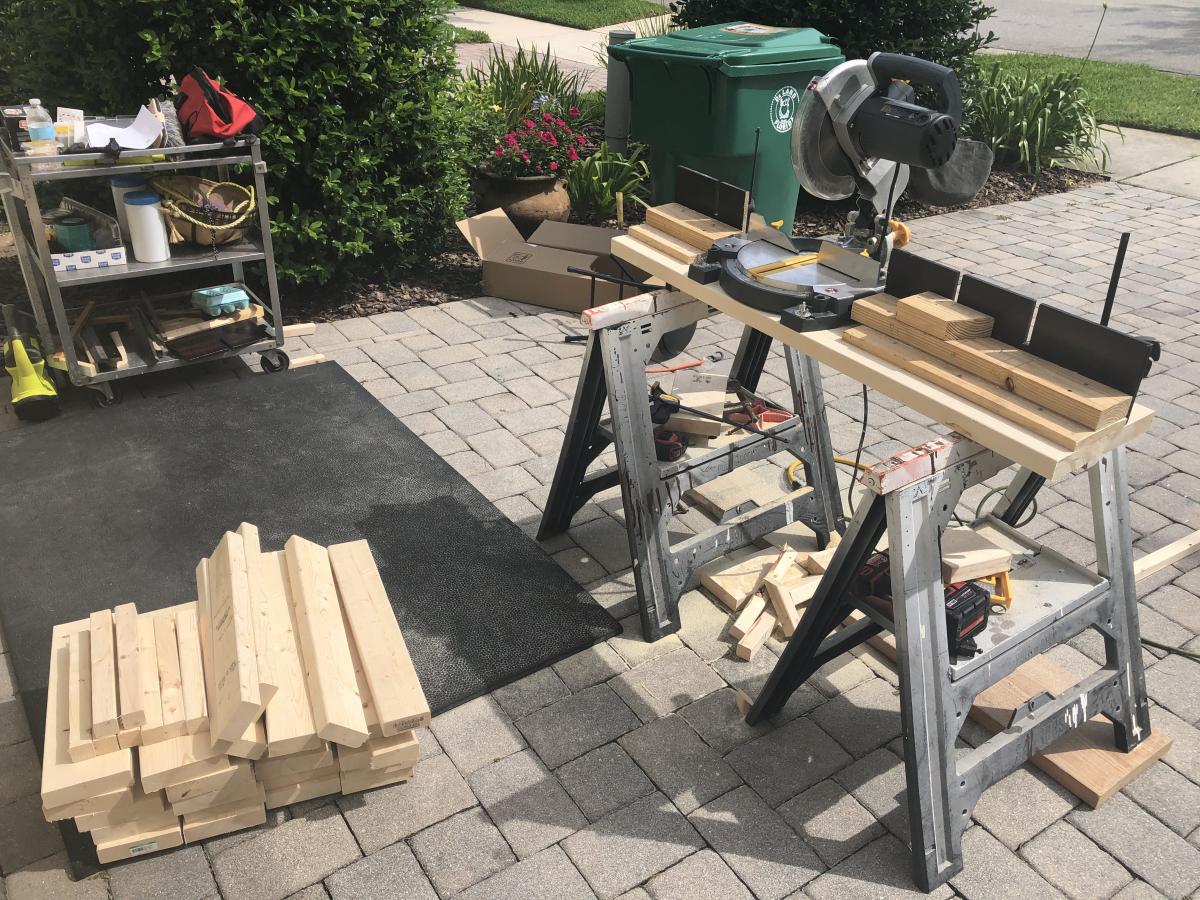
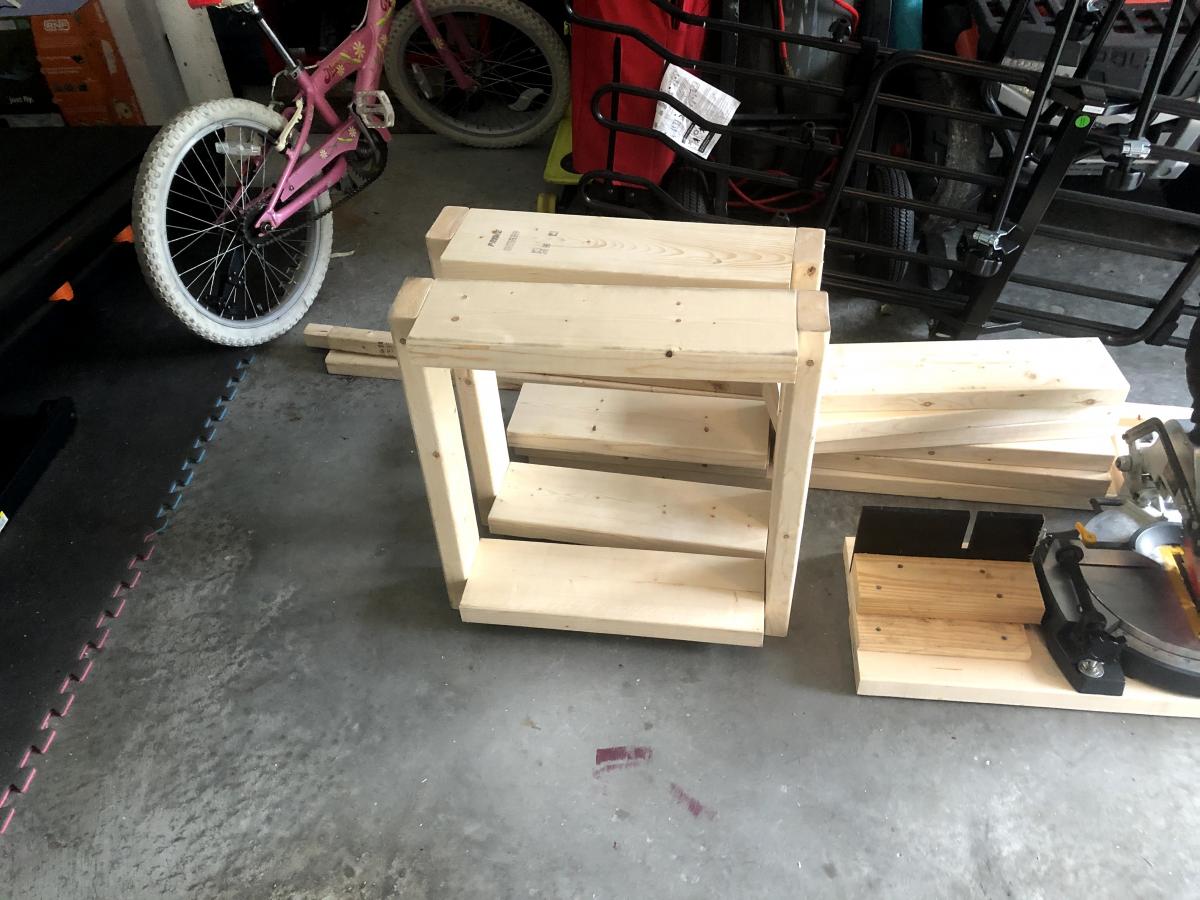
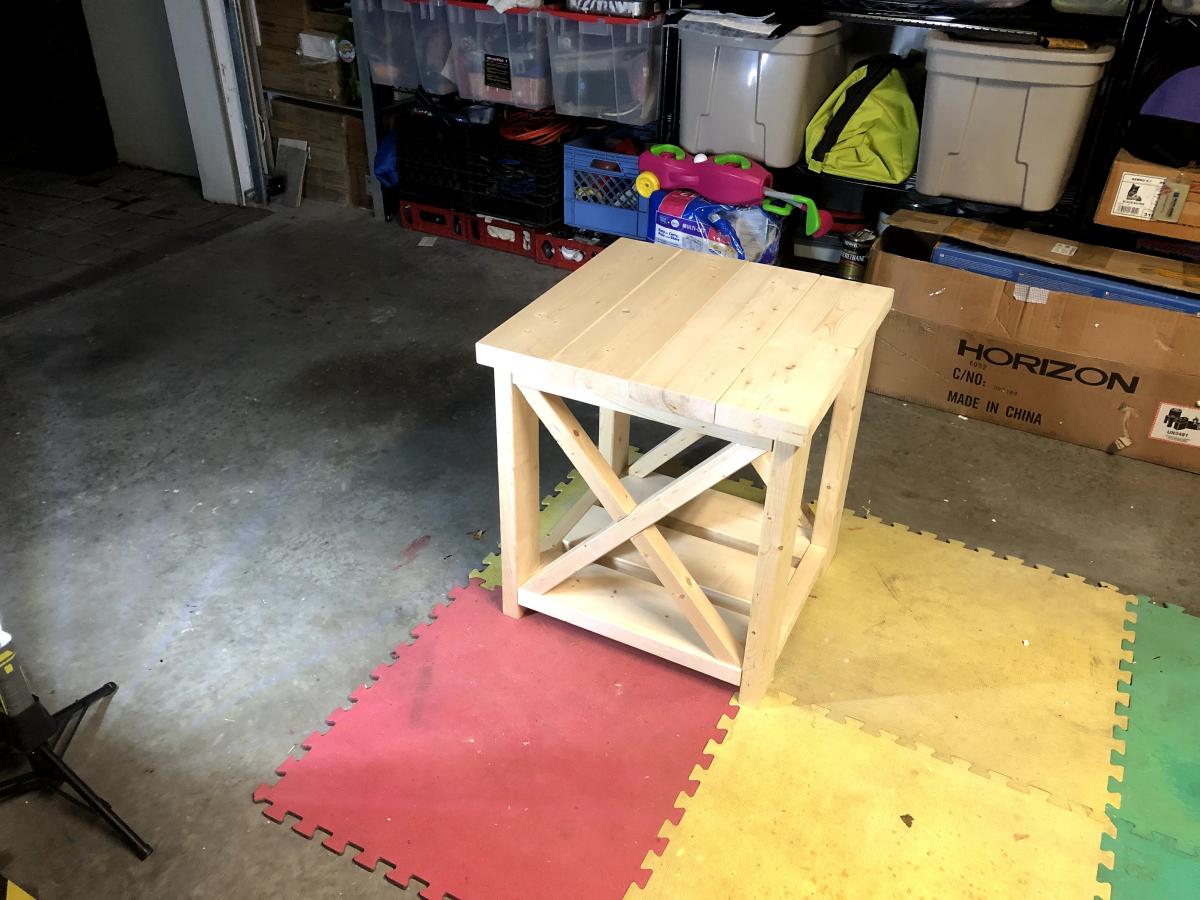
Farmhouse side tables to match the $40 Farmhouse Coffee Table
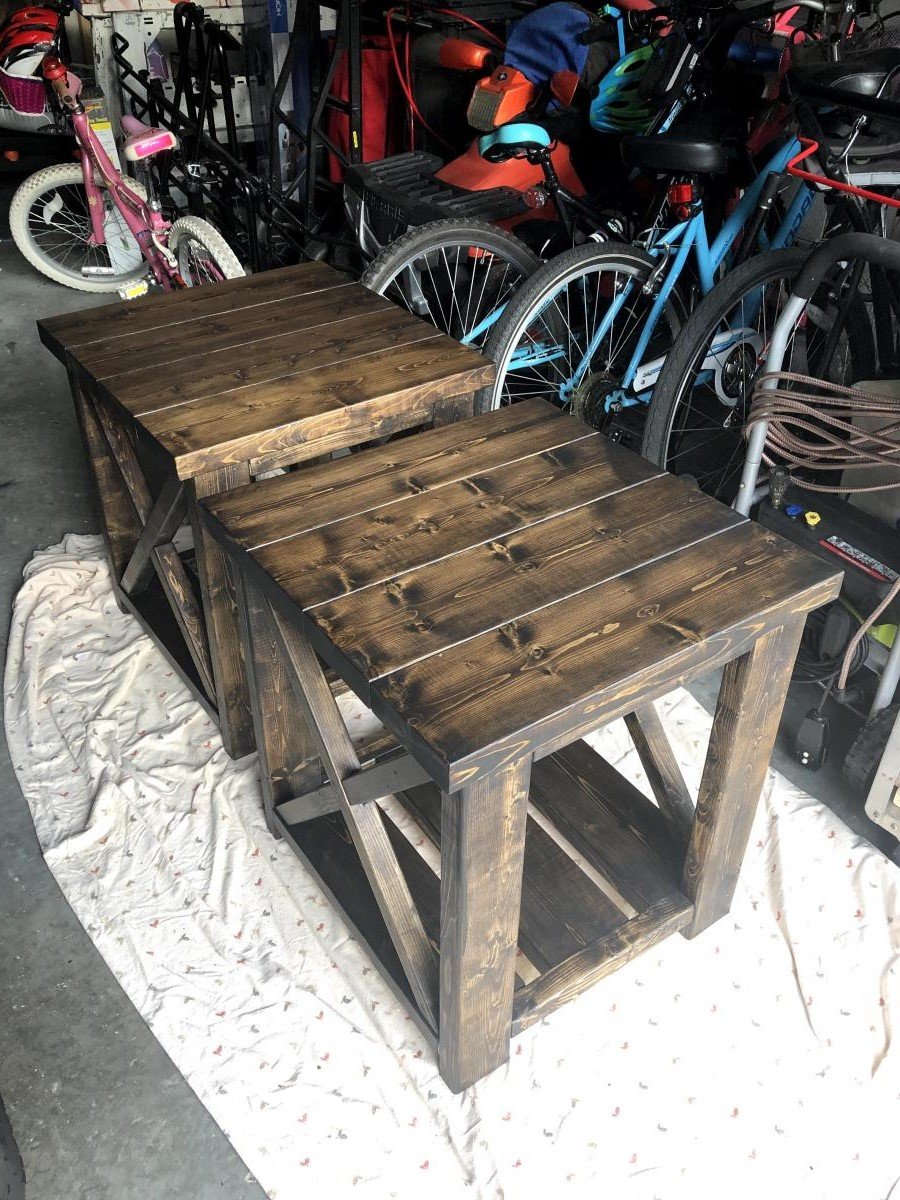
First it was the $40 Coffee Table, after it was finished my wife asked for the matching side tables see my other Brag Post. This time I built and used a proper miter saw stand, as well as purchased a new 60t saw blade for cleaner cuts. My wife didn't think they were tall enough so I increased the height by 2" with no need of additional wood. I took my time with these and even bought wood filler to even out and fill the knots. Ana does make it look easy having a workshop, but it wasn't that hard to build in my garage. I hated making the Xs on the Coffee Table and tried a different technique. I decided to notch them using my circular saw and my multi-tool as a plunge cutter. Sanded all the wood stained with Jacobean 2750 tint Minwax and sealed with Satin Polycrylic. See Photos for Details.
Built from Plan(s)
Estimated Cost
$60
Estimated Time Investment
Weekend Project (10-20 Hours)
Finish Used
Minwax Jacobean 2750 tint and sealed with Satin Polycrylic
Recommended Skill Level
Beginner
Double Laundry Basket Organizer
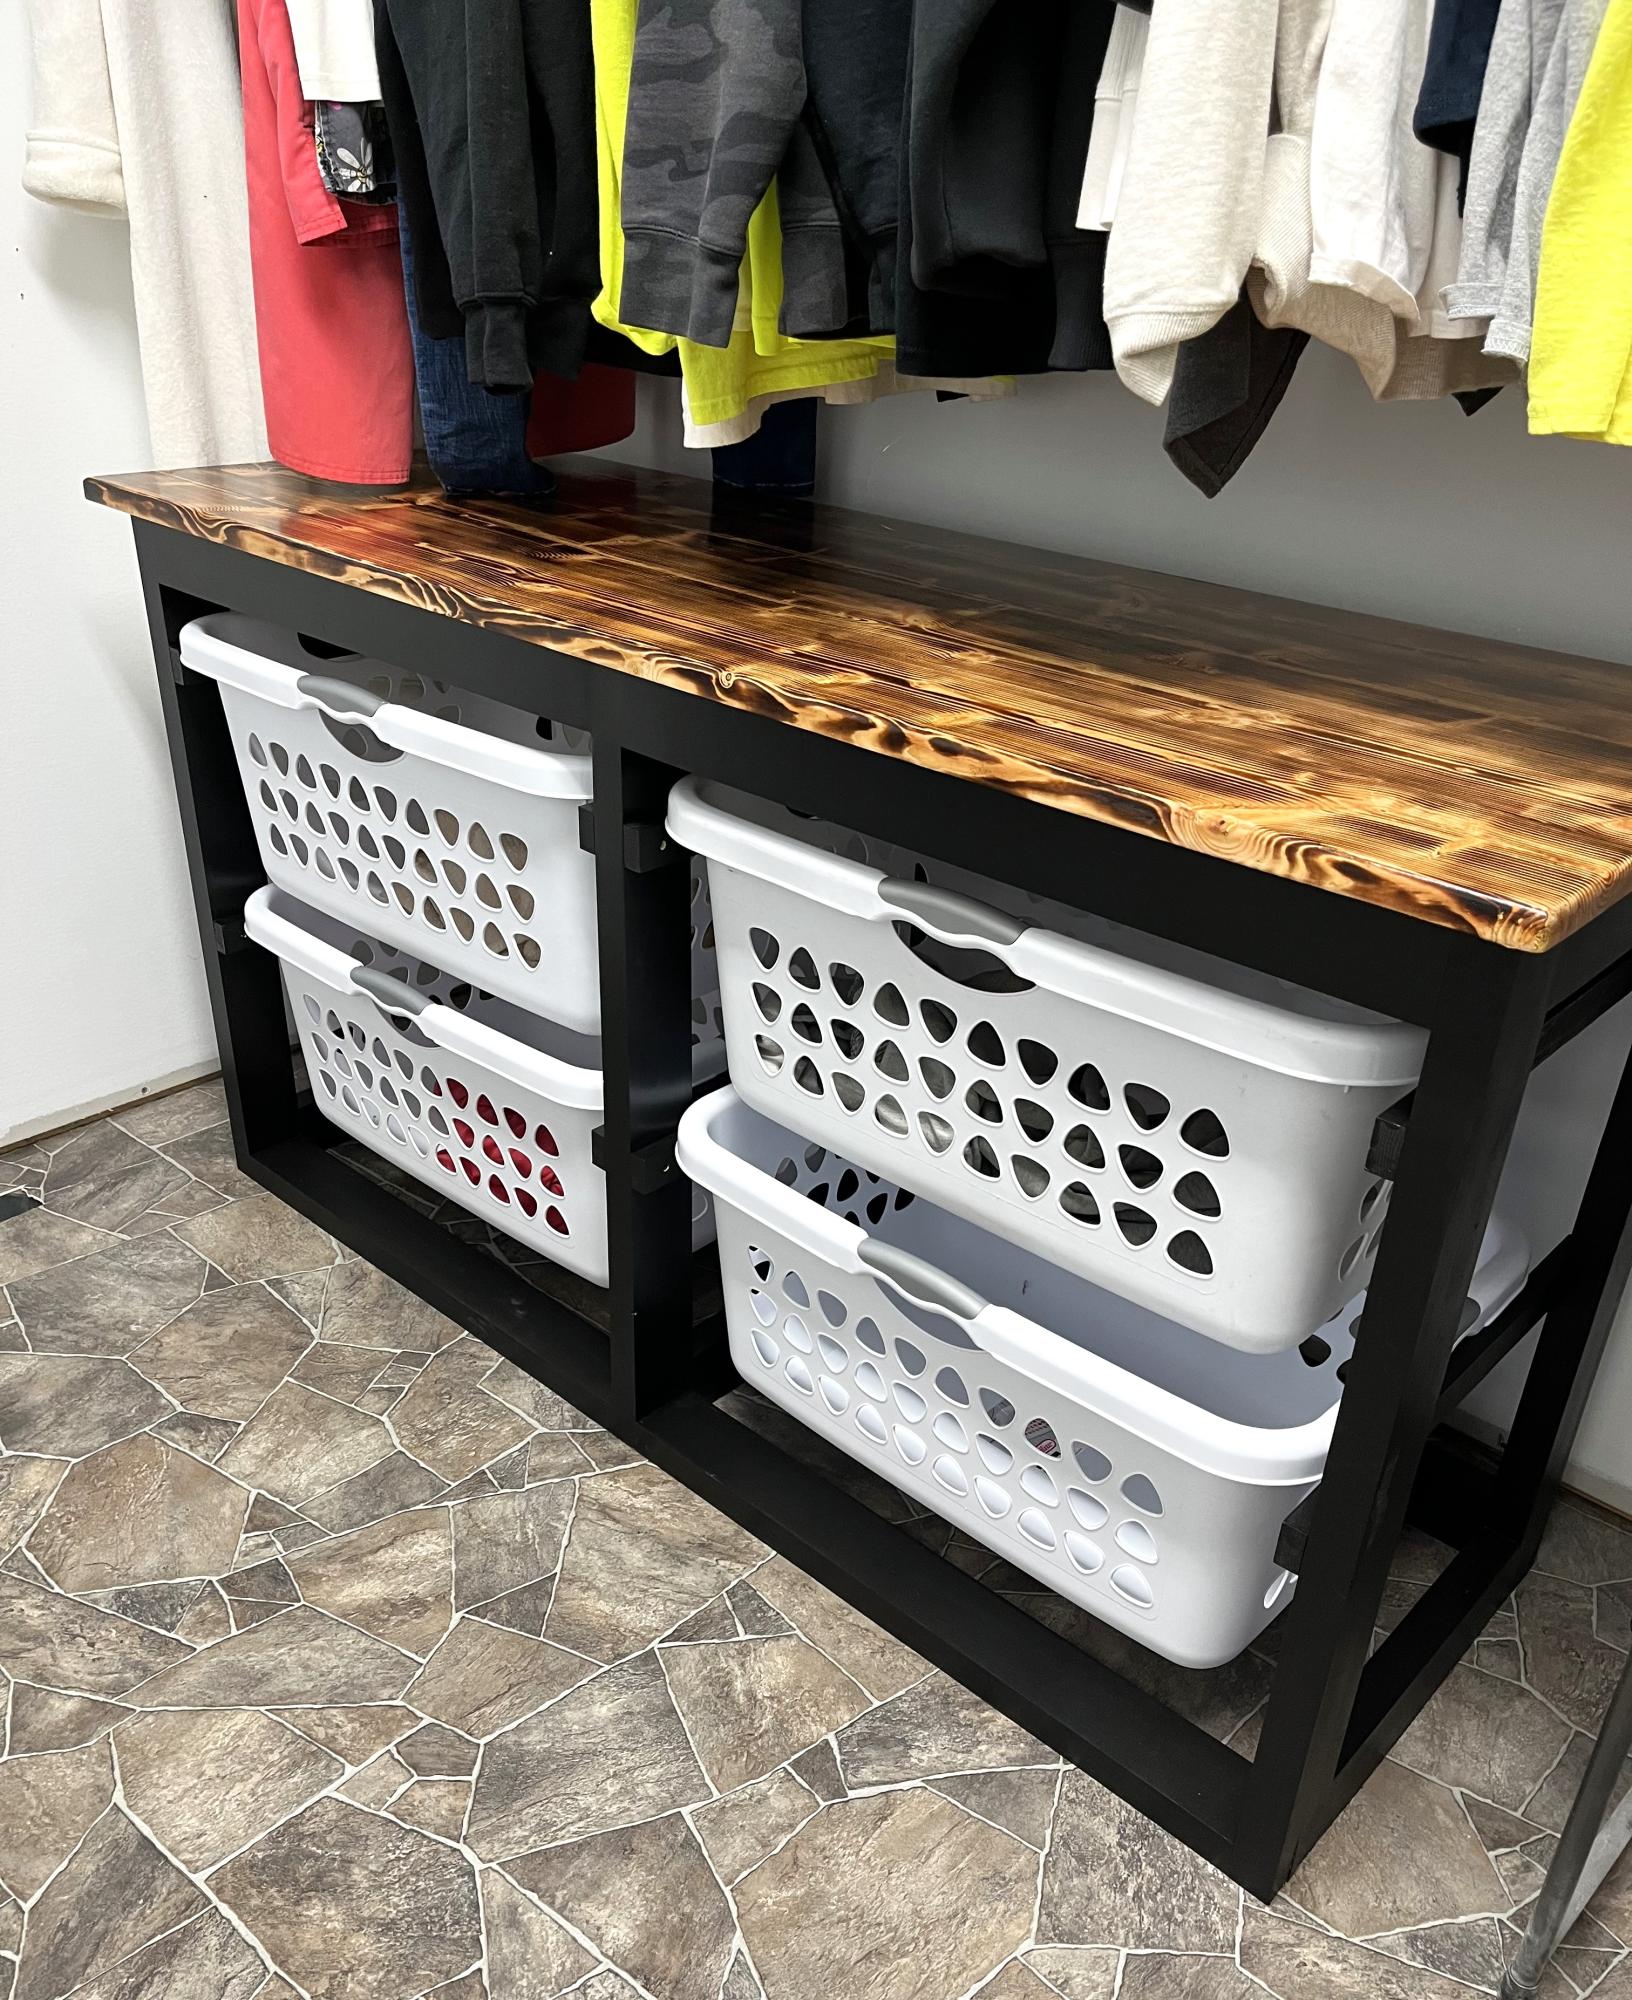
Ana your plans are amazing- here’s how mine turned out, I love it
Arlene

Built from Plan(s)
Play Kitchen

I combined the play sink and play stove into a one-piece kitchen by having them share a side. I found a bathroom faucet at my local Habitat ReStore for $15 (and that included a sink I didn't even need!). Time investment does not include painting. Here's my cost breakdown. Lumber: $25 (I used some scraps.) Faucet: $15 Dog bowl: $7 Hardware: $13 Primer and paint: $19 Screws: $4 Sandpaper: $5 Plexiglass: $3 Prepping dinner while my toddler works in his play kitchen beside me: Priceless.


Built from Plan(s)
Estimated Cost
~$90
Estimated Time Investment
Day Project (6-9 Hours)
Finish Used
Cheap white paint. It dripped like crazy and took forever to dry. My mantra was "It's a toy, it's a toy, it's a toy."
Recommended Skill Level
Intermediate
Comments

tilt out recycling center

Second wood project overall. First with a power-saw. Just found Ana-White - love it and thanks for sharing it all! I had to change the dimensions of this one to fit the space we needed it for. It holds two paper bags side by side to hold all of our recycling. So much neater then our plastic bin we had.
Looking forward to the next project...


Built from Plan(s)
Estimated Time Investment
Afternoon Project (3-6 Hours)
Finish Used
sanded all, wood filler in holes on plywood, sanded again, painted plywood (2 coats) and clear polyurethane (2 coats) rest of project.
Recommended Skill Level
Beginner
Comments

Sun, 11/29/2015 - 11:57
Bottom of recycling bin
The bottom looks different as well. I'm trying to avoid having to use a jig saw for the bottom. Would you mind sharing if and what modifications you made to the bottom? Great work!
Cara
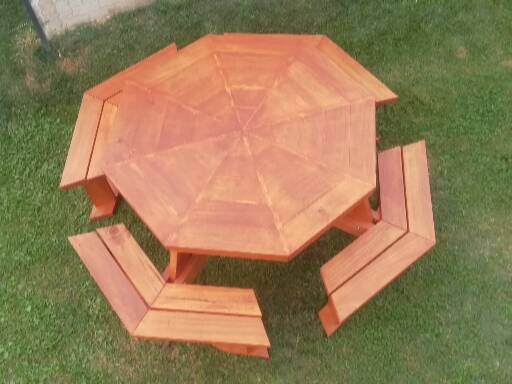
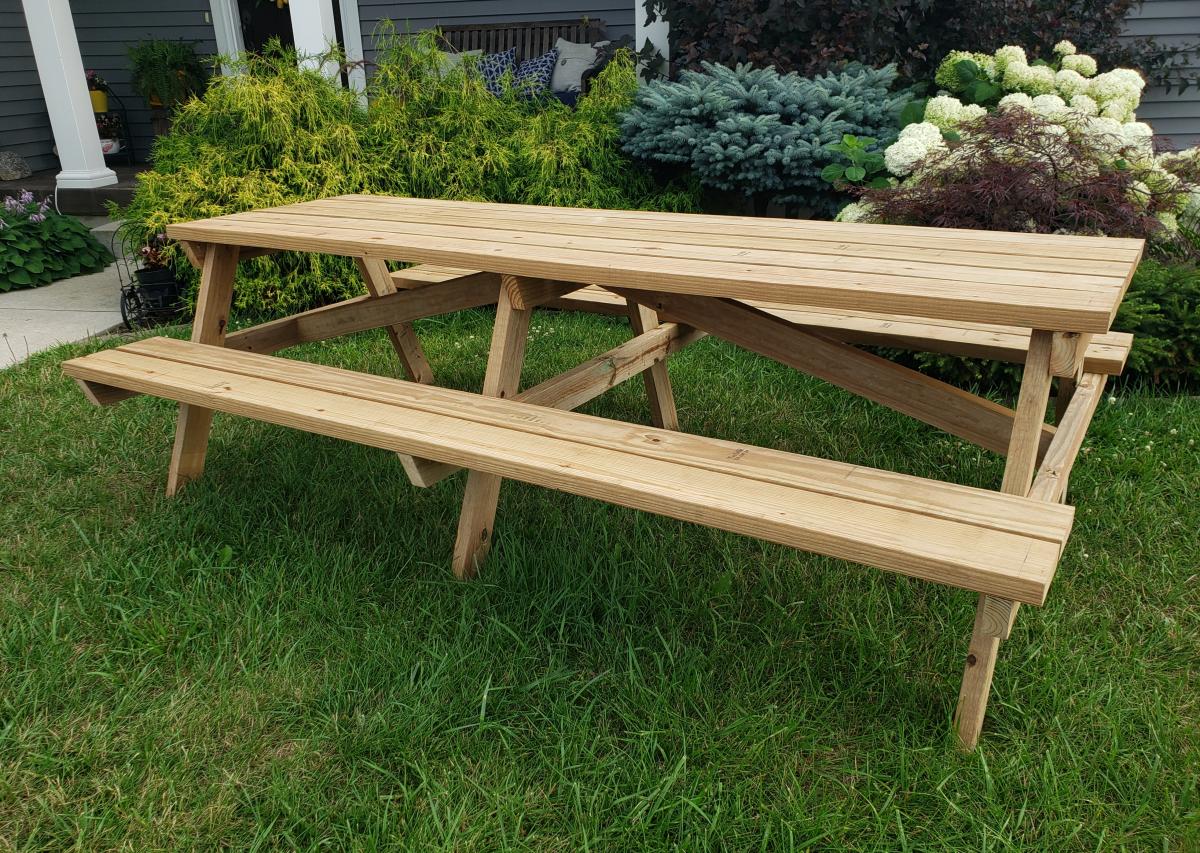
8 Foot Picnic Table
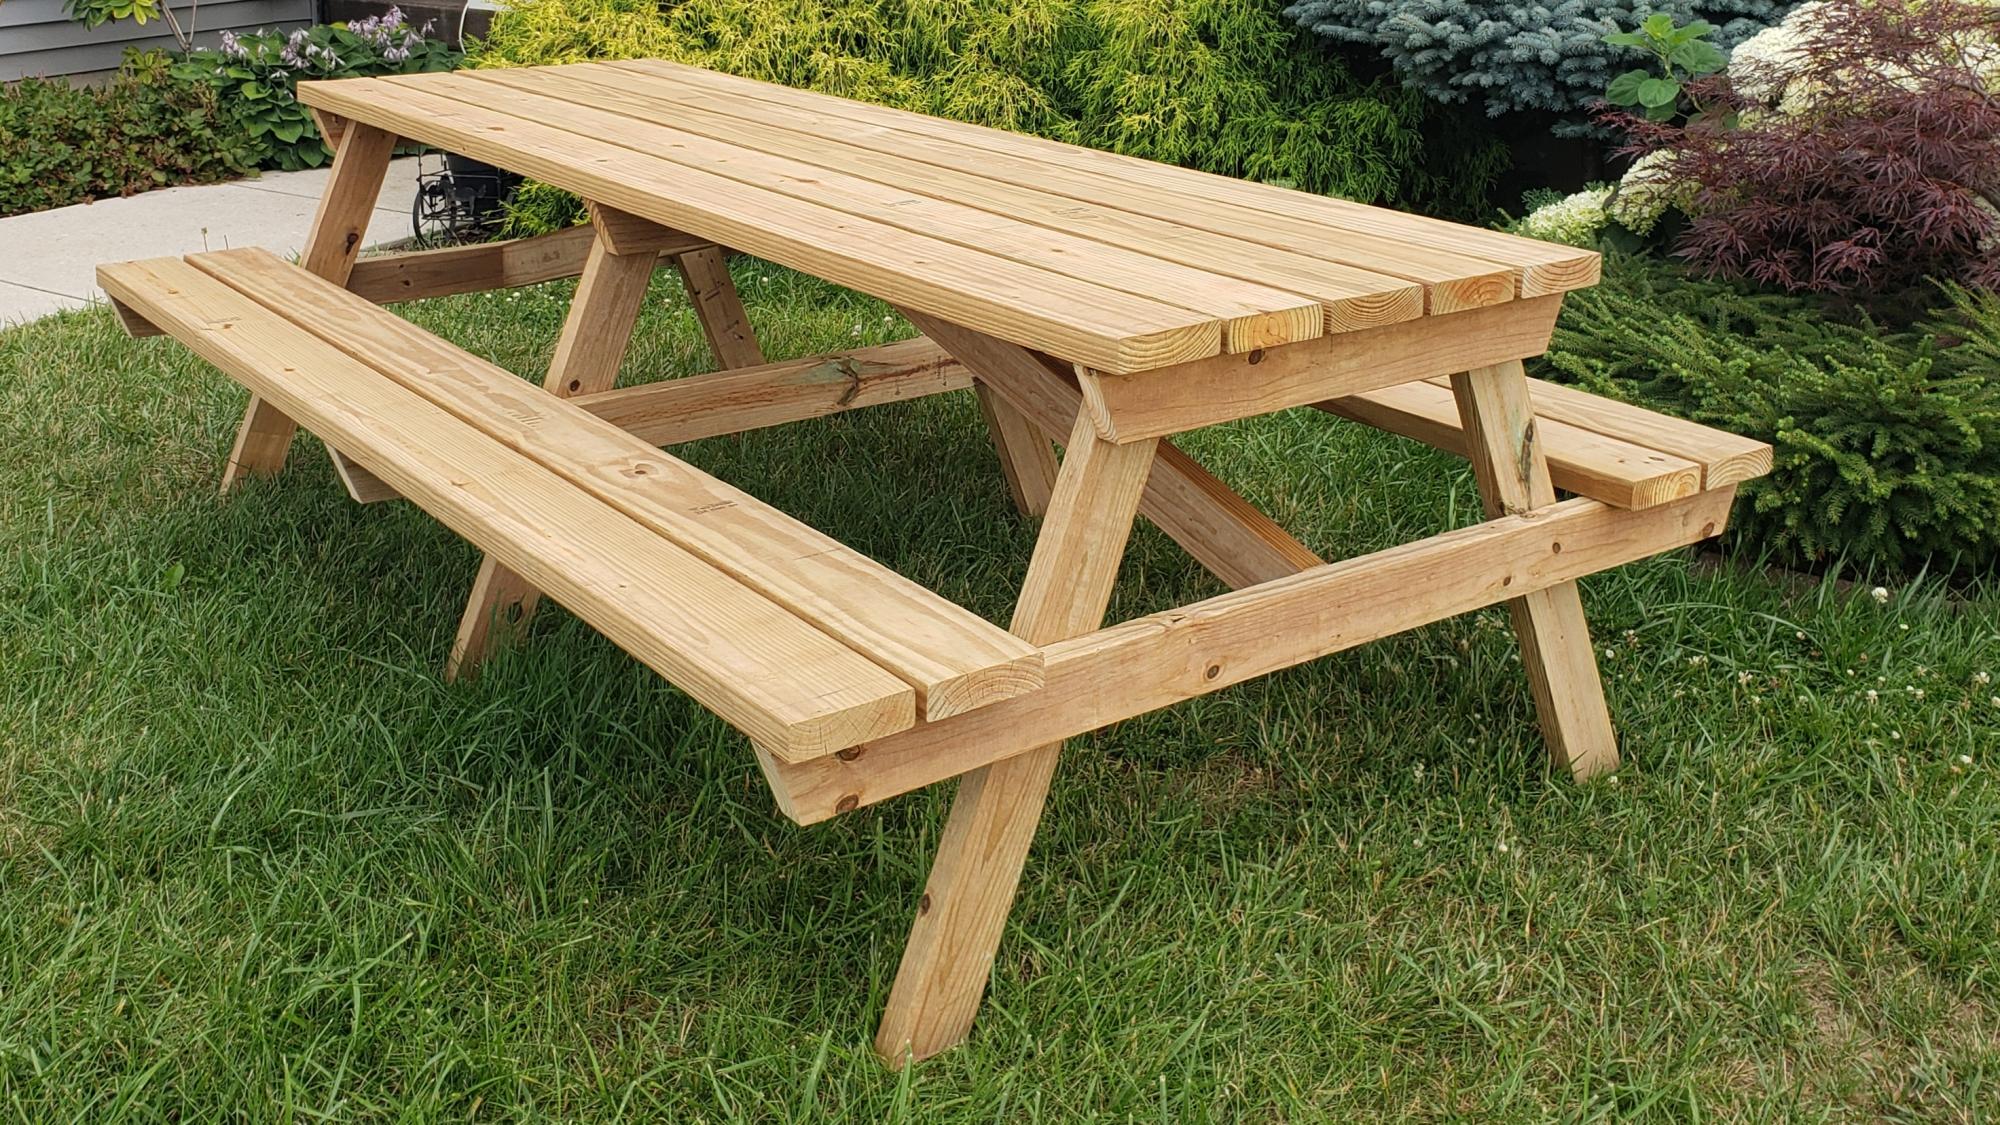
My teenage son and his father took over the bulk of the building duties this time. We chose to use treated lumber as untreated lumber with finish applied doesn't do well in Michigan weather in my experience. We made it more beautiful by using the treated lumber in cedartone. We used pocket holes to attach the top and seats to the supports to make for a smooth appearance. This is one large and heavy table! The plans were accurate and the build was fairly simple, but having many hands made working with the large piece easier.
Built from Plan(s)
Estimated Cost
$150
Estimated Time Investment
Afternoon Project (3-6 Hours)
Finish Used
None
Recommended Skill Level
Intermediate
Comments
Wed, 07/22/2020 - 12:10
This is BEAUTIFUL!!! Thank…
This is BEAUTIFUL!!! Thank you so much for building this table and sharing photos!
Bon Appetit Rustic Kitchen Island

Here is the Easy Kitchen Island all finished. I learned to use my k-reg with this project. To attach the top I instead used corner blocks in each corner of the bottom unit and screwed the top in place. I found this made the piece more sturdy. for the 1x2's I used furring strips which are not very nice however I painstakingly picked through a large pile till I found ones that were straight and without knots. I then had to sand them like crazy. Saved a ton of money but worked very hard. This project actually took 19 - 1x2's rather than what the plan called for. When complete this piece was very heavy...I love it and have found the perfect home for it.
Thanks again Ana!
Janet


Estimated Cost
60.00
Estimated Time Investment
Weekend Project (10-20 Hours)
Finish Used
White gloss paint and Mahogany stain.
Recommended Skill Level
Beginner
Mini Wine bar

Be aware: some of the measurements and materials needed in the plan are off. For example, you need 1/8" hardboard for the bottom of the drawer but earlier in the plans it shows 1/4". Also, if you have larger wine glasses, you'll want to plane down your stemware holders so the distance between them is 3 1/8" instead of 3". It would have also been a good idea to pre-stain those before adding them in. Regarding stain, it would also look really good with a light stain. Another really nice thing about this project is that people are really impressed with it though it is fairly straightforward. :)
Built from Plan(s)
Recommended Skill Level
Beginner
Comments
Fri, 06/10/2016 - 07:09
Stain color
Thank you. :) I don't remember exactly, I believe it was regular Minwax wood stain, walnut and/or red mahogany. I will try to find what I actually used.
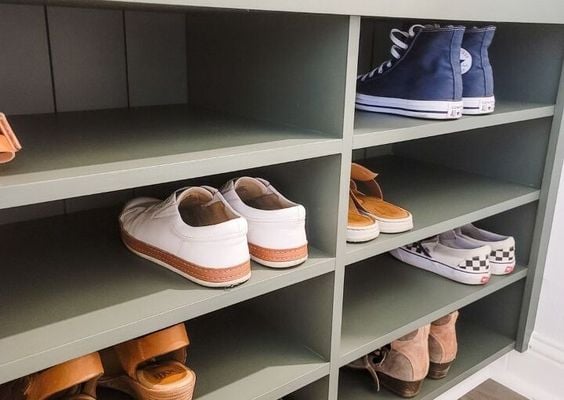
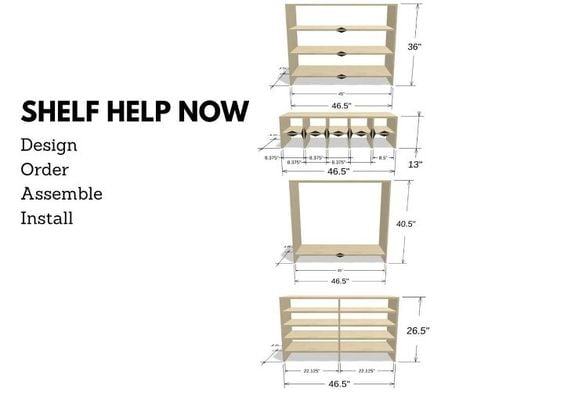
Computer Desk with hutch
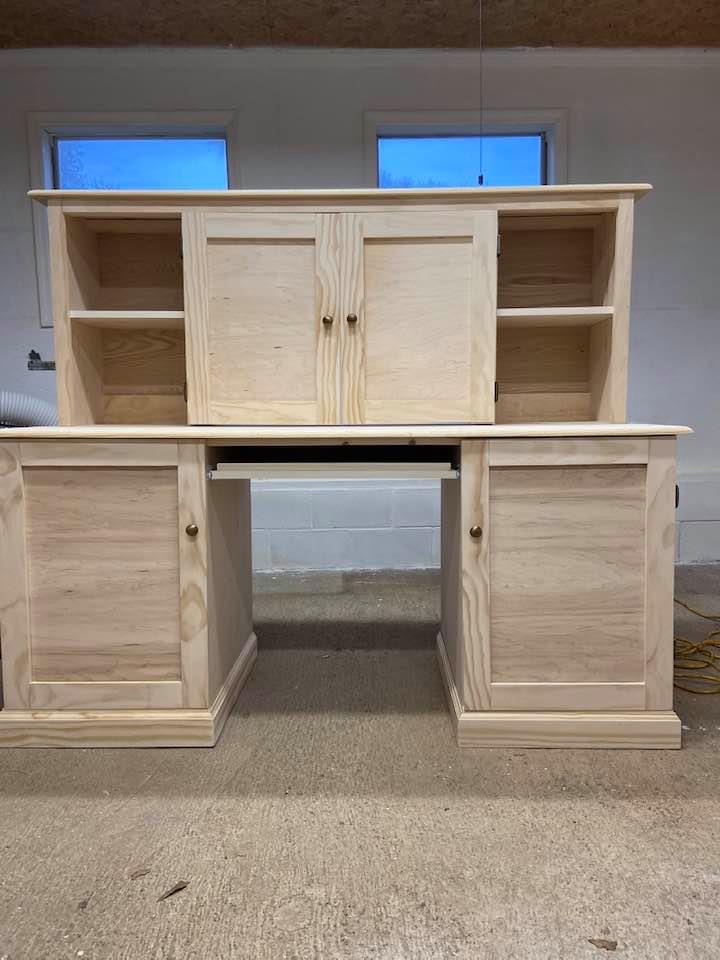
My cousin needed a computer desk but wanted it to look like a piece of furniture when not in use since they have limited space. The left side stores her tower, the right side has a pullout shelf for her printer and storage for printer paper & supplies. She works with 2 monitors so the center on the hutch will accommodate both but be hidden when she isn't working. This was a fun project and using Shelfhelp made it a joy to build. They will be my "go-to" place when building large pieces of furniture.
Built from Plan(s)
Estimated Cost
$400.00
Estimated Time Investment
Weekend Project (10-20 Hours)
Finish Used
Unfinished as they will stain to match their furniture
Comments
Sat, 12/19/2020 - 10:30
Lots of great workspace and storage!
Thank you for using Shelf Help! It looks fantastic:)
Henry bookshelf
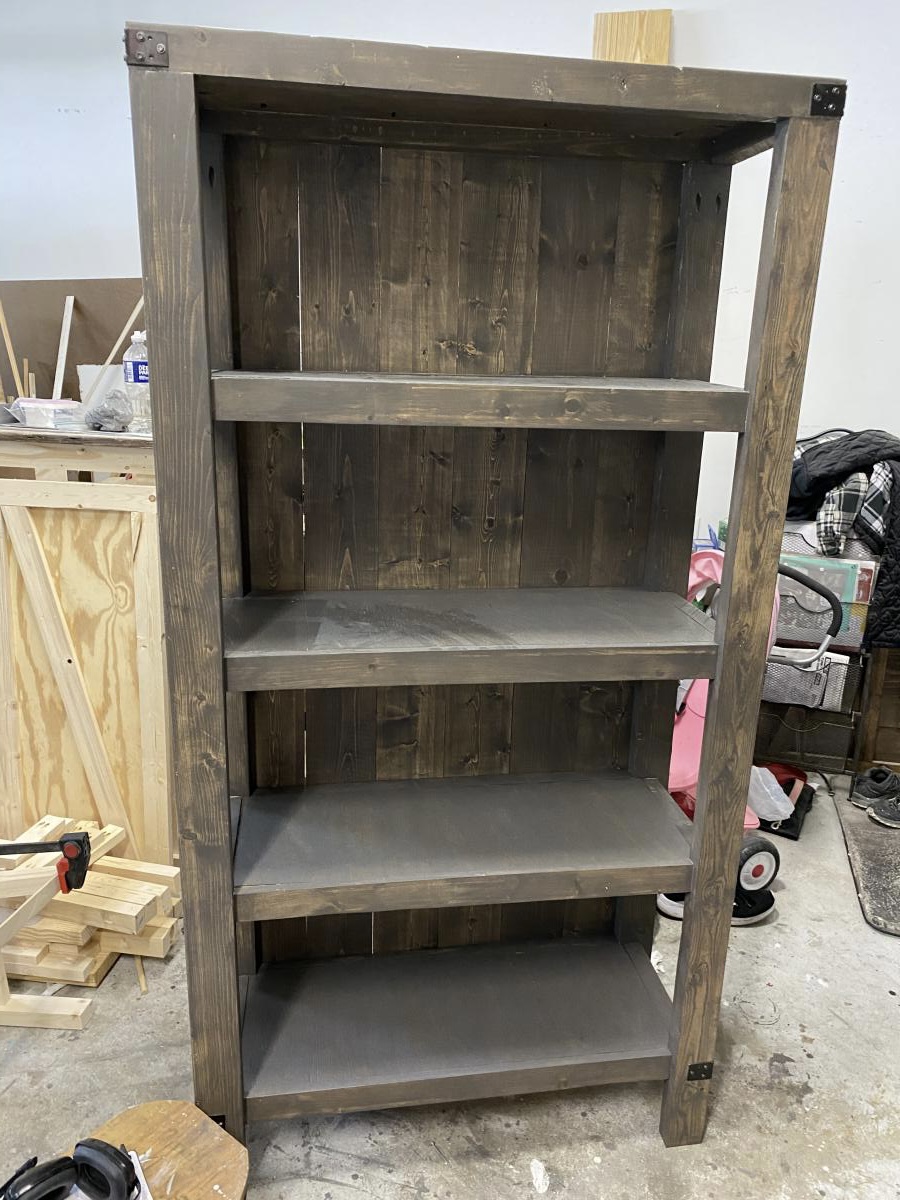
My husband has been hounding me to build him a bookshelf for his office. I actually used wood that I already had in my garage. The next time I build it, I will follow it exactly... I used plywood on the shelves and planks on the back... next time, I will do the opposite, but I really love it!!


Built from Plan(s)
Estimated Cost
Less than 100
Estimated Time Investment
Afternoon Project (3-6 Hours)
Recommended Skill Level
Beginner
Comments
Fri, 03/19/2021 - 09:31
Great finish and details!
The brackets add that farmhouse industrial feel, great job!
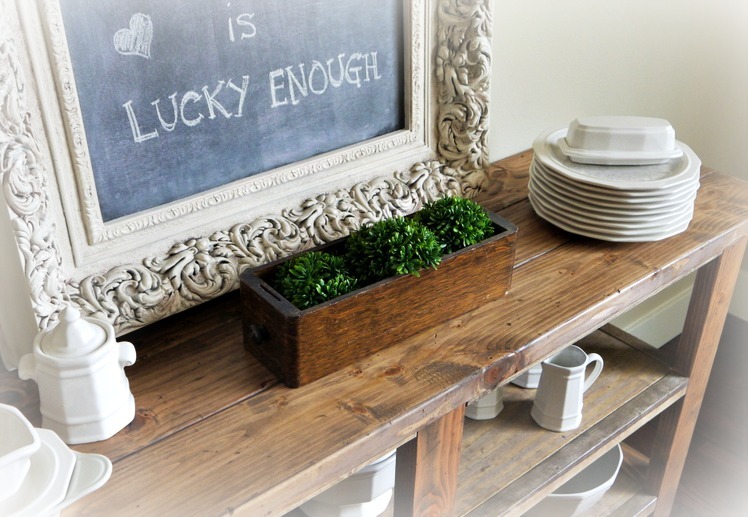
Rustic Buffet Table
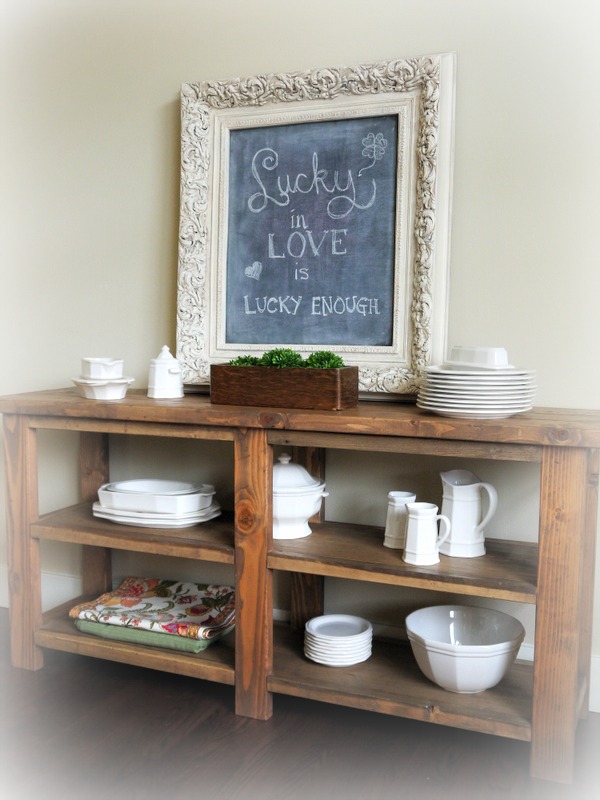
Love how this rustic buffet / console table turned out! It was made as a companion piece for a Farmhouse - style table. Modified to be shorter (64"), and made without the decorative hardware or the "X" detailing from the original plan.
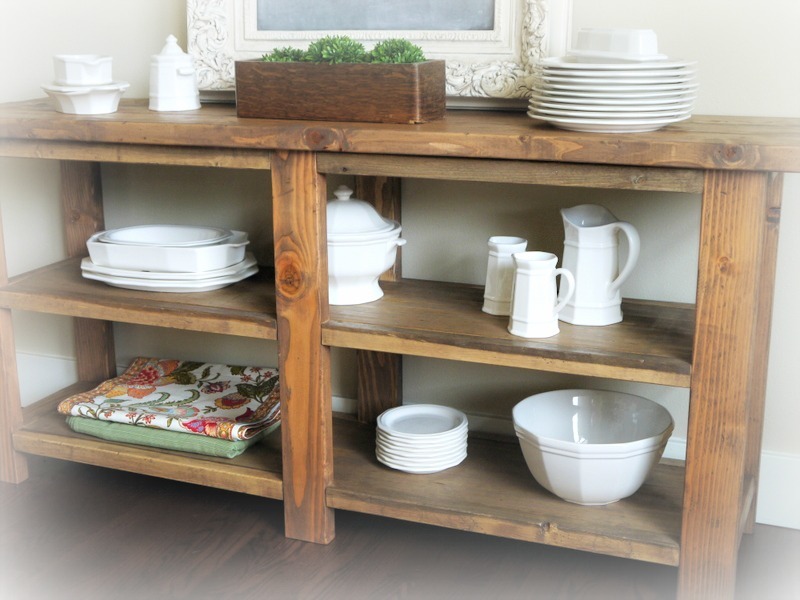
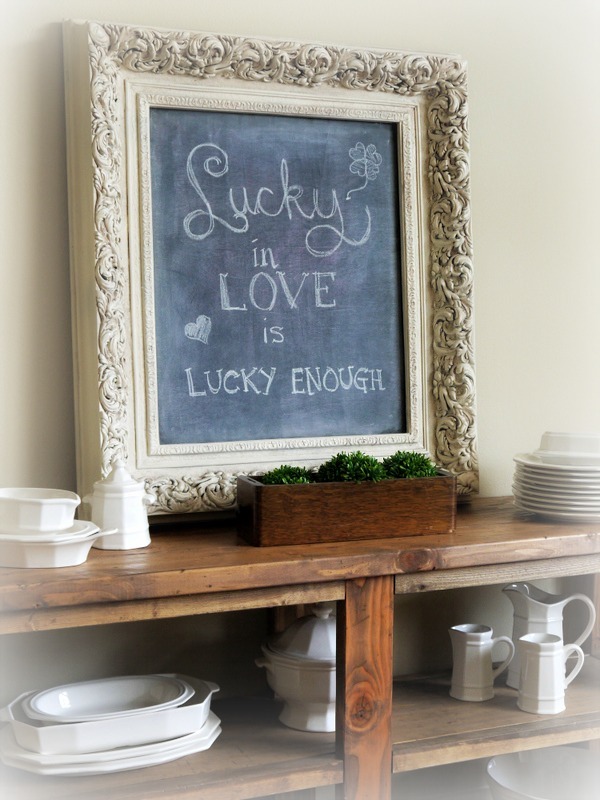
Built from Plan(s)
Estimated Cost
$55
Estimated Time Investment
Day Project (6-9 Hours)
Finish Used
Custom mix of Minwax Weathered Oak + Antique Walnut Stain. Three coats of hand-rubbed polyurethane.
Recommended Skill Level
Beginner
Comments
kkmerrett
Tue, 01/31/2023 - 08:46
Love this drop zone.
Very nice!