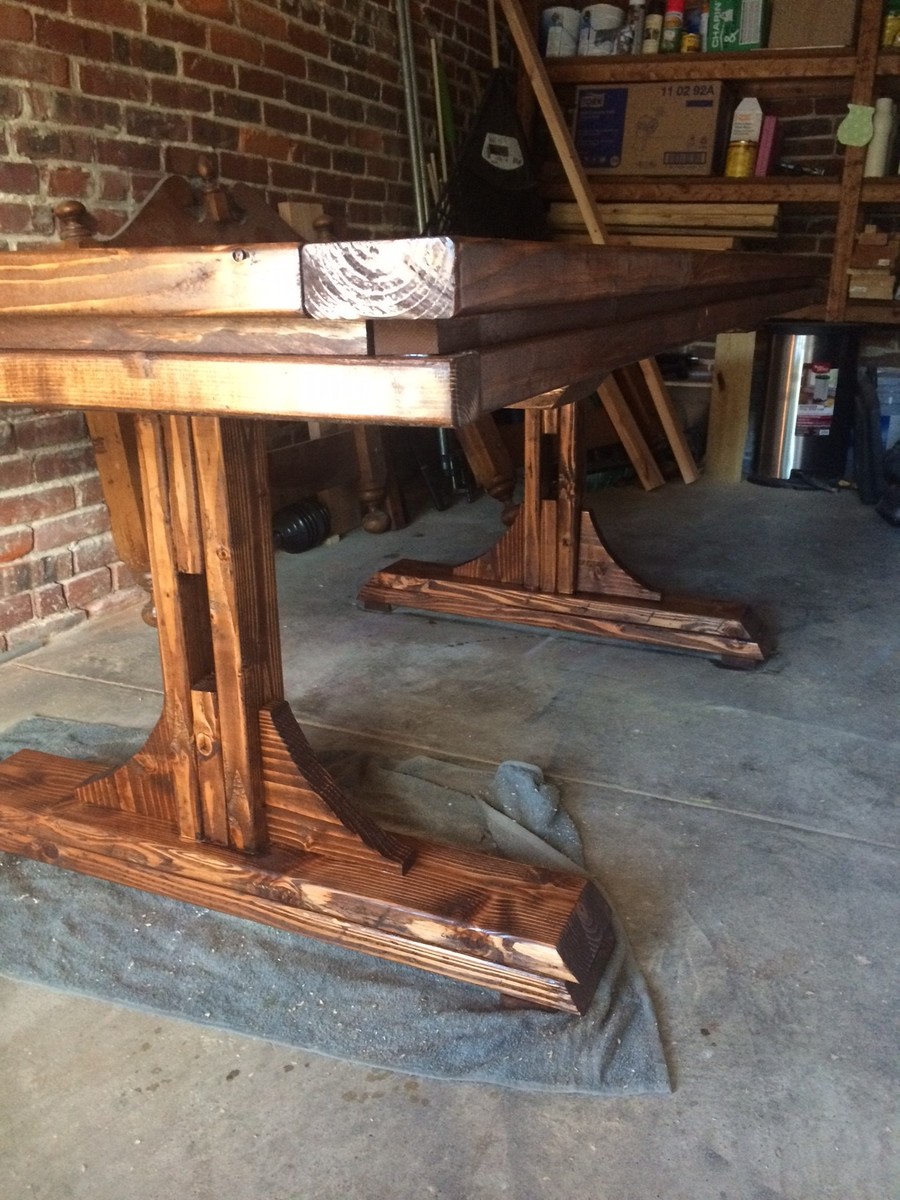
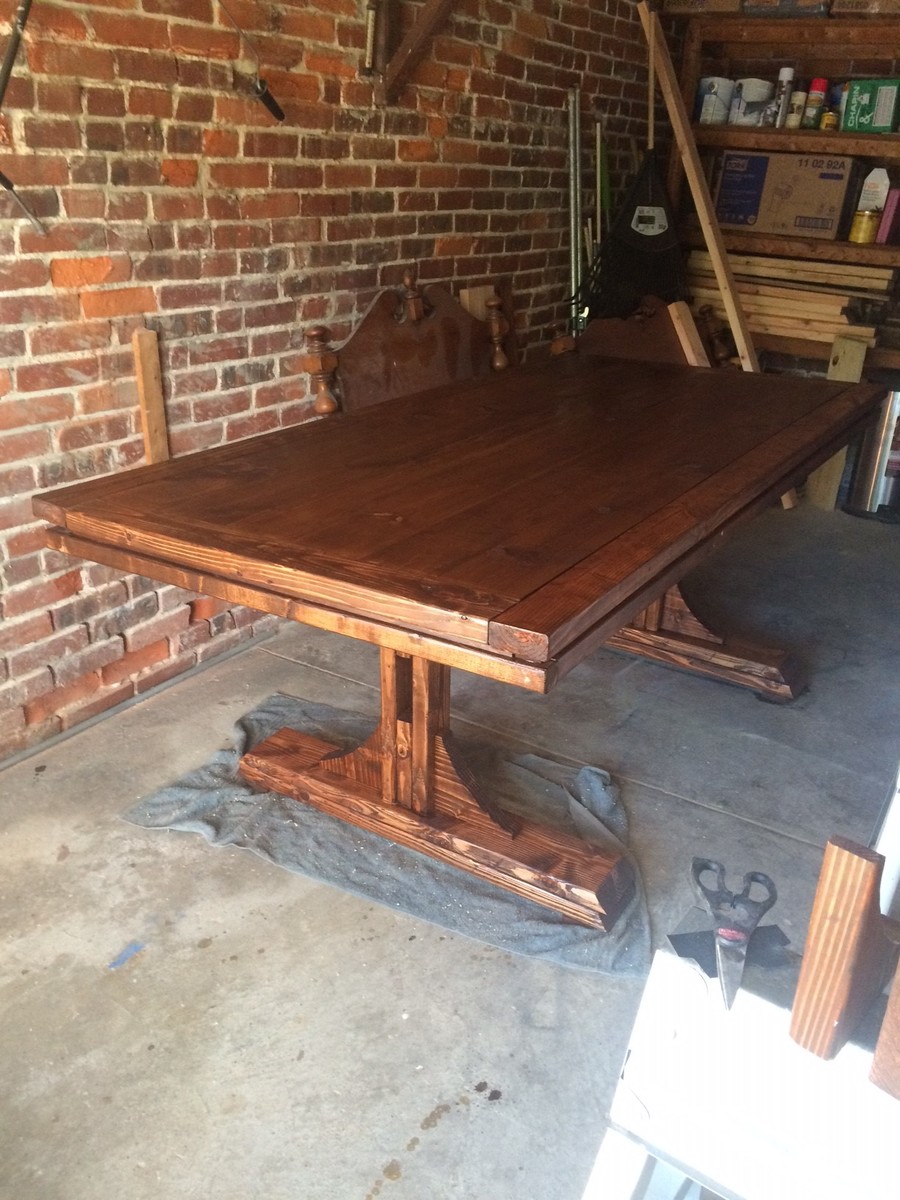
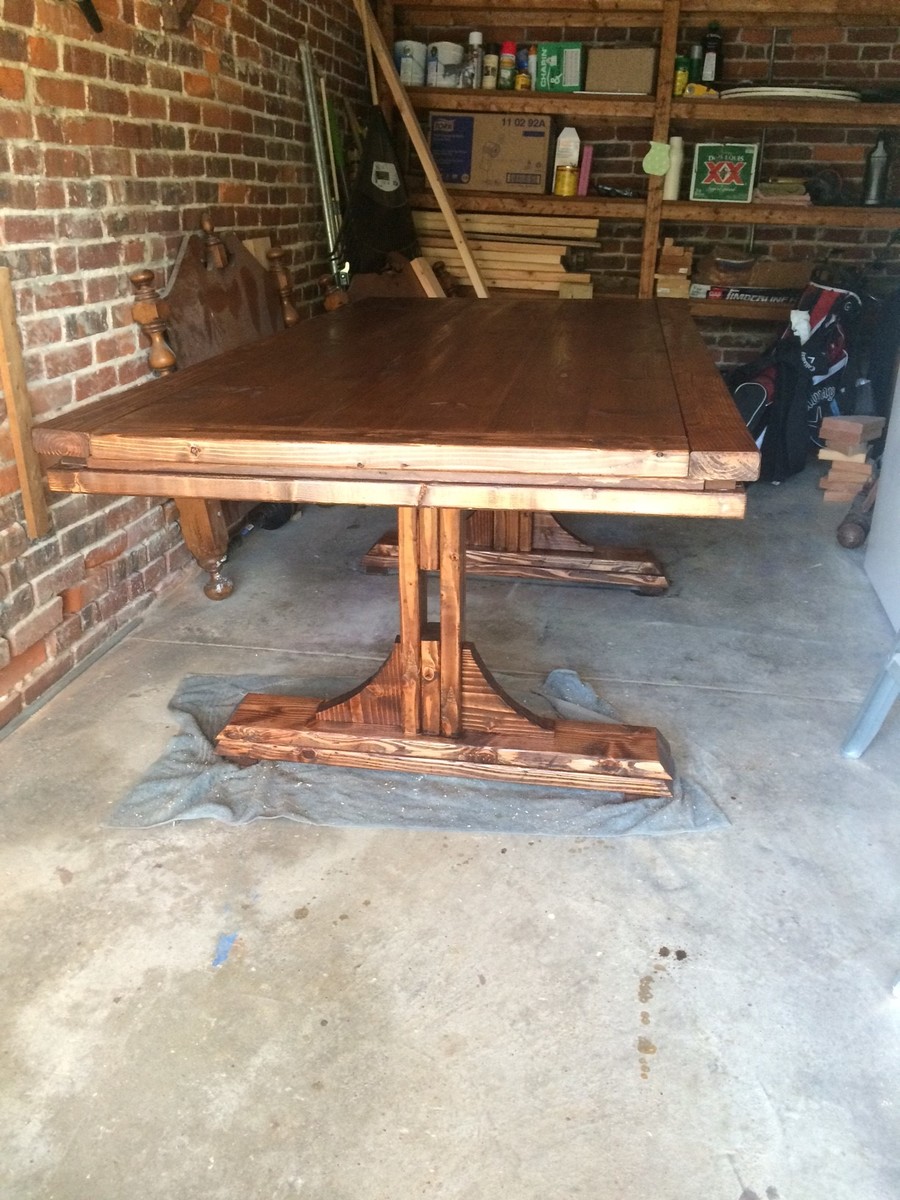
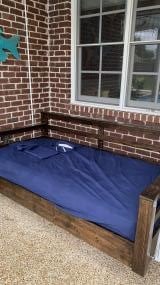
Community Brag Posts

Stone Bird House

Submitted by sawdust on Sun, 06/08/2014 - 16:59

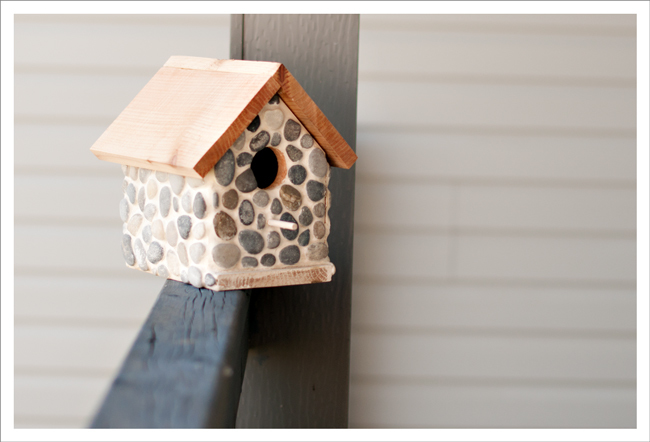
I've been collecting small flat rocks off the road every time I take the dog for a walk. Unfortunately my grout cracked, I probably used the wrong type. Anyone who can tell me what I should have used instead? Suggestions very welcome, as I might try this again.

Estimated Cost
$5.00
Estimated Time Investment
An Hour or Two (0-2 Hours)
Finish Used
Tiled road rocks. No finish.
Recommended Skill Level
Starter Project

Comments

Lady Goats

Mon, 06/09/2014 - 14:28

I love this idea! What kind of grout did you use? I would imagine that for such large gaps between the rocks, you'd have to use a sanded grout (most state whether they're for indoor/outdoor use, but I've only seen ones that say both). But it could have cracked because the wood underneath expanded or contracted or the grout wasn't the right consistency.. Love, love, love!

In reply to by Lady Goats

sawdust

Wed, 06/18/2014 - 09:30

Thank you for your comment on my birdhouse! I talked to a contractor who suggested that my grout was too watery when I started. I also used Polyblend non-sanded grout. I may use sanded next time. Trying to decide if I should give it another go, I kind of want to!

Ryobi Nation Bathroom Ladder

This leaning bathroom ladder was the perfect final touch to our budget bathroom re-do.

I used all reclaimed wood - old barn wood, pallet, and scraps - and had the nails/screws on hand. The only cost will be for stain, which the jury is still out on. Likely I will use the Danish oil in medium walnut.  Loved doing this project and the result!

Estimated Cost
$10 (reclaimed wood and hardware was on hand)
Estimated Time Investment
Day Project (6-9 Hours)
Finish Used
I rounded off the edges of the shelves like the "tip" recommended so they weren't so sharp. I don't have a nail gun, so I pre drilled very small holes and hammered in the nails after the glue set for a bit. I also cut a 10degree angle off the bottoms of the sides (to match the leaning angle at the top) so they would sit flat.
Recommended Skill Level
Beginner

Comments

Idahofischer

Fri, 09/09/2016 - 11:01

I posted this brag post before registering with a user ID. I'm not sure how to "claim" my (first ever!) brag post. Anyone know if this can be done?

Farmhouse Dog Bed

Submitted by KWhitt92 on Mon, 06/22/2020 - 14:23

Followed the Farmhouse Doll Bed build! It worked out great! It’s the perfect size for my tiny pup. Cost and time to finish includes everything you see here. The bed frame, the sheets, pillow, and mini quilt all made by hand.

Estimated Cost
$65
Estimated Time Investment
Afternoon Project (3-6 Hours)
Finish Used
Minwax Dark Walnut
Recommended Skill Level
Beginner

Landon's Mischief Step Stool

Submitted by elh130 on Mon, 08/20/2012 - 13:50

Very sturdy and stylish step stool built for my son in a style to match the kitchen and bathroom in our house.

This entire project was built using scrap plywood from a previous project and reclaimed oak boards that we demoed from our house while remodeling.

The sides were simply cut using a table saw to the rough dimension and then I added the details using a bandsaw. The stairs and rails were rough cut on the tablesaw and then milled using a jointer and planer to the specifications in the plan. Once cut I used a pocket screw jig to drill all the necessary holes before finishing assembly on the base. Each section was finished separately and then I used pocket screws to attach the steps last.

Very easy project that I made slightly more complicated by using reclaimed wood and a 2 tone design. Would recommend pocket screws to ensure strength and durability...I can stand on this and it doesn’t even budge!

Thanks for the plans!!

Built from Plan(s)
Estimated Cost
$10ish
Estimated Time Investment
Day Project (6-9 Hours)
Finish Used
Sides got an oil based primer followed by a high gloss trim latex paint applied using a HVLP Sprayer.

Steps were stained using Minwax Red Chestnut oil based stain.

The whole thing was finished using 2 coats of a clear Poly applied with a HVLP Sprayer.
Recommended Skill Level
Intermediate

Boardwalk Shoe Bench

I love the legs on Crate&Barrel's Boardwalk Bench, but I was on a tight budget (under $10), so I needed to make many modifications so that I could use the random pieces of wood I had accumulated from my local deconstruction warehouse, including free wood louvers for the slatted shoe shelves. If you'd like to make your own, more photos of my process are on my little blog: http://sunnysideup-stairs.blogspot.com/2014/05/boardwalk-shoe-bench.html

Estimated Cost
$5
Estimated Time Investment
Afternoon Project (3-6 Hours)
Finish Used
None applied, yet. :)
Recommended Skill Level
Beginner

Comments

JoanneS

Tue, 06/10/2014 - 17:06

Great use of materials! The lines are elegant, it's a wonderful build! (Also, I love the floor!)
:)
Joanne

yurra-bazain

Tue, 06/10/2014 - 22:00

Thank you, Joanne. :) I really like the floor too. I expect lots of patterns will be appearing in our home this year or next. :)

Mud room Lockers

Submitted by Anonymous (not verified) on Sat, 09/10/2016 - 22:06

This is 10 feet long and 5 1/2 feet tall. Made using a Kreg Jig.

Estimated Time Investment
Week Long Project (20 Hours or More)
Recommended Skill Level
Beginner

Comments

Farmhouse side tables to match the $40 Farmhouse Coffee Table

Submitted by b25pilot on Wed, 06/24/2020 - 14:54

First it was the $40 Coffee Table, after it was finished my wife asked for the matching side tables see my other Brag Post. This time I built and used a proper miter saw stand, as well as purchased a new 60t saw blade for cleaner cuts. My wife didn't think they were tall enough so I increased the height by 2" with no need of additional wood. I took my time with these and even bought wood filler to even out and fill the knots. Ana does make it look easy having a workshop, but it wasn't that hard to build in my garage. I hated making the Xs on the Coffee Table and tried a different technique. I decided to notch them using my circular saw and my multi-tool as a plunge cutter. Sanded all the wood stained with Jacobean 2750 tint Minwax and sealed with Satin Polycrylic. See Photos for Details.

Built from Plan(s)
Estimated Cost
$60
Estimated Time Investment
Weekend Project (10-20 Hours)
Finish Used
Minwax Jacobean 2750 tint and sealed with Satin Polycrylic
Recommended Skill Level
Beginner

Hailey Wall Magazine Rack

Submitted by dave_83 on Sat, 06/14/2014 - 23:03

This was my first ever project. I initially intended to use it for office storage but it ended up taking its place in the kitchen - and proving most useful for storage there too!

Estimated Time Investment
Afternoon Project (3-6 Hours)
Finish Used
Colron wood dye - American Walnut
Recommended Skill Level
Starter Project

Comments

CaitCouch

Submitted by Anonymous (not verified) on Tue, 09/13/2016 - 09:31

We altered our plans as my dining room could only accomodate a 7 ft table! This was out first DIY that was this large of an undertaking and we love the way it came out. If we can do this as woodworking novices you can definately do it! 

Estimated Cost
$150 in the philadelphia area including wood, screws, stain, and finish another $75 if you need to rent a mitre saw.
Estimated Time Investment
Week Long Project (20 Hours or More)
Finish Used
Sanded down the table starting with 150 grit, followed by 220, then 320. Next, MinWax English Chestnut (1 coat- painted on and sat for 5 mins and then wiped off with rags- we didnt time it just about 5 mins - did the top first- then sides- then the legs one at a time to make it more manageable) followed by MinWax Satin Matte polyurethane (2 coats- 5 hours between coats and then sit for 48 hours untouched)

It was suggested to us that before attaching we should sand, stain and seal the legs. We didn't follow this advice from a friend and we should have!! being down on the ground with the table is all together was very hard on our backs and bottoms (and were in our 20s!). that is the only thing i would have done differently.
Recommended Skill Level
Beginner

Bed porch swing

Submitted by Anonymous (not verified) on Sun, 06/28/2020 - 09:45

Utilized your plans for this porch bed swing! Looks great on the porch. Couldn’t find anything solid in the ceiling to hang it from so I installed my own joists with rafter hangers attached to the walls. Should hold long term.

Built from Plan(s)
Estimated Cost
$80 in Wood and $20 in stain and polyurethane
Estimated Time Investment
Weekend Project (10-20 Hours)
Finish Used
Spar Urethane
Mocha stain
Recommended Skill Level
Beginner

Reclaimed Wood Outdoor Table

Submitted by Anonymous (not verified) on Mon, 04/15/2024 - 10:47

I had leftover lumber from building the full size table so I built this outdoor coffee table using the same design just a little smaller.

Connie Breck

Farmhouse dining table with straight legs

Submitted by isti799 on Wed, 06/18/2014 - 22:12

I'm homemade woodworker. This is my first job!

Estimated Cost
100 $
Estimated Time Investment
Weekend Project (10-20 Hours)
Finish Used
2 coat waterbased stain ( trilak vekonylazur)
3 coat+1 coat tabletop waterbased furniture varnish (Trilak vizes butorlakk)
Recommended Skill Level
Beginner

Comments

West Elm Wall Cubby Knock Off

Submitted by Mike F on Sun, 09/18/2016 - 06:15

My wife found this post on Pinterest and asked if i could build it.  The hardest part was cuting the angles wit the jig saw because i can never get it to cut square and i have a little OCD about that sometimes.  I ended up using my table saw a little.  I would not recommened that though.  If i had acess to a band saw stand that would have ben perfect.

Estimated Cost
Around twenty dollars
Estimated Time Investment
Afternoon Project (3-6 Hours)
Finish Used
I used two different stains, provincial and special walnut.
Recommended Skill Level
Beginner

Narrow Cottage End Table from Scraps

Submitted by kmgoff30 on Tue, 06/30/2020 - 16:55

I loved this project so much!! The best part of it for me was I didn't spend any money! I literally used scrap boards I had from rehab projects I had completed around my little cozy cottage. Some of the boards were already painted in Polar Bear by Behr in gloss finish. The other boards are unfinished common boards. Including this room I finished 2 weeks ago!

Estimated Cost
0
Estimated Time Investment
Day Project (6-9 Hours)
Finish Used
Some of the boards are natural and some are painted with Polar Bear by Behr in gloss finish.
Recommended Skill Level
Intermediate

Mudroom Storage Lockers and Bench

Submitted by Anonymous (not verified) on Fri, 04/19/2024 - 14:06

I really appreciated your garage/mudroom project guidance. I stumbled on it as I was trying to figure out how to design my project. I basically copied yours!! 😁

You also turned me on to pocket hole joinery. Previously I have used a biscuit joiner and find it very challenging. Thank you, I am a convert!

Don Arrowood

Camp loft with side stair

Submitted by Theresa W on Mon, 08/27/2012 - 16:15

I finally decided I was going to make the fort bed for my daughter and was about to print off the materials list to take to the lumber yard and the junior height camp loft was front and center on the webpage. Though significantly more bed, it looked perfect my little girl. We really wanted her bed high enough to avoid the only heating vent in the room and didn't want to lose the floor space for play, this seemed to be an ideal fit. When I finally put the bed together I realized that keeping the staircase as in the original plans resulted in a bowling alley sort of space left over. It was awkward and really shrunk the room as the 'alley' wasn't usable for much of anything. I played around a little bit and my husband and I decided that we would put it on the side. It fit perfectly to the wall and was much more space efficient for the room. I am a little nervous about the new openness of the deck portion, but both kids have found it a fun place to read and pretend fish. It was my first project of this size and I did everything until the final assembly by myself and I am so glad to have done it. It took more time than I imagined, but again I am a true novice.

I really wanted it stained so that it would camouflage the wear a little better, but I had a great deal of trouble finding a low VOC stain in my town. I used the lowest I could find and a low VOC water based poly. It matches her dressers and trim nearly perfectly. Her older brother likes the bed so much that nearly everyday he tries to convince her that she wants to switch beds with him.

Estimated Cost
$100-$120
Estimated Time Investment
Week Long Project (20 Hours or More)
Finish Used
Zar UltraMax low VOC stain in Golden Oak
Recommended Skill Level
Beginner

Comments

Our first build!

Submitted by helenc on Sun, 06/22/2014 - 04:05

This is our first build. Instructions were easy to follow but we didn't go much on the bottom center drawer runners!
I love the second layer of slide out drawers we use for the printer , paper and electronic gadgets!

Estimated Cost
not sure
Finish Used
birch plywood painted white and top stained walnut and all coated with poly
Recommended Skill Level
Beginner

Comments

spiceylg

Wed, 06/25/2014 - 05:37

Love this. What great mods and you even tackled drawers for a first build?! I'm too chicken and still haven't tried. Especially love how you used slide outs in the middle. Clever!

Back