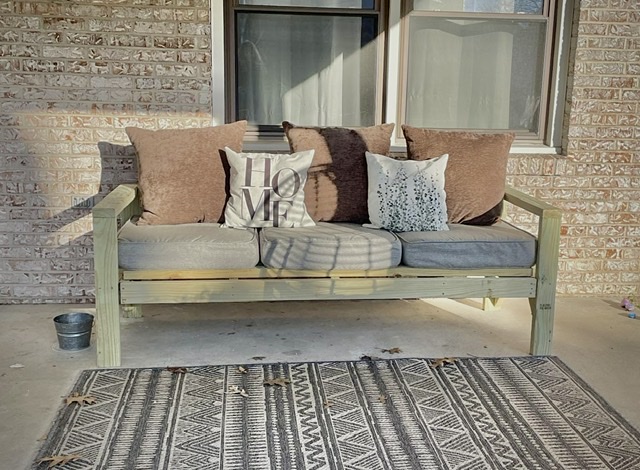
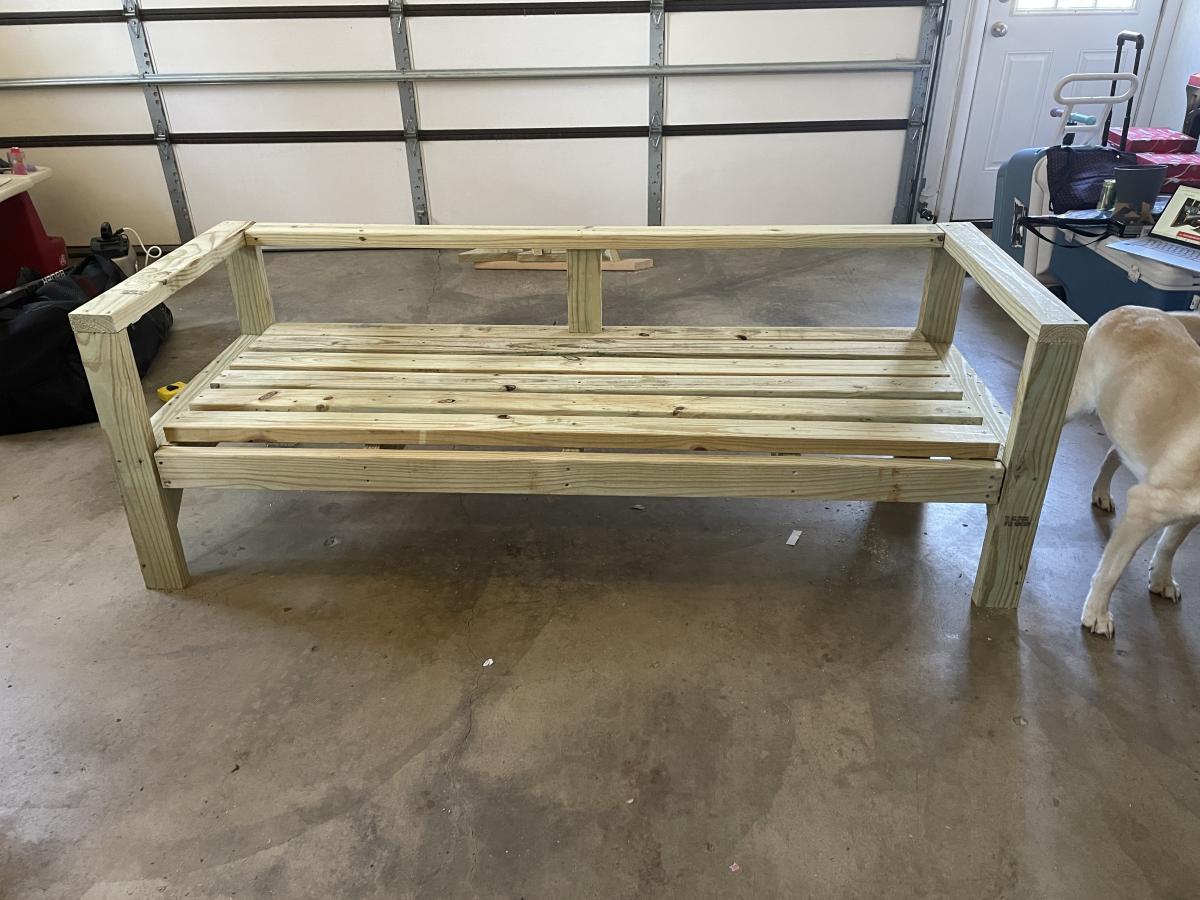
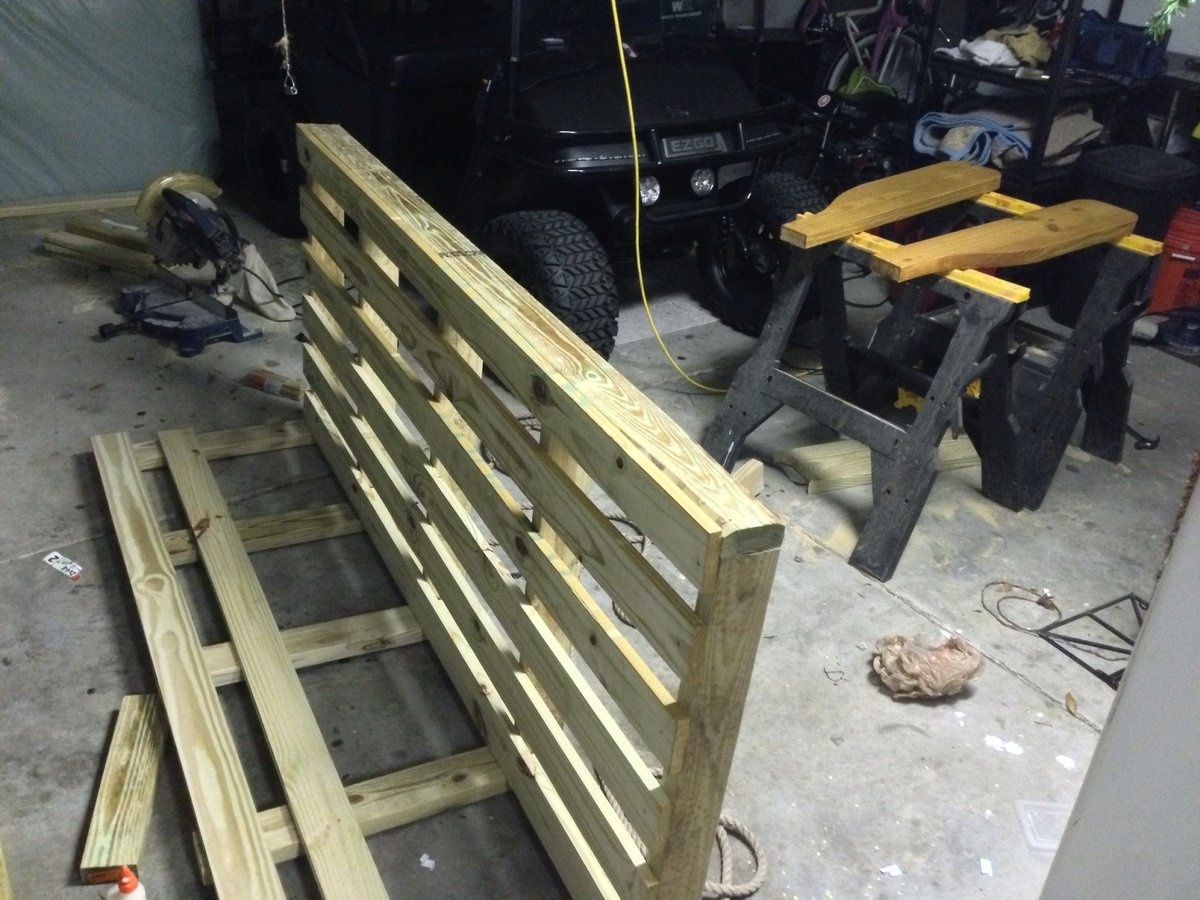
Patio couch
I have been looking at your blog and always been interested in making my own furniture. However, I was scared to try. Your diagrams and measurements were awesome. Thank you! Gave me the encouragement to try!

Built from Plan(s)
I have been looking at your blog and always been interested in making my own furniture. However, I was scared to try. Your diagrams and measurements were awesome. Thank you! Gave me the encouragement to try!
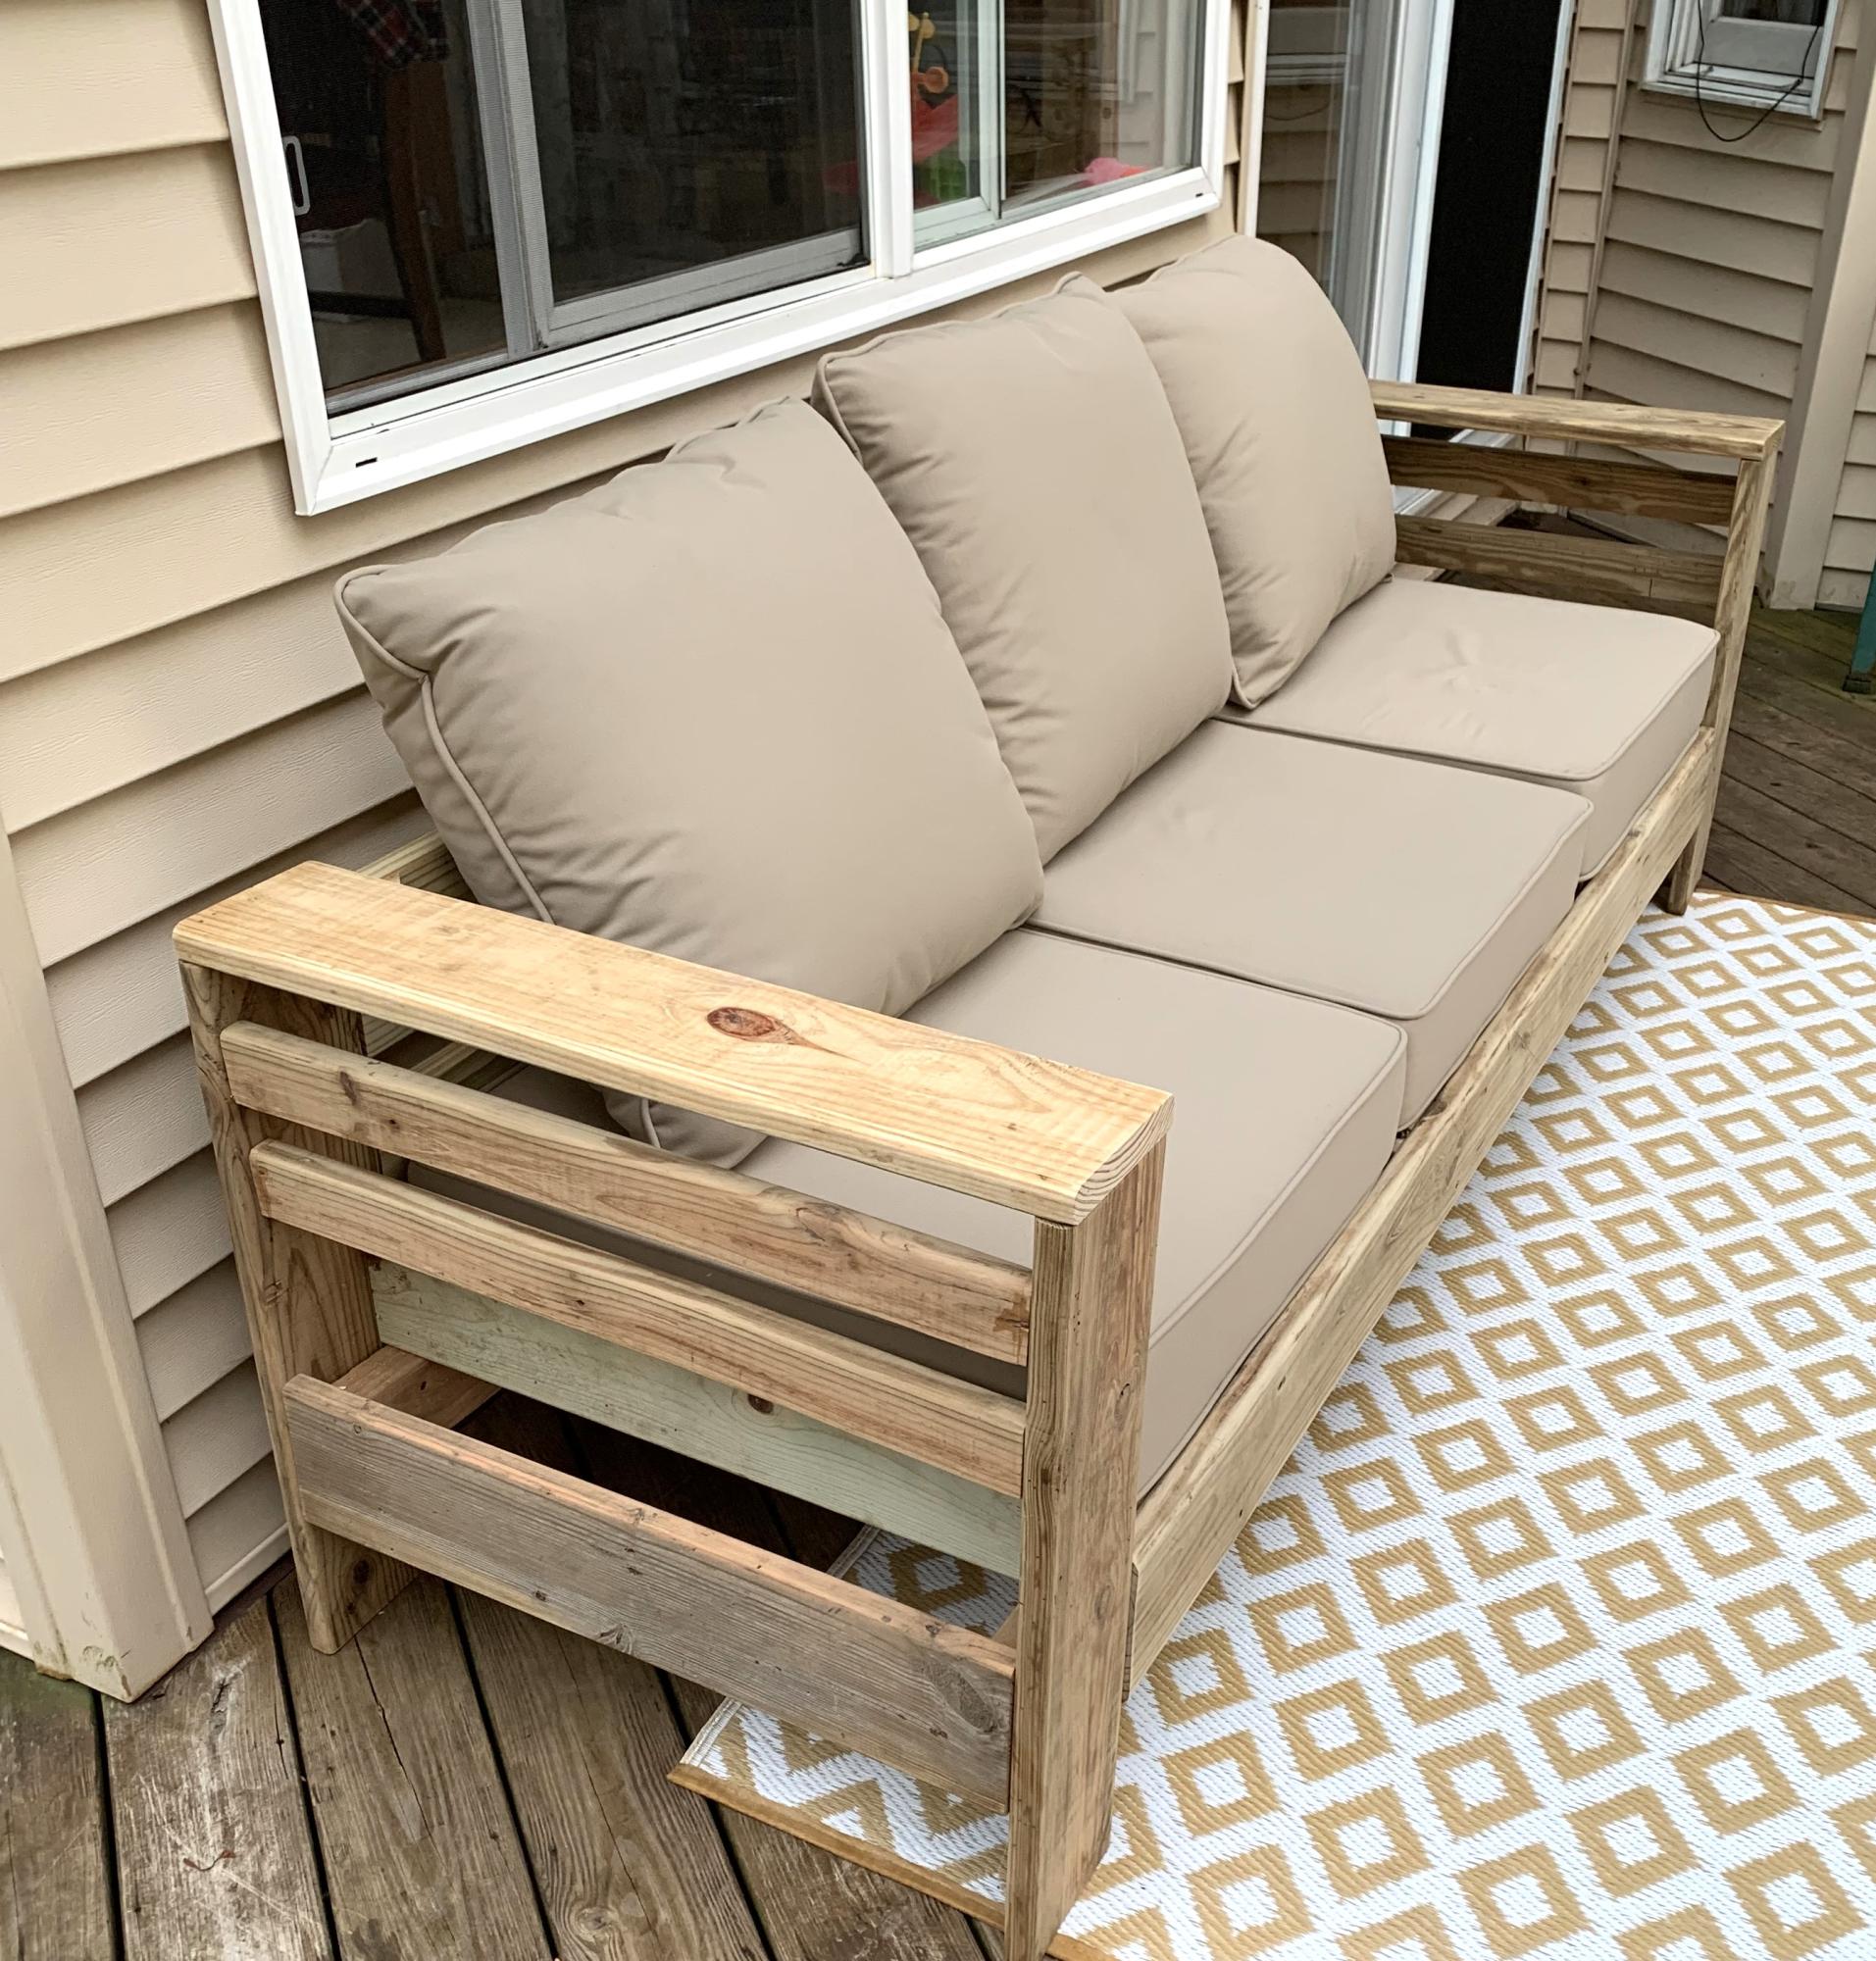
We had a small deck with many rotted boards. The contractor who demoed it, knowing my interest in diy projects, sorted out any usable boards. I loved the idea of an outdoor sofa, so altered your beautiful pattern to accommodate decking boards - I literally only had to purchase 2 boards for the entire project! I’m so thrilled with how it turned out! Thank you!!
Camey Brown
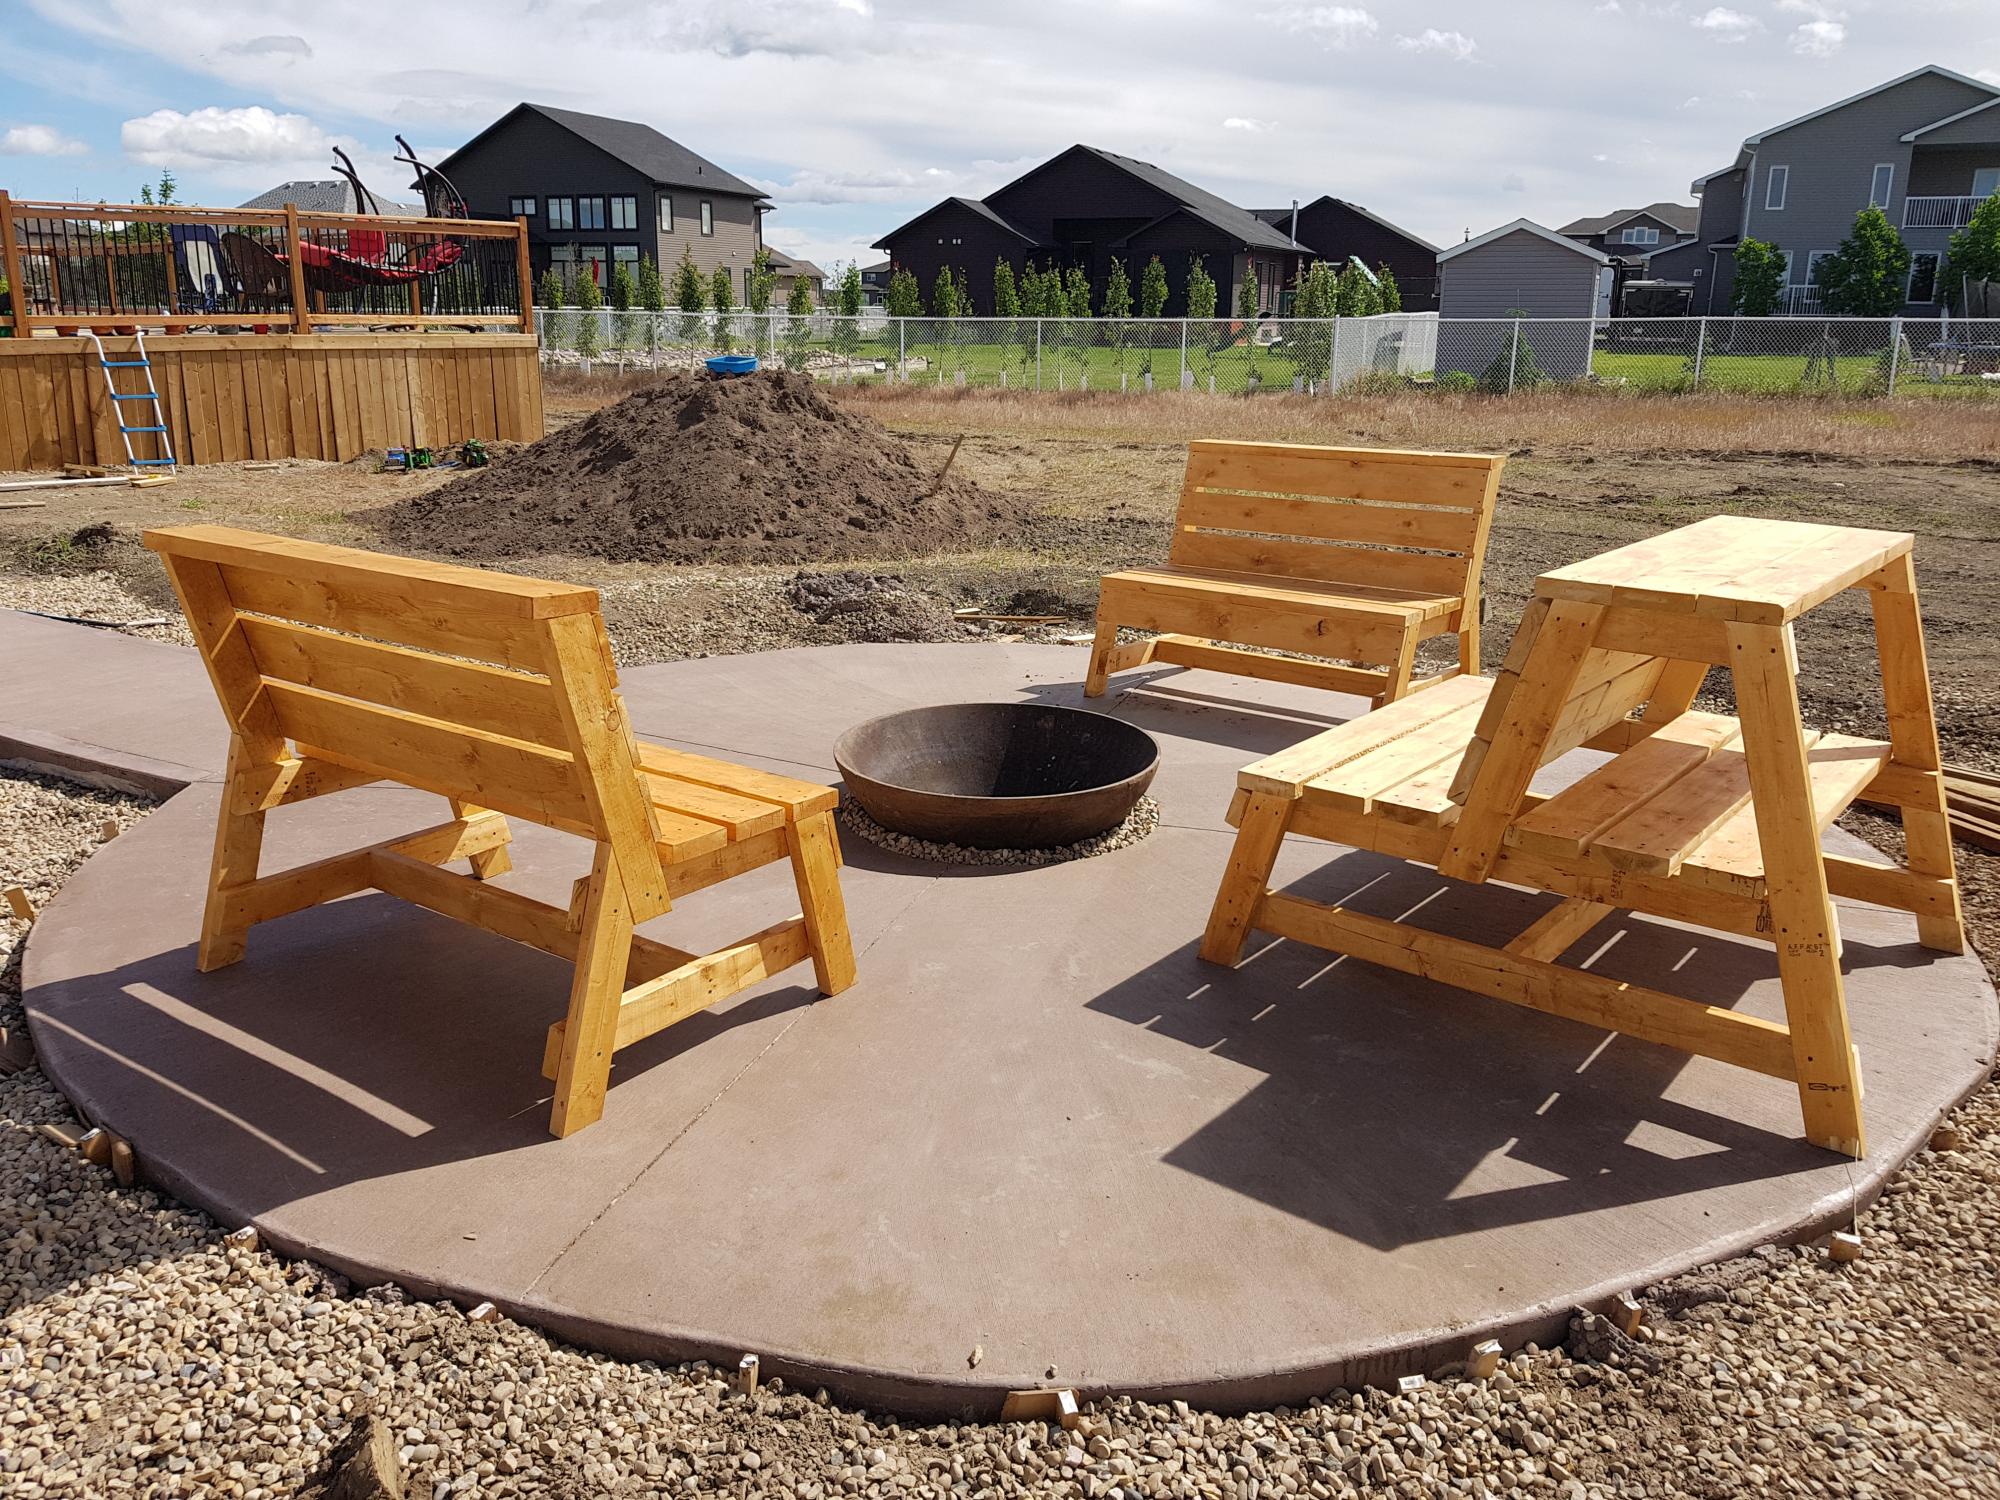
I built the one bench using the original plan with the storage and table top unit but needed two additional seating benches to go around the firepit without the bulk of the backside of the bench.
I modified the original plan as follows:
Shopping List:
(2) 2X6X8
(3) 2X4X8
(2) 1X6X8
Cutting List:
(2) 2X4X17" front legs, 15 degree cuts, parallel long to short
(2) 2X4X23" back support, 15 degree cuts, parallel long to short
(2) 2X4X20.75" back legs, 15 and 60 degree cuts, not parallel long to long
(2) 2X4X24.75" under seat, 15 degree cuts, not parallel long to long
(2) 2X4X30" bottom support, 15 degree cuts, not parallel long to long
(1) 2X4X42" bottom cross brace between leg sets, 90 degree cuts
(2) 2X6 cut equally in half, 3 for the seat and 1 for the top plate
(2) 1X6 cut equally in half, 3 for the back rest and 1 to be tucked under the seat overhang
Thu, 09/08/2022 - 11:23
Great work! Have you had any tipping issues with the benches without the table back? If you kneel on the bench backwards and lean on the back do you think it would tip? Ha I clearly have kids around to be asking such strangely specific questions... TIA!
Thu, 09/08/2022 - 14:26
Also, what size platform did you pour for reference?
Sat, 02/25/2023 - 08:57
The concrete pad they are sitting on is 14 foot diameter.
Sat, 02/25/2023 - 08:56
I built these for my daughter/son-in-law and their young family. I have grandkids that use them and have never tipped them. However a strong wind gust 100km/hr did flip one over but not the other. I would suggest adding a horizontal ground level ‘foot’ extension on one or both back legs to alleviate any concerns of tipping.

I started out several years ago building the Modern Adirondack Chairs using Ana White's plans. Customers loved the modern design and I was able to fulfill orders in any color or stain. Customers even asked if I could make a children's and adult size chair. These pans are available upon request.
As the trend towards outdoor living increased due to the pandemic, I expanded my product line to tables, benches and patio planters. I even created my own design for a fire pit rack and bench based upon Ana's designs.
Today, I have a thriving business for commercial and residential fire pit furniture and accessories.
I continue to follow Ana White for inspiration and ideas, George


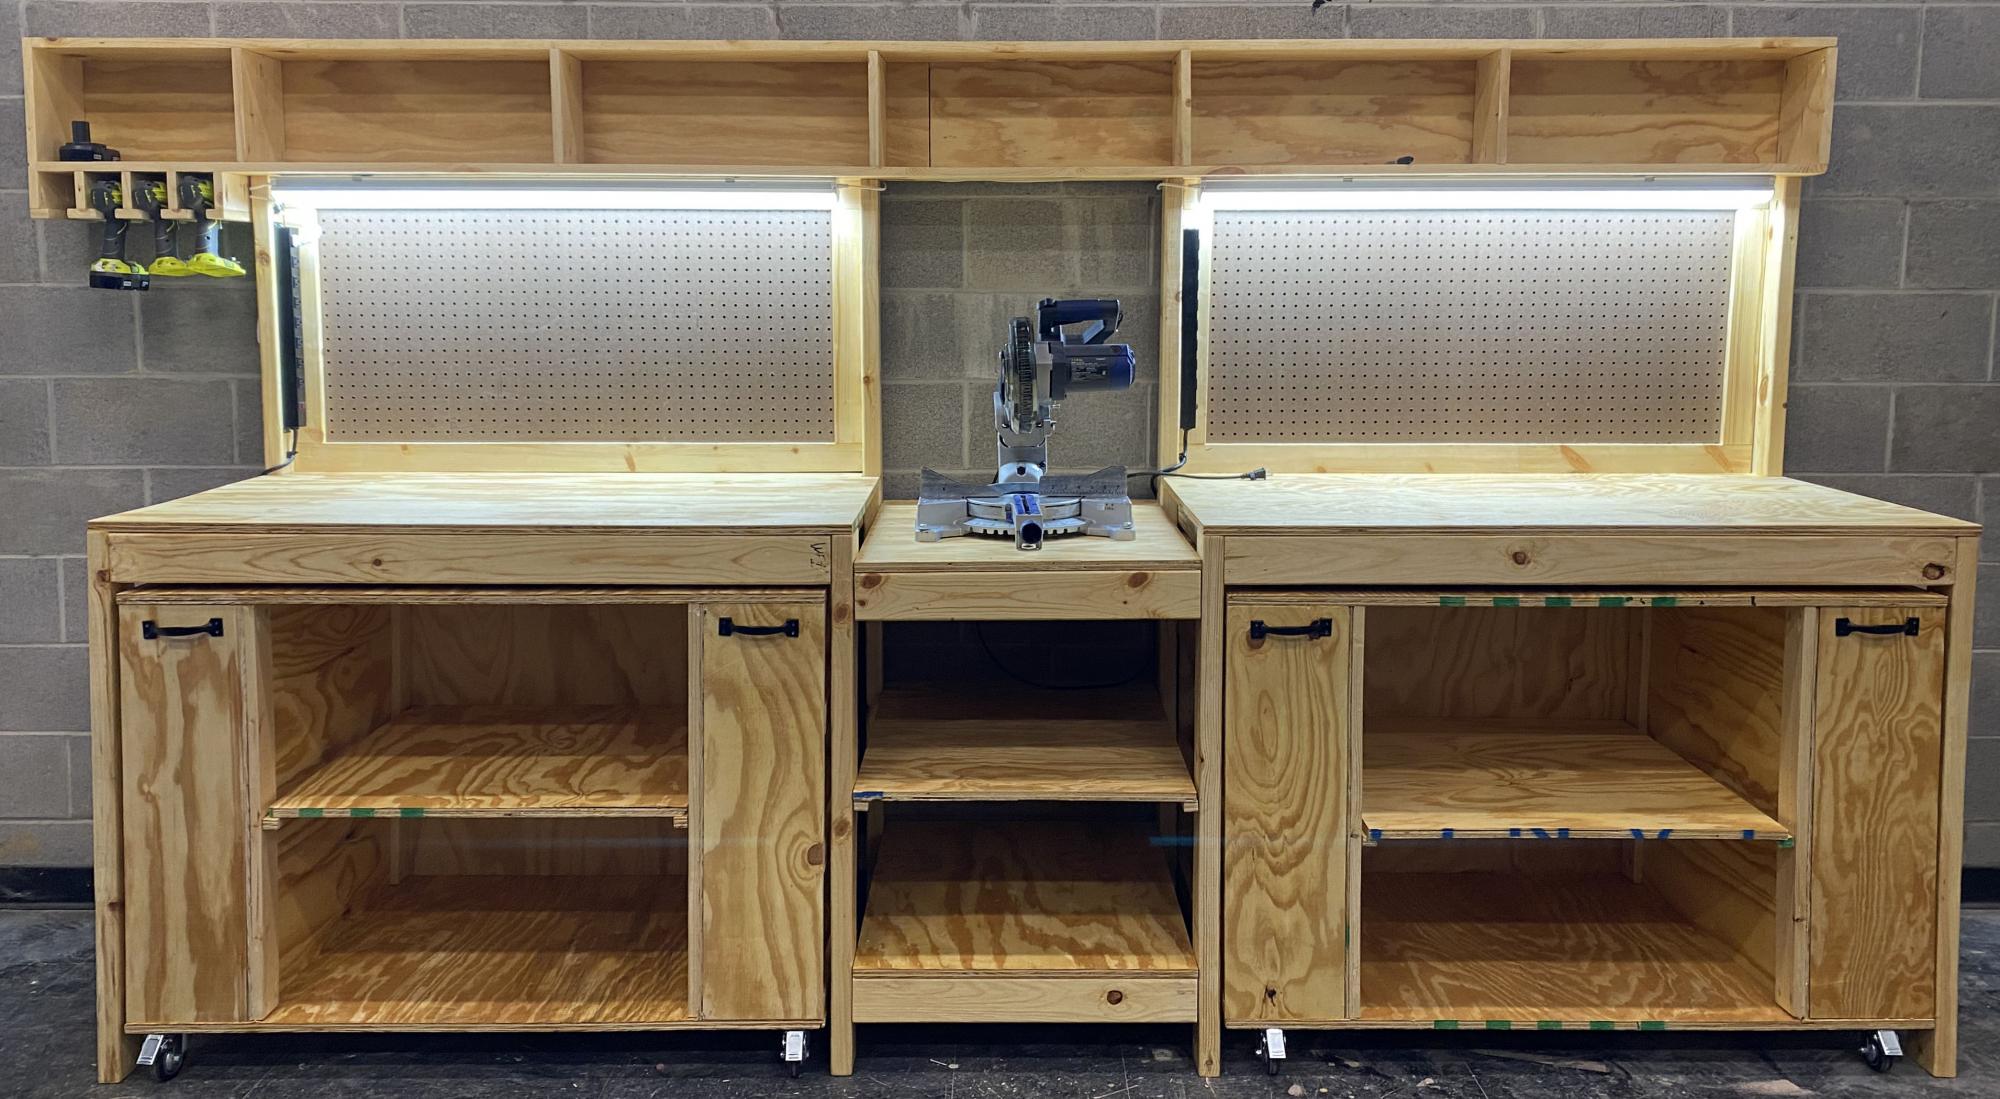
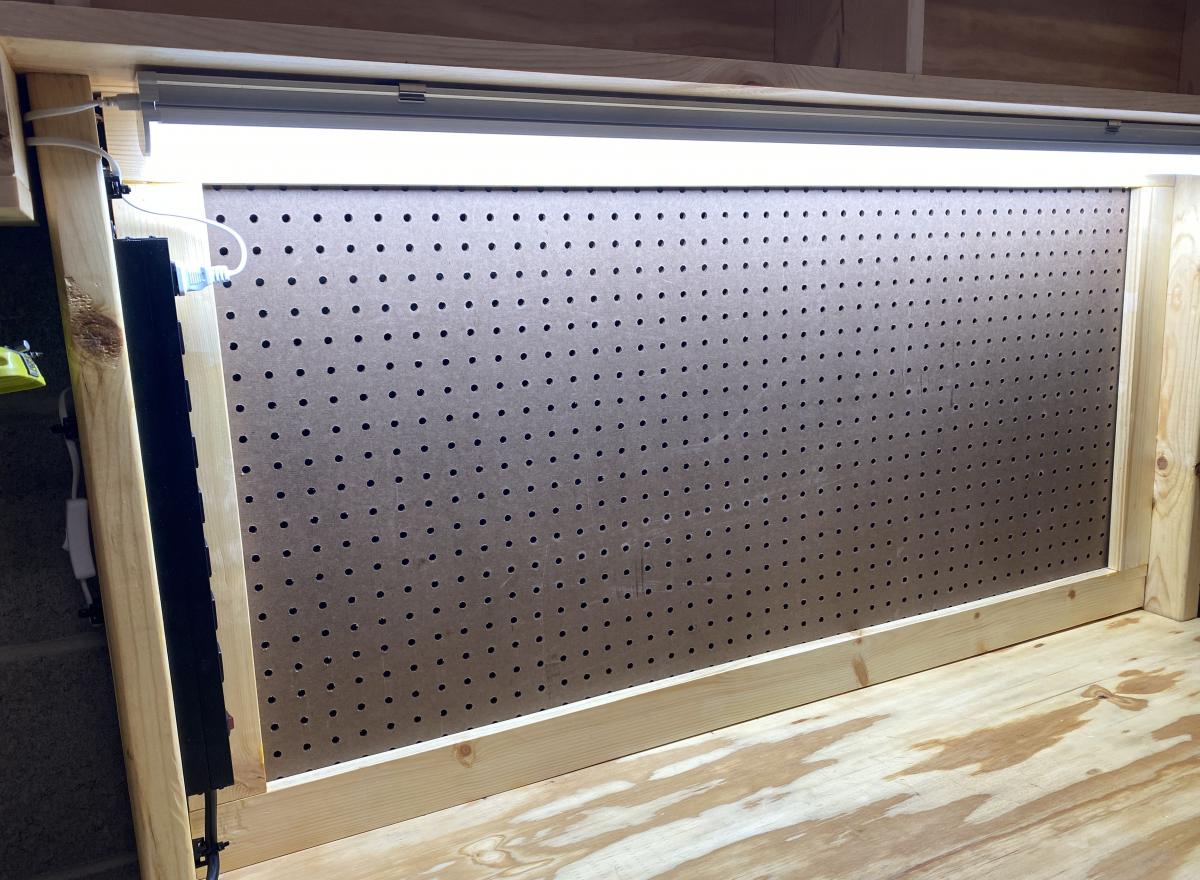
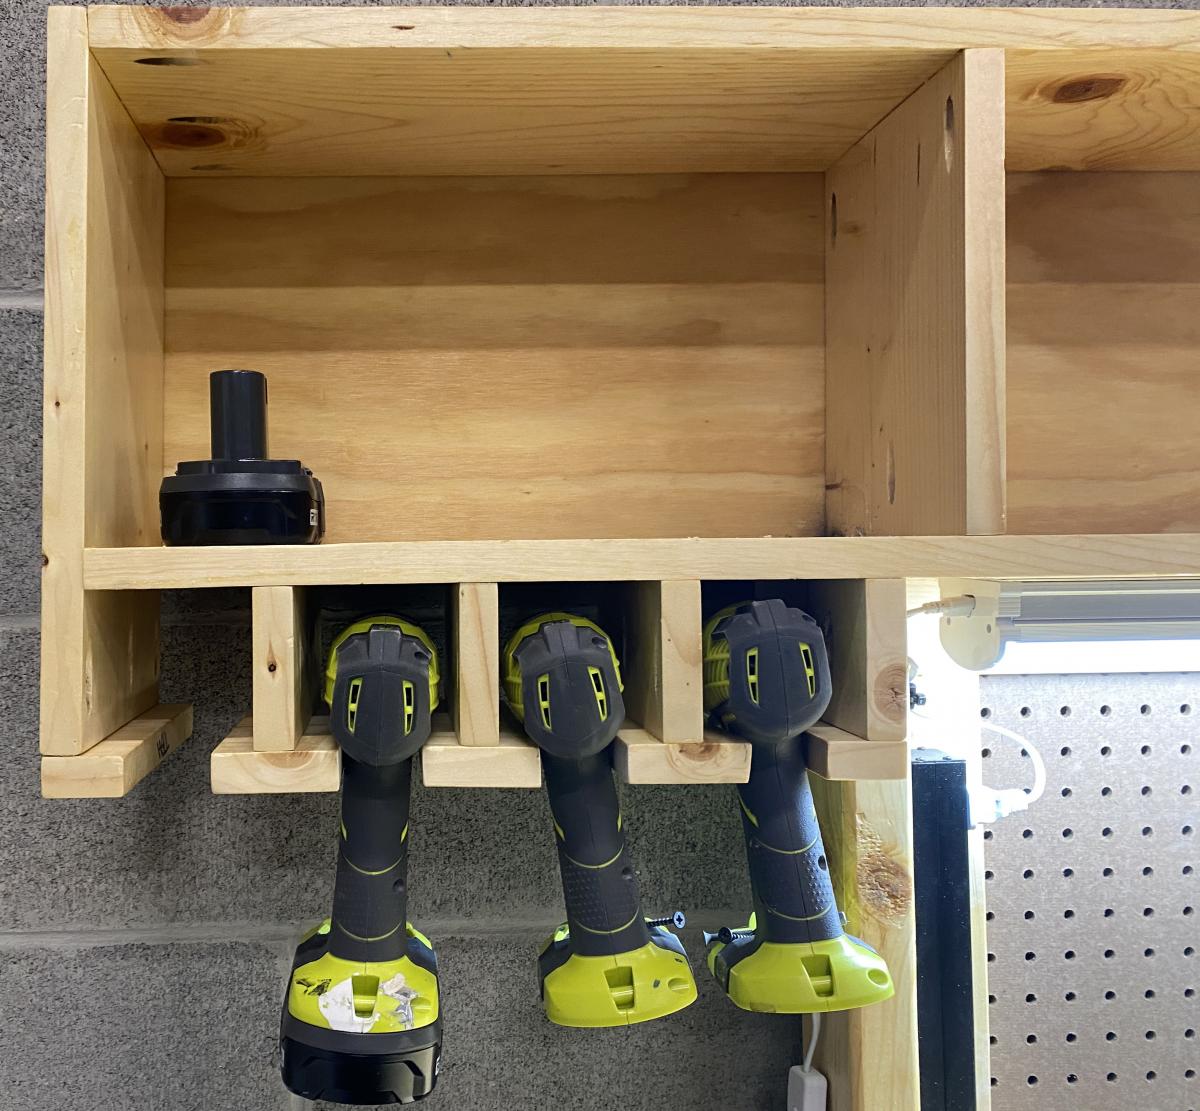
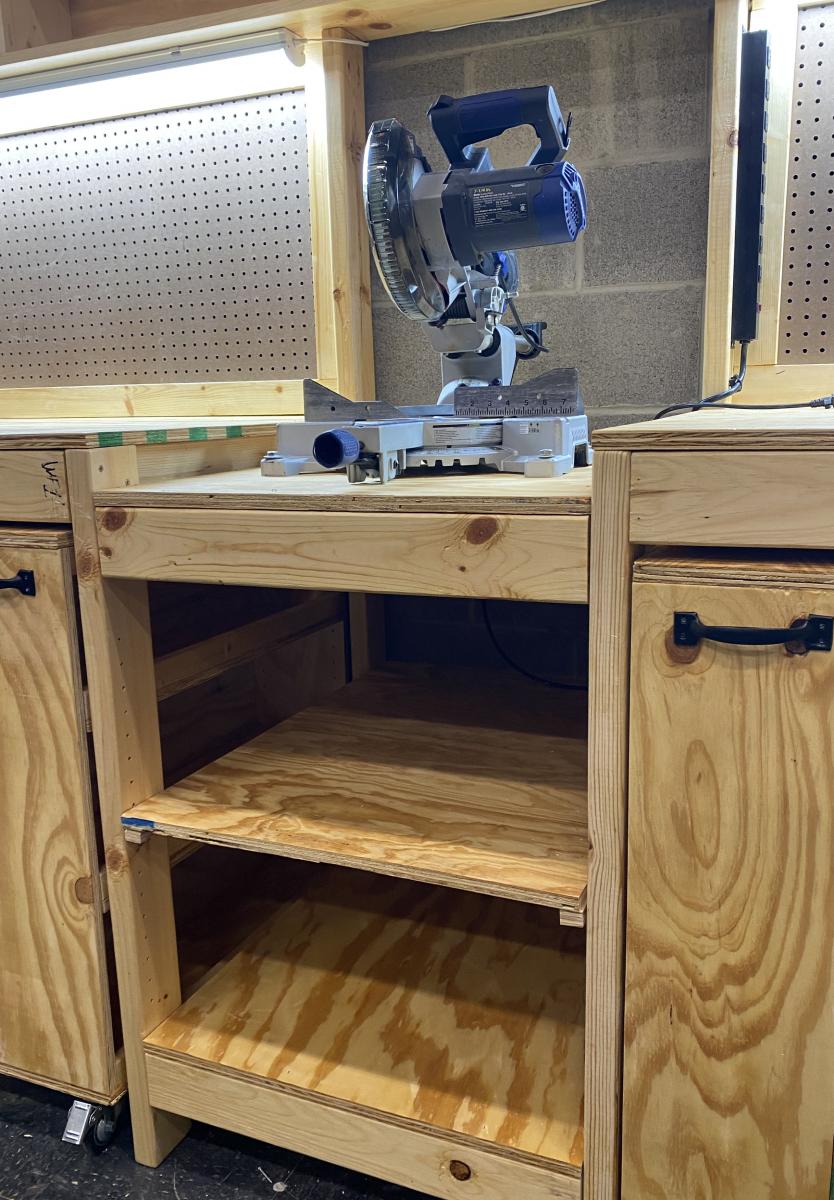
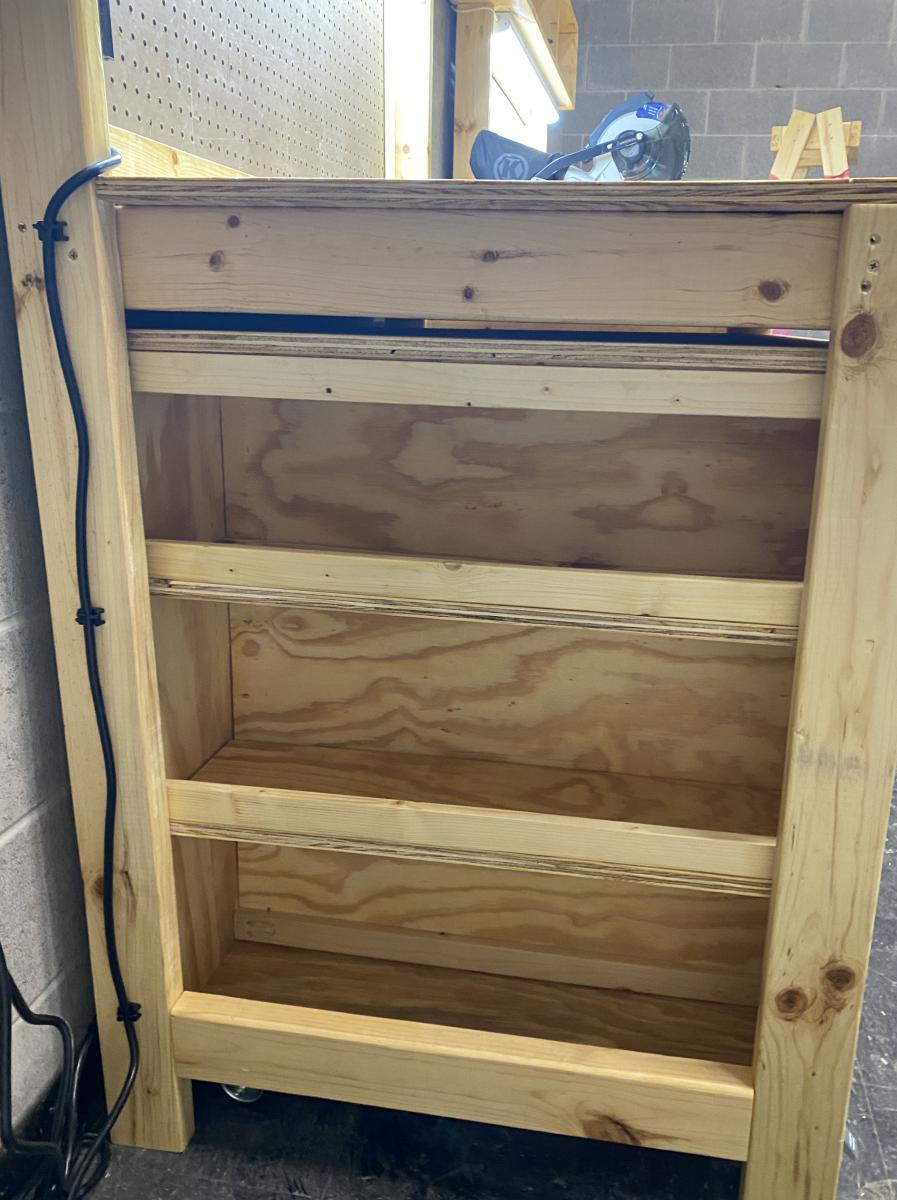
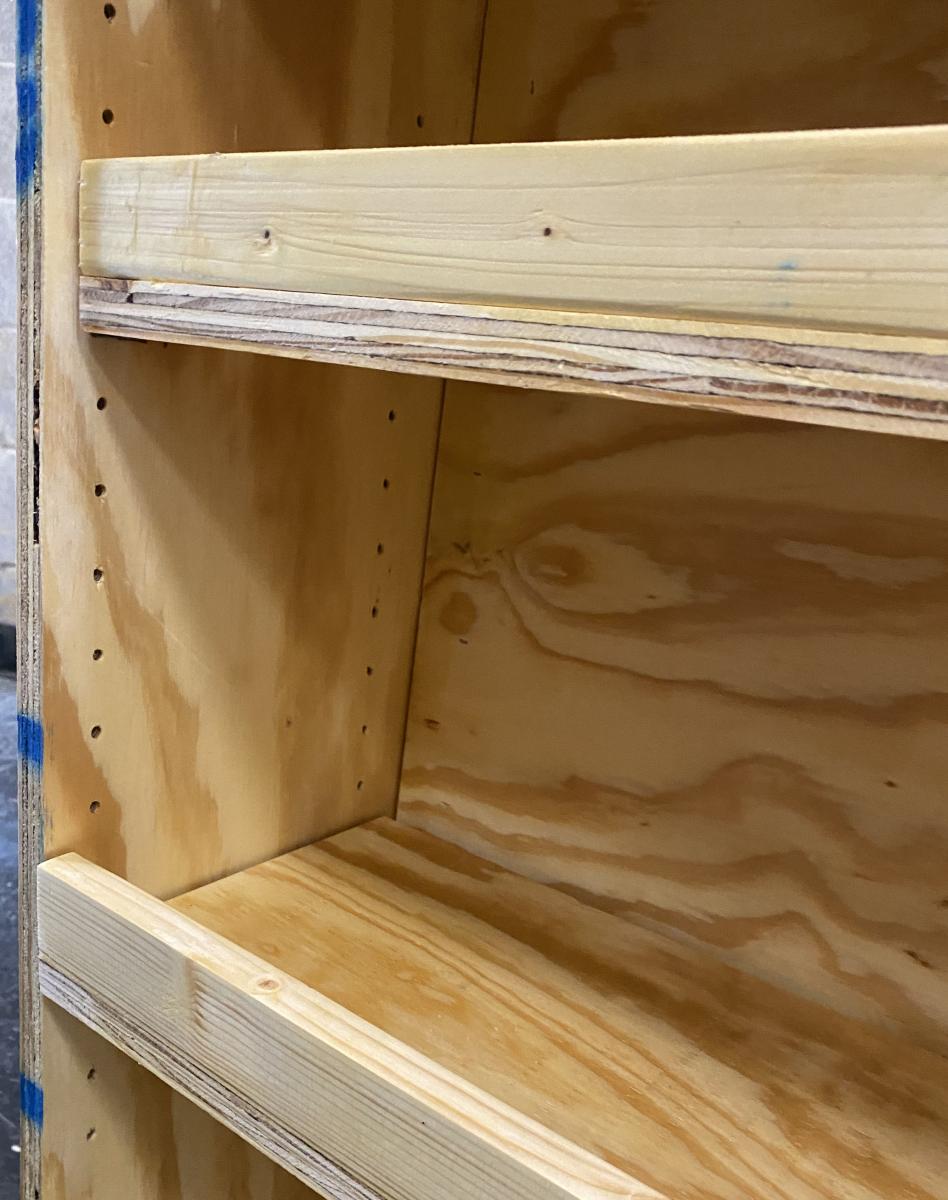
My son chose to make a workbench for his high school theater for his Eagle Scout project, and selected the Ultimate Roll Away Workbench with Miter Saw Stand as the basis for the project. The theater teacher wanted pegboard for tool storage, so we extended the rear legs on each workbench and notched the top to allow them to pass through. We built two frames from 1x3s to fit inside the rear legs, then put a pegboard inside each one.
To secure the extended legs, we added a riser shelf from 1x8s. We put a storage station for drills at one end of the riser shelf.
We also made all the cart shelves adjustable and added an adjustable shelf under the miter saw, and added lighting and power strips.
We left out the panels at the end of the workbench to allow access to the shelves there without having to remove the carts. Once we had constructed it, we added a brace at each end of the workbench to better support the outside front legs.
This plan was the perfect one for the theater, giving a stable work area for the miter saw and allowing for tool and materials storage. The carts can be rolled around to where a work surface is needed. This will come in handy for years of set construction in the theater. So proud of my son and all the leadership and hard work he put into this project!
Mon, 10/18/2021 - 11:54
WOW, that is absolutely amazing, thank you so much for sharing this story!

Entire wall fireplace built-in!


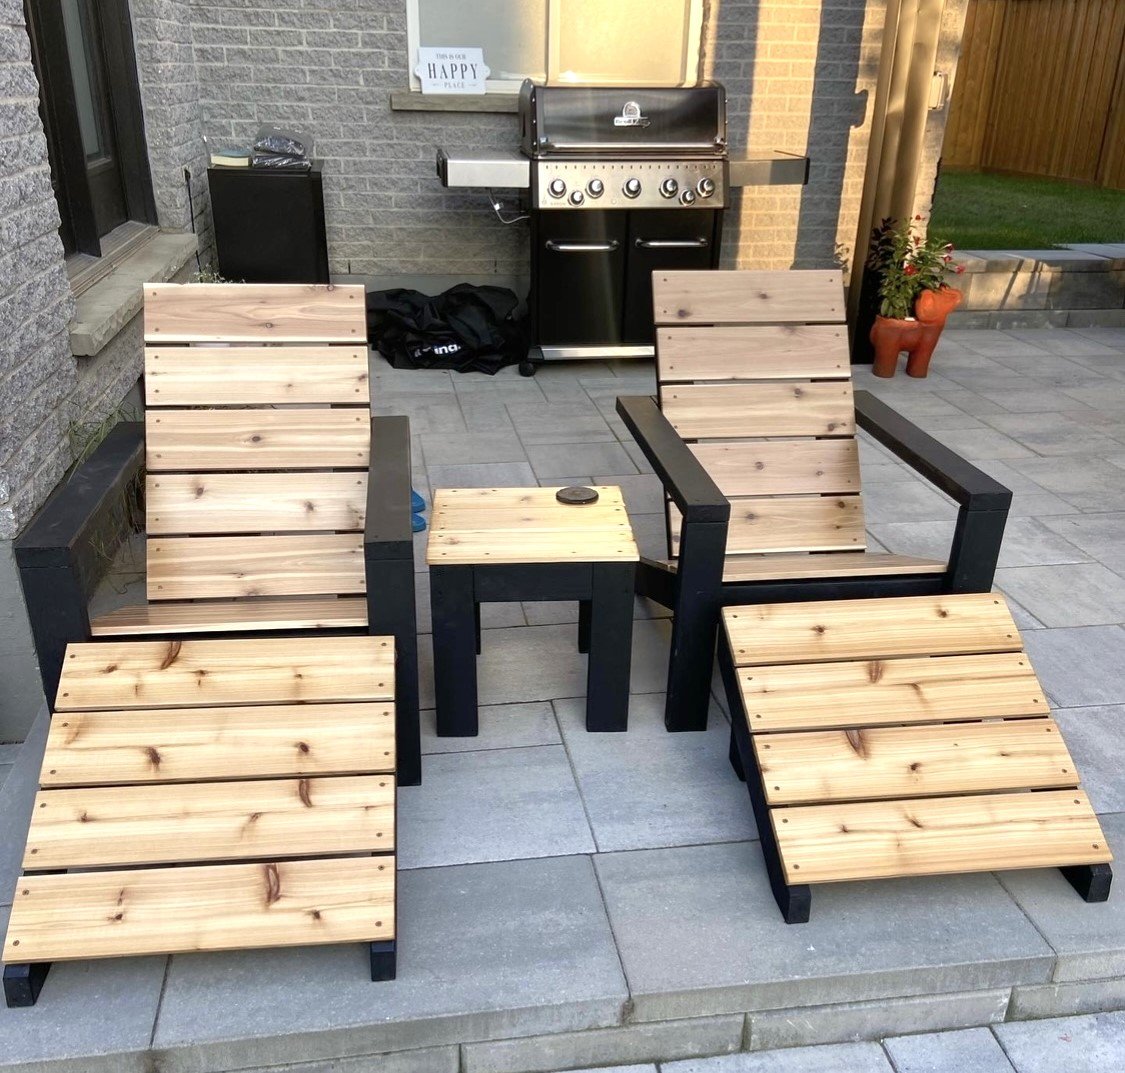
Great set of outdoor chairs with foot rest!
RG Design & Build

Great project and super easy! Made such a difference in organizing our tool shed. I modified one of the handles because several of my tools would not fit over the 2x4. I also had a challenge hanging it in my shed due to the metal sheeting for walls, but the build itself was very easy. No more messy tool shed! :) As an organization freak, like Ana, this makes me so happy!!!!

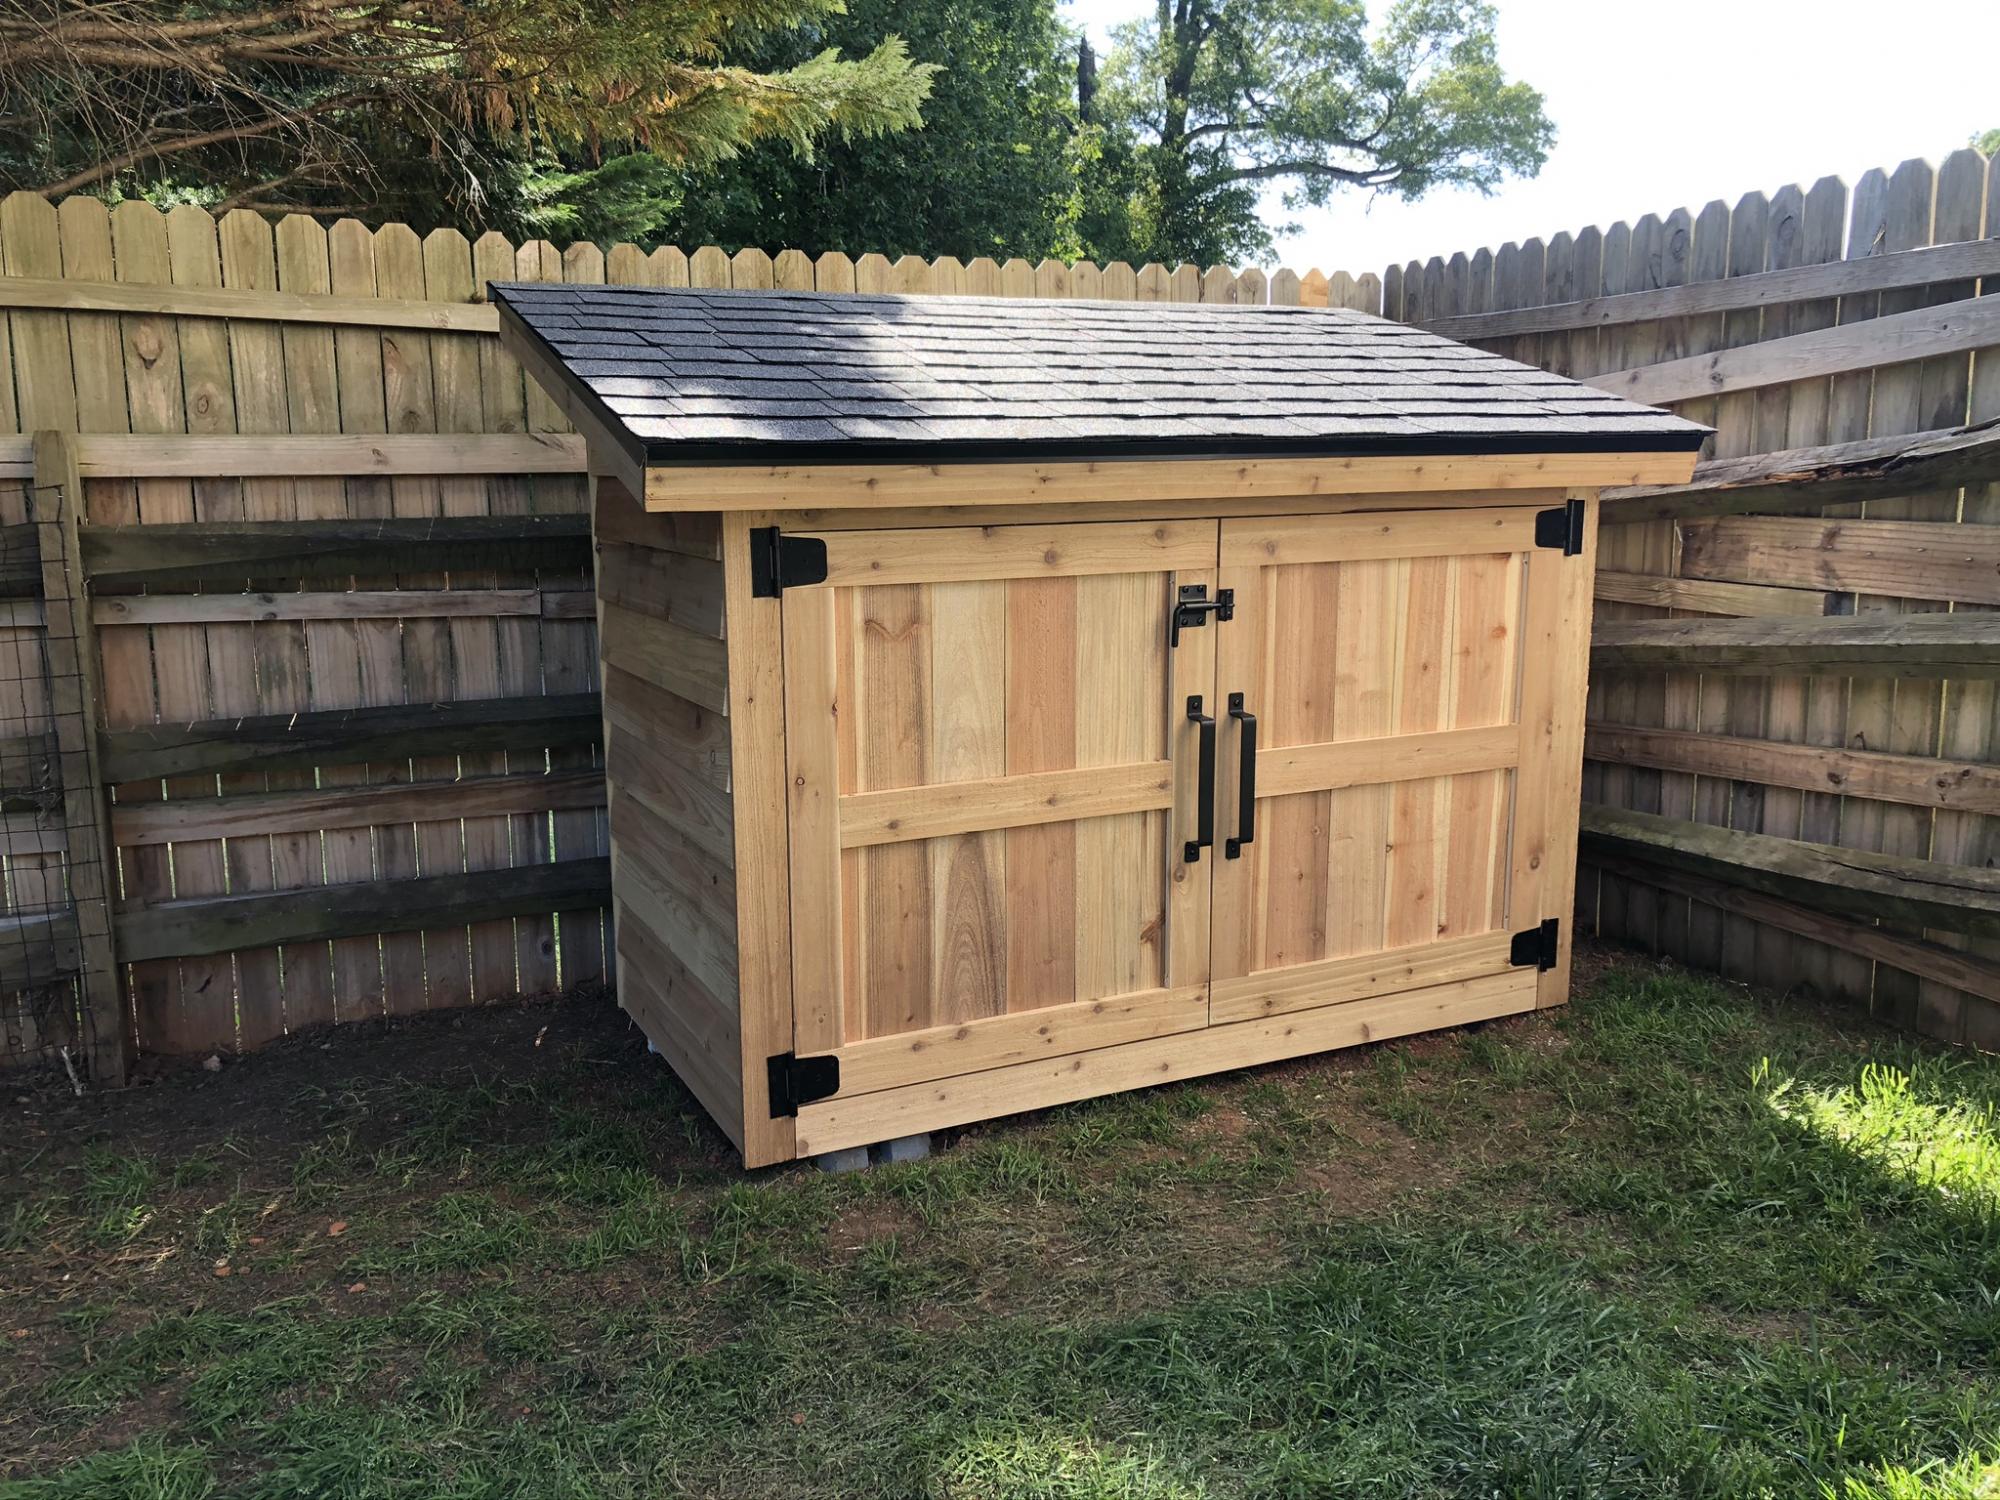
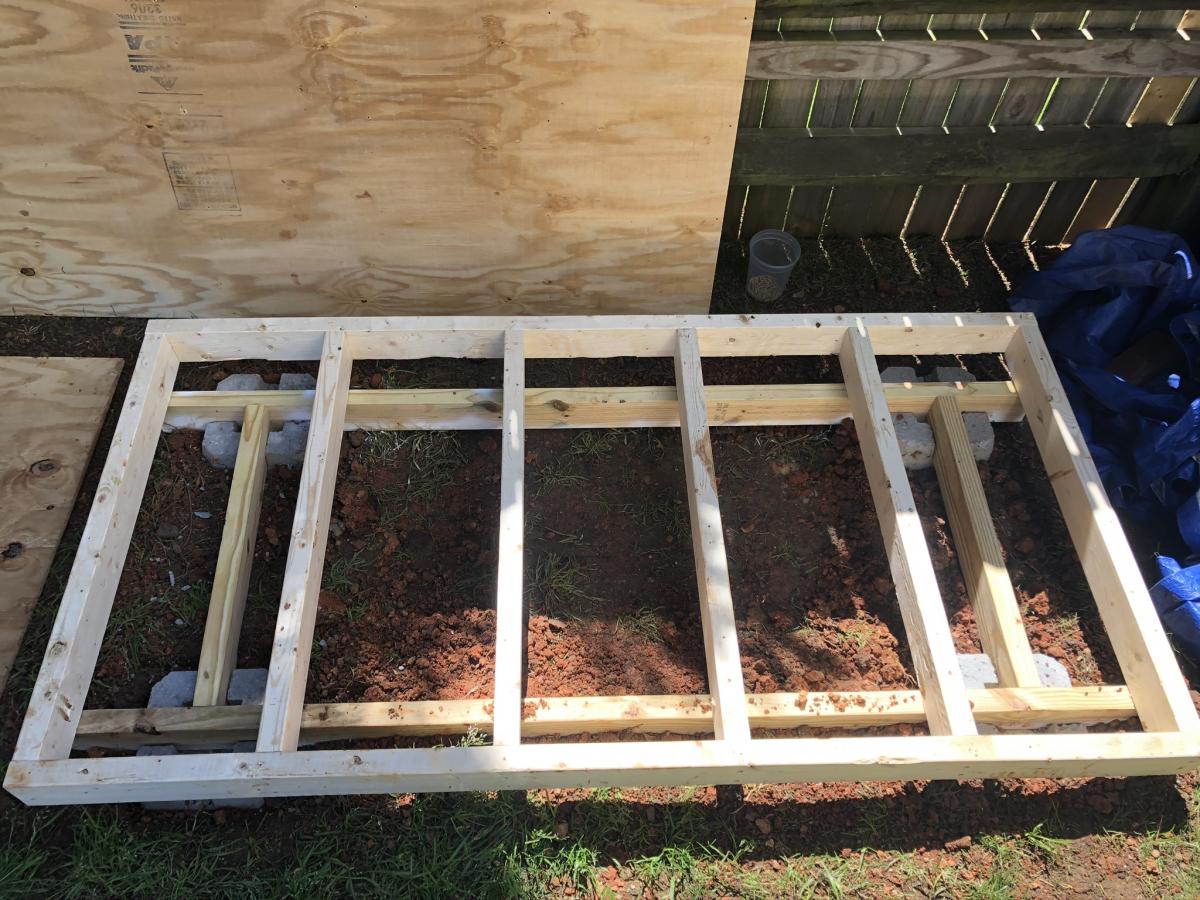
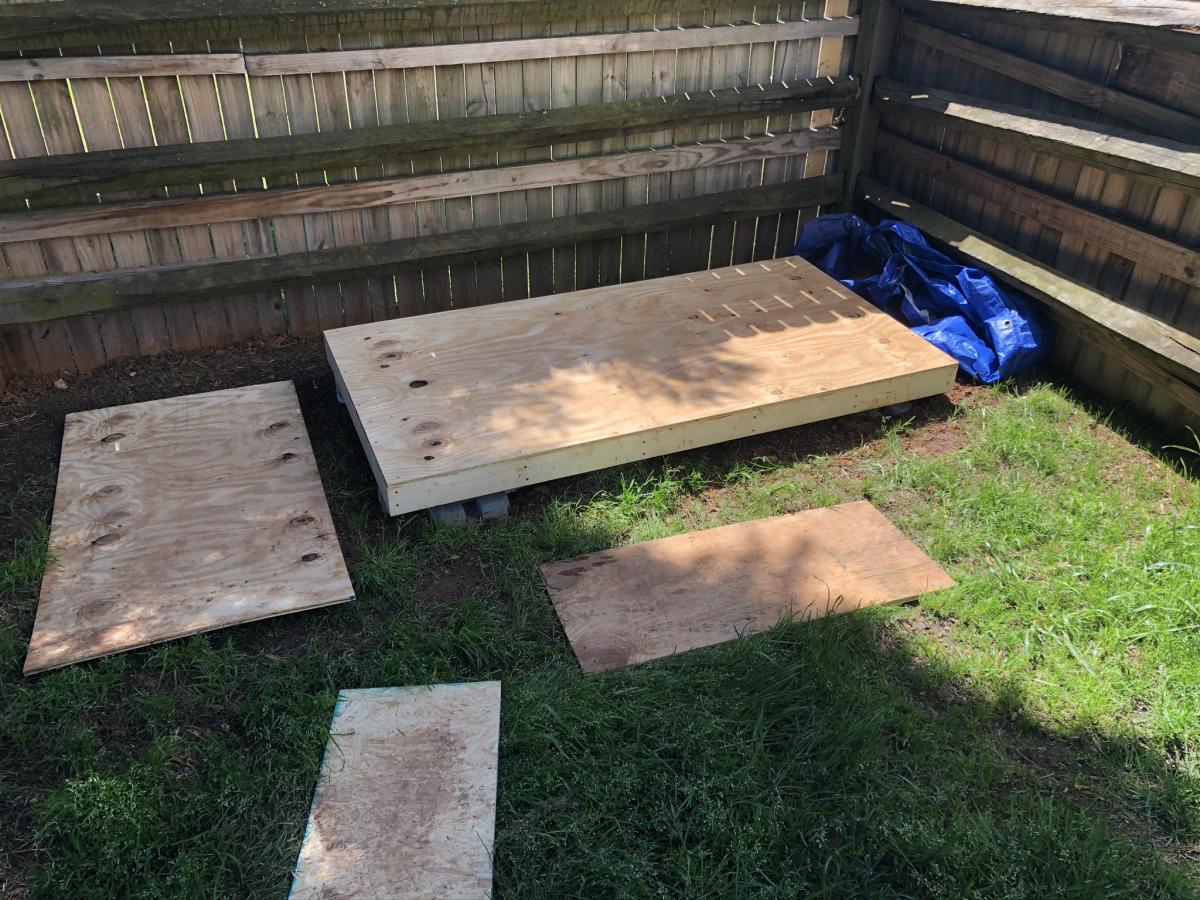
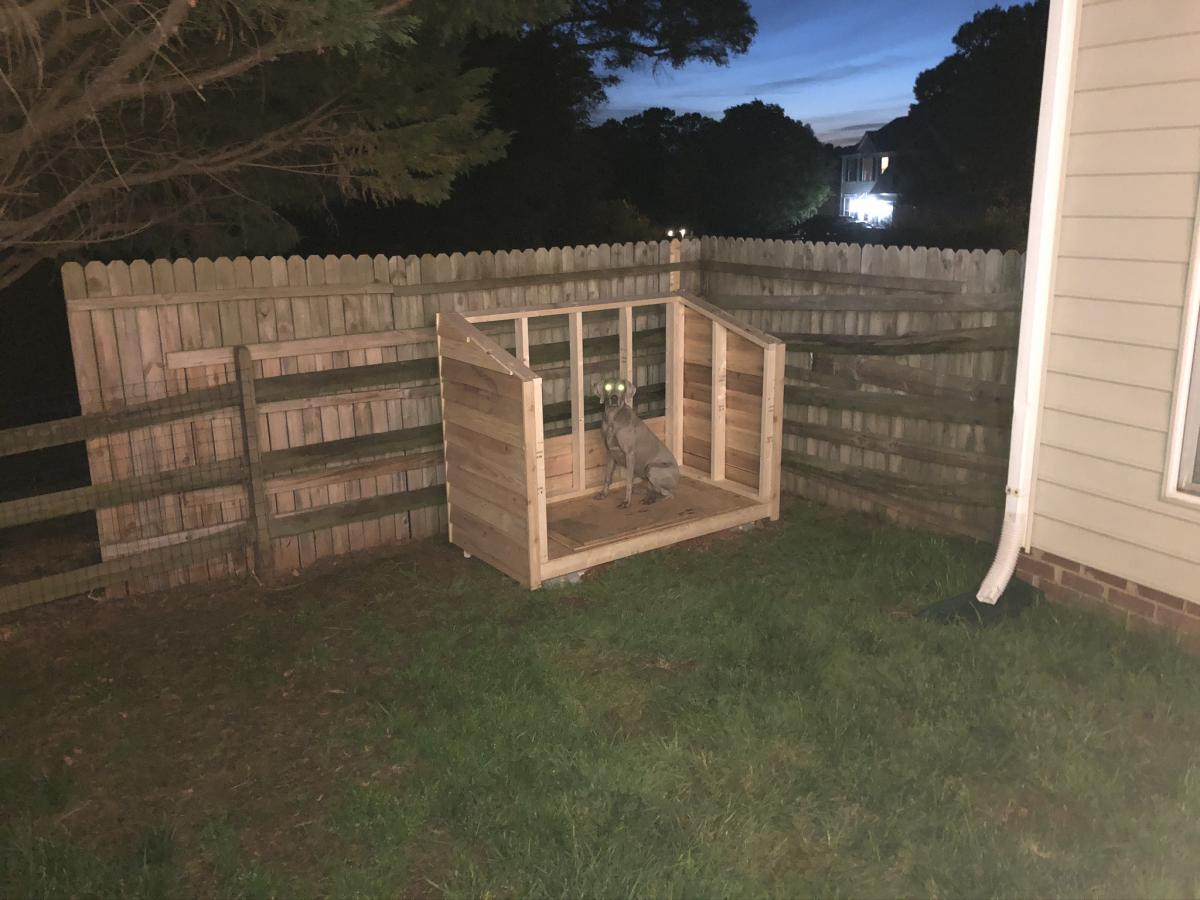
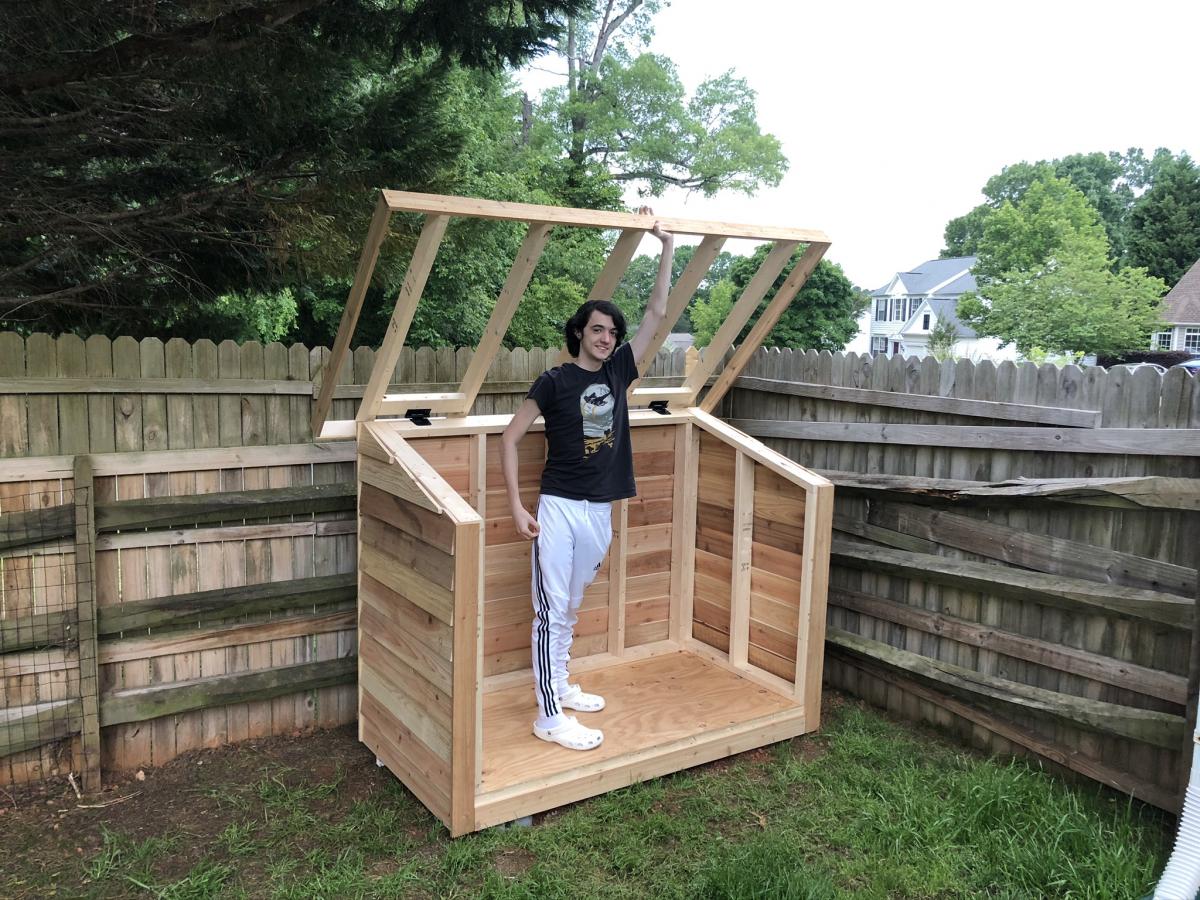
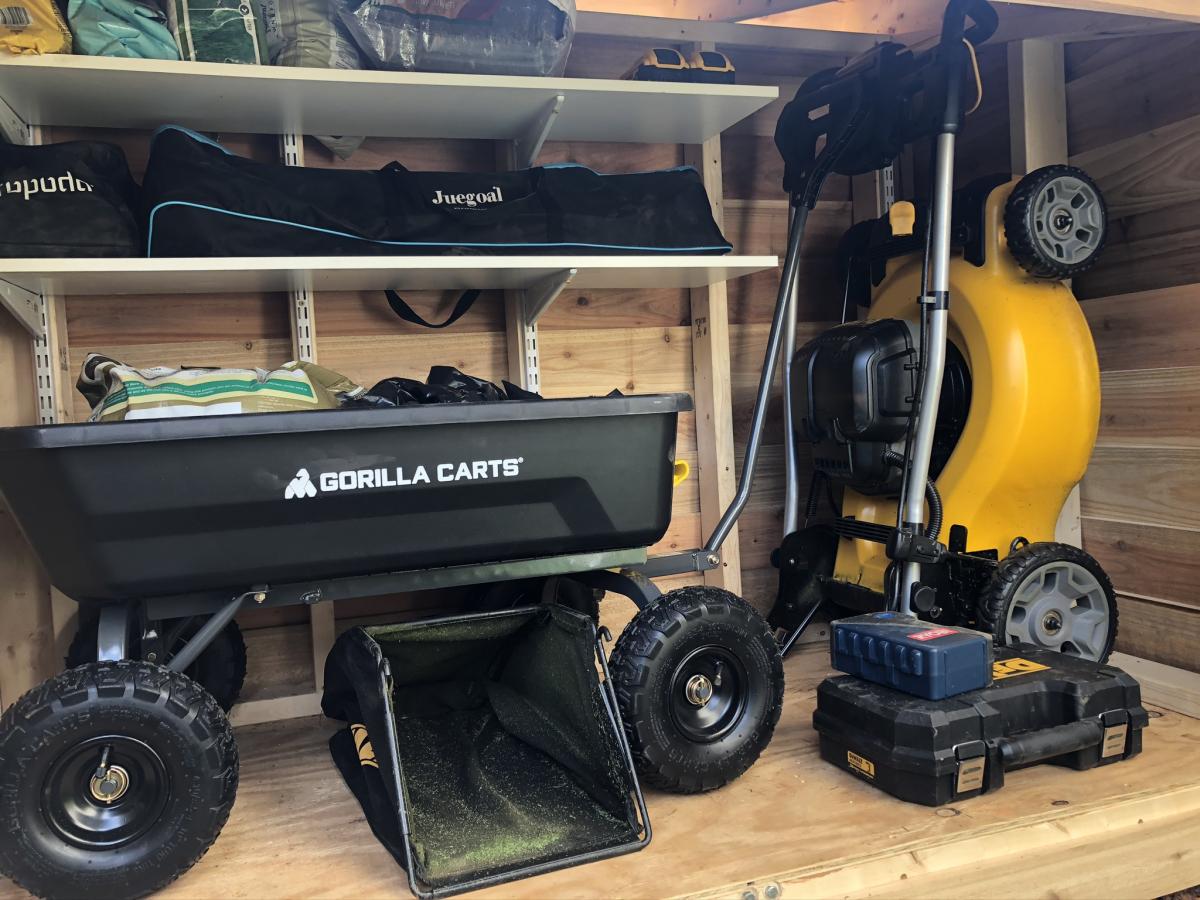
We wanted a shorter version, so that it would hide behind this fence. I just needed somewhere to store lawnmower, wheelbarrow, and a few yard supplies. I started putting the roof on hinges, but the gas struts couldn't support the 170 pound roof. So it's fixed in place (stronger structure anyway). That's why I went with 2x4's for the framed walls instead of 2x2's.

Thu, 06/11/2020 - 17:15
Very Nice modification. Two thumbs up! May I please ask you for the dimensions of the shed?
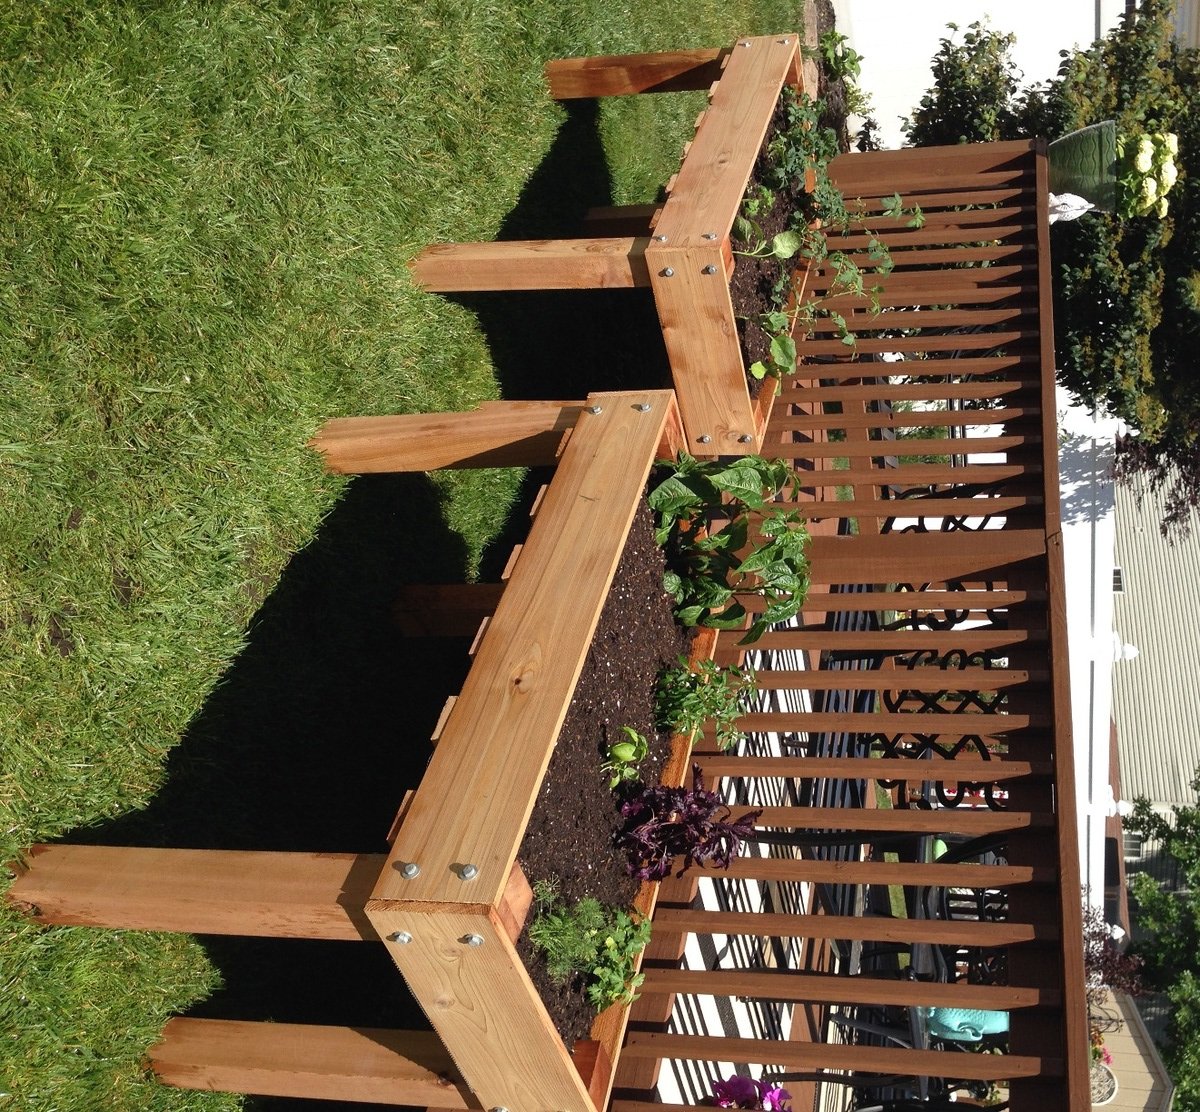
Using the counter height planter plans from Janettx. Thanks!

Mon, 09/20/2021 - 13:24
Nice job!!! I'm still using mine. I ended up putting 12"x12" pavers under each leg to extend their life. After the 2nd year now we get bumper crop out of ours each season.
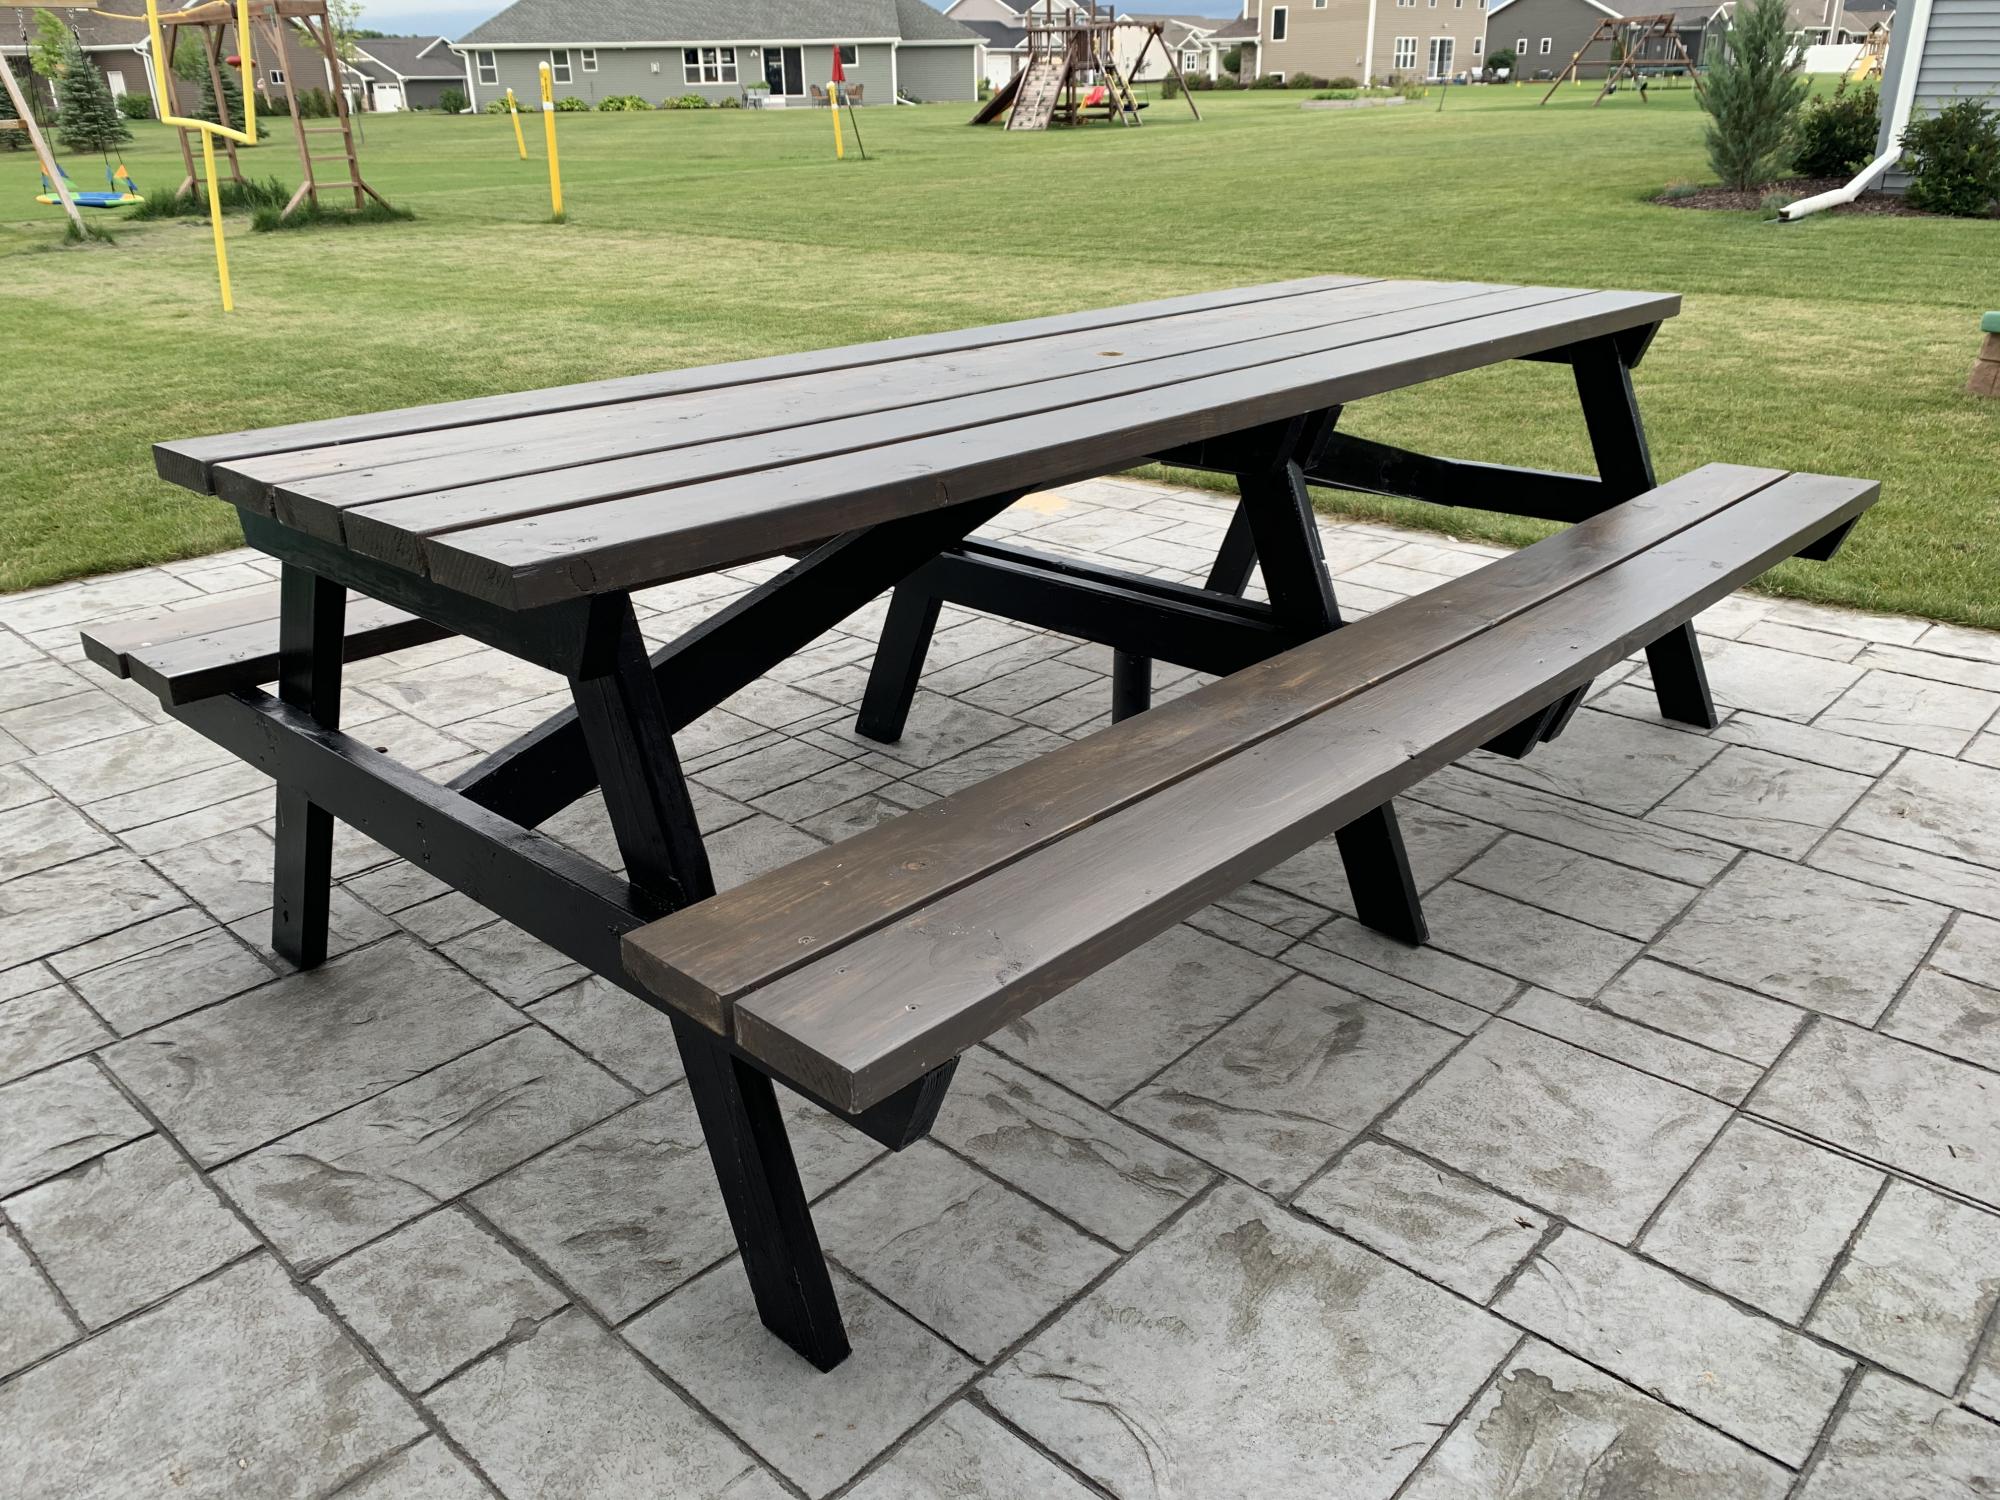
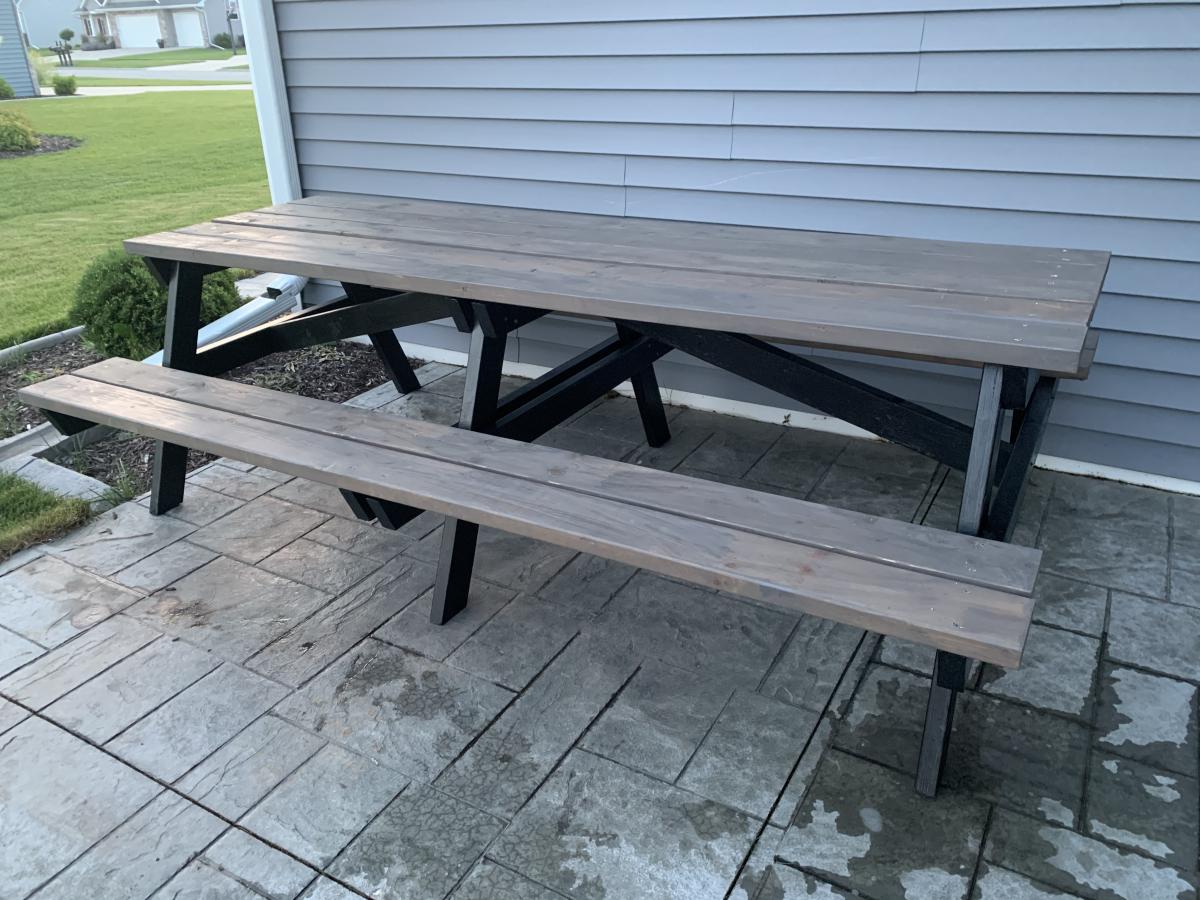
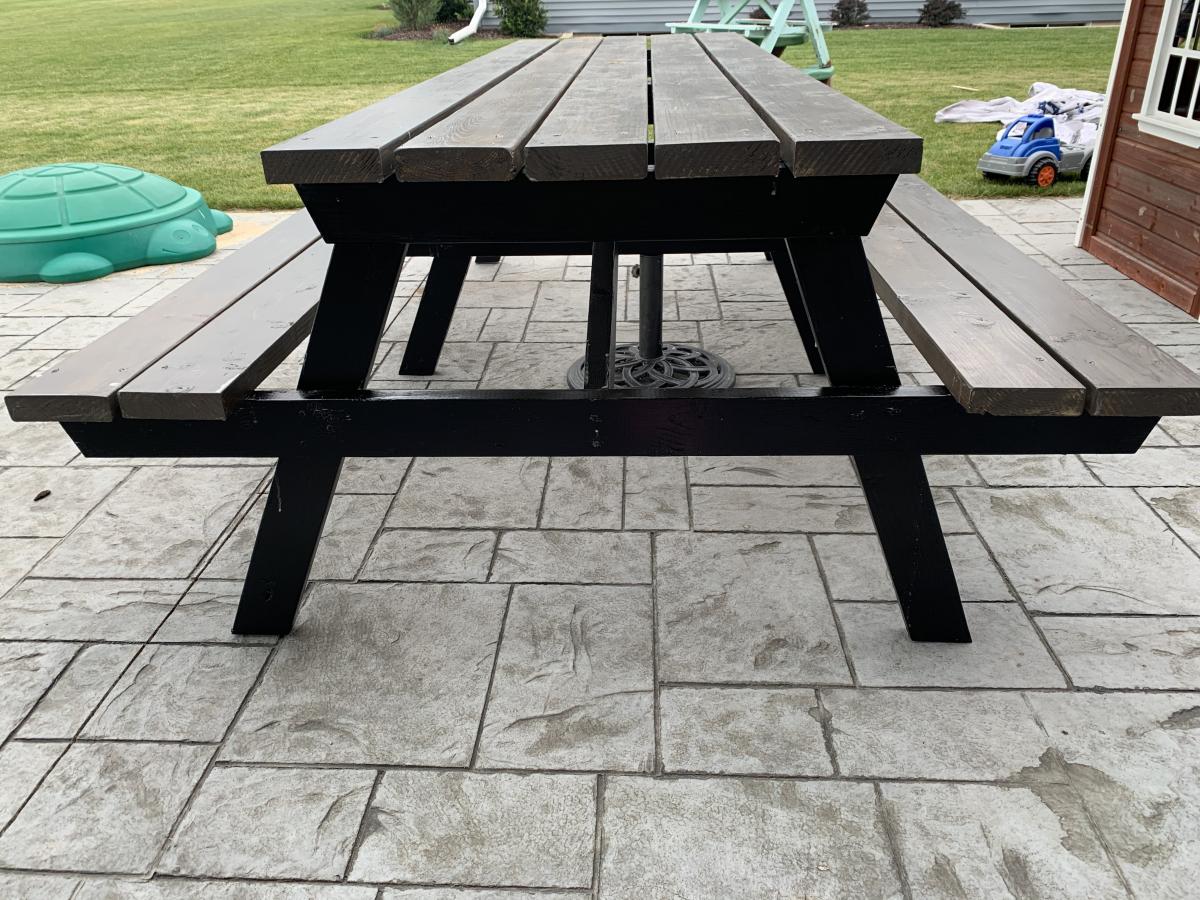
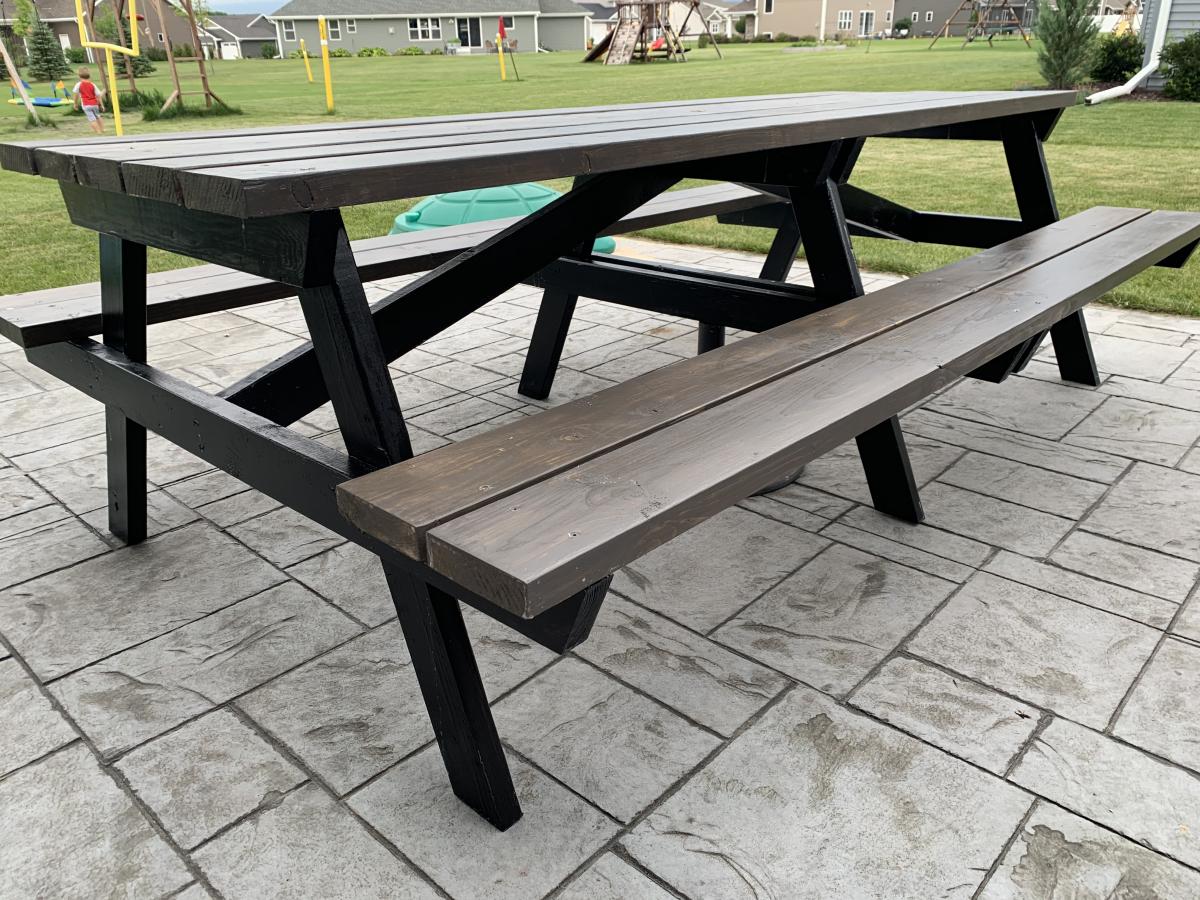
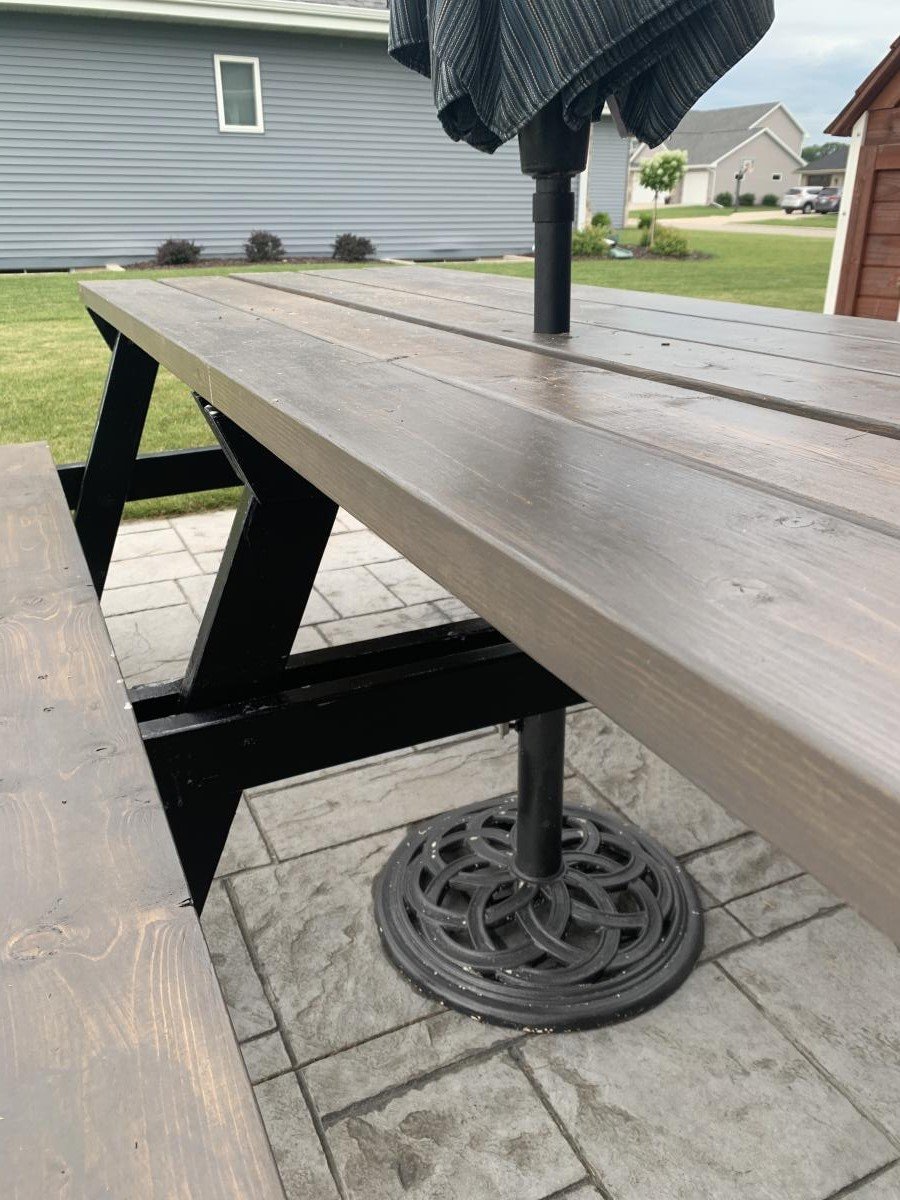
This picnic table was a quick build and turned out amazing. I modified the center base support by adding an extra table top support and seat support board to the opposite side of the center legs to give the table symmetry to accommodate an umbrella hole. I also shortened both cross supports by an inch to make sure the base wouldn’t be longer than the top boards. The space between the center table support boards and seat support boards is the perfect size to fit a standard umbrella. I used a 1 3/4” hole saw to make the umbrella hole. The build and stain/paint took me about 5 hours but additional time is needed to properly seal the table. I used untreated pine. Treated pine may give the table longevity but it would also add a lot of weight to an already heavy table. This was a relatively easy and quick build and is a great size to fit my whole family plus a couple guests! I’m happy with how it turned out and would recommend this build to anyone looking for a budget friendly and simple patio table.


Sat, 07/18/2020 - 13:17
Thank you Abby!!! Your picnic table turned out amazing, I love the added umbrella modification!
I had to convert all the measurements from inches to mm, but it was worth the brain drain. I didn't add the garden, but extended out the chicken coop. I am thrilled with the results! Thank you!
Fri, 12/03/2021 - 07:39
WOW, definitely worth the extra effort, just beautiful! I wish we could offer metric plans, may need to figure that out.
Wed, 03/23/2022 - 20:32
Did you change out the 2x4 and 2x6 on the lower half?
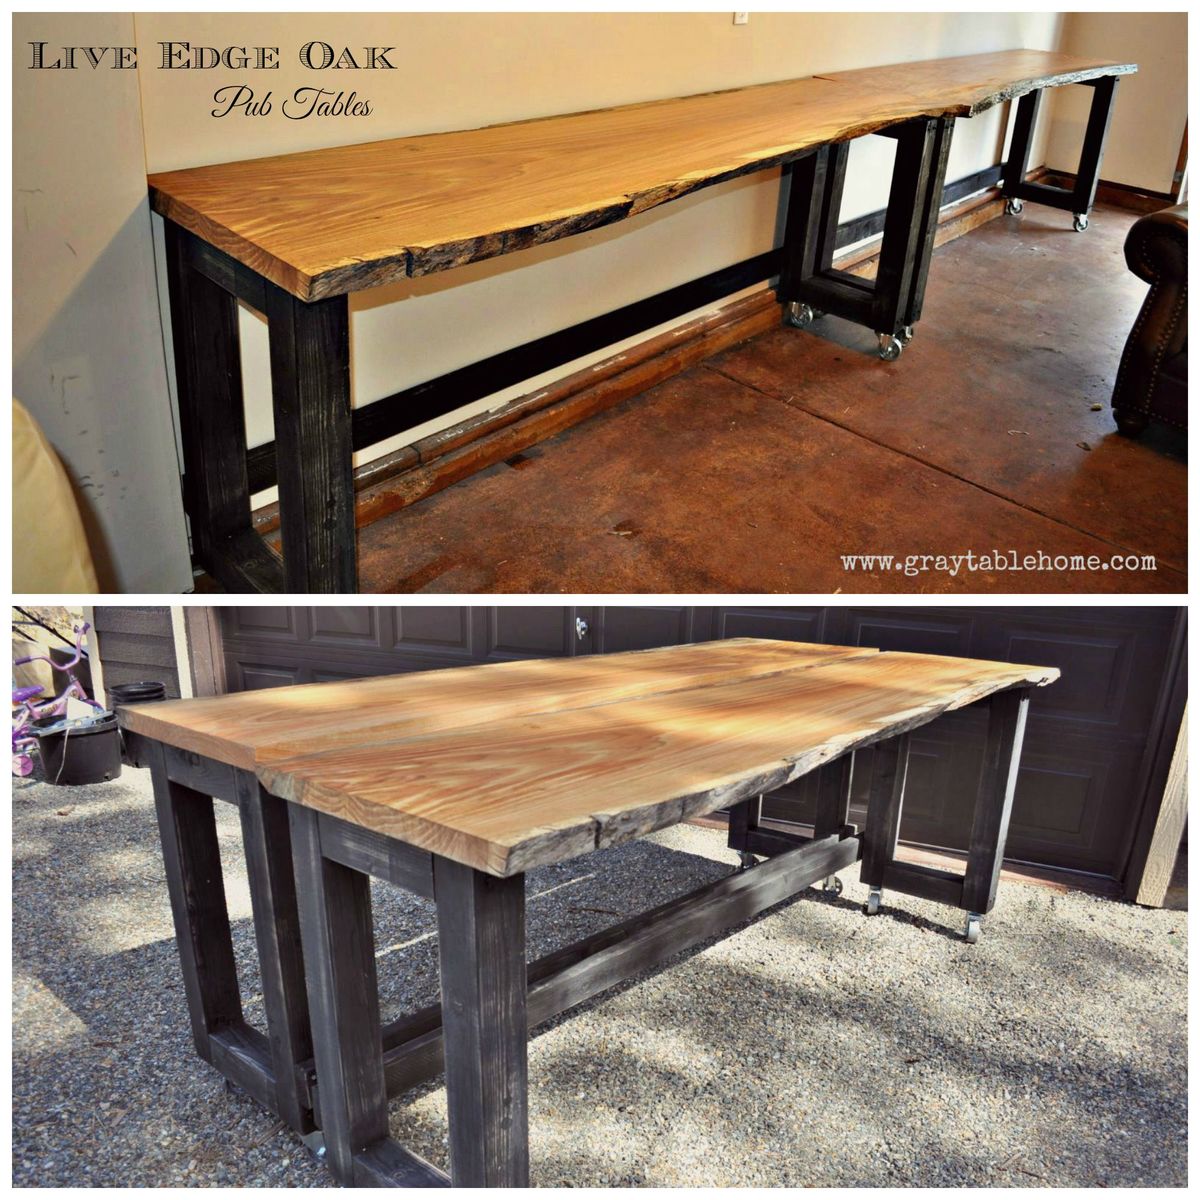
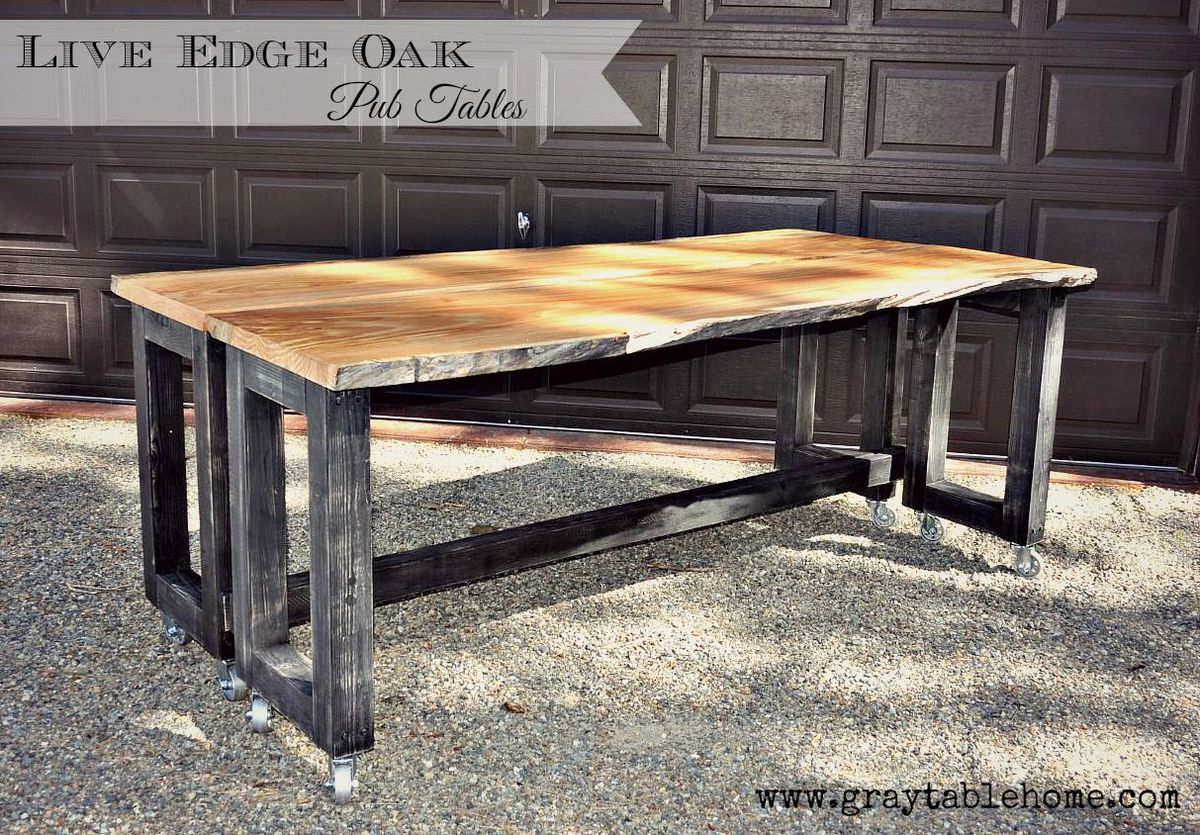
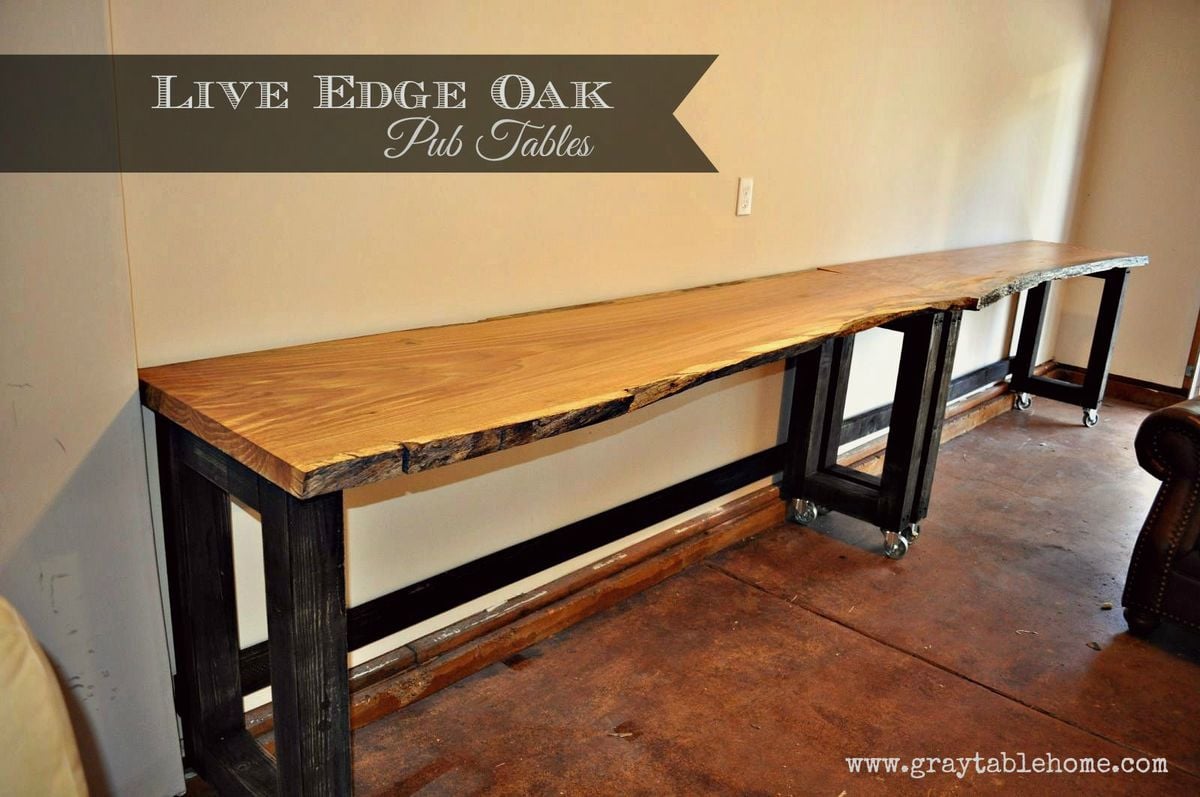
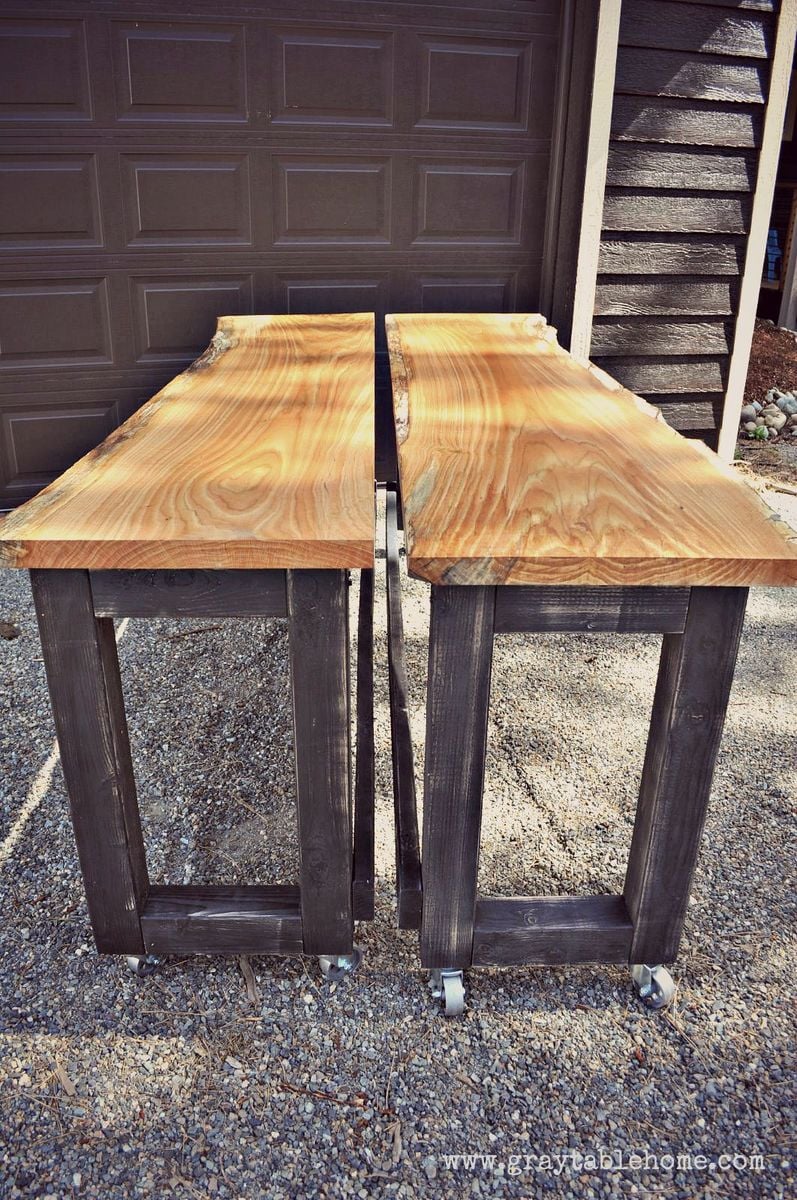
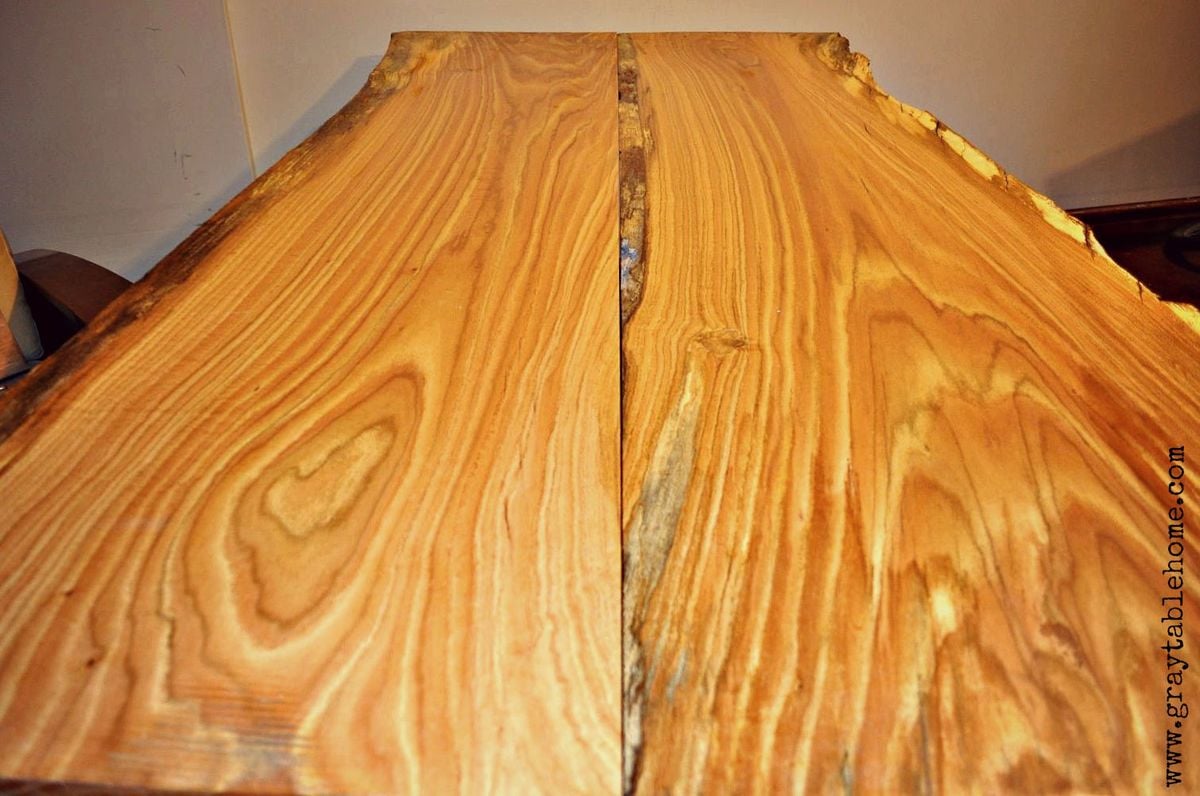
This rustic modern version of a pub table has multiple uses - it can rest along a wall to make a 16 foot long bar, or rolled together to form an 8 foot long pub table. It is standard counter height 36" and will accomodate seating for 8-10 counter stools. If you don't have live edge wood slabs, you can also use construction lumber (2x8s or 2x12s) to achieve similar dimensions and versatile use in a more cost effective way.

Fri, 07/31/2015 - 04:10
Awesome idea! I think I will have to try for a dining table version of this table. Do you happen to have a way to lock the 2 pieces together?
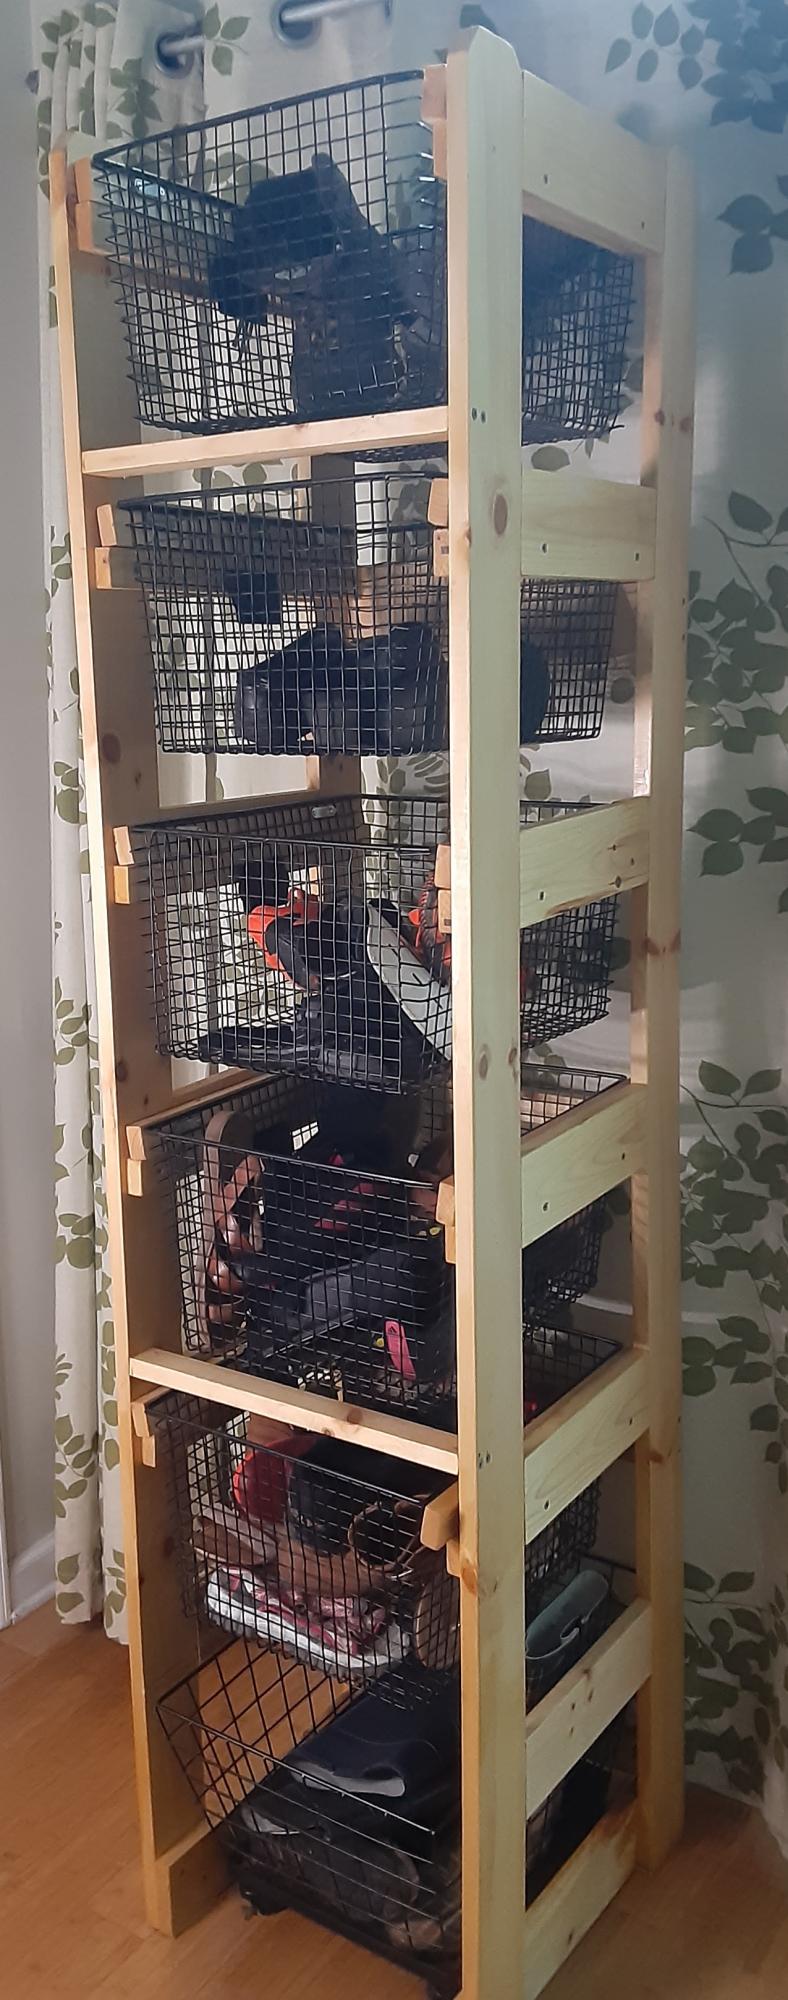
I needed a shoe rack that would work for our limited space and the Laundry Tower that was on the brag post caught my eye. It was modified from the Open Frame Laundry Basket Organizer. This shoe rack is working great for our family now! Thanks for this community!

Sat, 05/06/2023 - 21:09
Thanks for sharing your project, it looks really great!
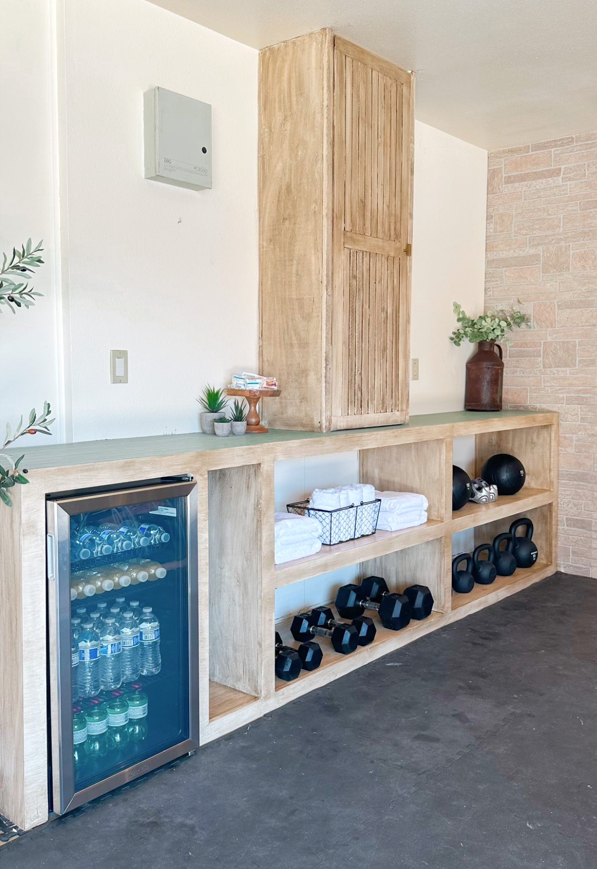
Fabulous home gym by Nailgun Nelly!
*Incorporated and modified the grand waterfall console plan

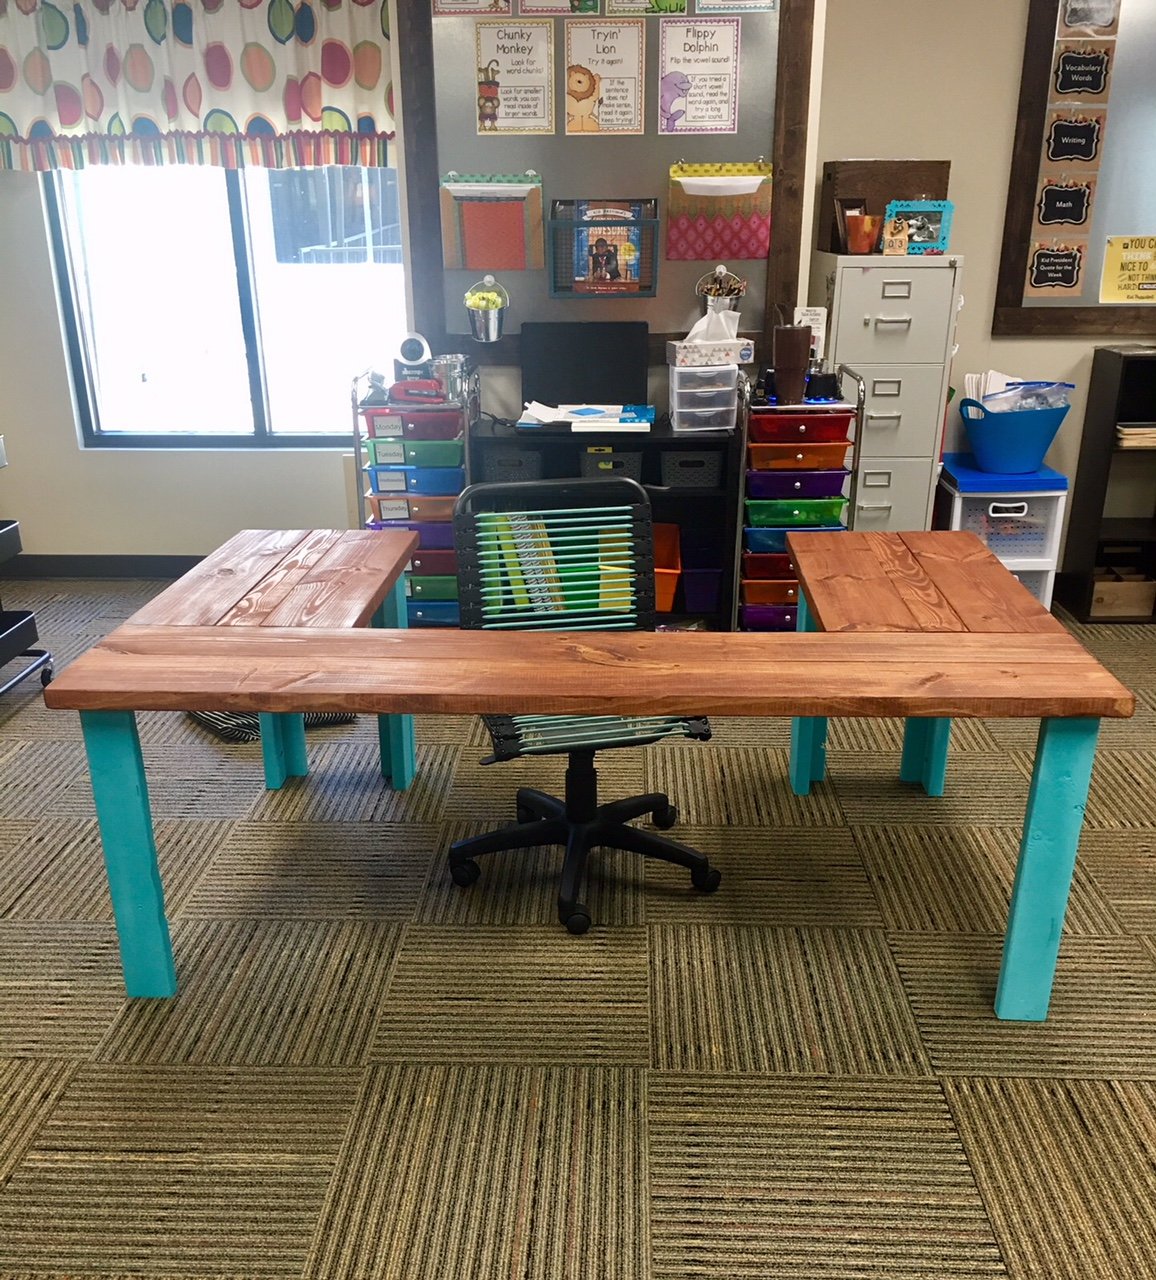
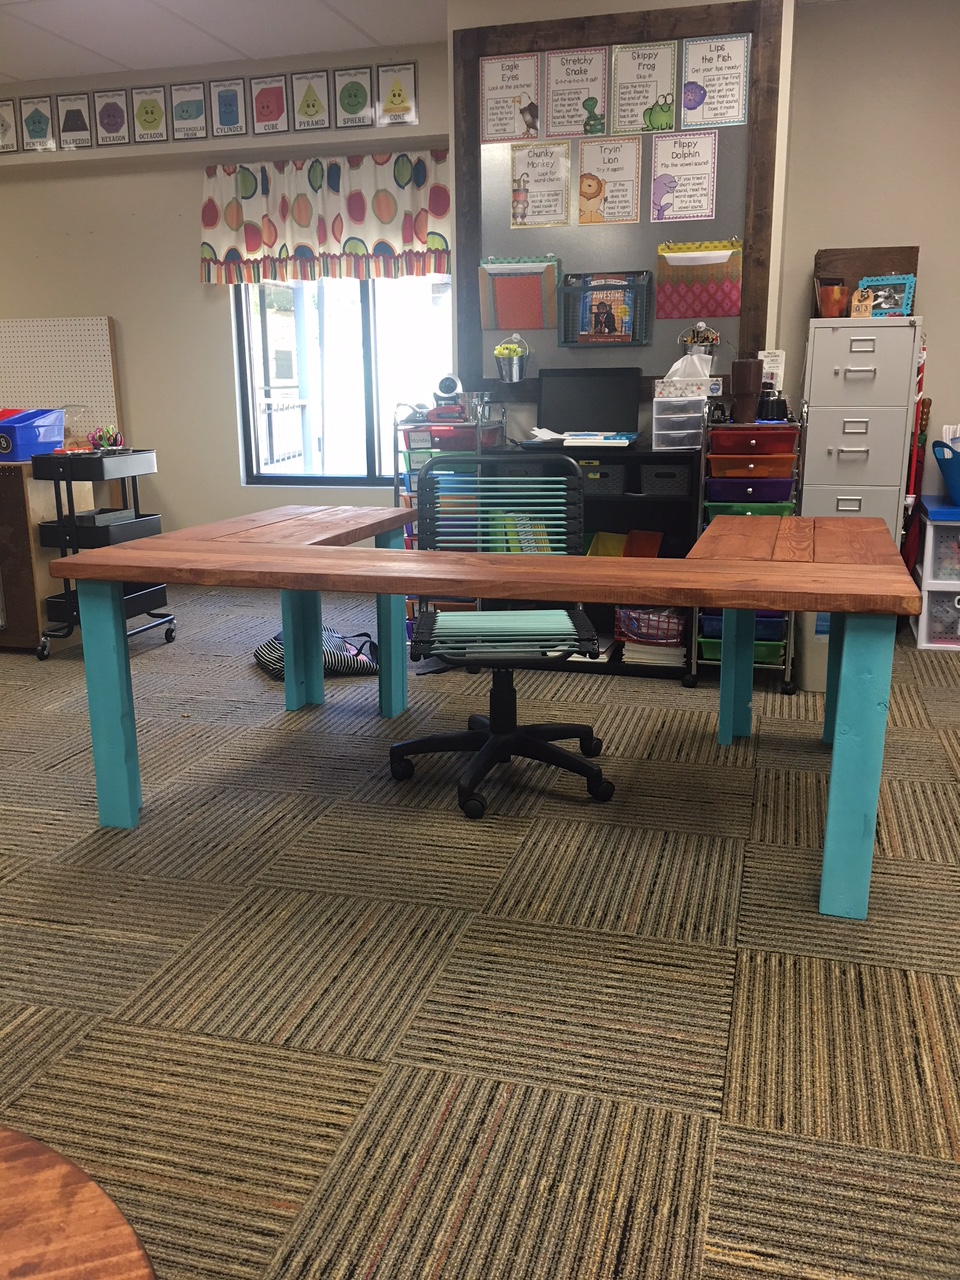
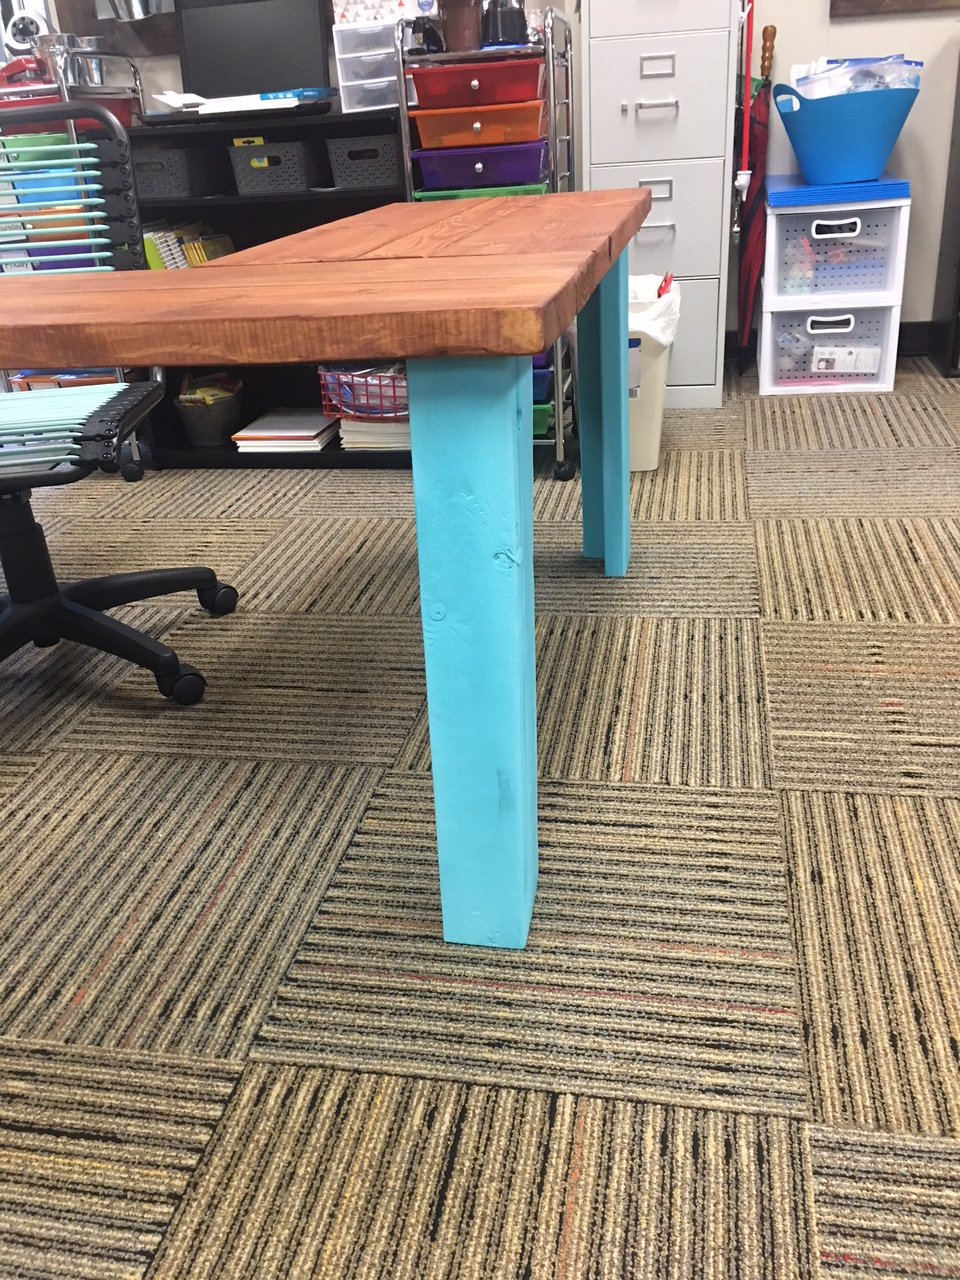
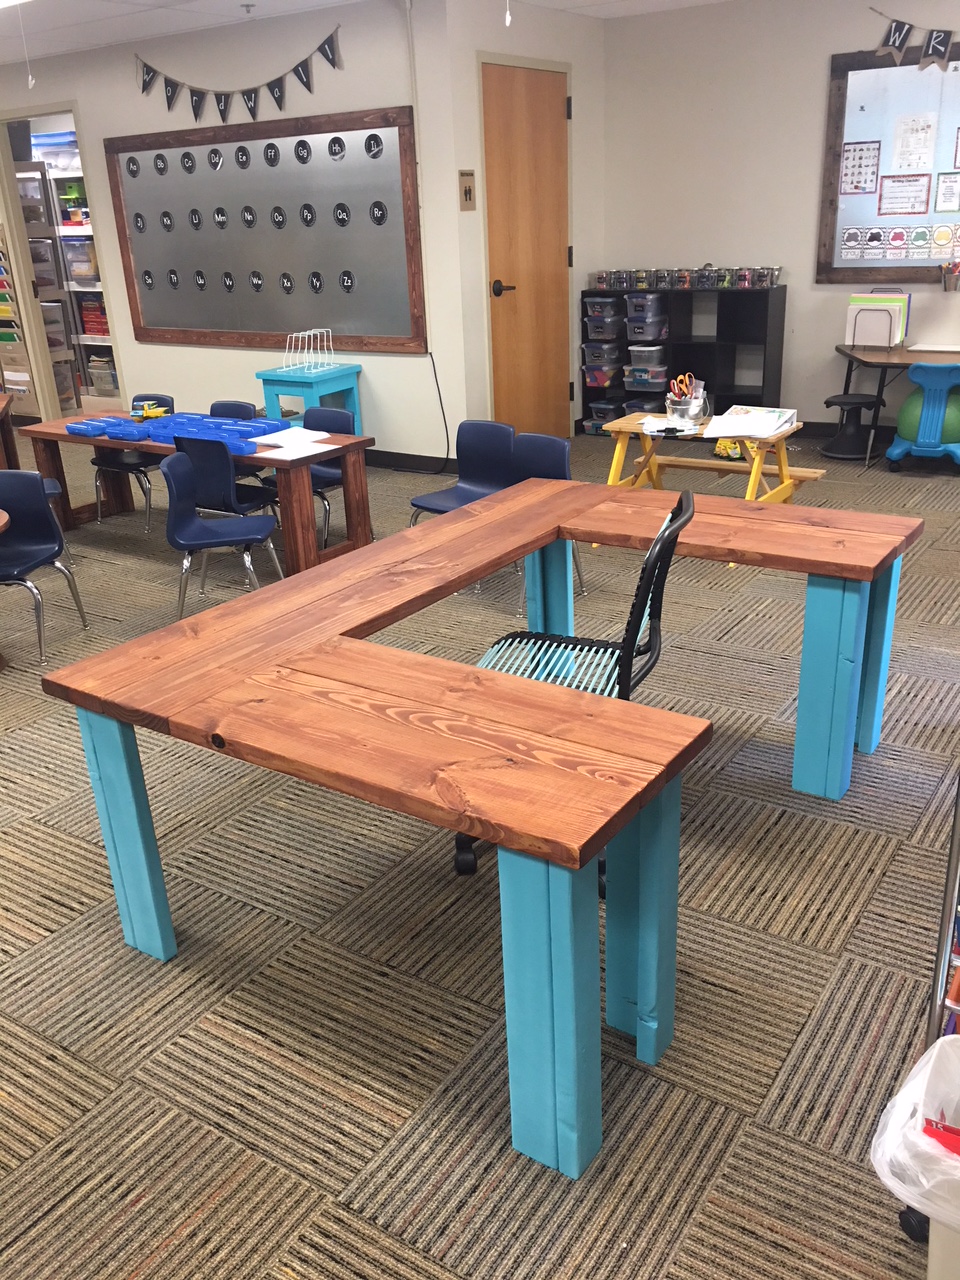
Been a while since I had time to actually build anything worth posting about! My wife wanted some items for her Kindergarten classroom this year, so built several items, most inspired by the Farmhouse family.
Sat, 06/29/2019 - 05:47
I love this! Can you give me the plans and list of materials for constructing it?
Sun, 06/30/2019 - 12:33
I am also a teacher and would love to build this desk for my reading class. Do you have plans?
Mon, 07/01/2019 - 18:05
I love this table for my classroom. Can you share the plans or the dimensions?
-Stephanie
Sun, 07/07/2019 - 09:46
I would love plans/dimensions for this! I was thinking I could also paint the top with wipe off board paint.
Sun, 07/07/2019 - 14:59
I would love to make one for my classroom. Can you share the plans and materials list for this table?? Thanks!!
Mon, 07/08/2019 - 19:11
I am looking to make this for my fourth grade classroom - can you provide the dimensions you used? Thank you so much.
Wed, 07/10/2019 - 11:59
Love this!
I would love this for my classroom! Can you share the plans and materials.
Thank You!
Mon, 07/22/2019 - 18:25
Anyone have any luck with figuring out the dimensions??
Thu, 07/25/2019 - 17:20
Has anyone gotten the plans for this table? I have contacted Ana White and tried other ways also. I would love for someone to share.
Thank you
Teri
Mon, 08/19/2019 - 12:09
I am guessing the corner posts are 2 x 4s, the top is 2 x 10s. It looks like the width is 6’ (looking at the floor carpet tiles being 24” square). So 2 - 2 x 10s side by side for the main part of the desk top and 2 - 2 x10s perpendicular on each side of the chair. I guess the height is subject to choice and the length of each side would also be subject to choice or to the length of the 2 x 10s to be economical.
an educated guess would be 4 - 8’ 2x10s for the top and 6 - 6’ 2 x 4s for the legs?
Anyone else have any input here? Open to suggestions.....
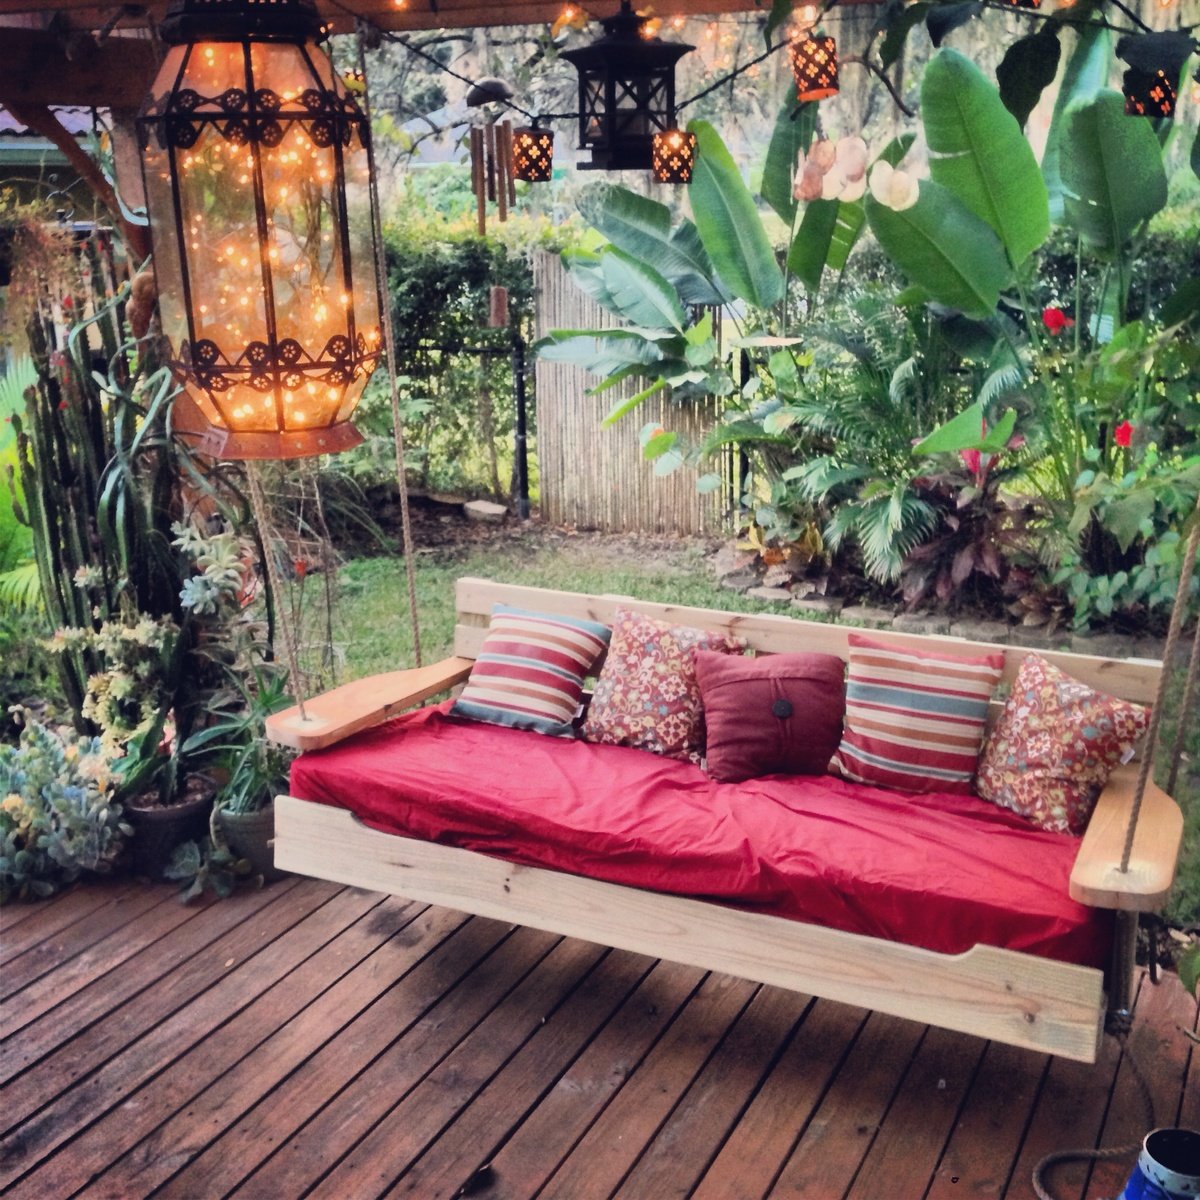
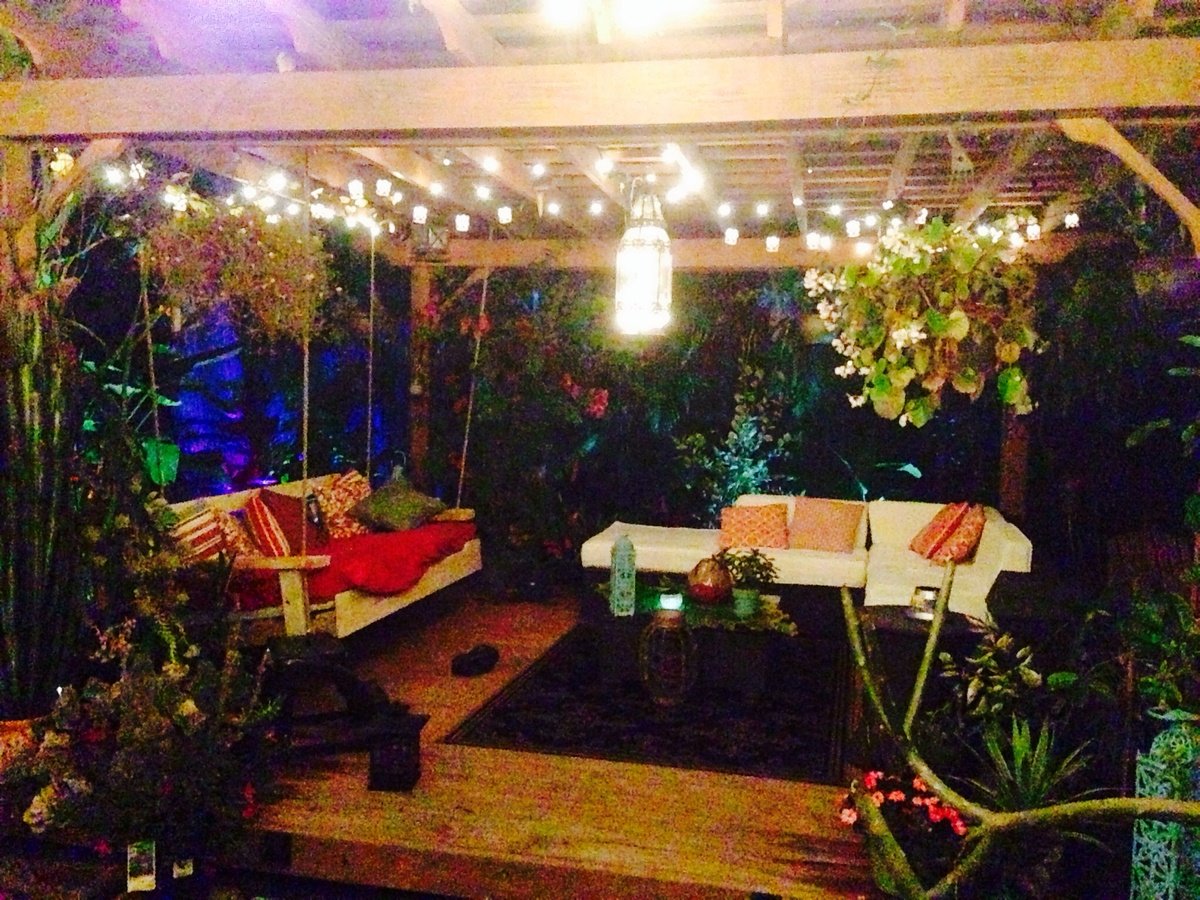
Started off with the original design but enlarged it to fit an oversize single mattress. The mattress cost me $35 from a local faith farm, while the materials came in around $200. I decided to hang under my backyard pergola. Fun and easy project.


Tue, 01/28/2014 - 21:10
Wow this looks so inviting I might just have to make one too! Nice work-- it looks great!
Mon, 04/07/2014 - 22:49
Really lovely! Great job! This will be one of your favorites spots all summer long.
Mon, 07/27/2015 - 22:45
I want this! I just made a couple of plant stands for my front porch. My husband asked me what my next project was, why, a swing bed. (This was only my second project!) I want to put cup holders in those big ole arms! We have a house at the beach in South Alabama, so, you gotta "hydrate." This is an awesome swing. I can't wait to do mine...pillows to rest on, one foot on the concrete pushing me in a slow swing. Cold beverage in my hand or in my cup holder. Yep, southern girl has a new project. Love it!
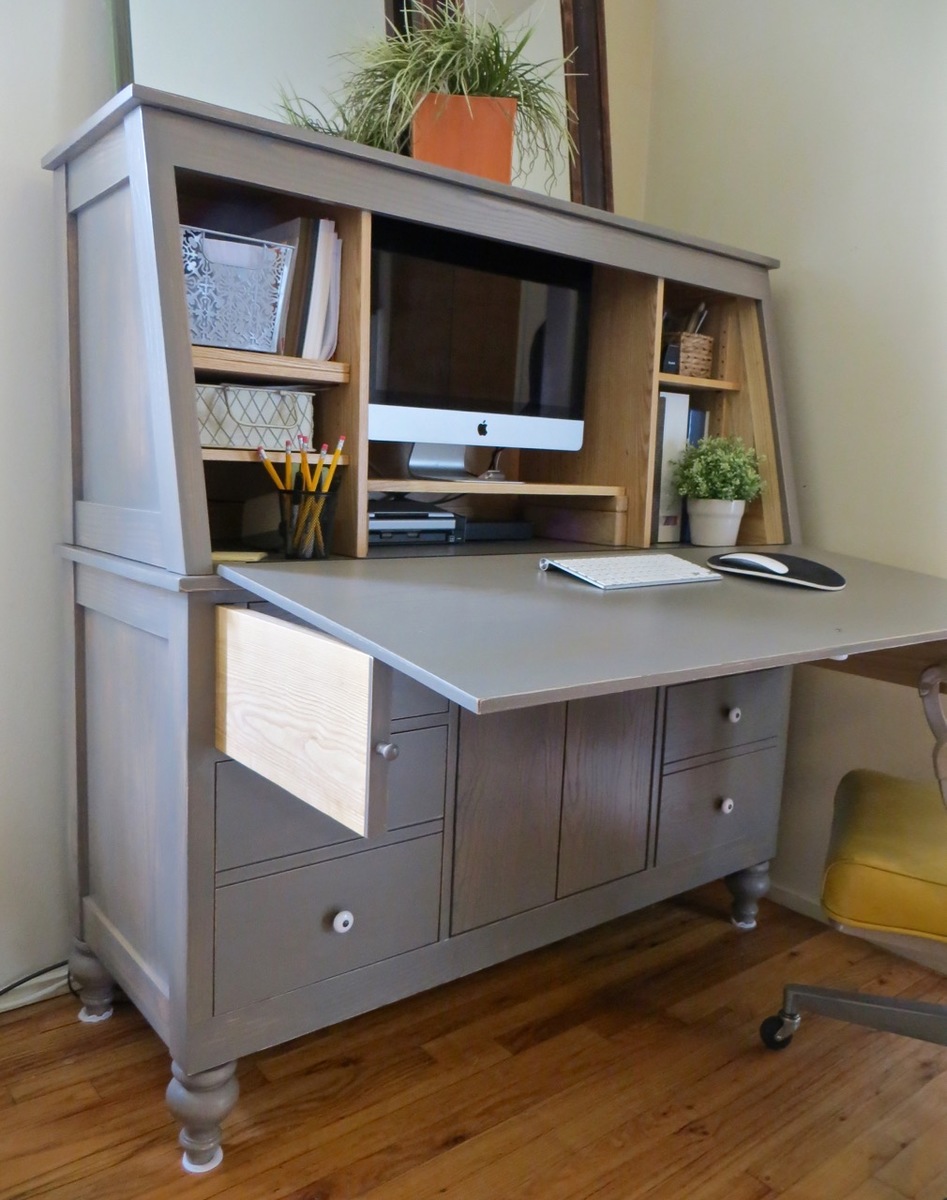
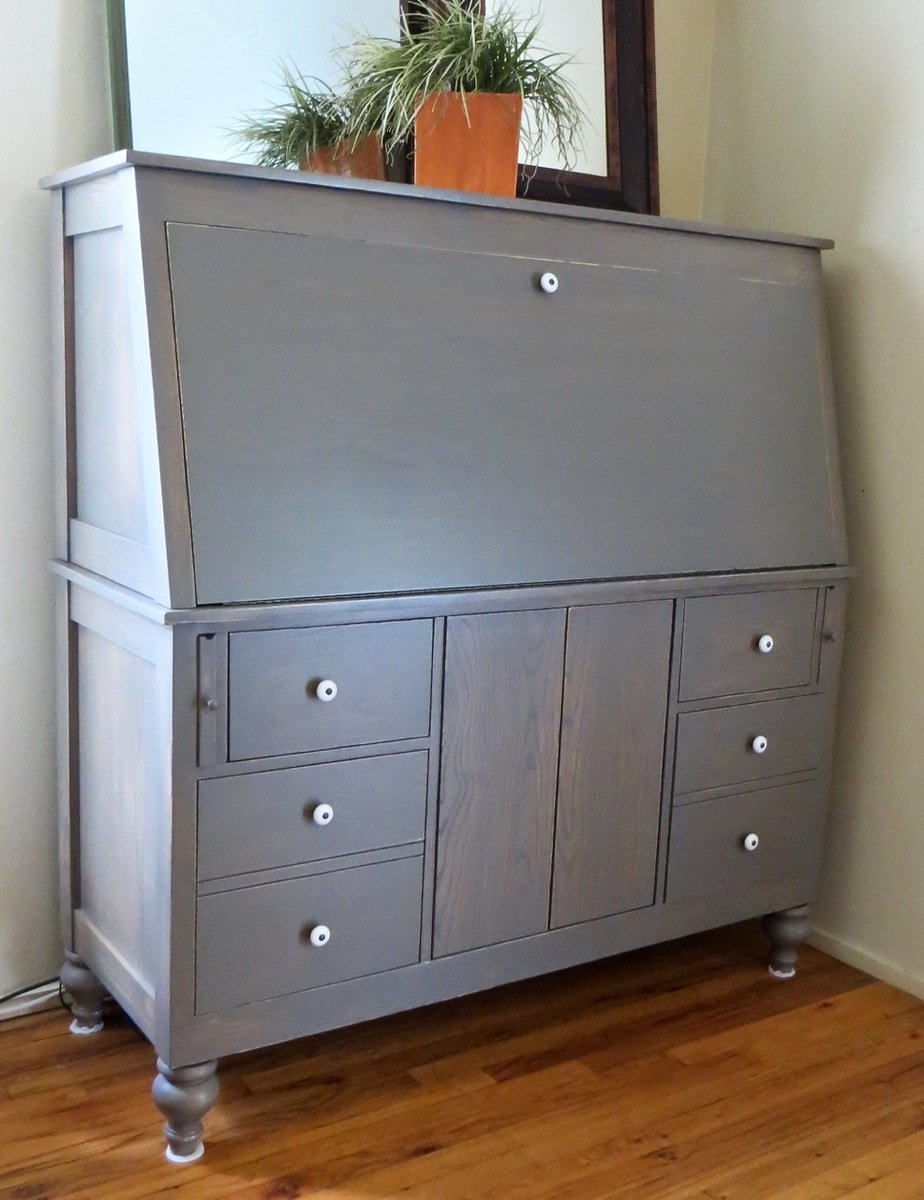
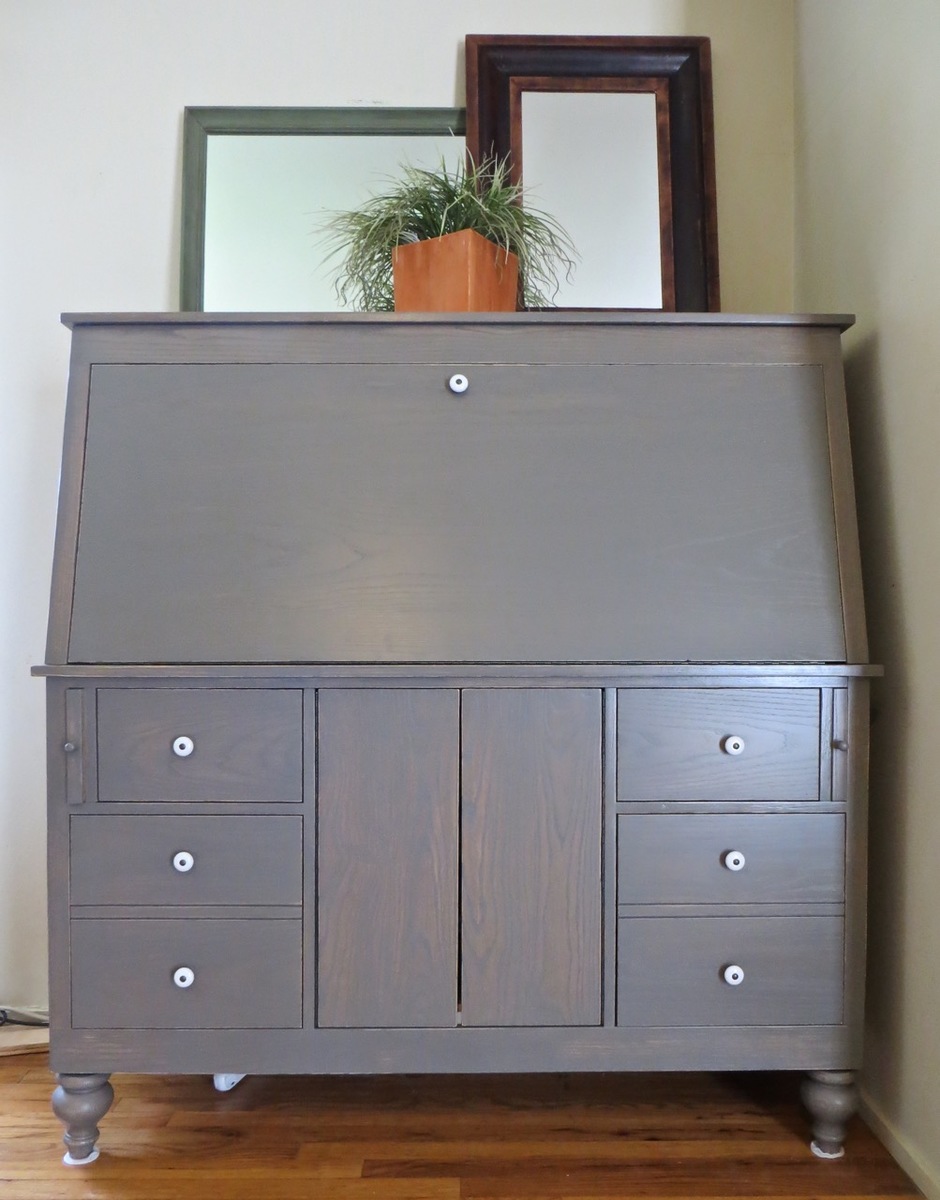
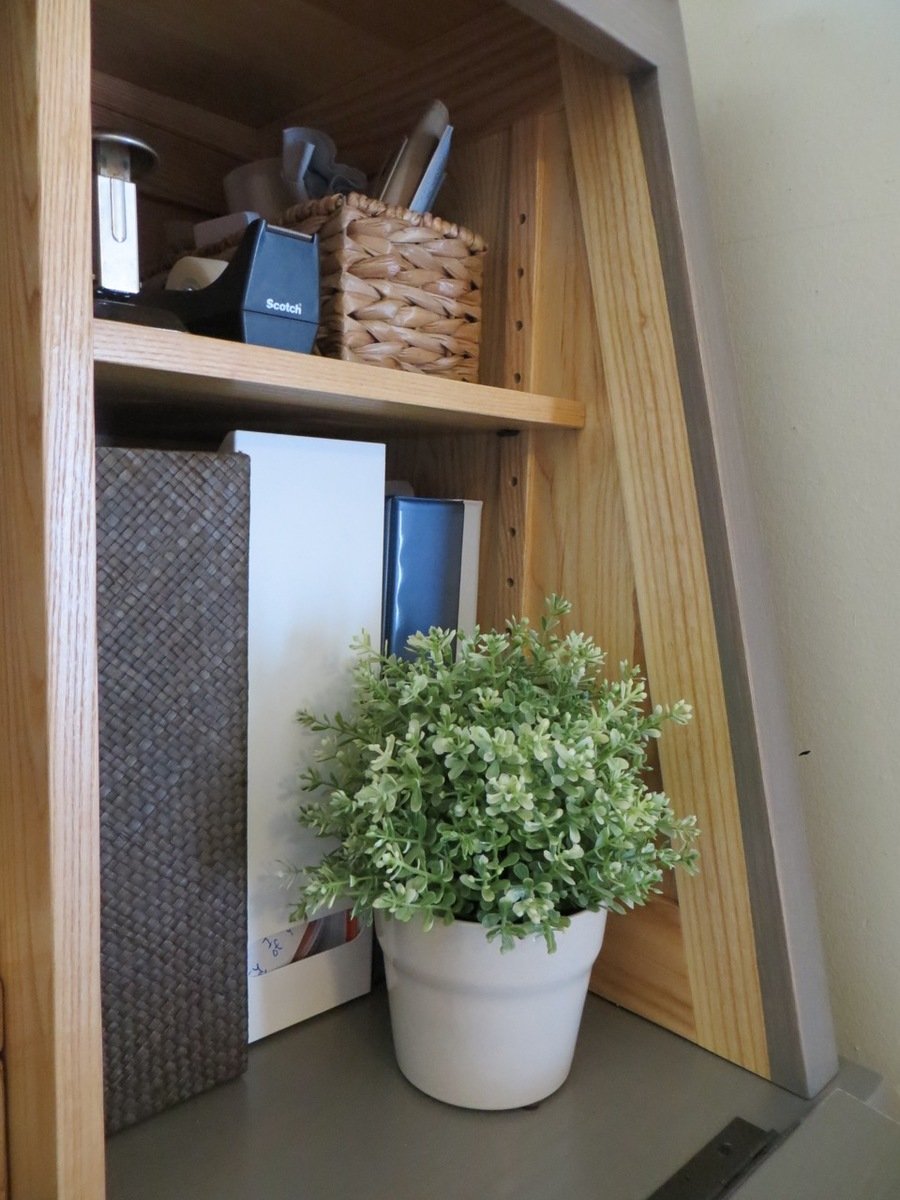
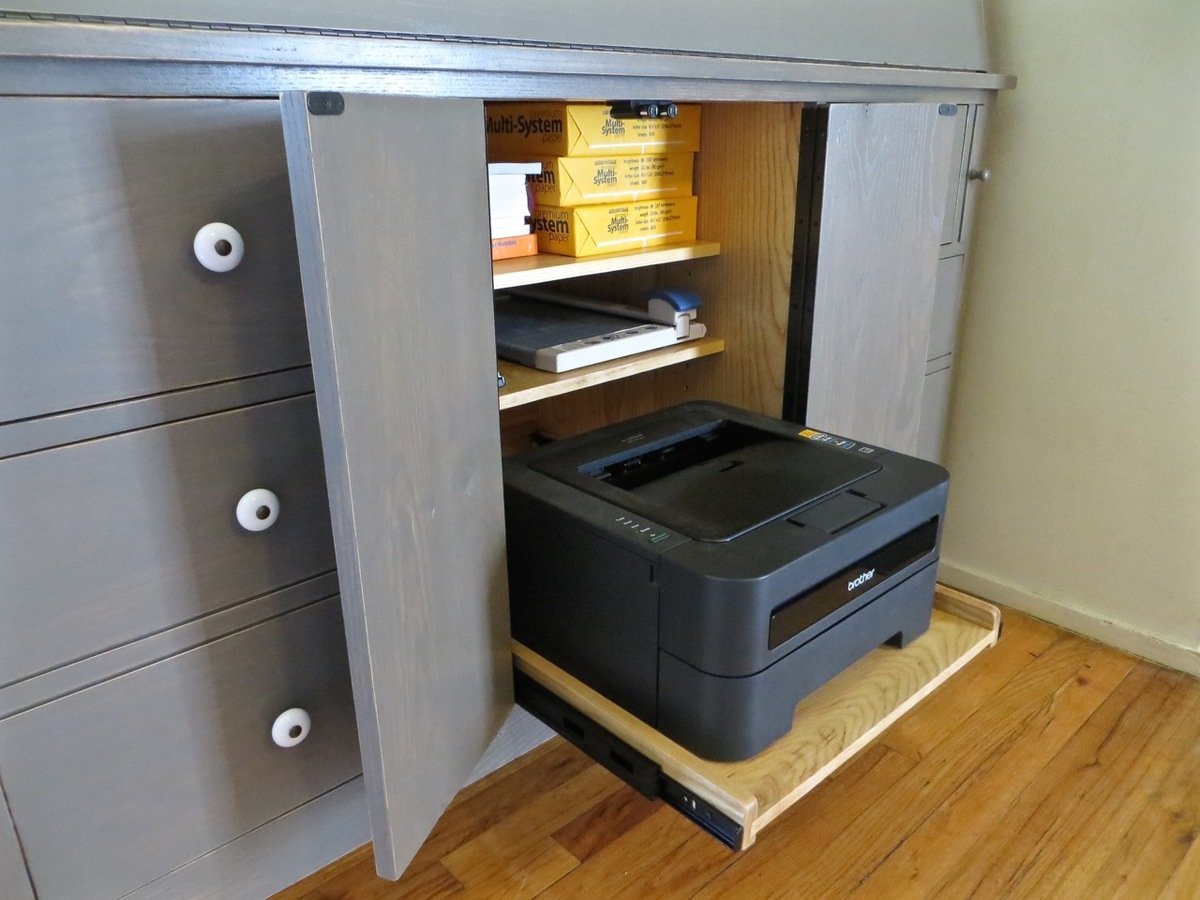
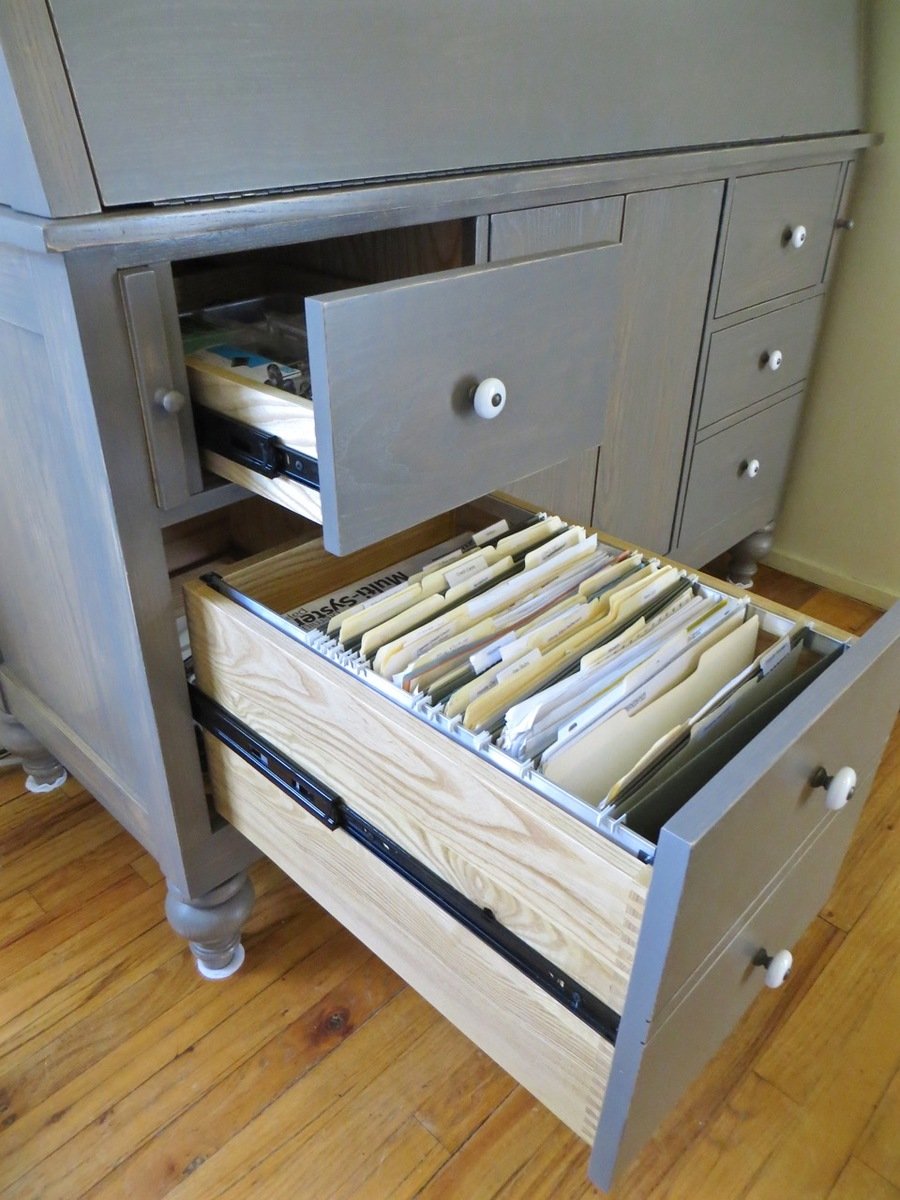
I designed this desk from another desk I built. With this one, I wanted the overall foot-print smaller but still something that was able to organize all our office stuff and be able to close everything to keep it clutter-free. We have a small apartment, and although this desk is about the size of an up-right piano, it works perfectly into our living space!
I made it out of raw hardwood (Ash) and because I knew just the wood alone would make this desk heavy/bulky to move I made the top hutch removable. It's held in place by wood pegs (dominos). All the shelves are adjustable and the drawers are full-extension (something I've never had - wahoo)! The drop-down door is help up by 2 pull-out boards on each side (my first desk had chains). I spend a lot of money on this desk because I knew it was a chance in a lifetime to make and wanted it to be perfect and something that would last generations.
I built the main carcass off of plans/measurements I designed, but then all the insides, drawers, shelves, doors, etc where made as I built (because just a millimeter difference in building changes everything)!
If you want more pictures/descriptions of the building process I wrote about it in a 4-part series on my blog.
Wed, 09/23/2015 - 11:22
is there plans available for this project?

In reply to is there plans available for this project? by Nsmjc
Tue, 09/27/2016 - 12:20
Hi there! I'm sorry but I don't have plans put together on it! I designed it in Google Sketchup and have some 'screen shots' I could send you for basic measurements if interested. You can e-mail me at [email protected]
Mon, 06/15/2020 - 09:08
Hi. Do you happen to still have those 'screen shots' or any other info/dimensions from this build? LOVE LOVE LOVE it!!

We went off the Farmhouse table and bench design but had to customize the length of the table and bench so that it fit in our kitchen space. The table was our first ever project and we made a few mistakes but learned from them and built the bench and are hoping to move up to the Farmhouse bed and then the fullstorage bed.

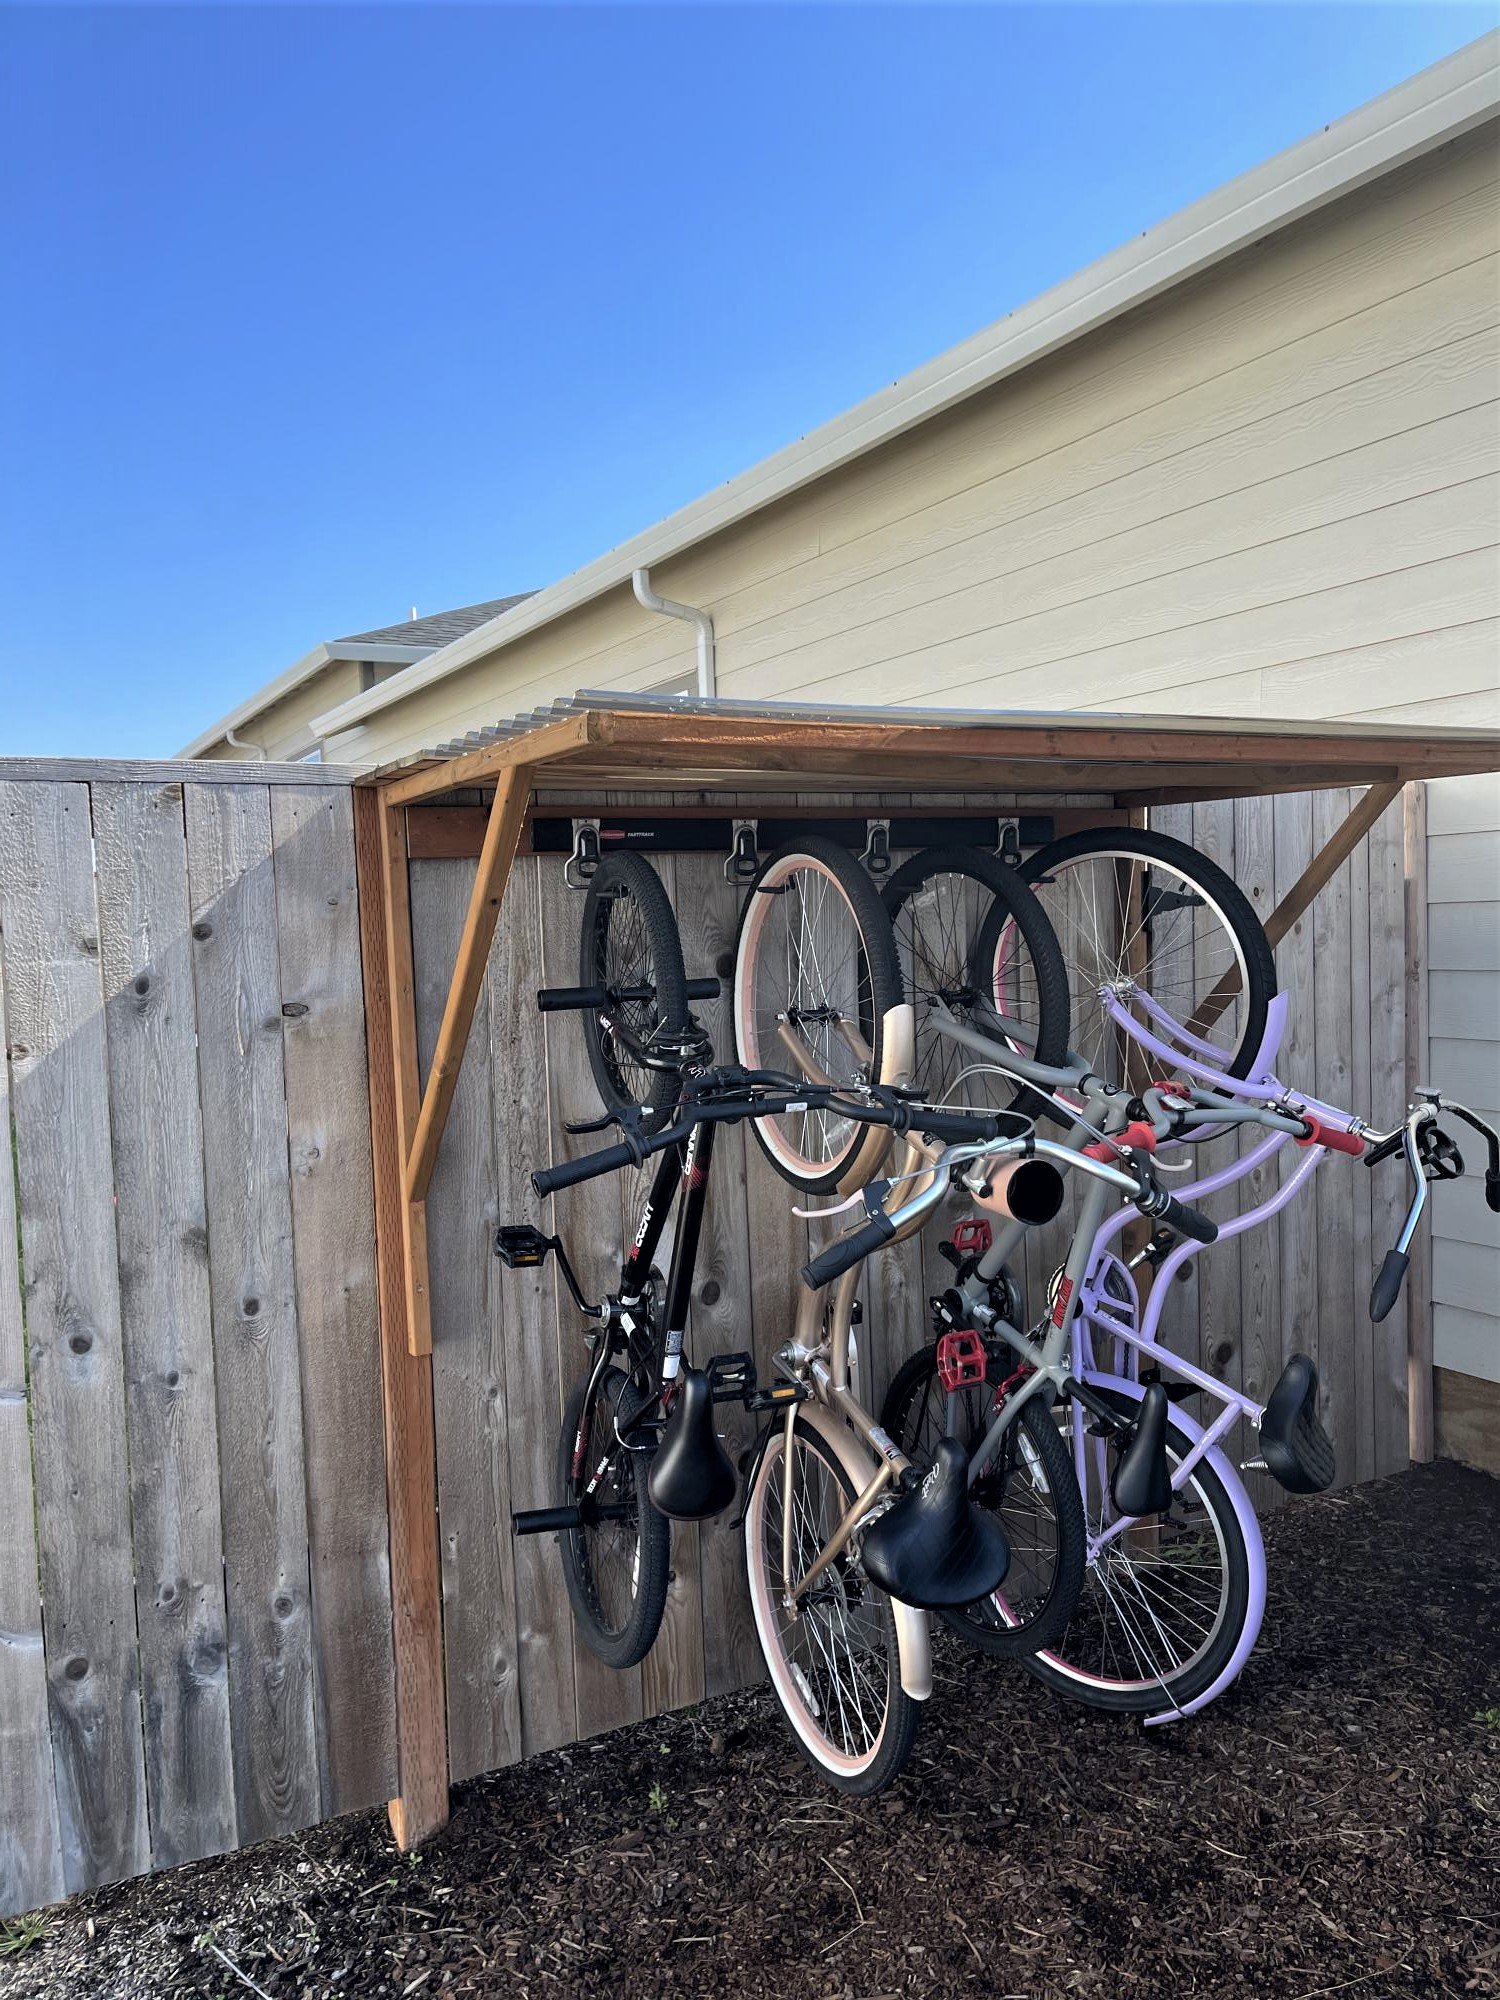
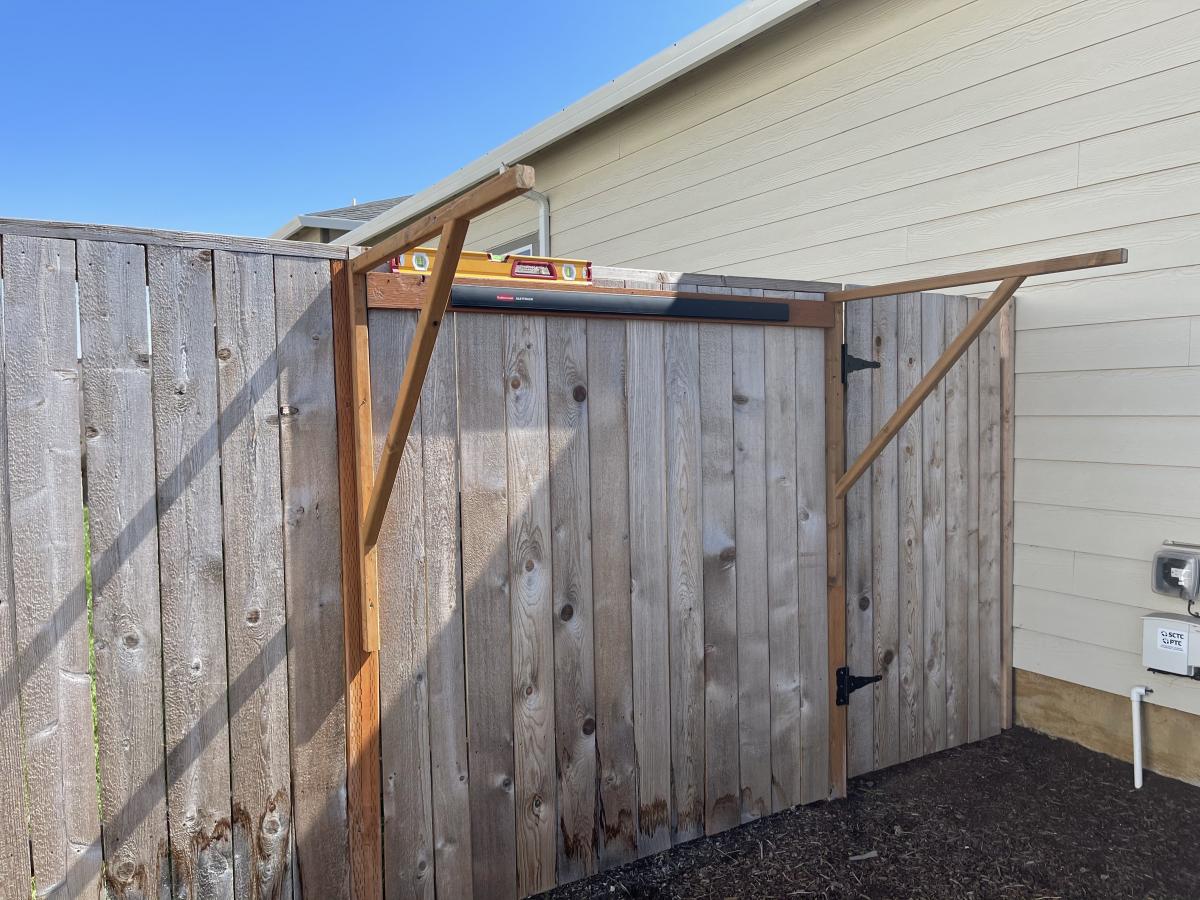
I live in a smaller rental with limited garage space, so I needed a place for my kids bikes. This is what I came up with. It required minimal screw holes in the treated fence posts and I attached a rail system(rubbermaid fasttrak) for the bikes to hang from. I used Ana's easy shelves plan for the upright supports and then just added some corrugated roofing and cedar fence pickets (which I had on hand) to finish off the top.
This was my first project from Ana's website and I'm hooked! I'm a beginner, but thank goodness for my Dad's help because I have a lot of learning to do!
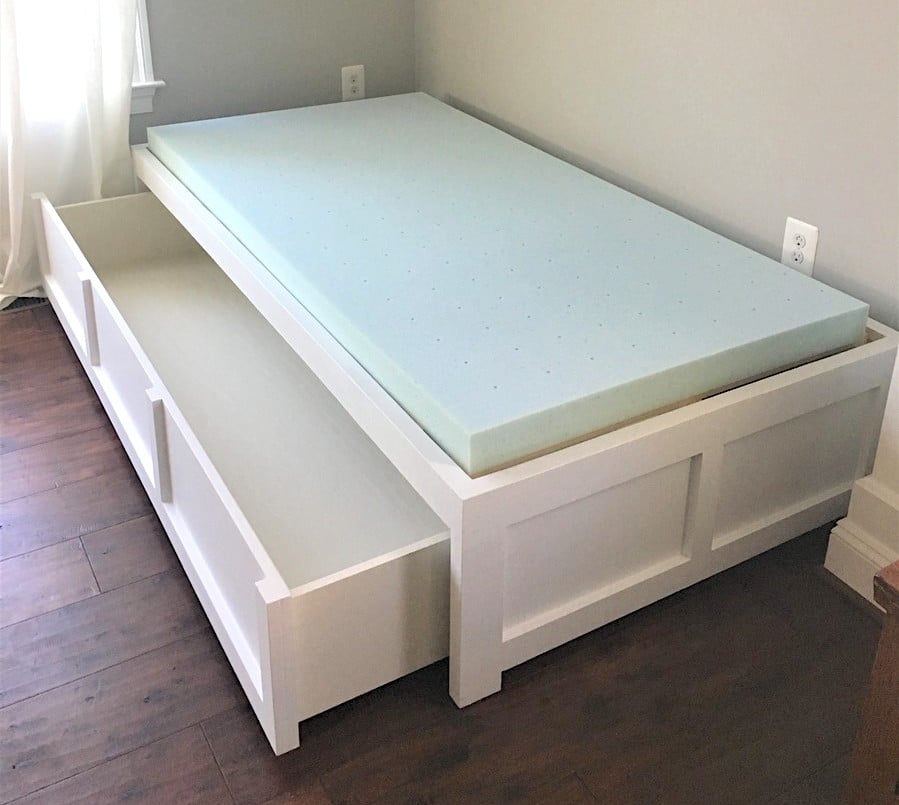
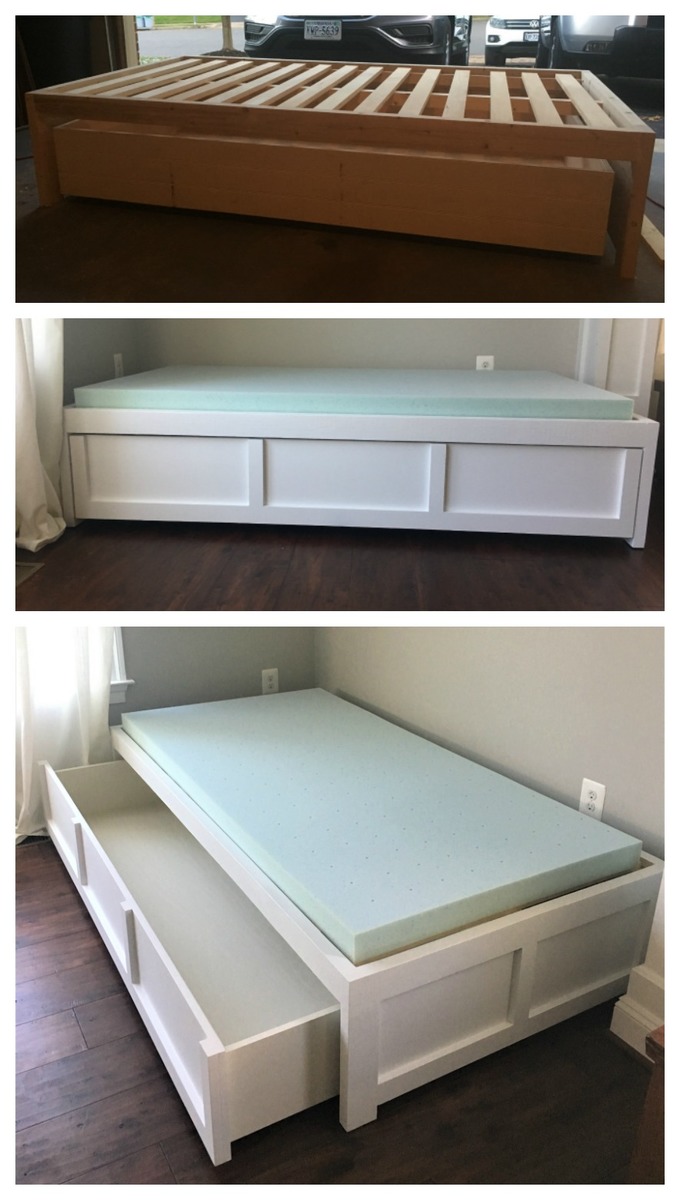
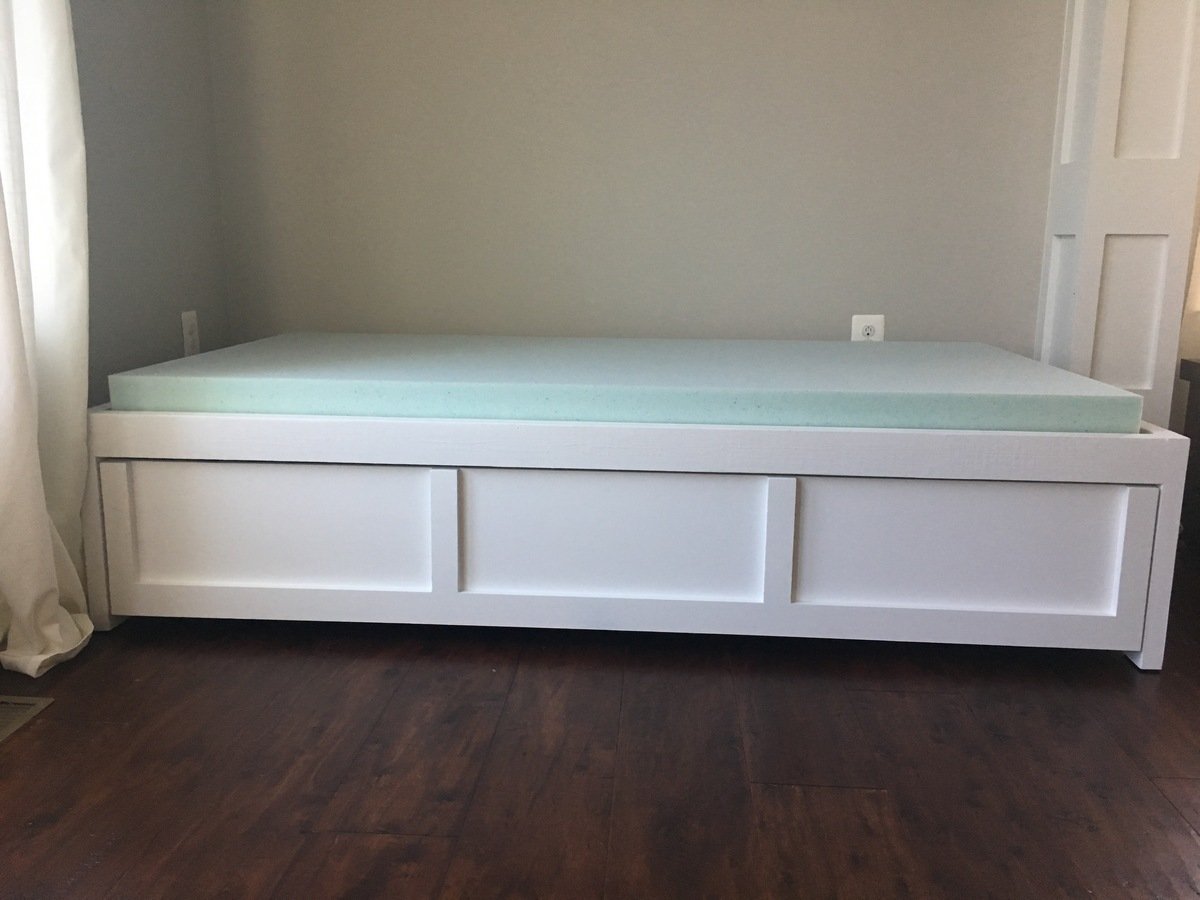
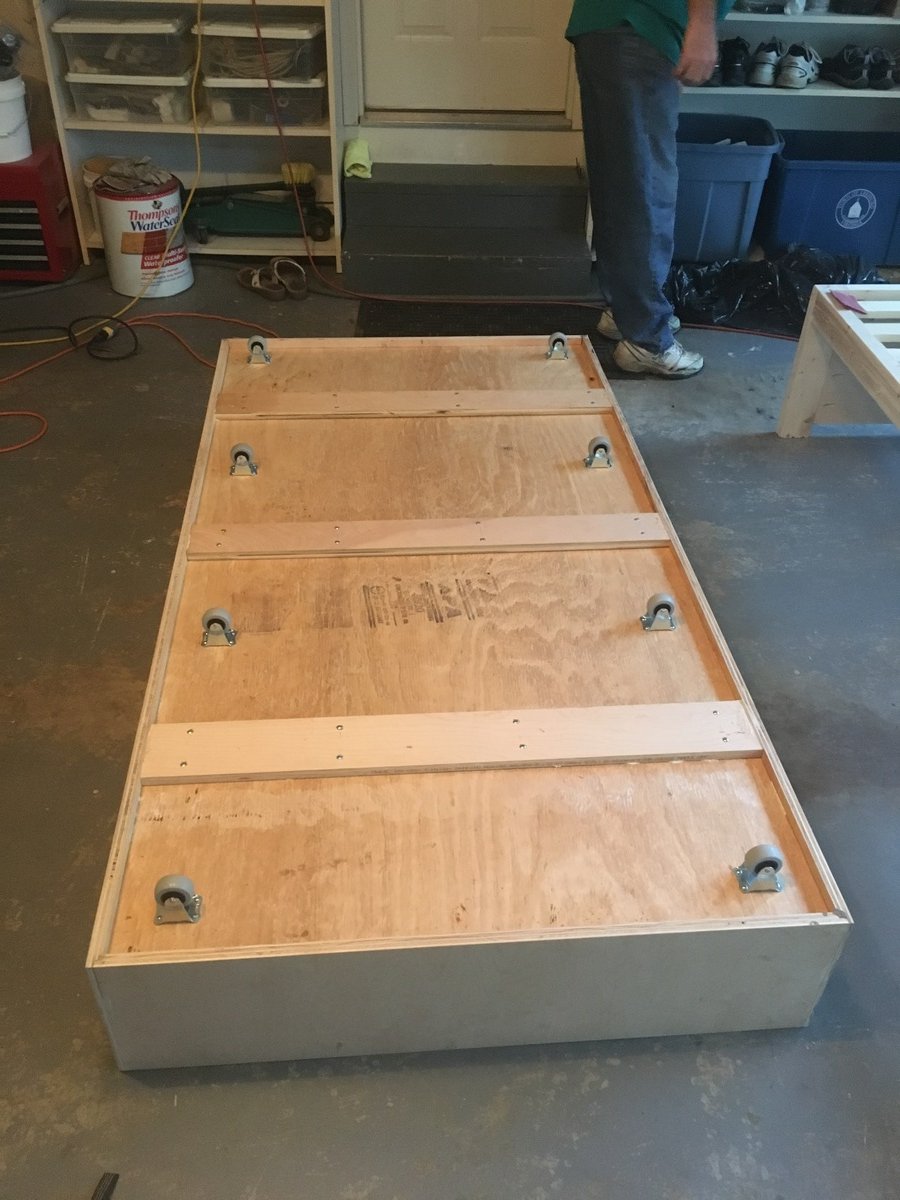
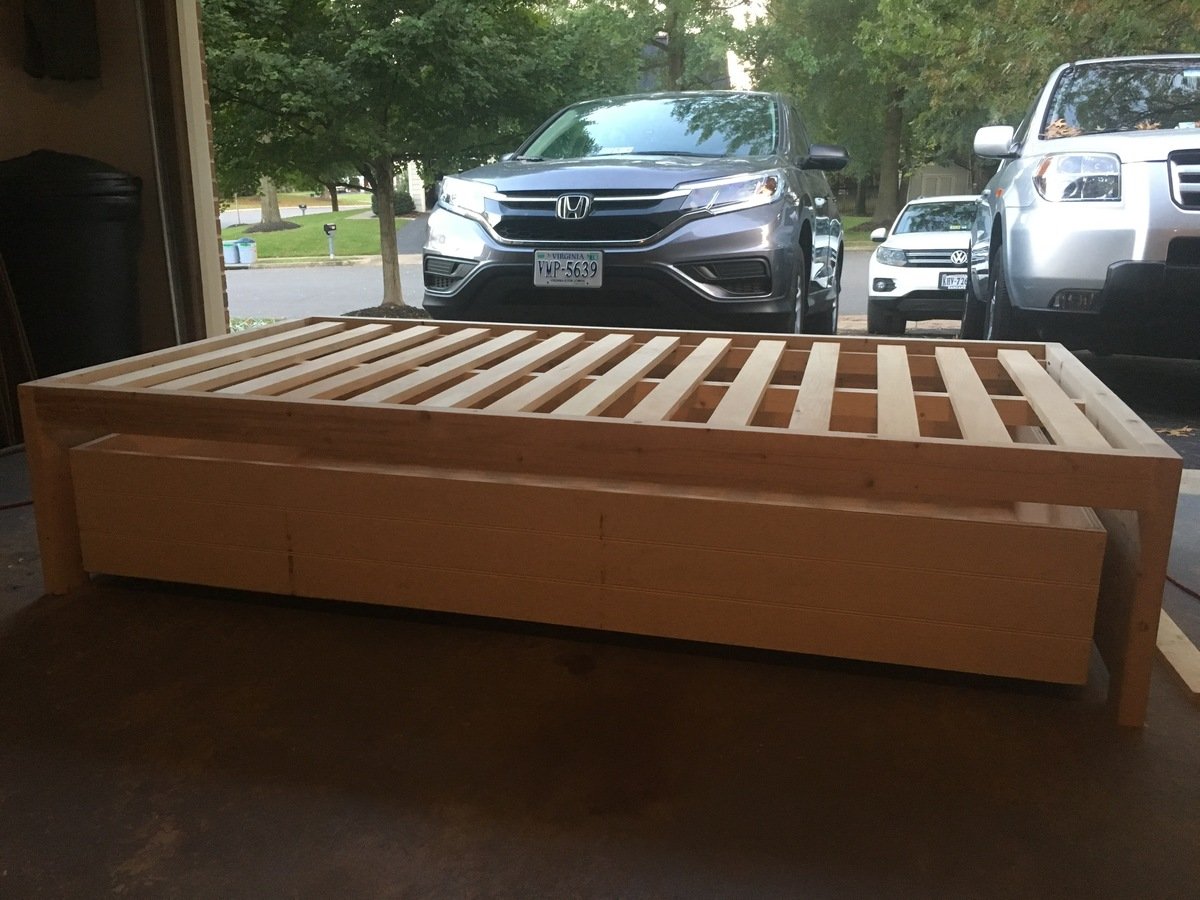
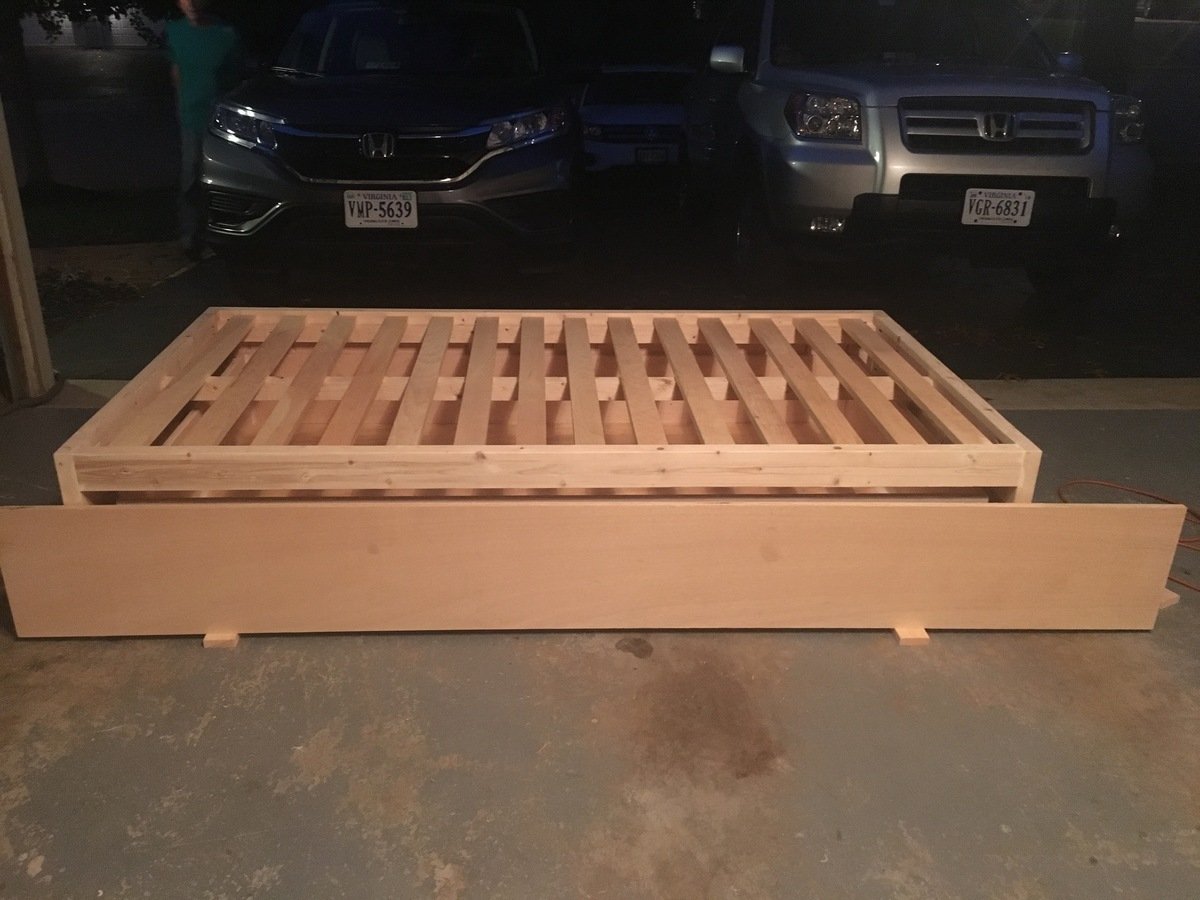
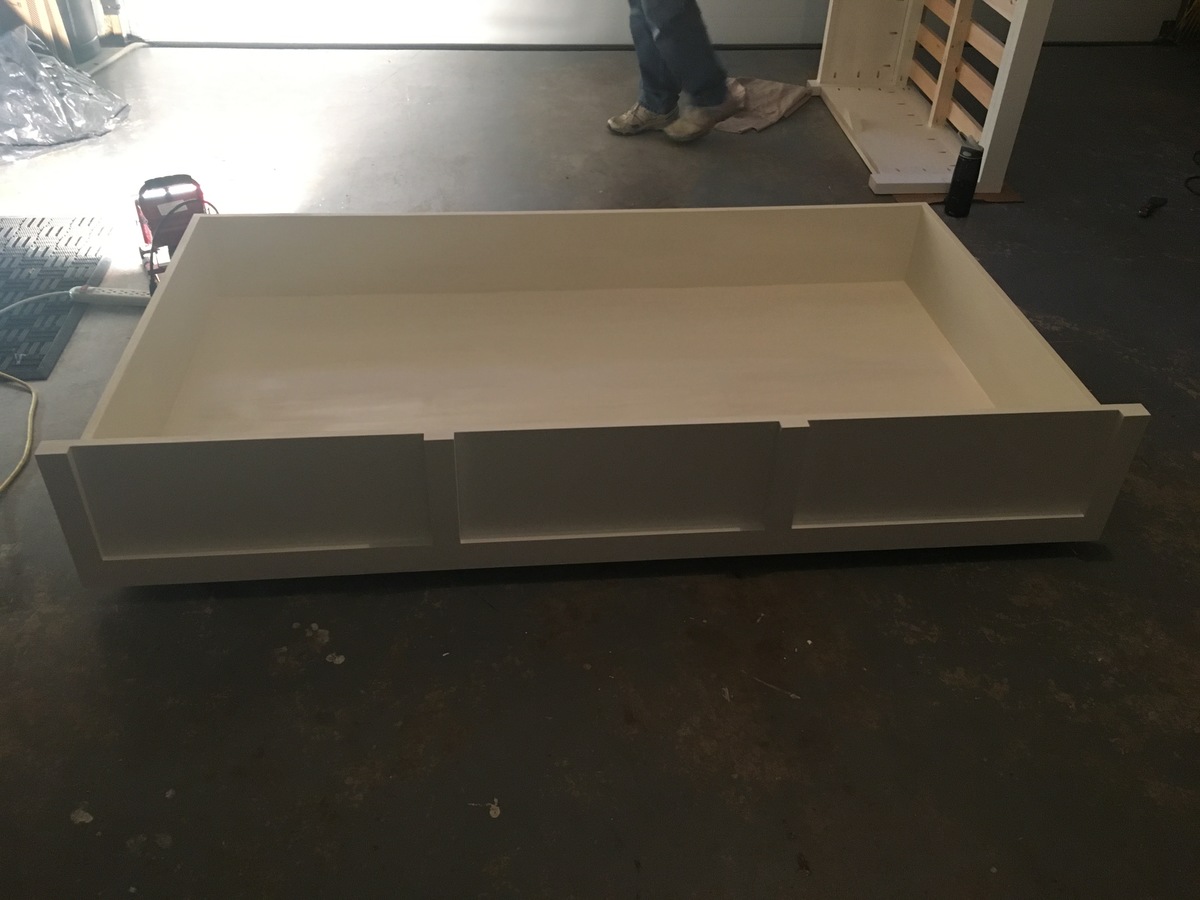
I wanted the drawer to be 1 drawer instead of 3. I feel like it looks cleaner (without having to adjust 3 drawers constantly to make it look good when you push them in). I was thinking the bed could actually be used as a trundle bed in the future too! I use this to store toys right now and it is Awesome!
I increased the bed size to fit a twin mattress and increased the height of the bed slightly so that the drawer would be a little bit deeper. We also added a back to the bed and carried around the trim to make all sides look the same. We added a bumper to the back and sides of the inside of the bed so the drawer is easy to push in and fits in snug. Finally we reinforced the bottom of the drawer with more 1x4 boards so that if a child does sleep in it, it would be more sturdy. I now have kids come over and jump into the drawer (literally) and I'm glad we reinforced it.
The changes we made did add to the cost and our time (as well as being newbies), but I think it's worth it and the bed turned out beautiful!
Sat, 01/15/2022 - 08:02
Any chance you have your cut list for this? Will the trundle storage drawer fit a twin mattress in it? Also, you say you increased the bed size to a twin, was the original not a twin too?
Comments
Ana White Admin
Mon, 04/03/2023 - 13:13
Fabulous first project!
So happy you gave building a try, great job!