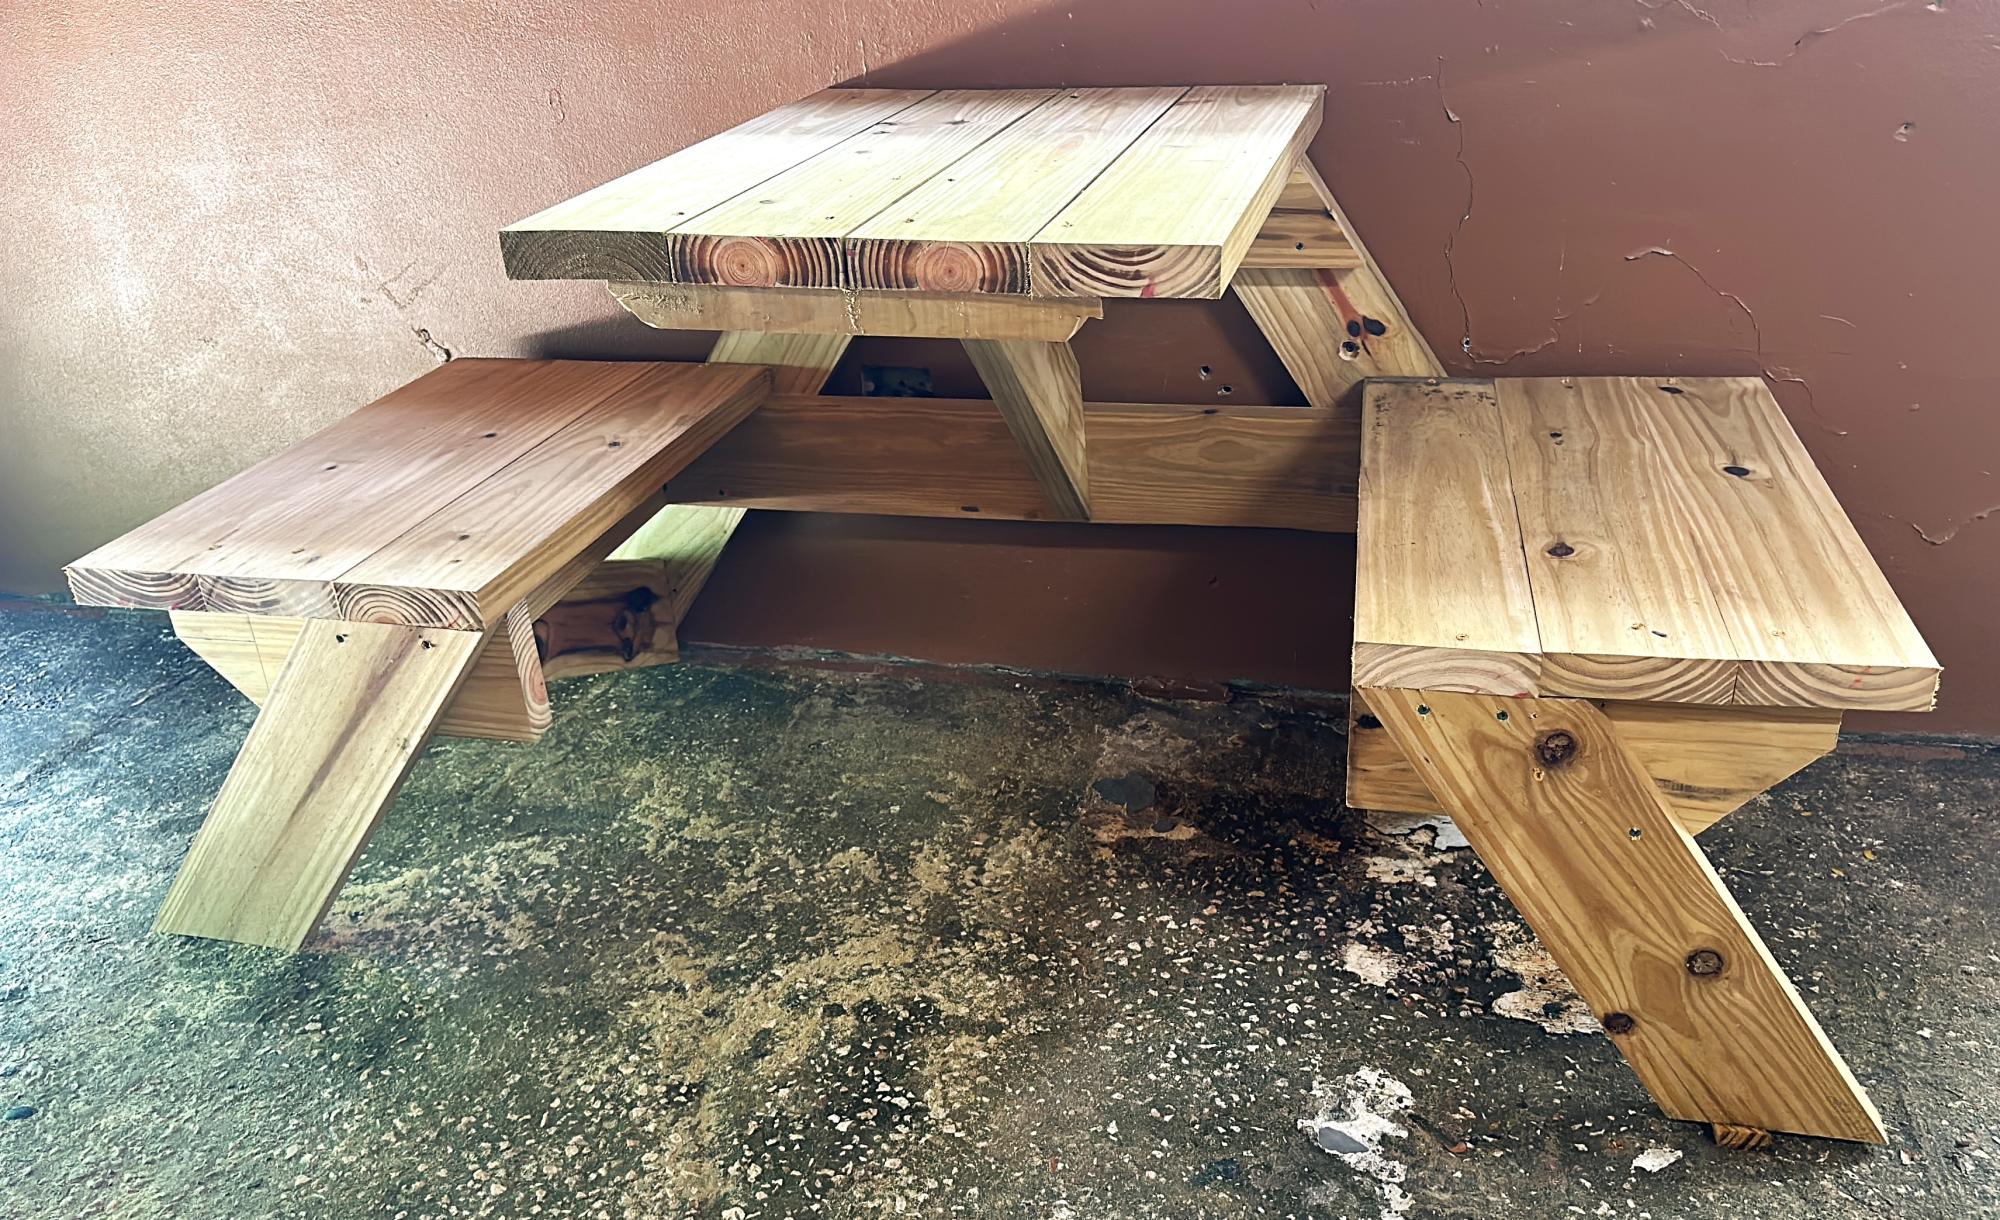
Deck furniture

We used pine for the chairs and table and stained with Cabots black exterior deck stain and sealed with polyacrylic.
Built from Plan(s)
We used pine for the chairs and table and stained with Cabots black exterior deck stain and sealed with polyacrylic.
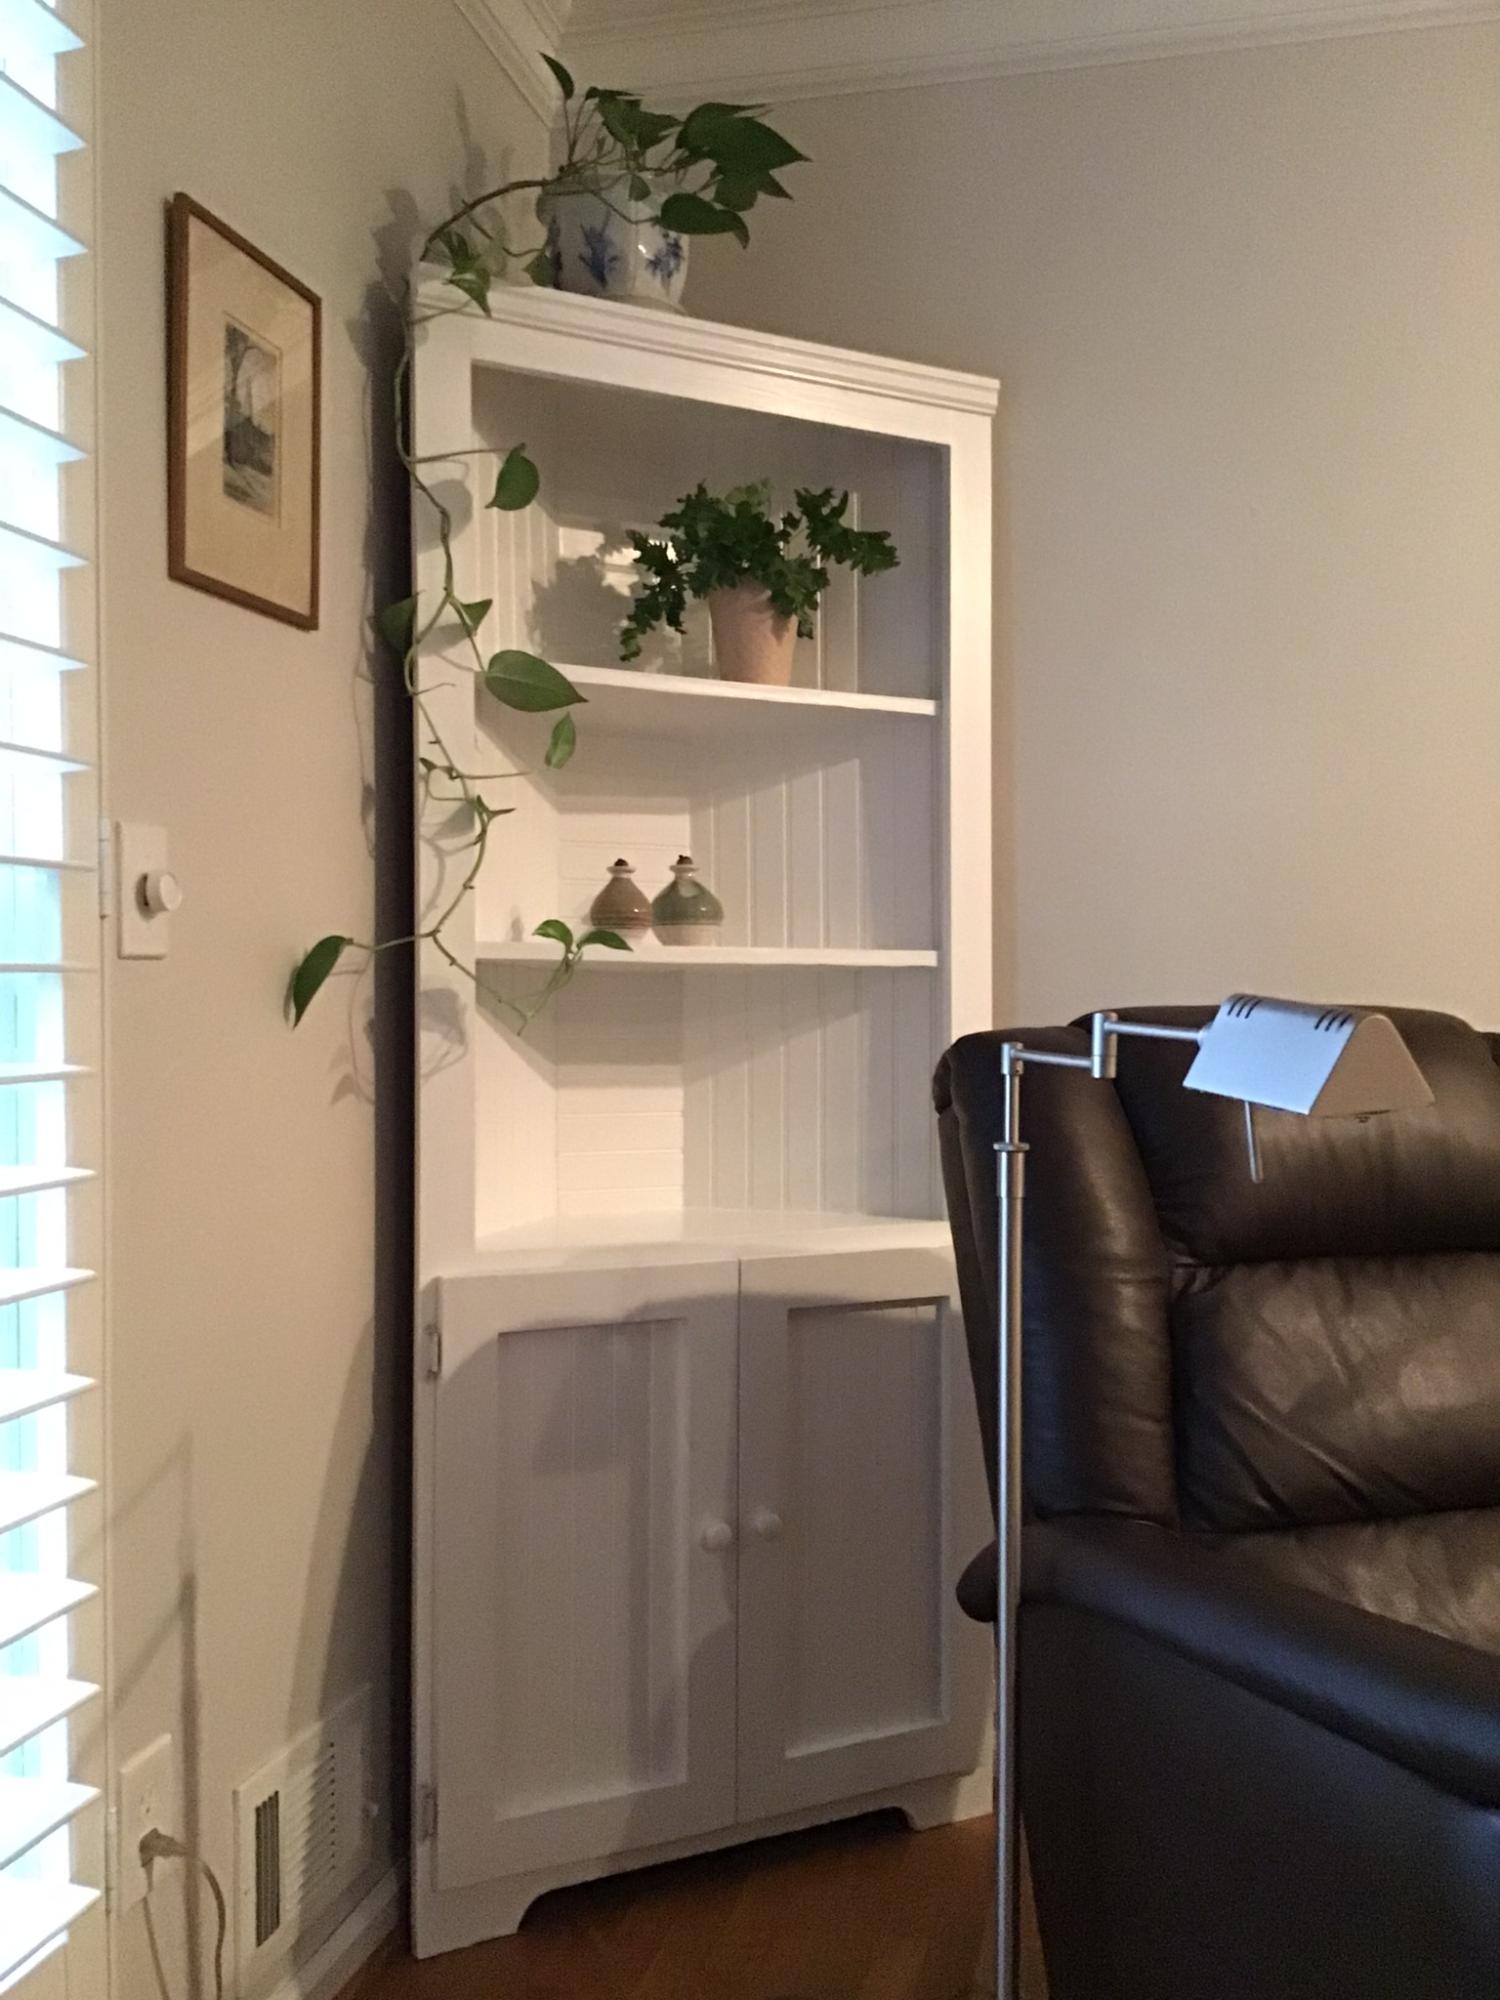
Finally I have made a project that is nice enough for our living room. Now I am so i spired to build more!
Sat, 11/26/2022 - 14:48
Beautiful job on your corner cabinet, thank you so much for sharing!
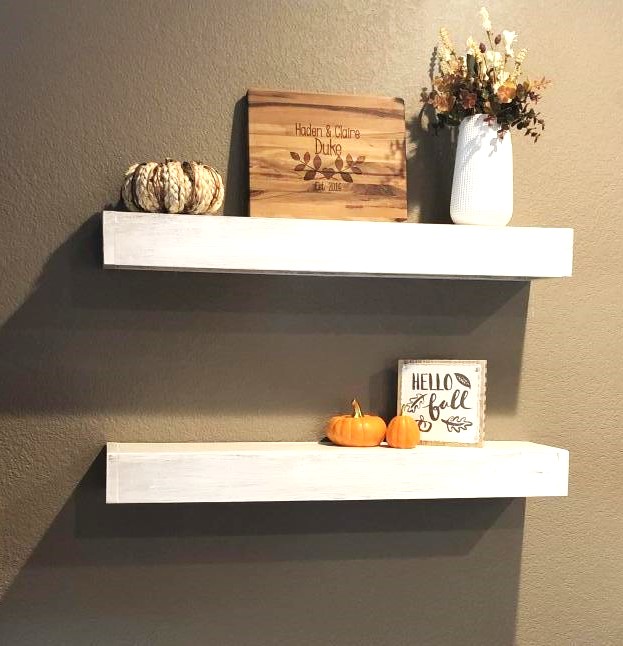
Been loving our Ana White plans!! The table and shelves turned out exactly how we wanted them to & they were SO much cheaper than paying for lesser quality furniture store finds. We’ve received so many compliments!

A friend of mine wanted a new queen bed in a rustic, weather grey look. I have built many projects from Ana's site and decided on the Farmhouse Bed. The plans were perfect and building the bed didn't take me long. The time consuming part was the finish. I really wanted an old, weather wood look so the entire bed and night tables were first stained with a dark Kona stain. Once this dried I applied two coats of a watered down (50:50) light grey paint. The thinner paint made it easier to sand. Once this was completely dry I used a medium grit sanding sponge and selectively sanded everything. This took a while. Once complete I carefully cleaned all pieces and then applied three coat of semi-gloss varathane. The bed is incredibly solid with the 2 x 4 slats and will last a few generations. As always great plans from Ana.


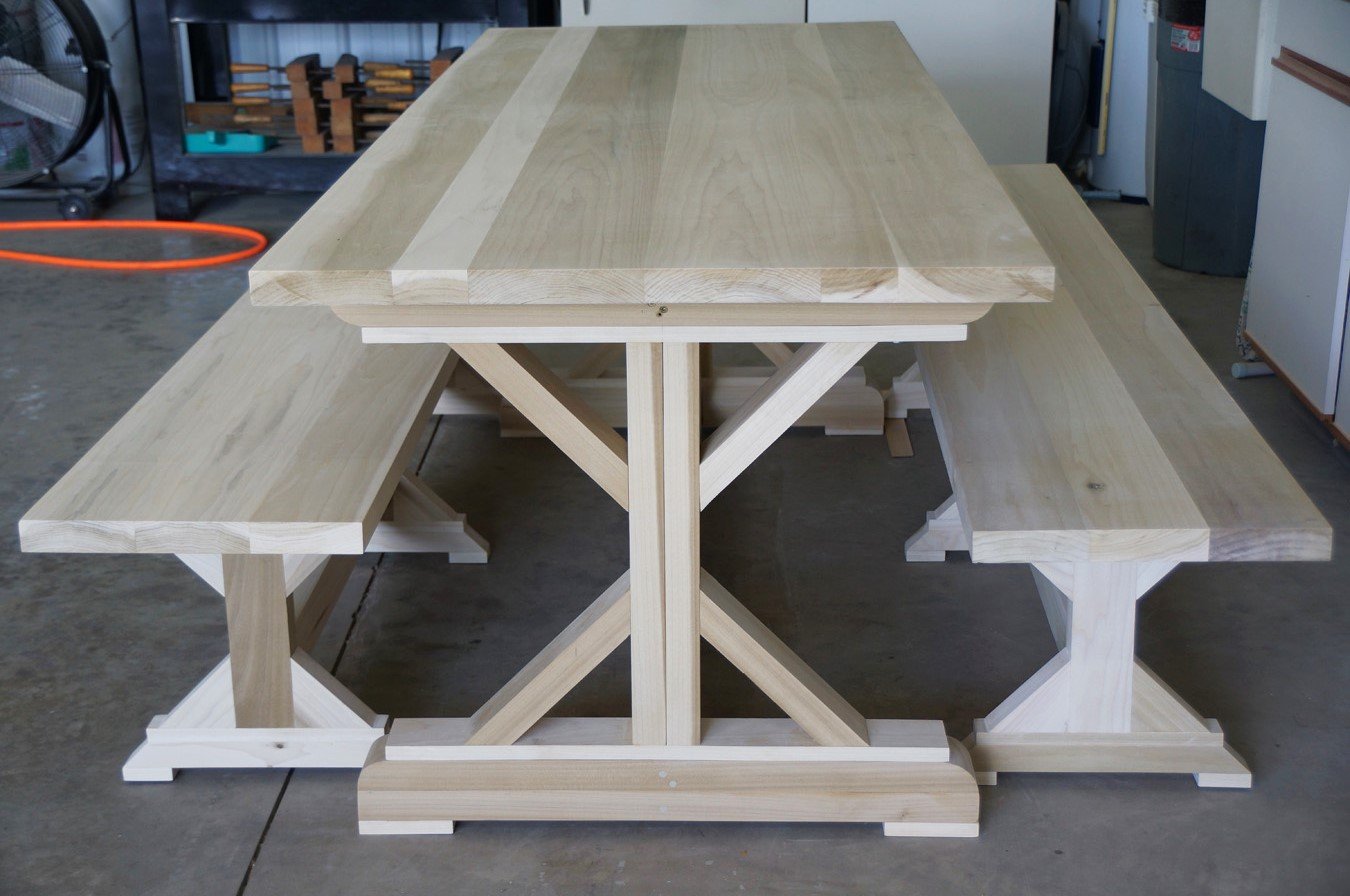
Farm Table 2 benches. Wood is Poplar
David Bellamy 89

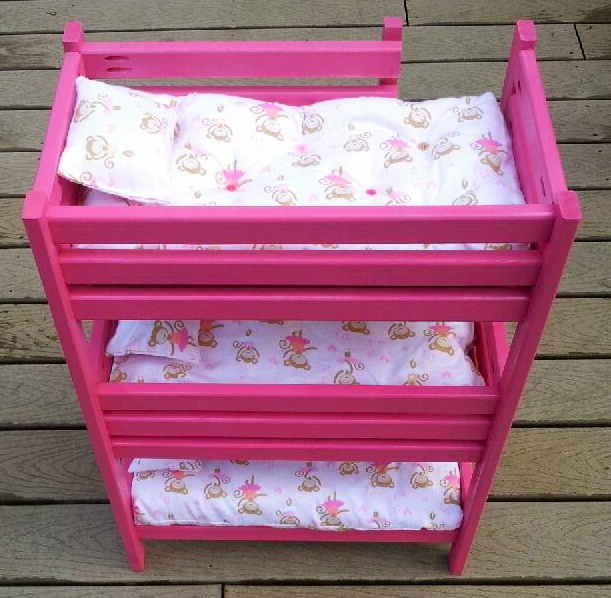
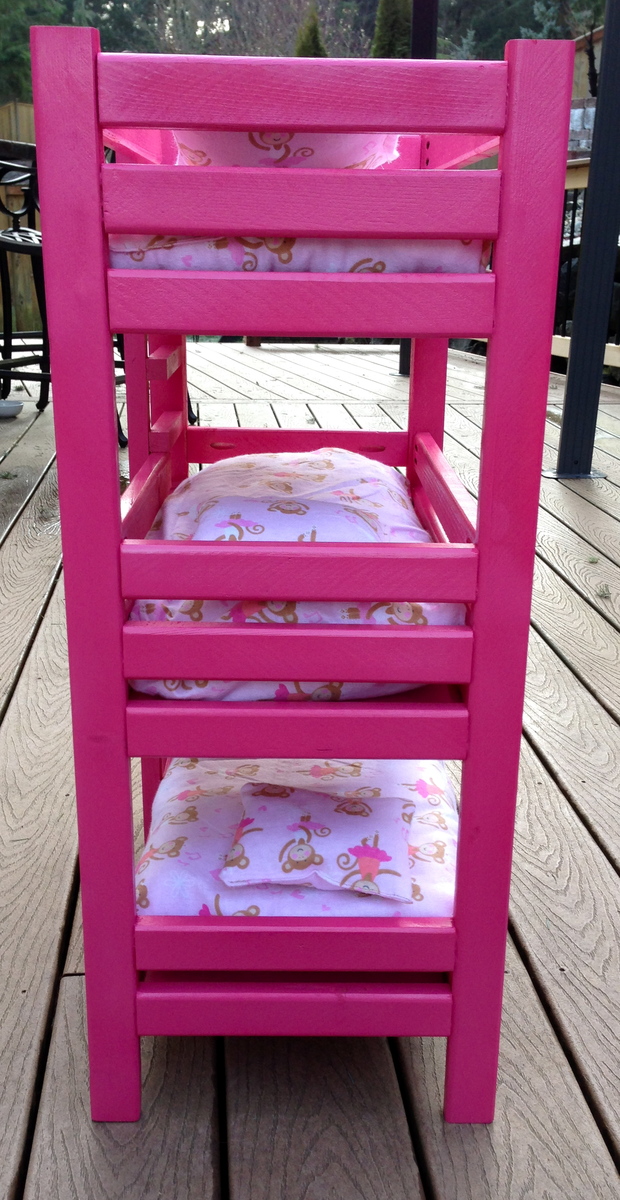
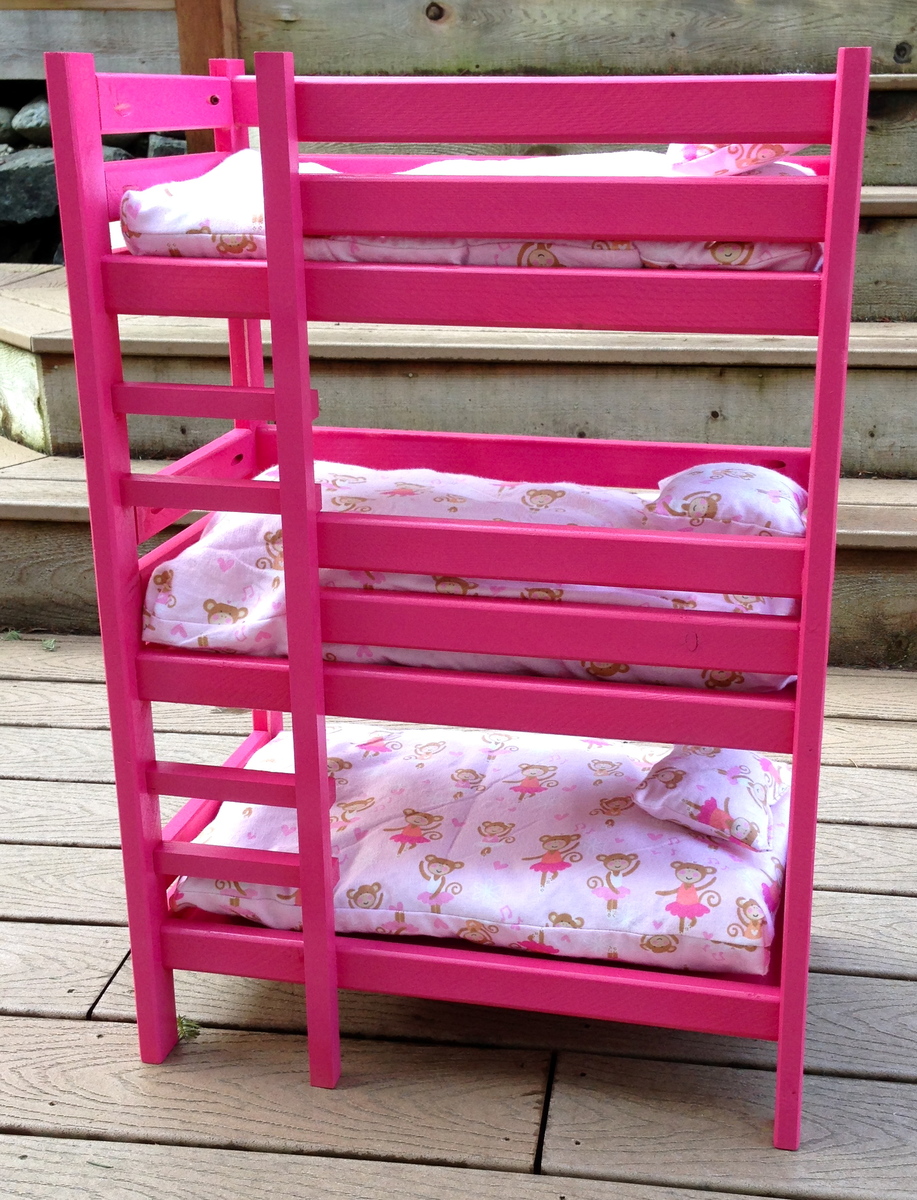
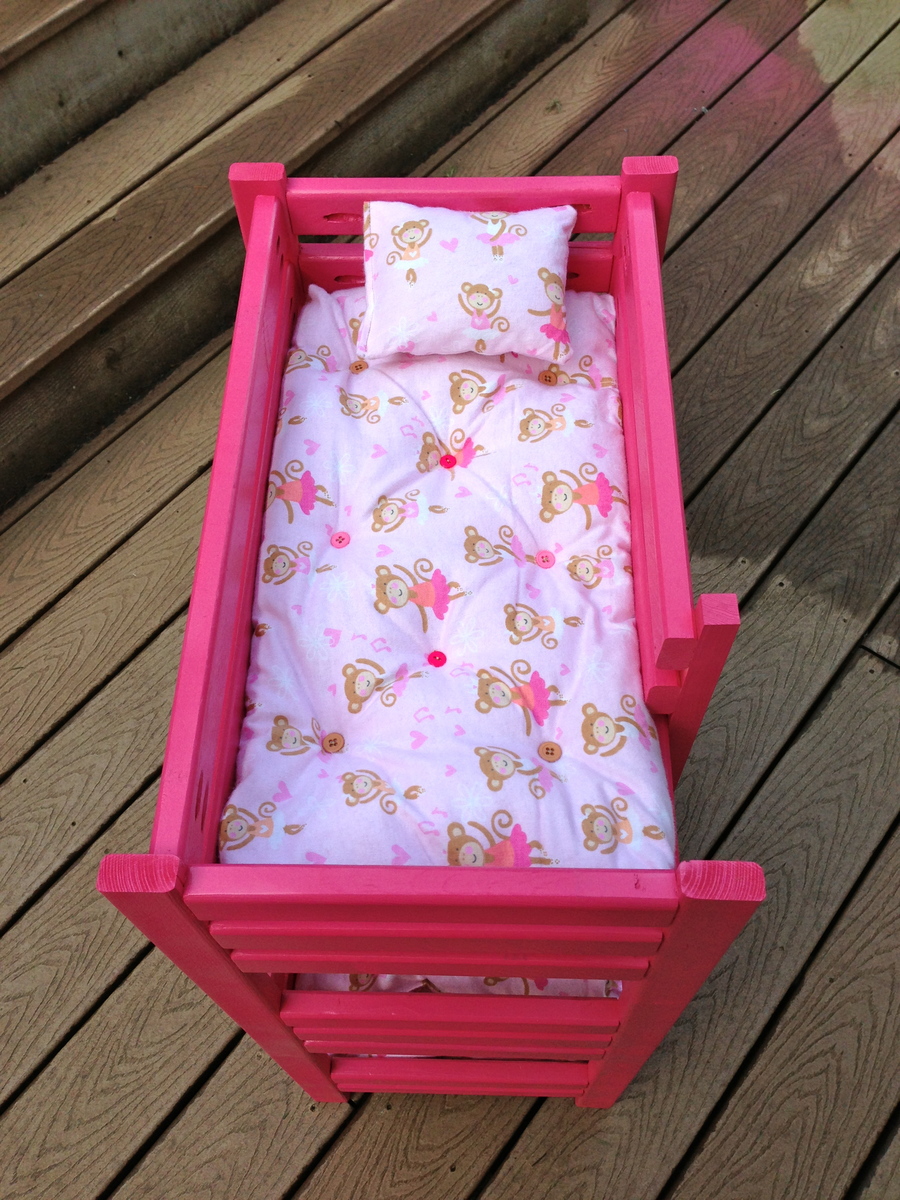
My friend's 7 year old daughter custom ordered this bunk bed! She asked for a bunk bed for her 3 dolls and she even picked the color! I had a lot of fun building it and learned a lot in the process. As usual, finishing took longest. Lucky for me, my hubby likes spray painting :-)

Wed, 02/17/2016 - 17:41
Can you please post the plans for this bunk bed. I want to make it for my daughter to play with her dolls with.
Thank you
Brett
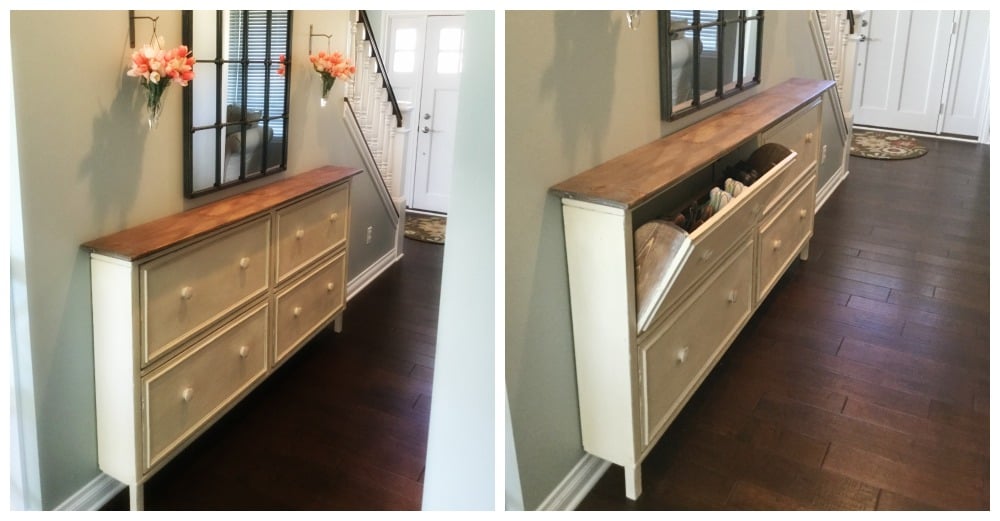
We used the shoe dresser instructions with some modifications to make it longer

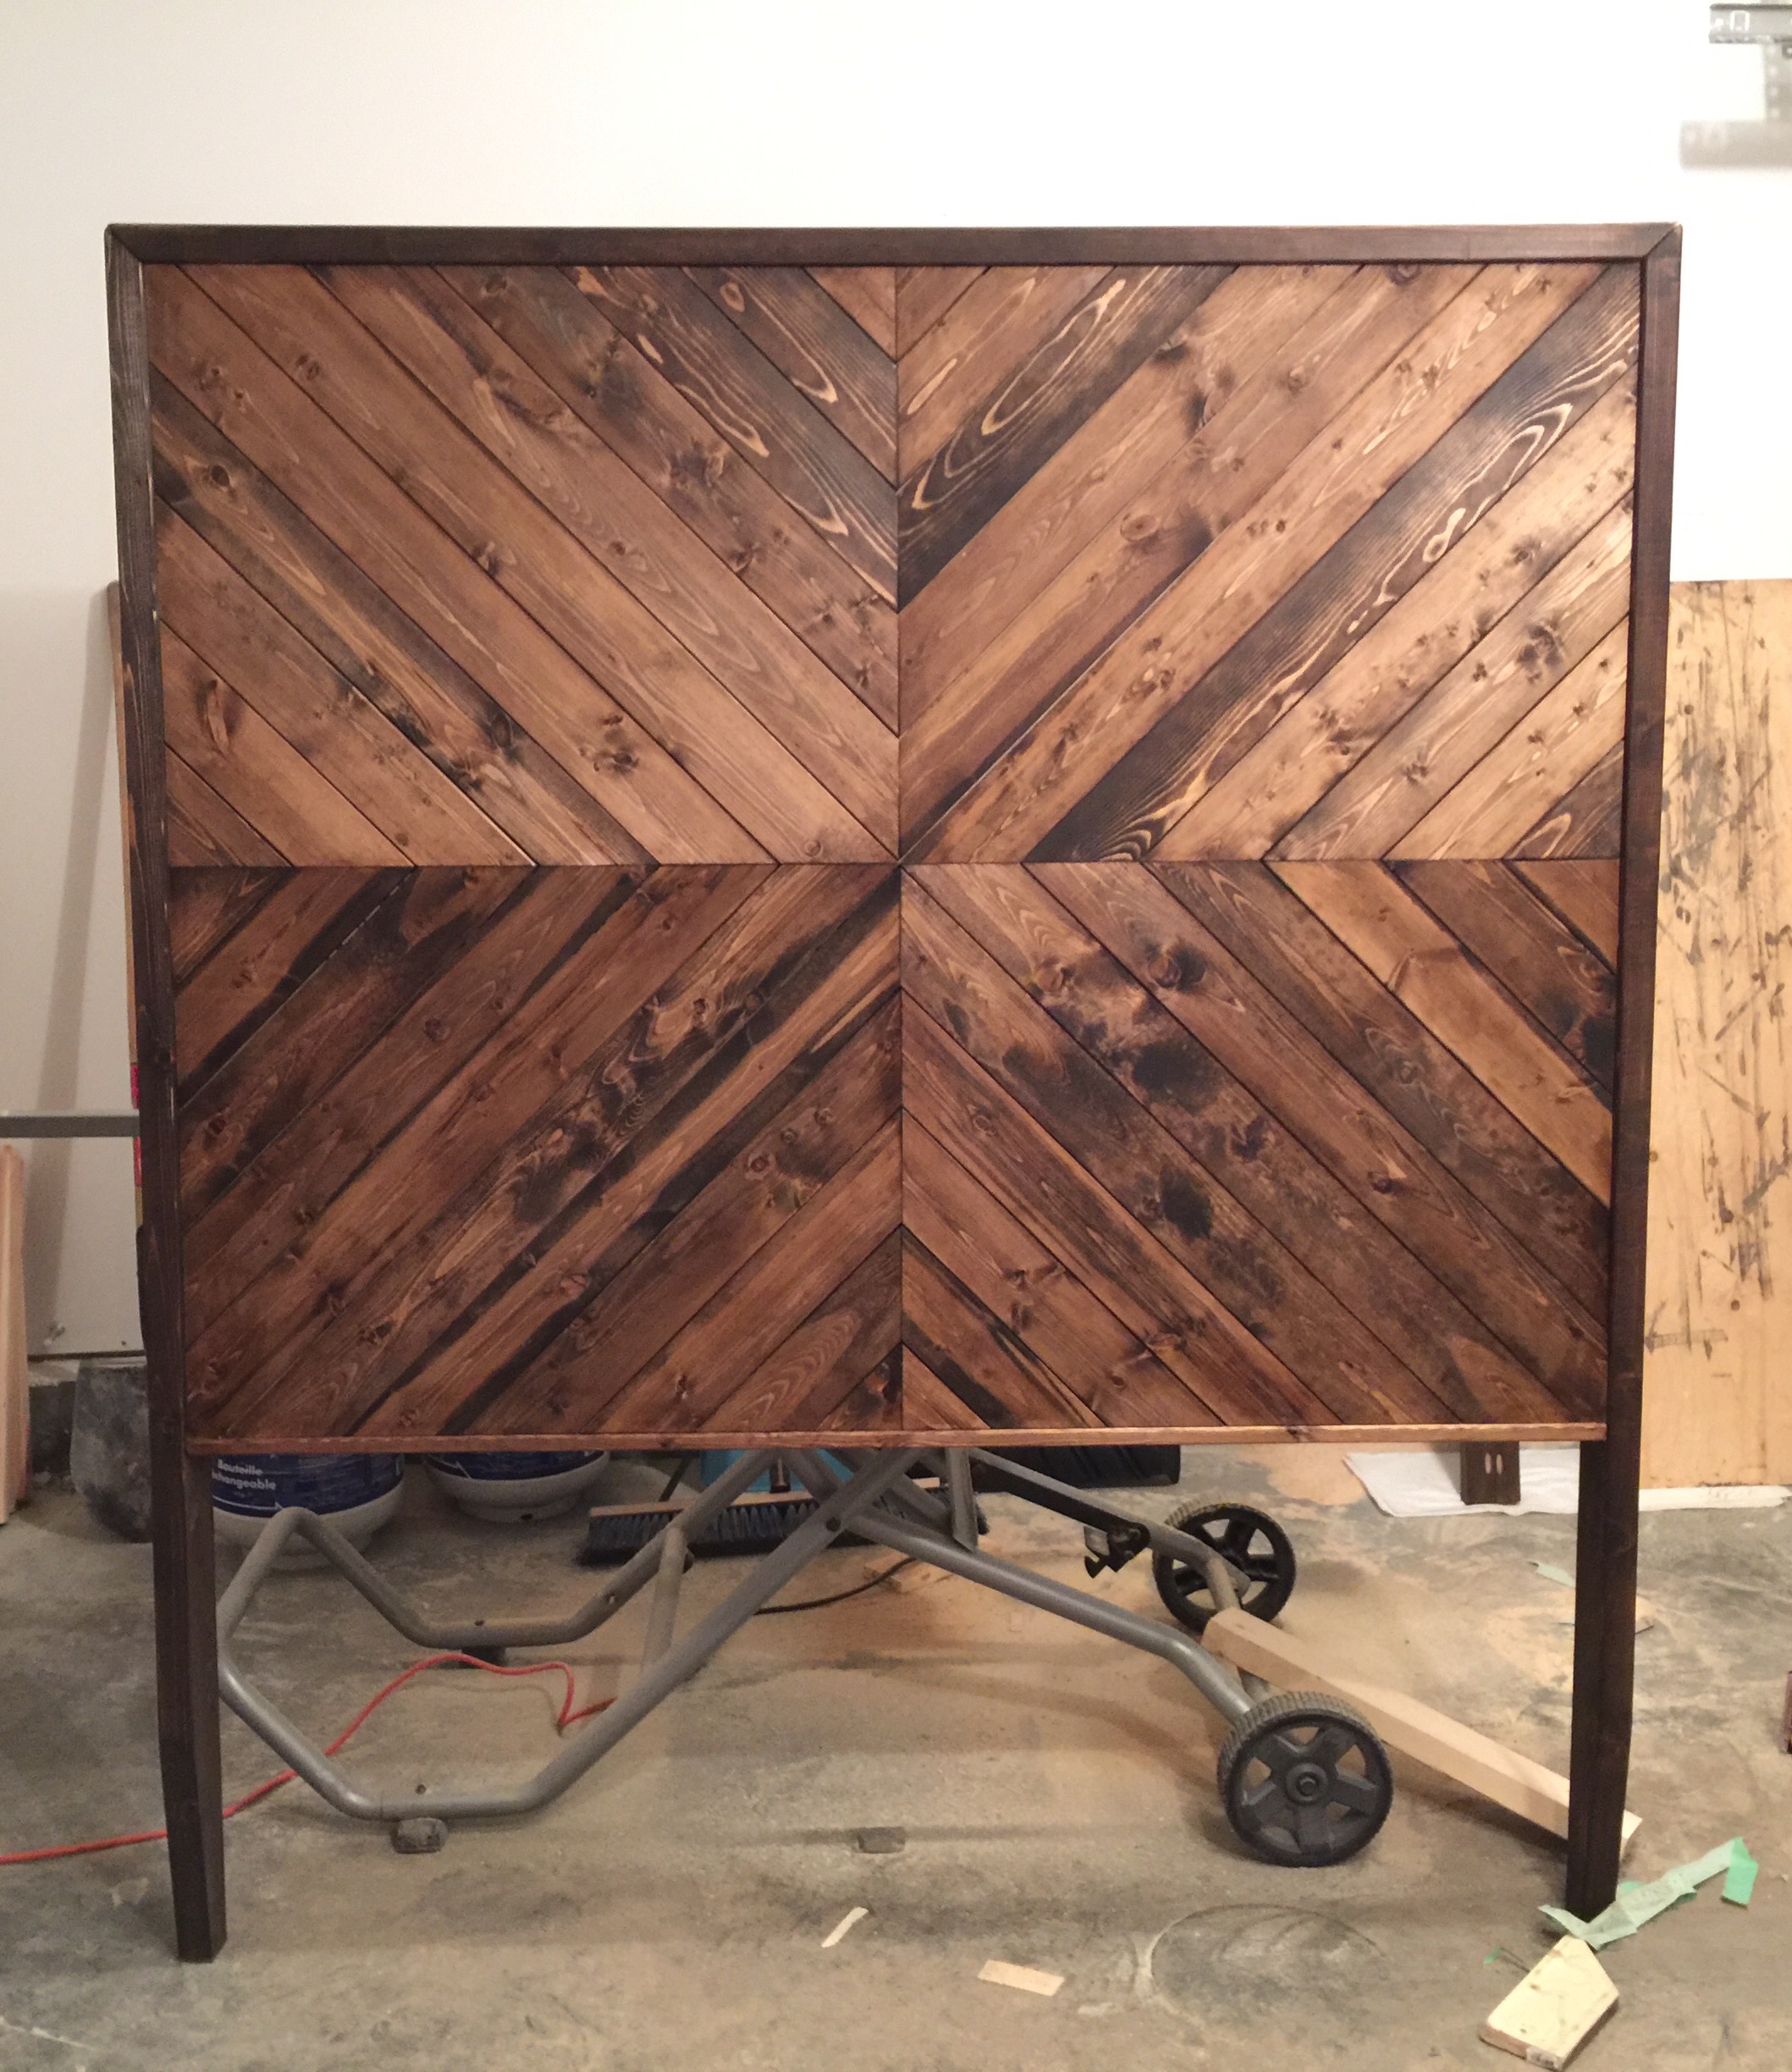
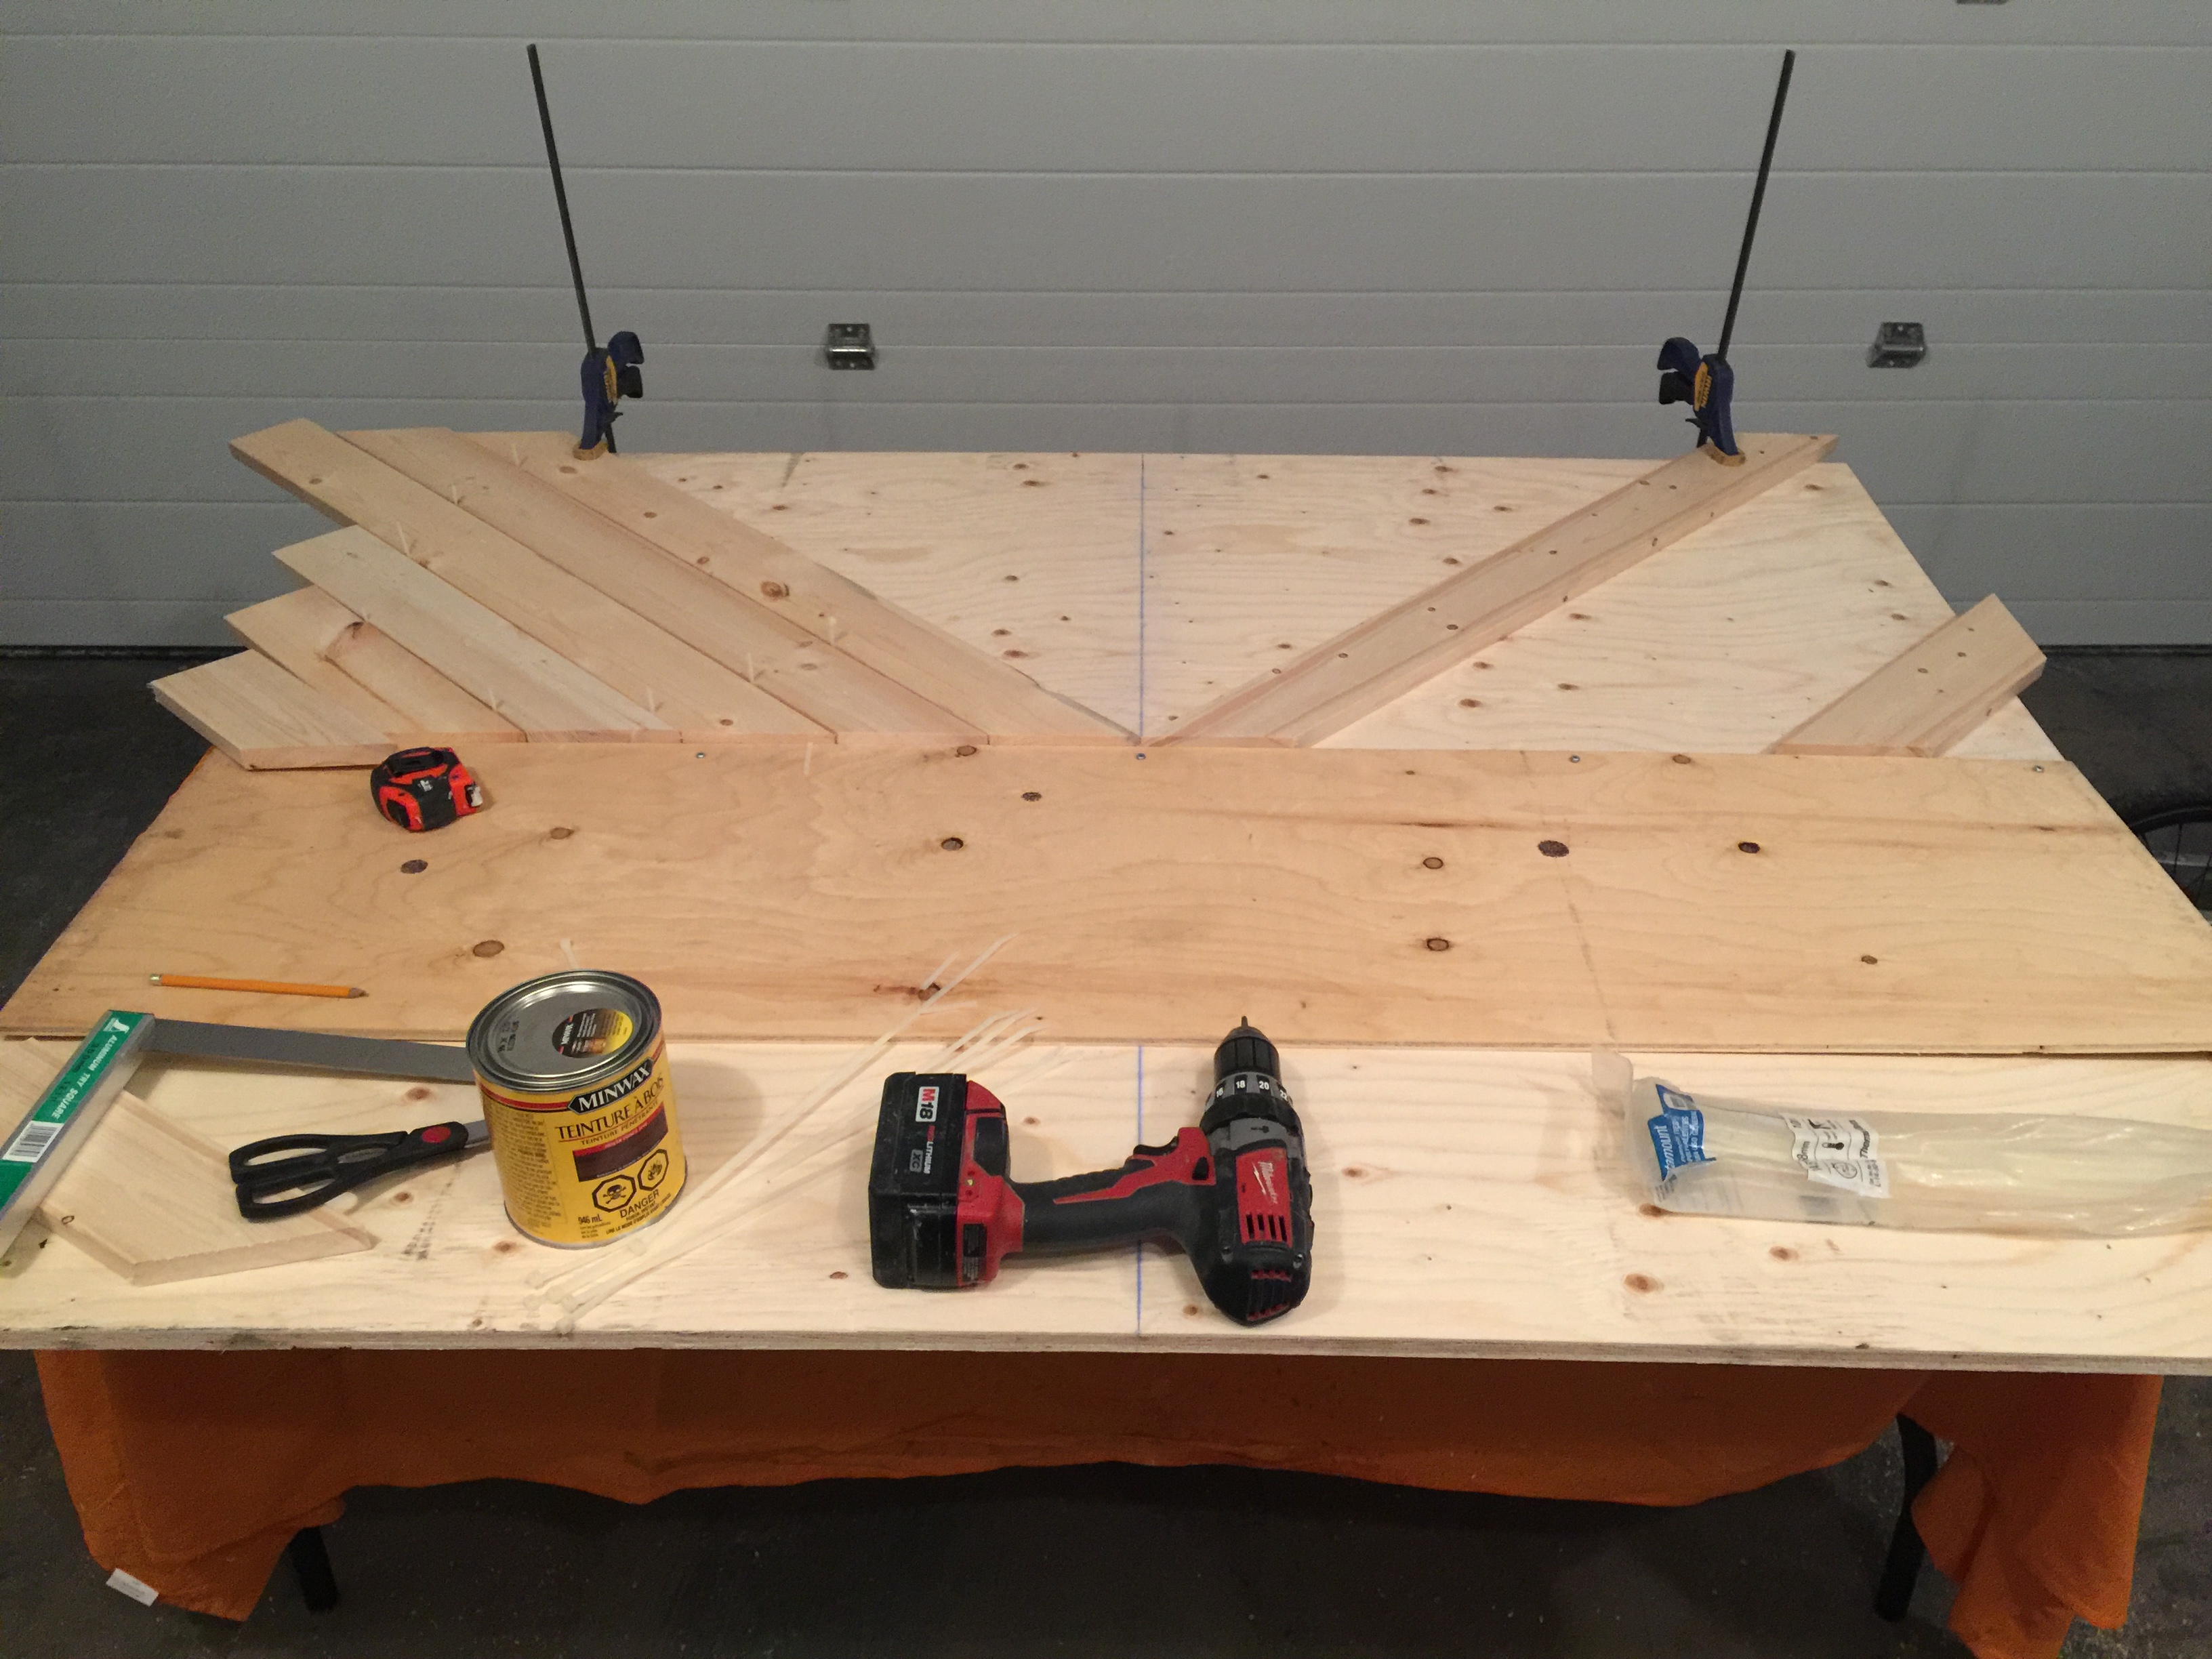
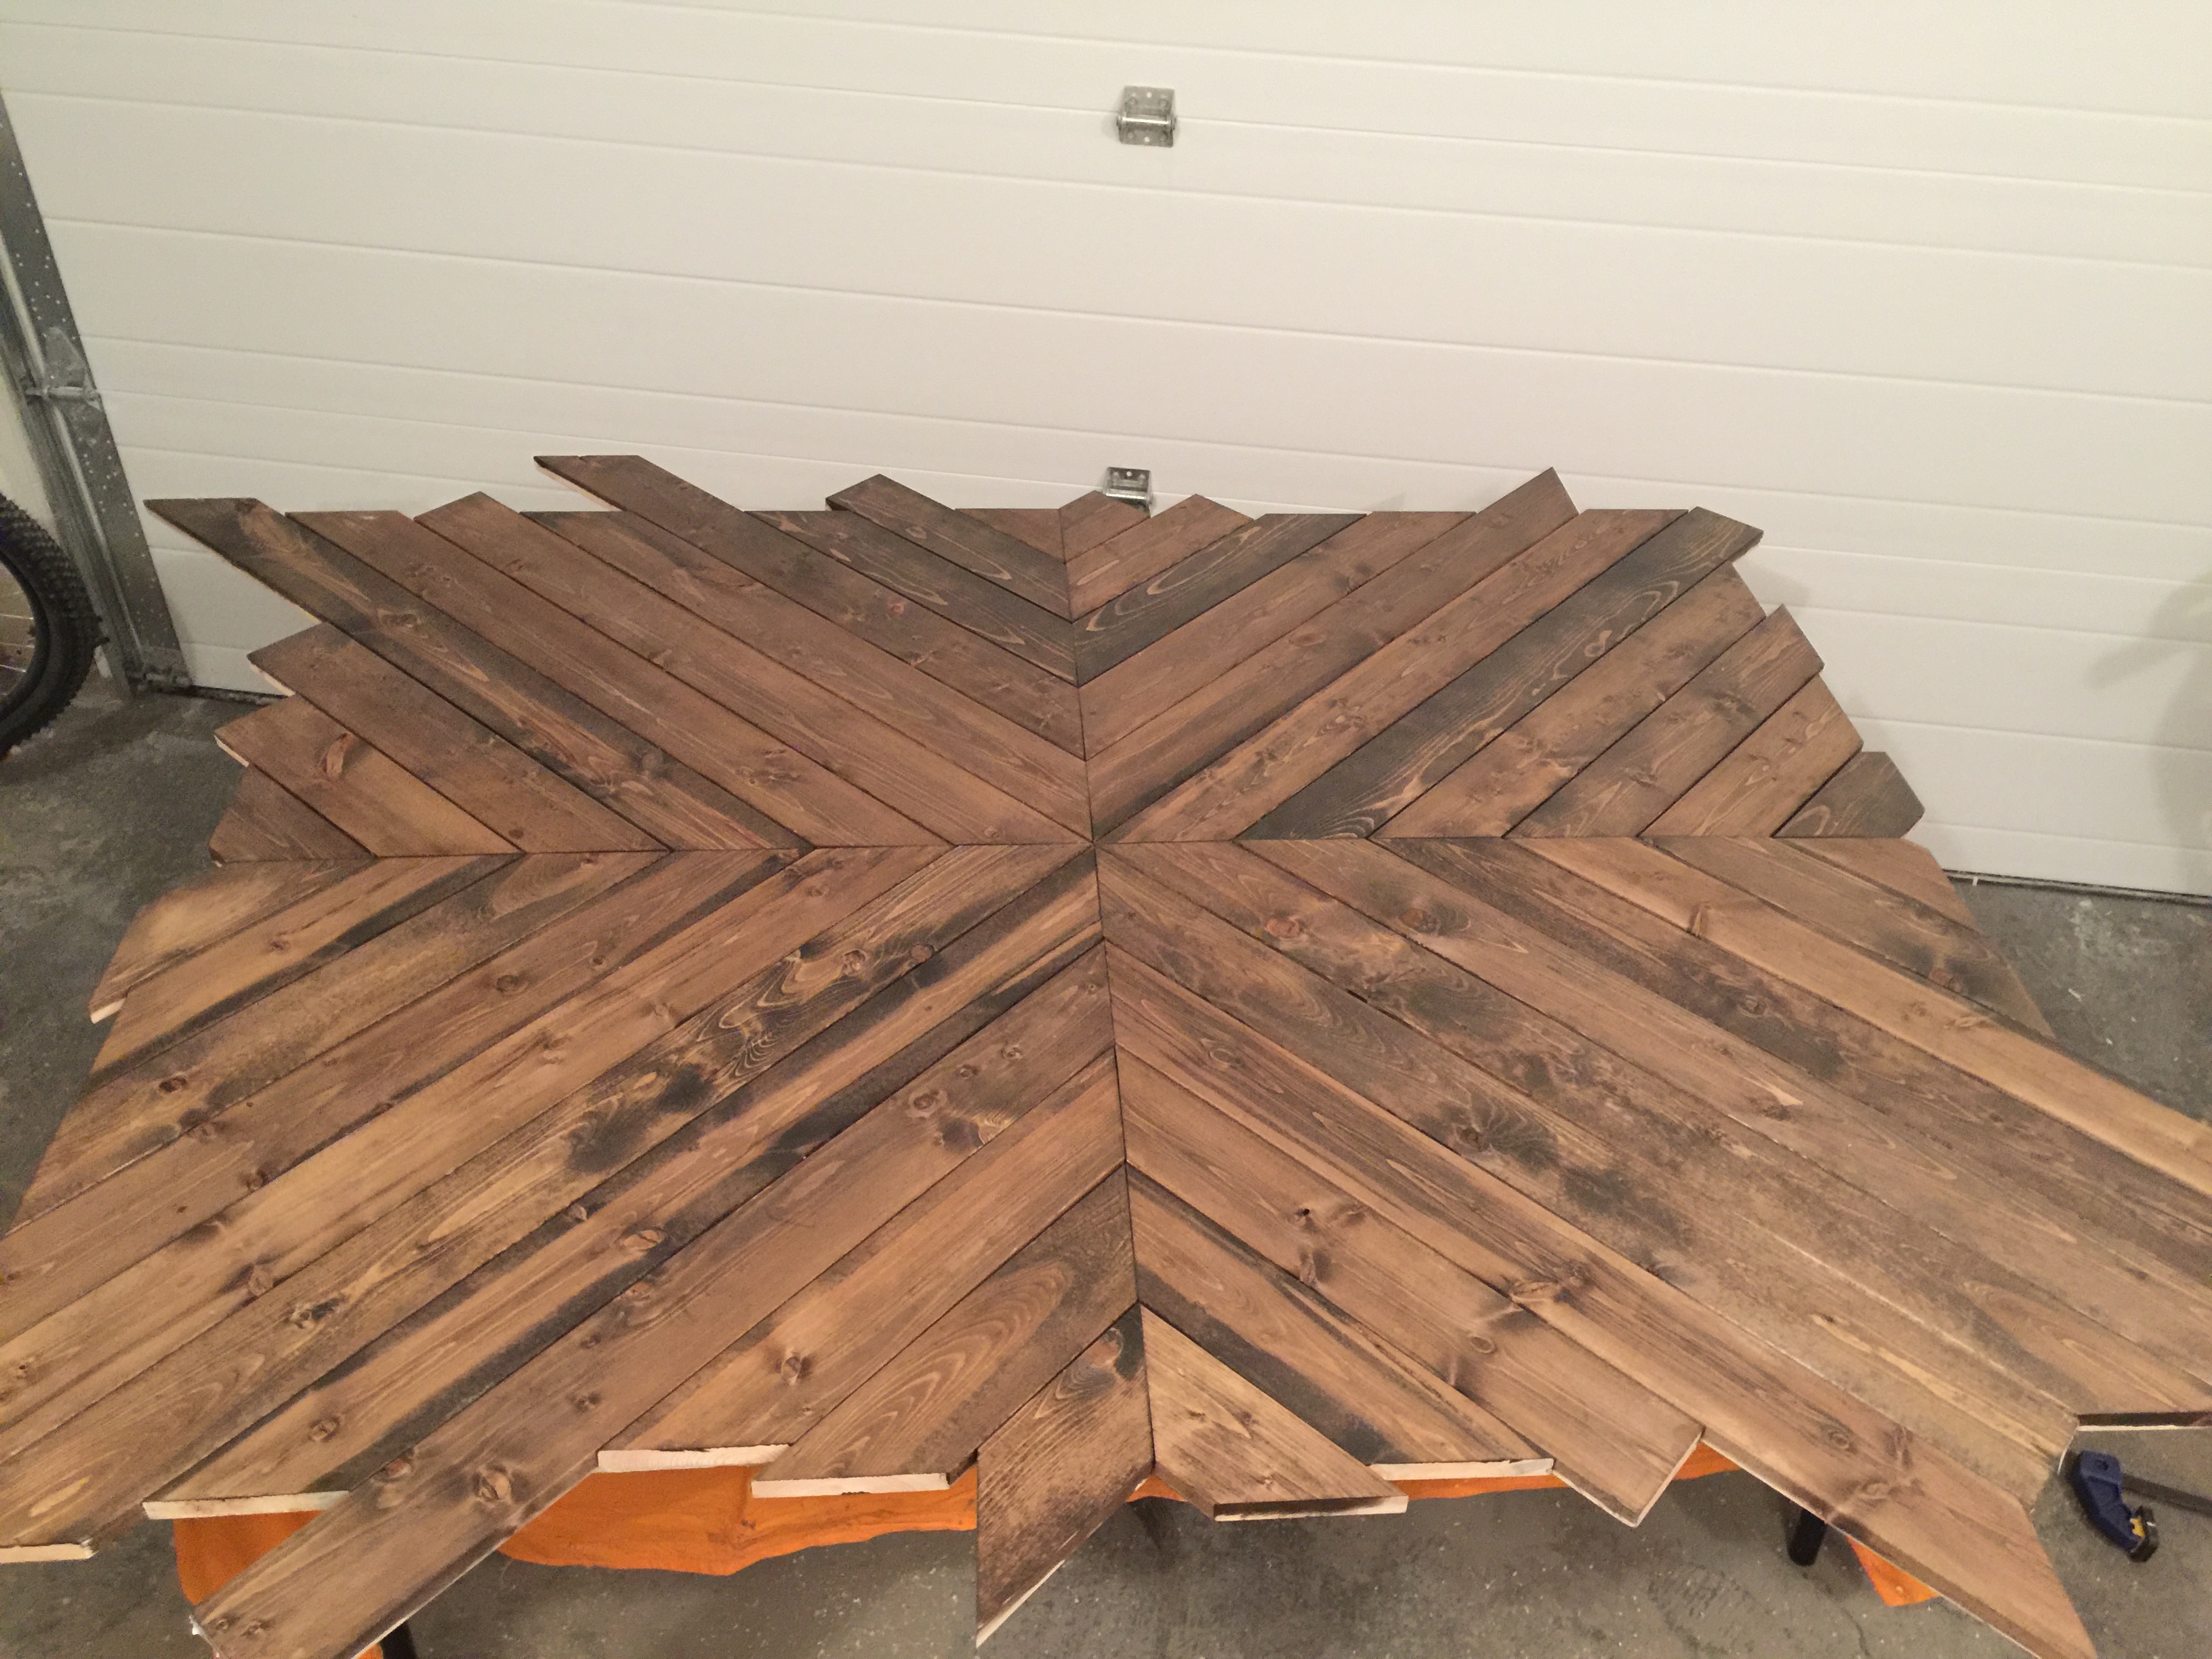
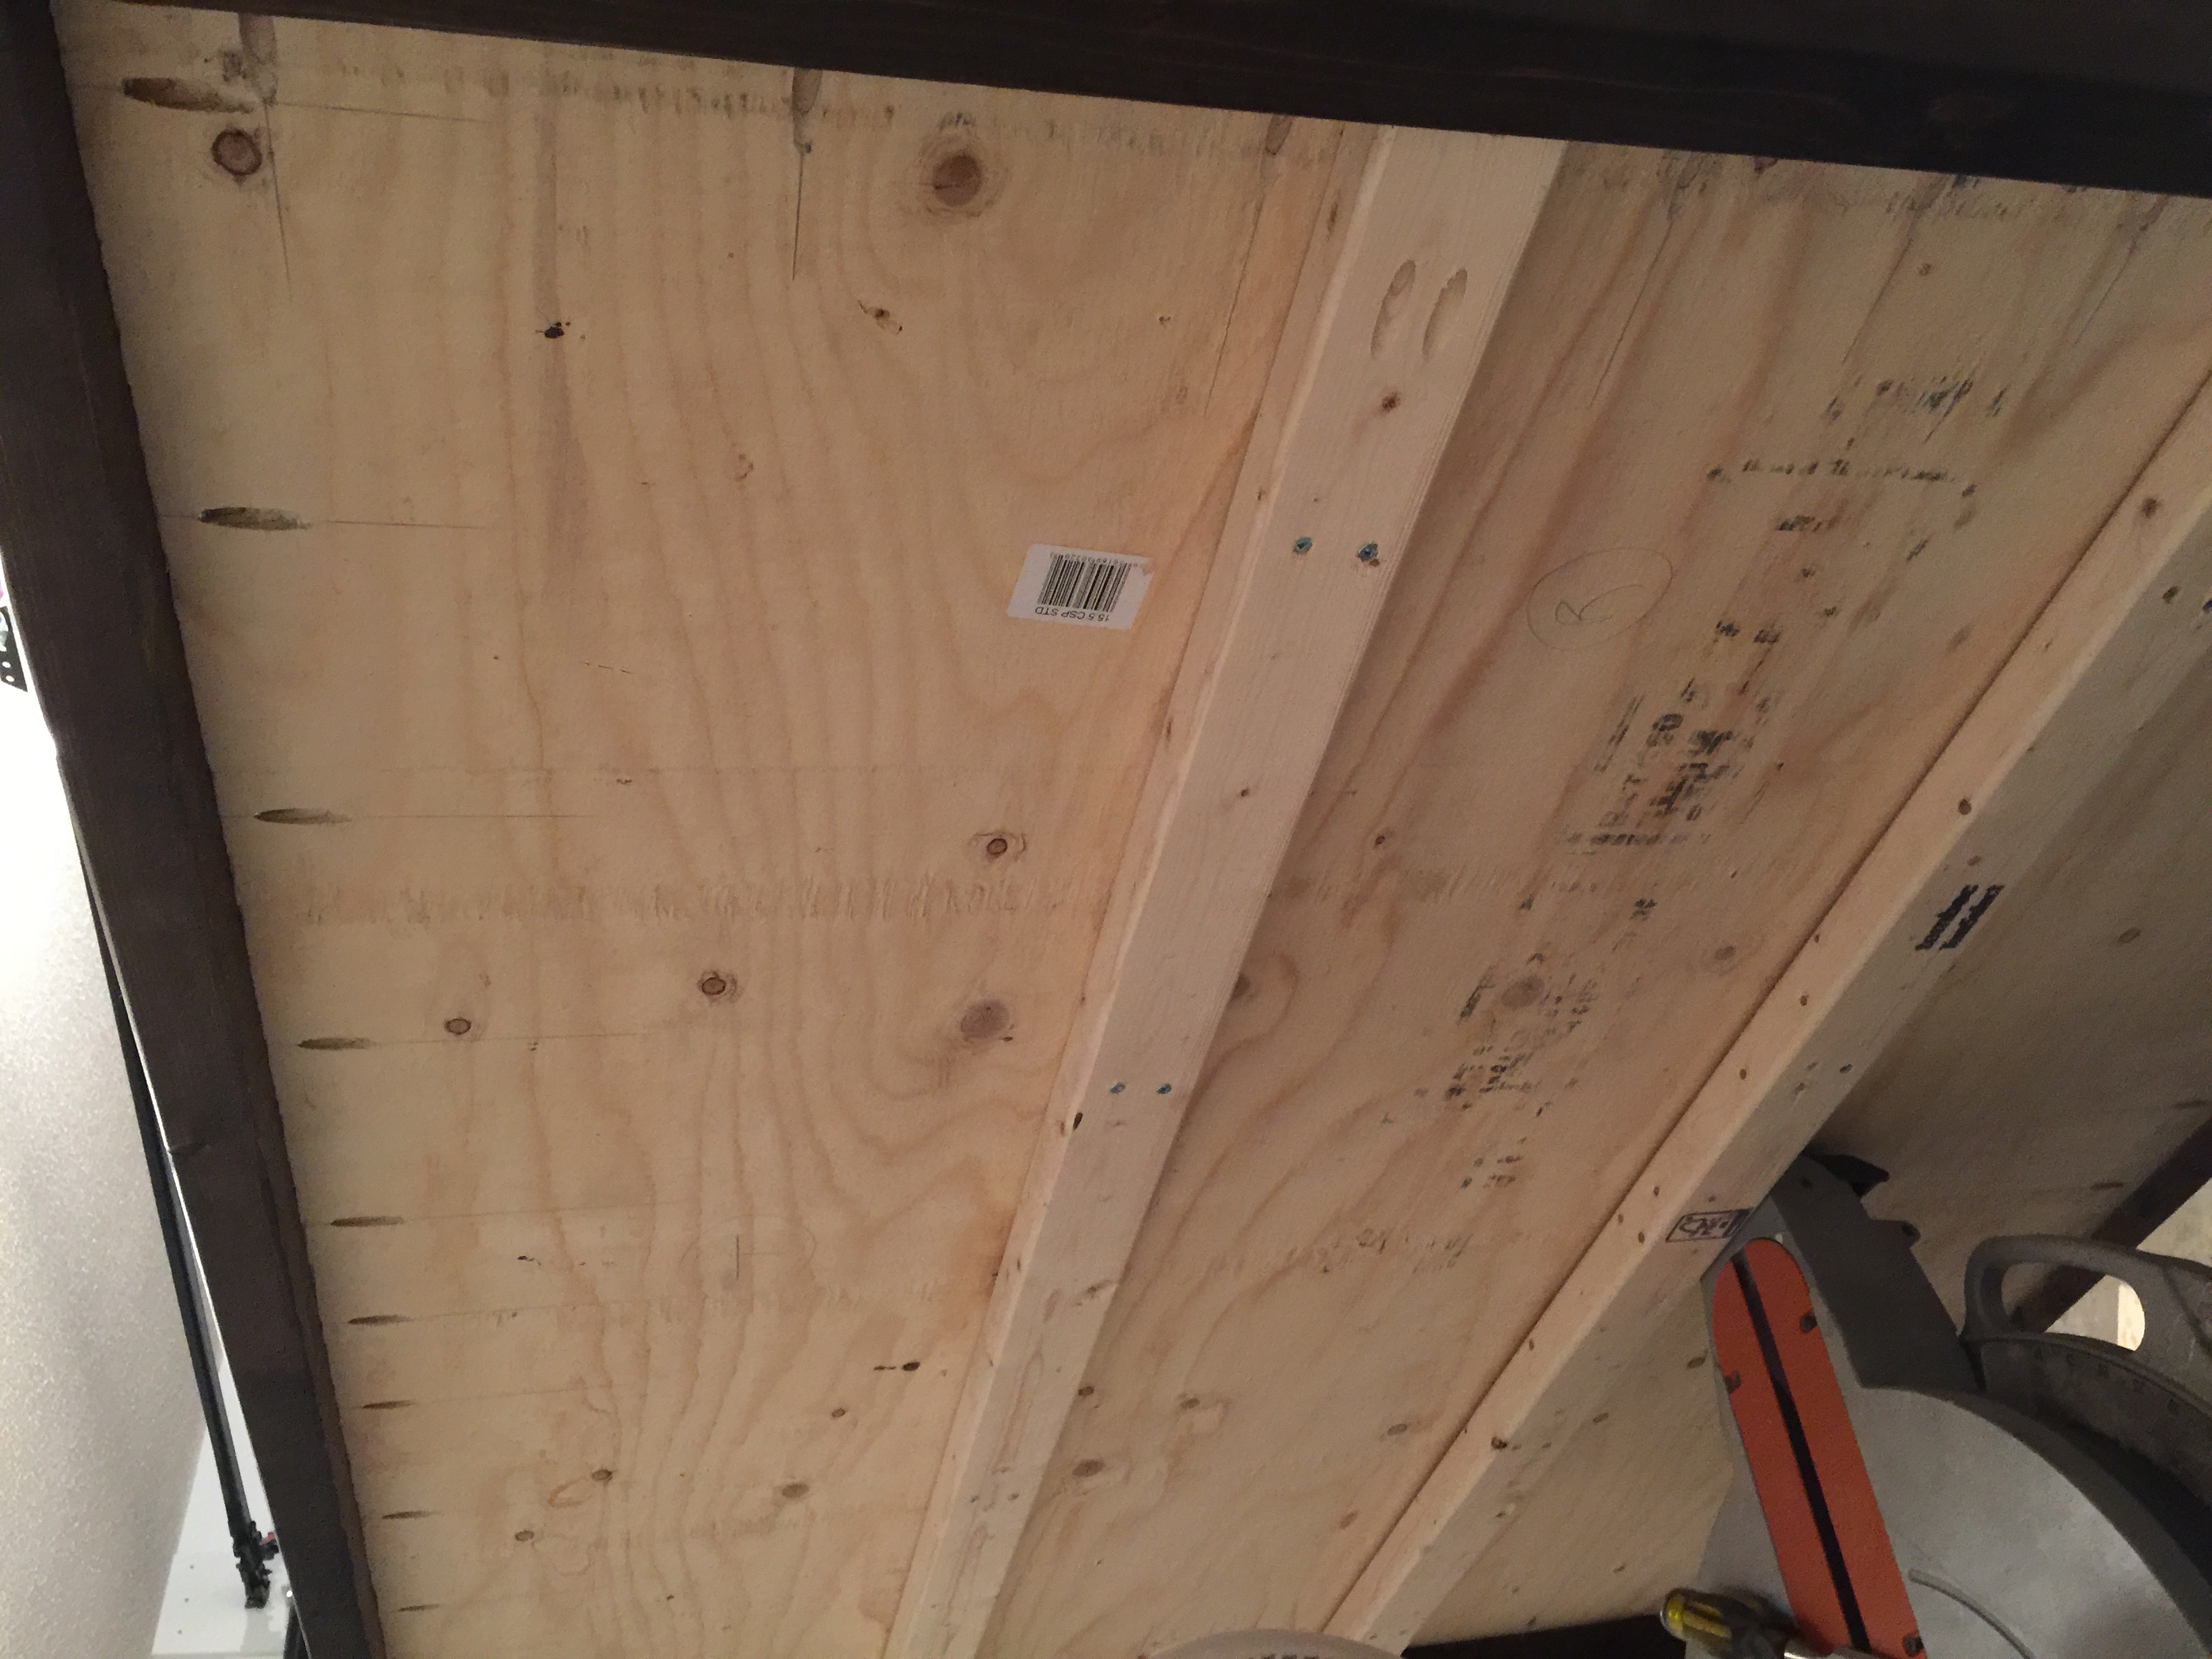
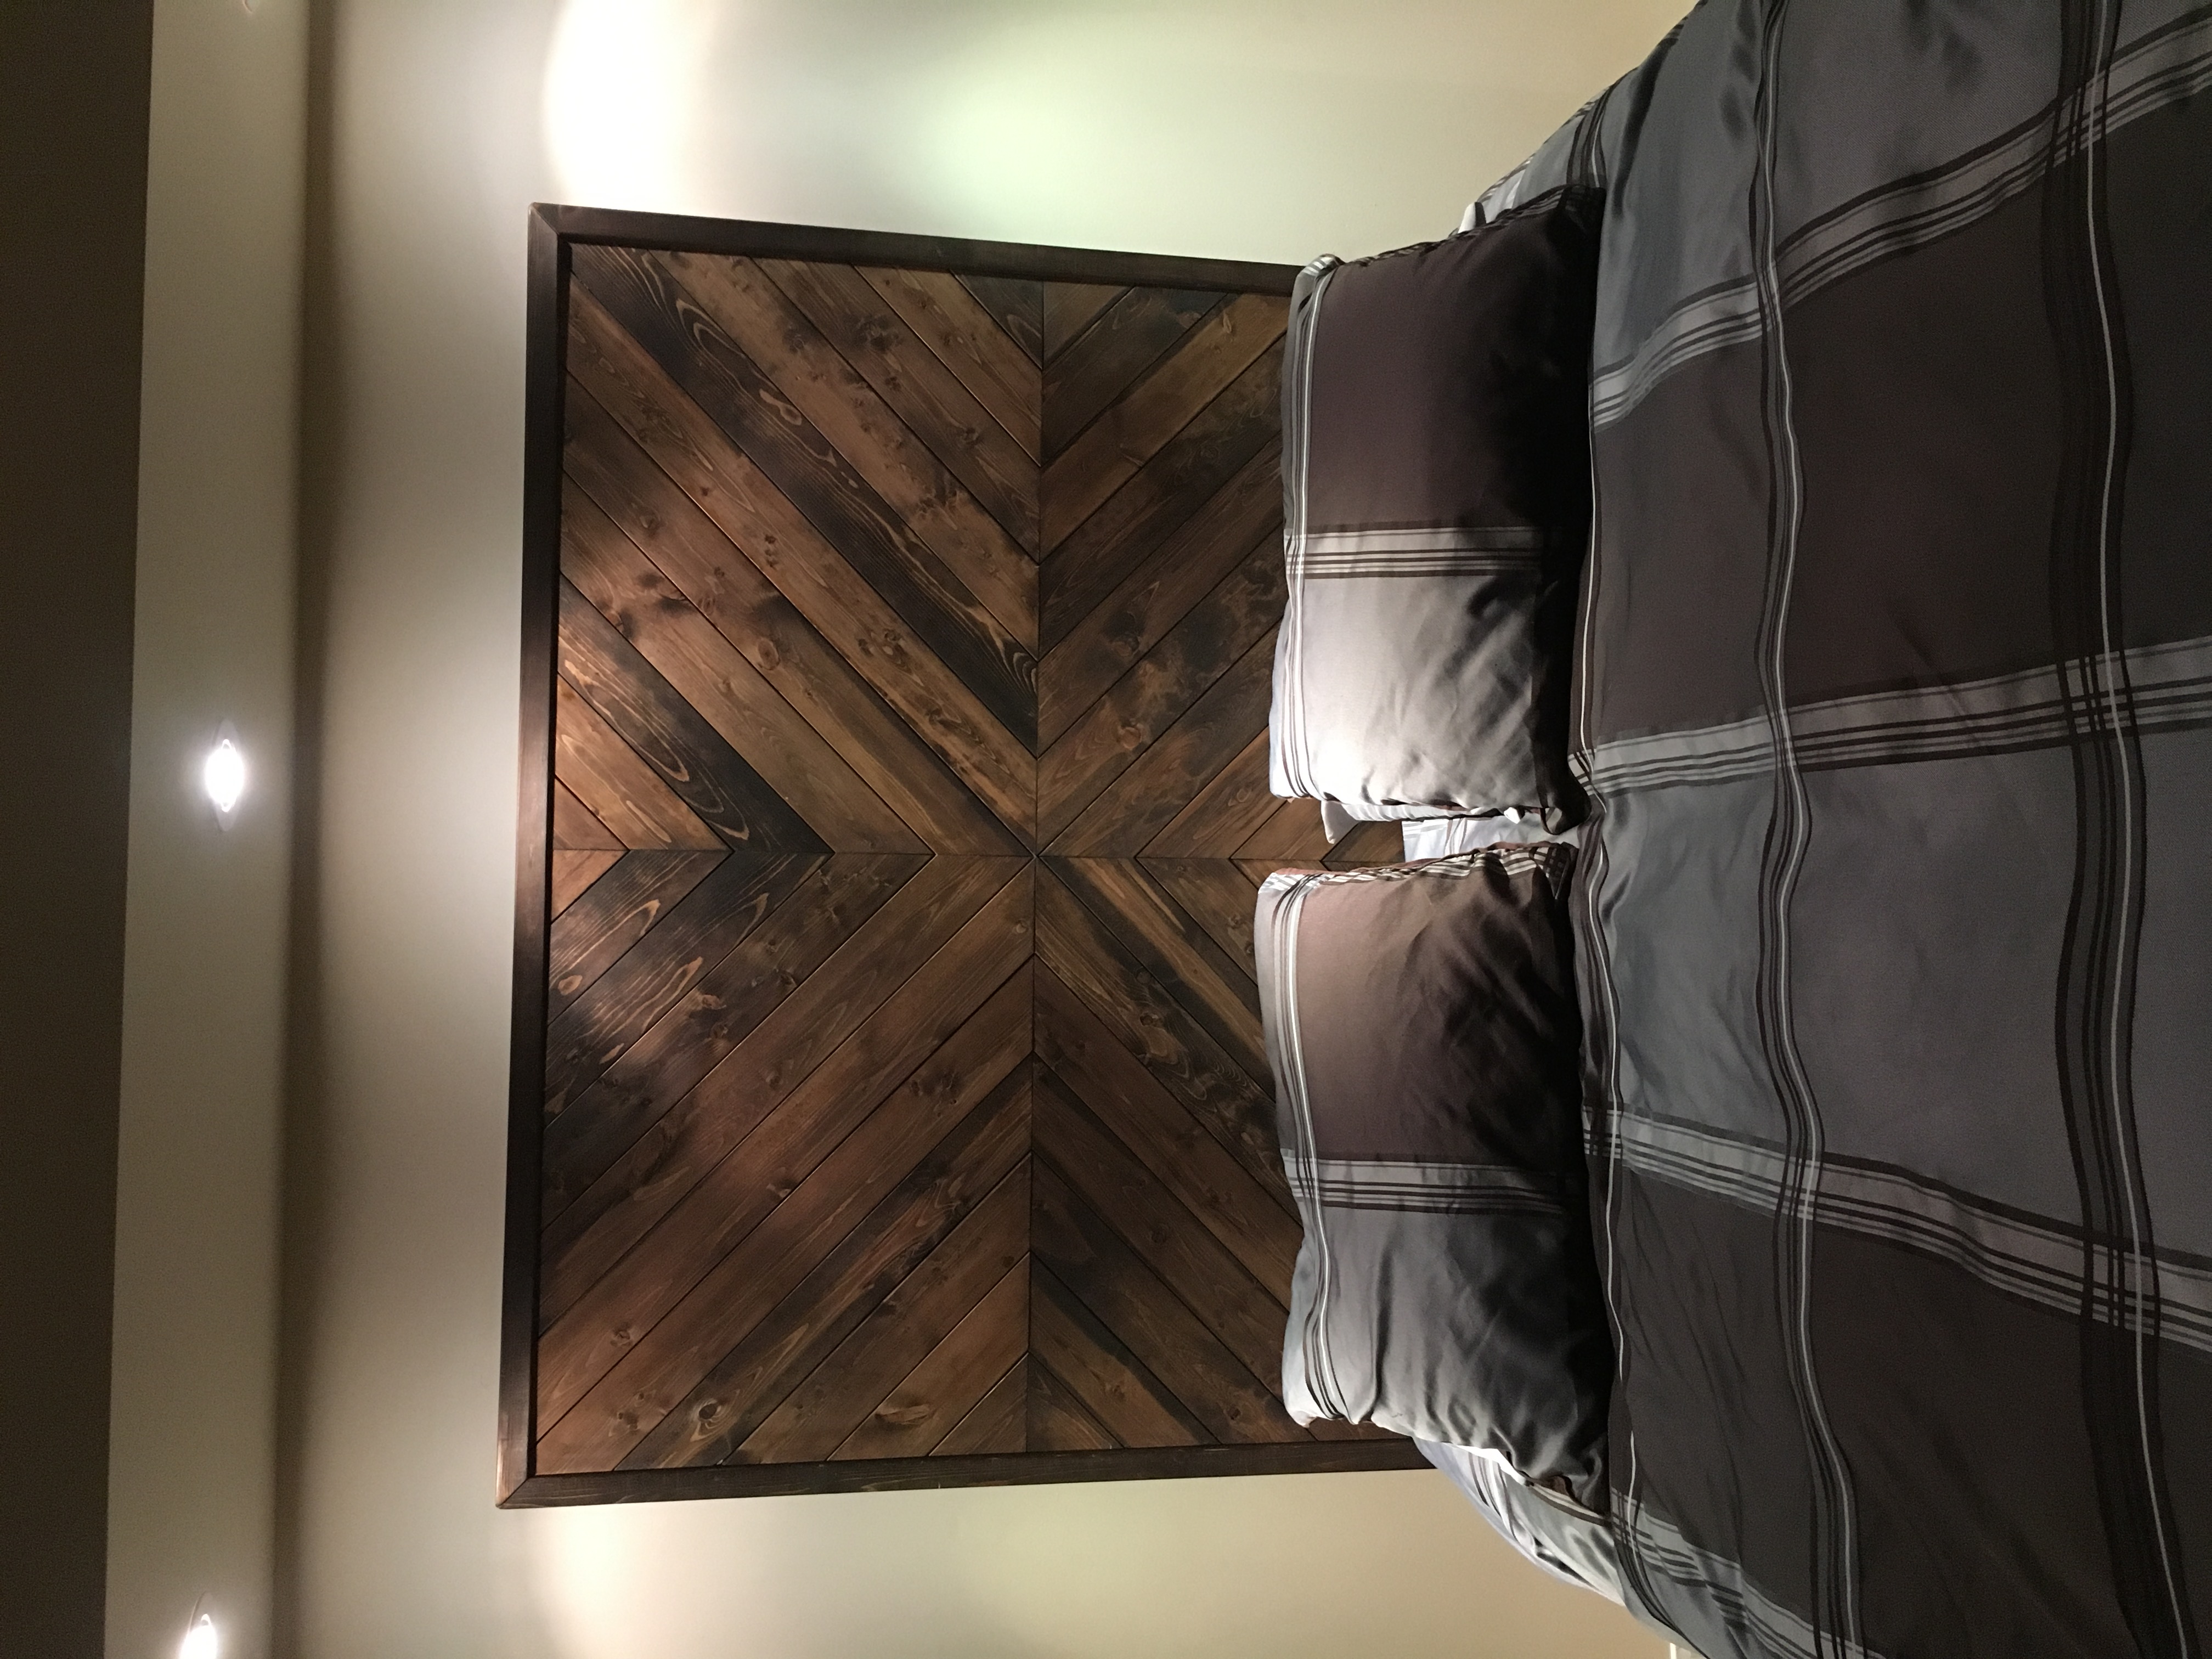
A friend asked me to make a headboard for him as he couldn't find anything online or in store that he really liked.
I was up for the challenge and always love working with wood to make new and exciting things so, challenge accepted.
This was my first attempt at a headboard and I think it turned out pretty nice.
Knotty pine face with a cedar frame.
Looking forward to my next project!
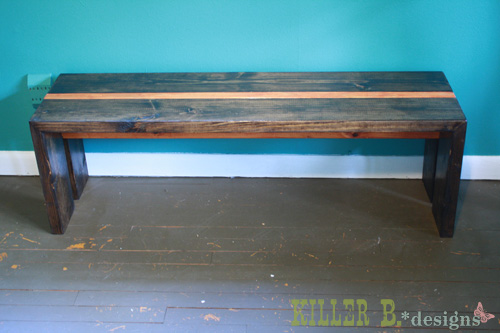
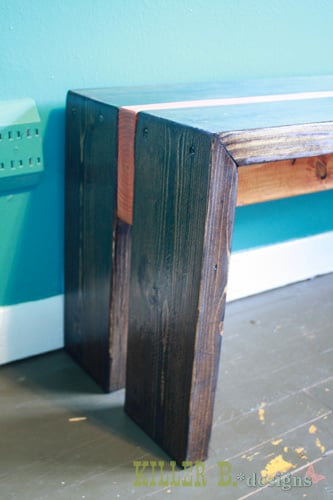
After seeing benches like these on a wedding blog, I really wanted to build my own. It was a super easy project, and really cheap! Here's what you need:
• 2 – 2x6x8′ boards. They cost about $3 each at Home Depot.
• Screws, sandpaper and stain.
Cut List:
3 – 2×6 @ 47″
4 – 2×6 @ 16″
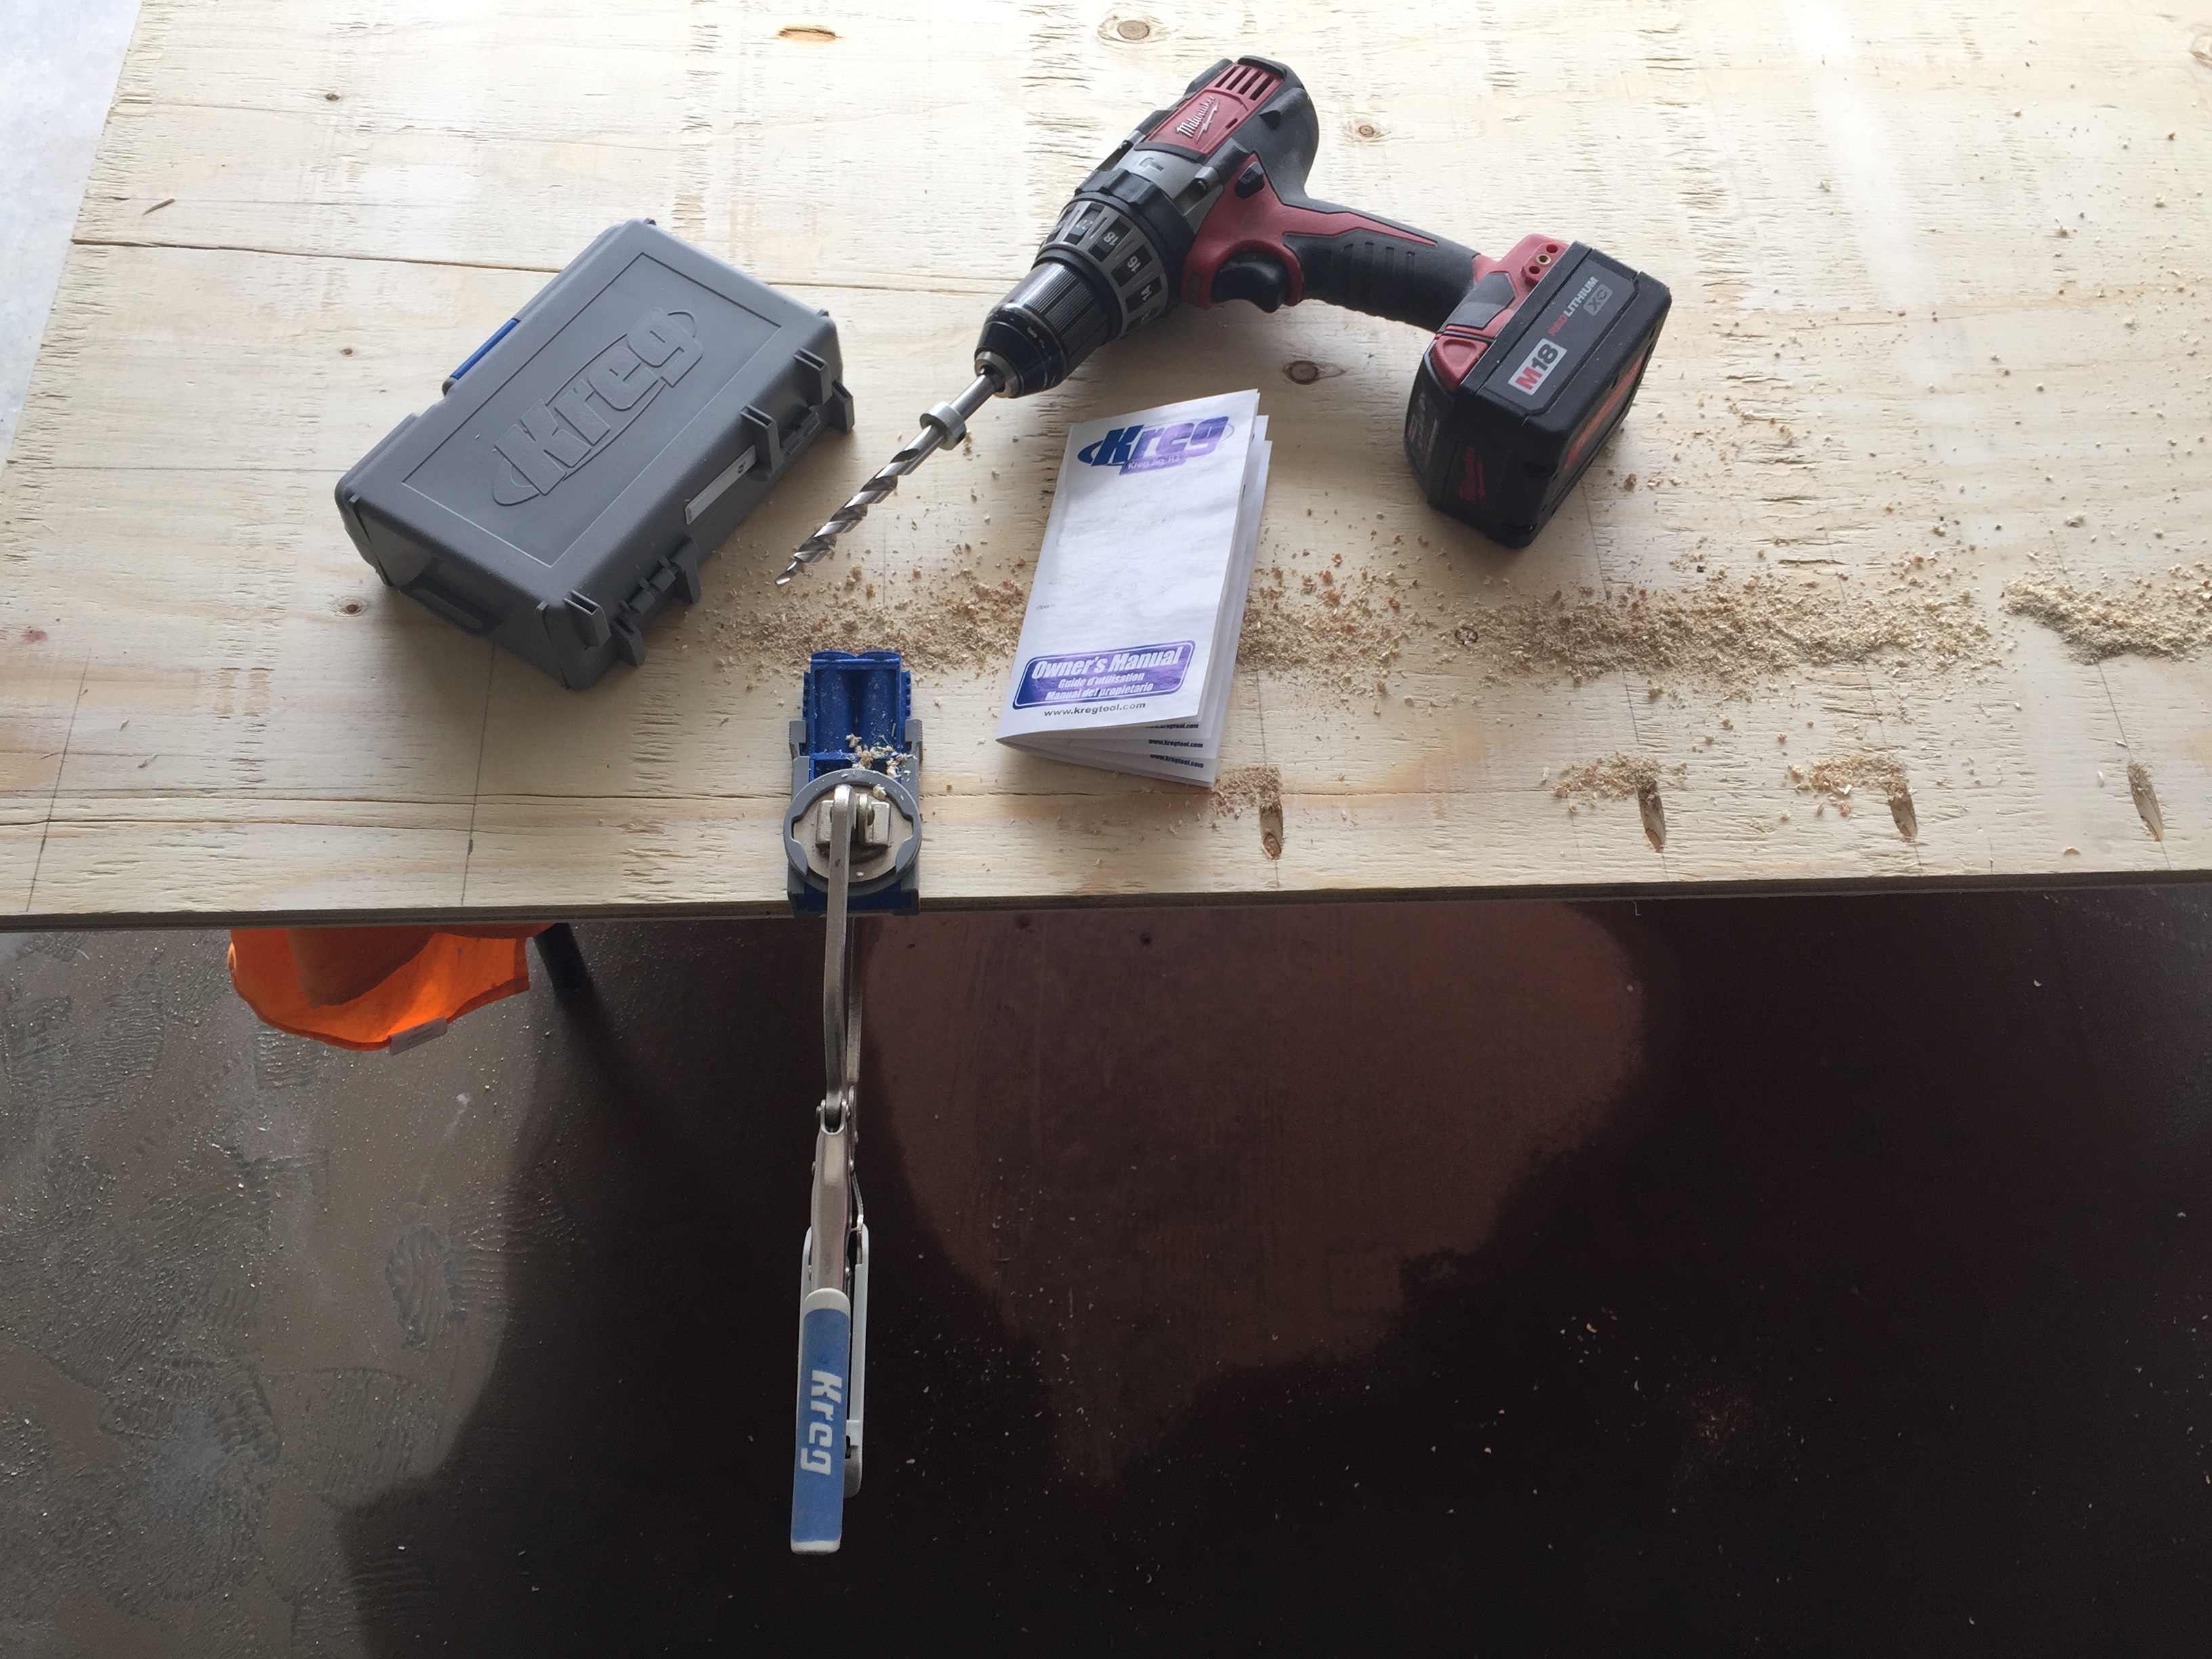
That’s it! I decided how long I wanted my bench to be (which was 47" long by 16" tall). Then, I cut out my pieces. I decided to do 45 degree angle joints on the ends, as opposed to having a flat edge exposed on the sides. I had to use my table saw to get the 45′s on the legs and two flat boards. This was very effin’ scary. Using my Kreg jig, I drilled holes in both of the flat boards that sandwich the tall center one. I offset my holes so that the screws wouldn’t hit each other. You can see in the picture that I accidentally drilled holes in my center piece too. Builder fail. That side will just have to face the back ;)
Attach your 3 top boards together. Then screw in your legs. I decided not to countersink and fill, kind of because I like the industrial look, but mostly because I’m lazy. Then you just sand that sucker up and voila! You’ve got a gorgeous bench perfect for any home. I decided to get a little fancy with my finishing and do a two-tone stain. It took about an hour to do the two colors and not drip on everything, as opposed to the 15 minutes one color would take. I think the extra time was definitely worth it!
Mon, 03/12/2012 - 16:58
How is the center top board attached to the ones on either side? I've never built anything before, so this is probably obvious to everyone else. :-/
Mon, 03/12/2012 - 17:00
How is the center top board attached to the other top boards? I've never built anything, so this is probably obvious to everyone else. :-/
Mon, 03/12/2012 - 20:39
I used a kreg jig to join the 3 boards. If you don't have a jig you can "toenail" the screws by drilling them from below at a 45 degree angle. I would join the vertical into one side at a typical 90 degree angle, then toenail the other board. You could add extra security with L brackets

Tue, 03/13/2012 - 03:57
The usual solution for cutting a long piece like this on a table saw is to build a crosscut sled first. There are a lot of good guides on the internet for how to build a crosscut sled.
I build something that is a bit oversized, so much so that I had to incorporate a box for some weights so it's stable on my table. But I can easily support a three foot board on this sled with room to spare before it runs off the end.
The sled supports the board and makes it so you aren't fighting your work in a dangerous situation. This sled made my saw completely non-scary to use.
One thing I've noticed about a table saw is that when you buy the saw, that's only the start of the tool. You'll spend a lot of time refining it with add-ons and jigs that you build for it.
Sat, 01/25/2014 - 11:12
I wanted to make this bench, went and bought the supplies, got home to cut it, and the measurements are off. I cannot figure out any possible way to make this bench 47 inches long without running out of wood. Is it possible that the measurements are off? Or can I just not figure out how to cut it so I don't fall short on my wood? Someone please help!


Made 2 of these for my coffee shop in Puerto Rico. Easy instructions. Thank you!
Javiel Cardona
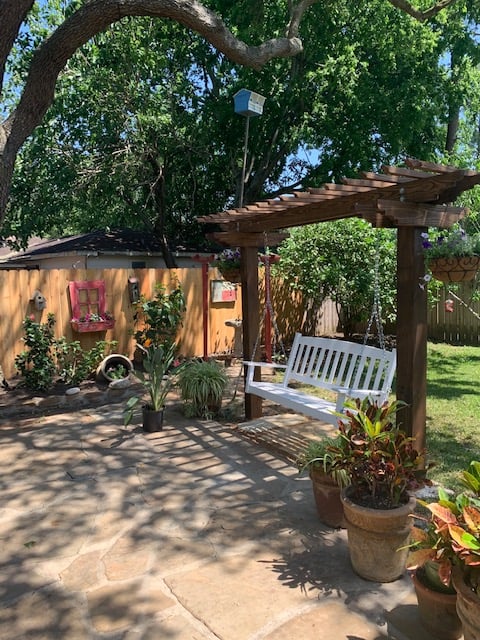
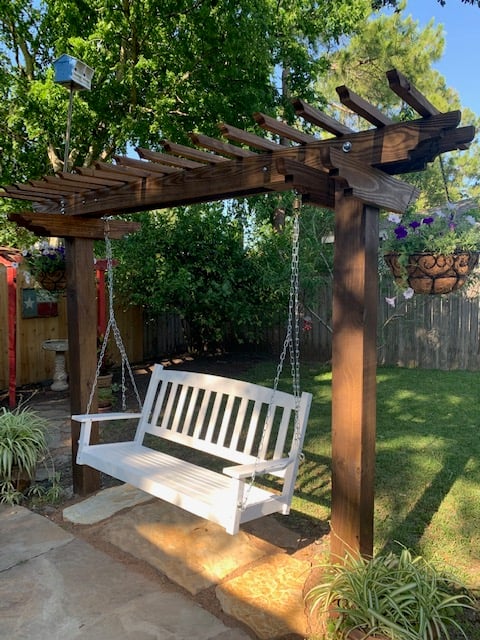
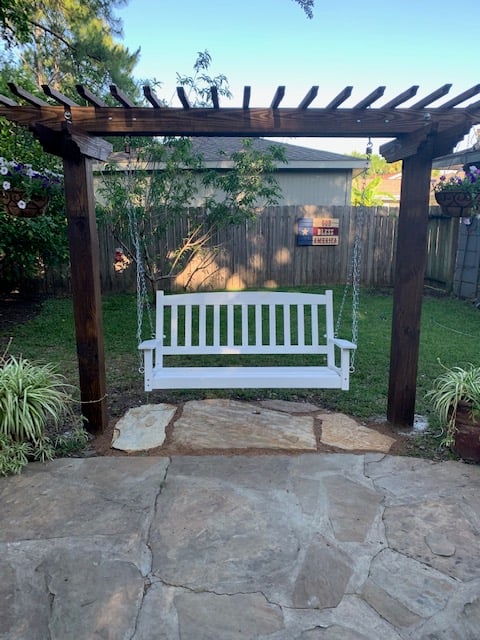
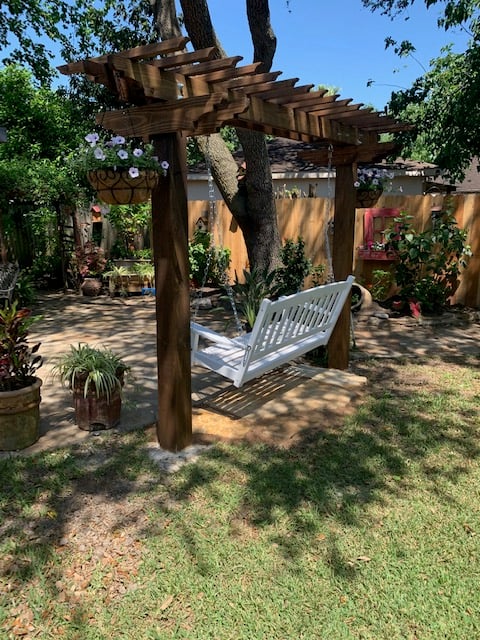
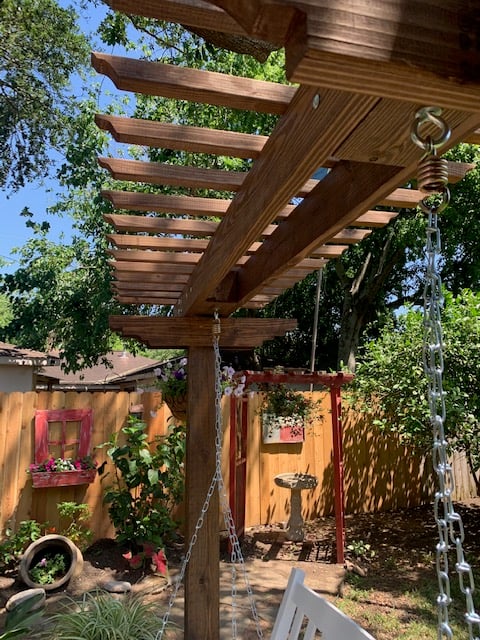
I saw this project on YouTube under Arbor Pergola Swing. It did not mention any specific detailed plans or cut list but it was enough to get me started. I began with (2) 10' 6" x 6" post. buried each 24" and cemented. I cut the post tops at 83" from ground line. The rafter consist of (2) 10' 2"x 6". I used the leftovers of the 6" x 6" post tops in the middle of my rafters to hang the swing from with 1/2 " eye bolt. Then I used (9) 2" x 2 " x 8' and cut each at 36" to finish off the top and (2) 2x6x8 for the 4 rafter supports. I drew out the designs of the rafters and top ends free hand and at made a template for the cuts with s jigsaw.
The entire cost including hardware minus the swing was $170. My wife had purchased the swing last Fall at a clearance for $40 brand new.
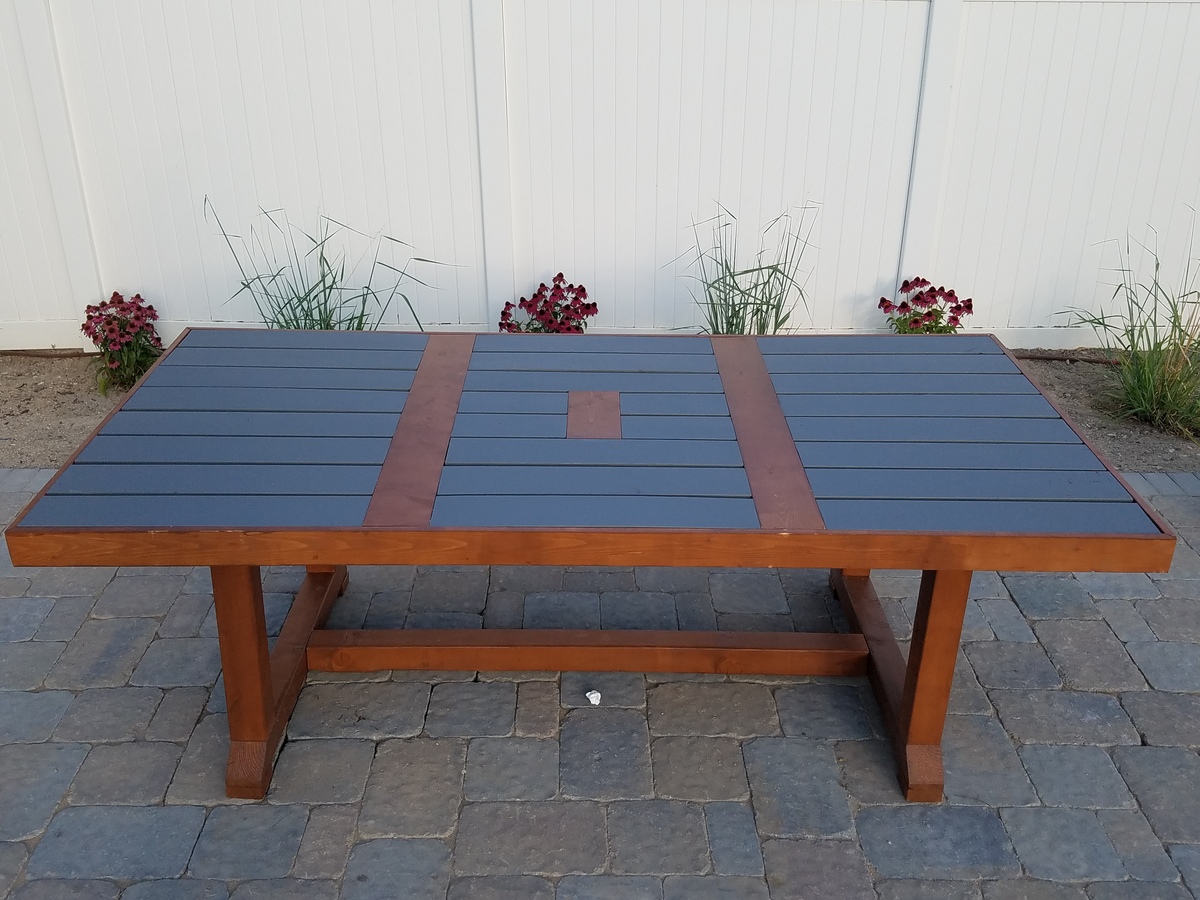
This took new novice DIYers about 25 hrs. Also this table is really heavy when complete so build it where you want it to sit or build in it one place and right before you are about to finish move the 3 built peieces separely where you want it to sit and finish assymbling it. Also, when completed this is counter height. We are going to take ours apart abit and shave 6in or so off the legs to be normal table height.
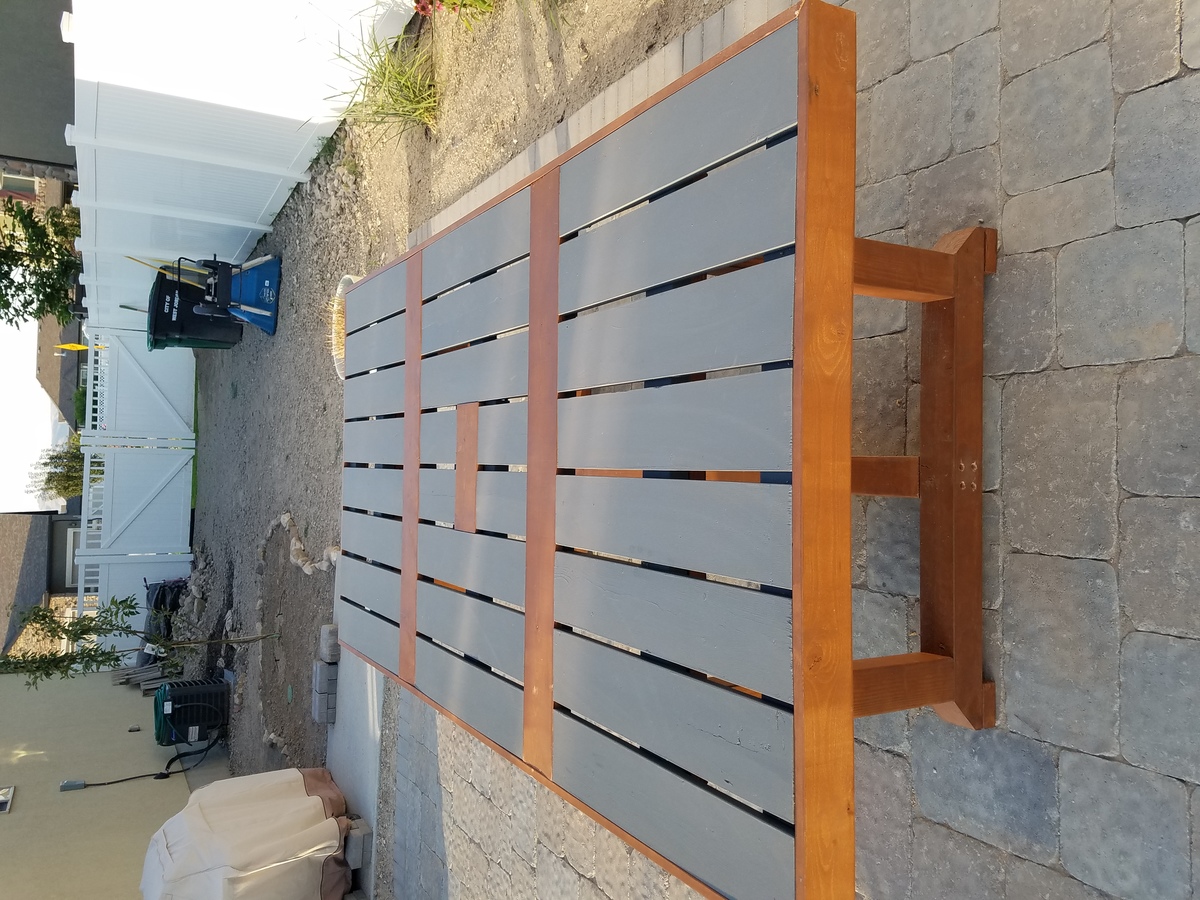
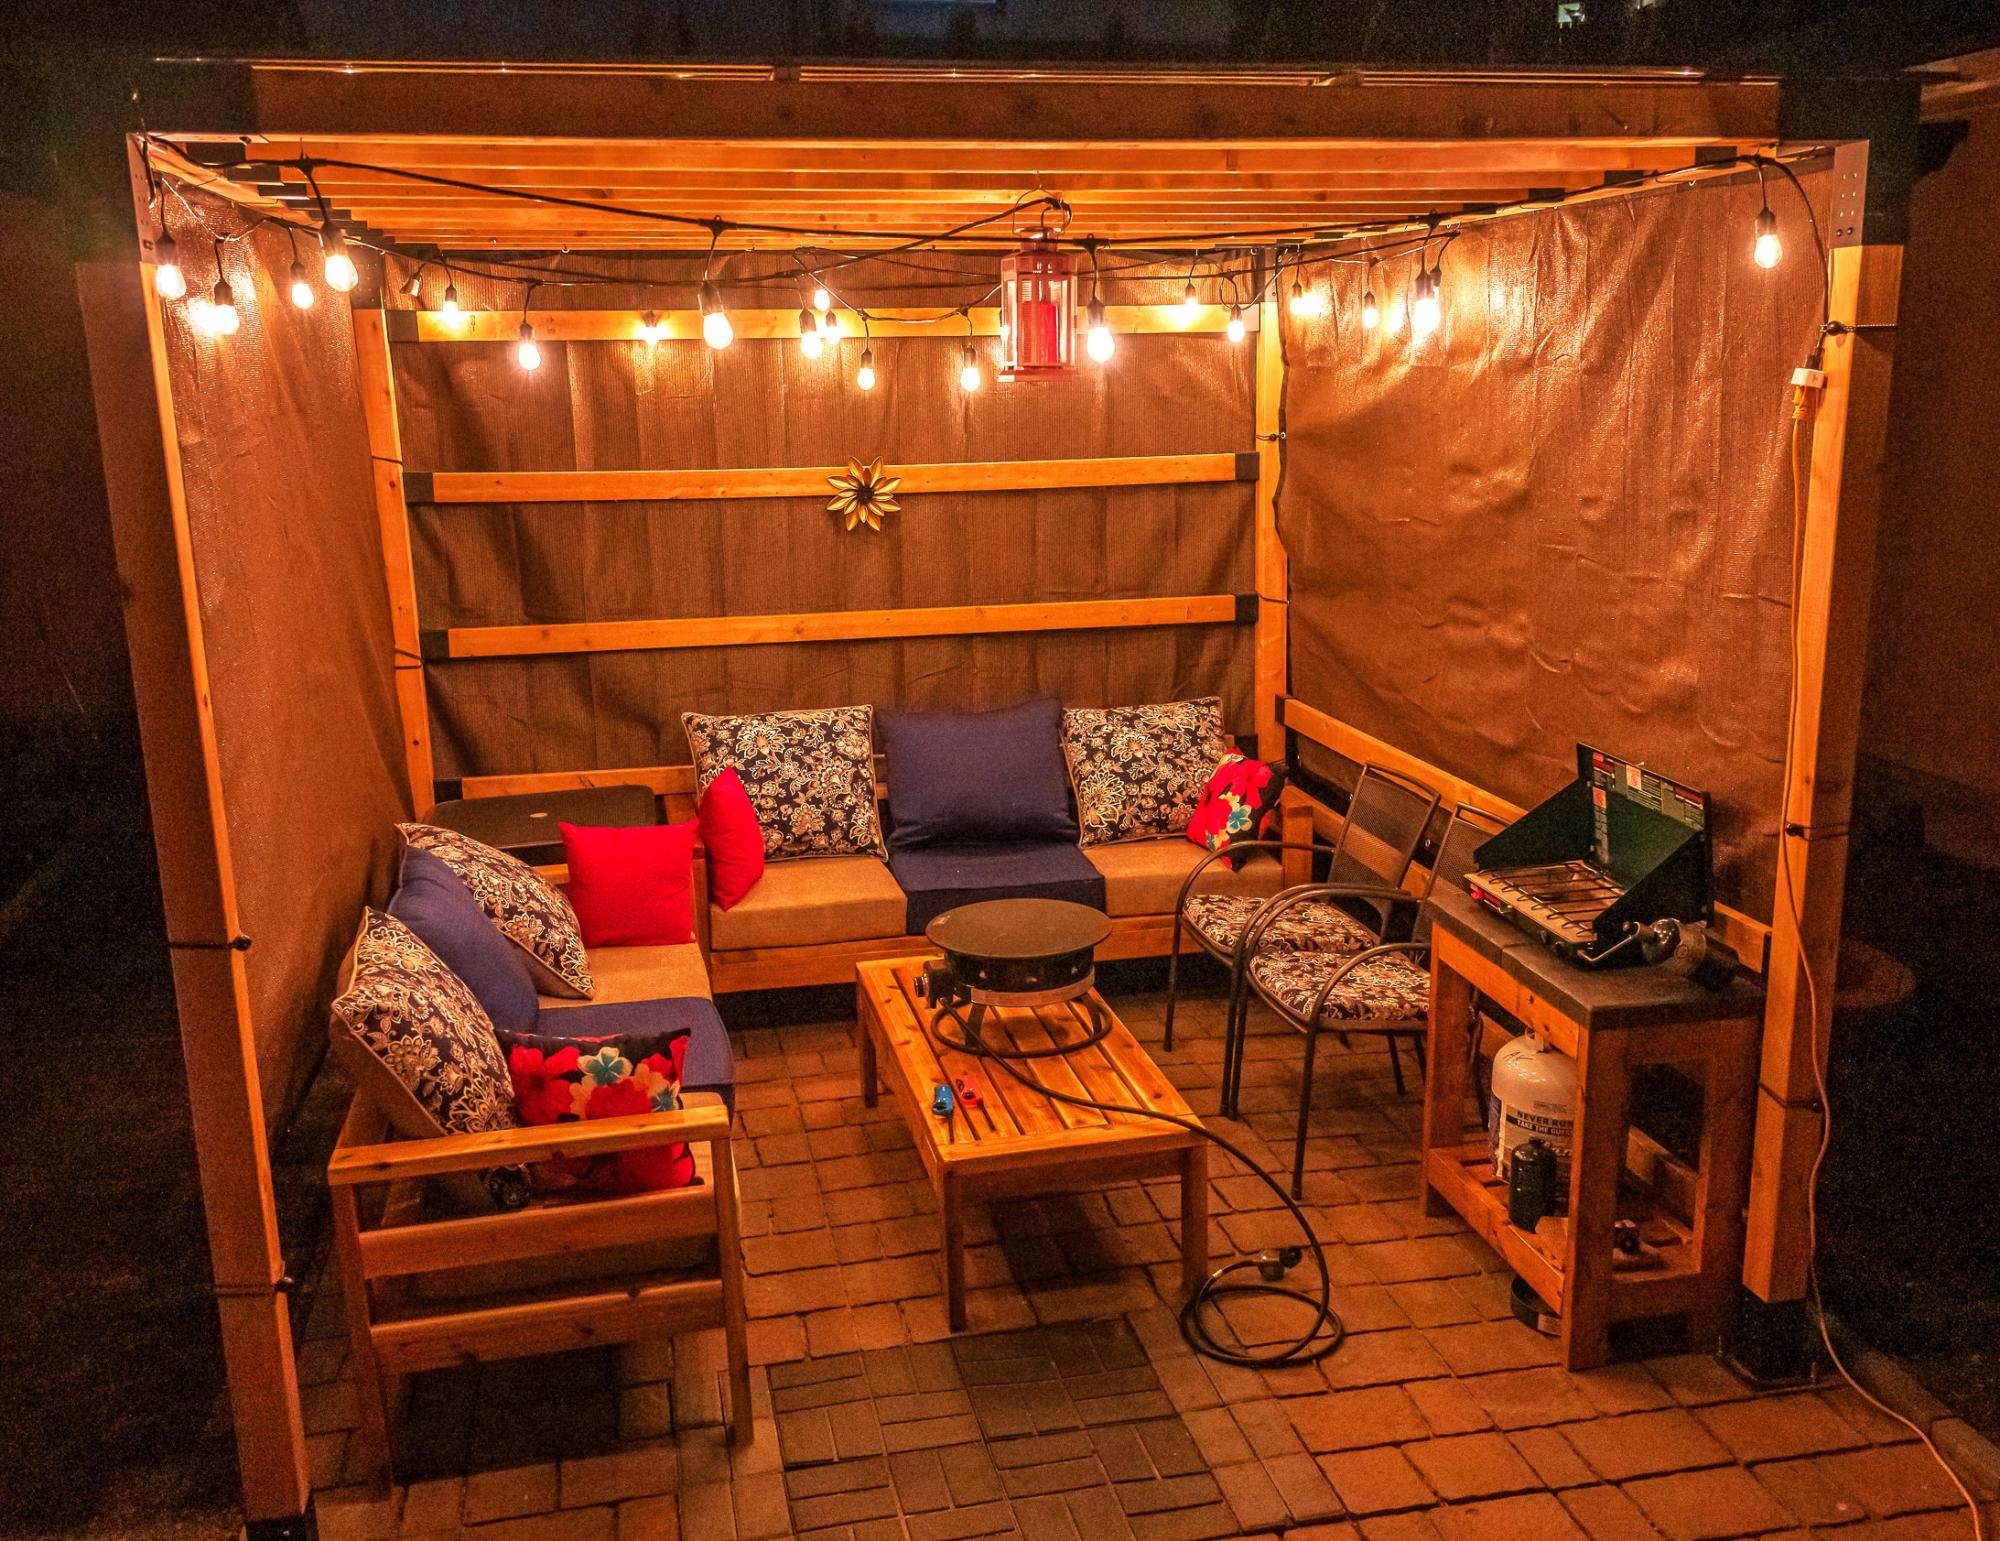
I built two 3 person outdoor sofa's and a coffee table as per your plans. It is sitting nicely inside the pergola we build last fall. I built a grill table too, to match the others. Thank You.
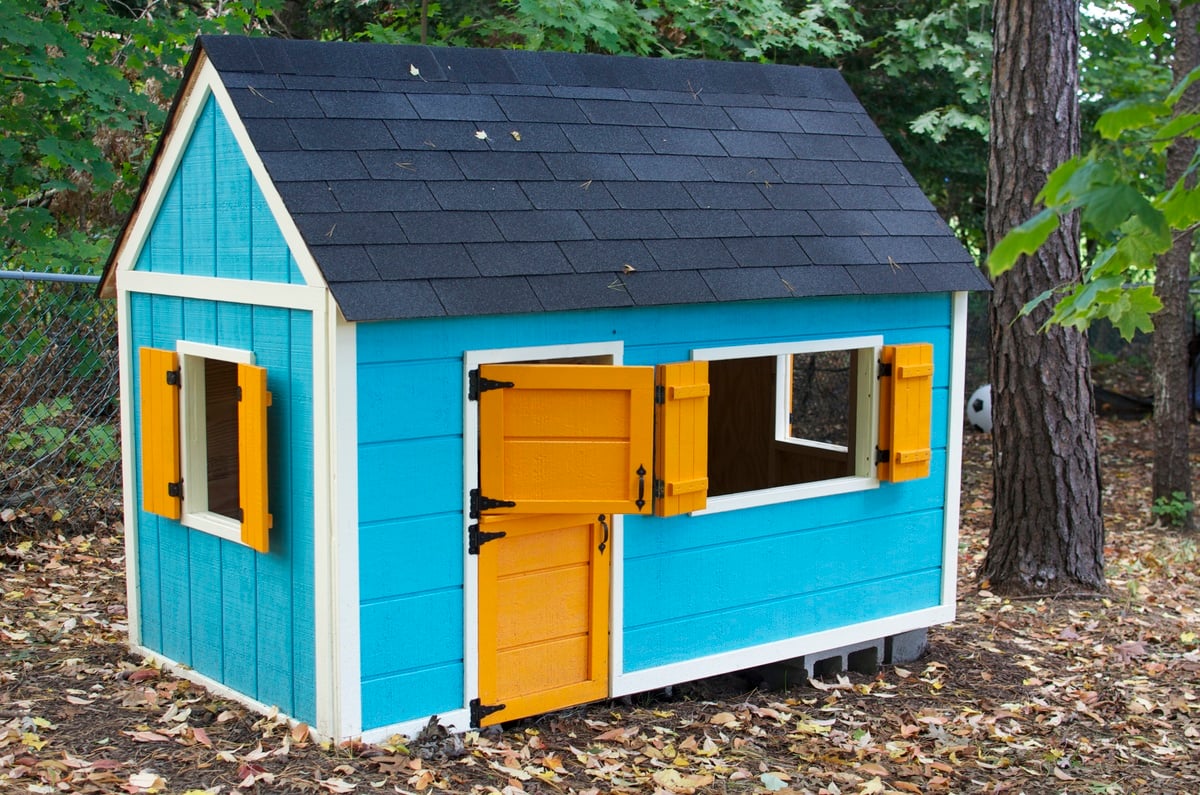
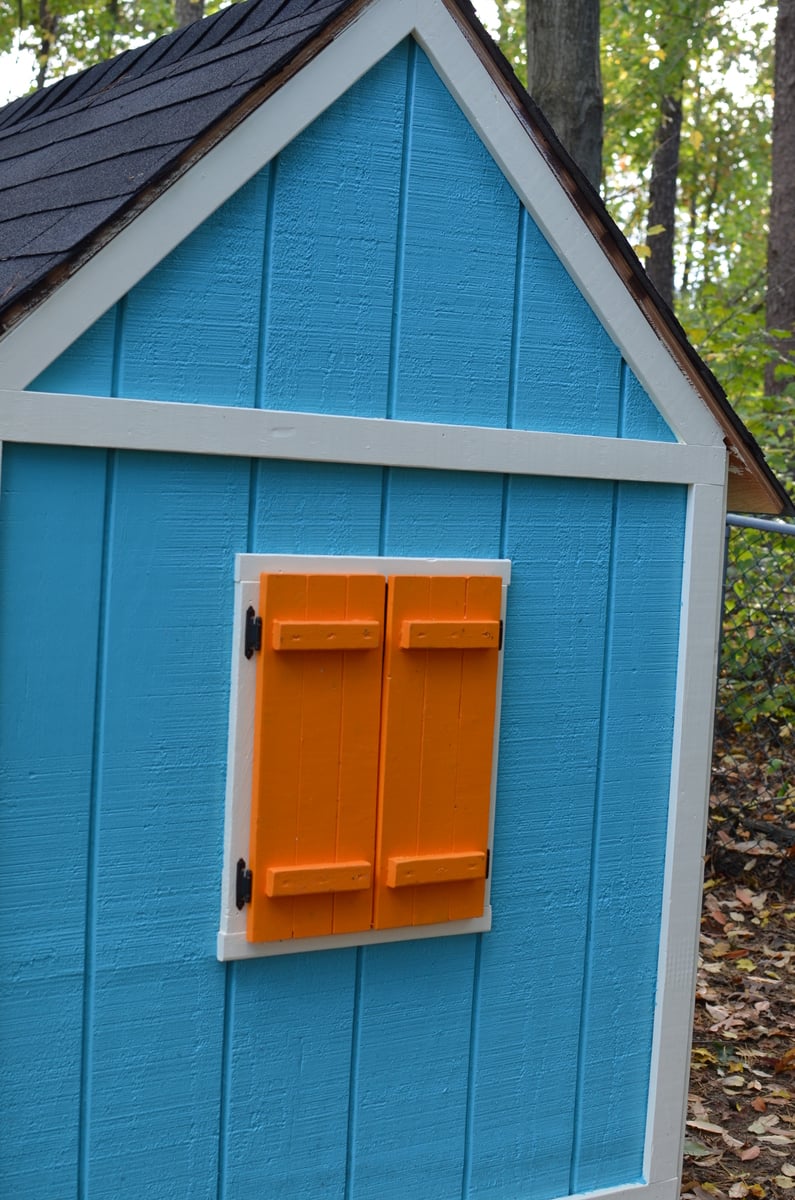
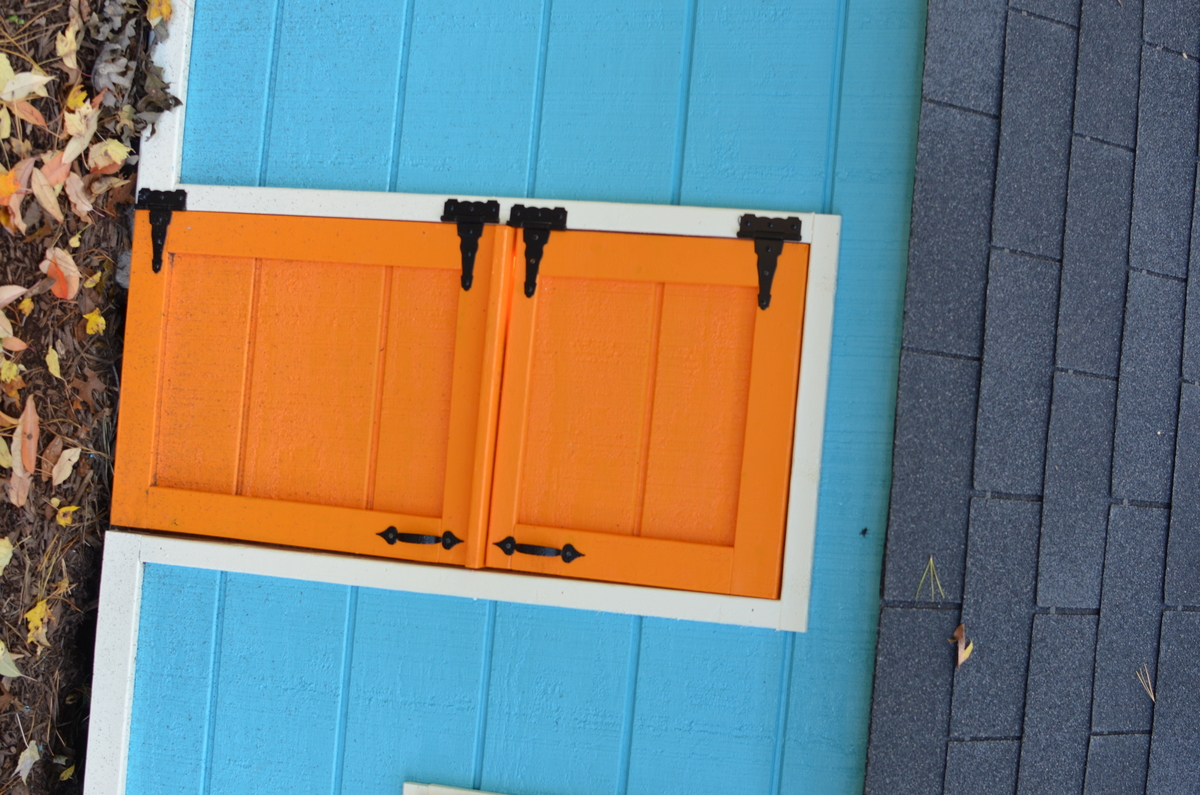
Olivia's Playhouse, built by mommy and daddy, though she did "help." Super-thankful to Ana for her awesome plans and making all this possible for our Little One. Modified the door to make it "barn style" which opens top/bottom. In the spring, plan on adding a small front porch/deck and railing.
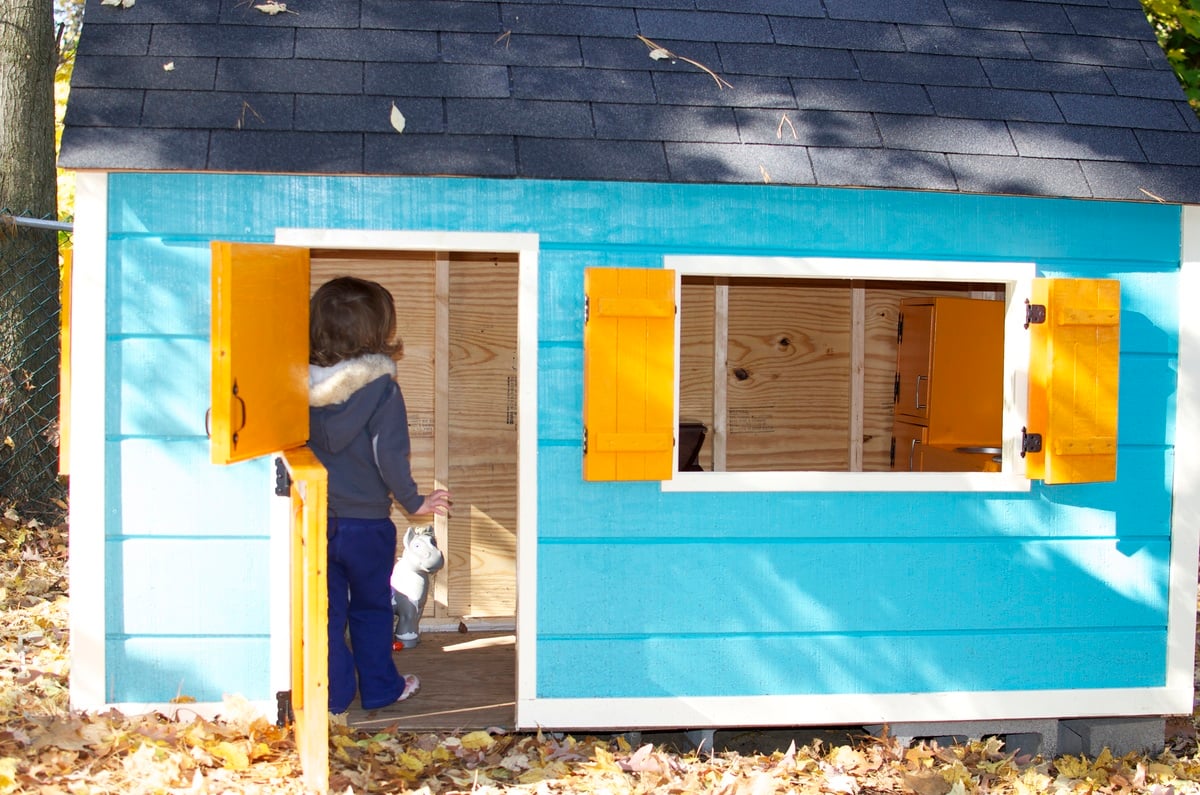
Mon, 03/23/2015 - 13:15
Loving all the little details! Great job, thanks for sharing!
Sat, 05/14/2016 - 08:02
I love your playhouse. Would you happen to have the dimensions for the shutters? They look amazing! [email protected]
Sat, 05/14/2016 - 08:02
I love your playhouse. Would you happen to have the dimensions for the shutters? They look amazing! [email protected]
Sat, 05/14/2016 - 08:02
I love your playhouse. Would you happen to have the dimensions for the shutters? They look amazing! [email protected]
Sat, 05/14/2016 - 08:02
I love your playhouse. Would you happen to have the dimensions for the shutters? They look amazing! [email protected]
Sat, 05/14/2016 - 08:03
I love your playhouse. Would you happen to have the dimensions for the shutters? They look amazing! [email protected]
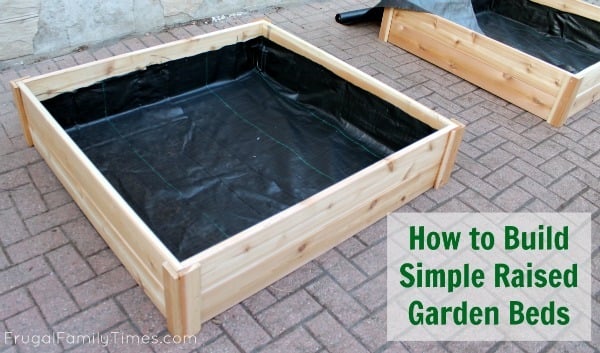
Starting with Ana's simple $10 raised garden plans, we built ours to be part of our experiment: Growing Vegetables in Our Driveway. Because our boxes are visible from the street, we made them a bit fancier and sturdier than we would have if they were hidden away in the backyard. An easy, afternoon project - with delicious results!

I scaled back the length of the sofa by a few inches and I made the sectional only one seat to fit my space on the deck. This was my first woodworking project that I did by myself. I got the cushions for more than 1/2 off at Ikea so the whole project cost about $150 ($80 for the cushions). It took me about a week to complete but the total time was less than 10 hours to build and stain. I'm pretty happy with how it turned out.

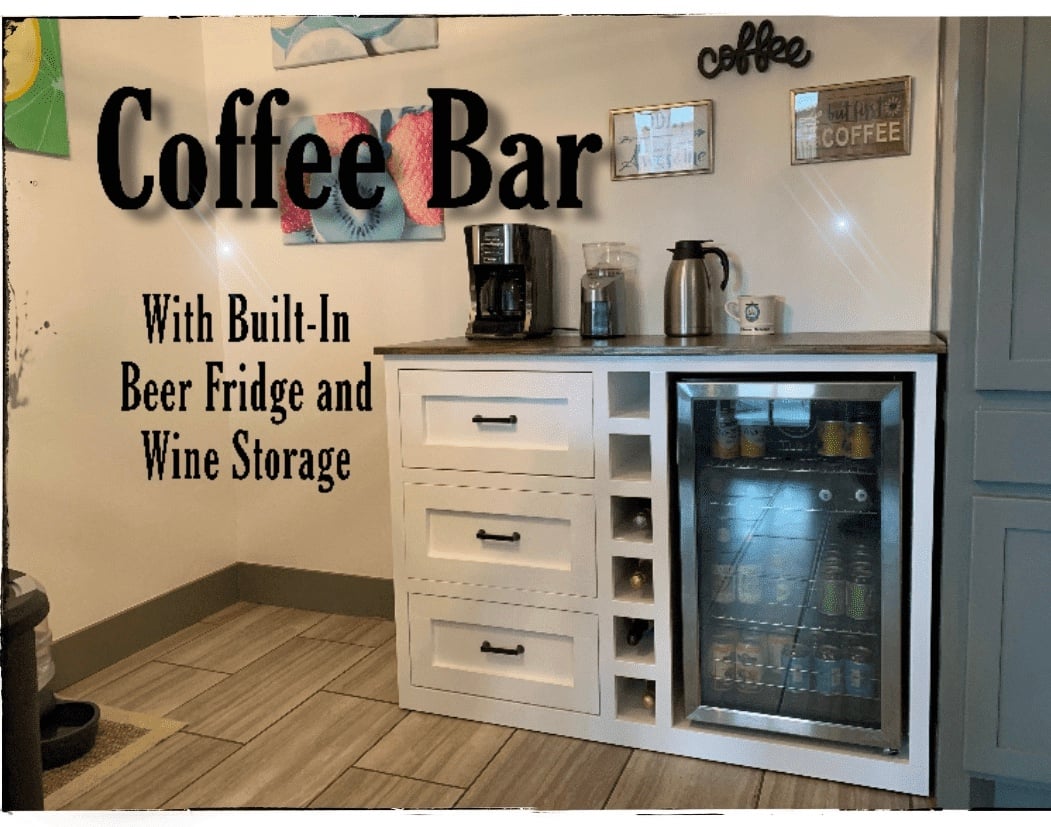
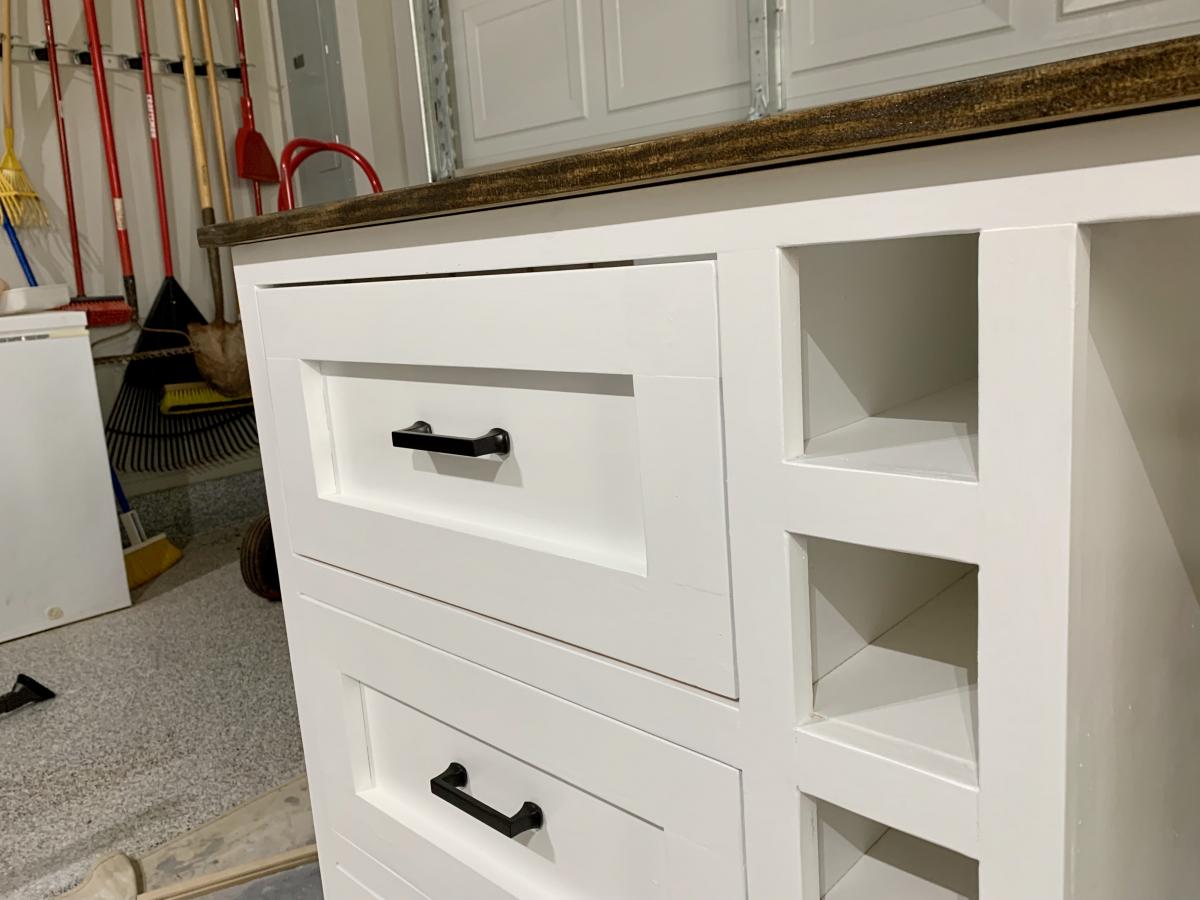
We made a beverage station for the corner of the kitchen!


Mon, 07/08/2019 - 10:46
We didn't use a plan for this but, if someone wants to build it, check out the linked YouTube video.

Tue, 07/09/2019 - 11:11
Amazing! Thanks so much for adding a brag post and linking to your video!
Fri, 07/31/2020 - 09:43
Hello! Was looking to see if this is something you would be interested in building for us? We are in love with this project but don't have the tools or means to do it ourself..
Can talk about pricing / size etc.
Thanks!
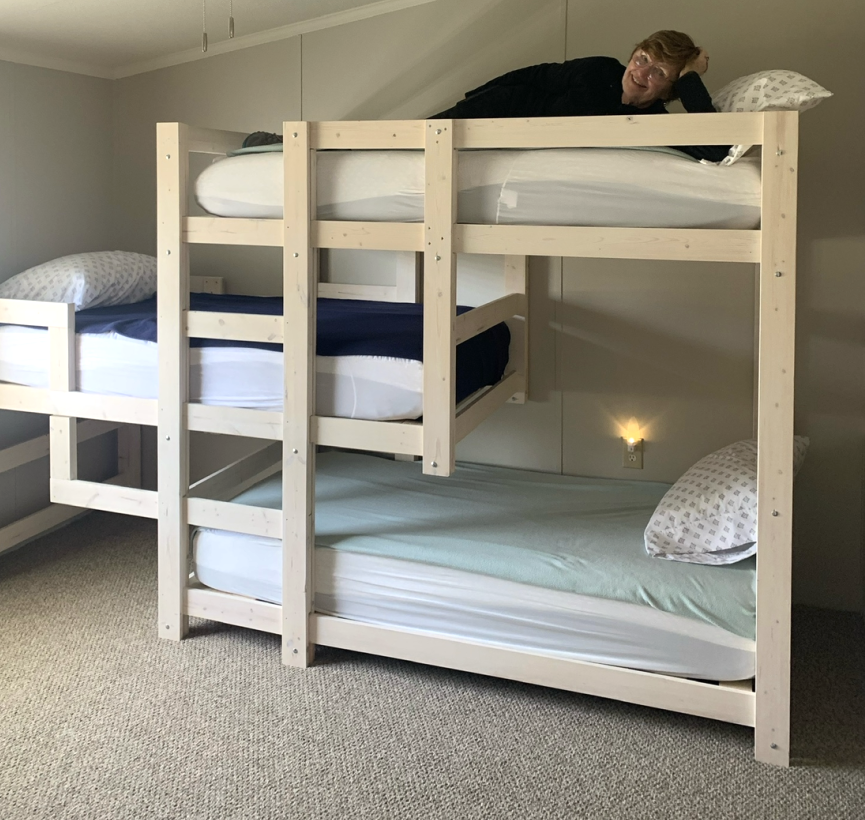
I needed to find a way to conserve space for 3 children to sleep in a very small home. I used an adapted pattern from Ana White. It turned out perfectly!
Sat, 04/29/2023 - 09:22
WOW, this is great, you fit a lot of sleeping in a small space!

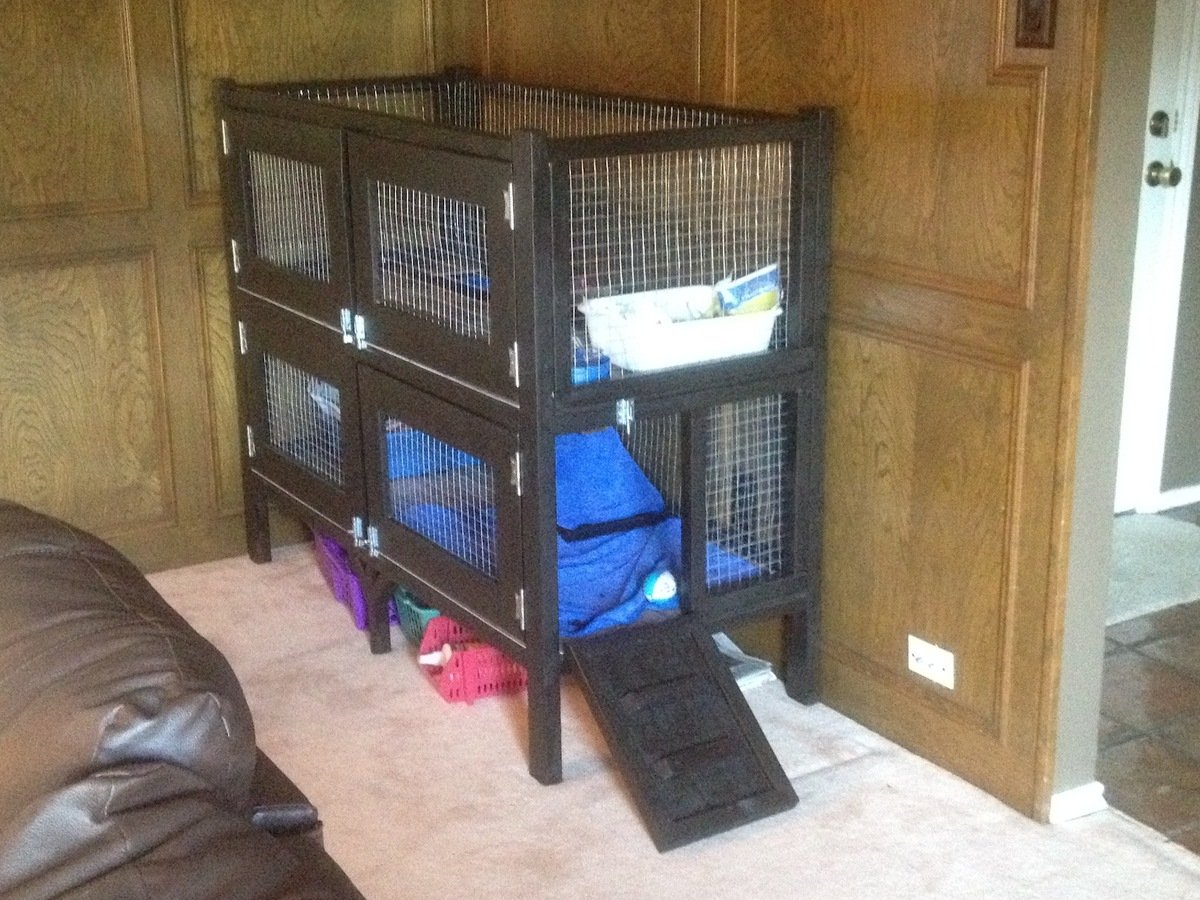
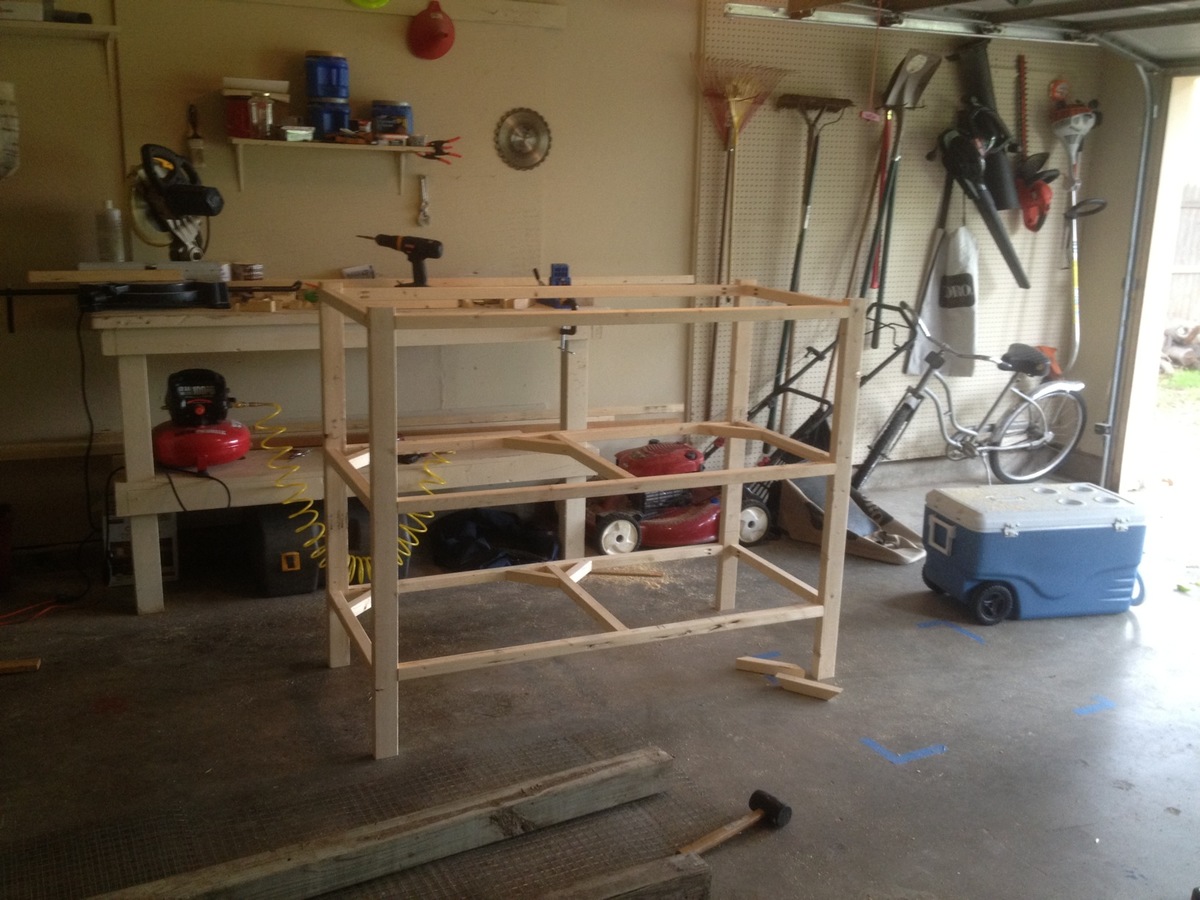
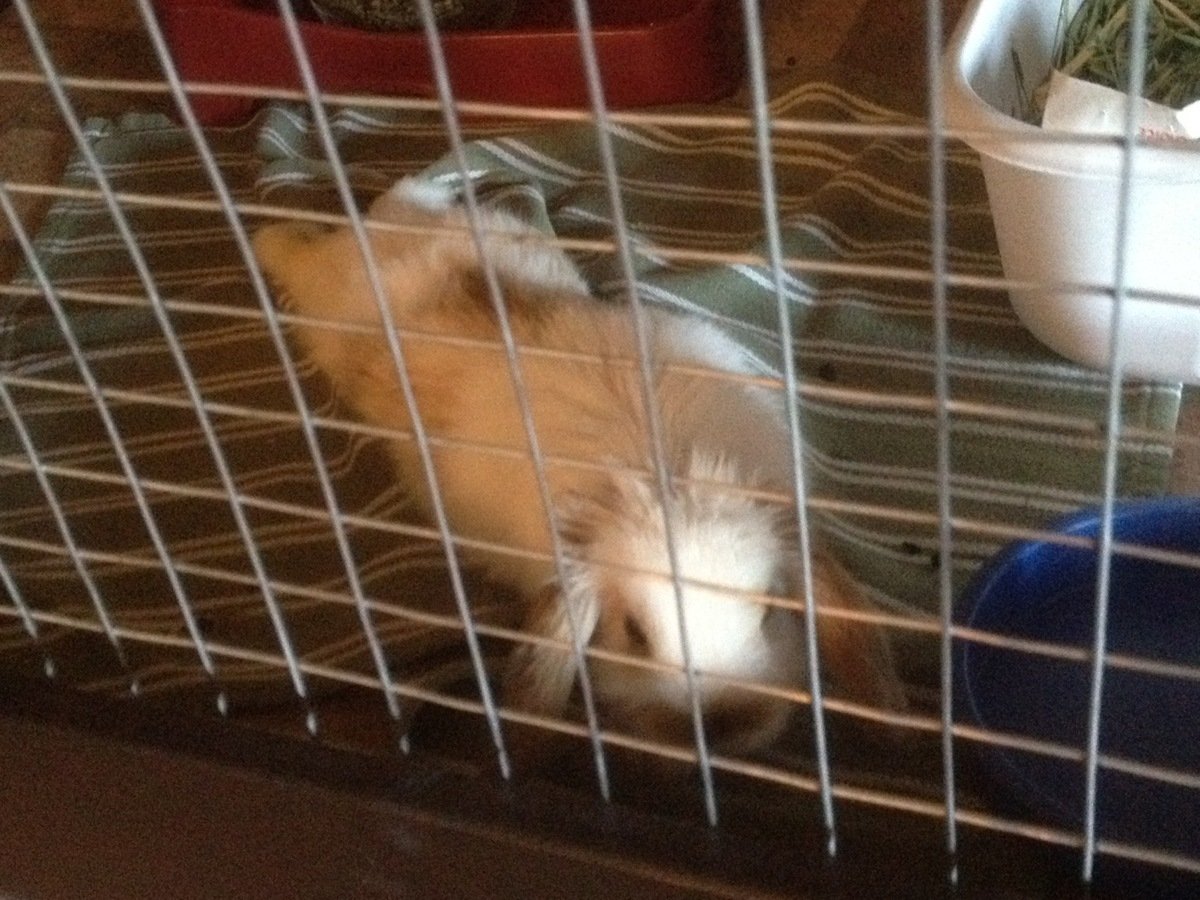
For my first woodworking project, I foolishly decided to build a rabbit hutch without plans for my daughters new Easter Bunny. So I literally scratched some ideas on my wood working bench and started going to work. I did some construction over a decade ago, but never attempted to build any furniture before, so I'm pretty happy with how this came out.
I spent a few days researching various rabbit cages and for our place we needed something that was ascetically pleasing and functional as it was going in our living room. I got some ideas from the web and decided the best thing for us would be to have an entry ramp, 2 sets of barn doors for each level (for easy cleaning) and an open roof. We went with linoleum floors since she's already litter trained. The floors could easily be modified to add 1/2" wire mesh if we decide to change things down the line. Also, we chose an espresso finish with silver hardware to accent the wire mesh
I pretty much crashed and burned on the staining as I've never done that before, but it ended up looking ok after all. I did a light sanding, but will probably invest in a planer and jointer to get my wood in better shape before assembling in the future. Also, I'll probably lightly dab some stain on ends of wood before final assembly as it made it difficulty trying to hide the white pine with the dark stain.
Other cages I saw ran around $200-$350.00 so i don't feel so bad about the cost. It's really the time that it took learning and making mistakes. I'm sure if I had plans I could of cut my time in 1/2.
Total Cost came out to around $150.00 but probably would of been cheaper if I had some plans to go by. I probably wasted a few 2x2s and accidentally mis-cut a scrap piece of 1/4"plywood which added another $16.00 to the bottom line.
Here's a breakdown of my total cost.
Hardware - $30.00
Includes 5 latches, 4 sets of hinges (8 total) and a 3' piano hinge
Stain - $8.00
Linoleum Tile @ ¢.69 sq ft - $16
Brushes, Stain Rags - $5.00
Screws - $6.00
Wire Mesh Roll $30.00
Needed 2 rolls at $15.00 each. I used 1" Wire Mesh measuring 2'x15'
Total Wood $50.00-$60
I used 2x3's for the legs - 2 @ 8' - $2.00 each ($4.00)
probably 15-20 2x2's - $1.52 each - can't remember how many I used to be honest ($30.00)
and a few 1x6's for the Doors - $2.00 each ($6.00)
Sheet of 1/4 plywood - $12.00

Thu, 05/03/2012 - 06:24
I bet your rabbit is pumped! What a nice house. Good Job.

In reply to I bet your rabbit is pumped! by Aargh (not verified)
Thu, 05/03/2012 - 06:57
Thanks! The rabbit definitely seems happy.
Thu, 05/03/2012 - 08:09
I also have been thinking with the idea of building a two story hutch for our rabbit. I love your ideas so now i have a new project to work on. Thanks for sharing!
Mon, 10/08/2012 - 12:46
I LOVE your cage! We have 2 rabbits and 2 Guinea pigs which means we have 2 ugly cages in our living room. We are planning something similar, but a bit bigger (but lower if that makes sense). And we'll put a 3rd story on for our Guinea pigs. So we have everyone on the same patch of real estate so to speak. I was going to do 3 solid walls with wire "windows" too keep all the hay, poops and such contained. I am also going to put lockable wheels underneath, so I can move it to my office if I ever need to (parties and renovations).
Is there anything that you can now think of that you would like to change on yours? R my research purposes.. :) It looks awesome, I'm just picking your brain for "hindsight" tips.
Comments
Ana White Admin
Sun, 10/23/2022 - 10:41
Gorgeous outdoor set!
This is awesome! Thanks for sharing.