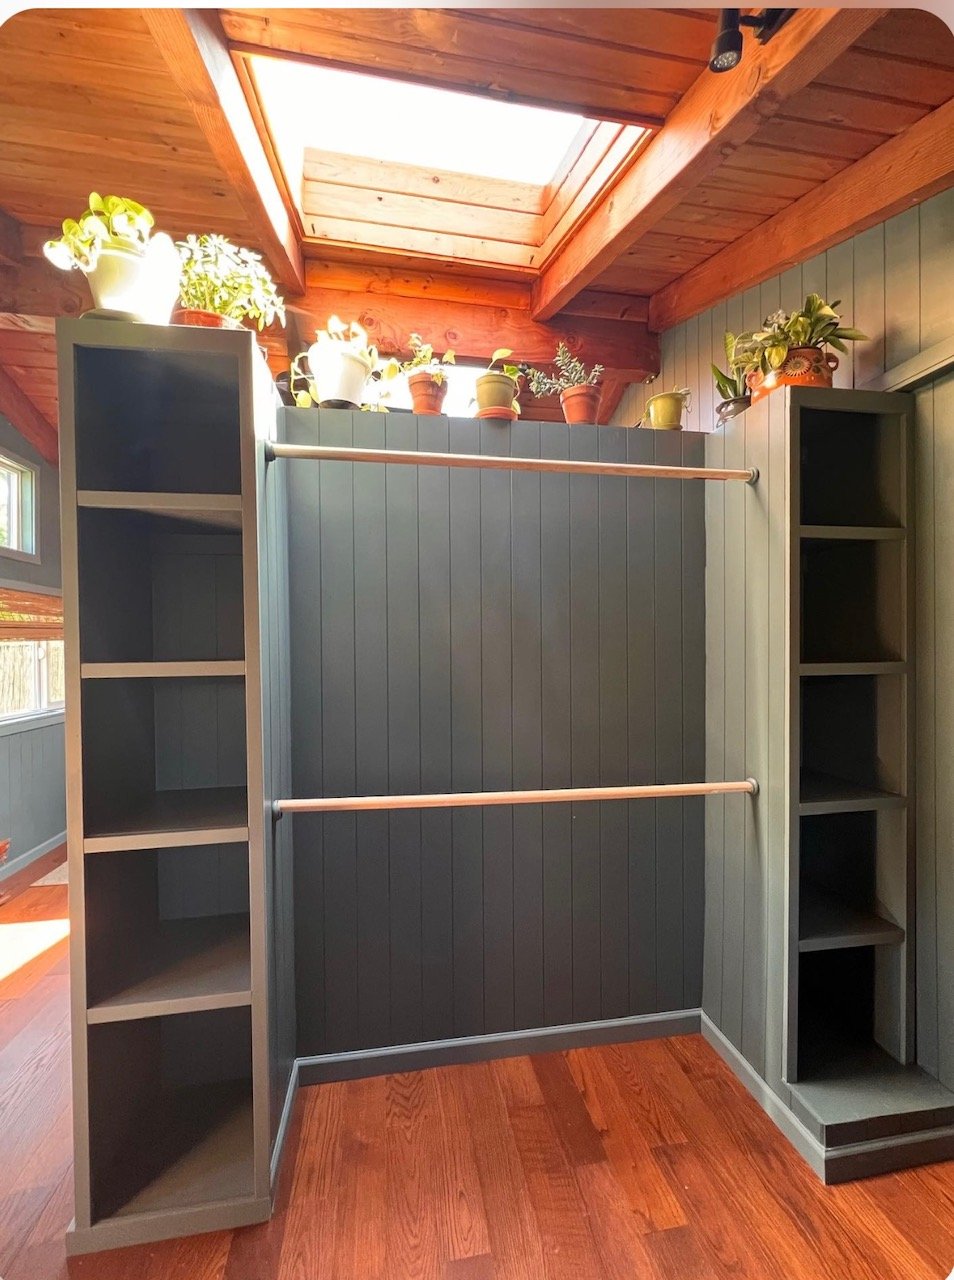
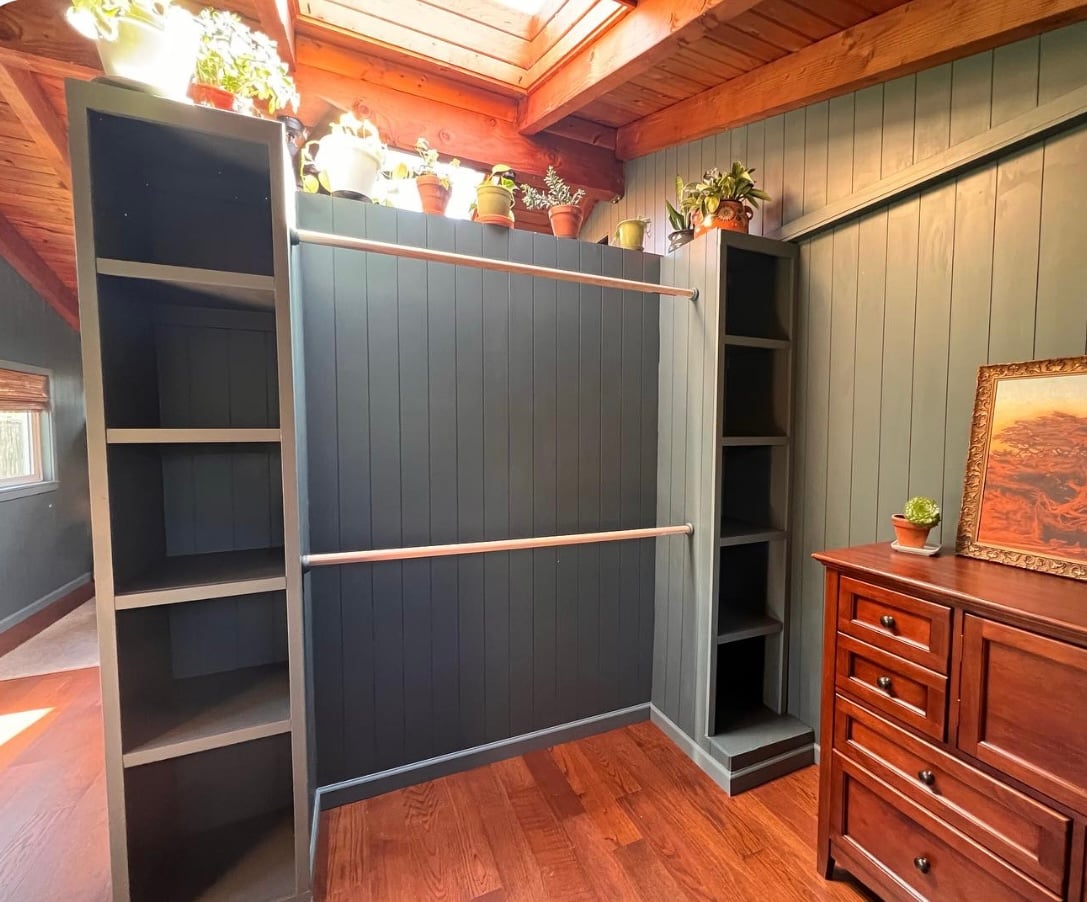
Community Brag Posts
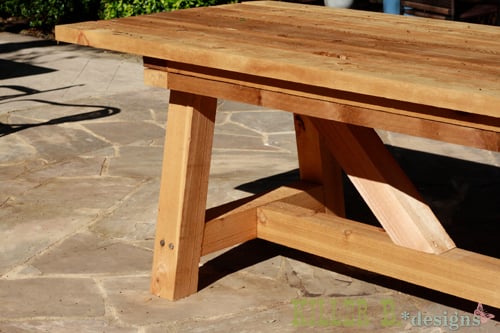
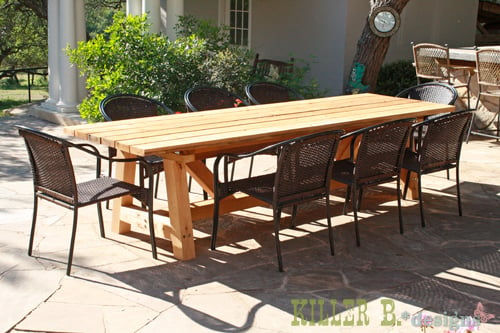
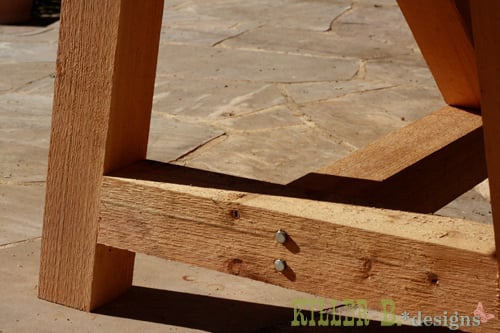
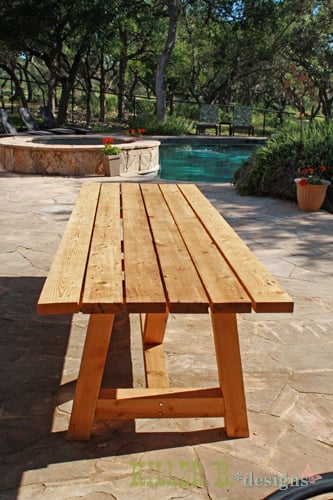
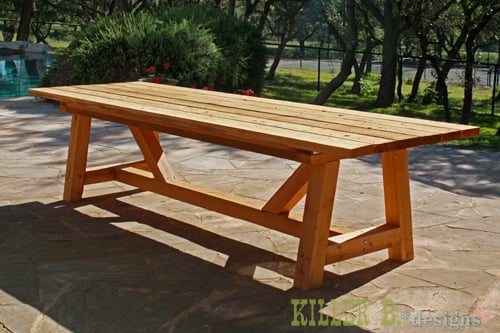
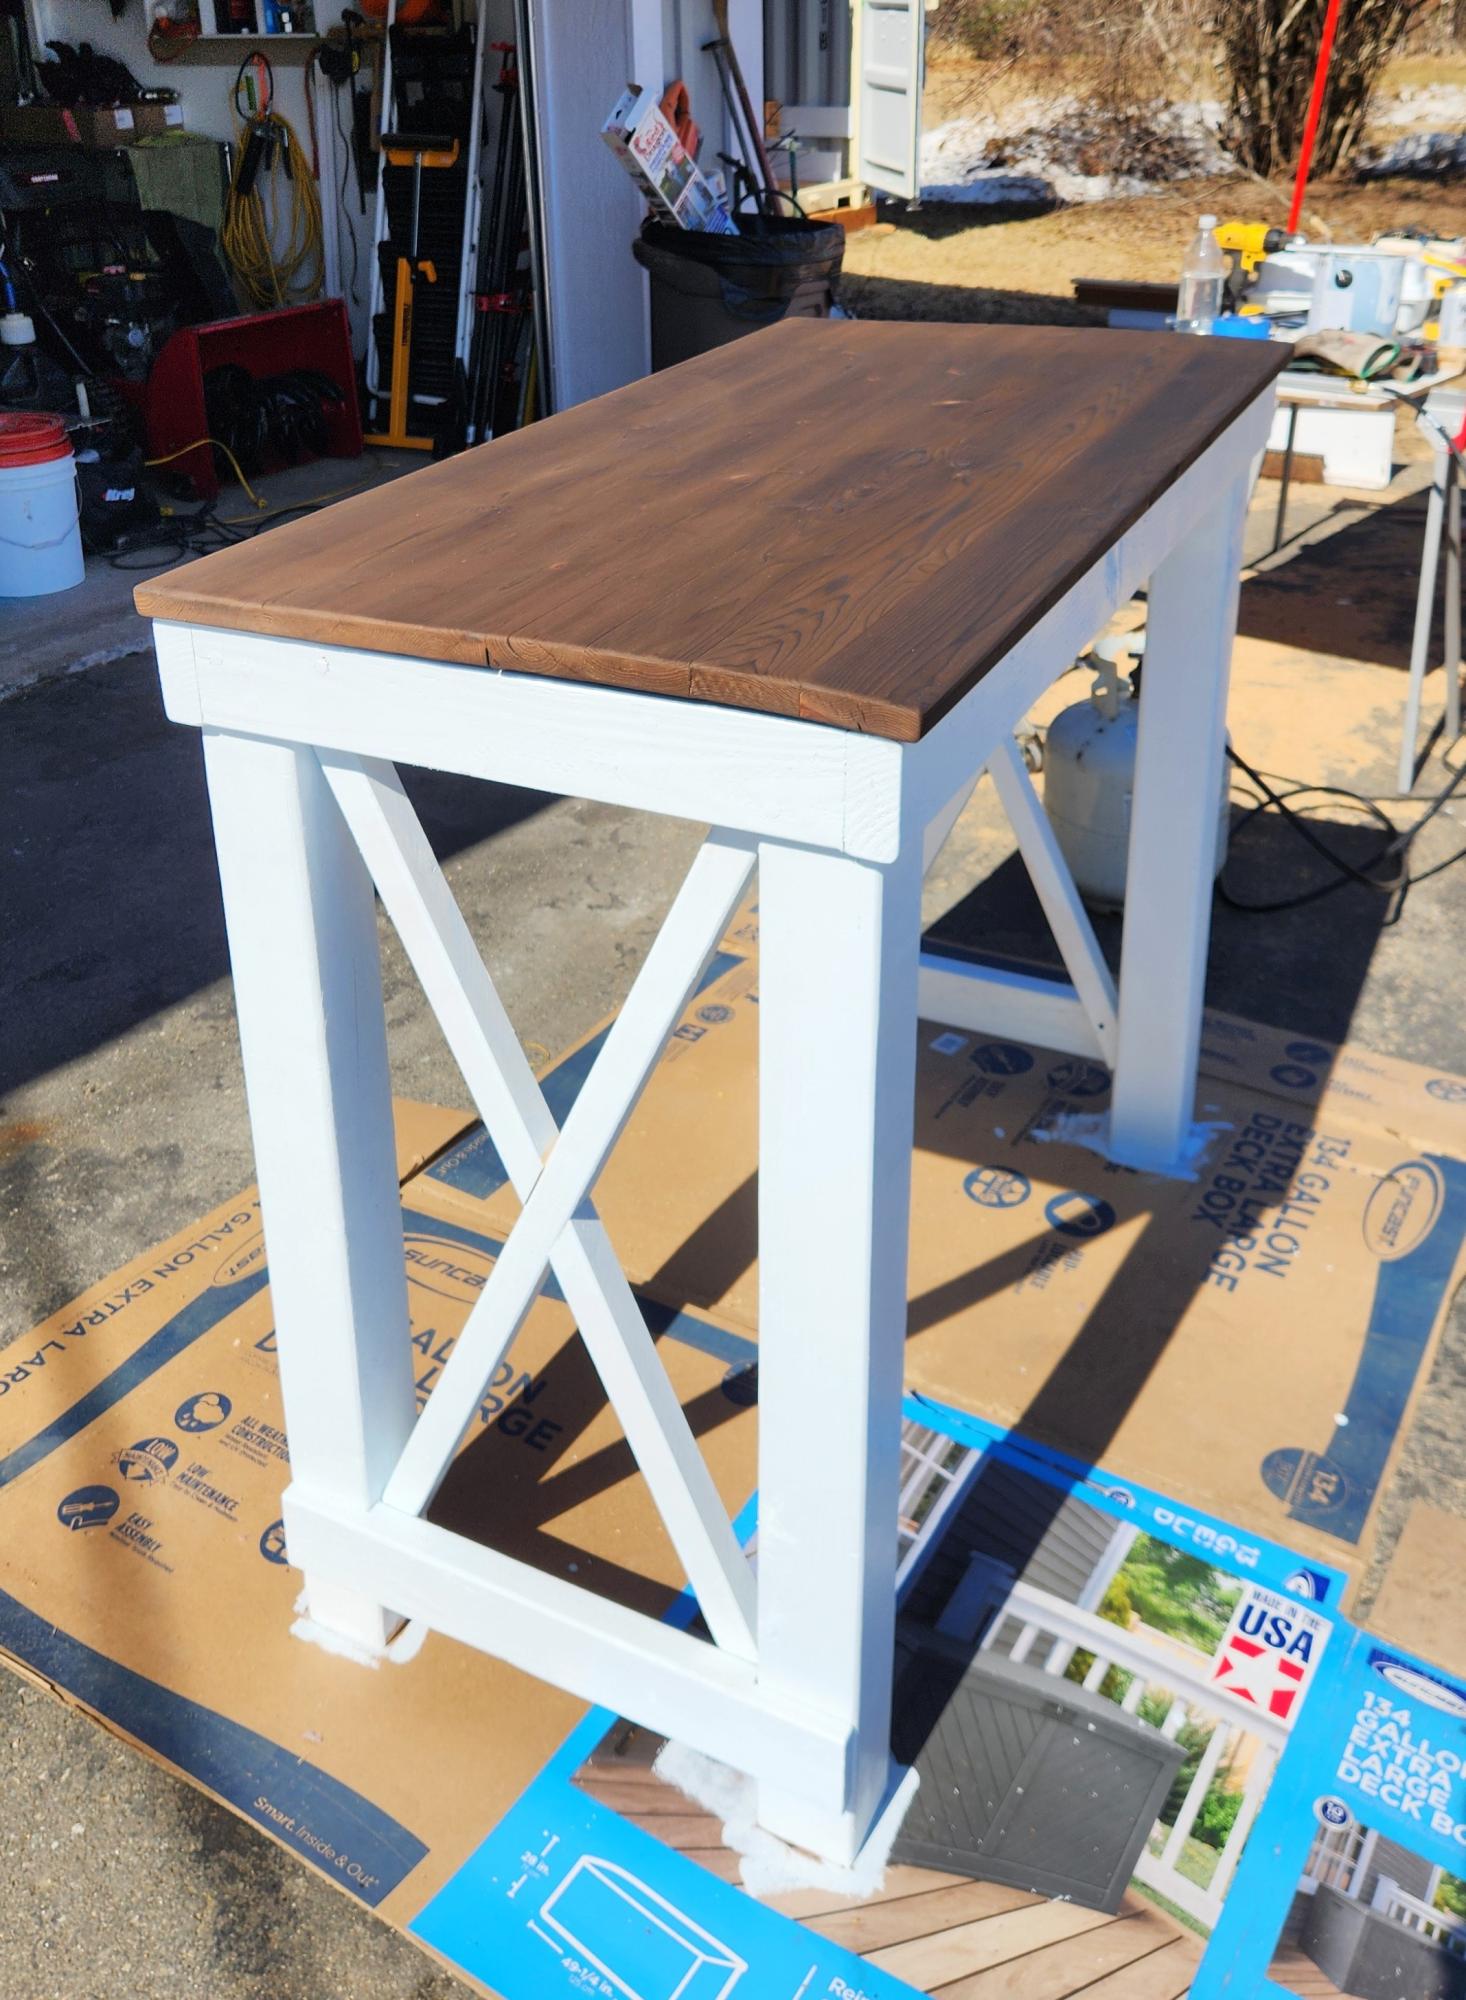
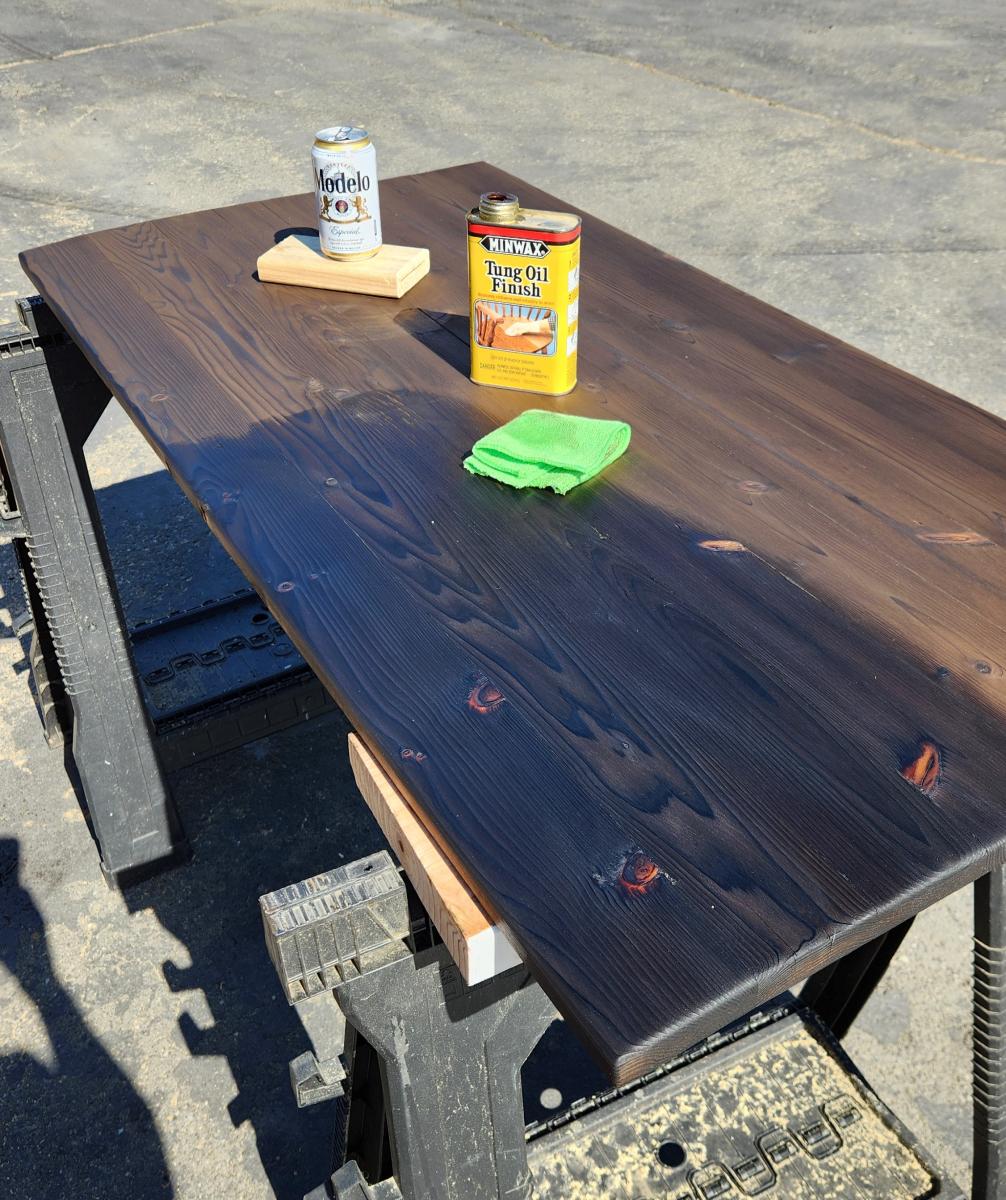
10 foot long Provence Table with 4x4's
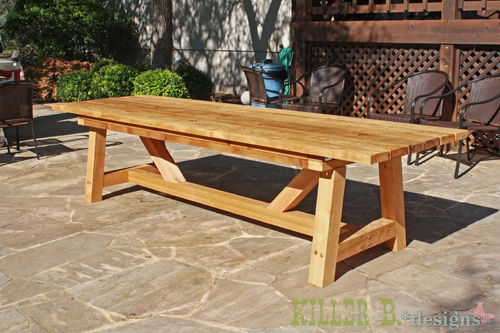
My mom was looking for a new outdoor table, and asked me to come up with something. I found the link for these plans (http://www.thedesignconfidential.com/2011/04/free-diy-furniture-plans-t…) to knock off Restoration Hardware's $4000 Provence Beam outdoor table. Overall I liked the plan, with the chunkier look of the 4x4's. But there were a lot of errors in the diagrams, and the finished height is 34" which is ridiculously tall for a table. So we took it apart and cut the legs back down to change the finished height to 30". We chose rough-cut cedar for it's look and outdoor properties, not wanting to use treated lumber for a dining table. We couldn't find 2x10's like the plan, so we substituted seven 2x6's just like Ana's plan, but left a 1/2" gap in between so water can drain and not pool on top and rot the wood. Also, since we were working with 4x4's for the legs, we chose heavy duty lag bolts instead of screws to join them together. I love the finished look they give. Overall it's a sturdy, yet lightweight table that my mom loves and has already used for entertaining!
Built from Plan(s)
Estimated Cost
$230
Estimated Time Investment
Day Project (6-9 Hours)
Finish Used
outdoor sealer
Recommended Skill Level
Advanced
Comments

Wed, 04/25/2012 - 10:02
Thank you!
Thanks Brook! It was so much fun to build. I put my dad and husband to work while I was the "project manager" ;)
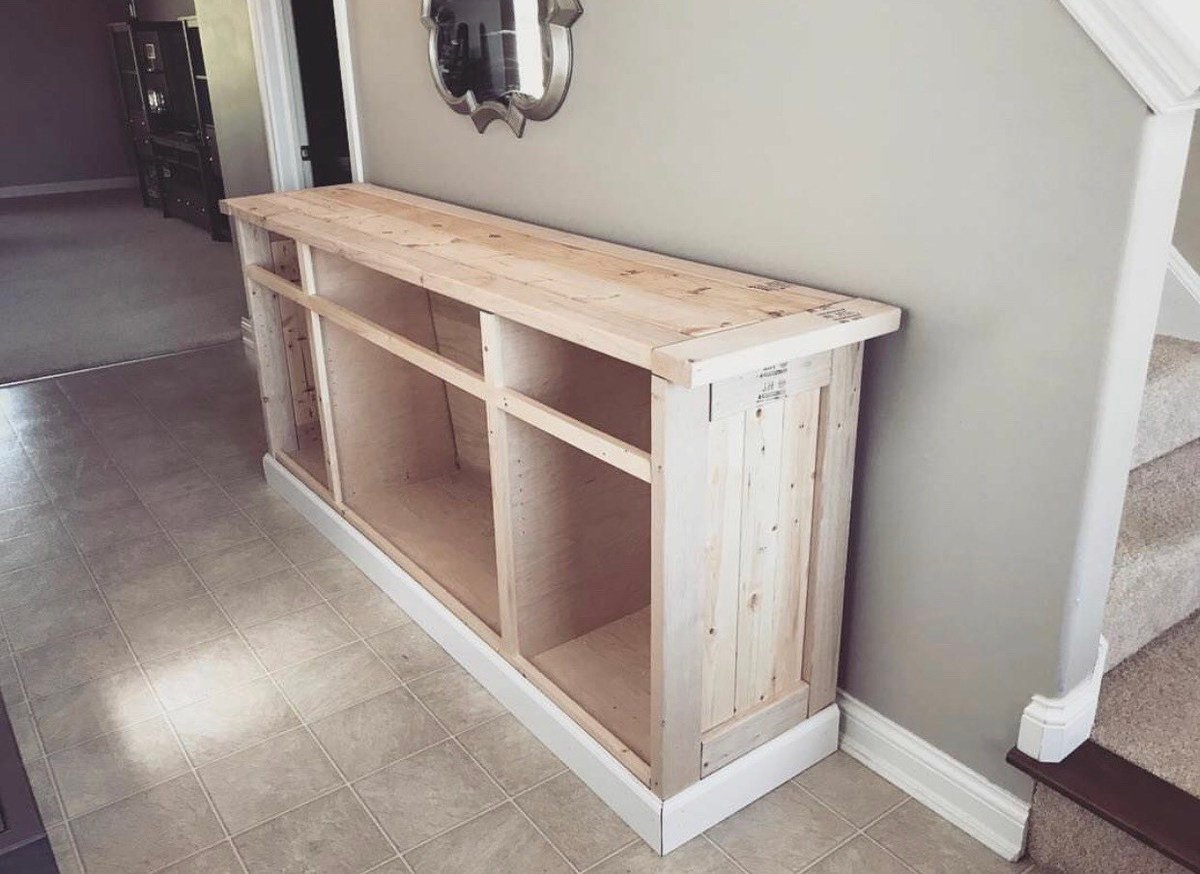
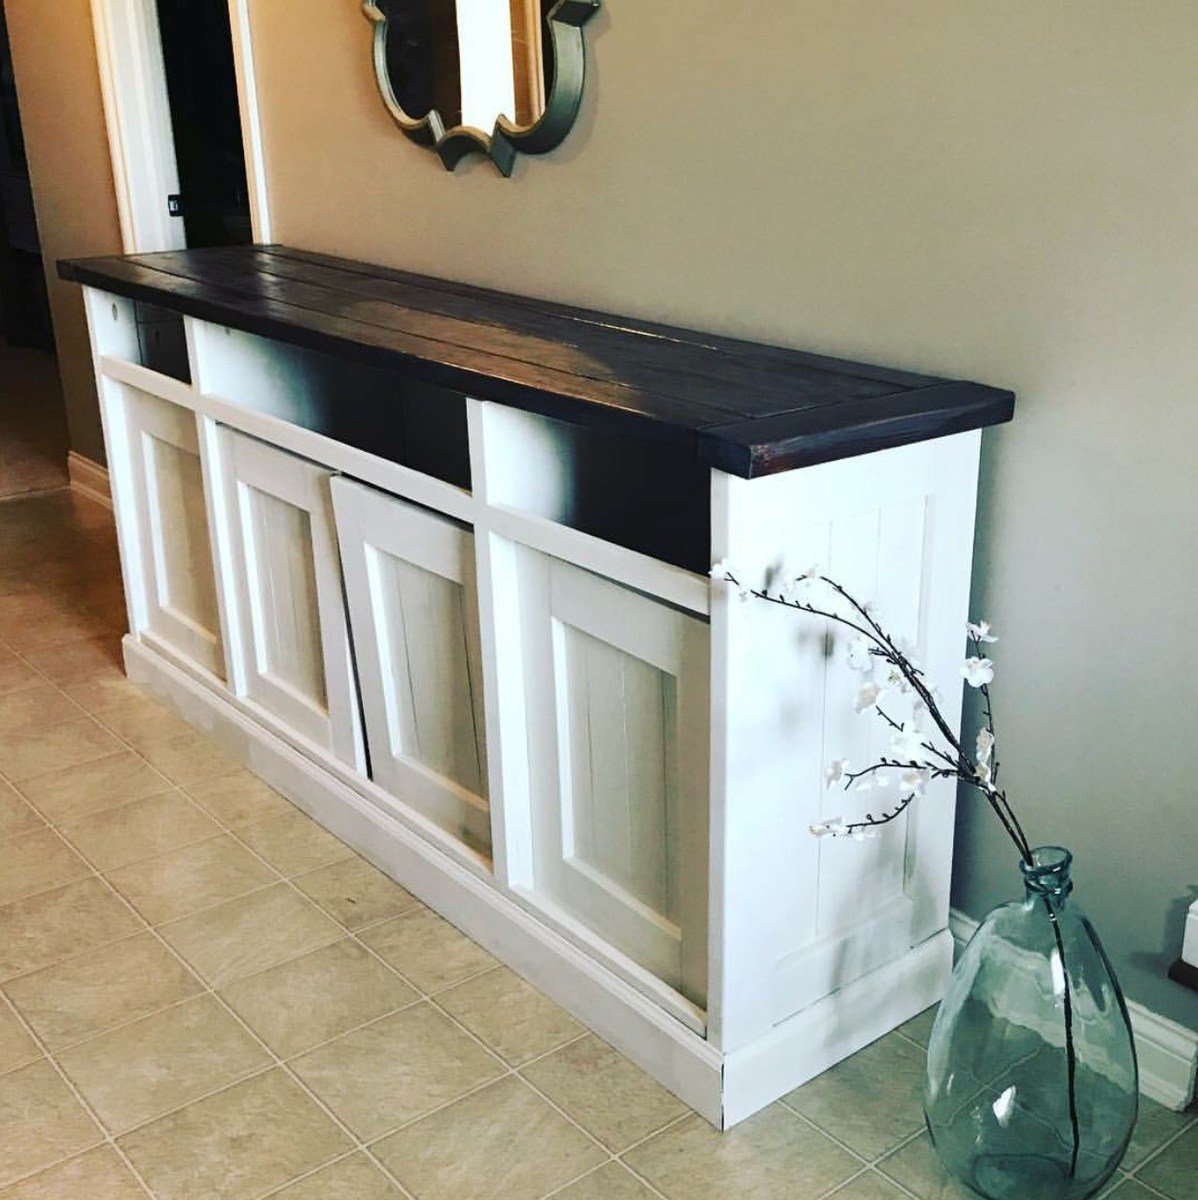
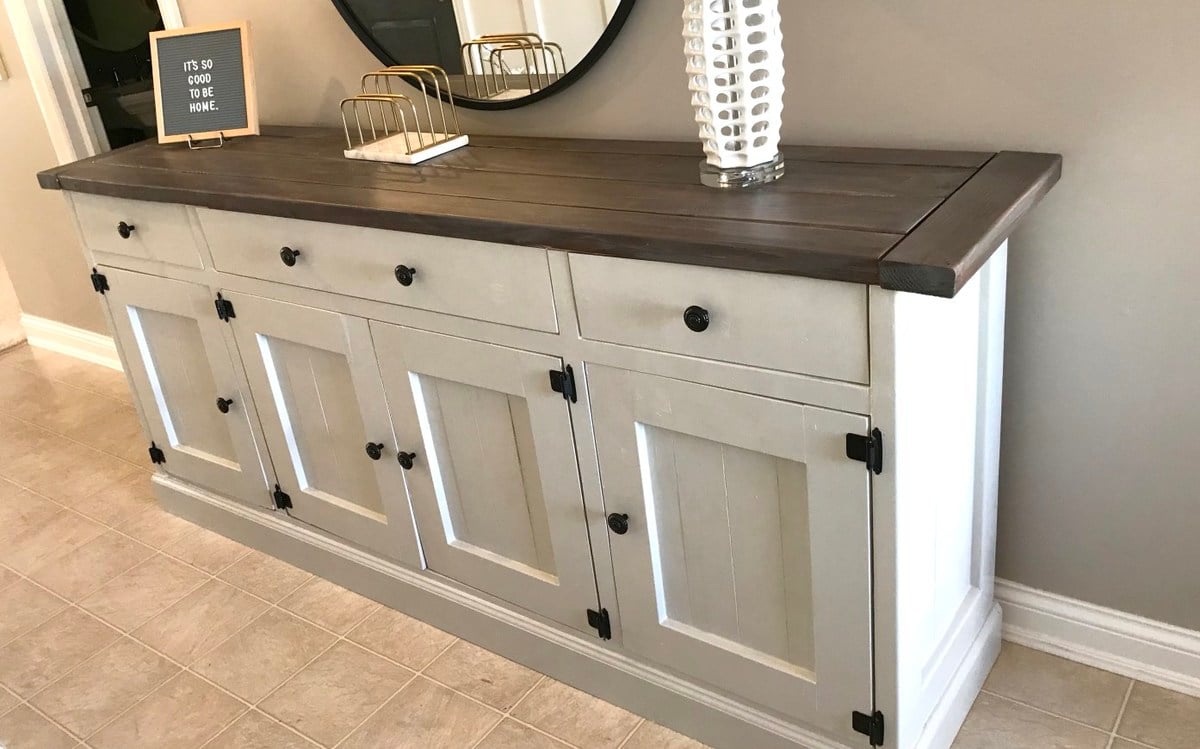
DIY Rustic Sideboard
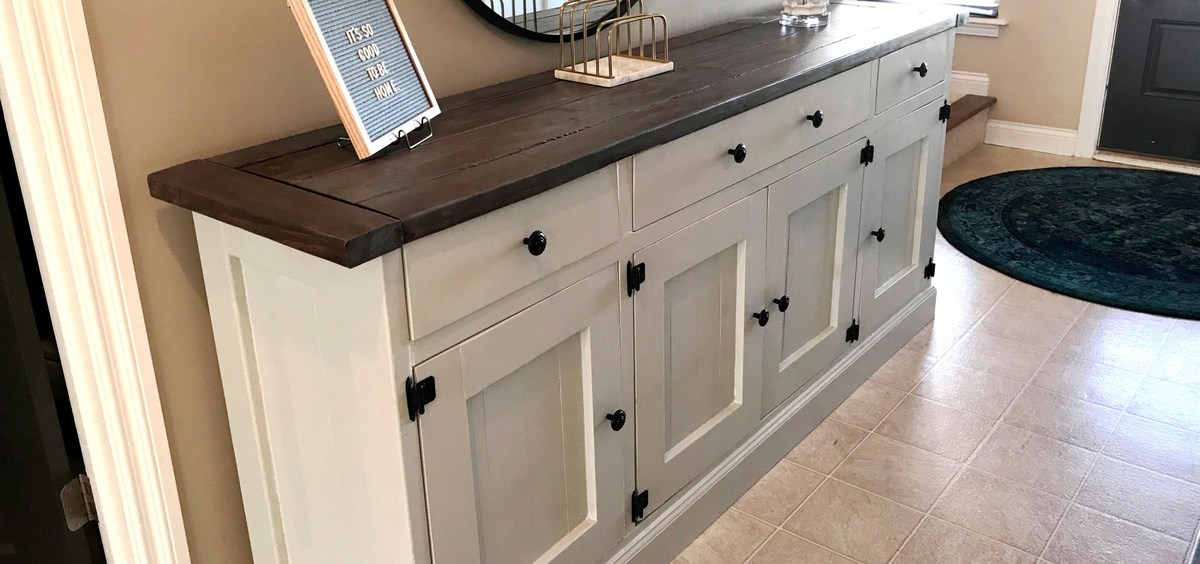
I worked on this project over the course of a few months, and I absolutely love the result! I posted all the info at my blog: http://www.designatedspacedesign.com/2017/10/01/a-rustic-sideboard/
Built from Plan(s)
Estimated Cost
Around $400
Estimated Time Investment
Week Long Project (20 Hours or More)
Finish Used
I painted it repose gray by sherwin williams. The top is a mixture of dark walnut and weathered gray stains.
Recommended Skill Level
Intermediate
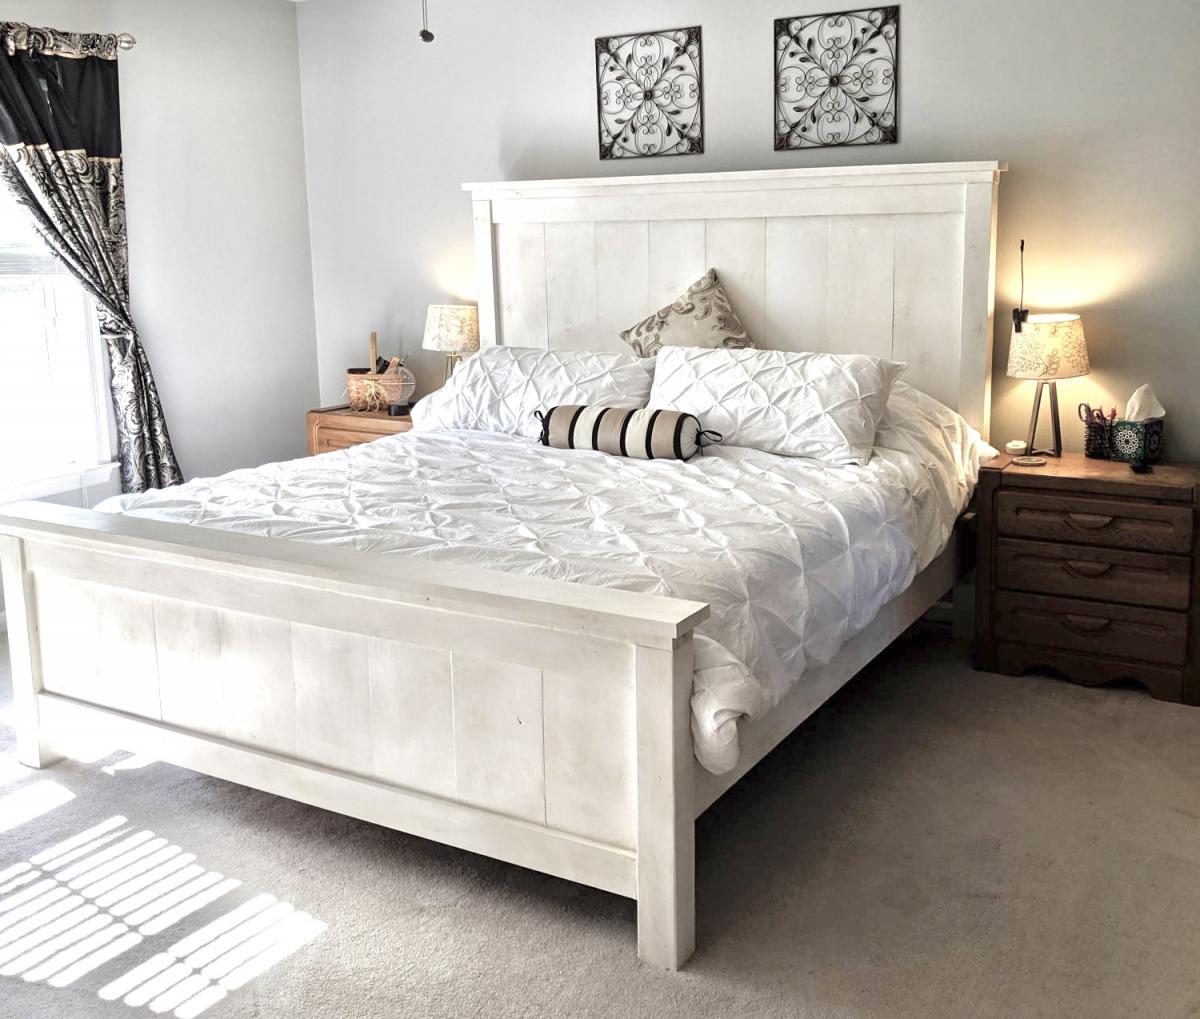
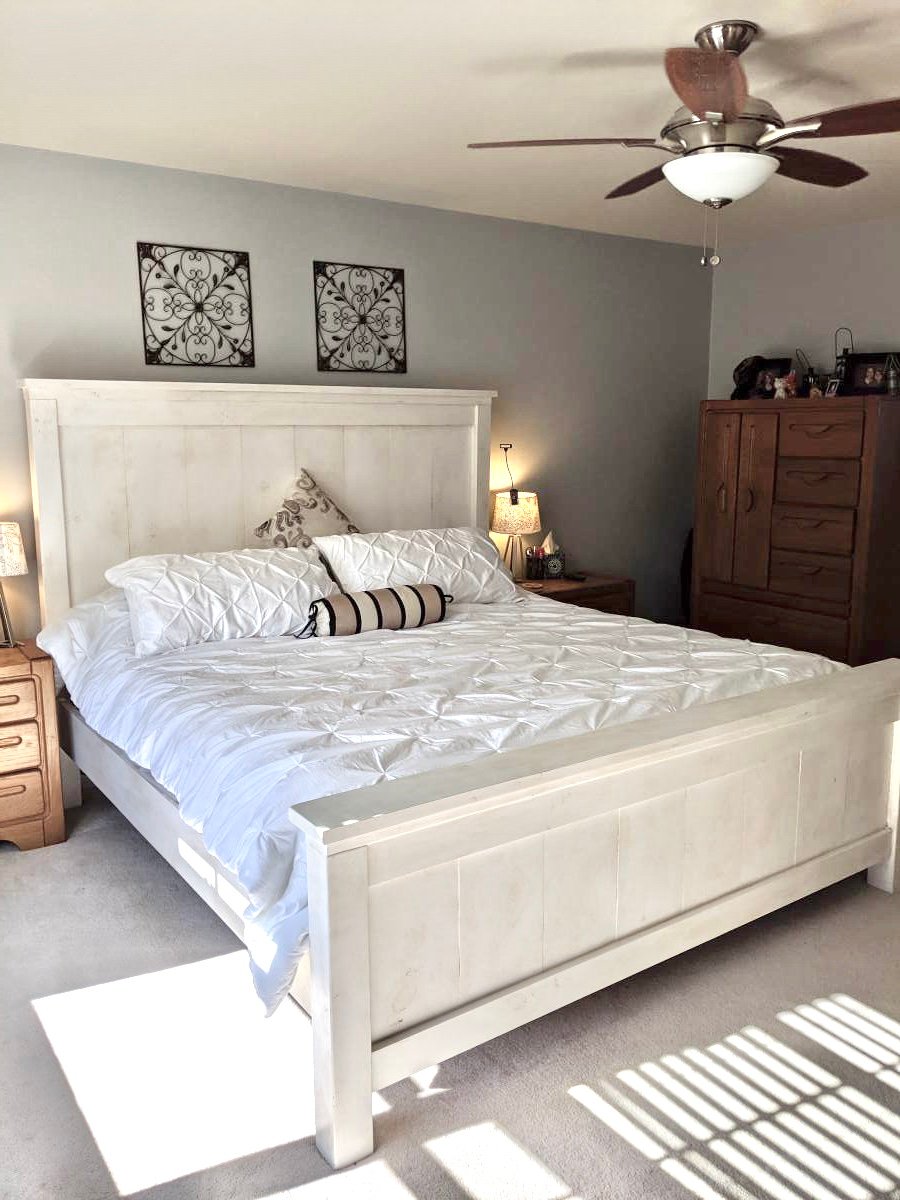
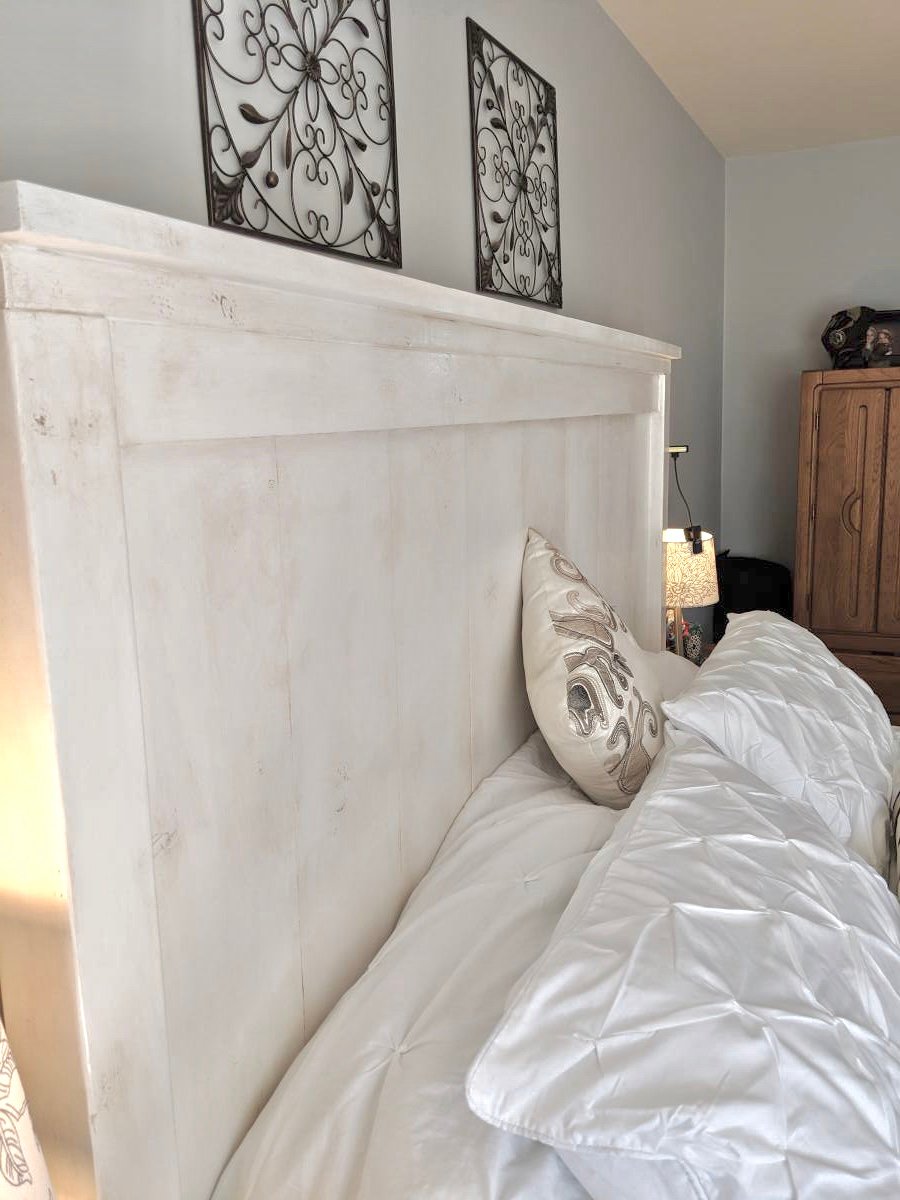
King Bed Frame for adjustable base
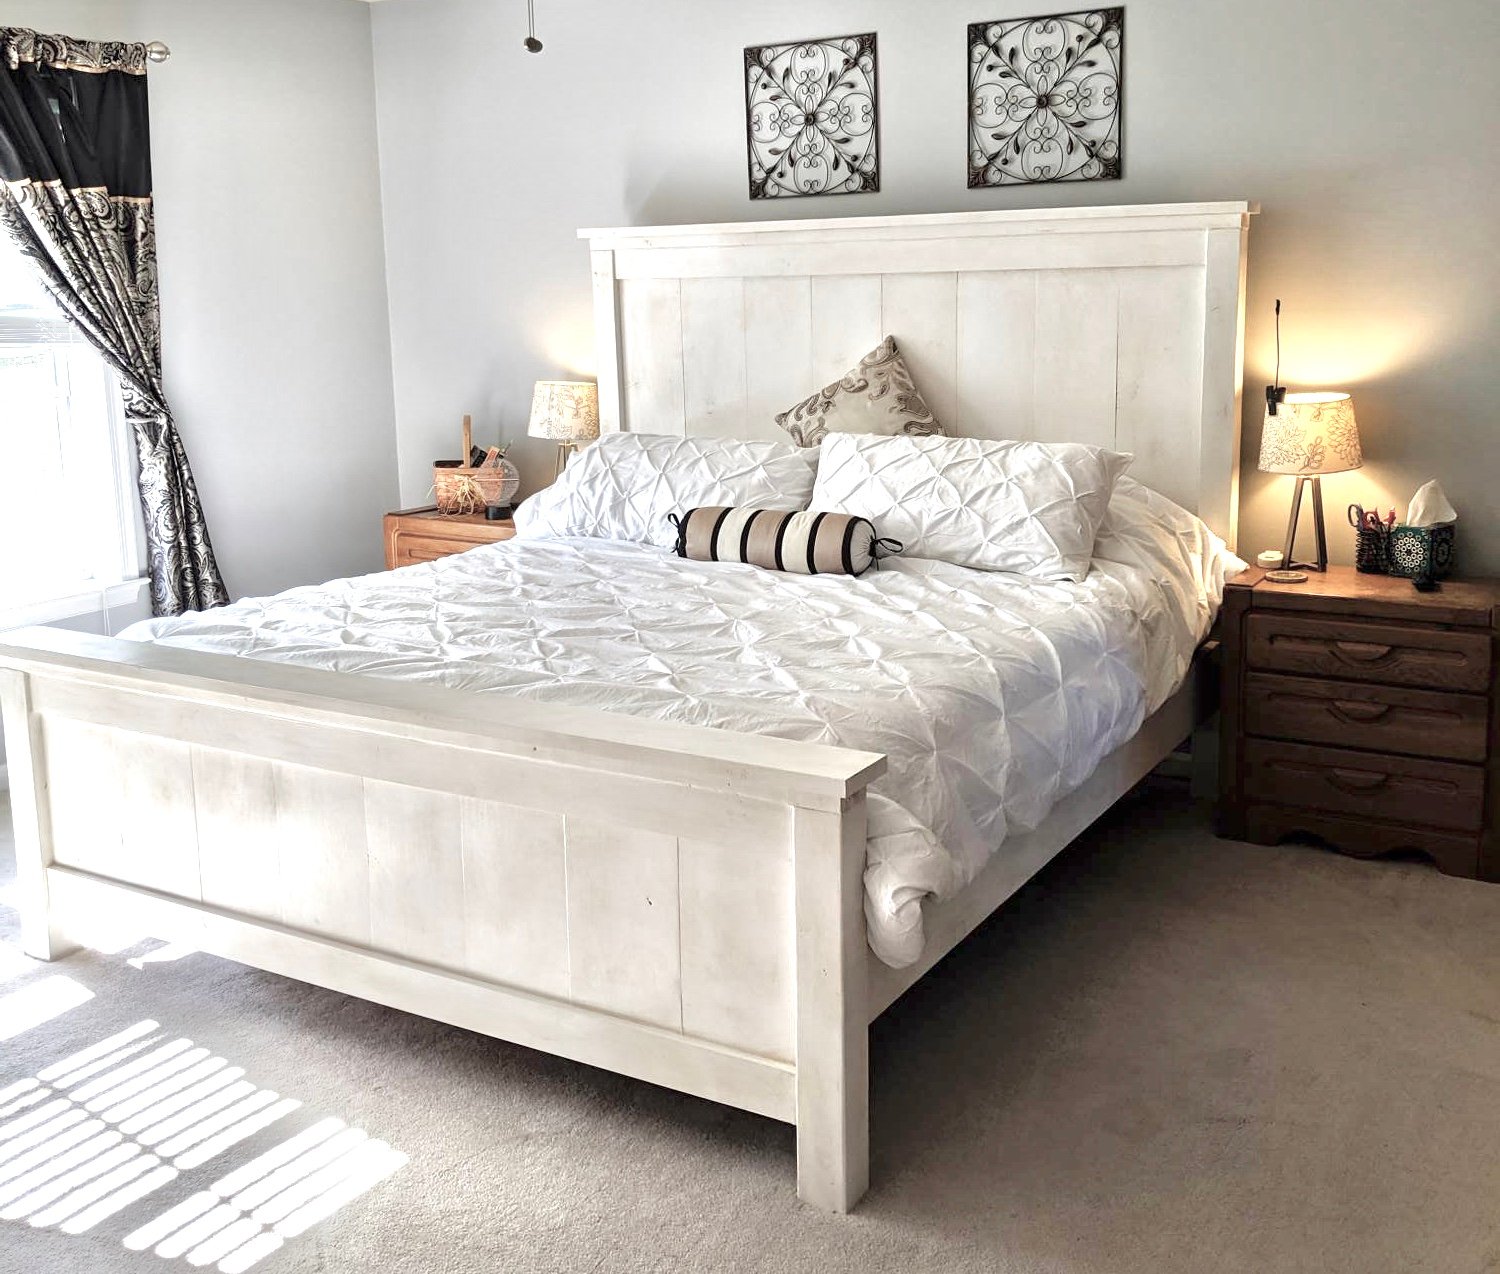
I could not find a frame which would accommodate my new adjustable king base. Modified Anna's plans by increasing the height of the headboard and footboard. Finished with chalk paint and antique finish for a rustic look. Side rails attached with mortises to allow for moving bed in 4 pieces if needed. Love my new bed
Built from Plan(s)
Estimated Cost
$300
Estimated Time Investment
Weekend Project (10-20 Hours)
Finish Used
Chalk paint (purchased from Habitat for Humanity re-store) using recycled paint. Finished with three coats of Annie Sloan wax
Recommended Skill Level
Intermediate
Comments
Sat, 11/30/2019 - 03:31
Hi! We are making this…
Hi! We are making this headboard this weekend. We want to increase the headboard height and footboard as well. Do you happen to know the cut measurements or how you adjusted the height of the 1x6 (or 1x8 as others used) to make it work? Yours looks perfect! Thank you in advance for any feedback!
Dining Table and Chairs

This was my first table - I added extensions by notching out the end 2x4's and making extensions that slide into the pockets. There were a few mistakes I made that will be corrected when I build my next.
I modified the length of the table down to 5 feet long, but with the extensions in it goes up to 8'. The table is also 34" tall due to a giant husband and Great Dane. The chairs were likewise modified in height and I made the backs a bit fancier using 1x2's and a nail gun.

Built from Plan(s)
Estimated Time Investment
Week Long Project (20 Hours or More)
Finish Used
Chairs are painted and waxed, table is stained and polyurethaned. When I do my next table it will be waxed.
Recommended Skill Level
Beginner
Outdoor DIY Grill Station
I saw this table and nesting grill station on your FB page. I changes it up a little bit, but the concept is perfect for my back yard deck.
Dharris
Built from Plan(s)
Outdoor rolling bar top
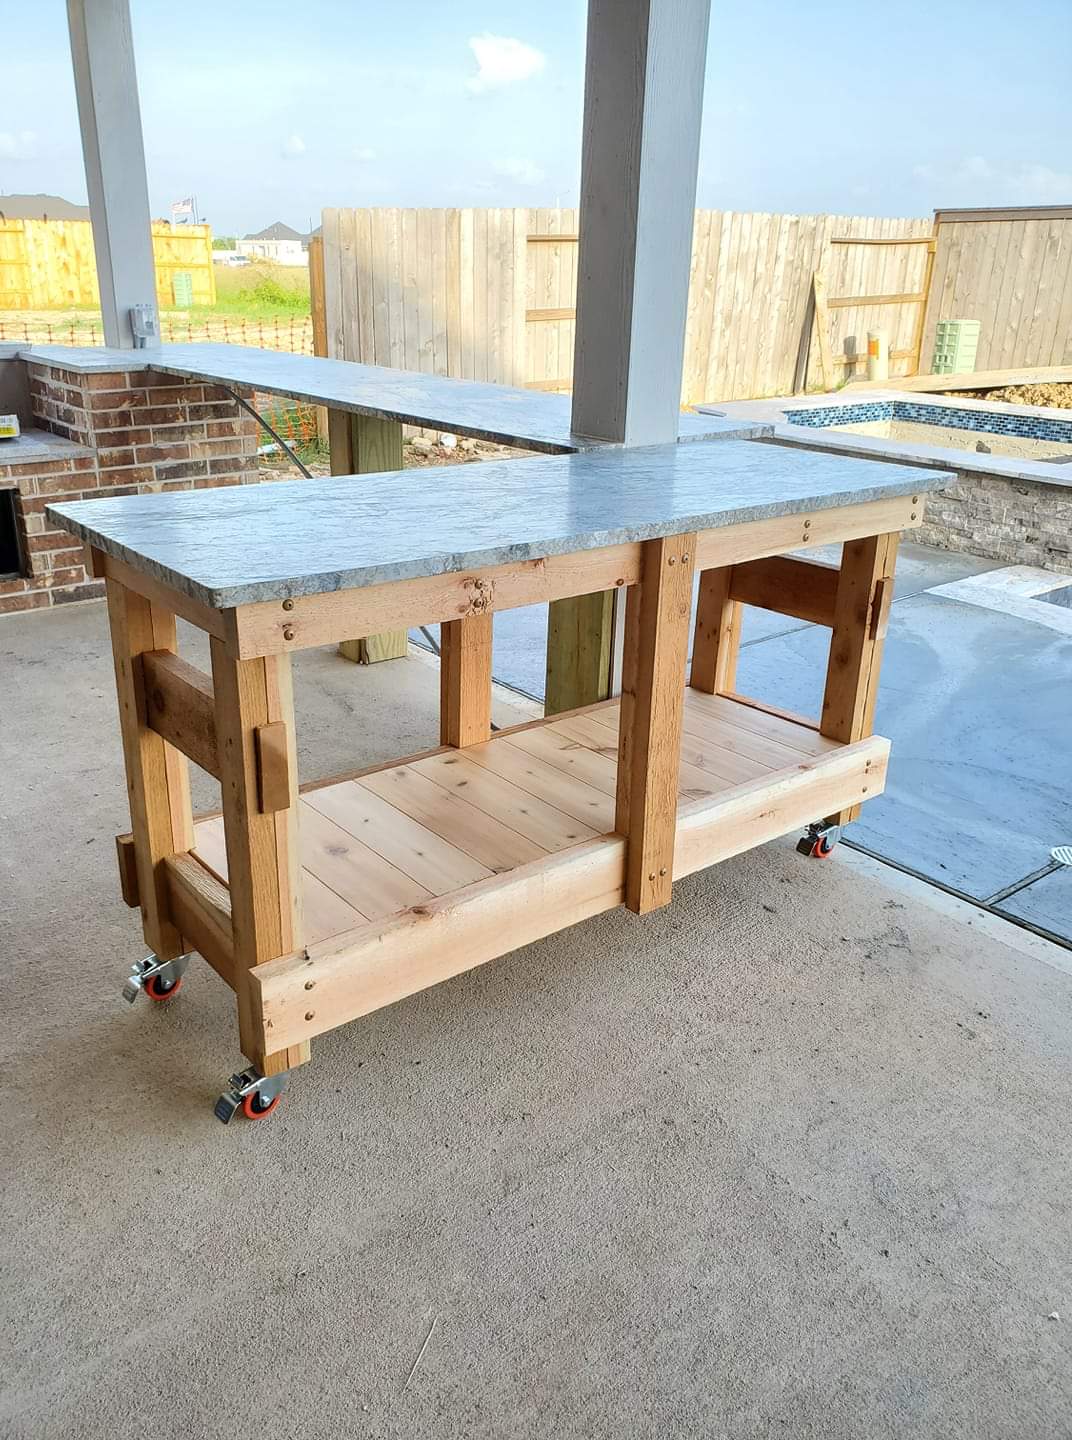
We had some leftover granite from an outdoor kitchen build and wanted to maximize the use of it. We loved the look of a rustic table from Pottery Barn and set out to find something that was asking the same aesthetic. I came across the Jilly and Mia workbench console and thought it would work great with some minor modifications. I shortened the overall length and height, went with some heavy duty casters to support the weight of the granite, and reinforced the cross beams that would support the 3/4" plywood sheet and granite. I went with cedar for this build since it was outdoors and I'll finish it with a clear sealant.
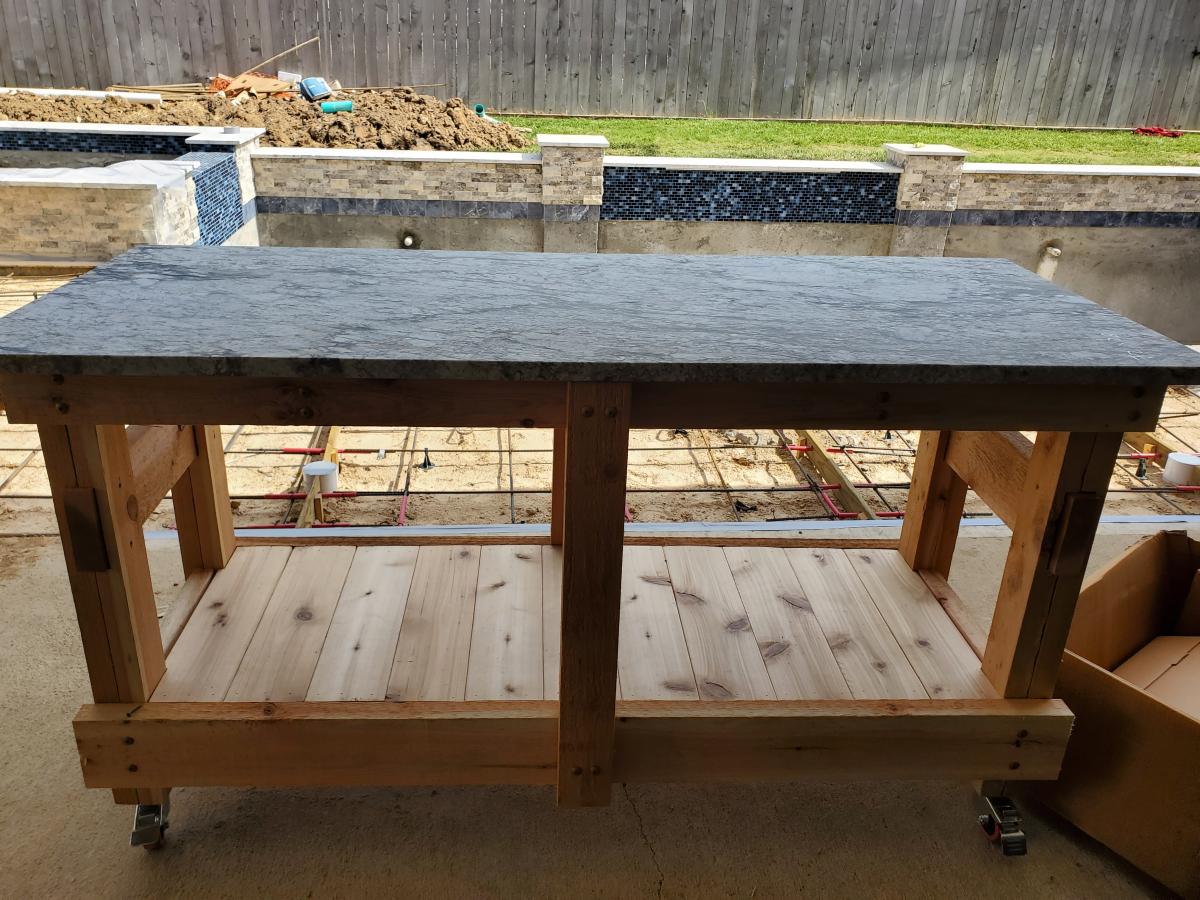
Built from Plan(s)
Estimated Cost
$300
Estimated Time Investment
Day Project (6-9 Hours)
Recommended Skill Level
Intermediate
Comments
Modified for double hanging

I used 8 ft precut boards for shelves and modified the design so there was enough room for two racks on each side. In addition I screwed 1x4 to the studs to secure the shelving to the wall. I have a 5 year old climber so it was best to be proactive and secure it. It was easy project took about 4 hours to complete. I plan to paint the vertical boards a medium gray and stain the shelves a dark coffee color.
Built from Plan(s)
Estimated Cost
$350
Estimated Time Investment
Afternoon Project (3-6 Hours)
Recommended Skill Level
Beginner
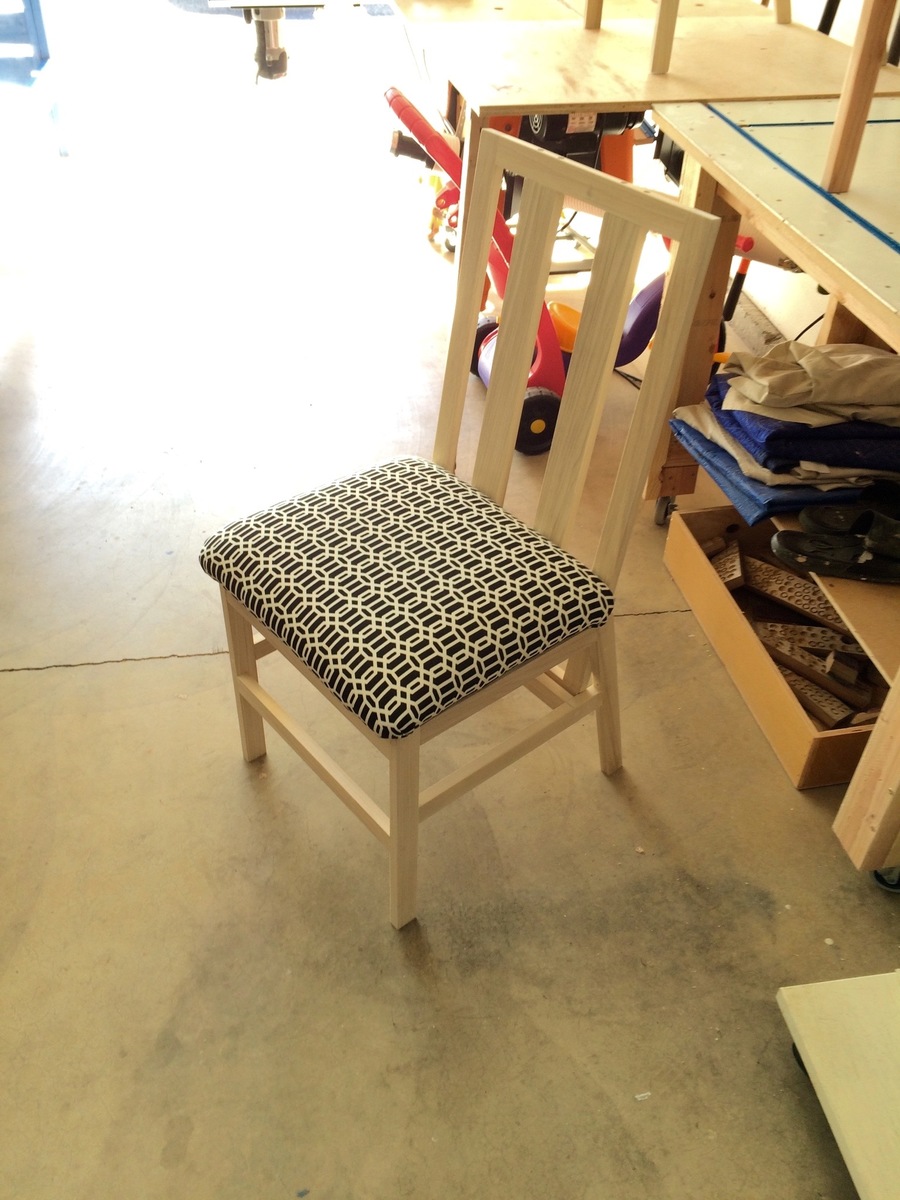
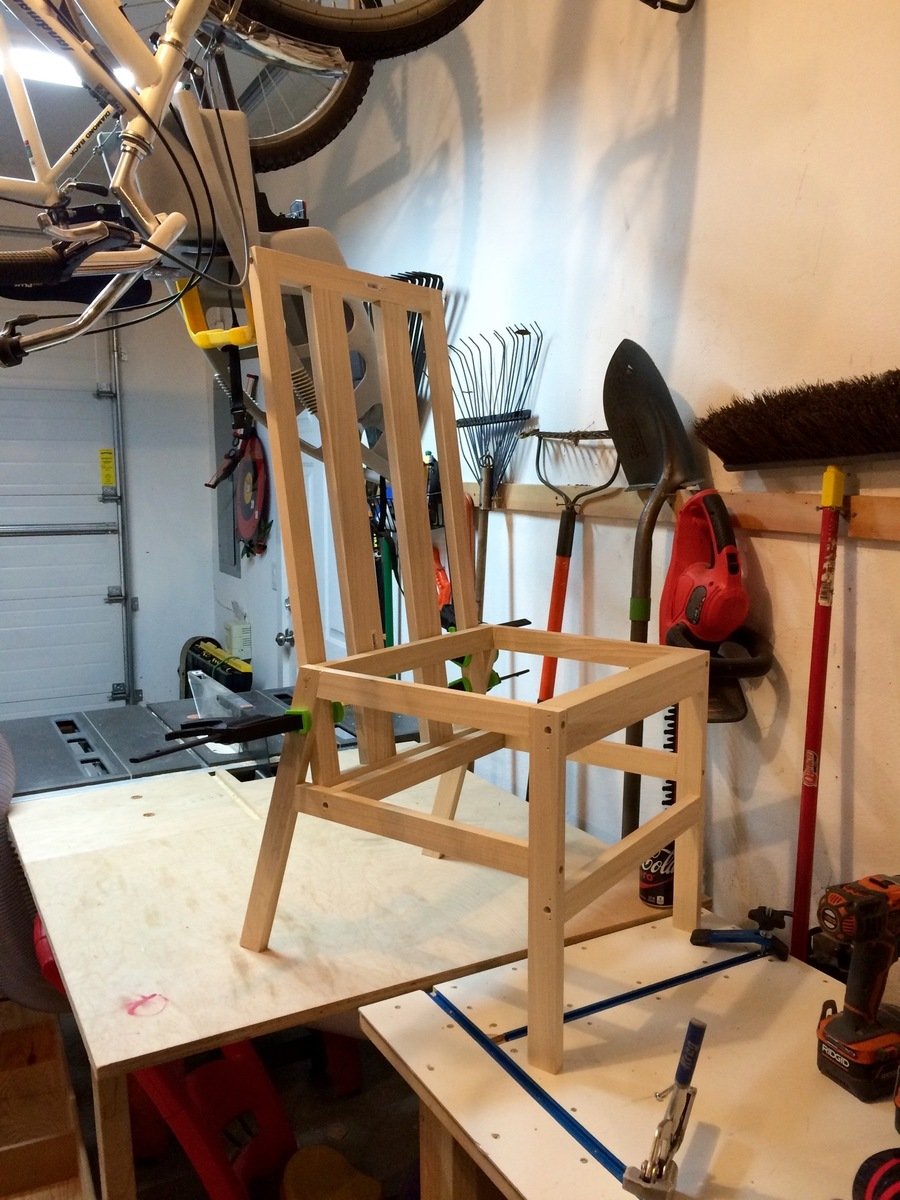
Harriet Chairs (by me)
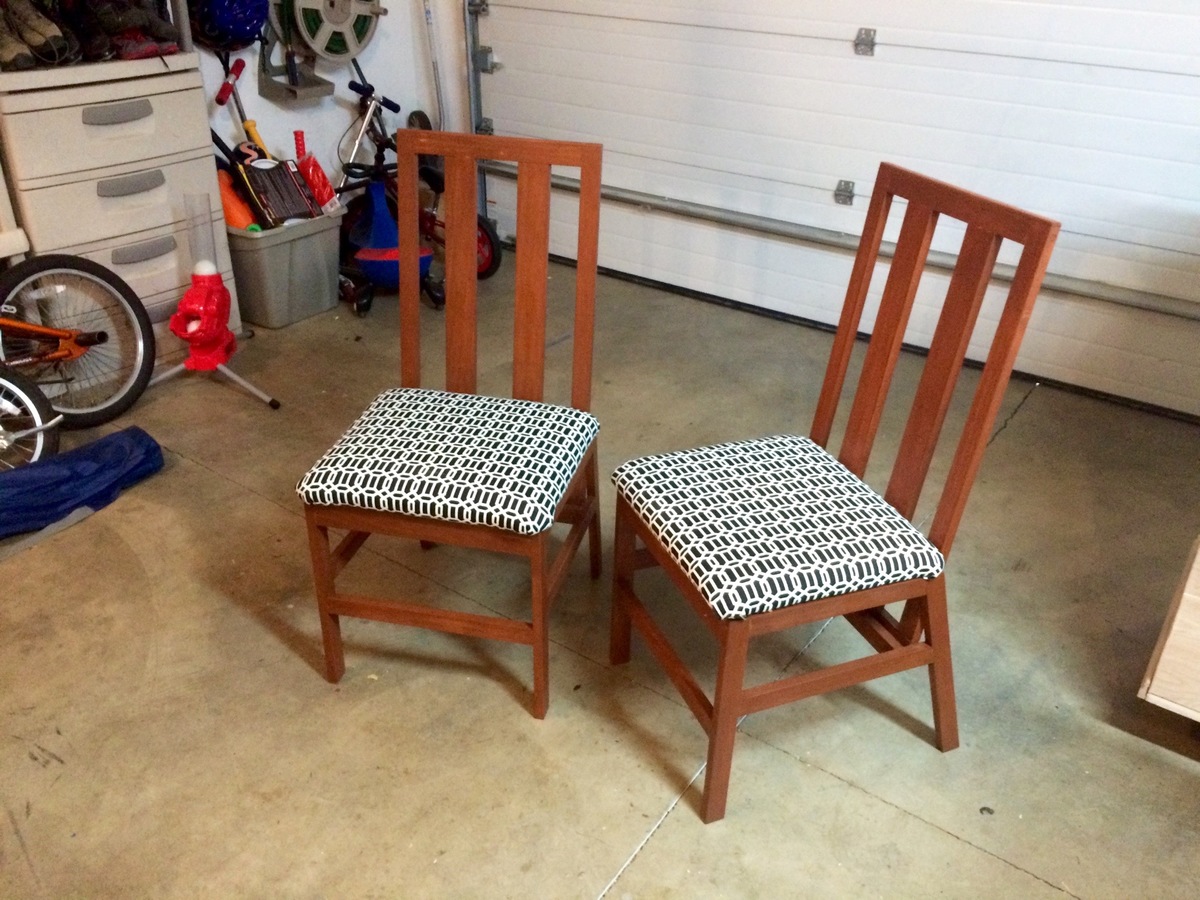
I'm pretty happy with the way these chairs turned out. It was a fun project as I did a few first, which included going to the fabric store (long waits) and got to tackle some upolstery for the first time! I did end up with a few glue drops that did not take the stain, so I'll be researching tips and tricks to prevant that in the future!
Also, I made these out of Popular, which pre stain was a must for cherry stain. Next time, I would use Cherry!
Thanks to Joanne S for the original post and consults regarding the upolserty!!
Built from Plan(s)
Estimated Cost
80-100/chair (depends on materials used)
Estimated Time Investment
Weekend Project (10-20 Hours)
Finish Used
Golden Oak Wood Classics stain from Sherwin Williams. Tinted to match my existing chairs.
Recommended Skill Level
Intermediate
Comments

Fri, 05/01/2015 - 13:29
Awesome job!
These are spectacular! Beautiful build! Love the finish and the upholstery. Also I'm super impressed that you can't see any of the filled screw holes. Would love to know the technique you used to hide them so well - I'm going to copy that! :)
JoanneS

Fri, 05/08/2015 - 12:48
Thank you
Thank you both for the nice comments. I was please with the way these turned out too, despite some glue spots not taking up the stain. I plan on getting more disciplined in this area. For hiding the screws, I finally upgraded to a real countersink like this one: http://www.rockler.com/8-pro-tapered-countersink-bit at Rockler.
Instead of always forcing a dull one in and getting a crooked openings, this razor sharp one cuts beautiful holes with no effort! But watch out, I cut myself just adjusting the depth of the drill bit. I discovered these the last time I made some wine oak barrel chairs!
Fri, 05/08/2015 - 12:53
I almost forgot...
Since I use Kreg screws for almost everything, (even non-pocket hole stuff)because they are self tapping and won't crack the would I sure my countersink matched the head of the Kreg screws and than purchased a plug hole bit. Can be used on a drill, but better on a drill press. You have to keep the drill perfectly straight or the plug can break and get stuck in the bit!
Queen size storage bed with headboard storage
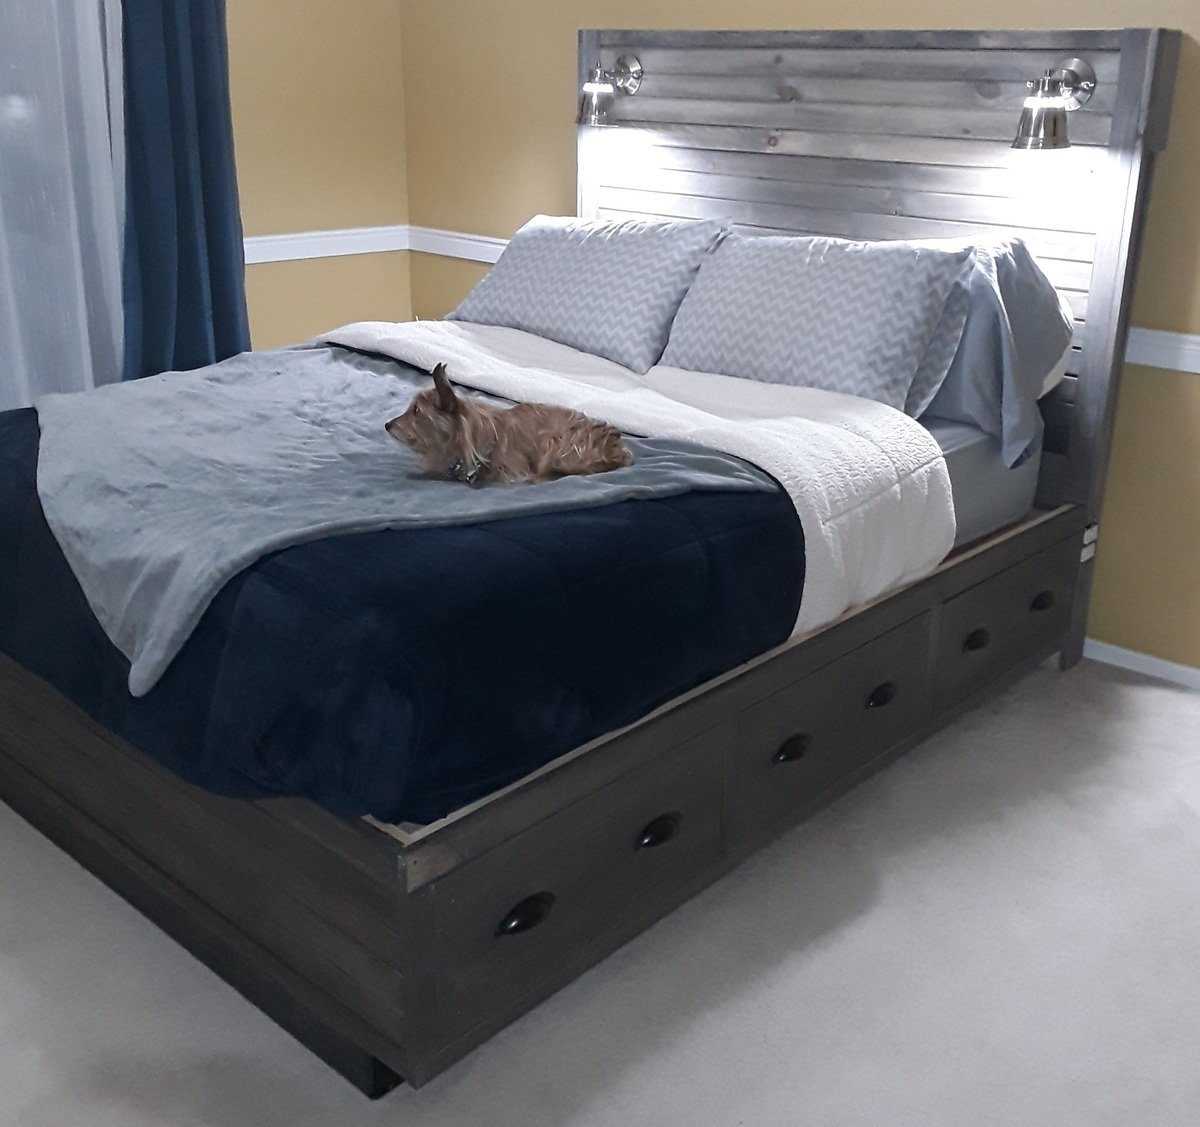
There was some deviation from the original plans.. We made the storage boxes a bit taller and the headboard has several new features.
First off, the under-bed storage takes up the whole size of the bed. So the drawers (six of them) are nice and deep. One of the drawers is actually the dog's bed now.
The picture doesn't show it but behind the headboard there are cubbies for storing books, tablets, phones, glasses, etc.
On both sides of the headboard there are four electrical outlets plus two USB charging outlets for charging tablets, phones, etc.
There are two reading lamps on the headboard as well.
I did the construction portion while my talented wife did the amazing paint job.
Built from Plan(s)
Estimated Time Investment
Week Long Project (20 Hours or More)
Finish Used
FAT paint, charcoal colour.
Recommended Skill Level
Advanced
Comments
Ana White Greenhouse
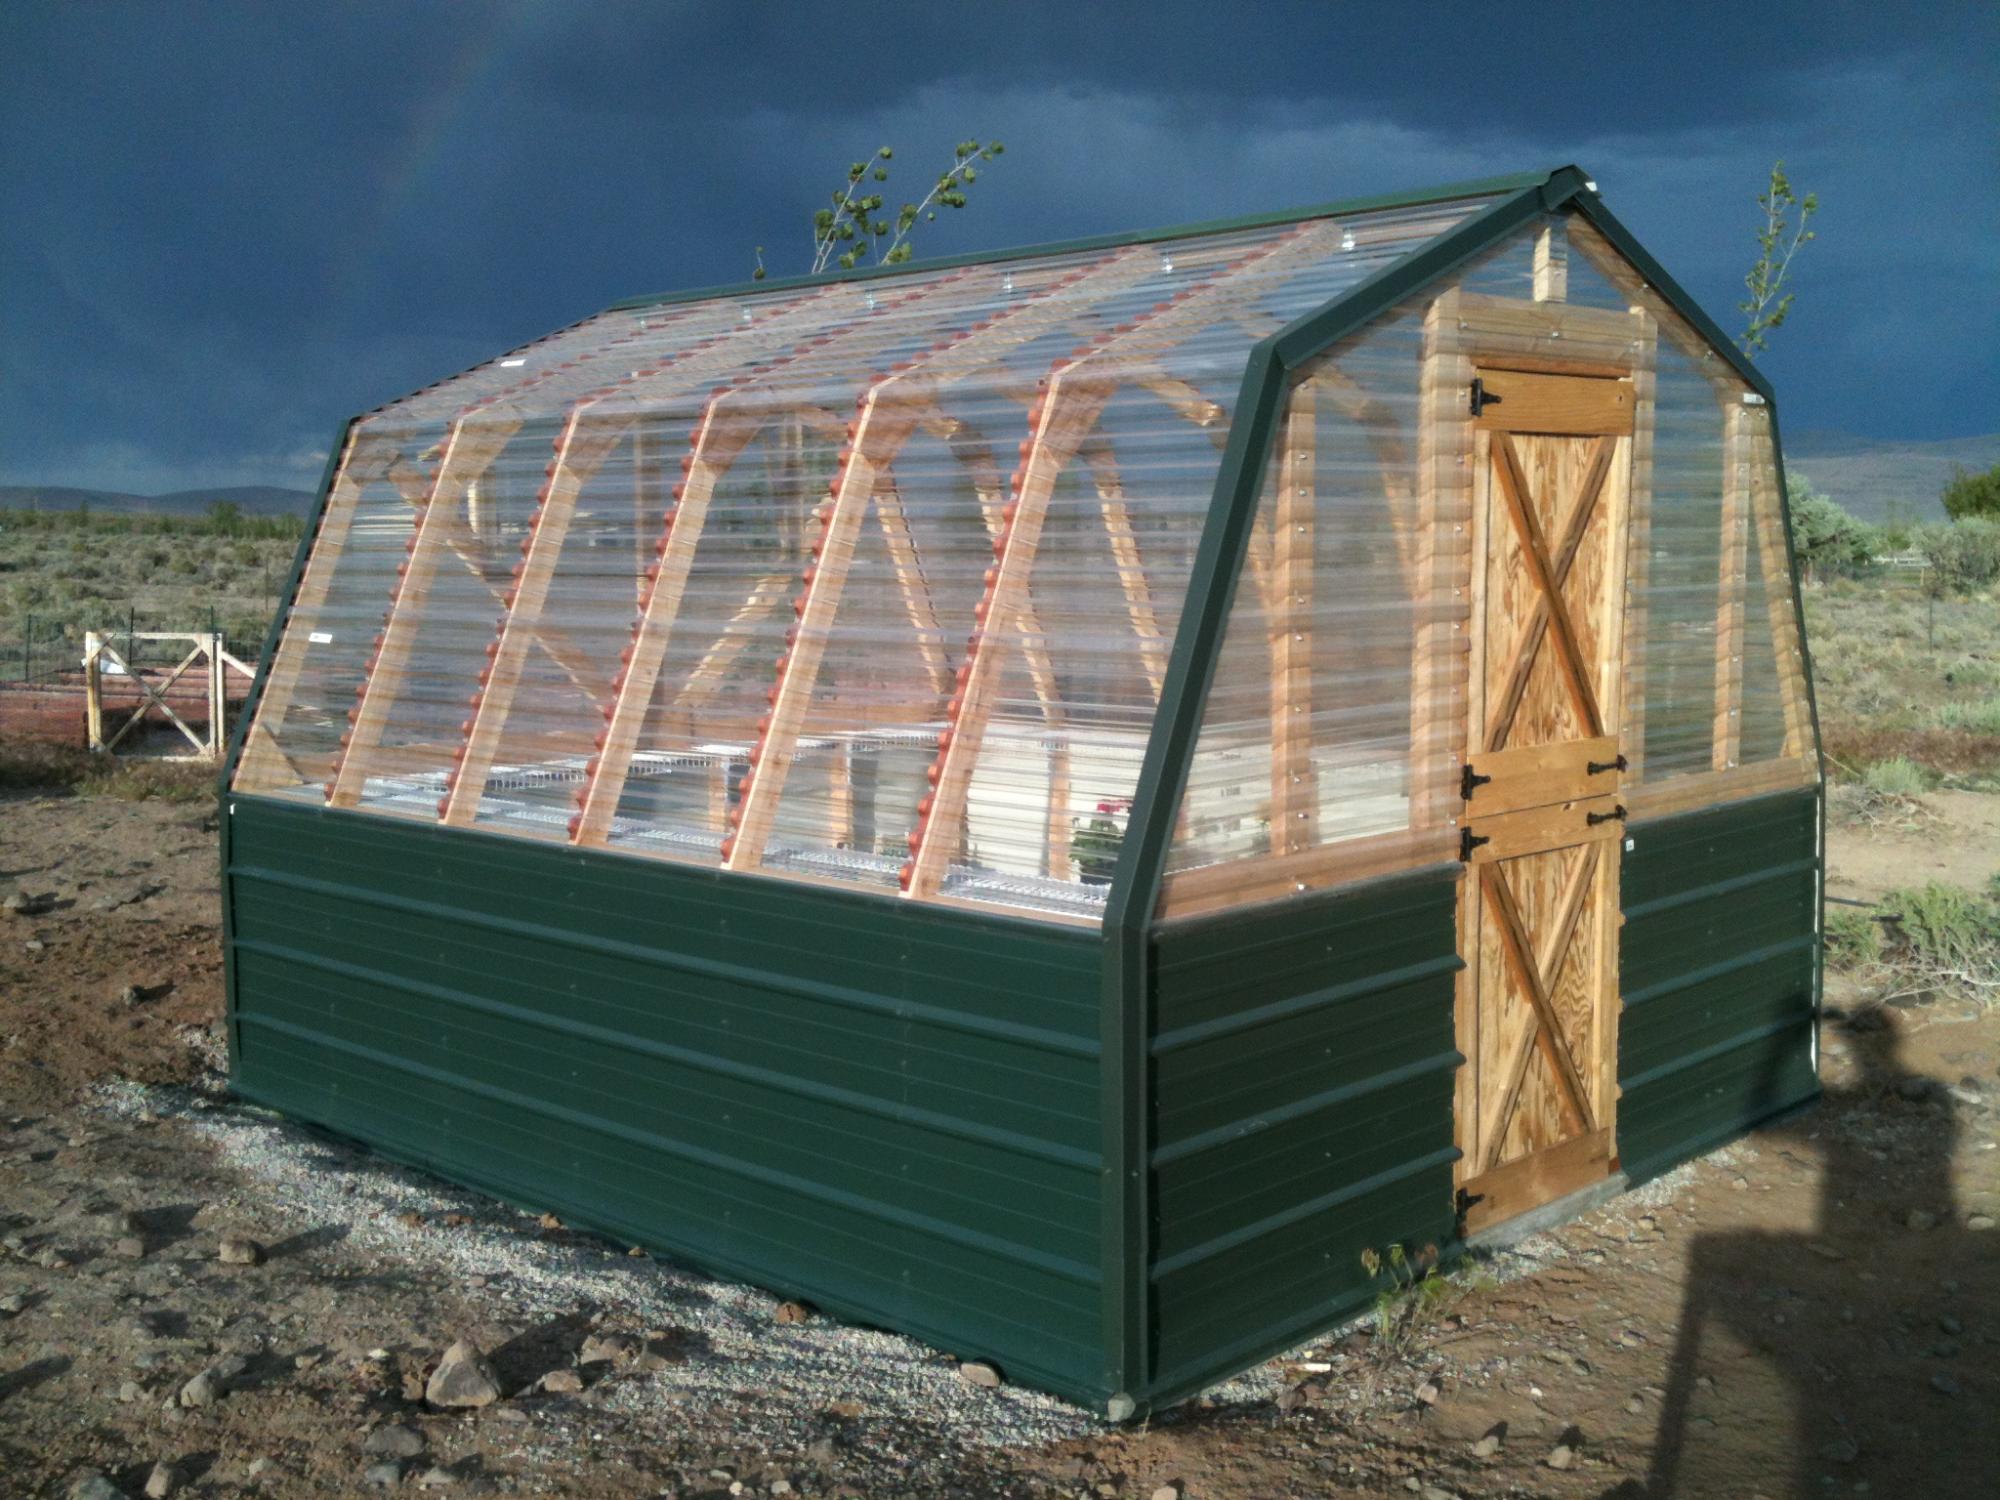
We built the first one about 8 years ago, and then the wind flipped it over and scattered it all over the back part of the property. I then dug footings and anchored the second one down; I was able to save the Dutch Door I made for the first one. Thanks for the plans!!!
Built from Plan(s)
Comments
Fri, 04/08/2022 - 10:35
Beautiful Greenhouse!
That's not going anywhere! Thanks for sharing, it looks amazing!
Seasonal And Holiday
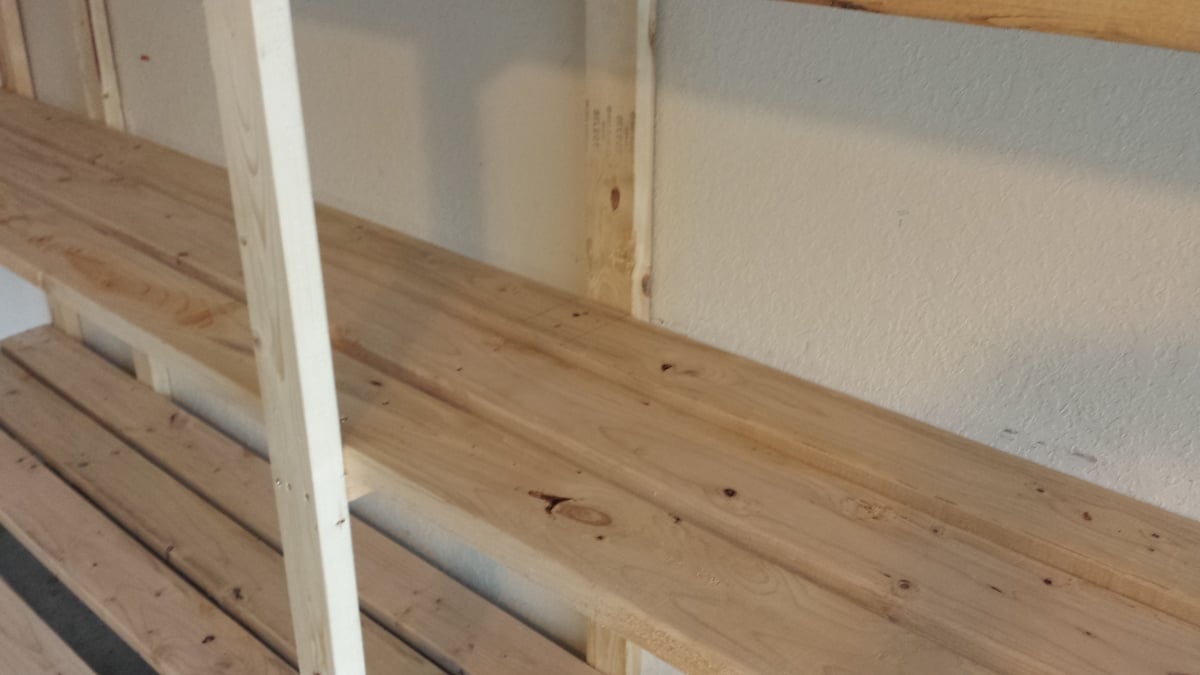
Garage Shelving - Some minor mods to Ana's great basic plan

My father-in-law and I knocked this project out in about 5 hours including the trip to the lumber yard. You've got a great basic design here! A few modifications we made:
1. I thought the depth of the shelves in the original plan was a little too shallow so I used 3 2"X6"s instead of the 4 2"x4"s. That made the shelves 1 1/2" deeper. Although 2"x6"s are obviously more expensive, the overall cost for the project didn't change much because we only had to use 3 boards per shelf instead of 4. This also reduced the amount of screwing and made it easier to position the shelf boards without taking measurements since we only had one middle board to deal with (instead of 2 with the 2"x4"s). We just eyeballed the spacing of the middle shelf board as we worked.
2. Since our garage has a 10' ceiling, I decided to go 8' tall with the unit. This allowed us to add a 5th shelf.
3. Some oversized tubs can be 18-20" high or more so I varied the height of each shelf -- 24" at the bottom, then 20", 18" and 16". There's approx. 24" available between the top shelf and the ceiling.
4. Due to the position of the garage door track, I had to notch out a couple feet at one side. The end support piece is only 6' high.
5. Since many storage tubs can be 16-18" wide, I made sure that there was at least 54" between 3 of the vertical support structures. This will allow us to store 3 tubs side-by-side and maximize storage. You might notice that I have two vertical supports that appear to be very close together near the back wall. I did this so I would have something on that side to attach more shelving to on that short wall where the garage door opener is.
The only cuts we had to make for this entire project were for the 18 1/2" 'braces' or support pieces on the vertical ladder structures. The shelves are either 14' or 12' (top shelf only) and the vertical 2"x4"s are either 8' or 6'. Most lumber yards will carry these lengths in either 2"x4"s or 2"x6"s.
We didn't use any wood glue, and I admit this may come back to haunt me. However, to get a good fit and eliminate gaps, I used clamps I already owned to squeeze the boards together before adding the screws. Everything feels very solid and sturdy to me.
Because of the extra height compared with the original plan, I was worried about it possibly tipping over (we have a 10-year-old who likes to climb ![]() ) so I made sure that 3 of the supports are lined up with the wall studs. After leveling the entire unit, I plan to anchor it to the wall using 3 1/2" screws.
) so I made sure that 3 of the supports are lined up with the wall studs. After leveling the entire unit, I plan to anchor it to the wall using 3 1/2" screws.
So for about $187 in lumber and maybe $20 in construction screws, I've got 76 feet of STURDY shelving that should accommodate hundreds of pounds! Not a bad investment at all...
Built from Plan(s)
Estimated Cost
$187 lumber + $20 construction screws
Estimated Time Investment
Afternoon Project (3-6 Hours)
Finish Used
None right now, but my wife wants to sand it and apply marine varnish to give it a shiny, yet still unfinished, look.
Recommended Skill Level
Beginner
Comments

Easy Peasy Garage Shelves
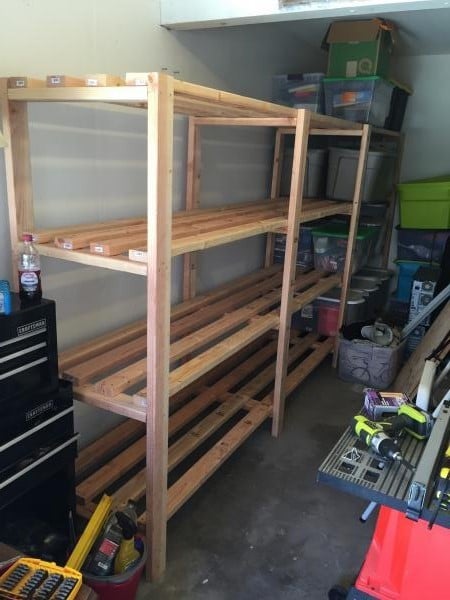
This was such an easy project to complete although it did take some time to measure and cut all the boards. I could only transport 2x4s at 8' so after cutting the height to 6' for the braces I used the extra 2' for the shelf width. The extra width really helped with some of my storage totes. I made the first section at 5' in length to handle the heavier totes, and the second section I used the full 8' board with a brace in the middle. I wish my garage was a little deeper to handle 16' of shelves as it would have saved me a good bit of time. I'm also glad I have an extra ryobi battery to charge while I assemble. Gotta love how fast those things charge. Can't wait to try another one of your plans.
Built from Plan(s)
Estimated Cost
Around $130 from the Depot. 2x4 at 8' $2.73 a piece and two boxes of screws.
Estimated Time Investment
Day Project (6-9 Hours)
Finish Used
none
Recommended Skill Level
Beginner
Comments
Barstools
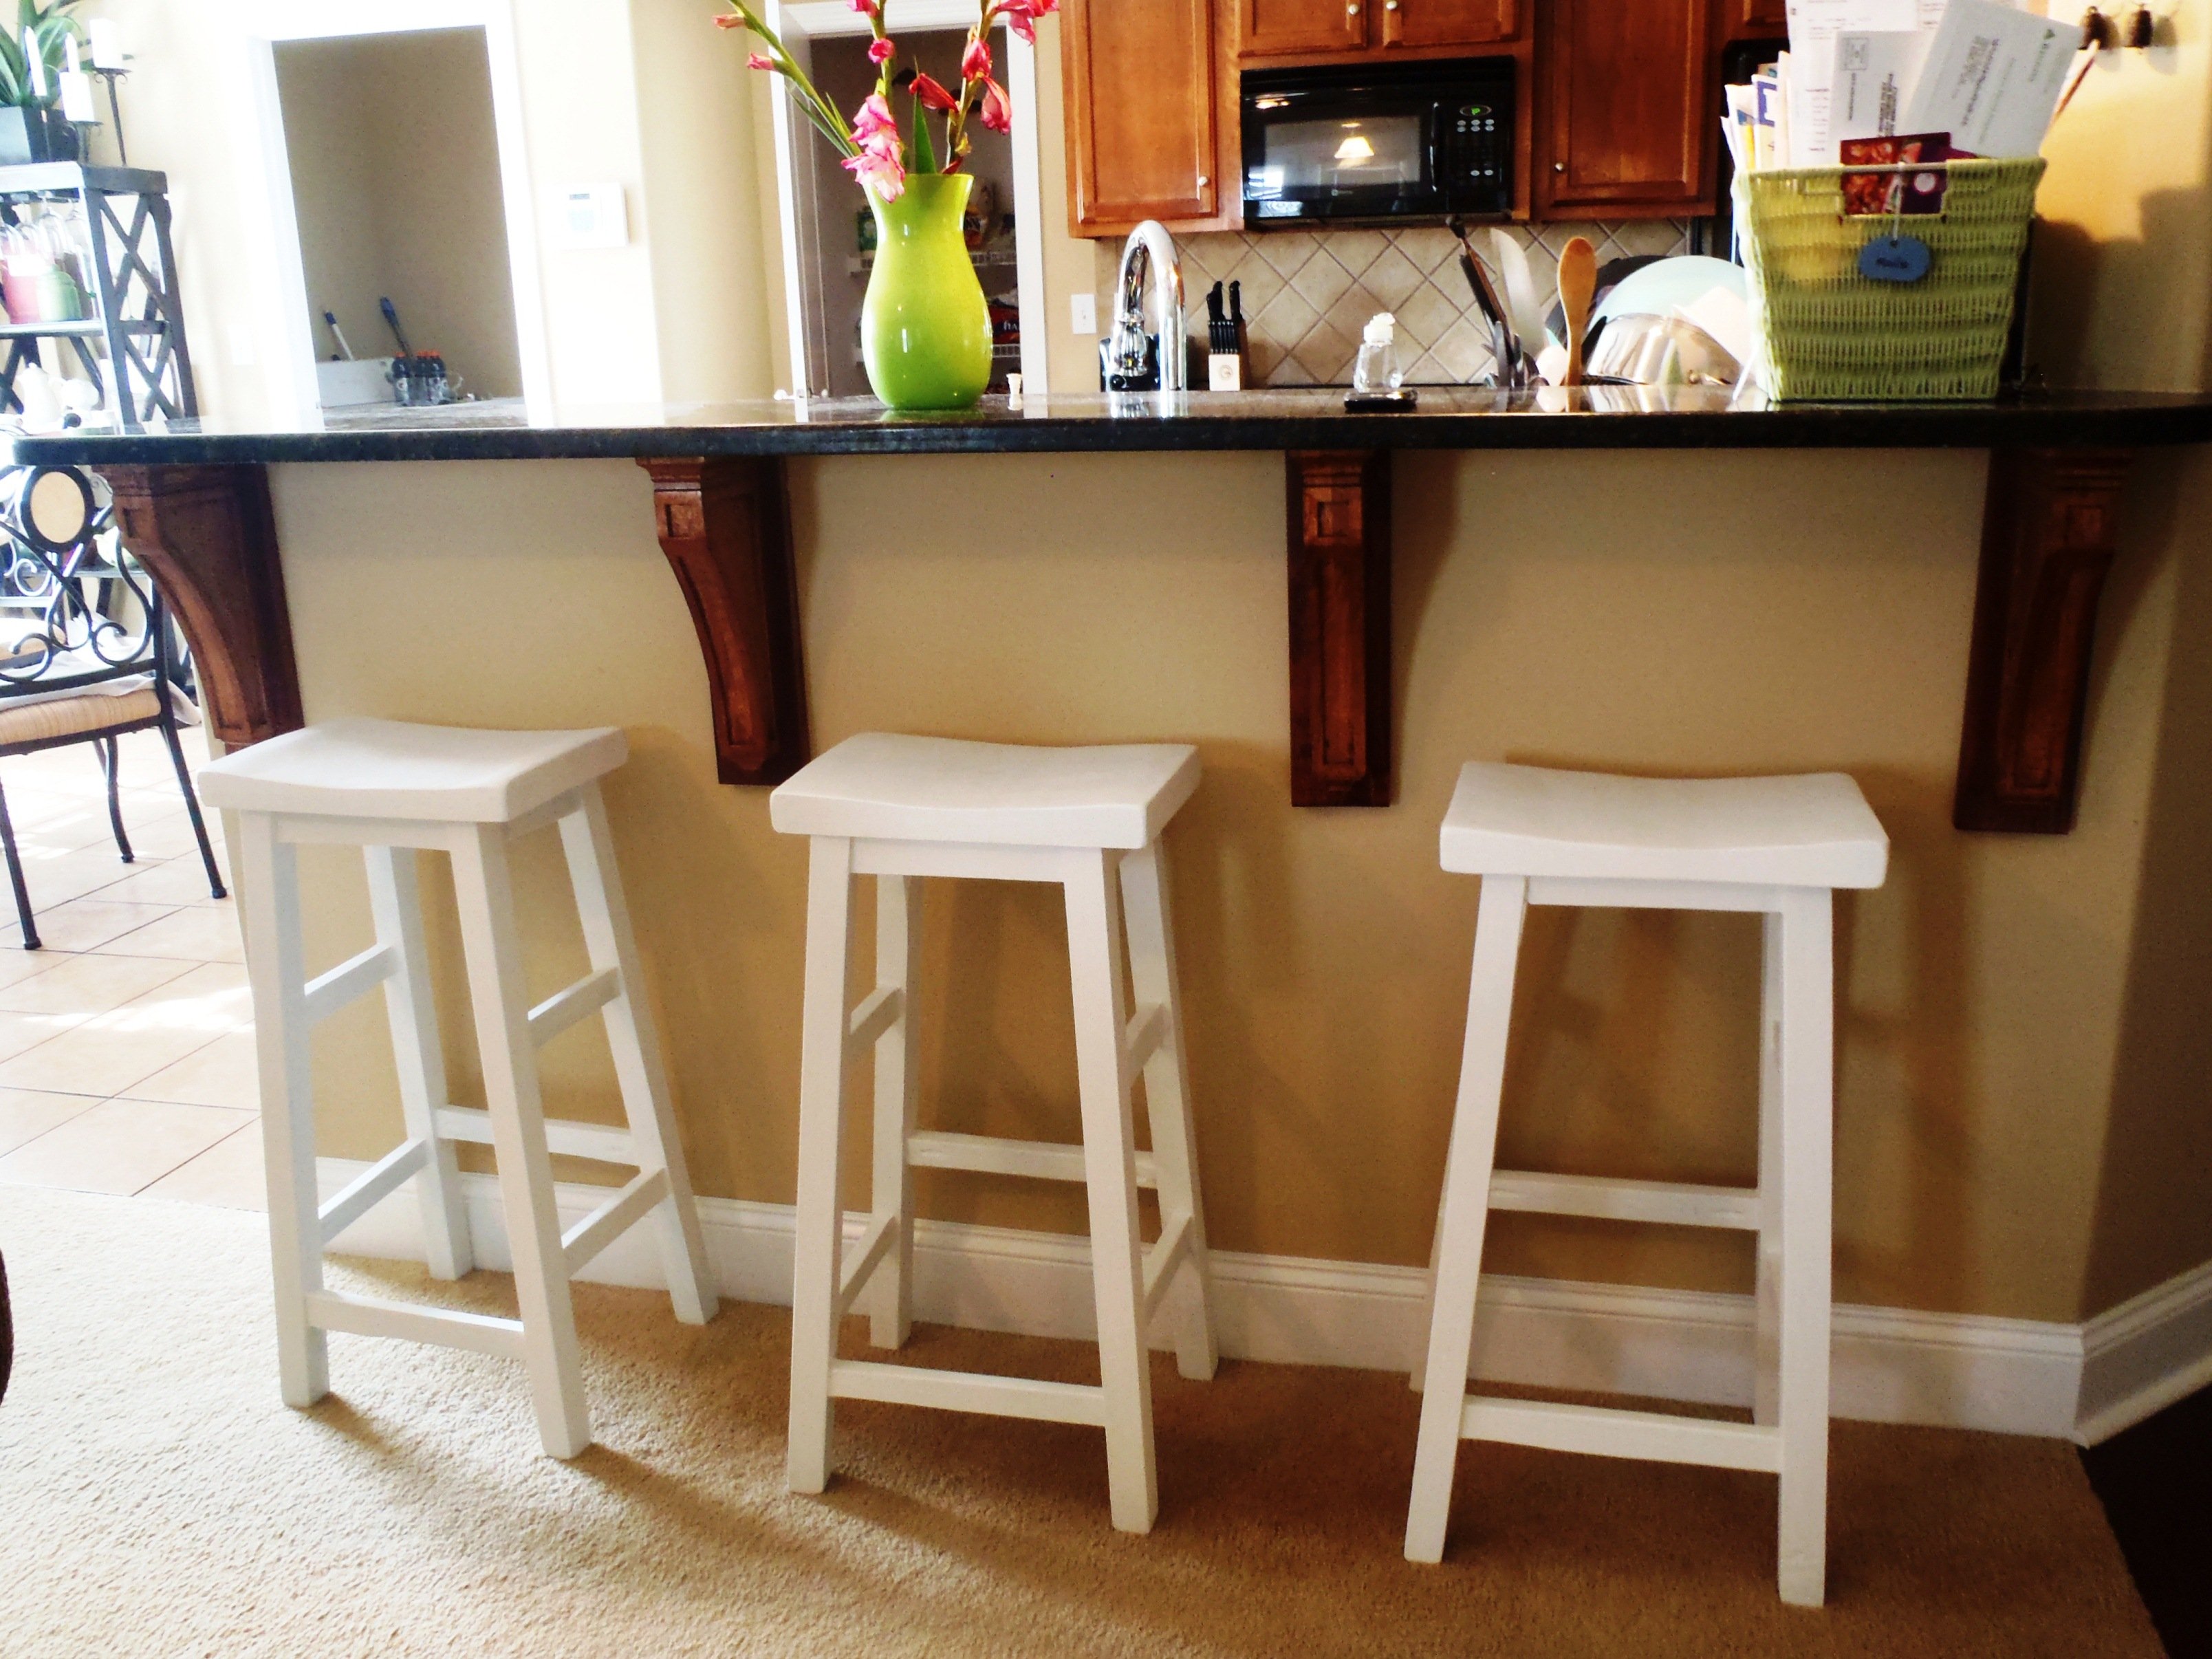
A 30" tall bar stools inspired by the plan simplest stool.
Built from Plan(s)
Estimated Cost
$ 40- $60
Estimated Time Investment
Afternoon Project (3-6 Hours)
Finish Used
valspar white paint
Recommended Skill Level
Beginner
Comments

Fri, 07/20/2012 - 05:32
I like your design. Finally
I like your design. Finally made an account and will be making matching ones. Thanks for the inspiration. If the better half doesn't like the first one I will have a new stool for my workbench
Tue, 09/04/2012 - 15:20
by adjusting circular saw
by adjusting circular saw depth and using chisel and hammer and lots of sanding :)
Beer Wall for Wedding

My cousin recently got married and wanted a beer wall at her wedding. I quickly searched Ana's site for the perfect plan and chose the Tall Panel Headboard for my starting point. With a few modifications it became a beer wall in no time at all. I love how Ana's plans can be easily modified to make a totally different project.
No fancy wood was used here. Just regular wood from the big box store. A jockey box was attached to the back side of the wall. It worked awesome!
Since I discovered this site in January, I've made close to 30 items from her plans. I'm ridiculously addicted and not just with Ana's site but also with her blog friends. For Valentine's Day I asked for a Air Strike gun and got it. It was better than jewelry and chocolates! I'm well on my way to collecting my own tools and learning how to save money by making it myself. Oh, and I can't even begin to tell you how impressed everyone is with my finished products.
Built from Plan(s)
Estimated Cost
roughly $200.00
Estimated Time Investment
Weekend Project (10-20 Hours)
Finish Used
Valspar paint from Lowes
Recommended Skill Level
Intermediate
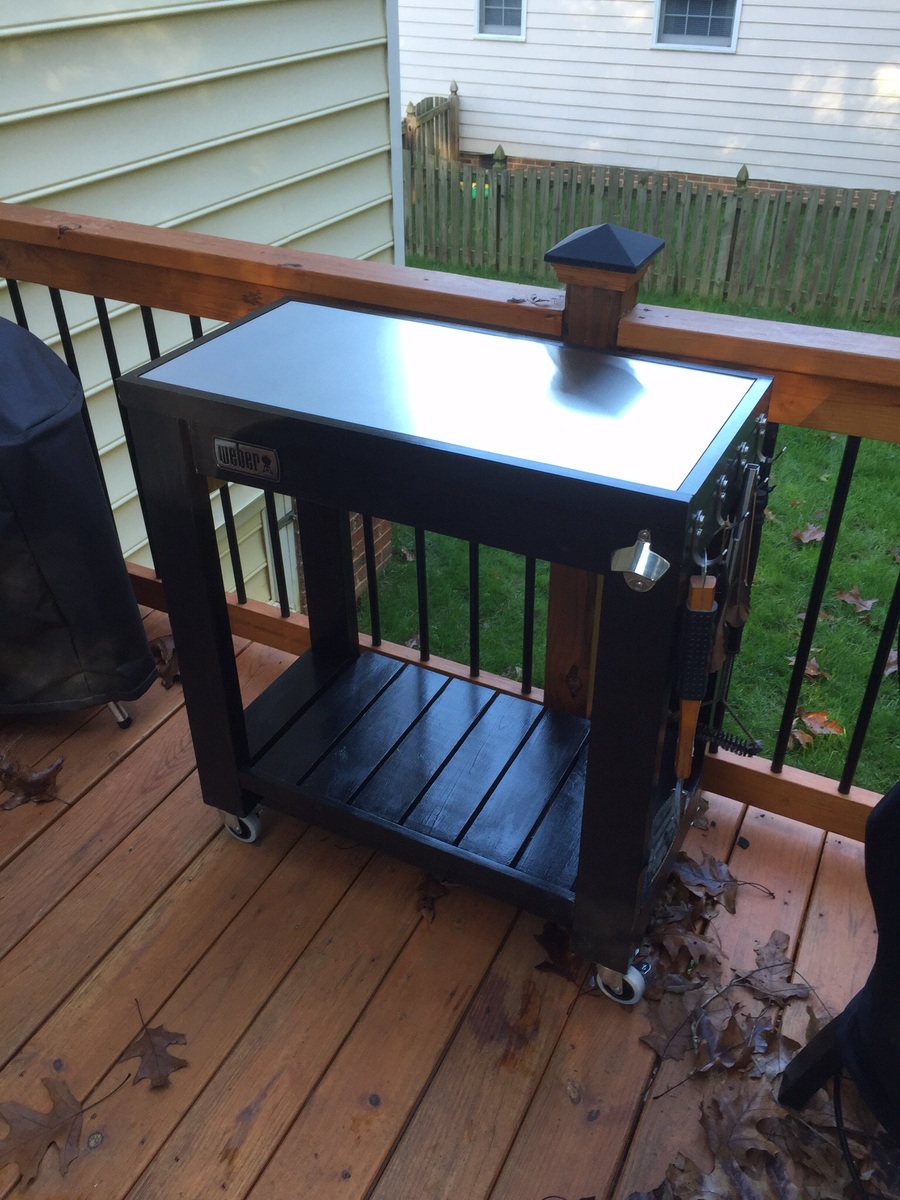
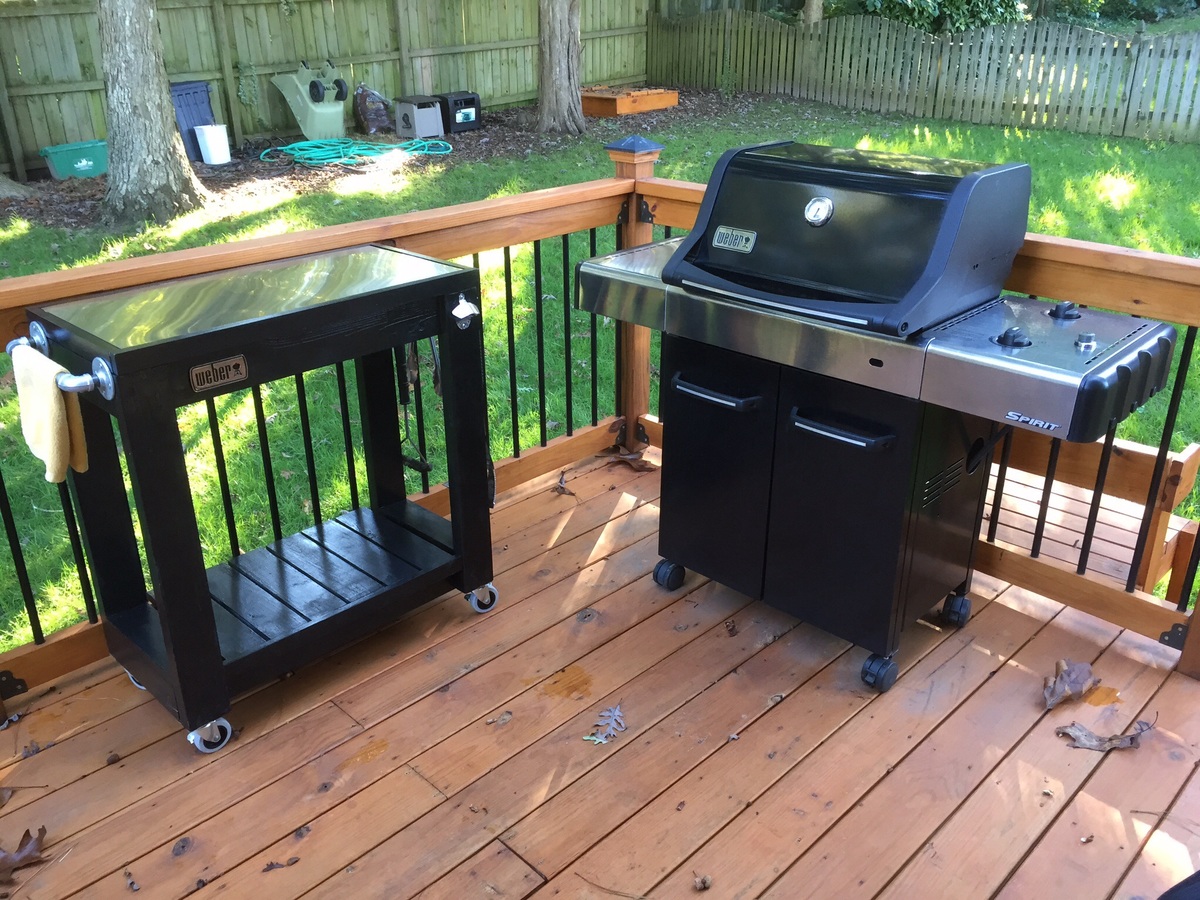
Rolling grill cart table
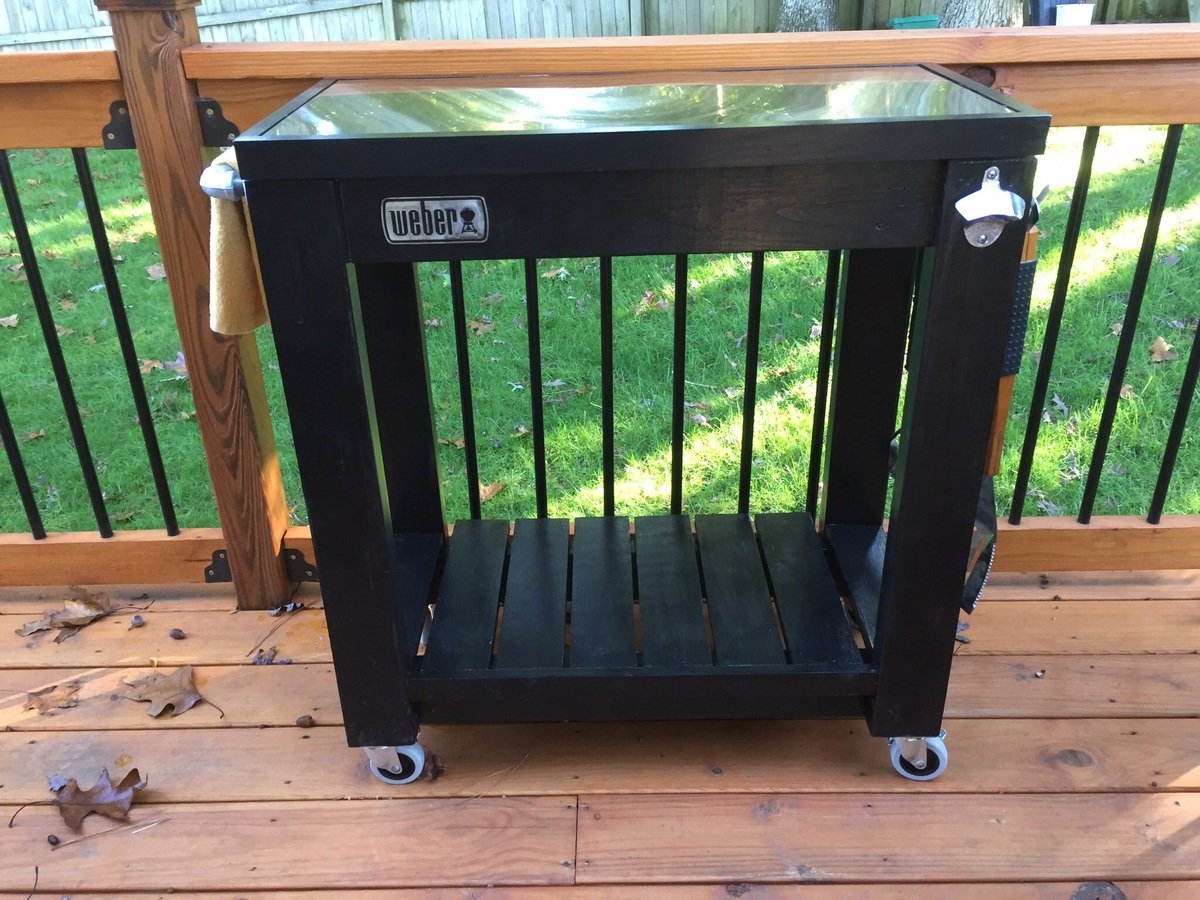
I made the countertop with 2 plywood boards screwed together and topped the stainless steel with heavy duty adhesive. I adjusted the plans a little to accommodate my space. Thanks for the plans! It was a fun build!
Built from Plan(s)
Estimated Cost
$100
Estimated Time Investment
Day Project (6-9 Hours)
Finish Used
Glossy black exterior paint
Recommended Skill Level
Beginner
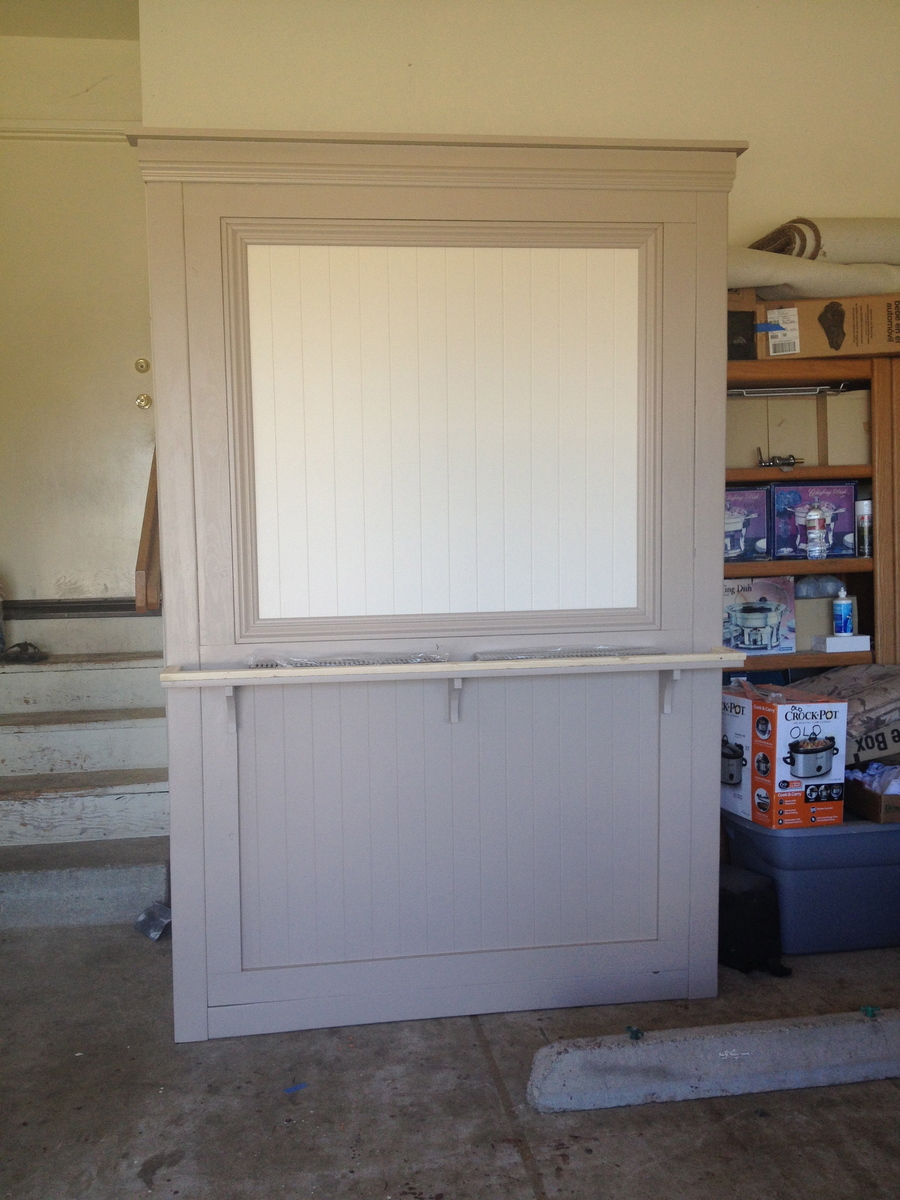
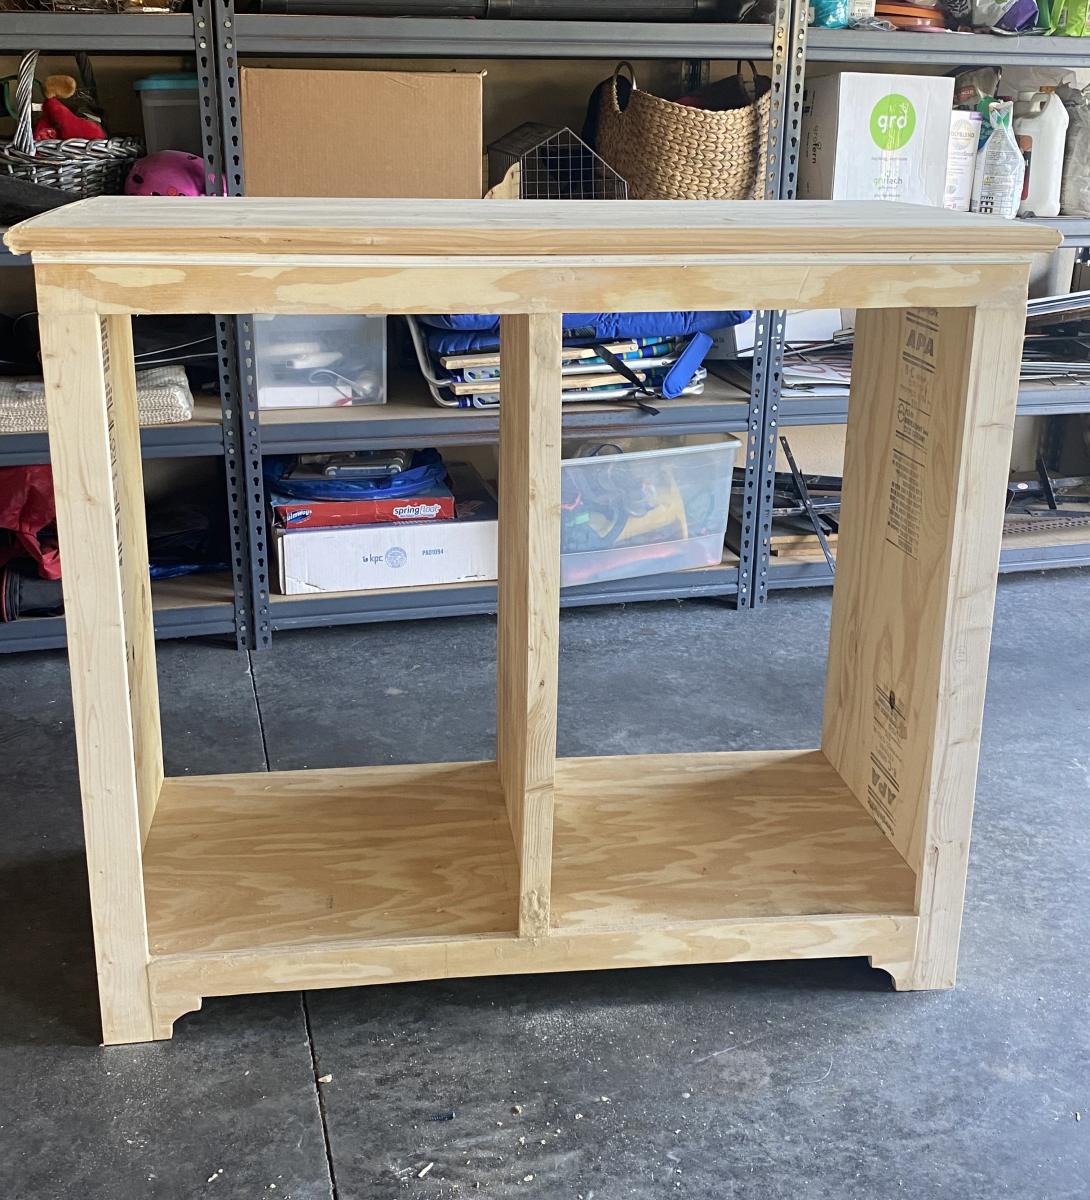
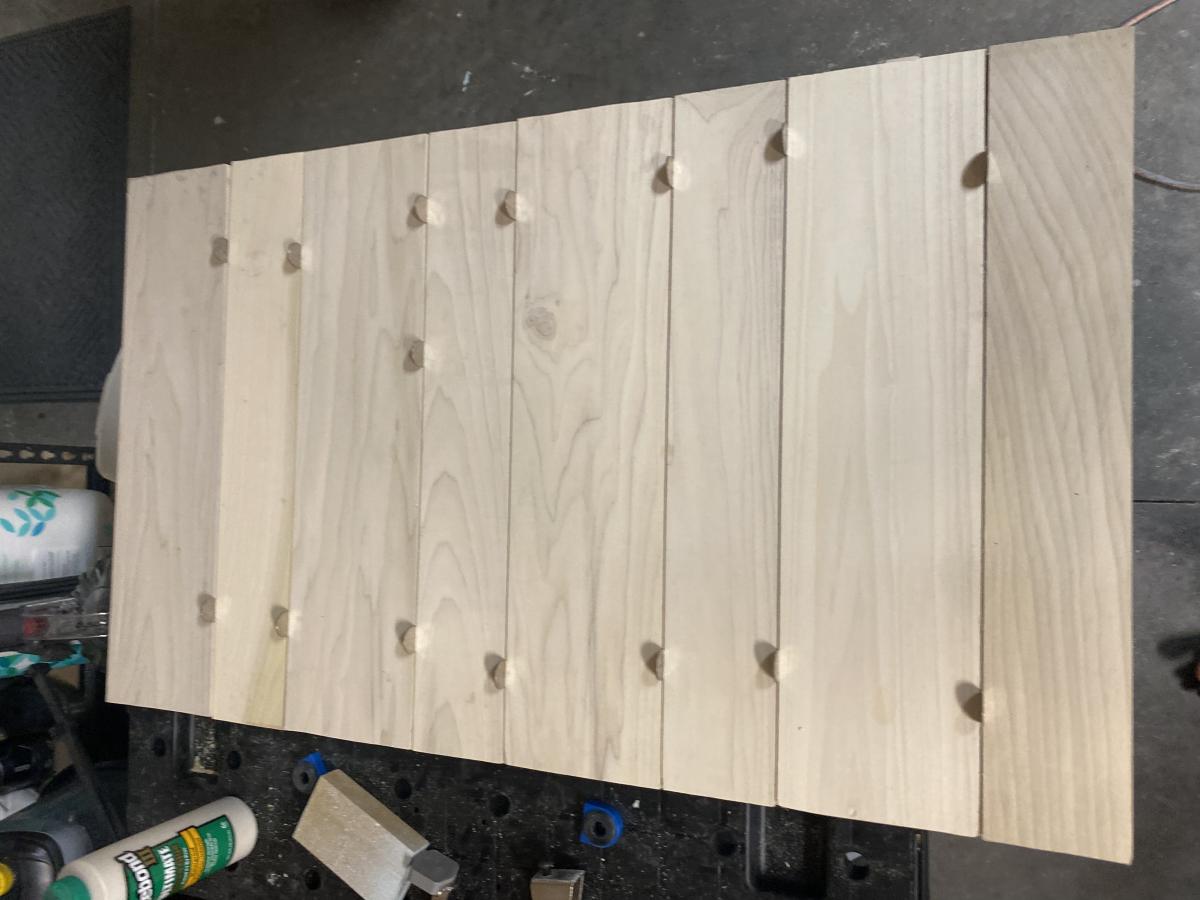
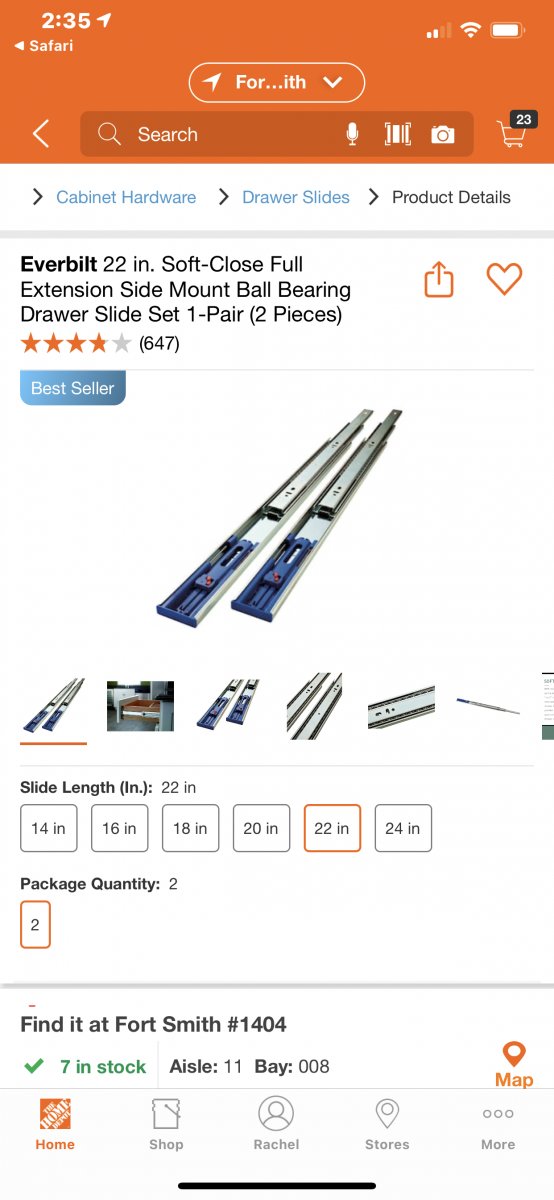
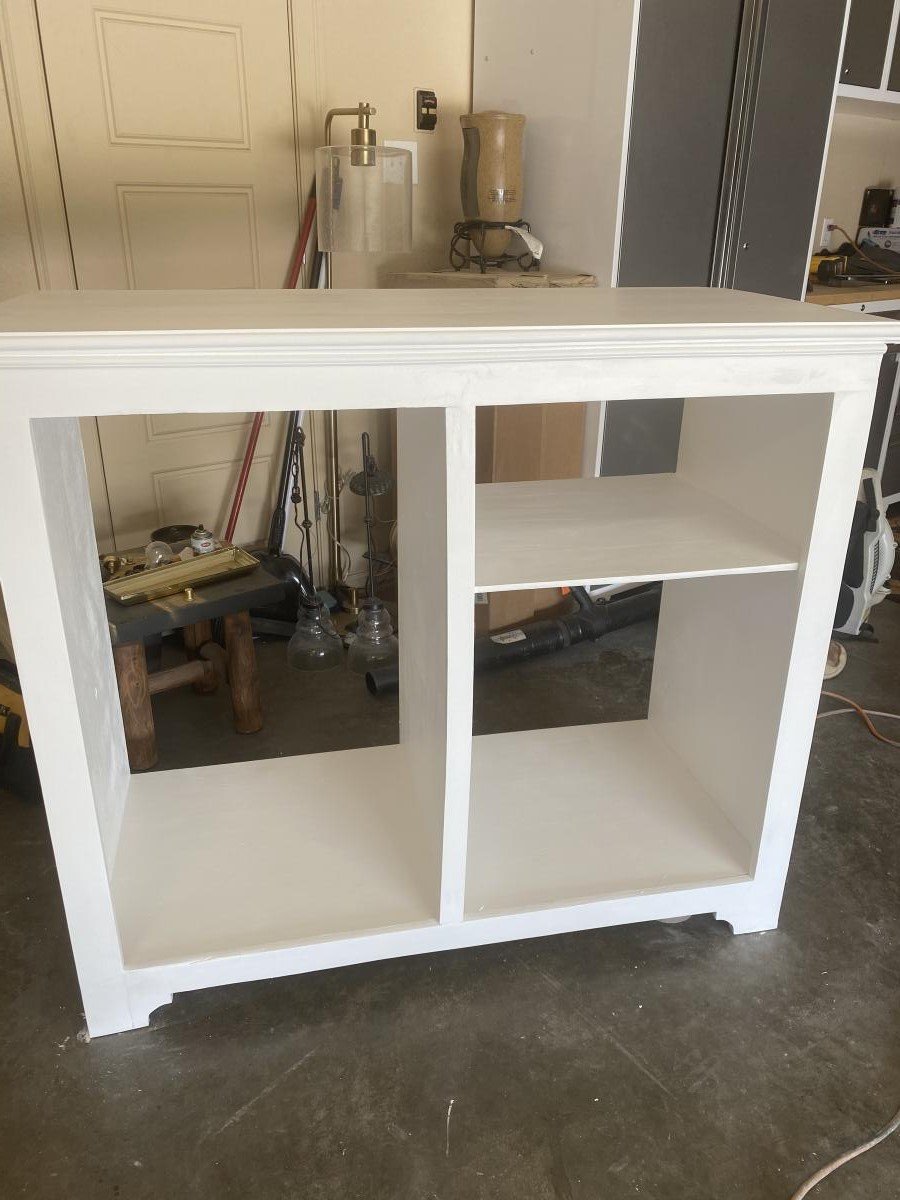
Modern Dorm Mini Refrigerator Microwave Cabinet
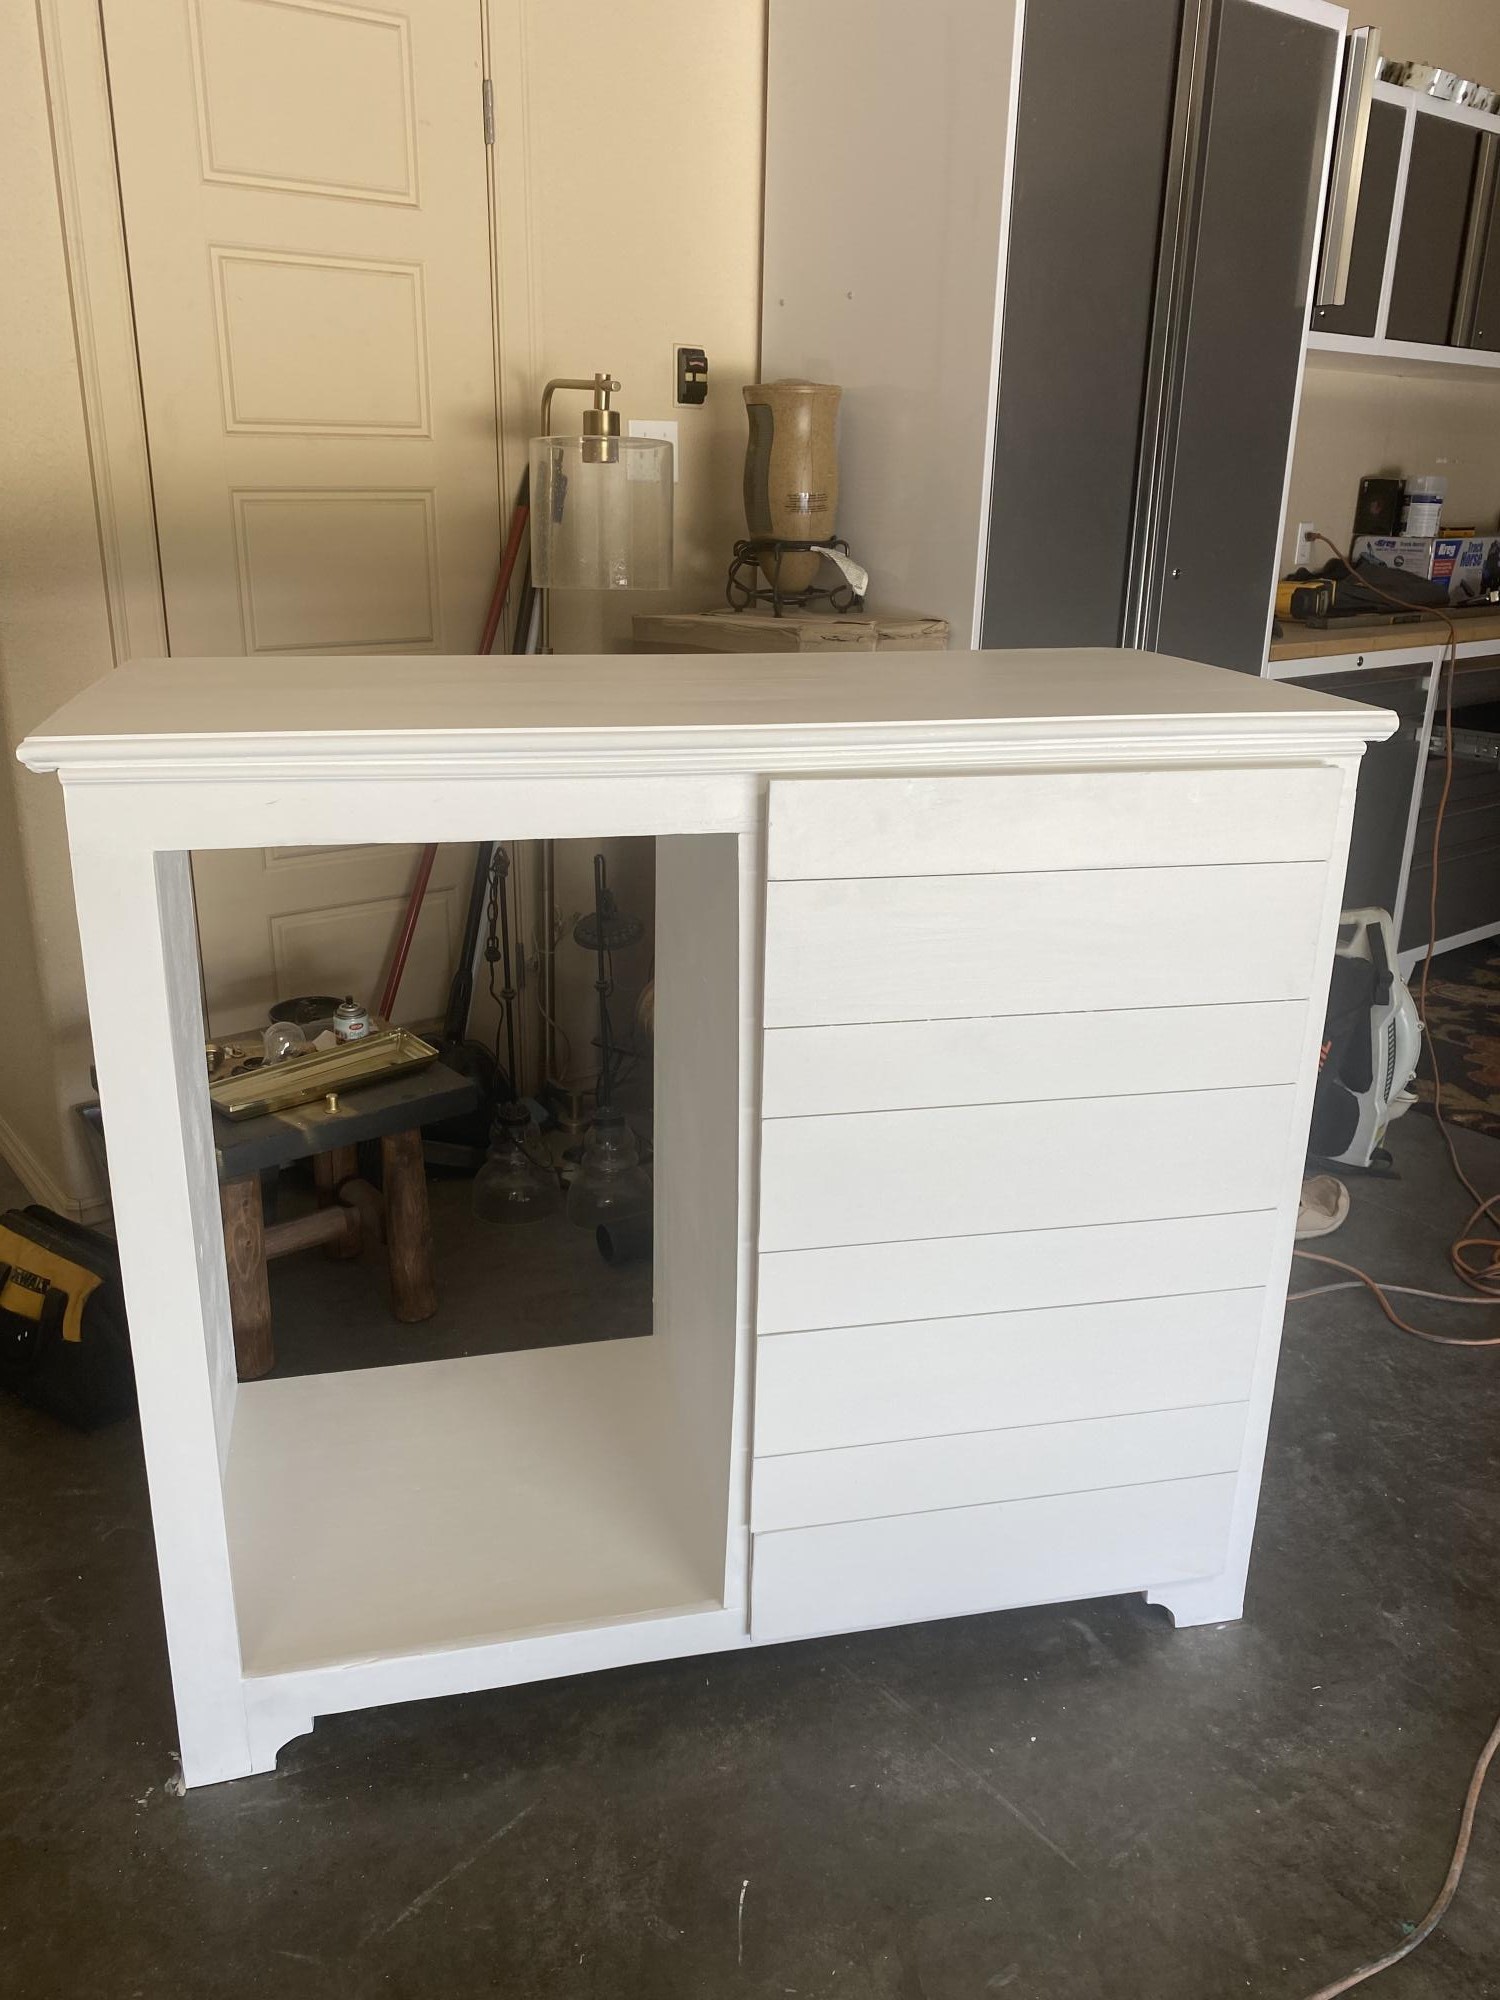
I changed plan to make deeper. I also modified the bottom trim and top. I put a ball bearing soft door drawer guide on modern door so it can slide back and forth. I feel we need more modern plans on here but with a bit of creativity and using plans you can make anything. I have never built anything before. I love General Finishes Milk Paint in Snow White and I brushed rolled it on (sanded between 3 coats). It’s basically self leveling and leaves a nice matte finish. Used door glide in picture bought from homedepot in the 24 inch and that’s how wide door was and it was 36” tall. Door glide I only used one on top of the door not on bottom as well. Door piece of fiberboard with just strips glued on and quarters spacing them correct.
Built from Plan(s)
Estimated Cost
$200
Estimated Time Investment
Weekend Project (10-20 Hours)
Finish Used
Dorm mini refrigerator microwave cabinet
Recommended Skill Level
Starter Project
Comments
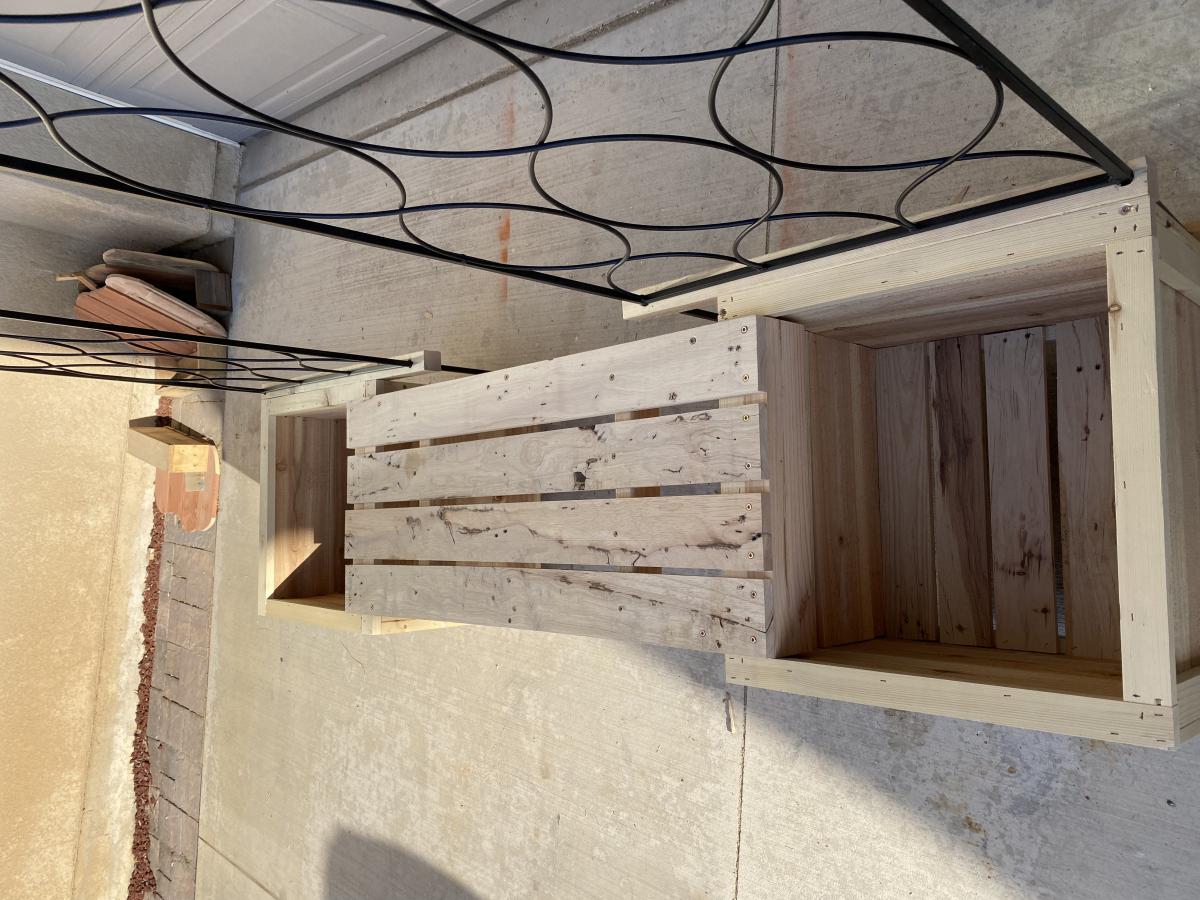
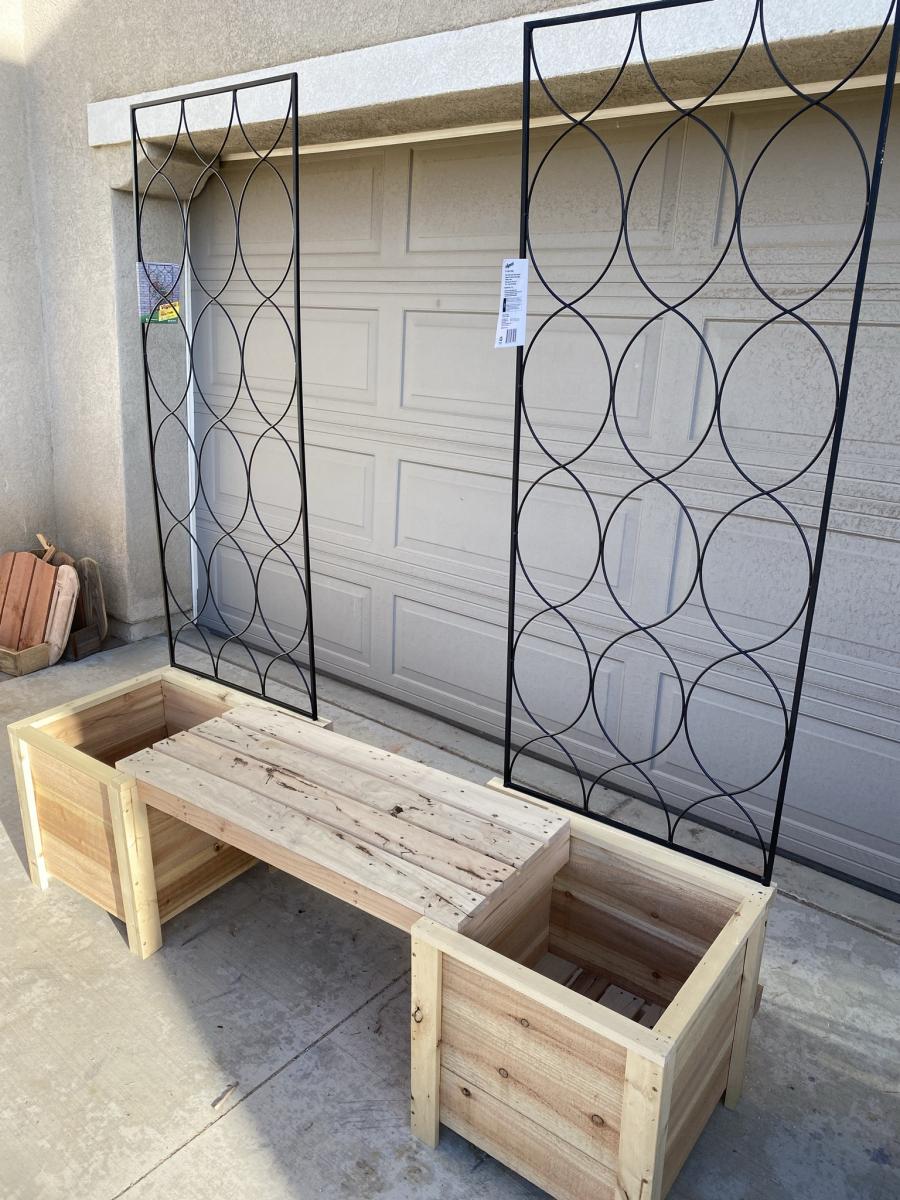
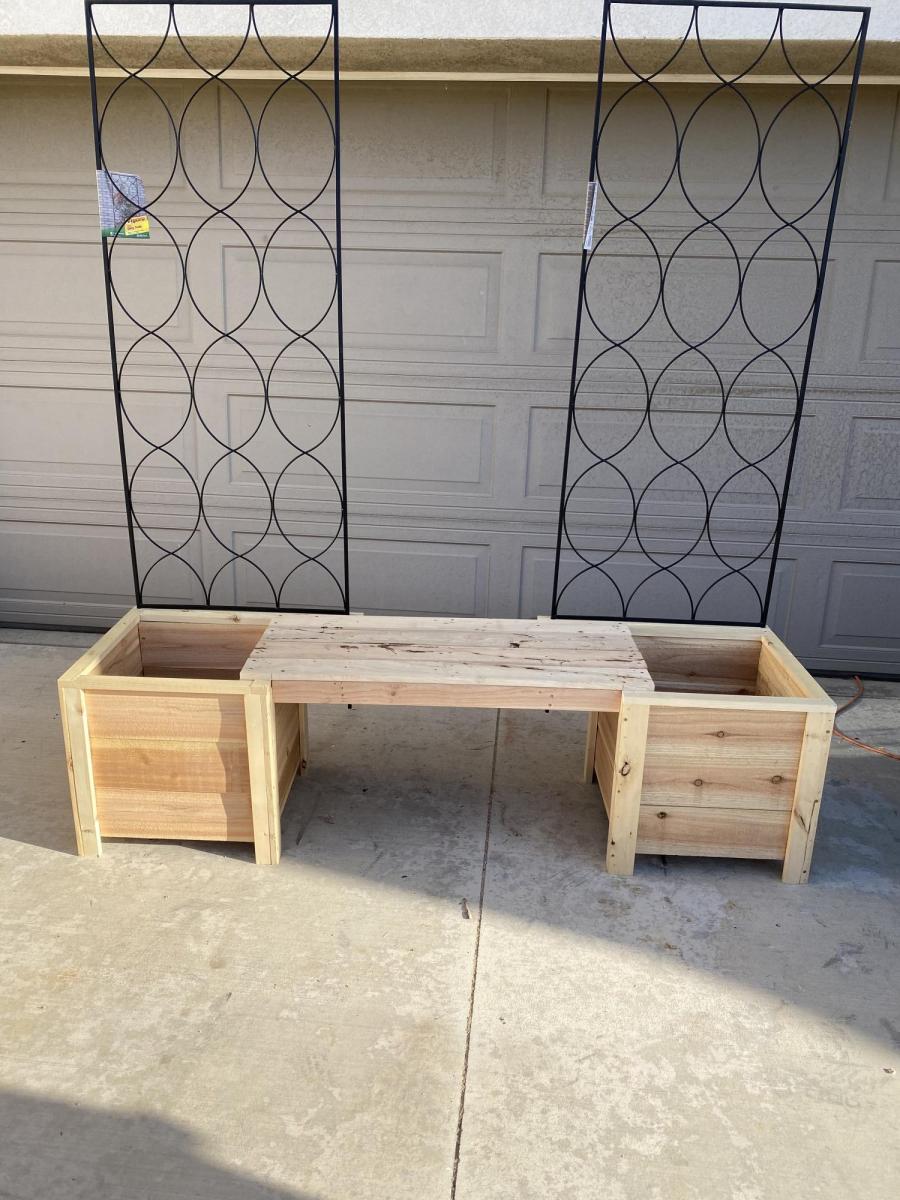
Planter Boxes
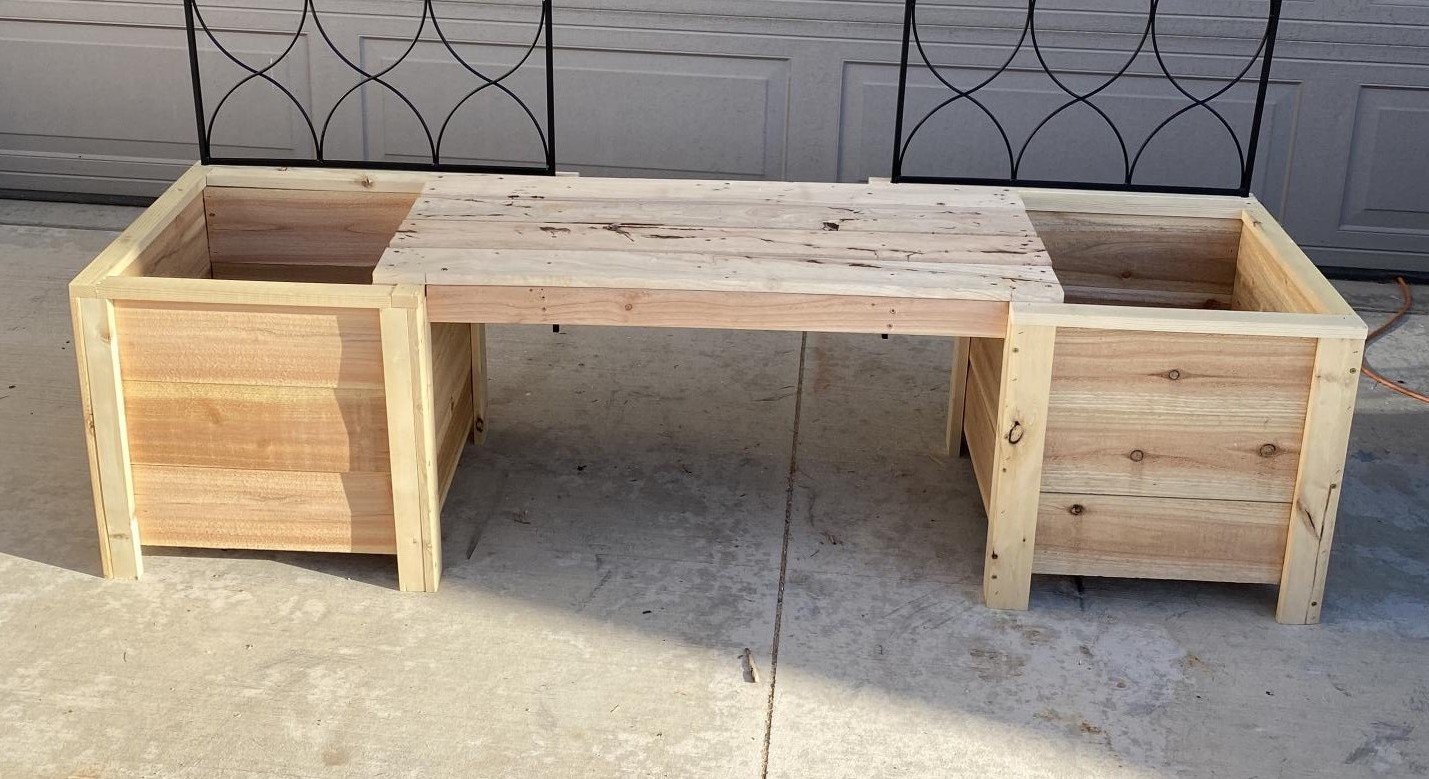
I made the boxes from plans, but added bench and trellis from my own design.
Built from Plan(s)
Comments
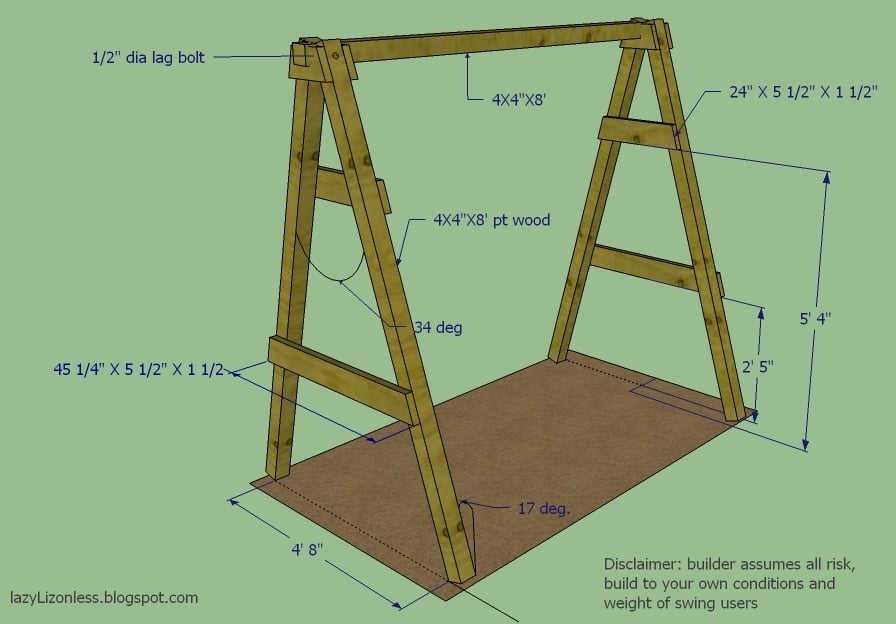
Swing set
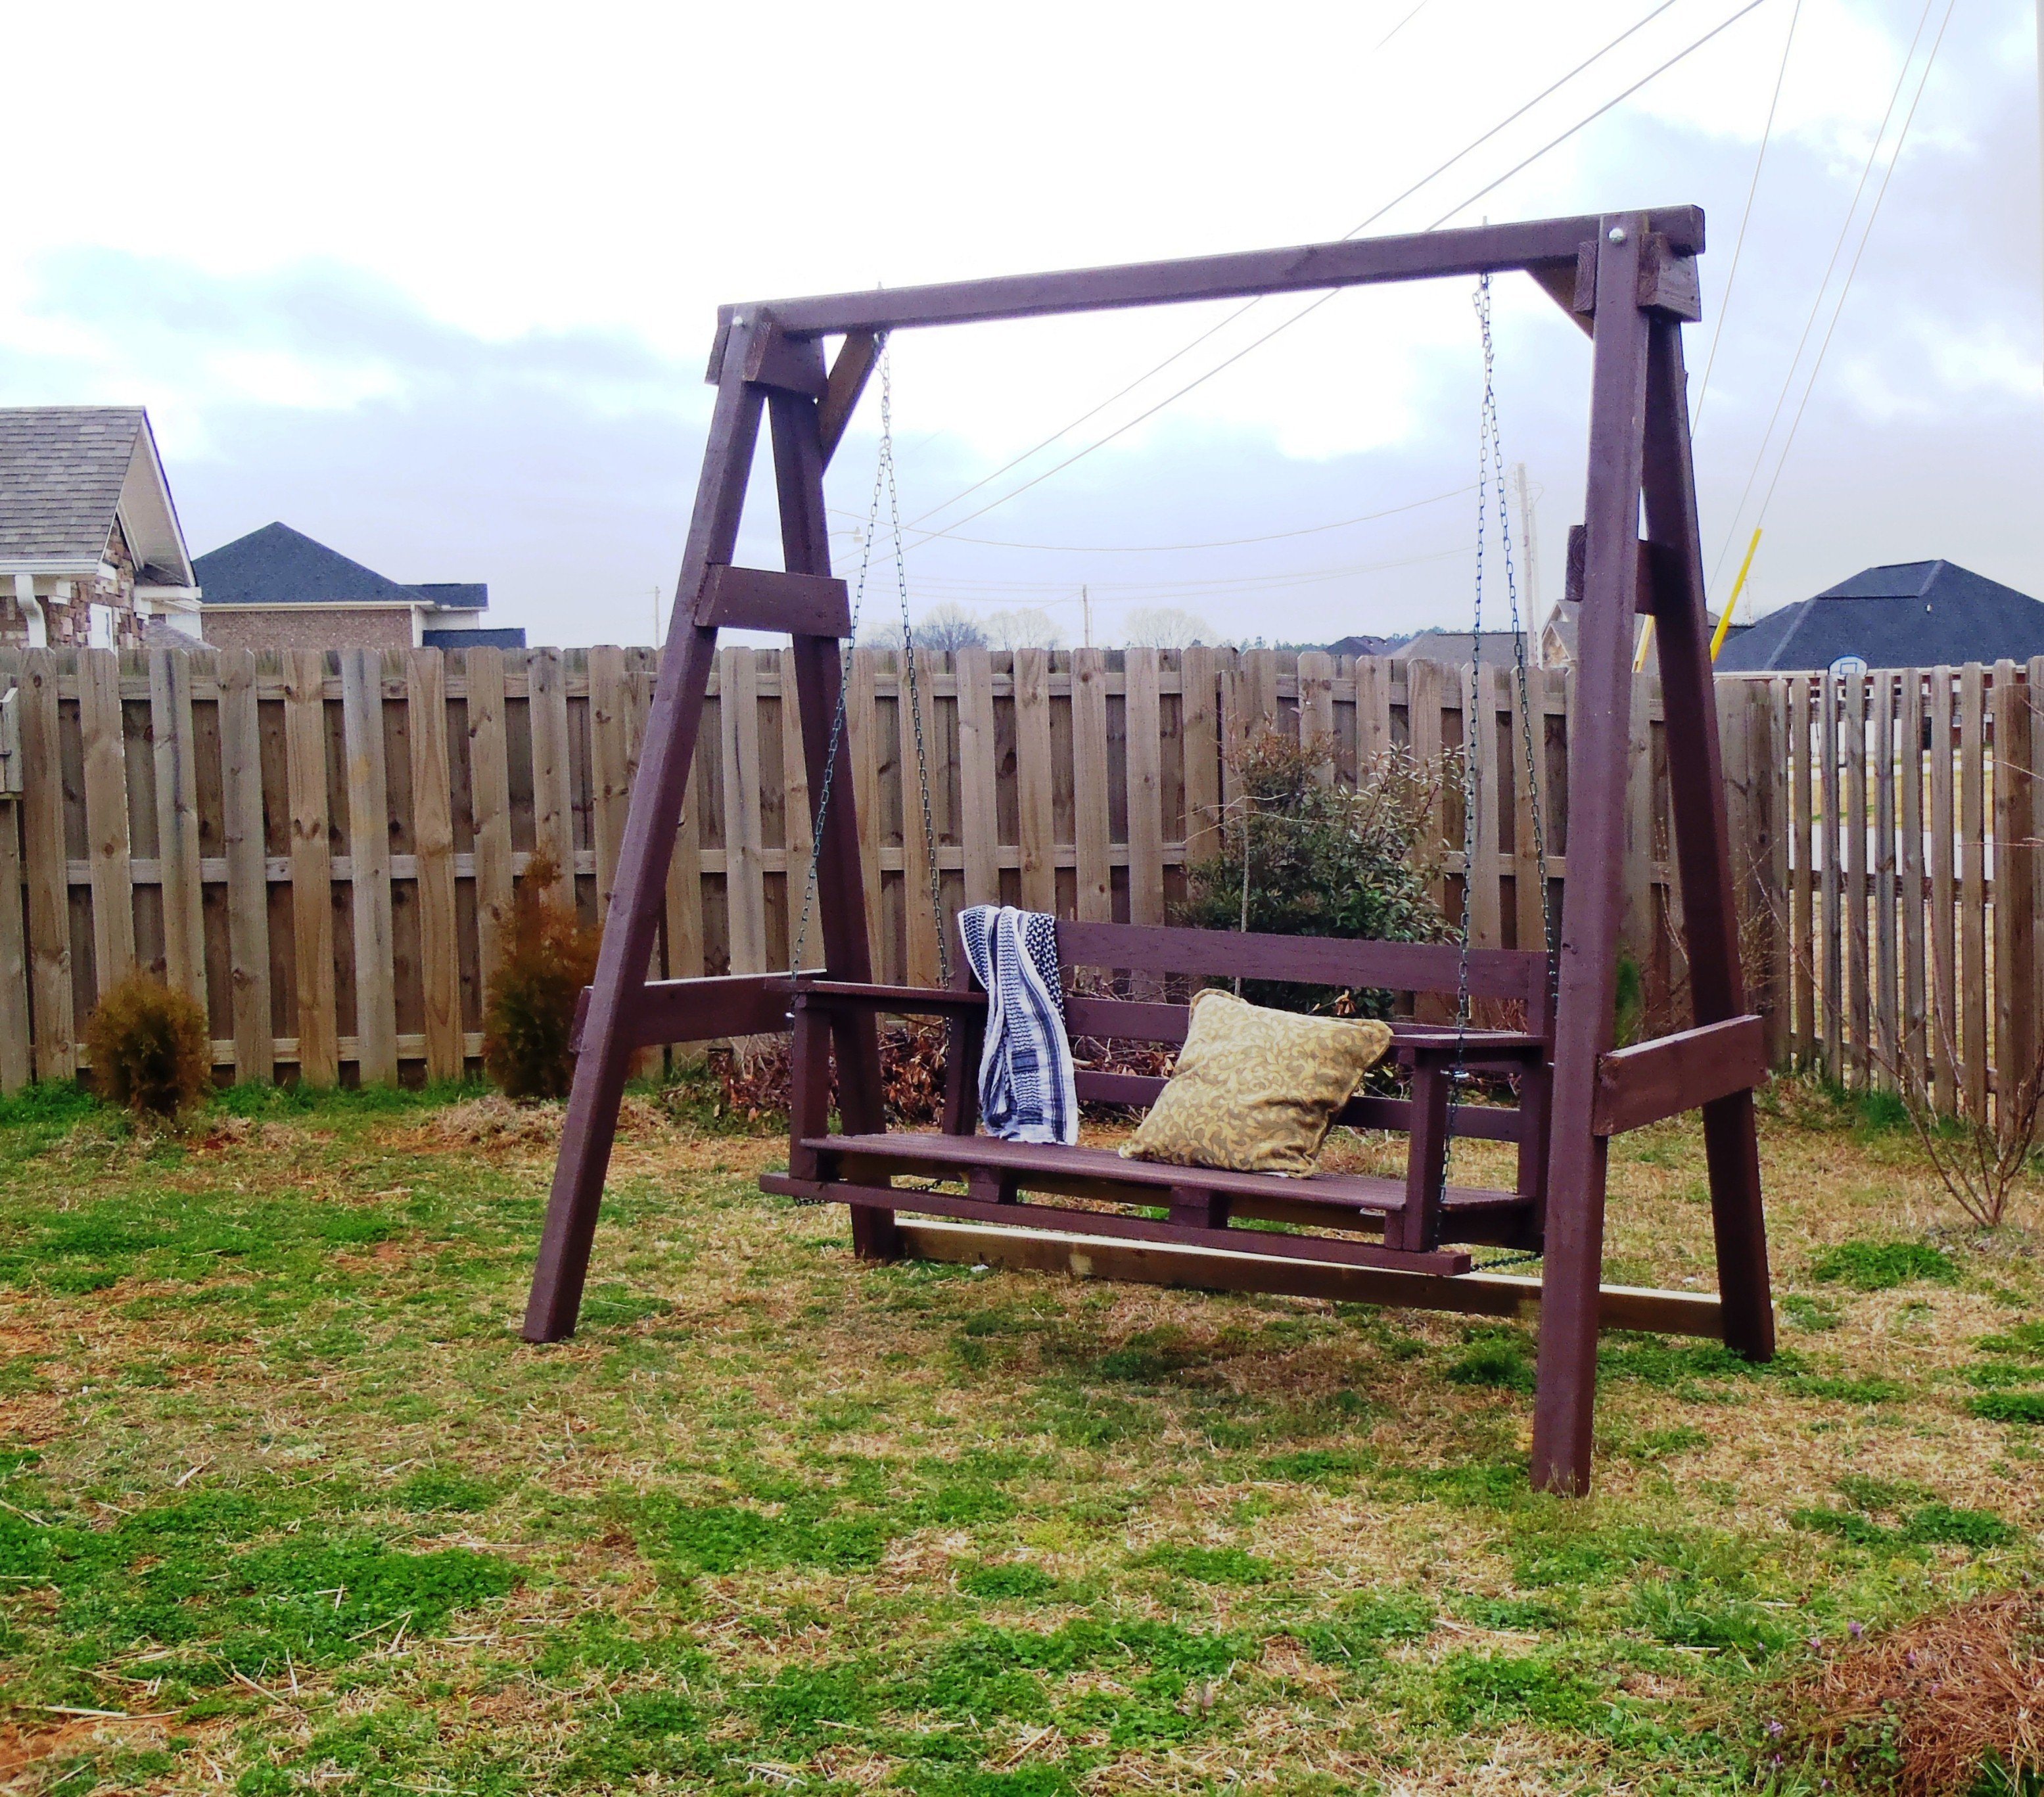
I've finished my swing but my porch don't have enough clearance so I built A frame stand for it.
Built from Plan(s)
Estimated Time Investment
Day Project (6-9 Hours)
Finish Used
mahogany latex based exterior primer and paint in one
Recommended Skill Level
Intermediate
Comments
Fri, 03/02/2012 - 07:09
I love this swing!
You did such a great job on your swing! I hope I can build up to making one someday.

In reply to I love this swing! by beachmama79
Thu, 05/10/2012 - 14:02
Thanks and you will. I just
Thanks and you will. I just added the dimensions in case
Fri, 04/19/2013 - 15:37
Desert Dweller
I love the idea of adding the A-frame considering that where i live there are no real trees to hang it on and building a porch where one doesn't already exist is a pain in the butt! Lol. How wide do you think we could go before it starts compromising the frames integrity? And how much weight can it hold?
My Simple Outdoor Lounge Chair with 2x4 modification

I modified this chair with 2x4's as the base and 2x2 for decoration on arms, this is prior to sanding and finishing

Built from Plan(s)
Estimated Cost
$15-$20 dollars, depending on local lumber prices and finishing options.
Estimated Time Investment
An Hour or Two (0-2 Hours)
Finish Used
Unfinished
Recommended Skill Level
Beginner
Comments
Outdoor Grill Station
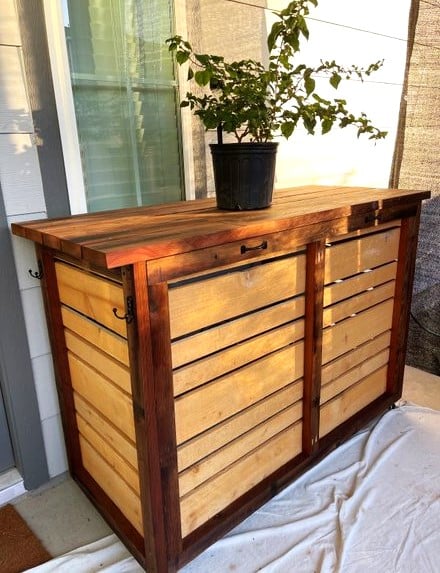
This rolling bar was inspired by Ana White's plan. It is used as a bar and conceals an electric smoker and a grill. I added handles for moving and some hooks on the sides. I stained the salvaged 2 X 6 's and brushed on clear oil based poly on the new Cedar fence boards.
Billie
Built from Plan(s)