Community Brag Posts

Wooden Volcano Stacker

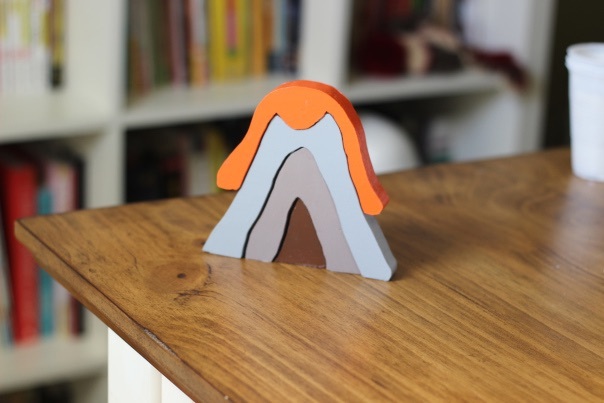
I'm so thankful for Ana's March scrap work love challenge for encouraging me to make use of scrap lumber.  I completed several scrap work projects last month.  This is a volcano stacker I made from a scrap piece of 1x12 pine.  I got the pattern from the book Natural Wooden Toys.  I used my scroll saw to cut out the shape.  I painted it with craft acrylic paint and sealed it with Mod Podge.  The toy is a hit with the little guy!

Estimated Cost
free
Estimated Time Investment
An Hour or Two (0-2 Hours)
Finish Used
Craft acrylic paint and Mod Podge
Recommended Skill Level
Beginner

Pool equipment fence refresh

Submitted by Anonymous (not verified) on Fri, 07/14/2017 - 00:15

The fence the previous owners had in place was weather-worn and just overall non-aesthetically pleasing. We completed this project in 3 days and now we just love it!!!

Estimated Cost
$300
Estimated Time Investment
Weekend Project (10-20 Hours)
Recommended Skill Level
Intermediate

Adirondack Chairs and End Table

Submitted by Anonymous (not verified) on Mon, 10/04/2021 - 15:15

Hubby’s first Ana White project! Love these! Just need to stain.

Comments

Danielle's Wall Unit Shelves

Submitted by zigmommy on Wed, 03/09/2011 - 14:19

I designed these to specifically work for my homeschool storage needs. My husband built two of them for me and they are exactly what I hoped they would be! They're strong and heavy and sturdy and still manage to be stylish, I'm proud to look at them and have them in my home!!

Estimated Cost
About $100 (for one)
Estimated Time Investment
Weekend Project (10-20 Hours)
Finish Used
Behr - Antique White High Gloss and Rustoleum latex clear top coat. We bought a paint spray gun and this was the first project we used it on. DEFINITELY saved us a ton of time, this time we sprayed it after it was built, next time the individual pieces will get at least a coat or two before it's built!
Recommended Skill Level
Intermediate

Wall art

Submitted by kwayman on Sun, 05/19/2013 - 08:28

This was my first project and I am so happy about how it turned out!! Heavy though...
Feel like I can build anything now:)

Estimated Time Investment
Weekend Project (10-20 Hours)
Finish Used
I painted it with a leftover creamy white, red and blue. Next I roughed it up with sandpaper and applied a walnut stain over to "age" it. :)
Recommended Skill Level
Starter Project

New Kitchen, New Table!

We just finished our complete kitchen remodel, from tearing down walls to new cabinets, appliances, hardwood floors, and countertops. I assembled the cabinets and installed them myself, along with tiling the backsplash and nailing down the floors. So I though I'd try my hand at furniture building. It was my first time building anything like this and I thought it turned out pretty nice!

I used left over boards from the removation for the bases of the table and benches and 2x6 poplar boards for the tops. I made some adjustments in the size since we're only a family on 3. Since I made the table shorter, I changed the 45 degree cuts on the cross braces to 30 degrees so they would fit. 

Estimated Cost
$300 just because I bought high quality poplar with the edges planed so they would fit together with no gaps
Estimated Time Investment
Week Long Project (20 Hours or More)
Finish Used
minwax sedona red
zar merlot
minwax red mahogany
in that order, but I found that the stain effects poplar differently than it does pine
3 coats of brush on polyurethane sanded with 220 in between coats
Recommended Skill Level
Beginner

Comments

Custom grandy

Custom 75" grandy

Estimated Cost
$275
Estimated Time Investment
Weekend Project (10-20 Hours)
Recommended Skill Level
Intermediate

Comments

rust0r

Sun, 07/23/2017 - 08:18

That is beautiful!! What color is the base? (Brand and color)


What wood/stain did you use on the top? I love how it contrasts itself, would be great for other furnature choices as well.


Thank you

rust0r

Sun, 07/23/2017 - 08:24

That is beautiful!! What color is the base? (Brand and color)


What wood/stain did you use on the top? I love how it contrasts itself, would be great for other furnature choices as well.


Thank you

Flip Down Wall Art Desk

Submitted by Anonymous (not verified) on Mon, 10/04/2021 - 16:45

Followed the plans, made a few mistakes but my son and I like the overall result. Thanks Ana :)

Built from Plan(s)

Comments

Easiest Upholstered Bench

This is the first project my husband and I tried from Ana's site. We did add a foam on top and around the edges since we have two little kids running around. I then tufted it and absolutely love the way it turned out.

Built from Plan(s)
Estimated Cost
$40
Estimated Time Investment
Afternoon Project (3-6 Hours)
Recommended Skill Level
Beginner

Parson Chair Slip Cover with Chevron Fabric (so easy!)

Slip Covers were easy peasy to make and really spruced up my kitchen table with some much needed color. Follow all the detailed steps on iamhardware.com.

Estimated Cost
$10
Estimated Time Investment
Afternoon Project (3-6 Hours)
Recommended Skill Level
Beginner

Comments

Restoration Hardware Inspired 4x4 Truss Beam Outdoor Table

Submitted by susanshamp on Fri, 04/10/2015 - 23:48

Hi! I was truly inspired by the plans I found at this site and the many brags that I saw! I have now built this table set a few times (first for myself, then for friends & family) and learned a lot each time. The things I have modifiied include...


1) Length = make it longer or shorter as space allows (I've done tables from 84" to 108" long)

2) Outdoor table top = because these are being used outdoors, I use screws as spacers between boards so that they have a 1/8 to 1/4 gap to allow for water to run through

3) Breadboard end support = I found that with just the pocket hole screws, my breadboards were a little 'wobbly' so I added Simpson Stong Tie metal plates underneath to reinforce the ends.

4) End length = in order to provide a little more legroom to those sitting at the end of the table, I recently changed the plan so that I would have at least 15" from the table base to the end of the table top (although this pic shows the regular plan with the ~8" overhang)

I really appreciate all of the plans and brags which have been shared by users of this site. Thank you!!!

Estimated Time Investment
Afternoon Project (3-6 Hours)
Finish Used
I picked cedar boards that had some color variation in order to add interest. To get an even more rustic & weathered look, you could consider using a steel wool & vinegar mixture.
Recommended Skill Level
Beginner

Comments

spiceylg

Mon, 04/13/2015 - 09:38

Beautiful build! I was just curious what your cost was. I want to build this for outdoor use as well and also want to use Cedar. I priced it at a local lumber yard and they said it would be around $400.

In reply to by spiceylg

susanshamp

Thu, 04/30/2015 - 21:38

Thank you!!! That sounds about right for the cost - I spent about $425 on my lumber and hardware. Cedar is more expensive, but I was happy with the results. And it still seems like a good 'deal' when you consider what you would get for that price from a store.

Seasonal And Holiday

Storage shelf

Submitted by Anonymous (not verified) on Mon, 10/04/2021 - 18:45

We made smaller versions of your 8 foot shelf. The plans were perfect. Thank you very much

Built from Plan(s)

Comments

His & Hers Closet Laundry Basket Dressers

Submitted by Sarah F on Fri, 05/24/2013 - 08:53

After 3 years of absolutely no closet organization, my boyfriend and I decided it was time. This was our first build together and my boyfriend was amazed that it was so easy to actually build something from wood. We already had 6 baskets that lived all around the room so they needed a home and that's when we found Ana's Laundry Basket Dresser. Knowing that we wanted to hide our dirty laundry in the closet, we found that the plywood box design in the closet made for some very dark corners and little arm room so we needed to modify the plans some. Instead of the plywood we used 1"x4" furring strips to make an open framework for our baskets. It's plenty strong enough and allows light to reach the back corners with the added bonus of looking like custom closet organization.

Built from Plan(s)
Estimated Cost
$50 for the pair including wood and paint
Estimated Time Investment
Day Project (6-9 Hours)
Finish Used
Sanded, primed with Kilz 2, sanded again and gave it 2 coats of Behr Semi-gloss in Silky White.
Recommended Skill Level
Beginner

Rustic X Console

Submitted by cudazi on Mon, 04/13/2015 - 11:11

This is a half-width version of the Rustic X Console table on Ana-White.com. The oxidized finish came out purple and needed some sanding. If I build another like it, I would highly suggest sanding the X pieces before assembly. It went together very well and was my first Kreg Jig experience. 

Built from Plan(s)
Estimated Time Investment
Weekend Project (10-20 Hours)
Recommended Skill Level
Beginner

Landry Hamper Dresser

Submitted by old_man on Sat, 08/12/2017 - 15:46

So the GF at the time was not happy I was still living out of landry hampers. I promised here I would do something about it. This is what I did. The top hamper is used for soiled clothes, once it's full you simply remove it and bring it to the landry room. The rest just store clean clothes. Simple and effective. 


The hinges and latches are just outdoor gate hardware found at any of the big home improvement stores. The wood is just construction lumber. 4X4 for the frame, 1X6 strapping for the panels, and I think there are some 2X4s and 2X2s for the rails. Overall it took me a weekend and then some. I had to build it in two pieces to get it out of the basement, it is really heavy. I used higher quality hampers that had the regidity needed to be able to slide partially out and not buckle. 

Hardest part was figuring out the dimensions. How many 1X6s would be used vs how wide the hampers are. 

It's still being used over a year later. 

Estimated Cost
~75 due to high lumber costs in my area + cost of hampers
Estimated Time Investment
Week Long Project (20 Hours or More)
Finish Used
Minwax stain and water based poly.
Recommended Skill Level
Intermediate

Plant, shoe and bag stand

Submitted by Anonymous (not verified) on Tue, 10/05/2021 - 02:39

This is a stand I made for my sister who wanted something at the front door to put her shoes and shopping bags

Sewing Table for Small Spaces

Love the sewing table! It was a surprise Christmas gift from my parents.

Estimated Time Investment
Afternoon Project (3-6 Hours)
Finish Used
We used Bombay Mahogany stain.
Recommended Skill Level
Beginner

Lack Inspired Entertainment Center

Submitted by eralben on Mon, 04/20/2015 - 07:24

The IKEA Lack Inspired Bookcase plans became my inspiration for the entire entertainment center.  I made a few changes to the bookcase plans.  I increased the height of the bookcases to 84 inches and added adjustable shelves.  I also included some major extras including a console for the TV, a bridge to connect the bookcases, and doors inspired by www.shanty-2-chic.com.

Built from Plan(s)
Estimated Time Investment
Week Long Project (20 Hours or More)
Finish Used
Red Mahogany
Recommended Skill Level
Intermediate

DIY Kitchen Island

Submitted by CustomPulp on Wed, 08/30/2017 - 12:16

Island dimensions Bar 36" deep x 50" wide, counter top height and base has 24 inch depth. I was lucky enough to have the walnut donated for the project which I cut into 1" stips and glued together butcher block style. Also put a 1 1/4" band of walnut around countertop for appearances and to help strengthen the top. The base was made with pine and painted turqoise. The double waste basket was another touch I added. Thanks for looking.

Estimated Cost
base with lumber, door hardware, double trashcan hardware, corbels, paint $250.00. Pricing the Walnut if not donated, would have added another $300.00 to the cost of the project.
Estimated Time Investment
Week Long Project (20 Hours or More)
Finish Used
tung oil on top. Lowes Satin finish Valspar for the base
Recommended Skill Level
Advanced

Comments

Coat Tree

Submitted by annem on Sat, 03/12/2011 - 07:27

With my 3 young kids and all of their winter gear, I needed a coat rack that they can use. Since I don't have a miter saw, I asked my Father-in-law to make the cuts for me so I can't claim to have done that (although I am asking for a miter saw for my birthday!). Assembly was pretty easy with 2 pocket holes each on the roots and one for each of the limbs. With the small pieces of wood, it was tricky to get the holes centered using my Kreg Jig Jr. so I added some small finishing nails to some of the limbs for more support. (Think young kids tugging to get their coats down!) Some things I learned: Sand all pieces to the way you want them BEFORE assembling as it's nearly impossible to do later. Stagger the bottom roots because screwing in 8 screws to the same center point does not work. I ended up using shorter screws than the 2 1/2" recommended and had to add felt pads to stabilize the legs that were moved up to allow for me to fit the screws in. I am pleased with this project and while it's not perfect, it will get a lot of use around here!

Estimated Time Investment
An Hour or Two (0-2 Hours)
Finish Used
Spray primer, Rustoleum Slate Blue spray paint
Recommended Skill Level
Beginner