Frequently Asked Questions
Wood Questions
What kind of wood should I use?
Most of our plans use standard construction lumber like pine or fir. It's affordable, easy to work with, and easy to find. It's also rapidly renewing and biodegradable, so a great eco friendly choice!
Can I use hardwoods instead?
Yes—just keep in mind they're heavier, cost more, and can be tougher on tools and harder to join together and finish. I recommend not tackling a hardwood project until after you have built several softwood projects.
What if my boards are warped?
Choose the straightest boards at the store. You can often work around slight warps by cutting them into shorter pieces.
What wood should I use for outdoor furniture?
Use red-toned or pressure-treated 2x lumber for framing, and cedar or cedar fence pickets for the decking. Outdoor furniture should be built like a deck—your local home center can help recommend the right wood for your climate.
Will my wood move or warp after I build?
Potentially, especially in humid climates. Let your wood acclimate indoors before building. Once acclimated and kept in a stable environment, movement should be minimal. Remember, most houses are built using framing lumber - it's all about keeping moisture down indoors.
Cutting Questions
Do I need a miter saw?
A miter saw is great, creating fast, safe, and precise cuts, even for beginners. But most plans can be built with a circular saw and a straight edge. If using a circular saw to cut, take time to practice, and get good at making cuts, before cutting your project boards.
How do I get clean cuts with a circular saw?
Clamp your board, measure twice, cut slow, and use a sharp blade. This takes practice, so spend some time making cuts. I go through becoming proficient at freehand cutting in my course, it is worth taking if you want to master this skill.
Will the store cut my wood?
Yes—most stores will do rough cuts to help you transport your materials home. But from store to store, the quality of cuts could greatly vary.
Joinery Questions
What screws should I use?
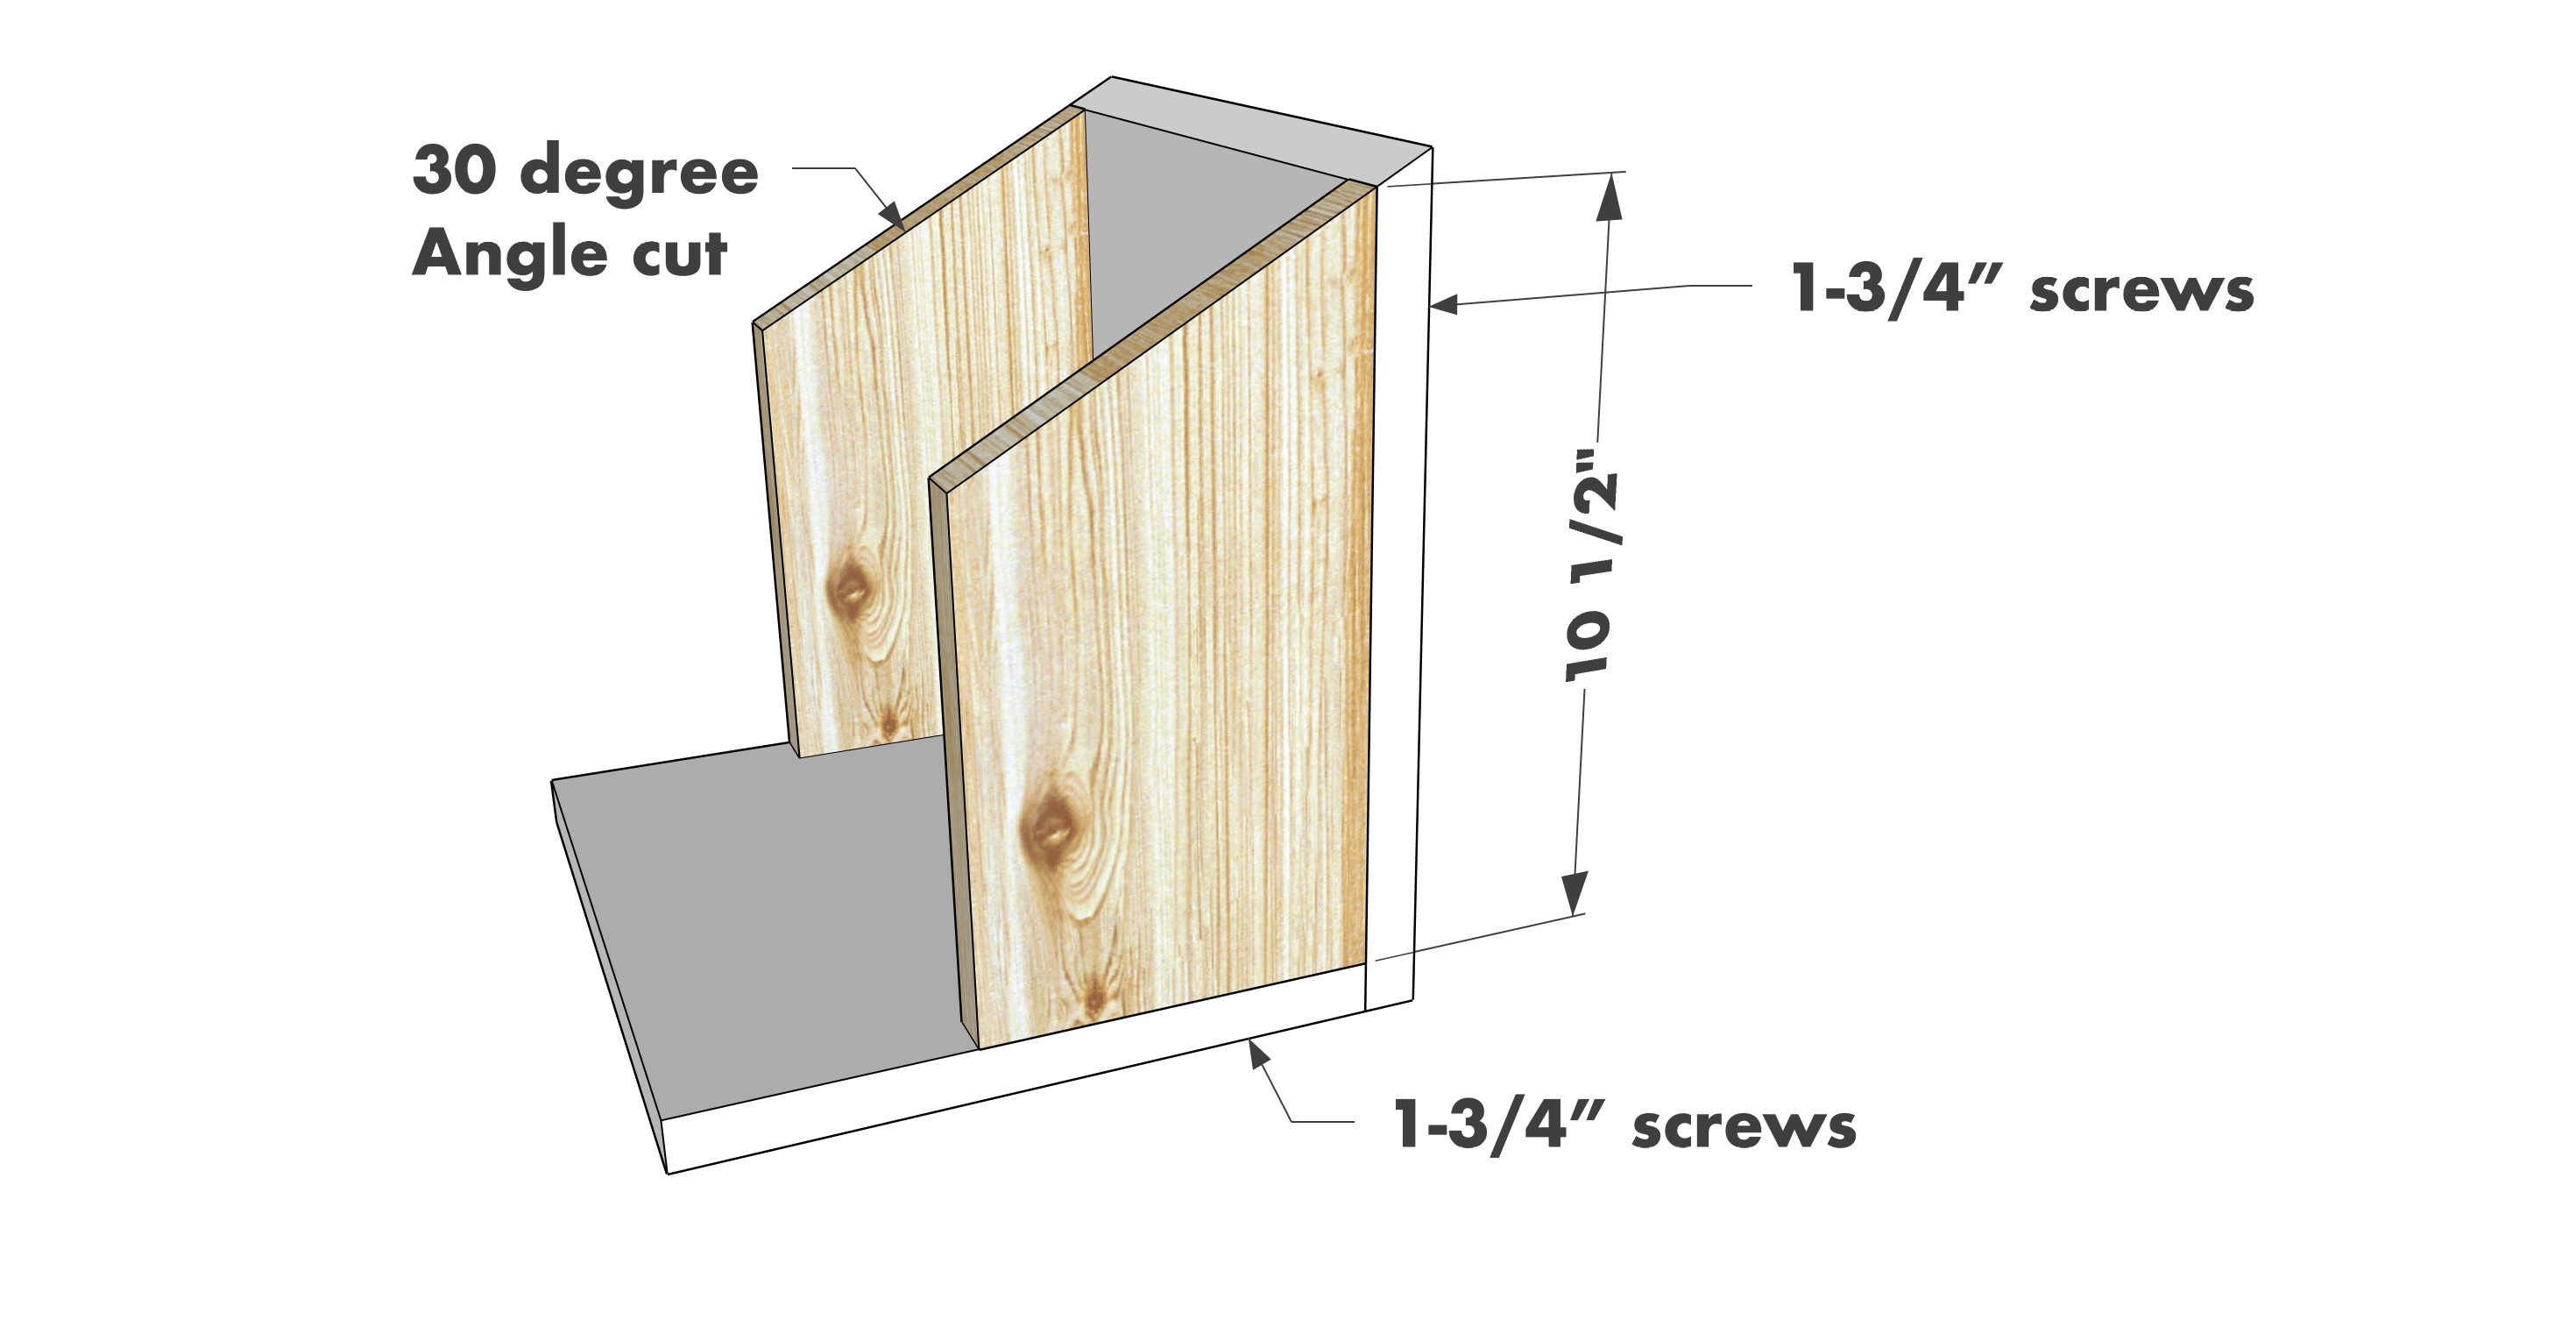
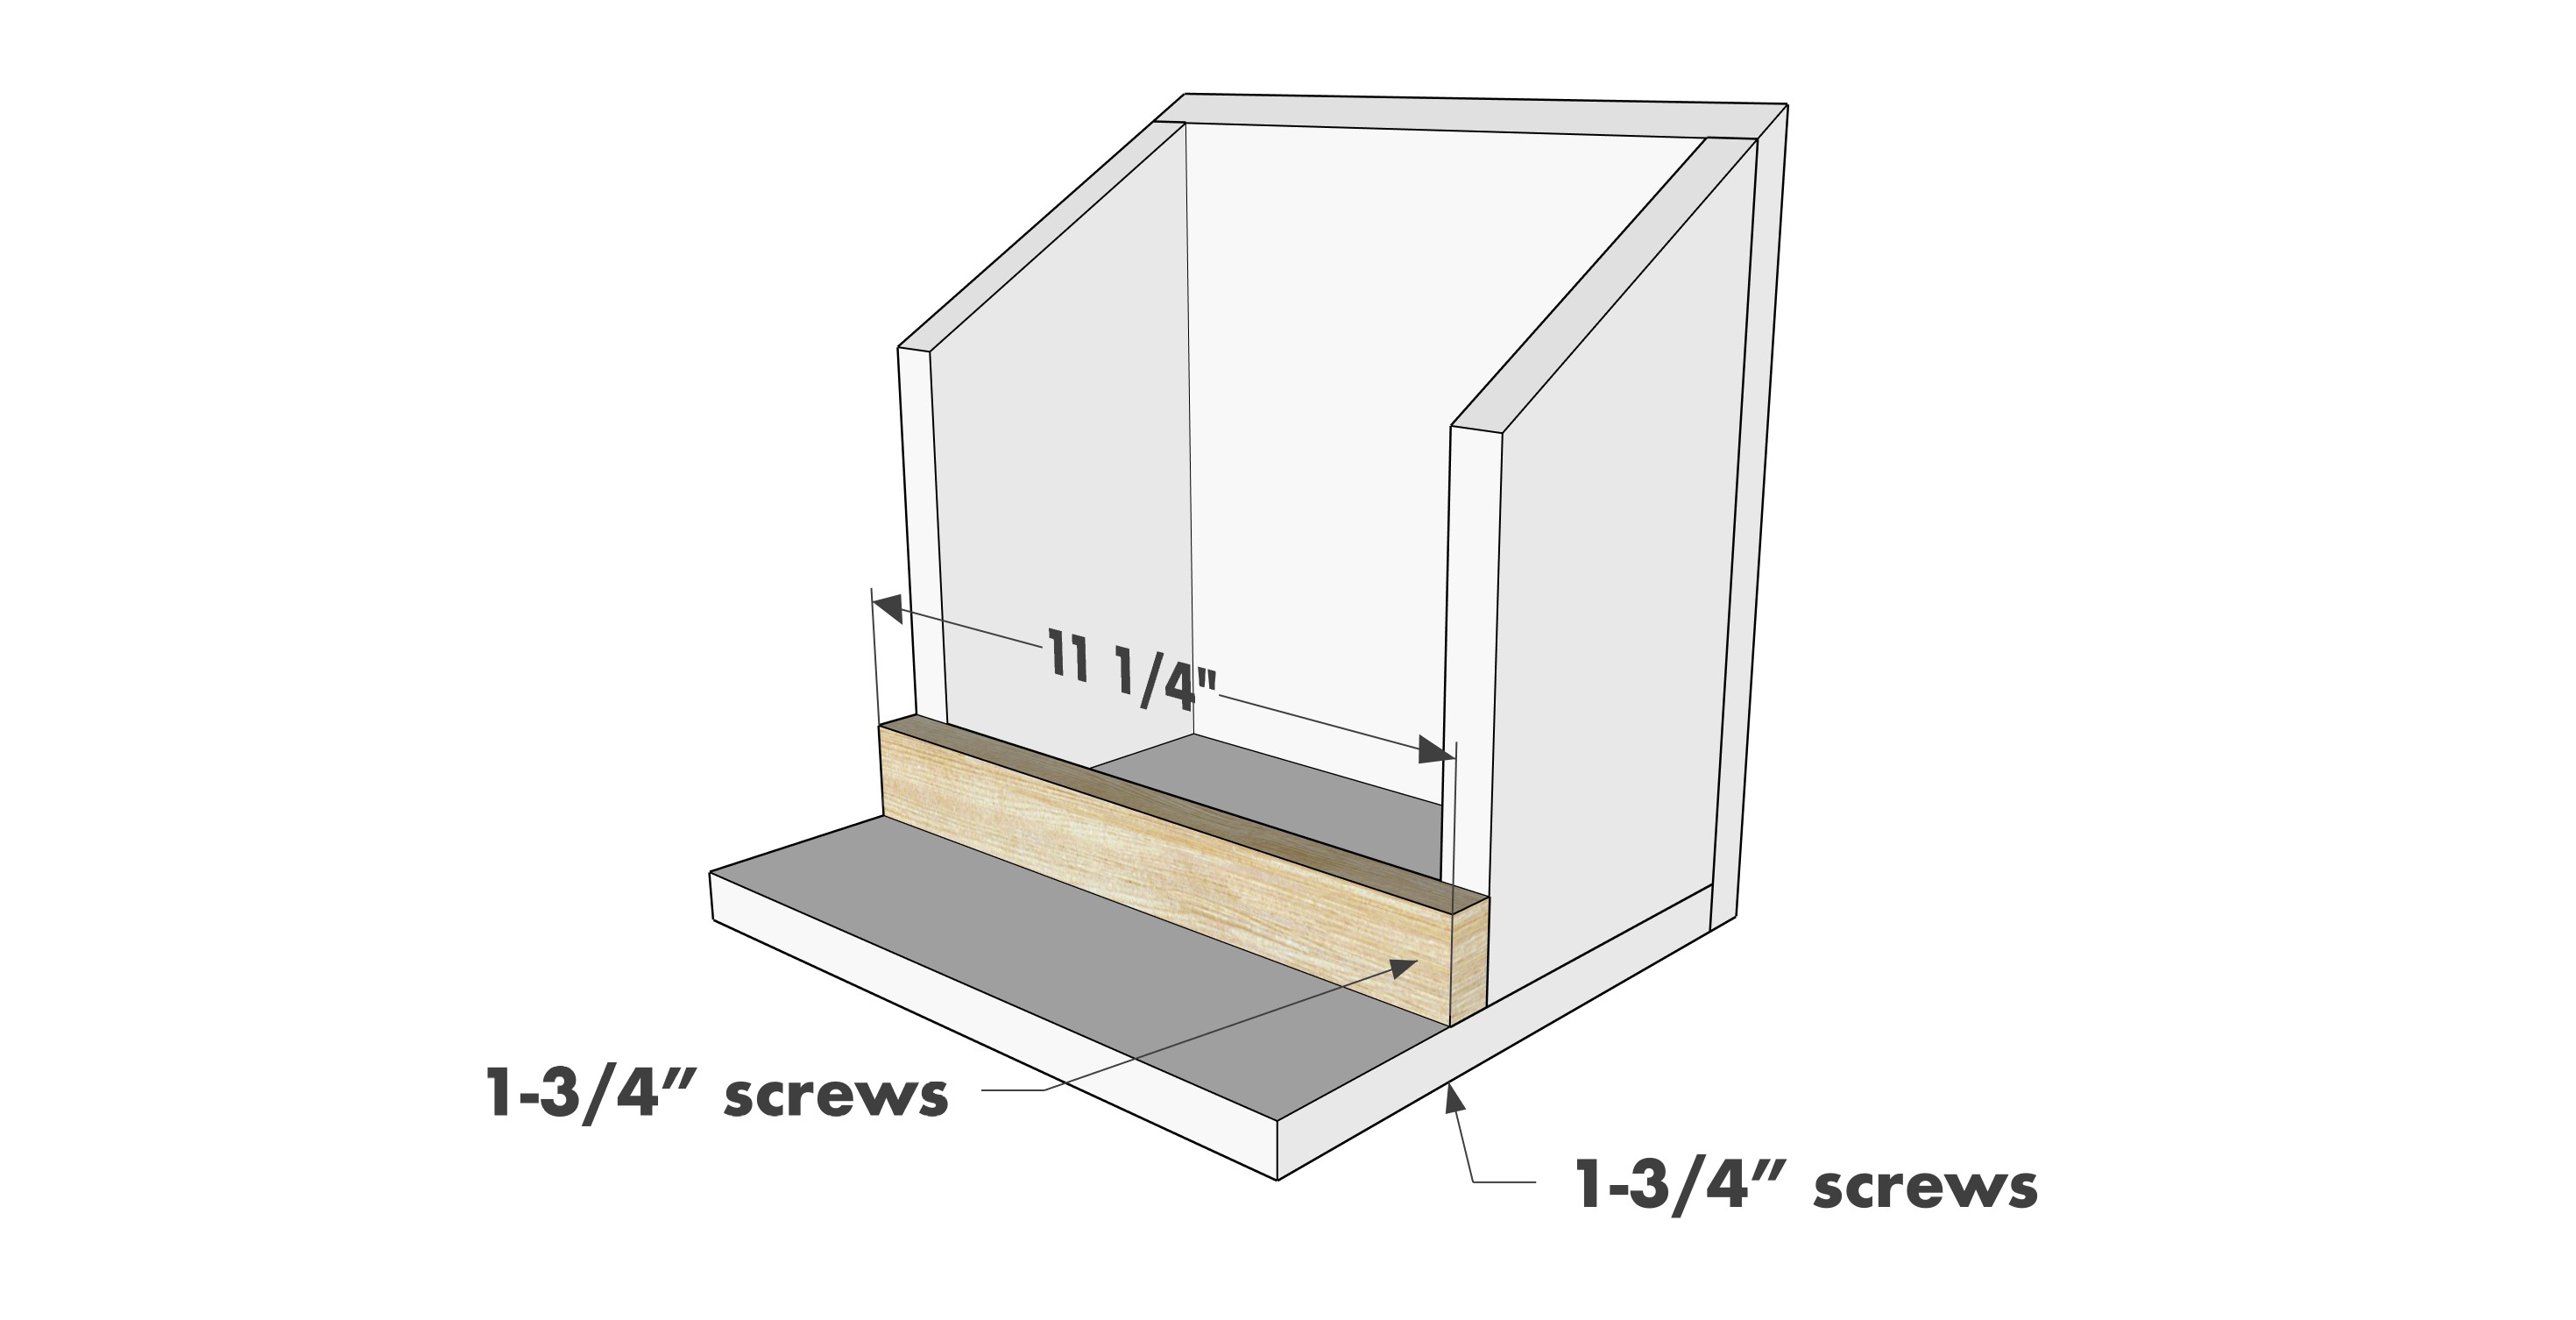
We recommend star-head self tapping screws for framing, most common sizes are 2-1/2", 1-3/4". Pre-drill if close to the edge or you find your wood is splitting.
Do I have to use pocket holes?
Pocket holes are the cheapest, easiest and fastest way to do some joints - like edge to edge or a hidden fastener joint. There are other methods, but these can be time consuming and expensive. We recommend using pocket holes as indicated in plans for best results.
How do I keep things square?
Use a speed square and measure diagonals after each step. Always clamp joints before screwing to keep them tight and flush.
Finishing Questions
Stain or paint before or after building?
A quick sand before and a full finish after gives the best results. Pre-finish if you're doing two-tone or detailed finishes.
What type of finish?
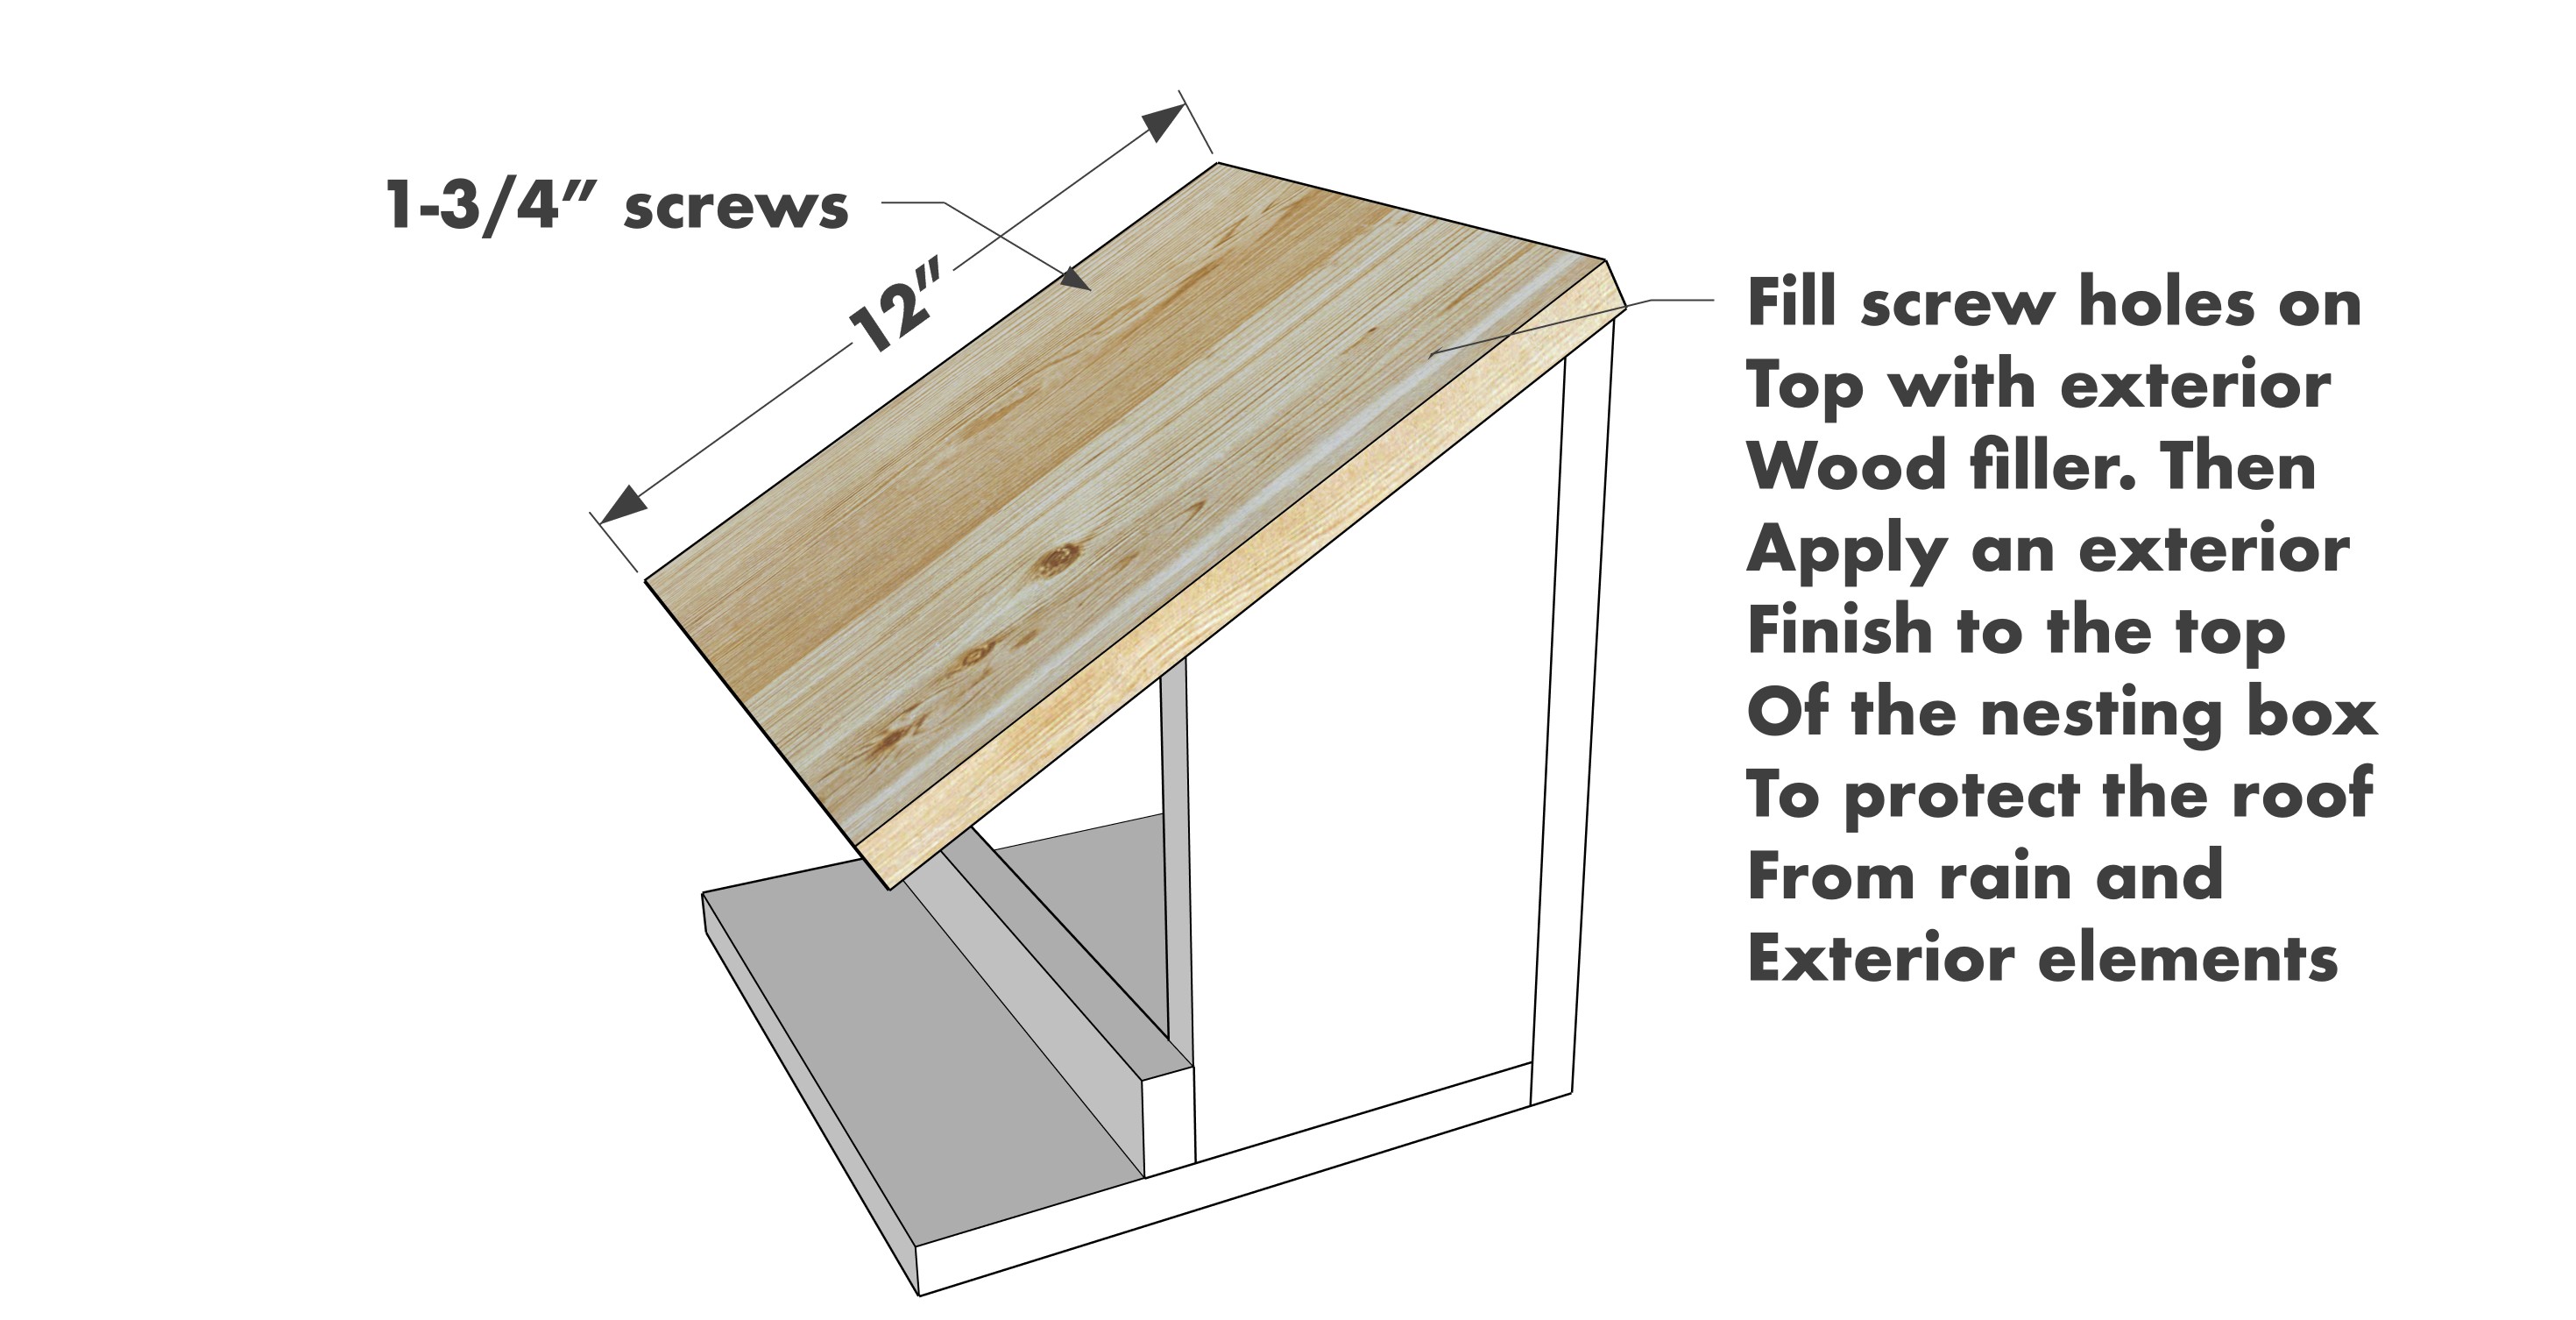
Use oil-based or water-based stain. For paint, cabinet-grade latex or enamel works great. High use surfaces on indoor projects should get a coat of polyurethane, I recommend a Helsman or Spar or other flexible poly that won't crack or peel with wood movement. For exterior projects, use a finish suitable for exterior fences.
How to get a smooth finish?
Start with a well sanded project. Sand between coats (220 grit), wipe clean, and apply light coats with a foam brush or roller.
Plan Questions
Can I change the size?
Many people do, and that's the great thing about building your own furniture! But do keep in mind going bigger might mean more supports are required, and often plans are optimized for minimal material waste.
Are these beginner-friendly?
Yes—plans are written with simple tools and clear steps in mind, with every effort to make plans as simple as possible.
Can I sell what I build?
Absolutely! Just don’t resell or repost the plans themselves.
General Questions
What tools do I really need?
A drill, circular saw, tape measure, square, and a few clamps will get you through most projects.
Do I need a workshop?
Nope! A driveway or small patio is plenty to get started, just make sure you have a level place to work. If you find you are building several projects a year, creating a small workbench is a great way to store tools and have a dedicated workspace.
What if I mess up?
Wood filler, sanding, or flipping boards goes a long way. Mistakes are part of the process!
What can I do to make my projects look more professional?
Start with straight boards, make accurate cuts, clamp all joints, and line up everything neatly. Sand thoroughly, use a neutral finish, and apply it in light coats for a clean look.
I've never built anything before. Where should I start?
Start with a few smaller softwood projects to get hands-on experience. Or if you're tackling a big project, buy a little extra lumber and practice your cuts and joints first. If possible, work with someone who has a bit of experience.
Care & Maintenance
How long will my furniture last?
With good joinery and regular care, your DIY furniture can last for decades. I have pieces in my own home that are over 20 years old and still going strong! One of the best parts about DIY furniture is that it’s easy to repaint, refinish, or repair—so your projects can grow and adapt with you.
How should I care for outdoor furniture?
Lightly pressure wash or hose it down once or twice a year. Tighten screws and reapply finish as needed to protect it—just like a deck or fence. A little upkeep goes a long way in extending the life of your furniture.
How about indoor furniture?
Regularly dust or wipe with a damp cloth. If it starts to look worn, a light sanding and touch-up paint or stain can refresh it in no time. DIY pieces are meant to be durable and fixable—so don’t be afraid to give them some love now and then.
Want to Build with Confidence?
Check out my ebook: 12 Skills to Build Your Own Furniture
It walks you through the core skills every builder needs—measuring, cutting, joinery, and finishing—so you can build beautiful furniture that lasts.
Still Have Questions?
Email us anytime at [email protected] and we’ll be happy to help!


Comments
The Dafoe Family (not verified)
Sat, 05/29/2010 - 22:09
Wonderful story! I would
Wonderful story! I would recommend the IKEA EKORRE collection as they are cheaper than buying the wood if you dont have enough left over!! Oh and if you live near IKEA. I am bribing and pleading with the Granny to go to IKEA for her grandbabies!
Su (not verified)
Sun, 05/30/2010 - 01:12
7 minutes! Incredible
7 minutes! Incredible
Janelle (not verified)
Sun, 05/30/2010 - 03:00
Obviously I'm ignorant, but
Obviously I'm ignorant, but why was it such a crucial matter that it be rushed?
Kay (not verified)
Sun, 05/30/2010 - 03:10
I have to admit when I saw
I have to admit when I saw the title...Evicted...I got worried, lol.
Very cool design!
Gnomeful Things (not verified)
Sun, 05/30/2010 - 03:19
Thanks for the birdhouse idea
Thanks for the birdhouse idea - something to do with the girls today.
Also a comment on the shingles. When I built the treehouse for my girls (not one from you but a few years ago) I used construction adhesive for the shingles. I did the same thing for the duck house and everything has held up fine through snow, etc. Just another option.
Desiree (not verified)
Sun, 05/30/2010 - 03:27
That is so sweet of you!
That is so sweet of you!
Tanja (not verified)
Sun, 05/30/2010 - 04:50
@ Janelle - as is the case
@ Janelle - as is the case with many species, the mother bird (or other animals) would reject the babies and abbandon the nest if it's been messed around with (It has something to do with the scent). So it was crucial for Ana to act as fast as possible to minimize the risk of mother bird abbandoning the nest. It seems like she did it on time!
Joanna (not verified)
Sun, 05/30/2010 - 04:59
I believe the moving of the
I believe the moving of the nest was a bad thing to do. I would have waited it out until the birds were old enough to fly away.
Did the mother bird ever come to the nest??? I pray that she did!
Viola (not verified)
Sun, 05/30/2010 - 06:36
Joanna, Unless I read the
Joanna, Unless I read the story wrong the mama bird came back and they are all doing fine. I do agree that it is best to leave them if possible, but sometimes it is not. I would love to build this play house so much. It would be really nice to see everyone's bird and animal houses that they build. hint hint.
Ana White (not verified)
Sun, 05/30/2010 - 08:32
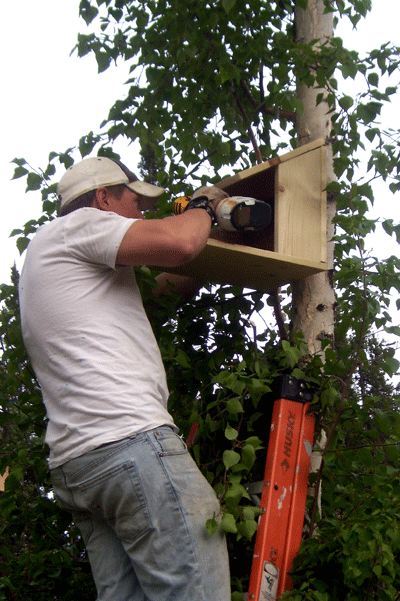
We were actually painting
We were actually painting with a sprayer and enclosing the rafters, so the nest had to be moved. We are so happy to see the mother feeding her babies and can't wait to see first flights. Robins are my favorite birds!
bell family (not verified)
Sun, 05/30/2010 - 10:48
hey don't want to sound like
hey don't want to sound like a booger because I love your site nad love taht you wanted to save the birds but it is against the law to touch or move a robins nest. They are protected. Found this out first hand because we had a momma bird build a nest in the rafters of our patio and it was a mess so I called to see what we could do and they told me it was against the law to touch the nest. Love your web site but I just thought I would share this with you.
Laura (not verified)
Sun, 05/30/2010 - 14:03
Hey I've done wild life
Hey I've done wild life rescue and my daughter is avian specialist. We just finished feeding and getting a baby Grackle with heat stroke up and well again. A little water, a little feeding with baby bird formula a few hours of AC and the parents we VERY happy to have their baby returned. It is a misnomer or old wives tell about scent. Birds actually don't have a very good sense of smell. Most birds will try and find lost babies and try to keep an eye on them. The best thing you can do is put a lost baby back in the nest even if you have touched it. If the parents reject it there is usually a genetic problem and has NOTHING to do with your scent on the bird; Hence my Grackle friends family opening welcoming back their young fledgling after about 8 hours of R&R. If you can't find the nest but you know were the parents are you can fashion one by a plastic butter tub. Just punch a few holes in the bottom. As for moving a nest, I think that might be a state by state thing. Here in Michigan your not suppose to mess with a nest.
Oh and if you find a baby bird don't mess with it, unless it is in immediate danger ie.. cat or car,but keep an eye on it. Chances are the parents are someplace nearby. Also don't try feeding babies call a wildlife rescue. Feeding young baby birds can be tricky. Great job Ana I showed my daughter your nest box and she thought it to be excellent and probably even better than there original.
Ana White (not verified)
Sun, 05/30/2010 - 14:34
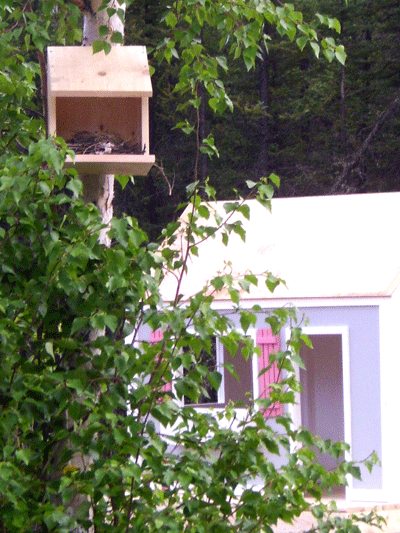
Thanks all, and to the Bell
Thanks all, and to the Bell Family, you are very right. We had been watching the robins for a couple of weeks (it's their third year in the rafter) and trying to work around them. Just on that particular day, the mother wouldn't have anything to do with the babies, for an entire day. The babies were quite hungry and loud. We even quit working in the area. So we tried to move the nest, and it worked, all is fine, and we see the momma going in and out with bugs in her mouth all day. Wow, those mother birds work hard! And hopefully with the rafters boxed in (and it's getting spray painted and sealed, ick) the robins will nest in the box next year.
Lori Belle (not verified)
Mon, 05/31/2010 - 12:57
that is so sweet!!
that is so sweet!!
Firefly Haven (not verified)
Tue, 06/01/2010 - 04:42
You may want to edit your
You may want to edit your quick bird house plans to include some kind of low "fence" around the platform. Blue Jays, Stellar Jays and Crows commonly come and roll eggs or babies out of the nest. I'm not sure why, but our robin's nest had it happen four years in a row. I started piling grass clippings below the nest and saved a few dropped eggs.
Nancy (not verified)
Wed, 06/23/2010 - 06:25
I am a bird biologist and can
I am a bird biologist and can testify to the fact that it is very difficult to get a mother bird to abandon her nest once the chicks have hatched (nests with only eggs in them are another story). I have handled many chicks of a variety of species from bushtits to scarlet macaws and none have ever abandoned their babies. So Ana did exactly the right thing--move the nest to a nearby location where the parents can easily find it and predators cannot get to it. Same goes if you find a nest on the ground--just put it up in a safe location nearby and the parents will continue to care for the chicks.
KaylaDanielle (not verified)
Tue, 06/29/2010 - 15:20
I blogged about using this
I blogged about using this story to build the same birdhouse today!
www.kaydani20.blogspot.com
HannahW (not verified)
Sat, 10/23/2010 - 15:29
The mama bird would not come
The mama bird would not come near enough to feed her babies when people were around. She might have abandoned them and the babies would starve if seperated for too long. Or she might have dive-bombed people in an attempt to save her babies.