
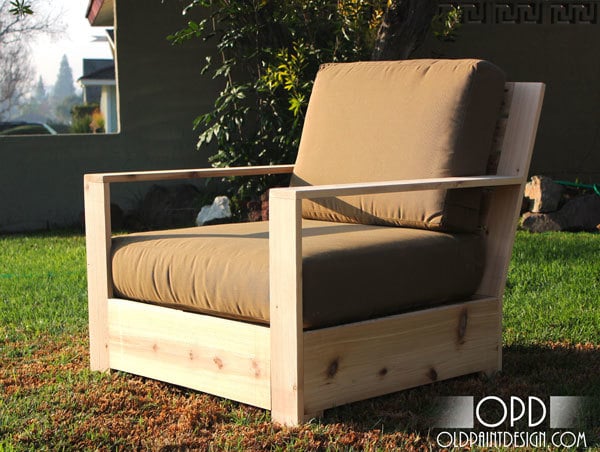

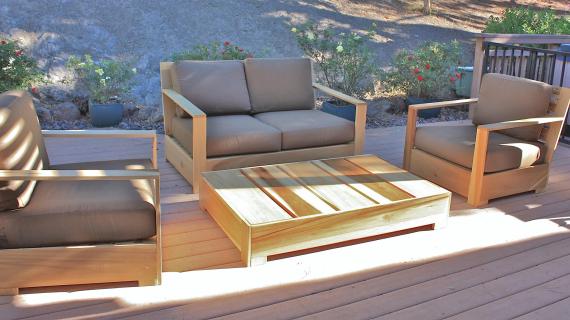
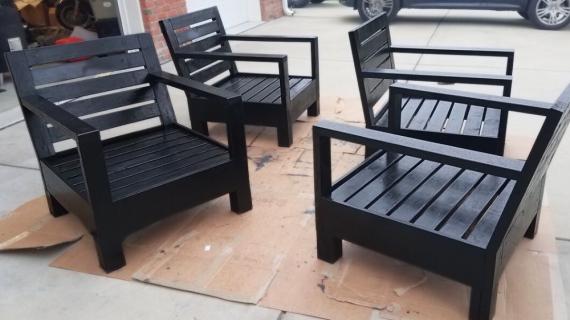
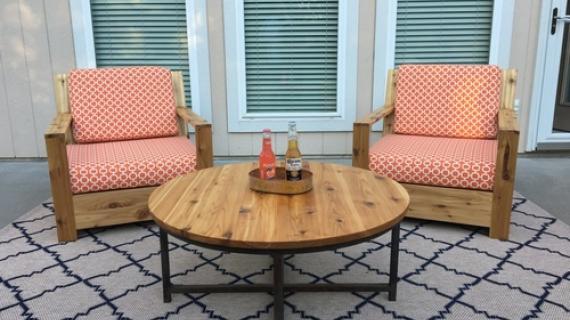
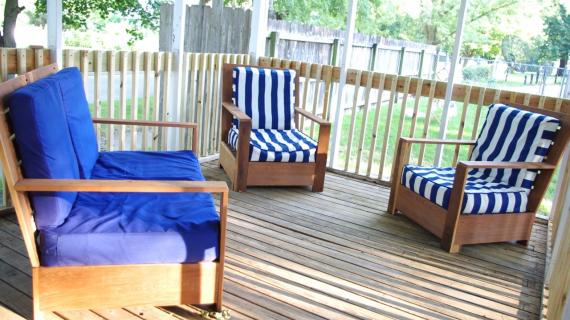
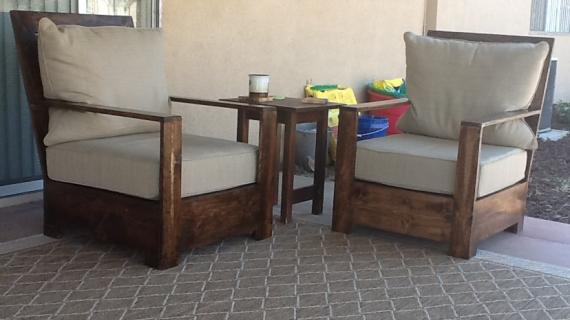
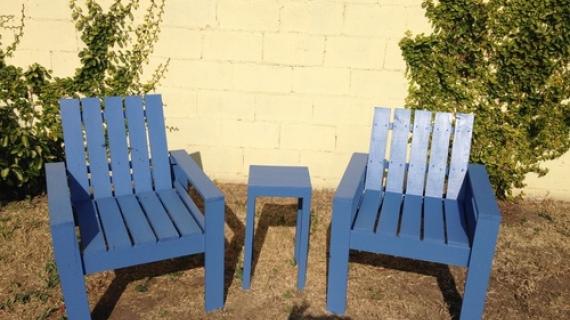
Free plans to build outdoor lounge chair inspired by Restoration Hardware Belvedere Chair.
Ringing in at no less than $1065 before cushions, how's a girl going to get the sleek style and contemporary comfort of wood outdoor lounge chairs like Restoration Hardware's Belevedere Chair?


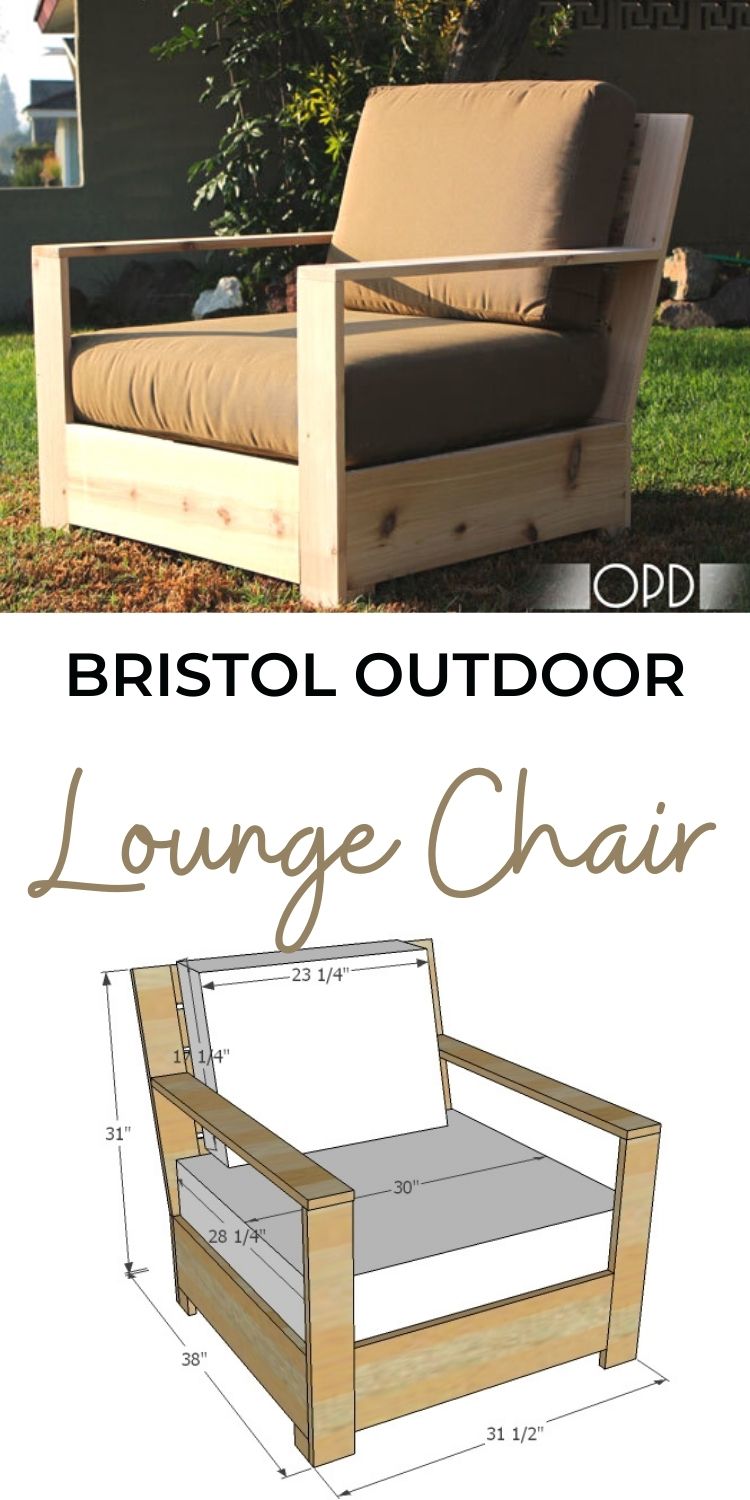
Pin For Later!
Preparation
1 - 1x8 @ 10 feet long 6 - 1x4 @ 8 feet long 1 - 2x2 @ 6 feet long
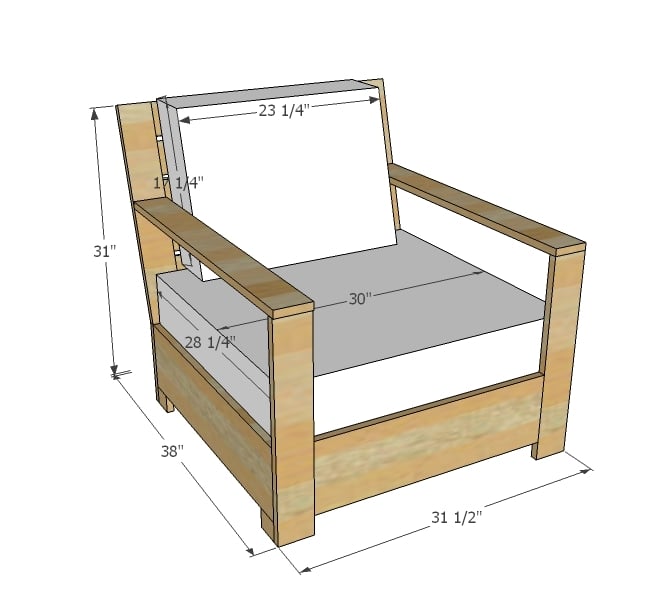
2 - 1x8 @ 24 1/2" 2 - 1x4 @ 9 1/4" 2 - 1x4 @ 21" 2 - 1x8 @ 28 1/4" 4 - 1x3 @ 2" (You can use 1x4 scraps as well) 2 - 1x4 @ 22 3/4" (longest point, one end cut at 15 degree bevel - see diagram) 5 - 1x4 @ 24 1/2" 2 - 1x4 @ 32 3/8" (longest point, one end cut at 15 degree bevel - see diagram) 2 - 2x2 @ 28 1/4" 7 - 1x4 @ 30"


Please read through the entire plan and all comments before beginning this project. It is also advisable to review the Getting Started Section. Take all necessary precautions to build safely and smartly. Work on a clean level surface, free of imperfections or debris. Always use straight boards. Check for square after each step. Always predrill holes before attaching with screws. Use glue with finish nails for a stronger hold. Wipe excess glue off bare wood for stained projects, as dried glue will not take stain. Be safe, have fun, and ask for help if you need it. Good luck!
Instructions
Step 1
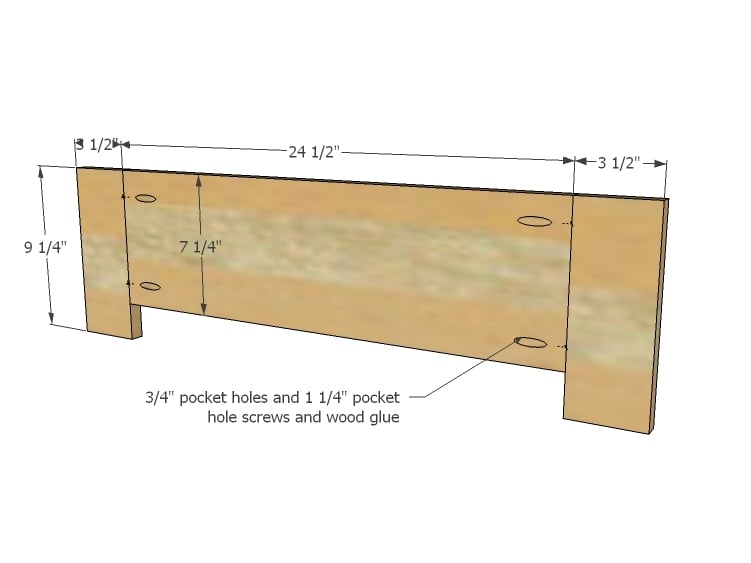
Build the back as shown above. Clamp joints for the smoothest joint.
Step 2

Build front frame as you did the back.
Step 3
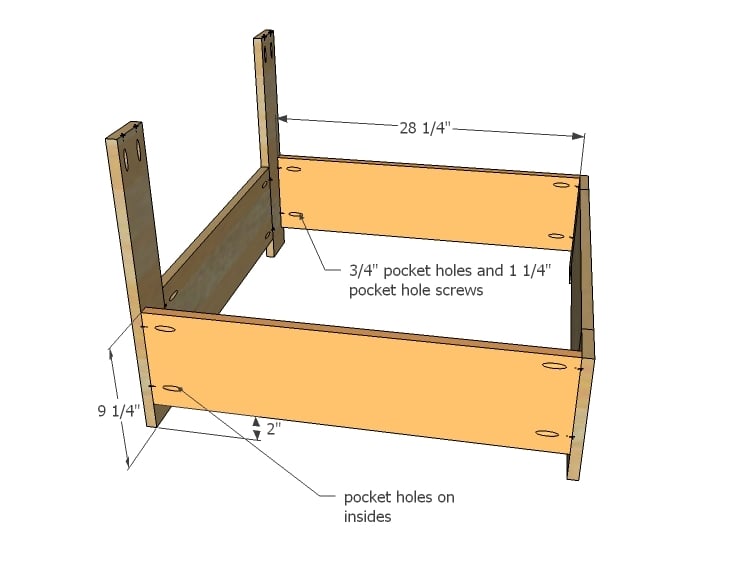
Now attach the front and back to create the seat box.
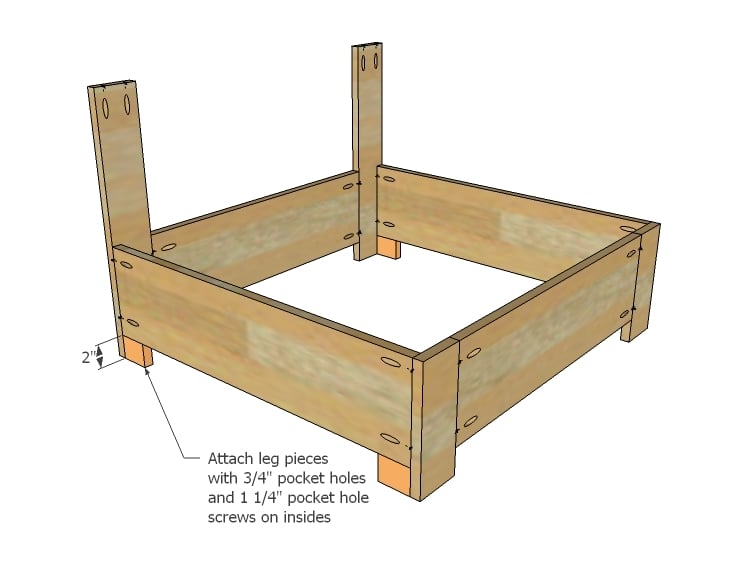
Step 4

Step 5
Step 6
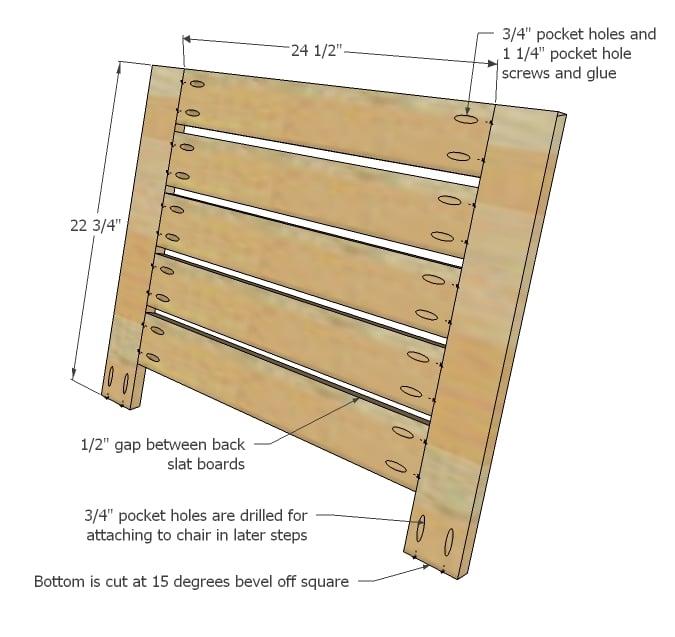
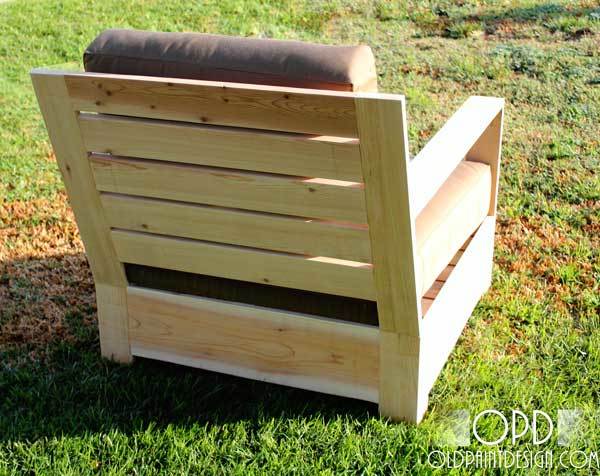
Now build the back as shown in diagram. Remember the bottom is angled to create a back angle for the chair.
Step 7
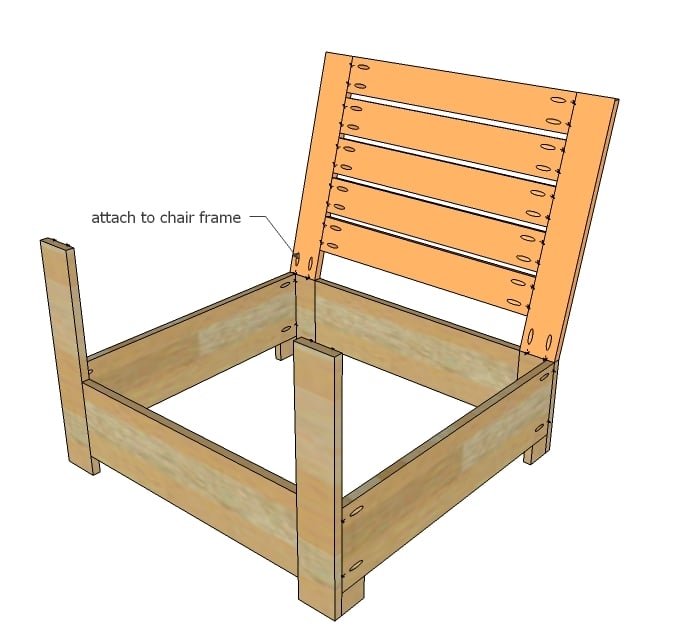
Now attach the back. For sure, it's going to be flimsy at this point.
Step 8

The arms will support considerably.
Step 9
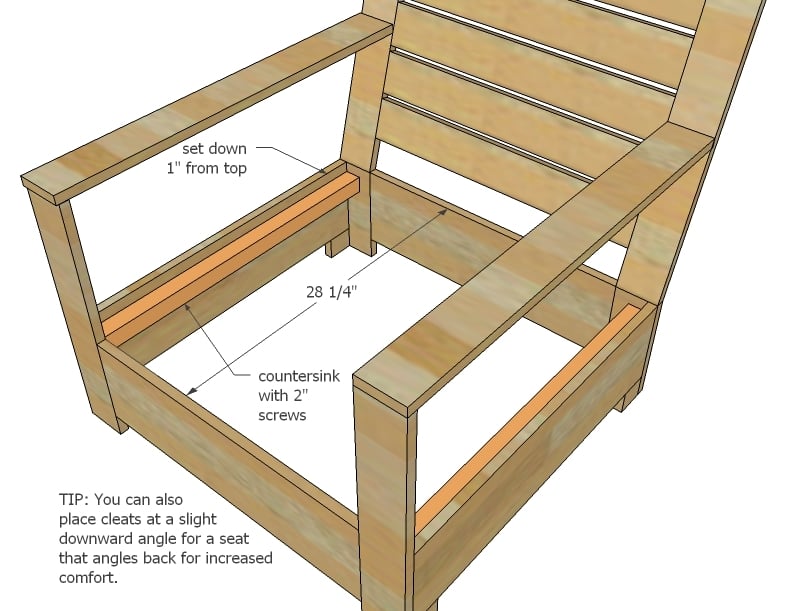
Attach cleats. You can also angle cleats downward and backward for an inclinded seat - some prefer for comfort.
Step 10
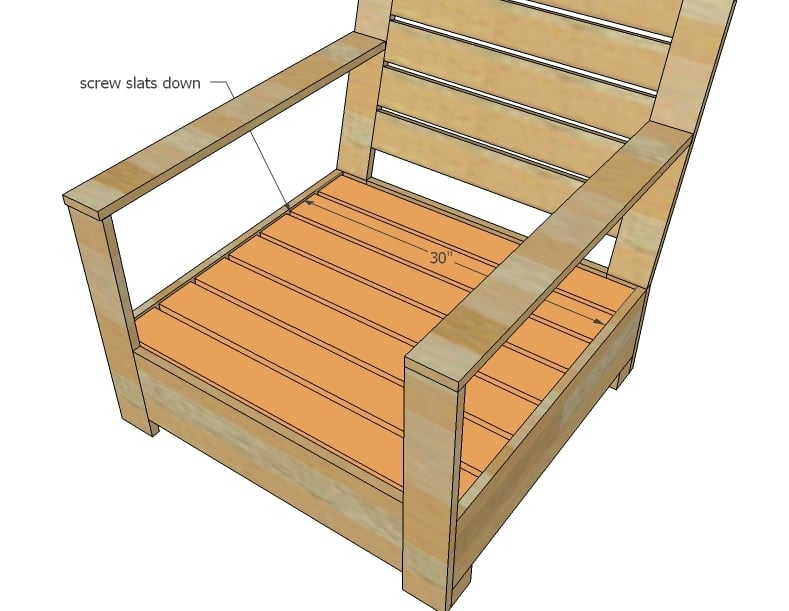
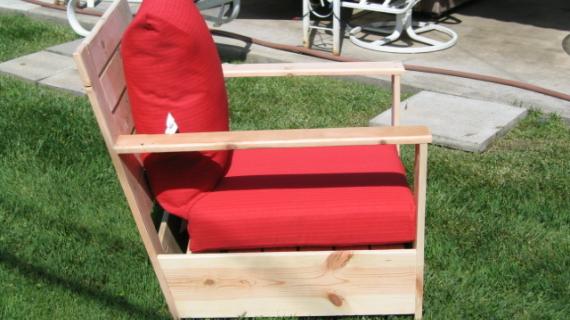
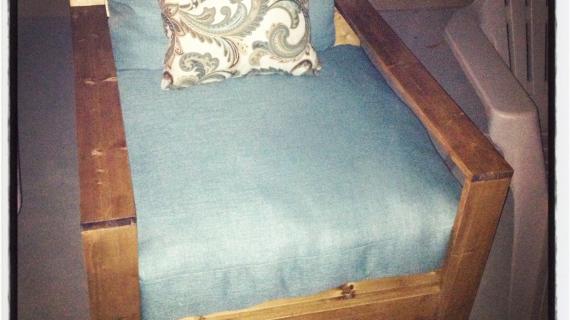
Finally, just add seat slats and cushions!
It is always recommended to apply a test coat on a hidden area or scrap piece to ensure color evenness and adhesion. Use primer or wood conditioner as needed.


Comments
Robohead
Thu, 02/09/2012 - 14:38
I love this. I'm going to
I love this. I'm going to have to build 2 of them and the table for my gazebo. I was going to go with adirondack chairs, but these have to be way more comfortable and they look awesome. Thank you for the plans.
Guest (not verified)
Thu, 02/09/2012 - 17:02
how do I size this for american girl dolls
is there a way to use plans to build for dolls 18 inch tall thanks
Bill (not verified)
Thu, 02/09/2012 - 21:10
how do I size this for american girl dolls
Yes. Take the ratio of your height to the seatback height. Let's say that is 72" for your height.
Seatback is 22-3/4"
Ratio = 3.16
Now, take the Doll's height as 18" / 3.16 = seatback height of 5-11/16"
The scale factor to convert is 72" / 18" = 4:1
Now, make a table of all the molded dimensions of the pieces and divide each one by this factor of 4.
After you have done the conversion, do a "sanity check" to see whether any of the molded dimension changes affect joint design. Also, look to see if the resultant slat widths (the molded face width of each slat) are close to some "standard" or easily re-sawn dimension. If so, look at re-jiggering the gap spacings and counts to suit the standard, while still keeping the overall scale.
Be sure do do some scale sketches when finished, to make sure you got it to actually work.
Because the
Guest (not verified)
Fri, 02/10/2012 - 12:45
Cushions
The only problem is that cushions are odd sized and it's hard to find an affordable replacement. Does any have the proper cushion specs? How about a good tutorial making outdoor cushions?
Robohead
Fri, 02/10/2012 - 15:49
Yeah, those cushions are
Yeah, those cushions are pricey. One alternative (and my plan) is to buy cushions elsewhere and then tweak the build plans to fit my cushions. It would be easy to do that and still get this look.
In reply to Cushions by Guest (not verified)
spiceylg
Sat, 03/10/2012 - 05:04
cushion instructions
She does have cushion instructions for the outdoor sectional. Of course the dimensions are different but you could modify as needed.
Guest (not verified)
Tue, 02/14/2012 - 13:21
For the cushion problem - I
For the cushion problem - I recently built a sofa and two chairs and the best cushion option I found was to buy a memory foam mattress. I bought a king sized 8" memory foam mattress from Samsclub.com for about $245 and cut it down (using a utility knife) to the sizes I needed. Then I just sewed a cover for my new custions. You can get a twin xl mattress for $148.64. If 8" is too thick, the top layer (the memory foam layer) is easily seperable from the rest, so you can have about a 5.5 - 6" cushin and use the 1.5" memory foam layer for something else. (PS. The matress is advertised as an 8" mattress but really it is more like 7" in real life). An added benefit to buying a mattress is that the cushion/mattress has held up well as compared to the sofa that I replaced. Hope this helps those trying to build this chair as well as other cushioned furniture.
jbwooster (not verified)
Fri, 03/09/2012 - 19:44
burley chair
just finished it...sucker's got a huge frame! I used cheap pine for the first one, to work out the bugs, since it was my first time with a Kreg jig. Overall, much easier than a lot of other projects I've done. I still have a little concern with the back. Even though it's fastened pretty well, there's still some give in it. Any advice, or is that just the way it is? I'm concerned about some really big dude leaning back in it and, CRACK!
Thanks.
jb
Robohead
Mon, 03/12/2012 - 11:09
I was thinking about that also.
I haven't built this yet, but I plan to. My kids can be a little wild sometimes and I'm concerned about them running to jump into the chair and possibly loosening or pulling the back section off of the arms. An idea I have is to use 2X4 for the arms instead of 1X4 and then use lag bolts thru the back section and into the arms. Just a thought. I'm sure there are several ways to beef up the support for the back section, but this is what I'll probably end up doing.
You should post your finished chair to the brag board. I would love to see it.
In reply to burley chair by jbwooster (not verified)
claydowling
Mon, 03/12/2012 - 11:57
Strengthing trick
I have a few outdoor chairs made from scrap. There have been failures. The failures have always been at a point where there are knots in the wood, usually pretty large ones. This makes sense, because the grain is discontinuous, and the strength of wood comes from the grain structure.
So buy only clear boards for making chairs. If it's got knots, it stays at the store or lumber yard. That probably means you're going to have to buy Select & Better lumber, which costs more. But having a chair turn to scrap is more expensive in both time and materials.
jbwooster (not verified)
Mon, 03/12/2012 - 20:23
thanks
Thanks. I think I'll leave it go for now. I gave some consideration to adding a side piece that would enclose the chair on both sides, and outfitting it with some sort of magazine rack (ours will be kept in a screened-in back porch) which might double as a stabilizer.
But now that I've sat in it (sans cushions), it doesn't feel terribly weak after all, and I suppose the cushions will help absorb some of the leverage applied against the upper portion of the back frame.
That Kreg jig is pretty cool. Never used one before. I'm not what you'd call a terribly sophisticated carpenter...
We'll see!
jb
Guest (not verified)
Wed, 04/11/2012 - 06:11
No Arms
I would like to build this chair, but I actually want to build it as an "L" shaped bench. Are there any suggestions to make the back supported without having to add the arms? Thanks!
Guest (not verified)
Wed, 04/11/2012 - 06:14
I would like to build this
I would like to build this chair but want to make it into an 'L' shaped bench. Any suggestions on how to make a supported back without the arms?
Wardo (not verified)
Sun, 04/29/2012 - 04:53
Can't download PDF for Bristol chair
I get this message:
TCPDF ERROR: [Image] Unable to get image: file:///home/anawhite/public_html/dev/acquia-drupal-1.2.33/sites/default/files/restorationhardware-outdoor_1.jpg%20
I'm using Firefox 11.0, if that matters :-(
Doug Ward
JoanneS
Sun, 04/29/2012 - 07:53
Saving a Copy of the Plan
Hi Doug,
This works for me if I ever have trouble opening the .pdf file. I tried it on this plan this morning with Microsoft Word 2007 and Microsoft Works and they both worked for me. (My computer has Windows 7.) I'm not a computer person, so I'm just writing this all out for the steps I used, hope it is helpful. :) It took about a minute to do all of these steps:
Click the icon to open the Printer-friendly version
Right Click>Select All (everything will highlight)
Control>C (will copy everything)
Open a blank file in your word processing program (Word is what I usually use)
Control>V (paste)
This will paste the whole contents of the printer friendly version into the Word file.
For Word, you can then select
File>save as
and under "save as type" select .pdf to save as a .pdf file
Word will let you save it is a regular document file too.
For Microsoft Works, you can save as a word processing file (saving as .pdf wasn’t an available file type to select on my copy of Works). But, the diagrams and wording will be there and you’ll be able to see everything in this format, and print out.
Hope this helps! :) Joanne
Lorie (not verified)
Tue, 05/08/2012 - 09:06
These Chairs
Ok...so I got two shipping crates that were huge and I broke down to recyle the wood. This was a major undertaking but I got it done. Got the first chair built, and dug through my sewing room closet and found that I still had an old crib mattress from one of the grandkids. I pulled all of the old plastic off of it, and used the foam for cushions. ANYTIME you need to cut or form foam, use an ELECTRIC KNIFE!!! It works really well...just make sure you aren't going to use the knife for food ever again. I went to the thrift shop and bought one for 2 dollars, just for foam. These turned out great!!! Thank you Shane and Anna!!
Wendy Shirai (not verified)
Wed, 06/13/2012 - 19:16
Just Built!
Just finished making 2 chairs and a side table (in pine) I am officially SPENT! I don’t know how you and Shane do it!! I now have my wrist brace on from using the driver (I confess, it was sore before I started but I just had to have it) We plan to use the side table as an ottoman. I just don’t know about the cushions… I sewed I seat using some repurposed tablecloth fabric I bought at a thrift store and then thought, wait a minute, I don’t even know if I can get cushions in those weird sizes. I think if I buy a Queen size mattress topper I can cut it up to make two seats and backs and have some left for lumbar pillows… Anyhow, thank you for listing the directions, my husband loves them and is very impressed I made them myself YOU ROCK!
Kscheffer
Sun, 09/23/2012 - 09:10
Help!
I am making two of these, and mis understood the directions for the pocket holes the attach the back to the base. I thought they were to put on the back where you couldn't see them, not on the front. I have only screwed in one side of one chair. No glue, thank goodness. I've removed them. How do I save this project? Flip them, and recut the 15 degrees the other way? If I glue in a wood plug to fill the old pockets, will it make it strong enough for a pocket on the other side? I am in the eleventh hour on this one.... Any assistance appreciated.
Bonny226 (not verified)
Fri, 10/05/2012 - 09:43
Unsafe unstable project plans
This chair is not safe to use as is. Additional vertical members needed to sandwich the back and base (2-1 x 10") and two members to sandwich the front armrest and base (2-1 x 6")
steephill96
Sat, 07/12/2014 - 18:22
Weight Limit
I would love to build it, however being 210 pounds I am concerned that a few 1x4's will keep me sitting up straight in the chair. Any help?
jgbreeden
Sat, 07/12/2014 - 19:43
Needs structural upgrades
I have to agree with the comment above yours, in that it needs structural improvements. Read the brag post from Monkeyboy. I would do 2 things.
First, replace the two 2x2s with four 2x4s, assembled in a square frame. The front and back pieces would be 27", based on the dimensions shown. If you build the frame first, then you can screw from the inside out into the outer boards, and not have to depend on the jig screws in 1x's for strength.
Second, I would attach a couple of 2x2s vertically, below the armrest at the back, attached to the backrest verticals, that extend below the seat rail, to give the back leverage similar to the Harriet chair on this site. They would need to be aligned with the inside edge of the vertical 1x4s to clear the inside 2x4 box described above. They might need a notch to clear the 2x4 box, but that back support seriously needs reinforcement.
Ekoed
Tue, 06/02/2015 - 11:58
Screwed Slats
Can anyone tell me if the screws are just screwed straight down through the slats in to the cleats? How many screws per slat? Also, is there a reason the pocket holes on the boards running across the back aren't put through the back of the boards?
In reply to Screwed Slats by Ekoed
Ana White
Wed, 06/03/2015 - 07:00
Feel free to do the pocket
Feel free to do the pocket holes front or back, at the back you will see
them if you don't plug them, otherwise at the front your cushion should
cover them. Screw straight down into cleats, 2 screws in each side and glue
will go a long way. Hope this helps!
Ekoed
Thu, 06/04/2015 - 08:41
Thanks Ana, I love this chair
Thanks Ana, I love this chair and I'm so excited to build this for our porch. Great site :)
-Ash
Fri, 05/07/2021 - 18:07
Chair and a half design?
Could this chair be made into a chair and a half? Other than multiplying each dimension by 1.5 would anything else need to change? The goal (concept) would allow my clingy pit in the chair with me out at the fire pit.