Hello, Jacob here today.
Ana's still traveling, making the most of her trip to Atlanta by taking a few days to film video for Ryobi.
The kids have been doing suprisingly well, especially the baby. But we will all be happy to see mom in a couple of days. Maybe we will take a few days off and head down to the cabin.
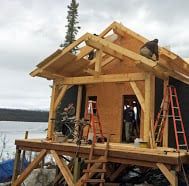
One of my favorite parts of our cabin is the front porch with it's gabled roof.

Not only does it give the cabin a grand enterance, it's also very functional, providing cover from rain and shedding snow off the front porch.

Next time we take photos we will have to turn the lights on in the ceiling so it's not so dark and you can see better.
Building this gable front porch was not easy or quick, but it is something that most anyone with general carpentry skills and a willingness to work can do.

It's a pretty simple structure - just two upright beams, bridged by the main beam with cross supports. From there a center upright supports the main ridge. Then it's just the rafters and their support beams.

Here's the main support beam with the two uprights and cross supports. It's almost identical to the back porch, expect shorter (and no center support because it is shorter).

From there we can tie in beams that support the lower end of the rafter. On the cabin wall side, they are just attached to the cabin itself.

Then up from there at the center with a support and a ridge beam.
Everything is joined together by mortise and tenons, locked in place with oak pegs. So no exposed fasteners anywhere in the beam work.

Finally the rafters are placed on top and screwed from the top. The screws will be hidden by the roof build up later on.
We cut and prepped all of the beams back home before hauling out to the cabin site. I can't tell you why, but we did have to redo an entire beam on site. You'll have to watch this fall on DIY Network ...
So here's the new beam -

The beams were all rough cut since I couldn't find a mill in Alaska that could plane this big of a beam. And we couldn't justifly investing in a big planer for this one job, so I ended up buying a hand planer. This thing is a beast. It weighs about 40 pounds and you have to do three passes on three sides, per beam. It is a wood eating machine that does it's job, but you'll be tired and sore by the end of the day.

The beam we had to redo needed a mortise drilled out. I just drilled holes to remove most of the material.

Then took a corner chisel to clean up the corners and square the mortises up. Then I cleaned the rest of the wood out with a regular chisel. These motises aren't so bad - you can make them a little deeper and the drill bits take care of most of the material.

Like we did on the back porch, we set all the beams for the outer supports together first, upside down. The beams lock together when holes are drilled through the joint, grabbing the tenon embedded in the beam, and an oak peg is pounded into the drilled hole.

Here's the outer support all assembled. We don't have heavy equipment out here, so we used a pulley to help us pull this all into place.

Once the upright beams were in place, we nailed a cleat to the top of the main outer beam and secured it to the wall. Then we added the upright in the center of the main beam. It is mortised and tenoned into the main beam.

Next we hauled the ridge up through the cabin, shoved it up on the loft floor, and then threaded it out over the deck. It was not light.

But thankfully, the rafters are. Most of the cabin timberframe is rafters. There's just a handful of the beams that weigh a ton, but once you get them up, the rafters fly. We will do a post very soon on the main cabin rafters and beams to show our fellow timbergeeks how we do that.

I'm getting a little ahead here, but the next step is to put tongue and groove up on top of the rafters. This way when you look up, the main ceiling is beautiful woodwork.

After that goes up, we built up the roof to allow for insulation and waterproofing. We will do a post on that soon too.
Easy? No. Doable? Certainly. Worth it? Ask me in a few more weeks.
Thanks for reading! Jacob
PS Ana says front porch bench plans are on there way this week!
Comments
Smokeydog
Tue, 08/04/2015 - 16:29
Cabin
Very, very nice!
grayemiliia
Sun, 05/15/2022 - 04:23
Thanks for sharing this…
Thanks for sharing this project. In fact, we also thought about building a house, or investing in an already finished one. A new house always looks like a better project, although it often has many difficulties and is more expensive. We even found a realtor in Cleveland who is currently looking for the best deals for us.