Harriet Higher Chair

higher chair for toddlers
Difficulty
Beginner Projects
| Print this plan

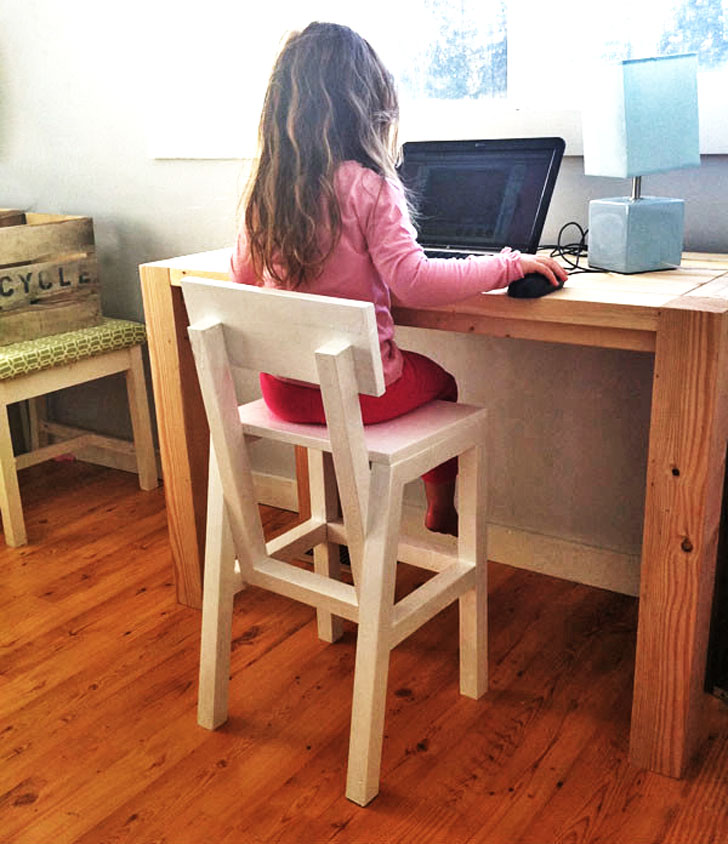
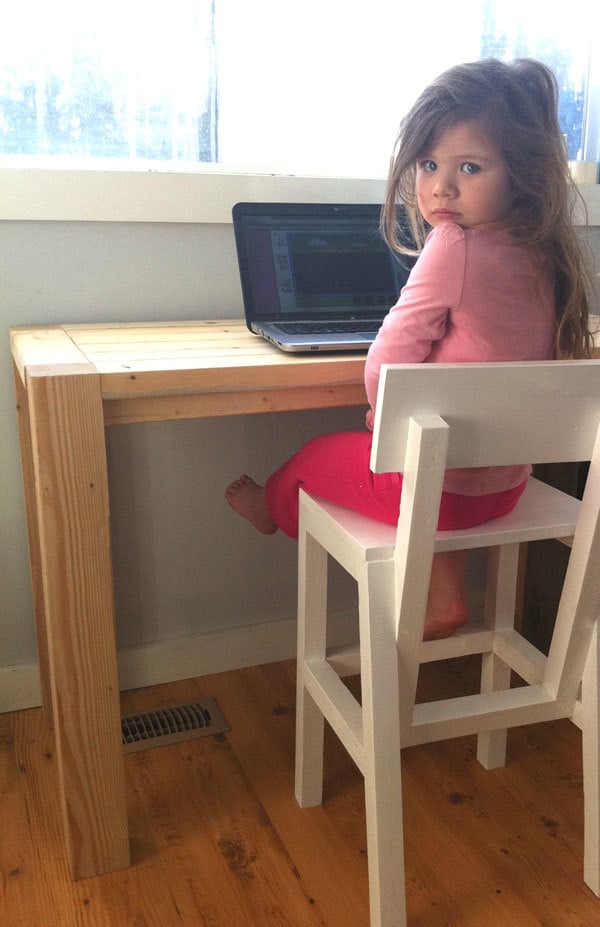
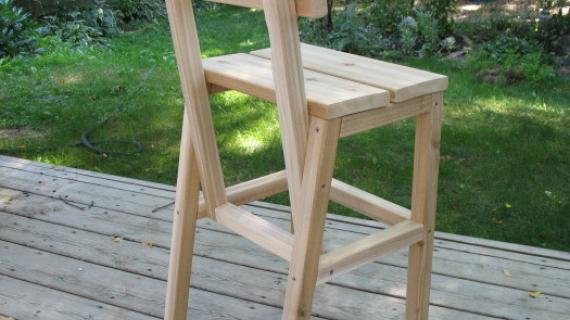
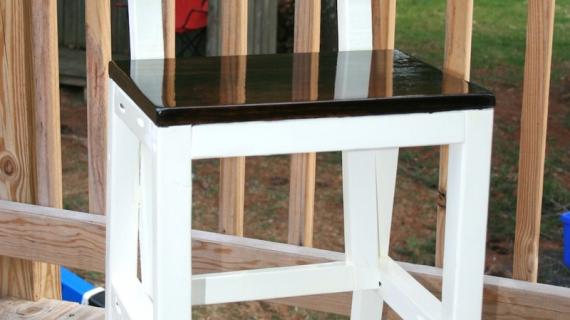
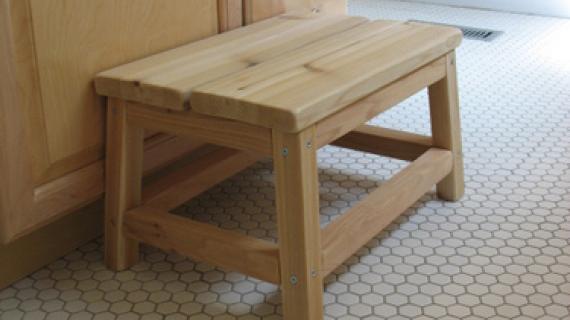
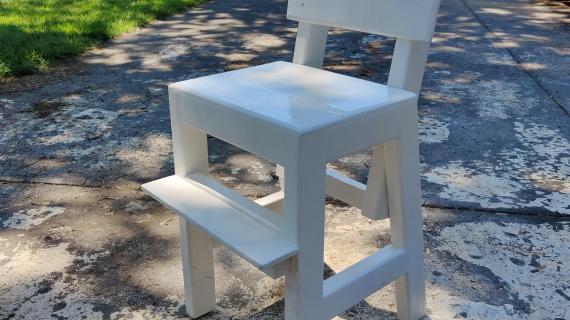
Is your child to old for a high chair, but too short for a standard chair?  

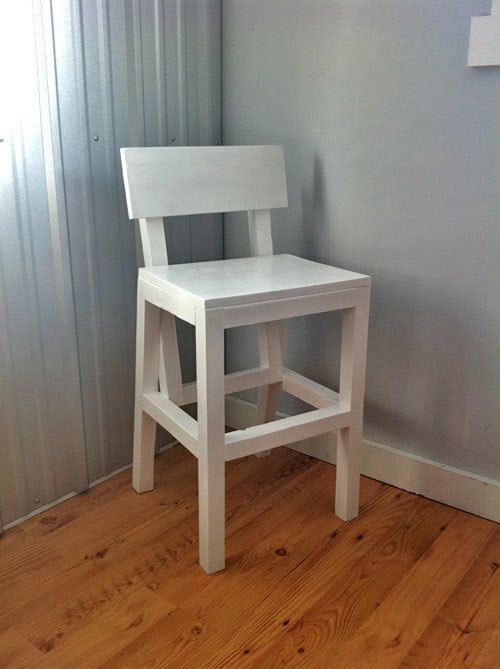
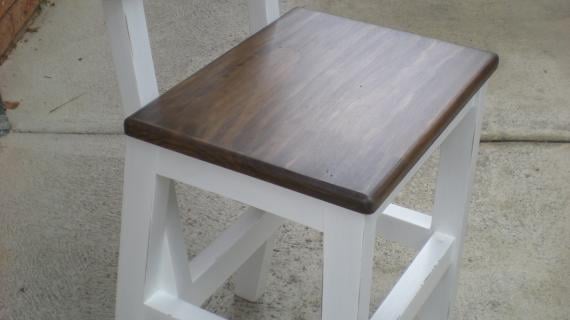
For the cost of a cheapo plastic booster seat, you can build your child a modern higher chair.  This simple sturdy plan is easy to build, features a foot rest and is easy for youngsters to climb up on.  This chair is not meant to replace a high chair, and does not offer the security and safety of a high chair.


higher chair
higher chair

My only coworker has been complaining quite a bit about her office chair, so I thought it was time to show some appreciation for my number one associate and build her a higher chair.  She of course, had to help.


Mom, how and I supposed to work if you keep making me take pictures?
 
This chair is perfect for preschoolers, who don't need the security of a high chair, but still could use an extra boost.  For sure a luxury if you had to buy such a chair, but in our DIY world where all things are possible on the smallest of budgets, why buy a plastic booster seat when you can make a mod style solid wood chair for the same cost?  And this chair is really cool because the base supports act as a step up, so children can seat themselves at the table.


Dimensions
higher chair dimensions
This chair is child sized, for an adult sized table. Could be modified to a bar stool with modifications to height and depth

Preparation

Shopping List
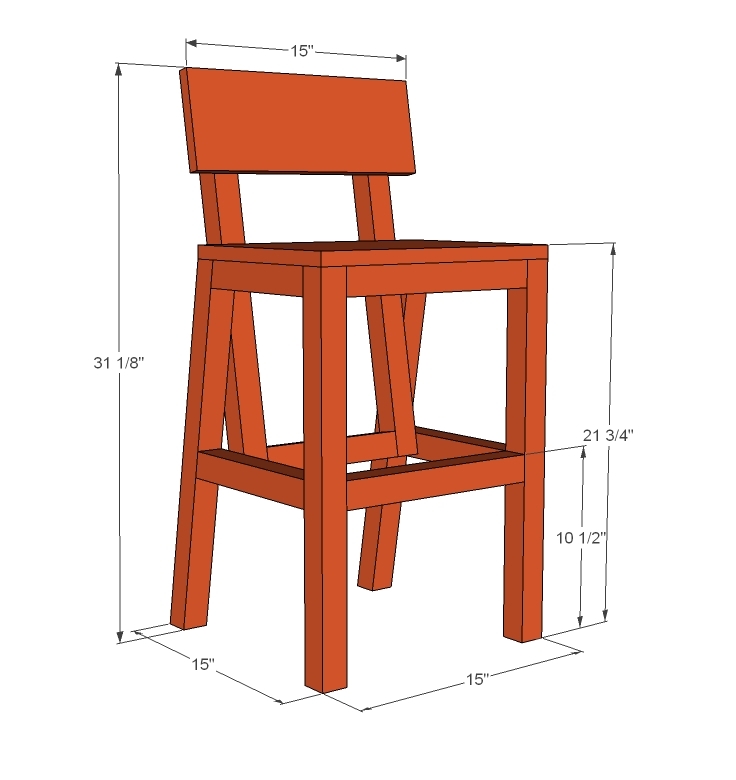
  • 2 - 2x2 @ 8 feet long
  • 1 - 1x12 @ 15" long
  • 1 - 1x6 @ 15" long
Common Materials
2 inch screws
2 1/2 inch screws
120 grit sandpaper
primer
wood conditioner
paint
paint brush
Cut List
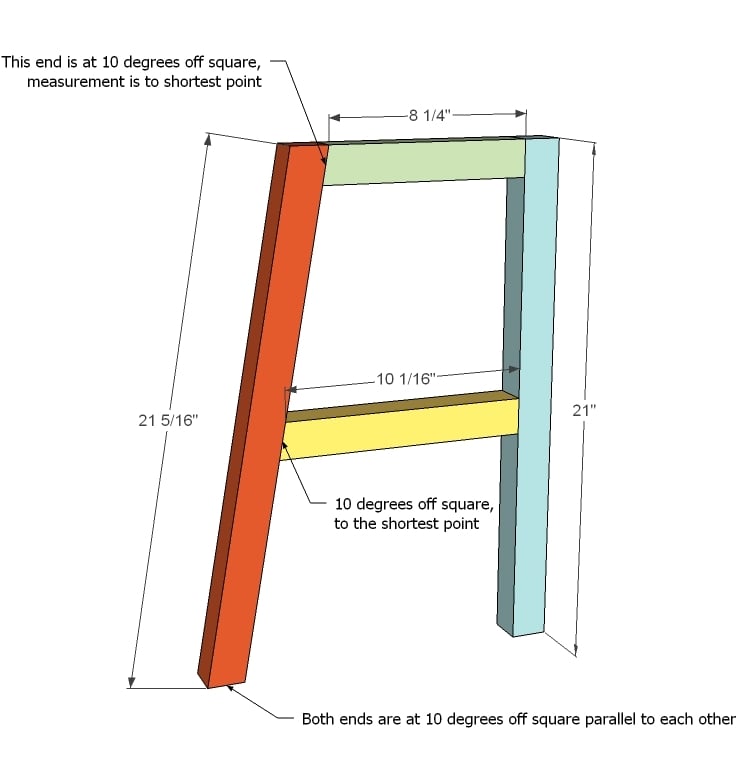
  • 2 - 2x2 @ 8 1/4" - one end at 10 degrees off square, shortest point
  • 2 - 2x2 @ 10 1/16" - one end at 10 degrees off square, shortest point
  • 2 - 2x2 @ 21 5/16" - both ends at 10 degrees off square, parallel to each other
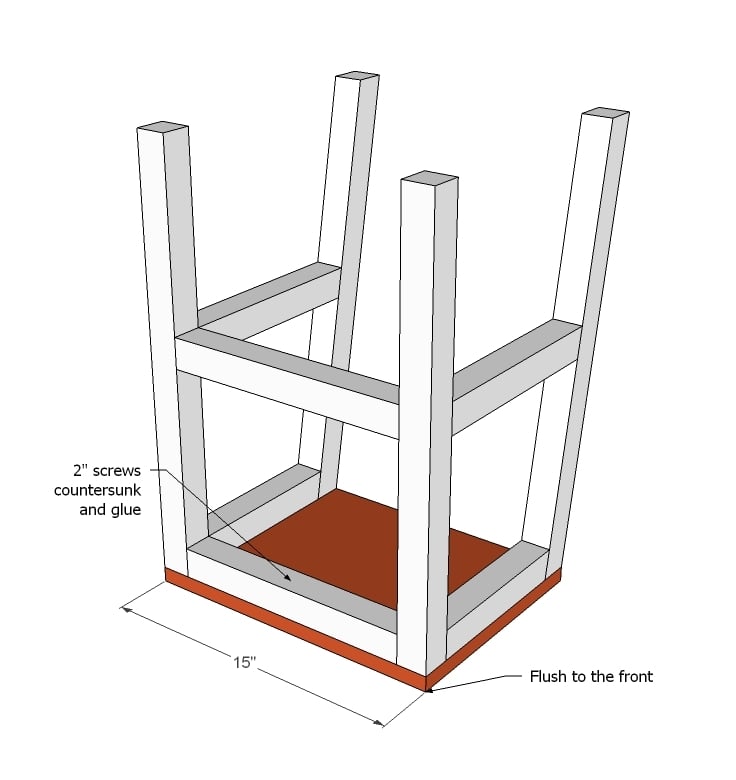
  • 2- 2x2 @ 21" (Front Legs)
  • 2 - 2x2 @ 12" (Front Support/Apron)
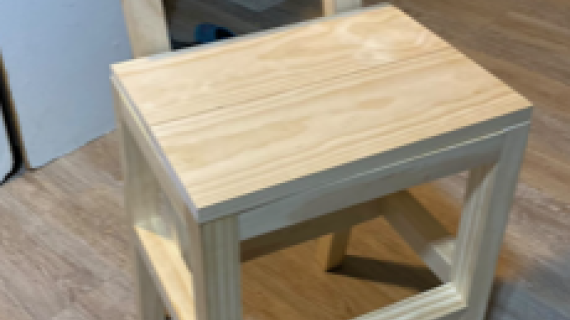
  • 1 - 1x12 @ 15" (Seat)
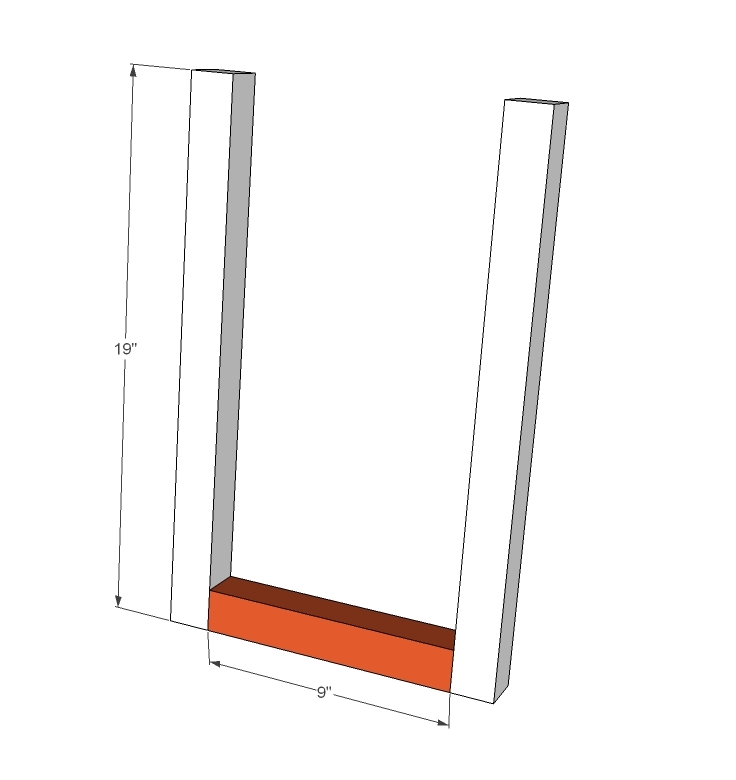
  • 2 - 2x2 @ 19" (Back Supports)
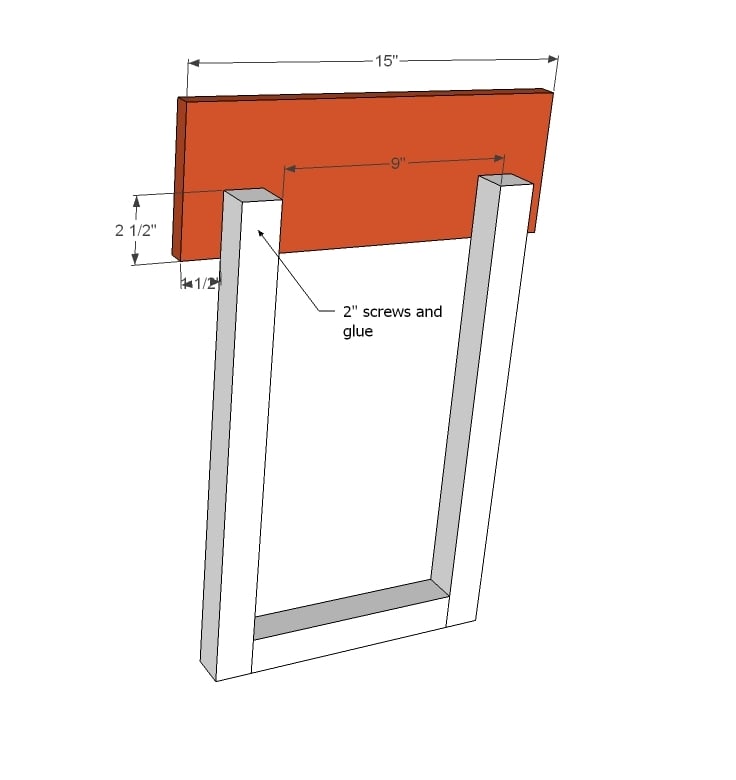
  • 1 - 2x2 @ 9" (Back Base)
  • 1 - 1x6 @ 15" (Backrest)
Tools
Tape Measure
Speed Square
Pencil
Safety Glasses
Hearing Protection
Kreg Jig
Drill
Miter Saw
Power Sander
Level
Drill Bit Set
General Instructions

Please read through the entire plan and all comments before beginning this project. It is also advisable to review the Getting Started Section. Take all necessary precautions to build safely and smartly. Work on a clean level surface, free of imperfections or debris. Always use straight boards. Check for square after each step. Always predrill holes before attaching with screws. Use glue with finish nails for a stronger hold. Wipe excess glue off bare wood for stained projects, as dried glue will not take stain. Be safe, have fun, and ask for help if you need it. Good luck!

Instructions

Step 1

Begin by building two of the above pieces. Make sure both match exactly. Use with either 2 1/2" screws countersunk and glue or 2 1/2" pocket hole screws.

Step 2

Join the two sides with the front apron/support as shown above. Use the same screws and glue.

Step 3

Now the top. This time you will need to use 2" screws so the screws don't poke through the seat. Also screw the side aprons to the seat.

Step 4

Now build the back. Go back to the 2 1/2" fasteners. Adjust for square.

Step 5

Attach back rest to the back support pieces.

Step 6

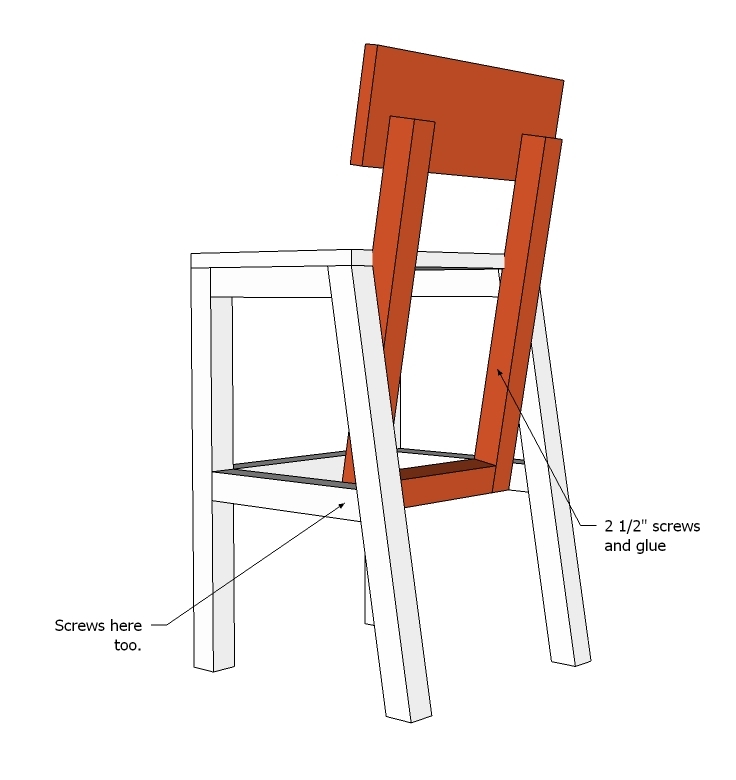
Finally, adjust the seat rest to fit in the seat back. Measure, use a level at the top, and screw in place. I actually sat my daughter in the chair to get the support just right.

Finishing Instructions
Preparation Instructions
Fill all holes with wood filler and let dry. Apply additional coats of wood filler as needed. When wood filler is completely dry, sand the project in the direction of the wood grain with 120 grit sandpaper. Vacuum sanded project to remove sanding residue. Remove all sanding residue on work surfaces as well. Wipe project clean with damp cloth.

It is always recommended to apply a test coat on a hidden area or scrap piece to ensure color evenness and adhesion. Use primer or wood conditioner as needed.

Comments

Kate (not verified)

Wed, 03/23/2011 - 06:09

Love this one!  I don't  have any kids yet, but I'm going to suggest this to my sister in law.  She has a little one who is too big for a high chair and refuses to sit in the "baby" (booster) seat.  Might be a perfect solution!

Nichole (not verified)

Wed, 03/23/2011 - 06:40

I love this... Those cheapo plastic boosters ruined the finish on my chairs last time... I am so going to build this when my baby is in that stage.

smasumur

Wed, 03/23/2011 - 07:23

I'd seen the boosterless booster chair at <insert big Swedish furniture maker here> before and though, what an awesome idea.  Of course, since I've had kids, I've completely forgotten about it.  Now I'm going to have to go build myself at least one of these, maybe more.  My kids will love you!

maura (not verified)

Wed, 03/23/2011 - 07:52

I JUST bought a chair of this size from <smasumur knows what Swedish mega store I'm talking about>.  Less than a week ago!  I should have known better!

Your co-worker is adorable, BTW.  And she wears the same hairstyle as my coworker ;)

annalea

Wed, 03/23/2011 - 20:39

I so need one of these.  Thank you for posting the plans.  As I read, I remembered that my husband's grandmother called her vintage version of this the "junior chair".  And it fits. :)

LauraDST (not verified)

Fri, 06/08/2012 - 17:40

Looking at comments on this chair and saw your cute picture and smiled. So should I just have the hubby make a bunch of these?

Guest (not verified)

Tue, 03/29/2011 - 14:21

I have been looking at your plans longingly without actually building anything because I'm quite the novice.  When I saw the plans for the Harriet chair though, I thought, maybe now's the time...and how can I modify that to make it a little higher for my 3 year old?  Thanks for not making me tweek it one bit!

Guest (not verified)

Wed, 04/13/2011 - 05:44

I can't wait till the snow is all melted and I can make a few of these projects.  My girls are going to be spoiled rotten :D  Thanks Ana for all your work.  MUCH appreciated!!!

Chad (not verified)

Thu, 12/08/2011 - 09:20

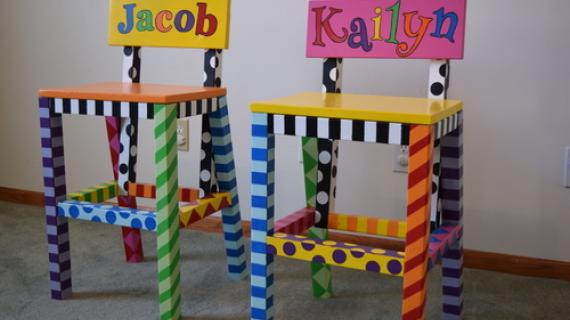
I built four of these chairs last weekend to go along with a large crafting table I am builing for my six-year-old daughter for Christmas. Paying $40-60 each for four chairs was simply out of the question. I saw these plans and they matched the design of the table project better than anything I had seen in stores. The simple design and low cost were great added benefits! The build was quick and easy, and after filling all of the seams, screw holes and end grains (and LOTS of sanding), the finished product looks great. I can't wait to see the look on my daughter's face and I'm sure these chairs will last for many years to come!

On a side note, I did have one minor issue with the build that was eaisly solved by picking up and extra 2x2. The shopping list calls for 2-2x2x8 (192 board inches) but the cut dimensions equal 192.25 board inches. Try as I might, I couldn't get my board stretcher to work, so I opted to purchase an extra stick. That drove my total cost per chair to a "whopping" $10.25...including the finish! I was able to build 4 chairs for about the same cost as one of the lower-priced "store-bought" chairs. Thanks for the plans and keep up the good work!

jart545 (not verified)

Sat, 06/09/2012 - 12:32

Nice chair. Thanks for sharing.

By the way, can you share the materials and specs of the table. I think it is very nice to make both.

Thanks so much.

Jake

moonhopping

Sat, 11/17/2012 - 18:03

This is my second chair. But my first since I got my kreg jig, i am having difficulty with the pocket holes. The drill and bit are to long to fit between the legs and supports. Any tips or ideas?

moonhopping

Sat, 11/17/2012 - 18:05

This is my second chair. But my first since I got my kreg jig, i am having difficulty with the pocket holes. The drill and bit are to long to fit between the legs and supports. Any tips or ideas?

gretaWEBB

Mon, 08/31/2020 - 16:23
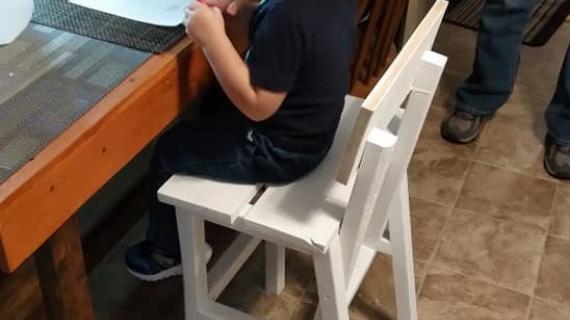
built this is two (very hot TX) days. we used 1x6 for the seat, cut two, leaving a gap for small fingers to grip as they climb up. Grandson (2.5 year old) mastered the climb the second time. All grown up tested it and love the design and sturdiness of it.

Frequently Asked Questions

Wood Questions

What kind of wood should I use?
Most of our plans use standard construction lumber like pine or fir. It's affordable, easy to work with, and easy to find. It's also rapidly renewing and biodegradable, so a great eco friendly choice!

Can I use hardwoods instead?
Yes—just keep in mind they're heavier, cost more, and can be tougher on tools and harder to join together and finish. I recommend not tackling a hardwood project until after you have built several softwood projects.

What if my boards are warped?
Choose the straightest boards at the store. You can often work around slight warps by cutting them into shorter pieces.

What wood should I use for outdoor furniture?
Use red-toned or pressure-treated 2x lumber for framing, and cedar or cedar fence pickets for the decking. Outdoor furniture should be built like a deck—your local home center can help recommend the right wood for your climate.

Will my wood move or warp after I build?
Potentially, especially in humid climates. Let your wood acclimate indoors before building. Once acclimated and kept in a stable environment, movement should be minimal. Remember, most houses are built using framing lumber - it's all about keeping moisture down indoors.

Cutting Questions

Do I need a miter saw?
A miter saw is great, creating fast, safe, and precise cuts, even for beginners. But most plans can be built with a circular saw and a straight edge. If using a circular saw to cut, take time to practice, and get good at making cuts, before cutting your project boards.

How do I get clean cuts with a circular saw?
Clamp your board, measure twice, cut slow, and use a sharp blade. This takes practice, so spend some time making cuts. I go through becoming proficient at freehand cutting in my course, it is worth taking if you want to master this skill.

Will the store cut my wood?
Yes—most stores will do rough cuts to help you transport your materials home. But from store to store, the quality of cuts could greatly vary.

Joinery Questions

What screws should I use?
We recommend star-head self tapping screws for framing, most common sizes are 2-1/2", 1-3/4". Pre-drill if close to the edge or you find your wood is splitting.

Do I have to use pocket holes?
Pocket holes are the cheapest, easiest and fastest way to do some joints - like edge to edge or a hidden fastener joint. There are other methods, but these can be time consuming and expensive. We recommend using pocket holes as indicated in plans for best results.

How do I keep things square?
Use a speed square and measure diagonals after each step. Always clamp joints before screwing to keep them tight and flush.

Finishing Questions

Stain or paint before or after building?
A quick sand before and a full finish after gives the best results. Pre-finish if you're doing two-tone or detailed finishes.

What type of finish?
Use oil-based or water-based stain. For paint, cabinet-grade latex or enamel works great. High use surfaces on indoor projects should get a coat of polyurethane, I recommend a Helsman or Spar or other flexible poly that won't crack or peel with wood movement. For exterior projects, use a finish suitable for exterior fences.

How to get a smooth finish?
Start with a well sanded project. Sand between coats (220 grit), wipe clean, and apply light coats with a foam brush or roller.

Plan Questions

Can I change the size?
Many people do, and that's the great thing about building your own furniture! But do keep in mind going bigger might mean more supports are required, and often plans are optimized for minimal material waste.

Are these beginner-friendly?
Yes—plans are written with simple tools and clear steps in mind, with every effort to make plans as simple as possible.

Can I sell what I build?
Absolutely! Just don’t resell or repost the plans themselves.

General Questions

What tools do I really need?
A drill, circular saw, tape measure, square, and a few clamps will get you through most projects.

Do I need a workshop?
Nope! A driveway or small patio is plenty to get started, just make sure you have a level place to work. If you find you are building several projects a year, creating a small workbench is a great way to store tools and have a dedicated workspace.

What if I mess up?
Wood filler, sanding, or flipping boards goes a long way. Mistakes are part of the process!

What can I do to make my projects look more professional?
Start with straight boards, make accurate cuts, clamp all joints, and line up everything neatly. Sand thoroughly, use a neutral finish, and apply it in light coats for a clean look.

I've never built anything before. Where should I start?
Start with a few smaller softwood projects to get hands-on experience. Or if you're tackling a big project, buy a little extra lumber and practice your cuts and joints first. If possible, work with someone who has a bit of experience.

Care & Maintenance

How long will my furniture last?
With good joinery and regular care, your DIY furniture can last for decades. I have pieces in my own home that are over 20 years old and still going strong! One of the best parts about DIY furniture is that it’s easy to repaint, refinish, or repair—so your projects can grow and adapt with you.

How should I care for outdoor furniture?
Lightly pressure wash or hose it down once or twice a year. Tighten screws and reapply finish as needed to protect it—just like a deck or fence. A little upkeep goes a long way in extending the life of your furniture.

How about indoor furniture?
Regularly dust or wipe with a damp cloth. If it starts to look worn, a light sanding and touch-up paint or stain can refresh it in no time. DIY pieces are meant to be durable and fixable—so don’t be afraid to give them some love now and then.

Want to Build with Confidence?

Check out my ebook: 12 Skills to Build Your Own Furniture
It walks you through the core skills every builder needs—measuring, cutting, joinery, and finishing—so you can build beautiful furniture that lasts.

Still Have Questions?

Email us anytime at [email protected] and we’ll be happy to help!