
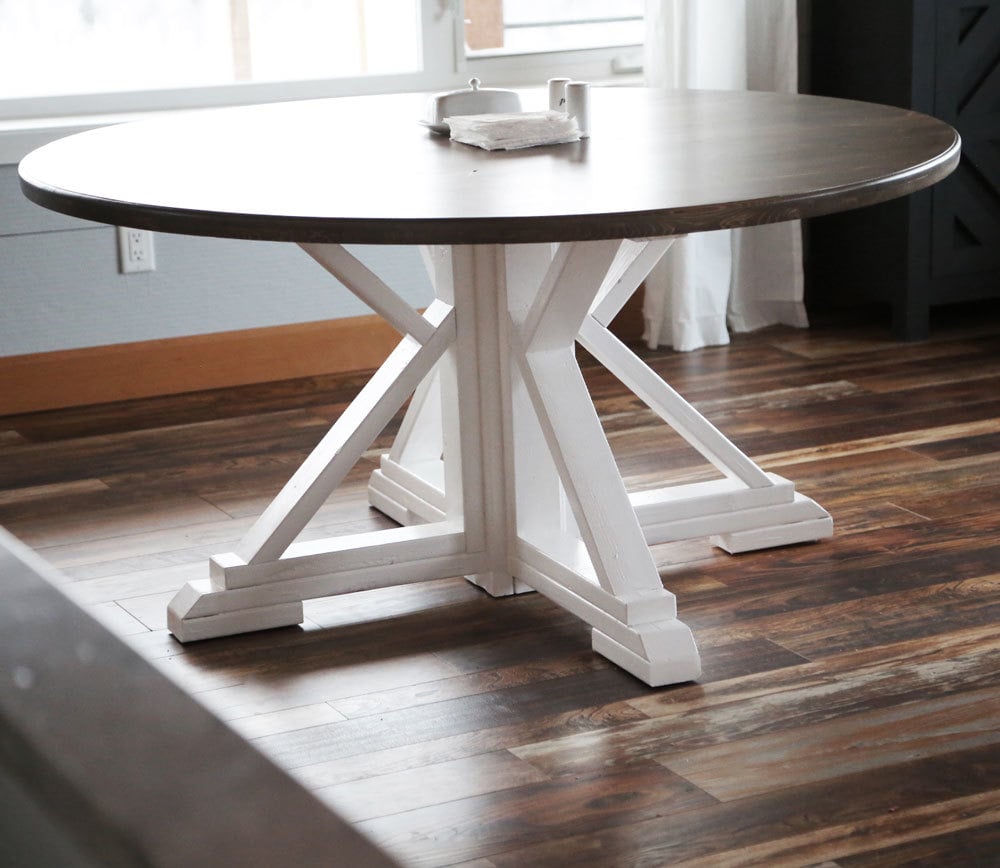

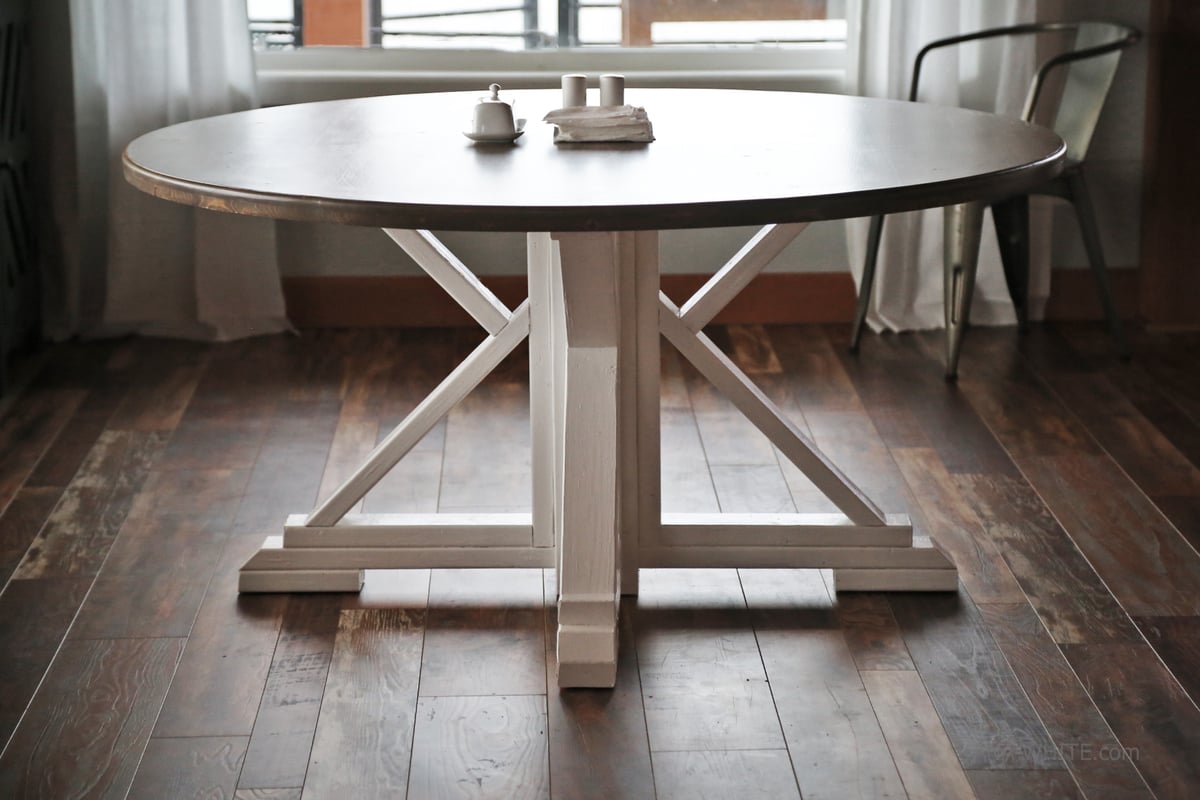
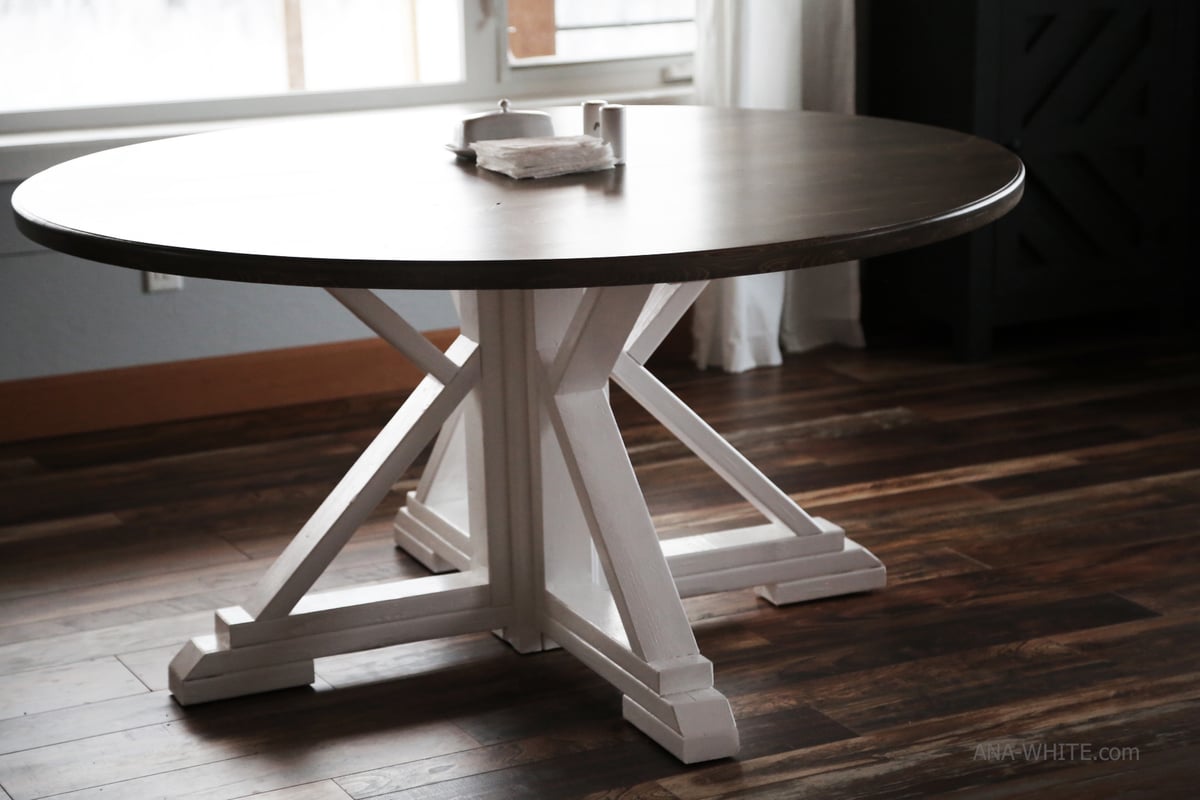
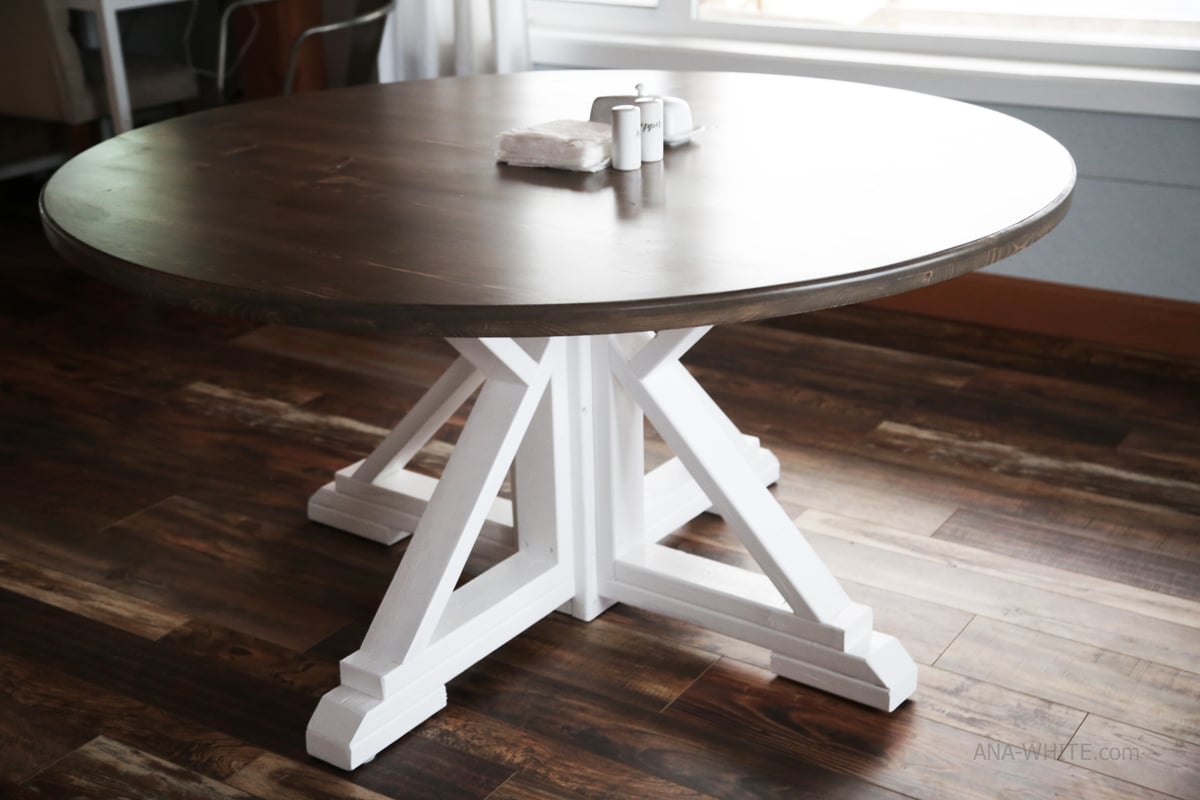
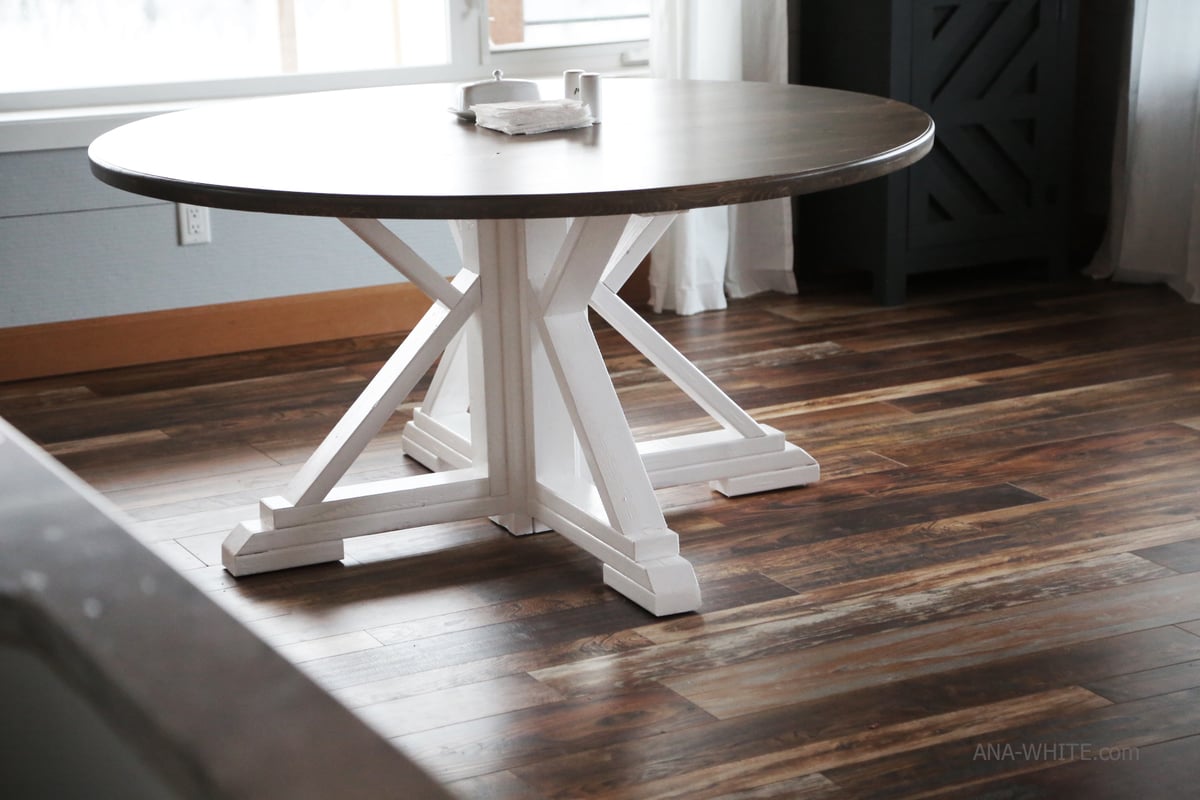
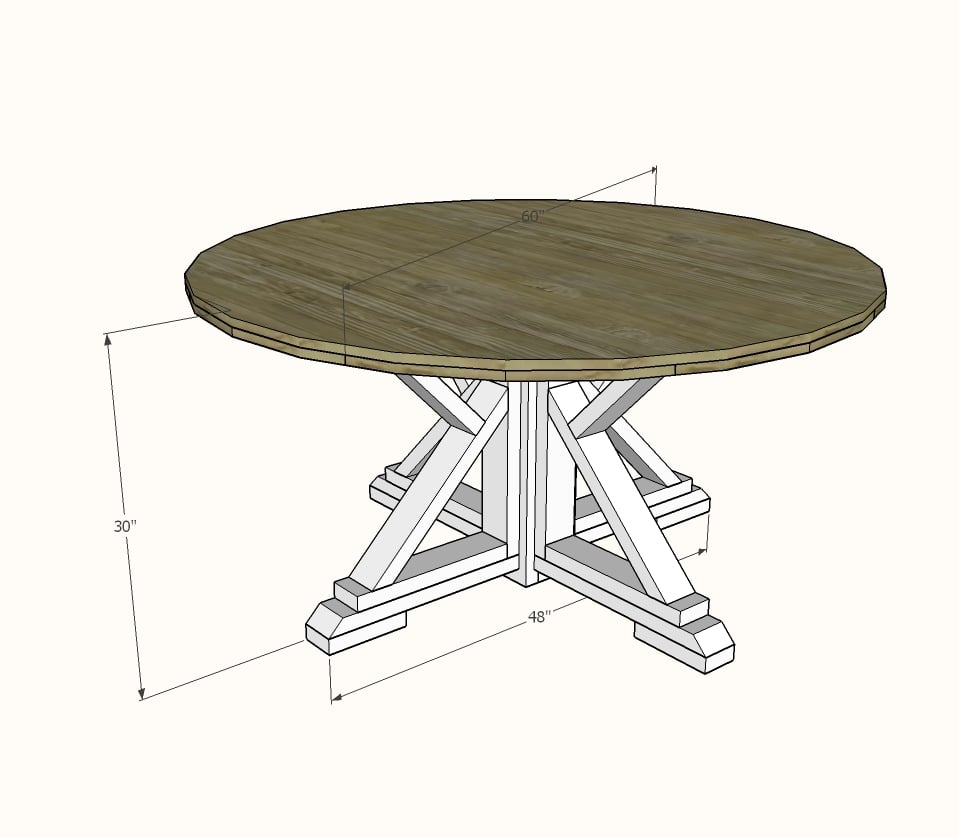
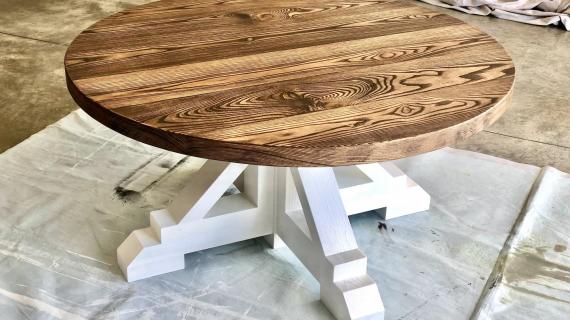
The farmhouse table goes cozy in this round version. Easy to build base from 2x4s. Free plans by ANA-WHITE.com
I'm still winning the war, but it isn't without lots of battling. The family is walking right past our dining table and plopping themselves on the couch and attempting to eat their meals.
If I could choose between being the nag and not being the nag, well, I'd rather not be the nag. So how else to get the family to sit down and eat at the table without being reminded?
I'm not really sure. But I'm going to try.
Maybe our big rectangular farmhouse table was just too big, too cold, and the benches too hard? Maybe it feels lonely sitting at such a large table?
So I'm trying something new.
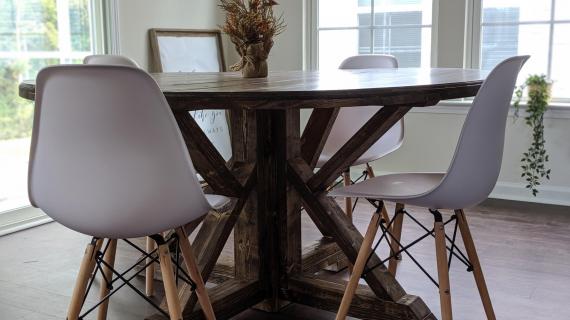
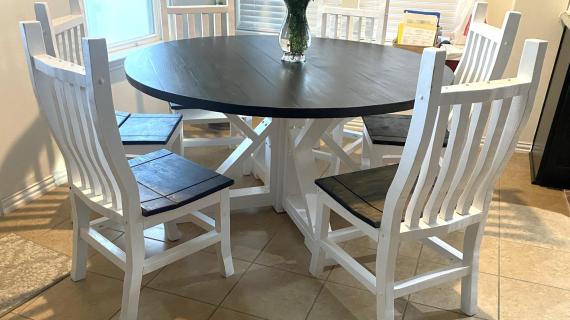
We built a new table, but this time it's round.

Maybe this is my ticket to less nagging and less crumbs in the couch. It's also quite pretty and makes my space feel gigantic. I like it.

I've been a little skeptic about round tabletops just because they aren't supposed to be the easiest to build. But we figured out how to cut out a round tabletop with a circular saw and make it look this good with basic homeowner tools.

Yep - we cut that tabletop out with a CIRCULAR SAW. You read that right.
And we shared are secrets to cutting out round tables in this video (as well as how to build the base)
If you liked this round farmhouse table, we've got you covered with the free plans below.
Build it!
XO Ana
Preparation
7 - 1x6 @ 10 feet long - cut longest boards first, work down to smallest boards with scraps
4 - 2x4 @ 12 feet long (can be in smaller pieces or 6 - 2x4 @ 8 feet long)
1 - 2x6 @ 8 feet or stud length
2 - 3/4" self tapping wood screws
1-1/4" self tapping wood screws
3/4" plywood scraps (recommended)
Center
2 - 2x6 @ 28-1/2"
2 - 2x4 or 2x6 @ 2-1/2"
Legs
4 - 2x4 @ 24"
8 - 2x4 @ 21" - long point measurement, one end cut at 45 degree bevel
4 - 2x4 @ 16-1/2"
4 - 2x4 @ 8"
4 - 2x4 @ 21-1/4" - long point to long point measurement, both ends cut at a 45 degree bevel, ends NOT parallel
4 - 2x4 @ 15-7/8" - long point measurement, one end cut at 45 degree bevel
Top
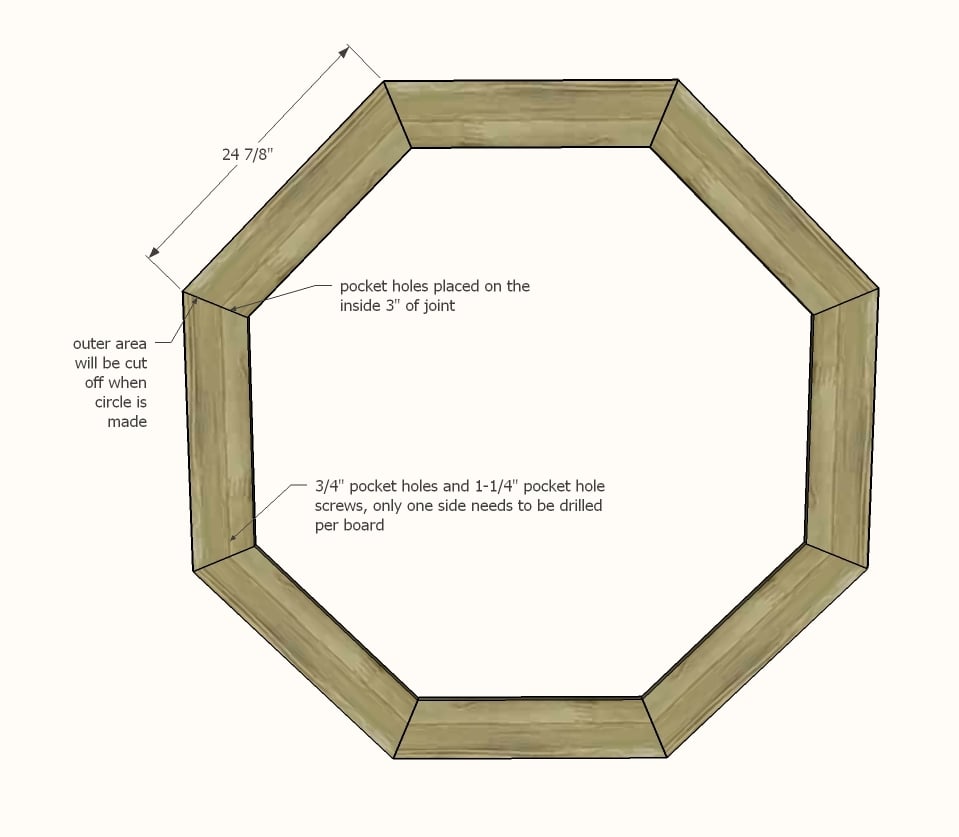
8 1x6 @ 24-7/8" - Longest point measurement, both ends cut at 22.5 degrees, ends NOT parallel
5 - 1x6 @ 60"
2 - 1x6 @ 57"
2 - 1x6 @ 47"
2 - 1x6 @ 35"


Instructions
Step 1

Build the center pedestal. You can use 2-3/4" screws (paint grade), or for stain grade - 2" brad nails and glue, or pocket holes. Set aside.
Step 2
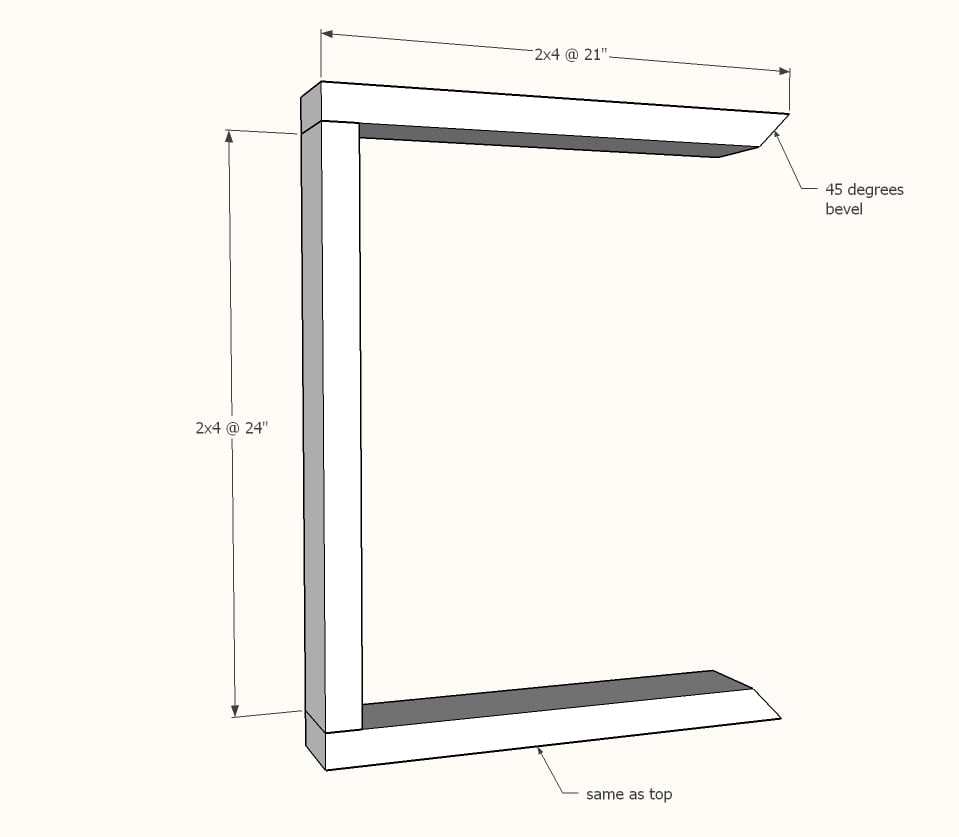
Start the legs by building four of the outside frames. You can use 2-3/4" self tapping screws or pocket holes set for 1-1/2" material and 2-1/2" pocket hole screws.
Step 3
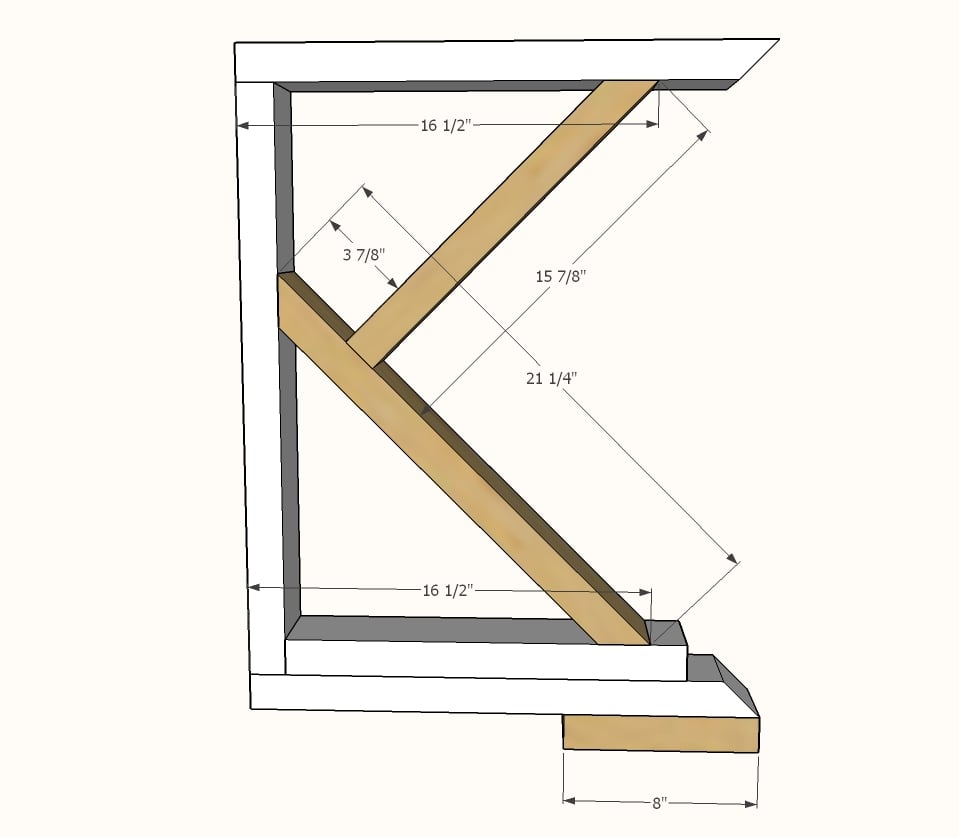
Attach the angled pieces together first with 2-3/4" self tapping wood screws, then attach to the 2x4 @ 16-1/2". Attach inside the leg frame. Add the bottom foot.
Step 4
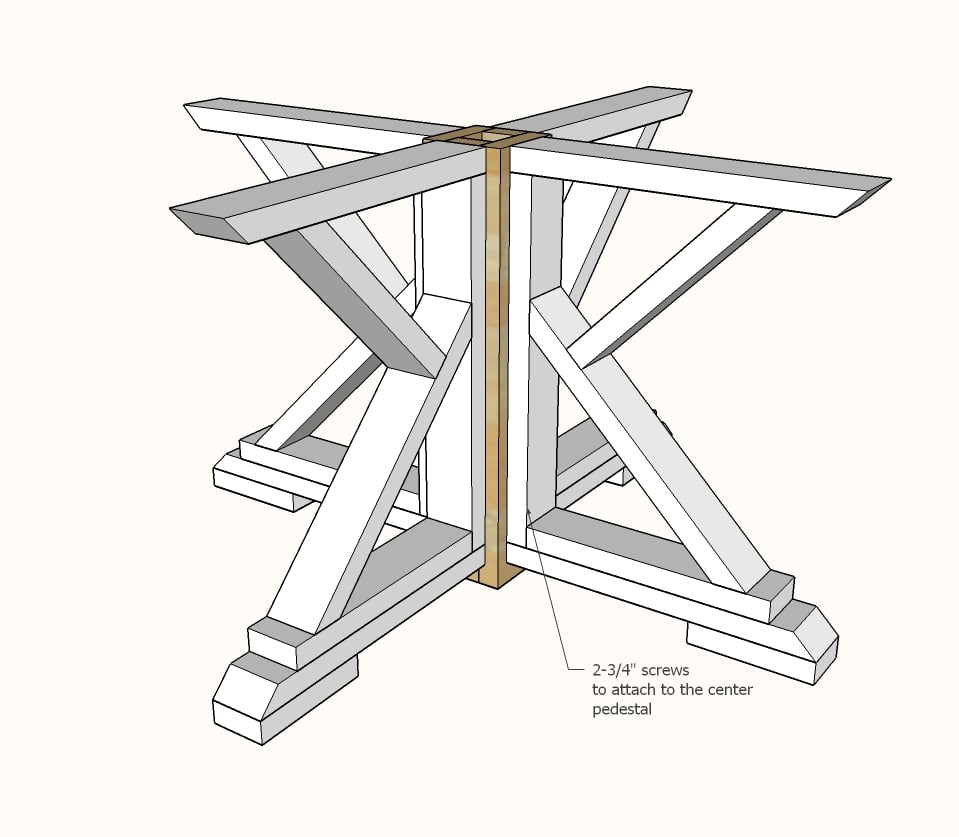
Once all four leg pieces are built, attach to the center pedestal with 2-3/4" screws. Everything is flush to the top.
Step 5
Step 6
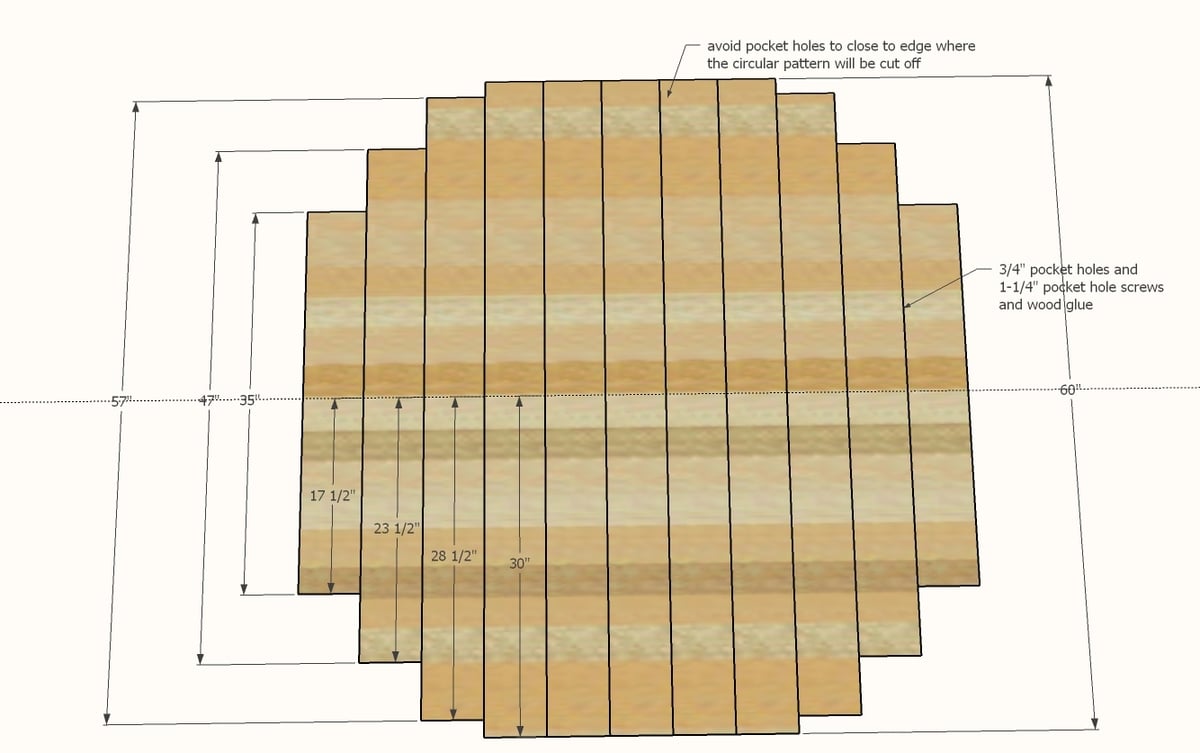
Cut the tabletop boards and mark centers. Line up and attach together with 3/4" pocket holes and 1-1/4" pocket hole screws. Remember that the tabletop will be cut down and avoid placing screws that could be cut with the saw in next step.
Step 7

Attach the octogon ring to the tabletop with glue and 1-1/4" screws.
Cut the circle out (see video for detail).
Step 8
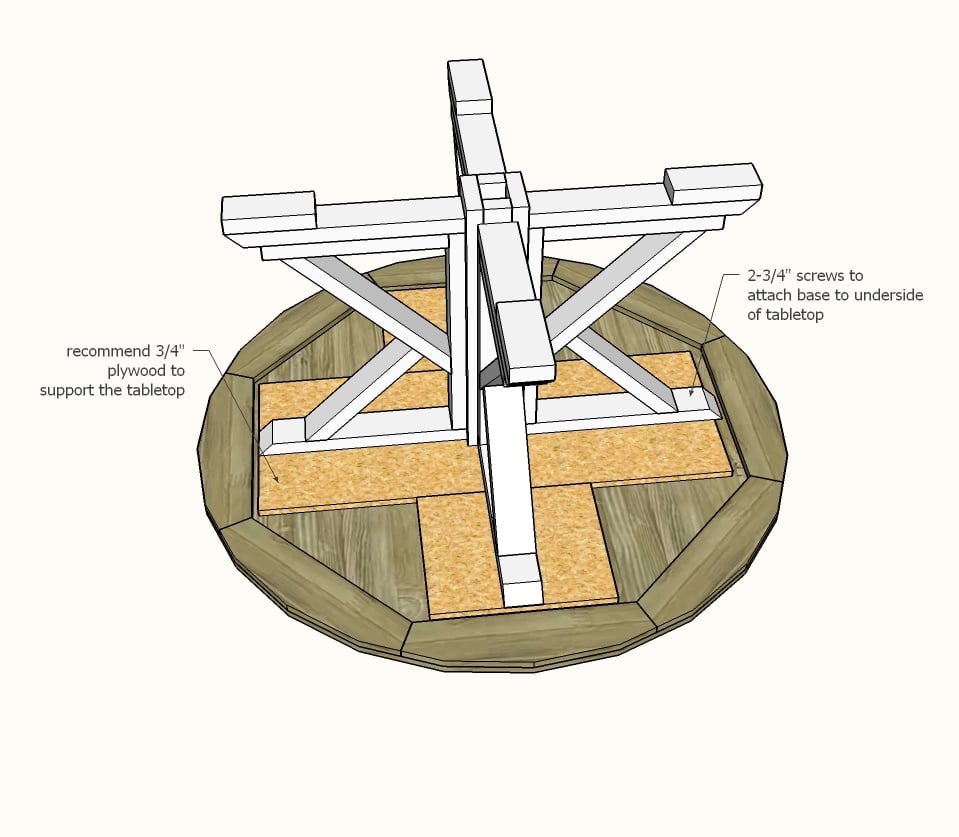
Attach base to tabletop.


Comments
kwaltons
Fri, 01/25/2019 - 06:26
Making Smaller
Does anyone have suggestions for making this smaller? I LOVE the design, but my space won't allow for a 60" table. I'd like to make it 48"-50", but I'm getting flummoxed by the octagon and how to transfer the measurements. Does anyone know of an online calculator that would help with the process?
Thanks in advance!
In reply to Making Smaller by kwaltons
Brian Famous
Sat, 02/02/2019 - 08:59
48" round table top
kwaltons,
if you want the table top to be 48" in diameter instead of the current measurements, you actually just need to knock 5" off of each of the 1x6 boards. So instead of 24 7/8", you need to cut them to 19 7/8". That should allow a 48" diameter circles to be cut if you ensure your fulcrum is dead smack in the middle.
Hope this helps!
keithdeith10
Tue, 07/14/2020 - 14:28
What wood would you use for…
What wood would you use for the top.
49rPhan
Thu, 07/16/2020 - 19:41
I'm following too just to…
I'm following too just to know. Don't want to use too soft of a wood for the table.
Vintage-Farm-Wife
Sat, 06/08/2019 - 13:08
Am I looking at this wrong? …
Am I looking at this wrong? Doesn't the center part need 4 of the 2-1/2" blocks?
devlinfa
Sun, 03/21/2021 - 03:24
I have been studying the…
I have been studying the design and I agree it must be 4 of the 2-1/2"
ashleyncsu
Sun, 09/08/2019 - 18:33
In the picture and video it…
In the picture and video it looks like the table top is beveled. If so, did you use a router for this? Which type/size bit?
JMac2474
Sun, 12/15/2019 - 02:52
Jig specs
Great design and tutorial! One fine detail, what was the dimension of the jig for the first pass around? 60’ inch table 30’ from the attached point? Or did you start out longer and then finished at 30’?
KyleG.
Sat, 12/28/2019 - 11:49
Great design but I'm also…
Great design but I'm also looking to make it a bit smaller (48"-50"). What should the angles of the pieces for the octagon ring be cut at?
lumberboy13
Sun, 01/12/2020 - 07:35
To make the octagon 48" in…
To make the octagon 48" in diameter, the segment length needs to be 1' 7-7/8" like Brian said above. No matter what size you make the ring, the angle of each cut needs to be 22-1/2 degrees.
steve4christ
Wed, 04/21/2021 - 14:29
Measurement rookie
I been struggling with the numbers😳 could you share what the octagon measurements would be for a 42” round table and the formula you used.
jasoncsmith1979
Mon, 06/08/2020 - 22:00
Base
If the table is 60” with the base being 48” what would be a stable base size be? Don’t think with the top being 48” that the base should be 48”.
jasoncsmith1979
Mon, 06/08/2020 - 22:01
Apologies for the grammar.
Apologies for the grammar.
ezjensen
Wed, 06/17/2020 - 11:03
Base
@jasoncsmith1979 I am looking to make this top at 48" as well. Thinking I'm going to make the bottom at 36".
The plans have the base 12" shorter, so I'll make is 12" shorter with the smaller top as well. I'm guessing there is most likely some mathematical equation for this, but that is not my strong suit.
keithdeith10
Wed, 07/08/2020 - 17:57
What type of wood did you…
What type of wood did you use. Looking to start this project this weekend.
mlbest1
Thu, 09/10/2020 - 12:39
Jig Length
Can you tell me what the length of the jig is? I'm guessing that it is a little longer than 30 inches due to the off set for the hole used to attach to bottom of table top? Also, did you use a router to make the groove around the edge of the top?
Thanks,
Mike
BAPoppe
Thu, 12/24/2020 - 10:31
Making a 72" table.
To make the table larger to 72" in diameter. What length do the 8 pieces cut at 22.5 degrees need to be, and do I have to extend the base dimensions out farther?
jbarcher13
Fri, 06/18/2021 - 12:12
Modifying the base of the circular farmhouse table
Those of you that want a smaller tabletop. (48" to 50"), would you keep the base the same as this plan or make modifications to that too?
Many thanks, Jan
williamsjamesridge
Sat, 12/25/2021 - 19:07
Wood types
What were the 2 types of wood (tabletop and base) used in this project?
kmg671983
Wed, 02/09/2022 - 13:05
Question
How hard would it be to alter this to be an oval table with this base?
KBrochu
Wed, 02/23/2022 - 14:46
Round Farmhouse Table Jig Sizes?
To make the 60" Round Farmhouse Table does anyone know what the jig sizes are?