
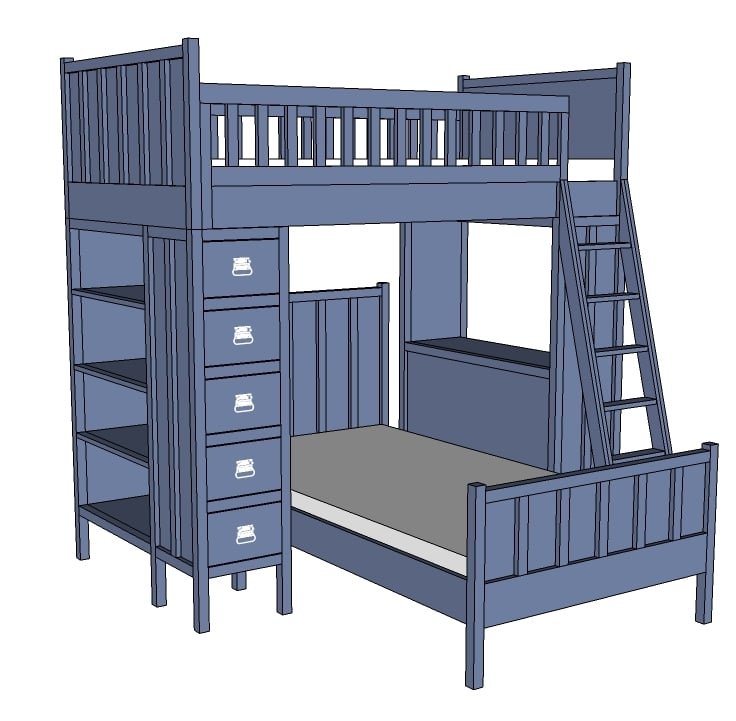

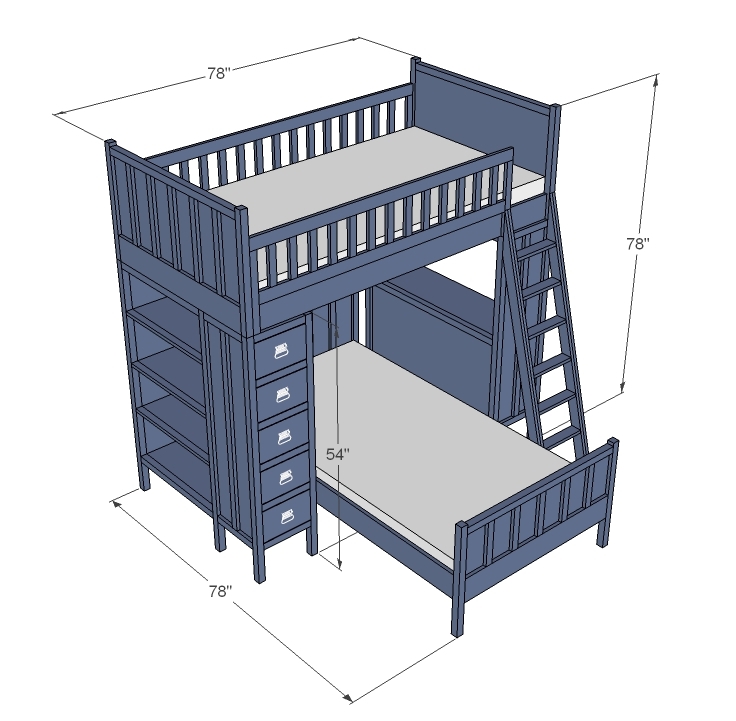
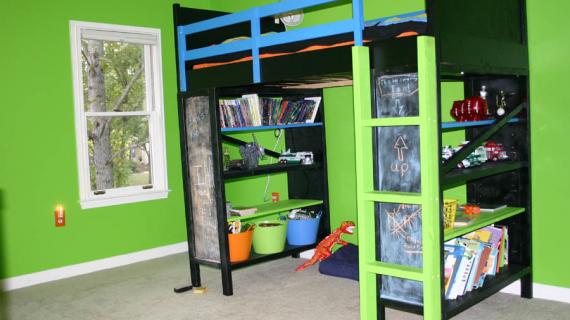
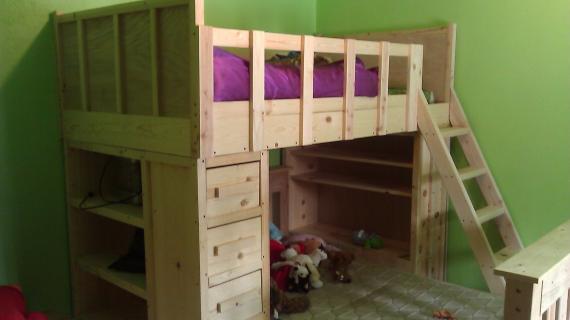
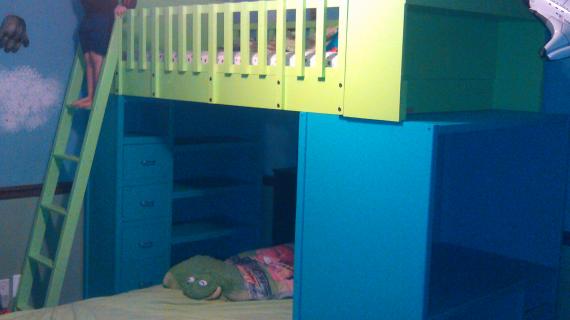
The top bunk for the Cabin Bunk System. Features full guardrails and slatted mattress support. Works with the rest of the Cabin Collection to create a complete storage and sleeping center.
Well, the flu visited us this week.

Thanks for being patient with me this week. I will try to get caught up on emails and comments to the best of my ability. A special thanks to everyone that has helped others out in the past few days.
Preparation
2 - 1x6 @ 10 feet long
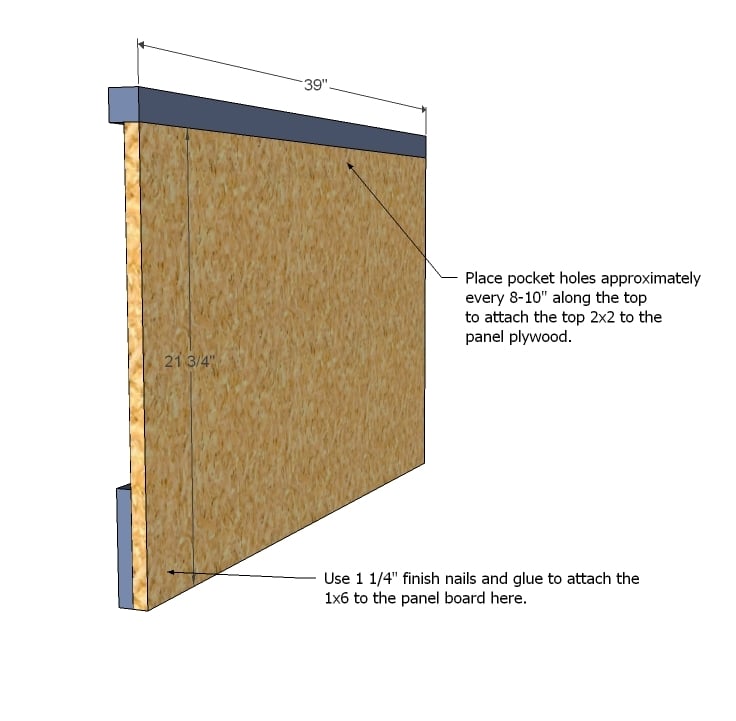
2 - 3/4" Plywood, MDF or Particle Board @ 39" x 21 3/4" (Panels)
After cutting each board, make the location of all pocket holes and predrill all pocket holes. Once you start assembling the project, it will be difficult to go back and add pocket holes. Remember that you can click images for a larger view.


Please read through the entire plan and all comments before beginning this project. It is also advisable to review the Getting Started Section. Take all necessary precautions to build safely and smartly. Work on a clean level surface, free of imperfections or debris. Always use straight boards. Check for square after each step. Always predrill holes before attaching with screws. Use glue with finish nails for a stronger hold. Wipe excess glue off bare wood for stained projects, as dried glue will not take stain. Be safe, have fun, and ask for help if you need it. Good luck!
Instructions
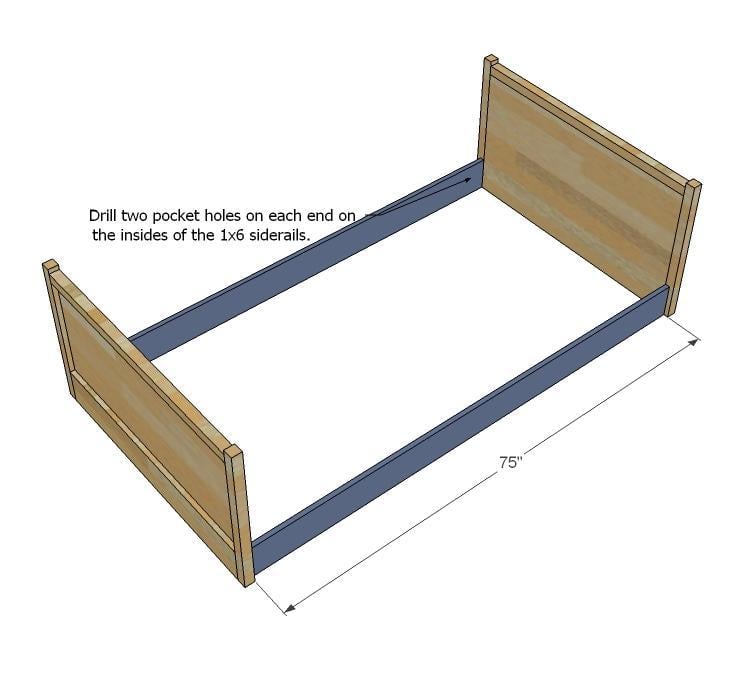
Step 1
Start by building the panels as shown above. Make sure you have also drilled the pocket holes you will need for step 2.
Step 2

Add the legs with pocket holes. You should use pocket holes set for 3/4" stock here and glue. Use 1 1/4" pocket hole screws. Also attach to the header (you may wish to use a pocket hole set for 1 1/2" stock and 2 1/2" screws for the header, but a 2" nail would work just fine too if you panel pocket hole is at the top).
Step 3
Drill you siderail pocket holes as shown above, set for 3/4" stock. If you plan to have a adult or large child/teen on the top bunk, you may wish to use brackets here.
Step 4
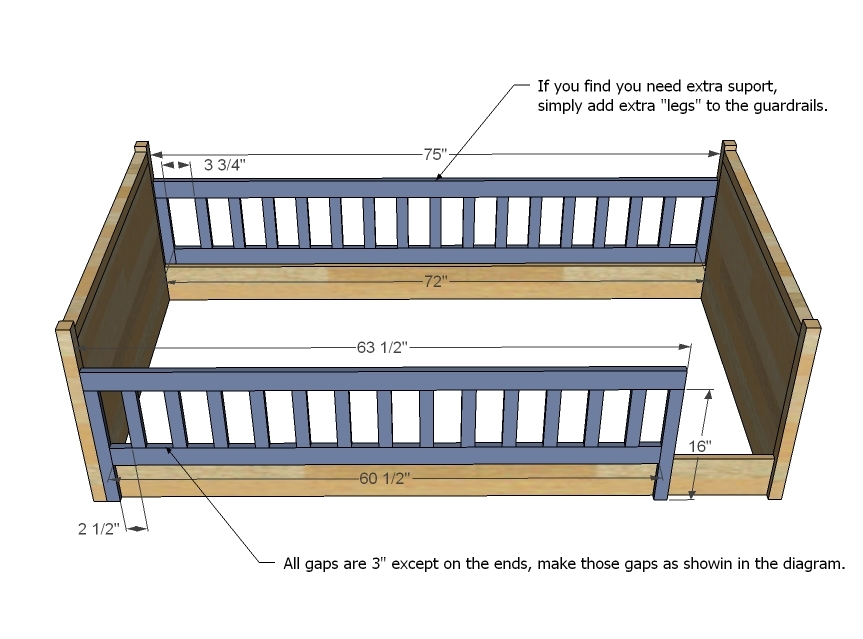
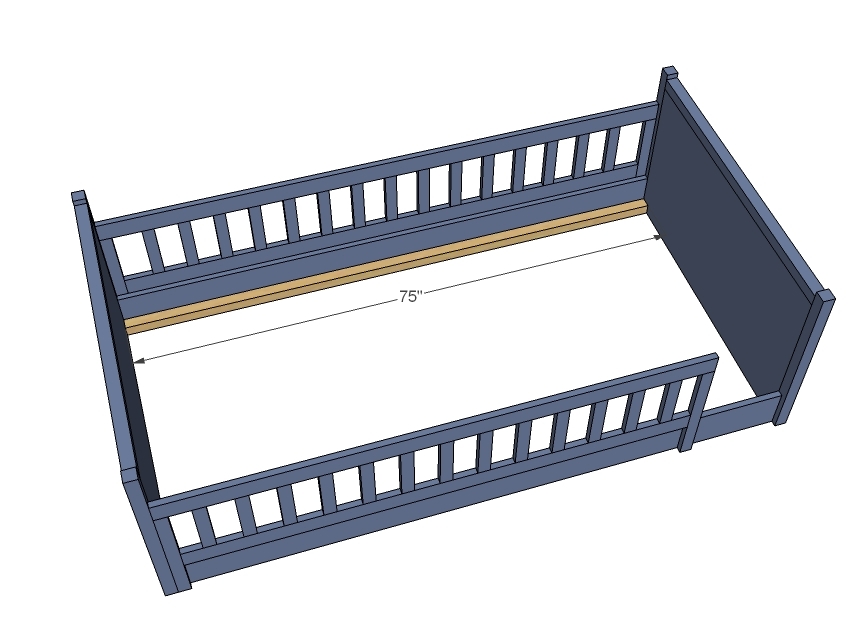
Now it's time for the guardrails, which are entirely optional. Begin by drilling one pocket hole on the inside of each of the rails, and one pocket hole on the top of each of the ends. Also drill two pocket holes on the ends of the bottom boards. Then build your rails as shown above. Attach directly to the siderail with bolts with nuts and washers. Carefully place your bolts in a symmetrical fashion.
Step 5
Step 6
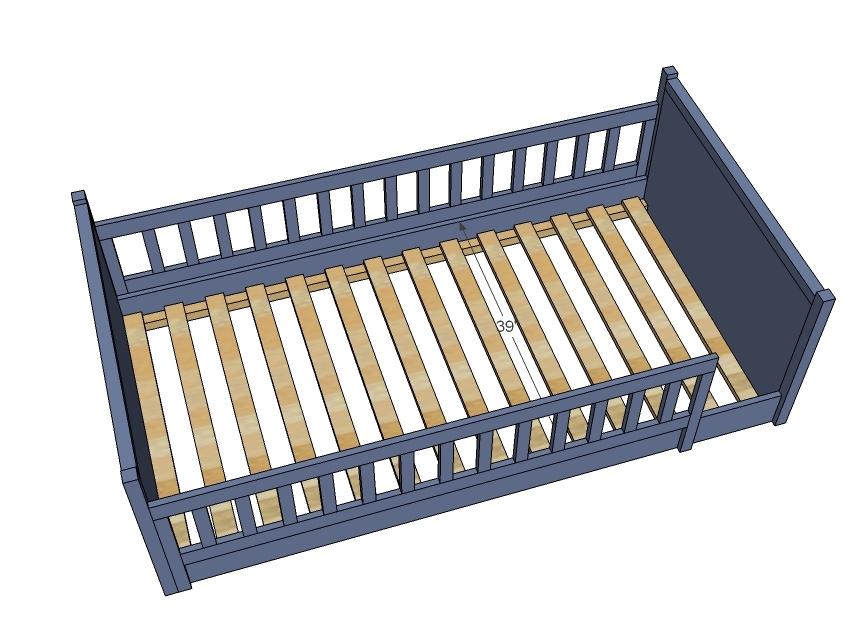
Either use a bunkie board as a mattress support system, or place 1x3s as slats, spaced according to your mattress recommendations. Screw the slats down with 1 1/4" screws. Do not use glue to make the slats removable.
Step 7
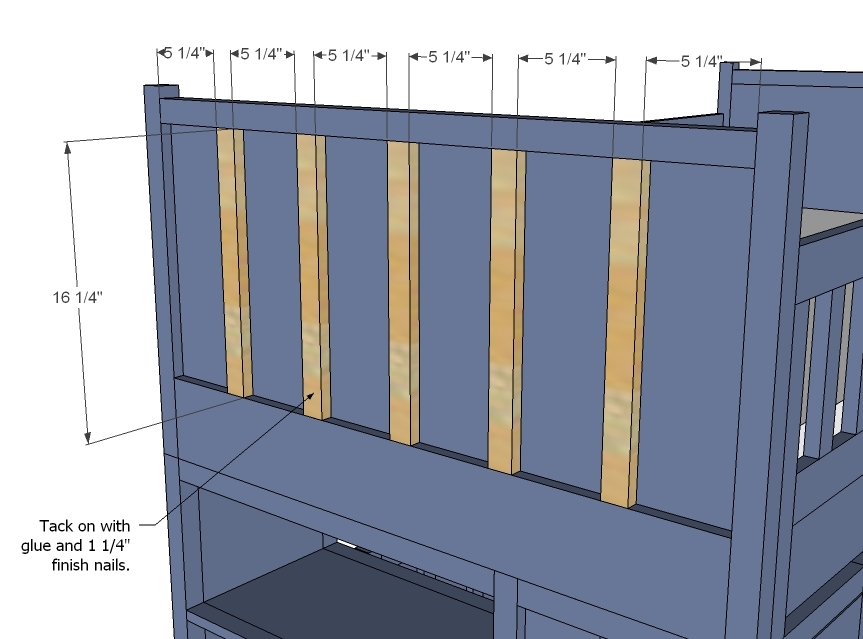
If you wish to add a little extra decoration to the headboards, you can use 1 1/4" finish nails and glue to add 1x2s as shown here.
It is always recommended to apply a test coat on a hidden area or scrap piece to ensure color evenness and adhesion. Use primer or wood conditioner as needed.

Comments
staceykf (not verified)
Wed, 03/30/2011 - 07:42
this rocks!
Thank you so much for all of the time and energy you put into your "work". Thanks to you, I have a matching master bedroom suit that looks awesome, is totally functional, and didn't cost an arm and a leg. I am really looking forward to making this for my girls, who will be sharing a room when we move. I was wondering what changes this set up would require to use a full bed on the bottom. Anxiously awaiting the girly version!
natsmom
Wed, 03/30/2011 - 09:17
Lalala... I don't see this
I'm going to pretend I don't see this since I've spent the last month working with a friend on a hybrid plan of the loft bed and playhouse bed with some stairs with drawers for storage. I'm afraid if I look at this, I'll notice something I need to change next week when we start building. Lalalalalala... I can't hear you either!
stepht
Wed, 03/30/2011 - 15:24
SWEET!!! thank you. I have 8
SWEET!!! thank you. I have 8 kids..yes you read that right 8..LOL
and this is perfect. I have been looking for a bed like this because my kids have to share rooms. 2 of my Step Son's need a new bunk bed and this is perfect.
Guest (not verified)
Wed, 03/30/2011 - 16:46
I am sooo super excited to
I am sooo super excited to see this! I have had my eye on this bed at a store for a looong time and have been hounding my poor husband to build it (because we could never afford the price tag) but he never seems to get around to drawing up the plans (he is very good in CAD and can do it but it just takes time as I am sure you know!) I can't wait to have this in my sons room!
hwagon
Thu, 03/31/2011 - 17:57
Love this!
Just what I had in mind, but couldn't quite explain. Thank you!
toni (not verified)
Fri, 04/01/2011 - 07:47
Oh My!
My 7 year old son has been begging me to build him bunkbeds! This one rocks, and if I get myself motivated, it could be done before school is out. I love it & he will too! Many thanks
JES
Fri, 04/01/2011 - 19:43
Saving this plan for Grandkids
Right now I don't have a place to put this in my home (we've got a full house with our son still at home going to JC and my Mom living with us.) Once our son goes away to University to finish college I'll have an 'empty nest' in his room. Sounds like a great place for a Grandkids' room (wishful thinking).. So I'm saving this one in several places on my computer, so it'll be available for me to build when I start getting some grandbabies. We'll have a really cool room at our house!. Ana, your plans are wonderful! Love your site. Thanks so much for inspiring us all
dhanes420 (not verified)
Sun, 04/03/2011 - 08:47
Awesome
You are awesome. Just stumbled your page, I am in awe. I have a full garage of tools and machines and don't think I could do what you've done. And then there's your CAD skills!
queenmommy
Tue, 04/05/2011 - 16:00
Perfect!!
I have been promising both of my daughters that when we moved into our new house that I would get them each a loft. Well, we're closing in a short 3 weeks and it's time to make good on my promise. I don't know how I came across your site, but this is almost the exact bed my 7-year old described. We'll tweak it by turning the desk to the inside, but it's just what the kiddo ordered.
saxnart713
Sat, 04/16/2011 - 19:12
Plan Errors...Great Plan
So I am building this plan that you made. I Started on it the weekend you came out with it. I love the design of the bunk beds and the desk and storage ideas. I came across a few errors on each plan for the collection. I just wanted to throw it out there for anyone trying to figure it out themselves. The only thing I found odd on this plan was the opening from the front rail and the headboard. It shows the cleat being 75", and the rail at 63.5". Now if you think about a kid trying to get into the bunkbed from a ladder, you would think a small space would suffice for them. The opening is only set at 11.5". When I was overlooking the bed plans, I thought that this would be quite small, even for my very skinny 5 year old. Instead of following the plan I went ahead and cut the rail at 55". This gave the nice opening of 20" and it made the bed seem larger because of the change. Other than that The only other change was that I knew I would put the bed up against a wall so I decided to not make the back rail. Also, as a side note, the headboards should not be made out of particle board... Everytime I tried to screw or even nail anything into the board it would just split the wood and not be nice and snug. I would suggest spending a few more dollars and get the MDF. I will post the other issues I had on the other plans. Thank you Ana for this awesome plan! Great work! I will post pictures of the bed once we finish the sanding and painting of it all.
hardknocks
Mon, 04/25/2011 - 15:37
Hi, thanks for the great
Hi, thanks for the great tips. How long did it take for you to complete this project and about how much did it cost?
saxnart713
Mon, 04/25/2011 - 19:41
Well i'm still not finished
Well i'm still not finished totally with the project. I still have the drawers to put in, and the finishing touches. I spent about 400 on the wood itself. Also I don't think the last set of instructions tells you how to put the whole project together, but I recommend using L-Brackets and attaching them to the top bunk and the desk/drawer supports. I have had to change a few things though, like taking the drawer slides out and using just wood to hold the drawers up. It's still a work in progress, but it is slowly coming along. So far I'm thinking I've put about 20 man hours into this project... But to tell you the truth I am a beginner. The best thing I've built is my son's wobbly horribly crooked bookshelf. So this is technically my first real project.
Guest (not verified)
Wed, 05/11/2011 - 21:56
Wow! It looks like quite the
Wow! It looks like quite the undertaking for a beginner. I am also a beginner. I called the lumber store and gave them a list of material. They quoted me $200 with tax for the lumber. I'm hoping to come in at around $300 with the rest of the supplies and paint.
In reply to Plan Errors...Great Plan by saxnart713
dan-k
Mon, 04/25/2011 - 19:15
the back rail is there for safety
it prevents a child from becoming trapped between the bed and the wall.
MrBroctoon
Sat, 02/09/2019 - 18:32
Good stuff! Thanks
Good stuff! Thanks
Ana White
Sat, 04/16/2011 - 19:28
Really Appreciate the Feedback!
Thanks for taking the time to make our plans better! Much appreciated! Ana
Tx.Gator
Thu, 06/30/2011 - 15:27
Ladder cut list and instructions
I can not wait to build this for my son. My only question, is what is the cut list and instructions for the ladder for this bed?
Thanks, I will post pics once I finish this project.
Guest (not verified)
Sun, 10/09/2011 - 16:11
Great, Easy To Build Plan
Looks like a very easy to build bunk bed. Do you have a plan for the ladder? Also, here is a link to a short easy to read government .pdf that shows bunk bed safety regulations in case anybody was wondering: http://www.cpsc.gov/BUSINFO/regsumbunkbed.PDF
Guest (not verified)
Tue, 12/20/2011 - 09:35
Stairs?
Could I modify the desk into stairs, and possibly have the side of the stairs an open shelf?
kkgriffith (not verified)
Mon, 03/05/2012 - 16:48
Ladder for Cabin Bunk system
Ana, thank you very much for the plans. My husband is making this out of oak and oak ply. This kicks up the wood cost to about $700 not including his new pocket hole jig or a bunkie board. Looks great but what about plans for a ladder? Thanks, Kristin
Brianne (not verified)
Wed, 09/05/2012 - 13:08
What is the paint color on
What is the paint color on this bed?
nikki902008
Mon, 09/02/2013 - 06:20
Mobile home dimensions?
Could I make this 66" High so theres enough room being in my mobile home its an older one so the roof is only 7.5 foot high. and thats the problem with my loft bed now there's not enough room to even sit up lol. It looks like I could with out any major adjusting seeing, it seems the head and base board are really tall. As long as my kid can't roll out I'm fine I just want him to be able to wake up and not knock himself out lol.
Labine37
Tue, 03/31/2015 - 09:00
help with the ladder
I'm making the top bunk right now, and I was wondering if there's a plan for ladder on the site?
In reply to help with the ladder by Labine37
Ana White
Tue, 03/31/2015 - 12:00
Take a look at this post, be
Take a look at this post, be sure to double check measurements of top bunk
for proper fit
http://ana-white.com/2011/01/plans/twin-over-full-simple-bunk-bed-plans
Hope this helps!
aareat00
Sun, 01/24/2016 - 21:05
Loft bed modifications
Is it possible do do something like this with storage steps up rather than the ladder?
In reply to Loft bed modifications by aareat00
Ana White
Mon, 01/25/2016 - 13:30
You could incorporate one of
You could incorporate one of these
http://www.ana-white.com/2010/09/easy-playhouse-loft-bed-with-storage-s…
http://www.ana-white.com/2012/09/plans/sweet-pea-garden-bunk-bed-storag…
http://www.ana-white.com/2013/05/plans/storage-stairs-bunk-or-loft-bed
http://www.ana-white.com/2012/07/plans/camp-loft-bed-stair-junior-height
Hope this helps!
itmechanic
Wed, 02/03/2016 - 15:44
Bunk Ladder
Hi I am very new to this and I am going to attempt to build the complete bunk bed system I have downloaded all the plans but cannot see a plan for the ladder just wondering if there is one if not what size timber I should use and if you have any advice on building the ladder obviously I don't want the kids to get hurt climbing the ladder
In reply to Bunk Ladder by itmechanic
Ana White
Thu, 02/04/2016 - 10:00
Please take a look at this
Please take a look at this post
http://www.ana-white.com/2010/01/plans-how-to-modify-the-simple-bed-to-…
Motoheadox
Sat, 03/26/2016 - 14:56
Plans
this plan looks awesome. Where can I find the entire plan. This is only for building the top. Is there somewhere on here I can click to build the whole thing.
In reply to Plans by Motoheadox
Ana White
Mon, 03/28/2016 - 14:30
Check out these links.http:/
Check out these links.
http://www.ana-white.com/2011/04/cabin-bunk-system-desk-support
http://www.ana-white.com/2011/04/dresser-bookshelf-support-cabin-bunk-s…