Pallet Bookshelf

Difficulty
Beginner Projects
| Print this plan

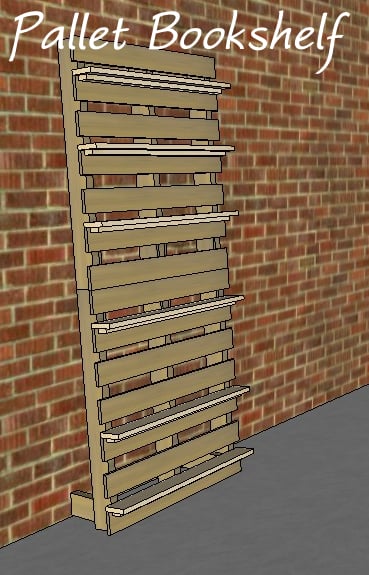
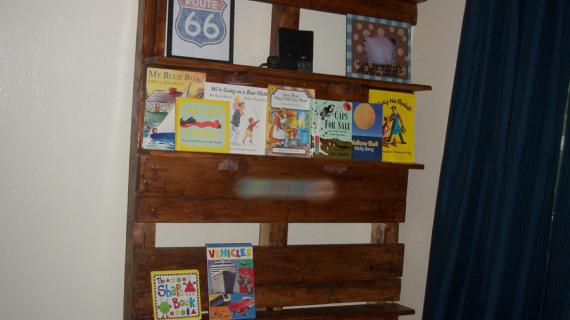
A simple bookcase made from pallets and a few 1x4's.
The measurements will vary based on the size of the pallets used.    Be on the lookout for donor pallets to provide wood for the shelves and support pieces.  If you don't have enough pallet wood to make the shelves you'll need to buy some 1x4's  In sketchup the shelves are 36" long.

Collections

varies

Preparation

Shopping List

1x2's  approximately 36" per shelf, this will vary with the size of the pallets used.
As shown 2 10' 1x2's are needed

Common Materials
1 1/2 inch screws
2 inch screws
2 1/2 inch screws
Cut List

Tools
Tape Measure
Pencil
Safety Glasses
Hearing Protection
Drill
Drill Bit Set
General Instructions

Please read through the entire plan and all comments before beginning this project. It is also advisable to review the Getting Started Section. Take all necessary precautions to build safely and smartly. Work on a clean level surface, free of imperfections or debris. Always use straight boards. Check for square after each step. Always predrill holes before attaching with screws. Use glue with finish nails for a stronger hold. Wipe excess glue off bare wood for stained projects, as dried glue will not take stain. Be safe, have fun, and ask for help if you need it. Good luck!

Instructions

Step 1

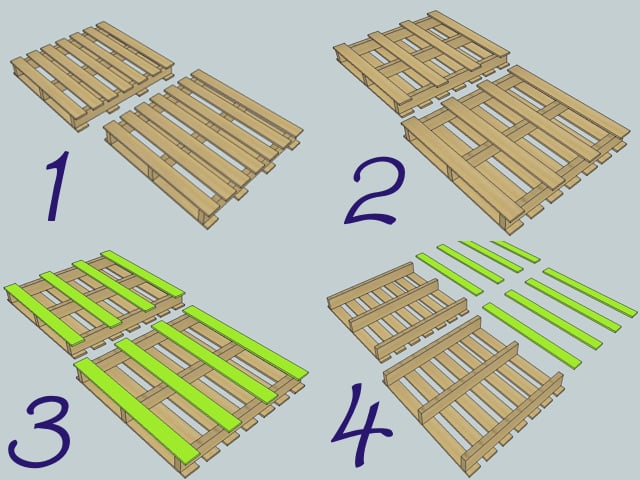
1. Find two pallets of the same size in good condition. A third pallet can be used as a donor for shelf boards and support blocks.
2. Flip the pallets upside down
3. Remove the bottom boards as carefully as possible. This is the fun part. Cutting the nails with a reciprocating saw works well.
4. Save the boards to be reused

Step 2

5. Set the pallets end to end.
6. Cut 4 12" pieces of boards saved from the bottoms of the pallets. Sandwich the center runner with two pieces and put one piece on the inside of each outer runner. Drive 3 2" screws into each side of the joints. Each 12" board will have 6 screws in it.
7. Lean the attached pallets up against a wall. Adjust the angle until it looks right. In the sketchup the pallets are at a 5 degree angle from vertical.
8. When you are happy with the angle measure from the top edge of the bottom board back to the wall. Cut 2 pieces of 2x4 to this length. In the example it was 9.5 inches. Your measurement will probably differ.

Step 3

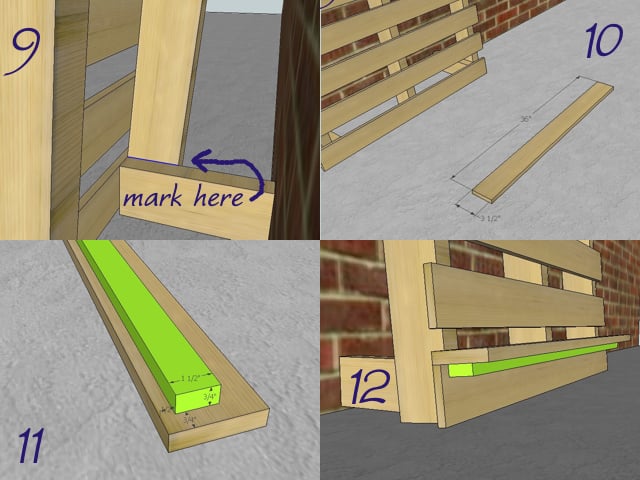
9. Insert the 2x4 blocks in behind the pallets alongside the outer runners. Scribe a line across the top of the 2x4 on both sides. Flip the pallets back upside down on the floor. Align your 2x4 blocks with the line and fasten to the pallet with 4 2.5" wood screws. Screw from the inside so the holes will be hidden.
10. Stand the pallets back upright. Cut shelving to the width of your pallets. You will need one 1x4 or pallet board per shelf.
11. Cut 1x2 supports to the length of your shelf minus 1.5 inches. This will give you a 3/4" overhang on the ends.
12. Clamp the 1x4 in position on top of one of the pallet boards. Place the 1x2 support underneath and clamp it to the 1x4. Predrill 3-4 holes through the back of the pallet boards into the 1x2. Drive 2" wood screws to secure the 1x2 to the pallet. Then predrill holes up through the bottom of the 1x2 into the 1x4. Offset the holes so you don't hit the screws already in place. 3-4 holes with 1.5" screws per shelf should be plenty

Step 4

No illustration but this is an important step. The top of the bookshelf should be fastened to the wall to prevent it from accidentally tipping over.

Option 1:
Find a wall stud and drive a 3.5" screw through the top of the frame of the bookshelf into the wall. This works as long as you can align the piece with a stud.

Option 2: Attach a "earthquake strap" to the piece and drywall anchor it to the wall.

Option 3:
Attach a piece of 1x2 to the back of the shelf that spans across the three vertical runners and allows you to hit a stud somewhere in the wall. This is probably the best option as you will be able to hit 2 studs

Finishing Instructions
Preparation Instructions
Fill all holes with wood filler and let dry. Apply additional coats of wood filler as needed. When wood filler is completely dry, sand the project in the direction of the wood grain with 120 grit sandpaper. Vacuum sanded project to remove sanding residue. Remove all sanding residue on work surfaces as well. Wipe project clean with damp cloth.

It is always recommended to apply a test coat on a hidden area or scrap piece to ensure color evenness and adhesion. Use primer or wood conditioner as needed.

Comments

Irecreateit

Sat, 04/16/2011 - 07:34

I have been looking for these plans.  I got two 6 ft pallets, to cut out the attaching step.  I look forward to building this.  Thanks again!

texasjuju

Tue, 04/19/2011 - 01:59

I've recently found myself on the look out for pallets by dumpsters all the time.  I even made my husband stop and load up an old wood fence that someone tore down, which he later thanked me for when we saved a lot of money on the floor we made for our new shop and where we store our round bales of hay.

So your plan is just one more thing I get to build with my reclaimed wood from my pallets that I still get teased about.

We just made the grandkids a toddler picnic table, and once I get it all painted I'm posting it so others can see just one more thing you don't have to spend money on for your kids/grandkids to love.

rspence (not verified)

Thu, 01/19/2012 - 06:59

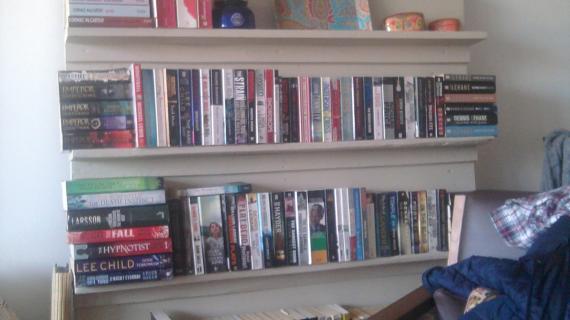
Does anyone have any picture of this book shelf. I was thinking about doing it in a kids room but I would like to see a finished product first. Thanks!

pam hope (not verified)

Mon, 07/16/2012 - 12:12

Another good fact about reusing pallets: here in the US, about 50% of the used pallets you will find are made with oak slats...to withstand the weight of what is being shipped on it...OAK! for free!!!! doesn't get any better than that!

Frequently Asked Questions

Wood Questions

What kind of wood should I use?
Most of our plans use standard construction lumber like pine or fir. It's affordable, easy to work with, and easy to find. It's also rapidly renewing and biodegradable, so a great eco friendly choice!

Can I use hardwoods instead?
Yes—just keep in mind they're heavier, cost more, and can be tougher on tools and harder to join together and finish. I recommend not tackling a hardwood project until after you have built several softwood projects.

What if my boards are warped?
Choose the straightest boards at the store. You can often work around slight warps by cutting them into shorter pieces.

What wood should I use for outdoor furniture?
Use red-toned or pressure-treated 2x lumber for framing, and cedar or cedar fence pickets for the decking. Outdoor furniture should be built like a deck—your local home center can help recommend the right wood for your climate.

Will my wood move or warp after I build?
Potentially, especially in humid climates. Let your wood acclimate indoors before building. Once acclimated and kept in a stable environment, movement should be minimal. Remember, most houses are built using framing lumber - it's all about keeping moisture down indoors.

Cutting Questions

Do I need a miter saw?
A miter saw is great, creating fast, safe, and precise cuts, even for beginners. But most plans can be built with a circular saw and a straight edge. If using a circular saw to cut, take time to practice, and get good at making cuts, before cutting your project boards.

How do I get clean cuts with a circular saw?
Clamp your board, measure twice, cut slow, and use a sharp blade. This takes practice, so spend some time making cuts. I go through becoming proficient at freehand cutting in my course, it is worth taking if you want to master this skill.

Will the store cut my wood?
Yes—most stores will do rough cuts to help you transport your materials home. But from store to store, the quality of cuts could greatly vary.

Joinery Questions

What screws should I use?
We recommend star-head self tapping screws for framing, most common sizes are 2-1/2", 1-3/4". Pre-drill if close to the edge or you find your wood is splitting.

Do I have to use pocket holes?
Pocket holes are the cheapest, easiest and fastest way to do some joints - like edge to edge or a hidden fastener joint. There are other methods, but these can be time consuming and expensive. We recommend using pocket holes as indicated in plans for best results.

How do I keep things square?
Use a speed square and measure diagonals after each step. Always clamp joints before screwing to keep them tight and flush.

Finishing Questions

Stain or paint before or after building?
A quick sand before and a full finish after gives the best results. Pre-finish if you're doing two-tone or detailed finishes.

What type of finish?
Use oil-based or water-based stain. For paint, cabinet-grade latex or enamel works great. High use surfaces on indoor projects should get a coat of polyurethane, I recommend a Helsman or Spar or other flexible poly that won't crack or peel with wood movement. For exterior projects, use a finish suitable for exterior fences.

How to get a smooth finish?
Start with a well sanded project. Sand between coats (220 grit), wipe clean, and apply light coats with a foam brush or roller.

Plan Questions

Can I change the size?
Many people do, and that's the great thing about building your own furniture! But do keep in mind going bigger might mean more supports are required, and often plans are optimized for minimal material waste.

Are these beginner-friendly?
Yes—plans are written with simple tools and clear steps in mind, with every effort to make plans as simple as possible.

Can I sell what I build?
Absolutely! Just don’t resell or repost the plans themselves.

General Questions

What tools do I really need?
A drill, circular saw, tape measure, square, and a few clamps will get you through most projects.

Do I need a workshop?
Nope! A driveway or small patio is plenty to get started, just make sure you have a level place to work. If you find you are building several projects a year, creating a small workbench is a great way to store tools and have a dedicated workspace.

What if I mess up?
Wood filler, sanding, or flipping boards goes a long way. Mistakes are part of the process!

What can I do to make my projects look more professional?
Start with straight boards, make accurate cuts, clamp all joints, and line up everything neatly. Sand thoroughly, use a neutral finish, and apply it in light coats for a clean look.

I've never built anything before. Where should I start?
Start with a few smaller softwood projects to get hands-on experience. Or if you're tackling a big project, buy a little extra lumber and practice your cuts and joints first. If possible, work with someone who has a bit of experience.

Care & Maintenance

How long will my furniture last?
With good joinery and regular care, your DIY furniture can last for decades. I have pieces in my own home that are over 20 years old and still going strong! One of the best parts about DIY furniture is that it’s easy to repaint, refinish, or repair—so your projects can grow and adapt with you.

How should I care for outdoor furniture?
Lightly pressure wash or hose it down once or twice a year. Tighten screws and reapply finish as needed to protect it—just like a deck or fence. A little upkeep goes a long way in extending the life of your furniture.

How about indoor furniture?
Regularly dust or wipe with a damp cloth. If it starts to look worn, a light sanding and touch-up paint or stain can refresh it in no time. DIY pieces are meant to be durable and fixable—so don’t be afraid to give them some love now and then.

Want to Build with Confidence?

Check out my ebook: 12 Skills to Build Your Own Furniture
It walks you through the core skills every builder needs—measuring, cutting, joinery, and finishing—so you can build beautiful furniture that lasts.

Still Have Questions?

Email us anytime at [email protected] and we’ll be happy to help!