Outdoor Chair - Modern Comfort Collection

diy outdoor chair frame build wood
Difficulty
Intermediate
| Print this plan

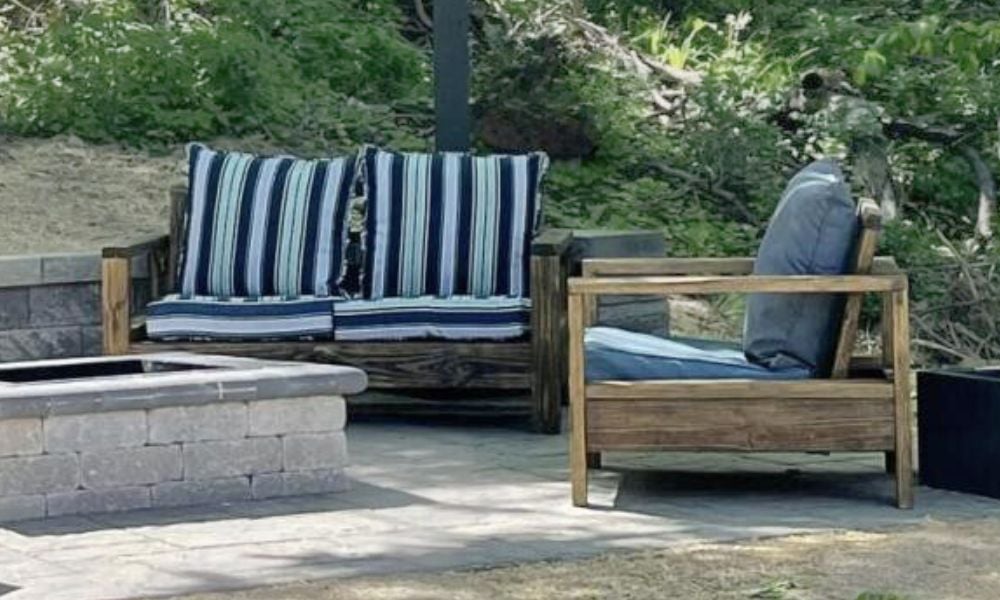
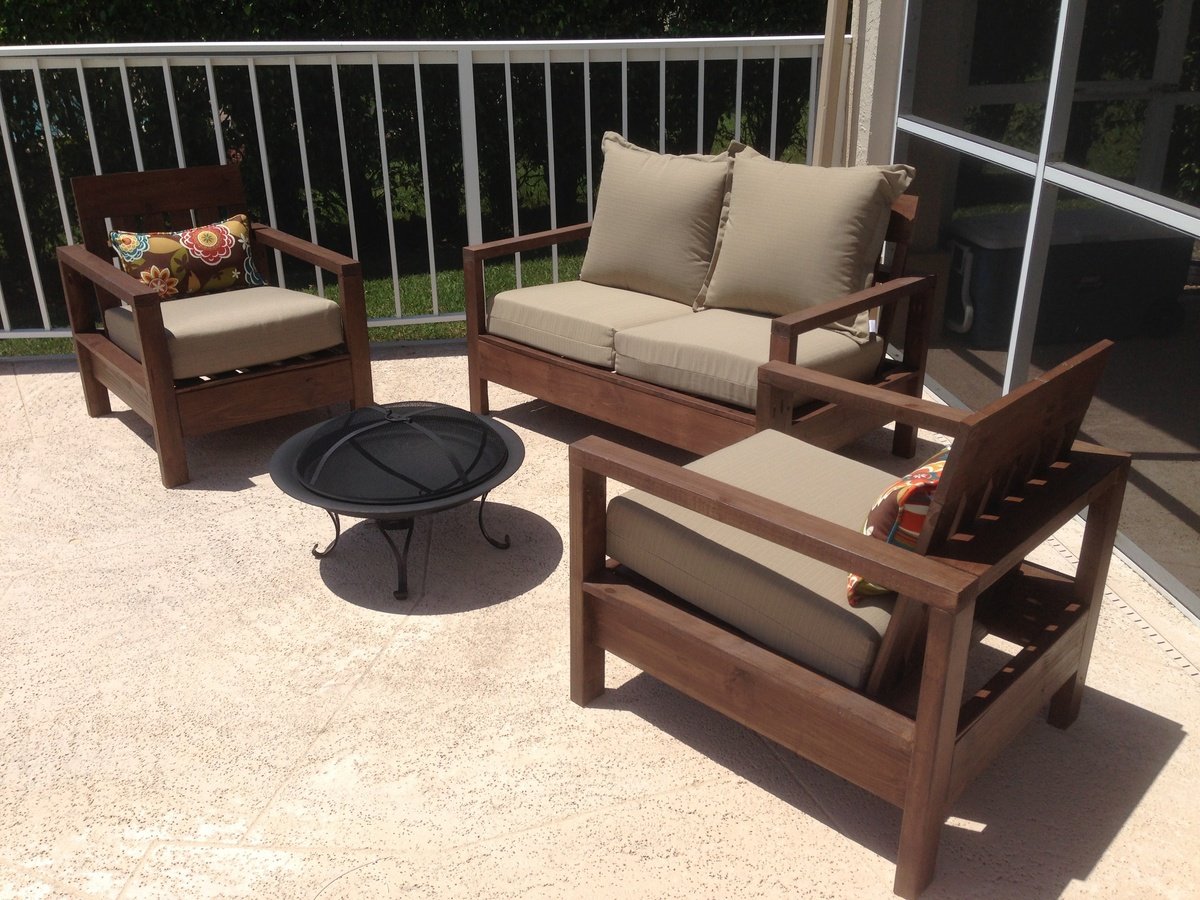
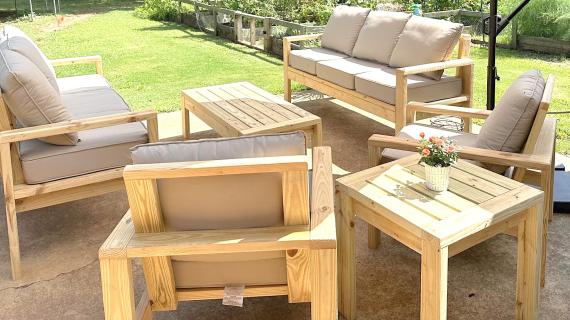
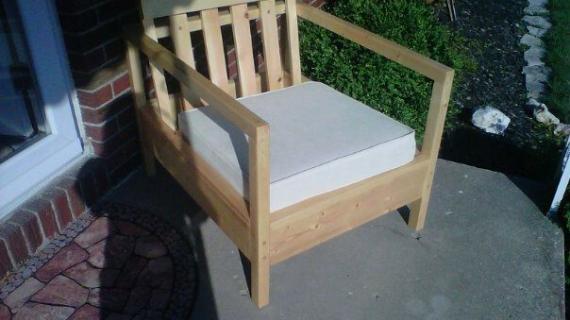
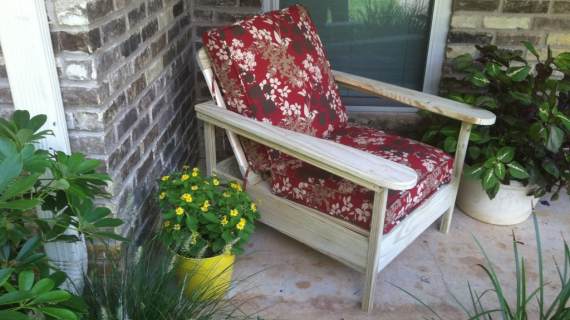
Build your own outdoor side chair frame.  Our free plans make it easy!  Uses off the shelf materials and basic tools.  

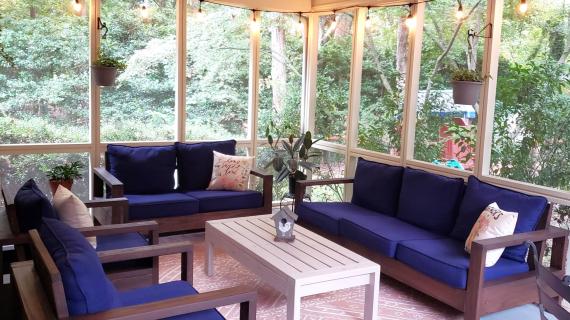
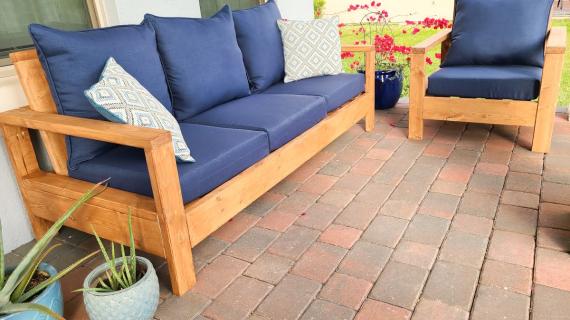
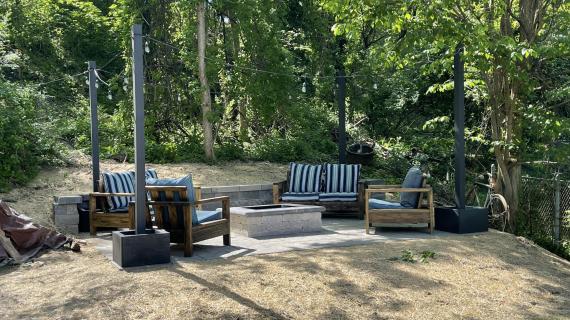
Outdoor chair features an inclined seat and backrest, wide armrests and sturdy 2x construction.  Heavy (so won't blow away in the wind).  

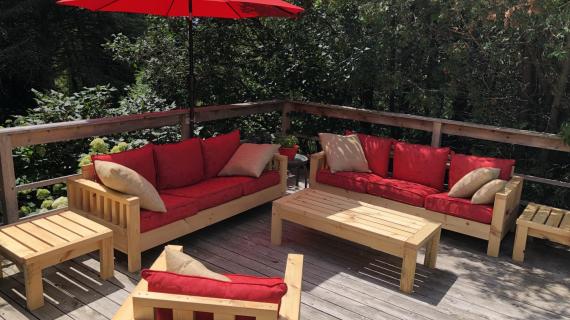
Also build the matching sofa and matching loveseat.

modern outdoor chair frame diy plans
 
You'll love this substantial and so comfortable outdoor chair.  It's heavy - so won't blow away in the wind, and is heavy duty - so should last you a long time!
 

What Cushions to Use?

This outdoor chair is designed to work with most "deep seat" outdoor cushions.  The recommended size for the seat is 25" x 25" x 5" deep, with a back cushion of 25" (wide) x 18"-22" (tall) x 3" - 5" (deep).
 
Here's our pick from Amazon affiliate link, but you can also find these cushions at Lowe's (Allen and Roth makes a good one) and many other stores.
 

What Type of Wood?

We recommend cedar wood for building this sofa.  You can also use standard 2x lumber if it is fully sealed (painted or stained with an exterior grade finish) or treated - just please, paint and seal the chemicals in.

Preparation

Shopping List
  • 1 - 1x4 @ 8 feet long
  • 1 - 2x2 @ 8 feet long
  • 2 - 2x6 @ 8 feet long
  • 4 - 2x4 @ 8 feet long
  • 2-1/2" Kreg Pocket Hole screws (about 40)
  • 2 -1/2" self tapping wood screws (about 30)
  • 1-1/2" self tapping wood screws (about 8)
Cut List
  • 4 - 2x4 @ 22" - legs
  • 2 - 2x4 @ 34" - arm rests
  • 2 - 2x4 @ 31" - arm supports
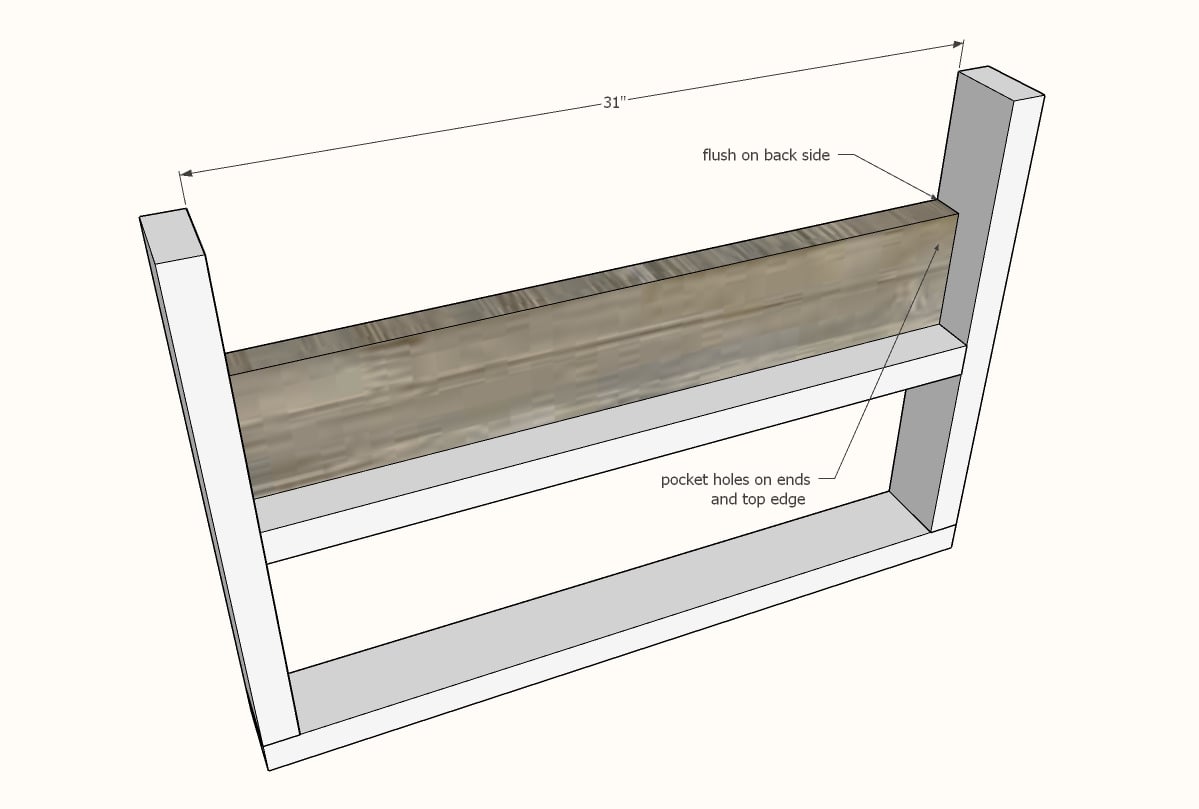
  • 2 - 2x6 @ 31" - arm supports
  • 2 - 2x6 @ 25-1/2" - bases
  • 1 - 2x4 @ 25-1/2" - back
  • 1 - 2x2 @ 25-1/2" - back rest top
  • 4 - 2x4 @ 23-3/4" - back slats
  • 1 - 2x6 @ 29-1/2" - back base
  • 2 - 2x2 @ 29-1/2" - seat slat cleats
  • 4 - 1x4 @ 23-1/2" - seat slats
Tools
Tape Measure
Speed Square
Pencil
Safety Glasses
Hearing Protection
Kreg Jig
Drill
Miter Saw

Instructions

Step 1

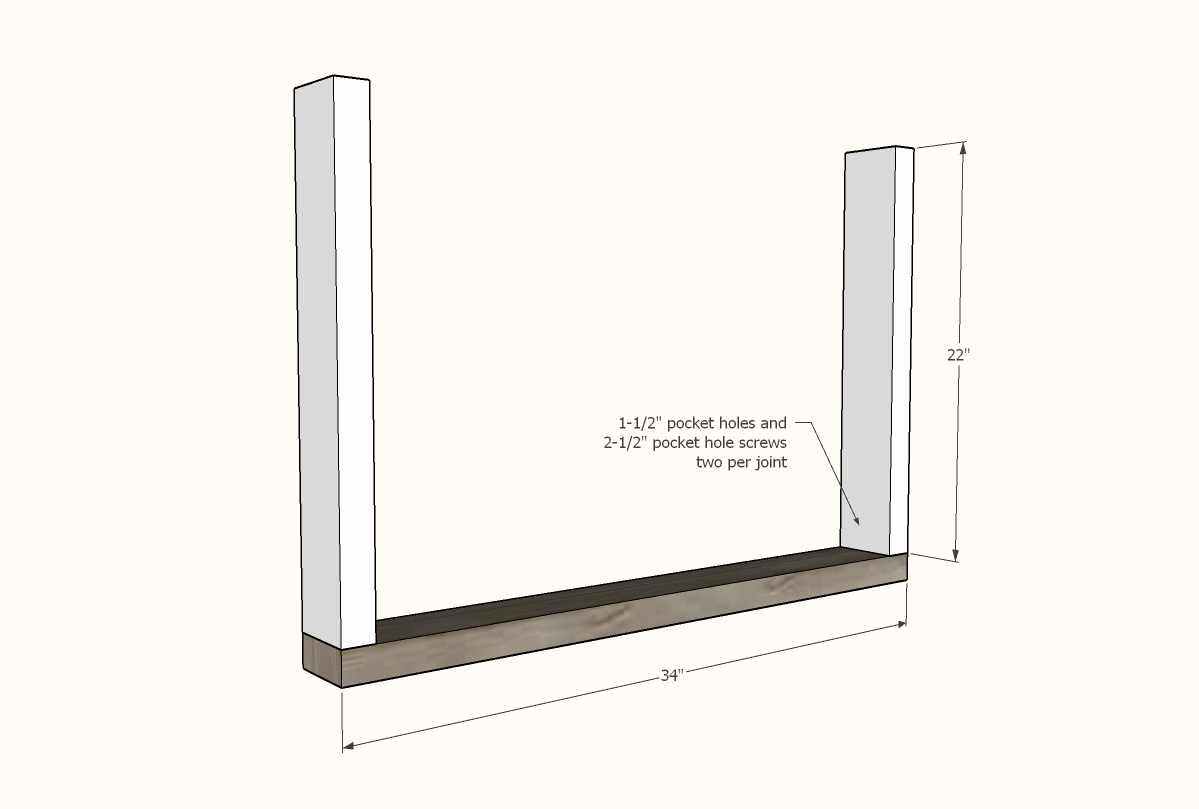
Drill two 1-1/2" pocket holes on top of each of the legs.

Attach to the arm rest from underneath with 2-1/2" pocket hole screws.

Leg is shown upside down.

Step 2

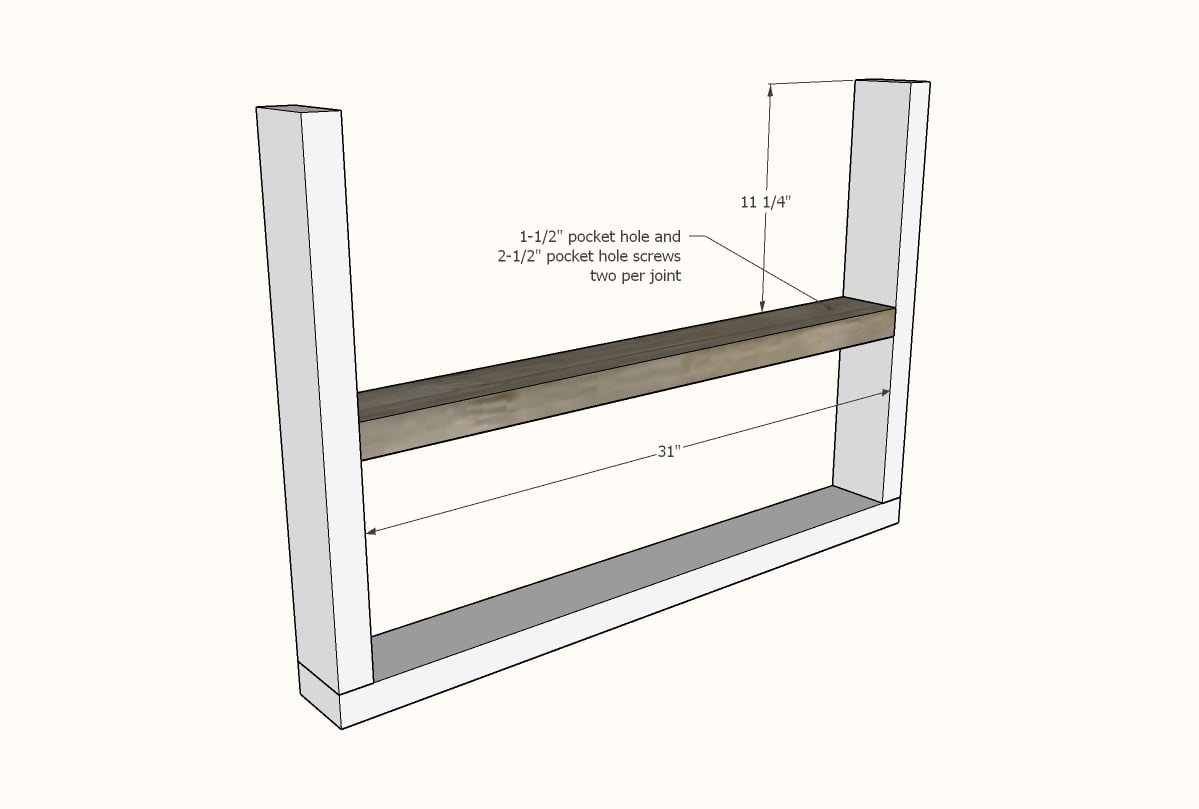
Drill two 1-1/2" pocket holes on each end of the 2x4 side supports. 

Attach to the insides of the legs with 2-1/2" pocket hole screws.

Leg is shown upside down.

Step 3

Drill two 1-1/2" pocket holes on each end of the 2x6 end aprons.  Also drill three 1-1/2" pocket holes along one edge.

Attach inside the leg, flush to the outside, pocket holes hidden on insides, with 2-1/2" pocket hole screws.

Leg is shown upside down.

Step 4

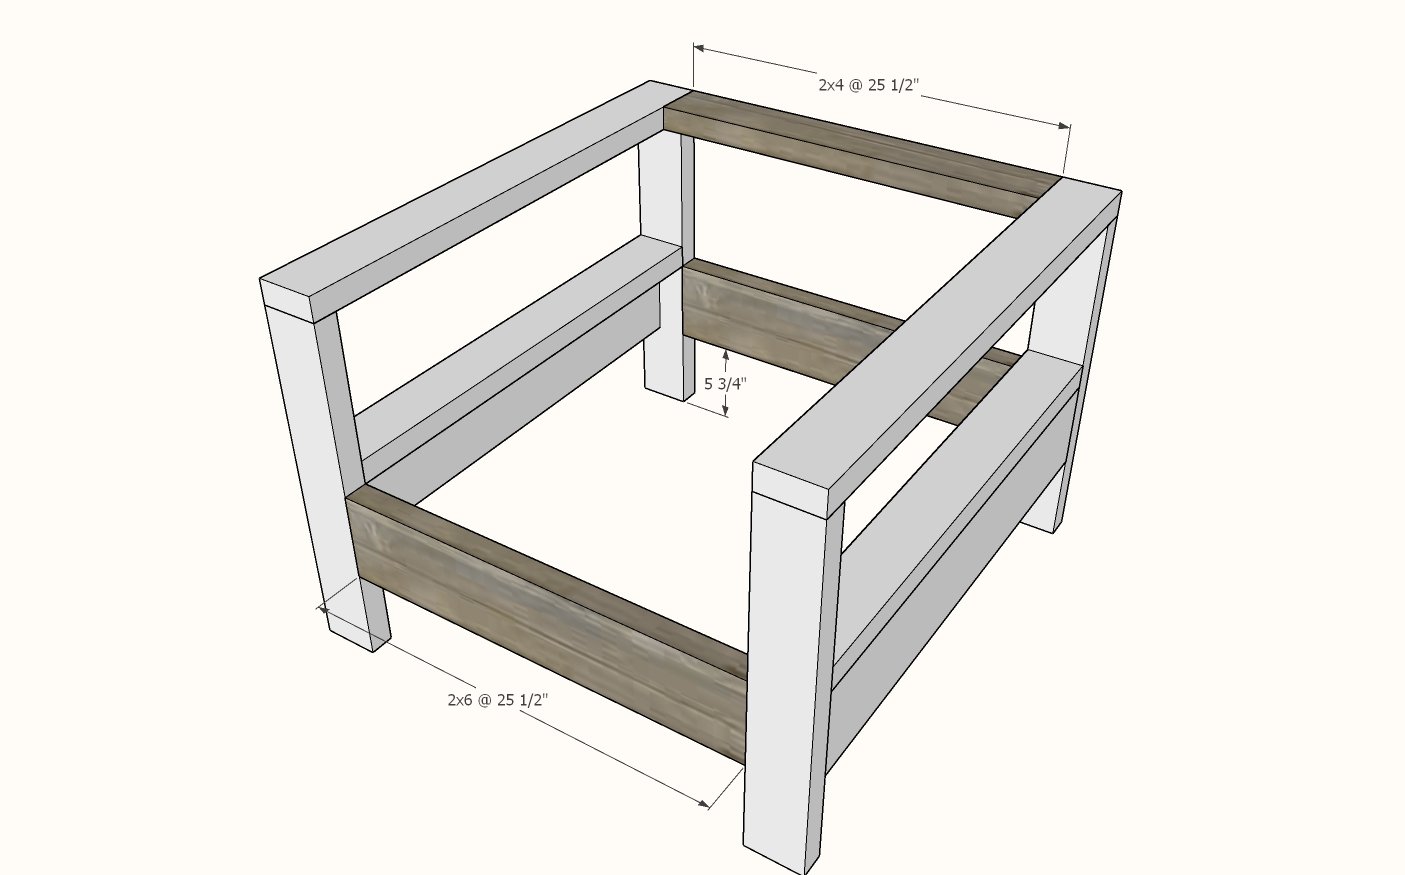
Drill two 1-1/2" pocket holes on each end of the 2x6 and 2x4s shown.

Attach with 2-1/2" pocket hole screws to the legs, all pocket holes are on the insides, or facing downward.

Step 5

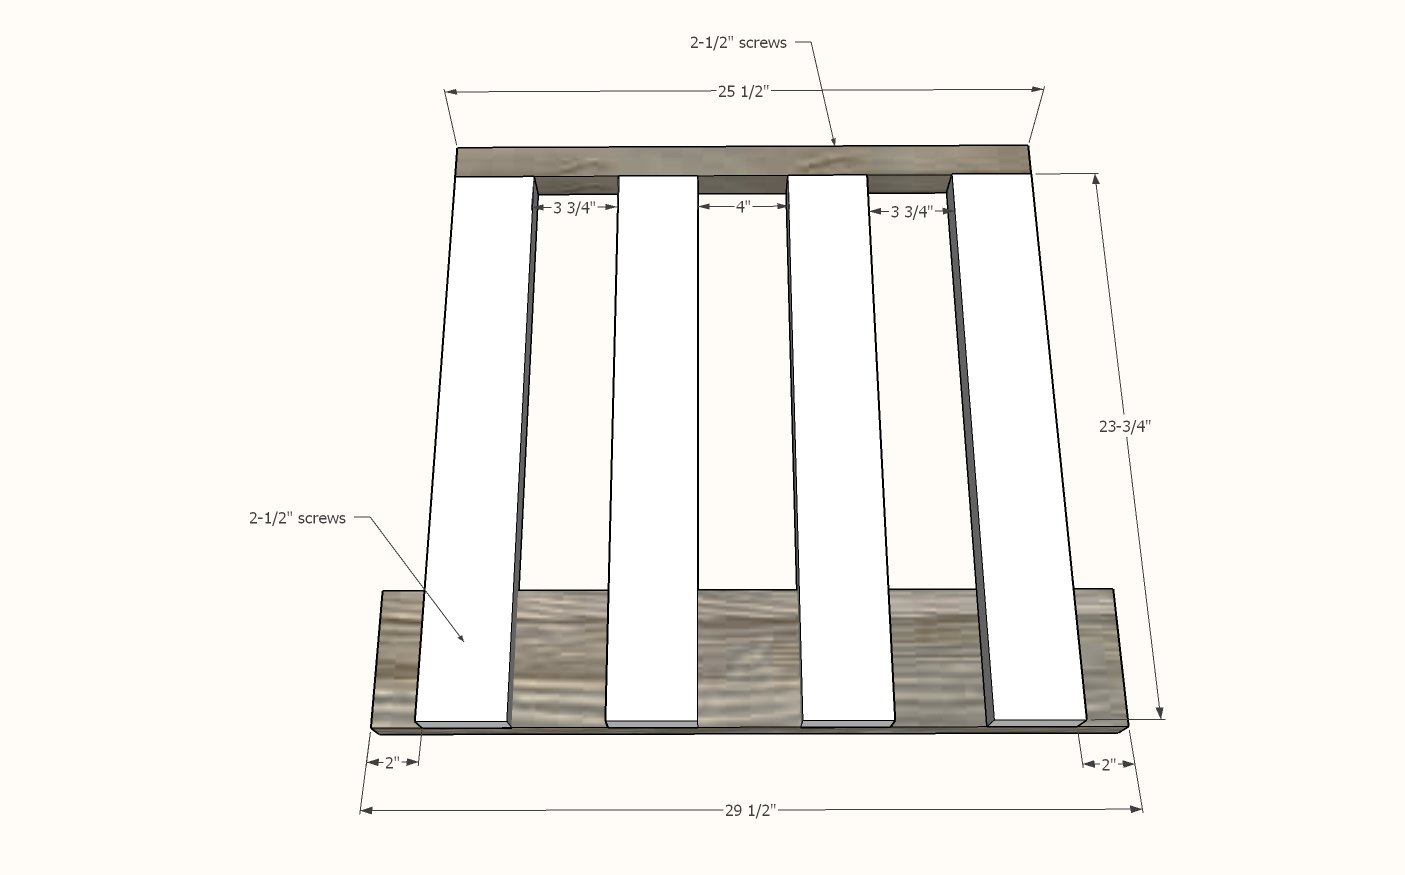
Attach 2x2 to the back slat pieces with 2-1/2" exterior self tapping screws.  Two screws per joint recommended.

Attach back slats to the base with 2-1/2" self tapping wood screws, with a 2" gap on each end, keeping the same spacing as the top.

Two screws per joint recommended.

Step 6

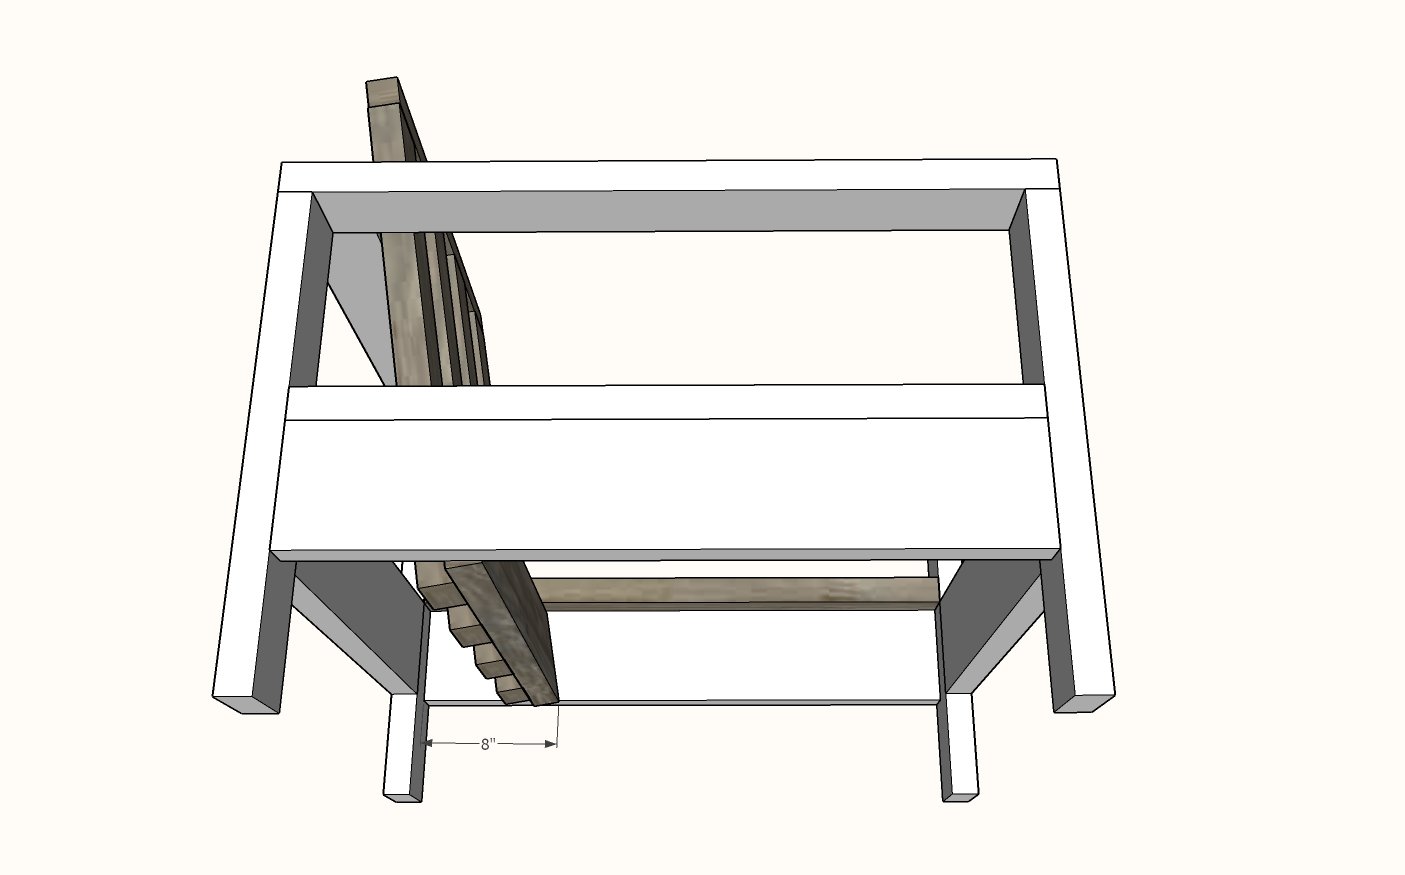
Set back inside the chair frame and attach with 2-1/2" self tapping screws to the side 2x6s and to the back.

Step 7

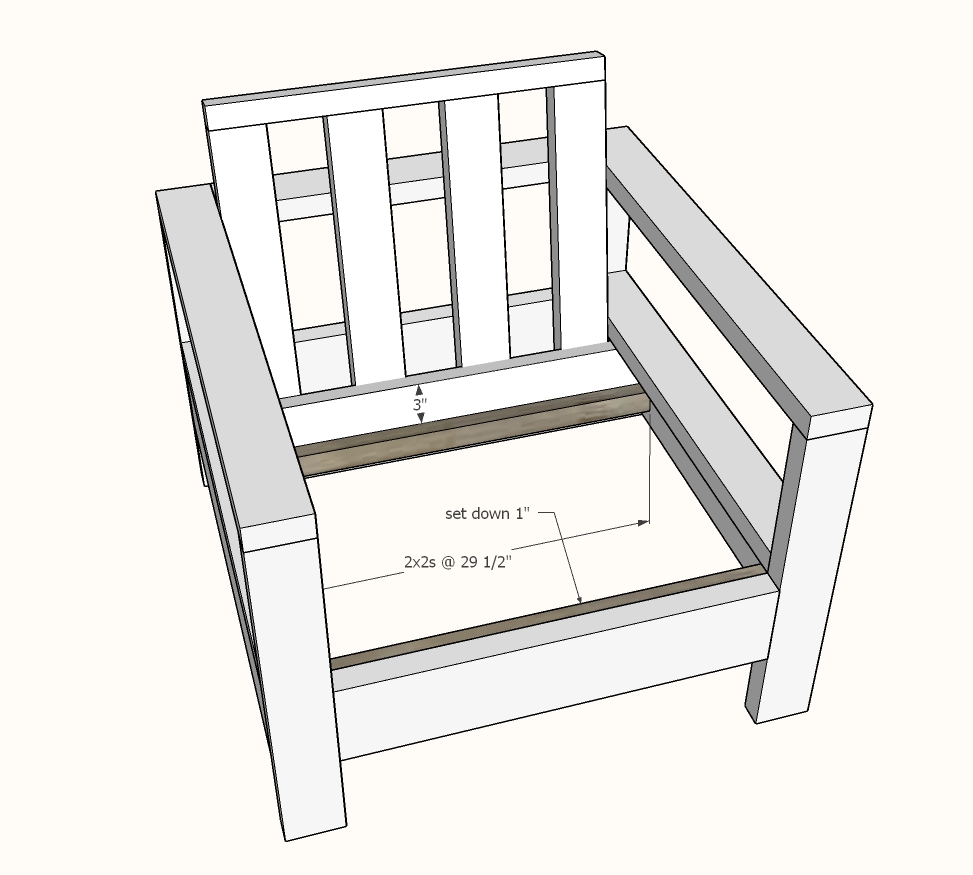
Attach seat slats cleats inside the chair frame with 2-1/2" self tapping screws.

Step 8

Lay seat slats down on the 2x2 cleats and attach wtih 1-1/2" self tapping screws.

Comments

Guest (not verified)

Fri, 06/10/2011 - 12:03

I would LOVE LOVE LOVE to build one (actually) two and use them indoors...

Guest (not verified)

Fri, 06/10/2011 - 16:37

Never, ever a blah week! Thanks for posting. Just what I've been wanting to build. Thanks so much Ana. Can't wait to see how the momplex comes along! Thanks for including us in that venture!!

Guest (not verified)

Sun, 06/12/2011 - 09:08

After seeing this collection I am finally dedicated to making some great outdoor furniture for us to enjoy this summer! Seems like buying a Kreg will be necessary. It seems like there is a HUGE price difference $39-$140... any tips????

deanna_g

Tue, 06/21/2011 - 10:54

I highly recommend the $99 Kreg Jig system. I thought about buying the Jr. and seeing if I liked it first, but just decided to bite the bullet and do it the right way the first time. I LOVE my Kreg Jig. My husband is envious. (-;

Thomas (not verified)

Thu, 06/16/2011 - 06:25

I'm looking at the list of supplies and it says 4 - 1x3, but I only see the need for 3 boards based on the cuts.

Board 1: 25" + 16 1/4" + 16 1/4" + 16 1/4" + 16 1/4" = 90"
Board 2: 25" + 25" + 25" = 75"
Board 3: 25" + 25" = 50"

All are less than stud length. You end up with what the cuts list calls for: 6 - 25" sections and 4 - 16 1/4" sections.

What am I missing?

Thanks!

Thomas (not verified)

Fri, 06/17/2011 - 07:15

I just bought all the wood for 2 arm chairs and the sofa...came home to order the cushions from Target. They are NO LONGER on the Target website!! They were there yesterday. I CHECKED. They have none of them in any color. Now I have to find cushions.

Frustrated,
Thomas

Simone (not verified)

Wed, 08/24/2011 - 09:27

Olá , adorei seu site , estava procurando muito algo assim , onde tivesse as medidas dos projetos , muito legal da sua parte dispor para nós , leigos em marcenaria .Comprei uma casa , onde terei que reforma-la , e mobilia-la,como aqi no Brasil , as casas não são tão grandes como as daí , tem muitas ideias que poderi aproveitar ....

Obrigada .

Beijos
Simone

Riley (not verified)

Thu, 04/19/2012 - 20:48

Am I crazy? The cut list has 1x2s but the buy list does not?

Peter Cwik

Tue, 06/12/2012 - 16:27

Ana,
Is there a SketchUp of this chair or the other "Simple White" items? I've made some changes and would like to update the plans, and not start from scratch if possible.

Sue_McL

Sun, 08/05/2012 - 13:04

Love the plan but want to raise the seat height to about 20" total. Will adding another 8 3/4" in height require changing the legs from 2x2 to 2x4s?

BadgerBen82

Tue, 10/12/2021 - 18:06

I don’t know why I’m struggling to figure out how to adjust these dimensions so that a cushion size of 22.5" L x 5.0" H x 22.5" W. I know these plans are made for 25x25 cushions. Do i just reduce all cuts by 2.5 inches? It just seems off to me for some reason! Any help is appreciated

Frequently Asked Questions

Wood Questions

What kind of wood should I use?
Most of our plans use standard construction lumber like pine or fir. It's affordable, easy to work with, and easy to find. It's also rapidly renewing and biodegradable, so a great eco friendly choice!

Can I use hardwoods instead?
Yes—just keep in mind they're heavier, cost more, and can be tougher on tools and harder to join together and finish. I recommend not tackling a hardwood project until after you have built several softwood projects.

What if my boards are warped?
Choose the straightest boards at the store. You can often work around slight warps by cutting them into shorter pieces.

What wood should I use for outdoor furniture?
Use red-toned or pressure-treated 2x lumber for framing, and cedar or cedar fence pickets for the decking. Outdoor furniture should be built like a deck—your local home center can help recommend the right wood for your climate.

Will my wood move or warp after I build?
Potentially, especially in humid climates. Let your wood acclimate indoors before building. Once acclimated and kept in a stable environment, movement should be minimal. Remember, most houses are built using framing lumber - it's all about keeping moisture down indoors.

Cutting Questions

Do I need a miter saw?
A miter saw is great, creating fast, safe, and precise cuts, even for beginners. But most plans can be built with a circular saw and a straight edge. If using a circular saw to cut, take time to practice, and get good at making cuts, before cutting your project boards.

How do I get clean cuts with a circular saw?
Clamp your board, measure twice, cut slow, and use a sharp blade. This takes practice, so spend some time making cuts. I go through becoming proficient at freehand cutting in my course, it is worth taking if you want to master this skill.

Will the store cut my wood?
Yes—most stores will do rough cuts to help you transport your materials home. But from store to store, the quality of cuts could greatly vary.

Joinery Questions

What screws should I use?
We recommend star-head self tapping screws for framing, most common sizes are 2-1/2", 1-3/4". Pre-drill if close to the edge or you find your wood is splitting.

Do I have to use pocket holes?
Pocket holes are the cheapest, easiest and fastest way to do some joints - like edge to edge or a hidden fastener joint. There are other methods, but these can be time consuming and expensive. We recommend using pocket holes as indicated in plans for best results.

How do I keep things square?
Use a speed square and measure diagonals after each step. Always clamp joints before screwing to keep them tight and flush.

Finishing Questions

Stain or paint before or after building?
A quick sand before and a full finish after gives the best results. Pre-finish if you're doing two-tone or detailed finishes.

What type of finish?
Use oil-based or water-based stain. For paint, cabinet-grade latex or enamel works great. High use surfaces on indoor projects should get a coat of polyurethane, I recommend a Helsman or Spar or other flexible poly that won't crack or peel with wood movement. For exterior projects, use a finish suitable for exterior fences.

How to get a smooth finish?
Start with a well sanded project. Sand between coats (220 grit), wipe clean, and apply light coats with a foam brush or roller.

Plan Questions

Can I change the size?
Many people do, and that's the great thing about building your own furniture! But do keep in mind going bigger might mean more supports are required, and often plans are optimized for minimal material waste.

Are these beginner-friendly?
Yes—plans are written with simple tools and clear steps in mind, with every effort to make plans as simple as possible.

Can I sell what I build?
Absolutely! Just don’t resell or repost the plans themselves.

General Questions

What tools do I really need?
A drill, circular saw, tape measure, square, and a few clamps will get you through most projects.

Do I need a workshop?
Nope! A driveway or small patio is plenty to get started, just make sure you have a level place to work. If you find you are building several projects a year, creating a small workbench is a great way to store tools and have a dedicated workspace.

What if I mess up?
Wood filler, sanding, or flipping boards goes a long way. Mistakes are part of the process!

What can I do to make my projects look more professional?
Start with straight boards, make accurate cuts, clamp all joints, and line up everything neatly. Sand thoroughly, use a neutral finish, and apply it in light coats for a clean look.

I've never built anything before. Where should I start?
Start with a few smaller softwood projects to get hands-on experience. Or if you're tackling a big project, buy a little extra lumber and practice your cuts and joints first. If possible, work with someone who has a bit of experience.

Care & Maintenance

How long will my furniture last?
With good joinery and regular care, your DIY furniture can last for decades. I have pieces in my own home that are over 20 years old and still going strong! One of the best parts about DIY furniture is that it’s easy to repaint, refinish, or repair—so your projects can grow and adapt with you.

How should I care for outdoor furniture?
Lightly pressure wash or hose it down once or twice a year. Tighten screws and reapply finish as needed to protect it—just like a deck or fence. A little upkeep goes a long way in extending the life of your furniture.

How about indoor furniture?
Regularly dust or wipe with a damp cloth. If it starts to look worn, a light sanding and touch-up paint or stain can refresh it in no time. DIY pieces are meant to be durable and fixable—so don’t be afraid to give them some love now and then.

Want to Build with Confidence?

Check out my ebook: 12 Skills to Build Your Own Furniture
It walks you through the core skills every builder needs—measuring, cutting, joinery, and finishing—so you can build beautiful furniture that lasts.

Still Have Questions?

Email us anytime at [email protected] and we’ll be happy to help!