
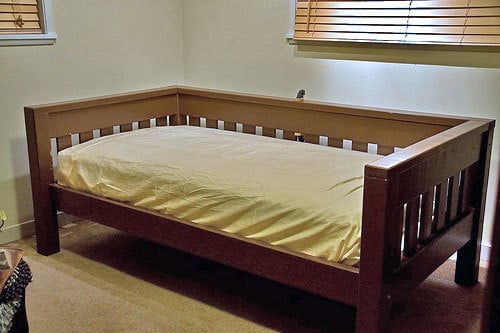

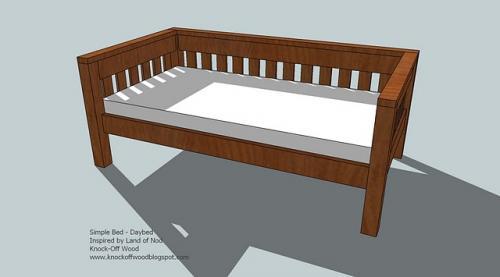
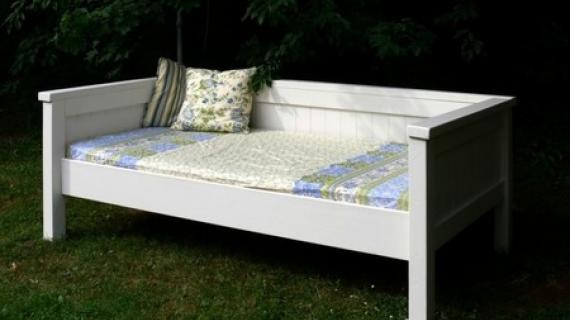
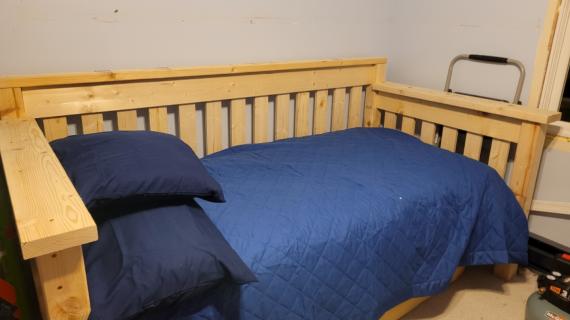
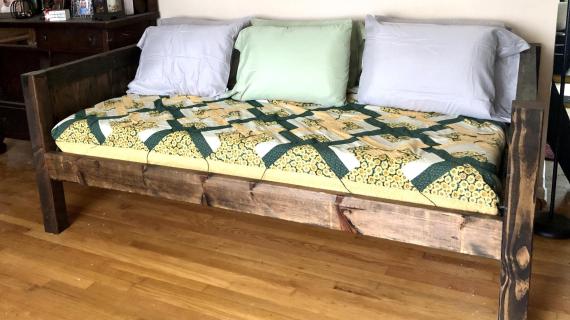
This simple sturdy daybed can provide a solid sleeping space for your children or in your guest room. Featuring a classic slatted design, expect this bed to be very very sturdy, but also big and heavy.
Preparation
In addition to the supplies needed for the Simple Bed, you will also need:
1 – 2×6 @ 74 1/2″ (Shown in blue above)
This cut list is in addition to the two footboards required by the simple bed (see step 1).


Instructions
Step 1

You will need to construct 2 footboards from the Simple Bed Plans. The only modifications you will need to make to the footboards is in the top piece, the 2×4 that finishes to top of the footboard. Cut this board at 42″ keep the front side flush with the front leg post. On the back side, keep the end edge of the 2×4 even with the end edge of the center panel of the footboard. This is shown above.
Review the plans for the Simple Bed here. You will first need to build (2) footboards, as directed in the plans for the Simple Bed.
Step 2
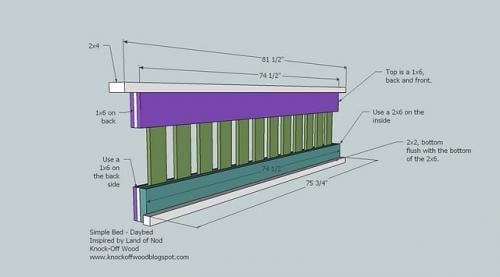
Next construct the back panel in the same manner as you constructed the center panel for the footboards. Take not of the differences shown above. Make sure you leave a 3 1/2″ overhang on either end of the 2×4 top piece.
Step 3
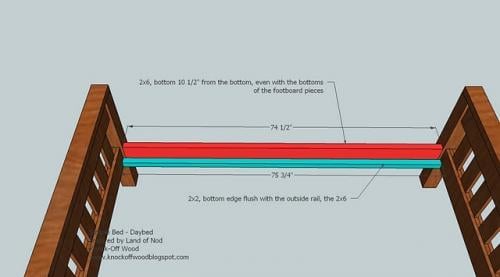
Construct the front rail piece, as shown above. You will need
1 – 2×6 @ 74 1/2″
1 – 2×2 @ 75 3/4″
Leave a 5/8″ overhang on either end of the 2×2. Keep bottom edges flush. Attach this piece to the footboards by first screwing through the 2×2 into the corner posts (make sure you predrill first. Then predrill and screw through the outside of the legs into the end edges of the 2×6.
The bottom edge of the side rail will sit 10 1/2″ up, or even with the bottom edge of the footboard center panel.
Step 4

Fasten with screws the back panel to the side panels. This is shown above. Use long screws and predrill before screwing.

Comments
Ladybug A. (not verified)
Sun, 12/27/2009 - 10:06
I Love your projects they are
I Love your projects they are so great. I just stumbled on your page a week a ago and I am so amazed, I have fallen in love with your work. I was looking over some of your project and although you seem to have a long list of things in the works I was wondering if you could try and work in the Anderson bed from PB kids, I am trying to update my daughters room from toddler to big girl and I love this bed, it would be much appreciated
Lizzy.Post (not verified)
Sun, 01/17/2010 - 16:12
OMG!! I just came across your
OMG!! I just came across your blog about an hour ago and I have already planned to make at least 3 different pieces!! I love the simple bed and was wondering if maybe you had a toddler bed version of it??? My little one will be 2 in 10days and i am ready to ditch the crib, but dont want to take up space in her room with a twin. Or maybe a bed rail for the twin??
Ana White (not verified)
Sun, 01/17/2010 - 19:40
Hi Lizzy, there is plans for
Hi Lizzy, there is plans for the guardrail (very very easy plans) located in with the simple bunk bed plans.
I do have toddler bed plans on the radar, but it could be awhile.
Thanks for stopping by!
Ana
Kae G (not verified)
Sun, 02/07/2010 - 18:43
If I wanted to make the back
If I wanted to make the back of the daybed taller (like in this pic- http://www.fastfurnishings.com/Casey-Daybed-and-Drawer-White-Twin-p/l_b…), how would I do that? PS- I love your website! Thanks for all your hard work!
Patrina (not verified)
Thu, 02/11/2010 - 06:56
Hi Ana, I love all your
Hi Ana,
I love all your plans, just wondering if there is a way to make this bed with solid ends and back.
Just found your blog this morning and i have plans to make a few of these items.
LouAnn (not verified)
Mon, 02/15/2010 - 11:18
SWEET! I totally want to
SWEET! I totally want to make this for our office/extra bedroom. I was just going to throw it in there on a trundle frame - but this looks amazing. and will look so much nicer in the room - thank you!!!
Anonymous (not verified)
Sun, 02/21/2010 - 20:14
Thanks Ana for all of the
Thanks Ana for all of the inspiration. I am in the middle of making this but I wanted to let you know that the cut list has a 2x4 listed as 74 1/2 inches-but the diagram shows that same piece as 81 1/2 inches-the diagram has the correct measurements (I learned this the hard way).
I was also wondering what you used to attach the 2x6 to the back center panal-using the 2 inch nails just does not seem sturdy enough.
Ana White (not verified)
Sun, 02/21/2010 - 21:22
thanks for coming back to let
thanks for coming back to let me know about this error in the cut list. I did correct it. I would perhaps try longer screws, this will strengthen things up considerably. thanks again, Ana
Gen (not verified)
Tue, 03/23/2010 - 20:00
Hi Ana,Quick question on the
Hi Ana,
Quick question on the daybed. In the plans for the 2 footboards (Im done with these) the rails are listed at 21.5 inches. But in the cut list for the back panel the rails are listed at 20.5. I just wanted to make sure this was intentional because HD is cutting my wood.
Also I am modifying the bed to fit a twin trundle. so I am adding 2.5 inches to all the long rails. Hopefully I calculated correctly.
Ana White (not verified)
Tue, 03/23/2010 - 20:27
Hmmmm, I see both listed at
Hmmmm, I see both listed at 20 1/2" for the rails on both the daybed and the simple bed. I could be missing something. Regardless, you will need to make the back of the daybed exactly like you made the footboards so they match up, so if the rails you made were 21 1/2" on the footboards, you should cut this length for the back of the daybed.
In reply to Hmmmm, I see both listed at by Ana White (not verified)
Verklempft
Sat, 09/26/2015 - 14:56
Footboard lengths
I believe the discrepancy is in diagrams [14] and [15] in steps 1 and 2, respectively. The diagram states "Board B [1x4 cut at 21 1/2" for Footboard"
Casey and Tami… (not verified)
Wed, 03/24/2010 - 18:30
I love this website and have
I love this website and have spent way too much time looking over everything and trying to decide on my first project. What I am wondering though is if I could convert your simple daybed into a low loft bed by simply making legs longer and putting a guard rail on. Would it still be plenty sturdy if the legs were longer? I would like to have a low loft wiht a trundle underneath. My little one isn't quite ready for a high bunk bed.
Kevin (not verified)
Sat, 04/24/2010 - 05:37
Hi all,I love the simple bed
Hi all,
I love the simple bed design, and the daybed from it. However, my daughter, almost a teen, wants a daybed, but the simple-bed-daybed design is a little "too" simple for a tween girl. I've seen some designs that have the back piece with a sort of rainbow curve to it, and the side rails curved as well. Does anyone have any plans (or ideas) on something like this? I'd like it to look a little more for a girl than the simple plan provides.
Thanks.
Amy (not verified)
Sun, 06/06/2010 - 15:31
Do you think these plans
Do you think these plans would work for a full-sized bed, with a few adjustments? Or would it look strange?
Courtney (not verified)
Wed, 06/30/2010 - 07:21
I love the simple bed and I'd
I love the simple bed and I'd love to make it for my little girl! I know you've said in the past toddler plans were on the way, but I still haven't seem them. Did I miss them, or are they not up yet?
Thanks!
kelly (not verified)
Wed, 08/18/2010 - 12:09
Courtney, try
Courtney, try these:
http://learningmydslr.blogspot.com/2010/05/knock-off-wood-is-my-new-fav…
http://www.knock-offwood.com/2010/02/plans-toddler-farmhouse-bed.html
http://www.knock-offwood.com/2010/04/upholstered-daybed-uncovered.html
Here is a link for the guardrail, you'll find it in the bunk bed post.
http://www.knock-offwood.com/2010/01/plans-how-to-modify-simple-bed-to-…
Hope that helps!
AmyLynn (not verified)
Sat, 09/18/2010 - 02:05
I think that a daybed with a
I think that a daybed with a trundle will go great in our guest bedroom. My house is a 1910 Victorian style, so I don't think the simple modern look will go. If I combined the 'reclaimed wood headboard' and this plan, do you think it would provide enough structure as long as I use new wood for the frame?
Lynn Burcher (not verified)
Fri, 10/22/2010 - 06:52
Hi Ana, and thanks for the
Hi Ana, and thanks for the plans.
I built a modified version of the daybed. I raised the back 10" (I'll try to add pictures later). I ended up spending under $130.00(US) on the materials. And $140 on tools ;) Funny how that works. My wife never understands that part...
One recommendation for anyone wanting to build the daybed (or other bed plans): make it disassembleable. To lift the fully-assembled daybed would take two large men and a good-sized boy. Plus it won't fit through doorways very well. I used 4" lag screws to assemble mine, and left some accessible at each corner (without gluing those joints).
Also, I was having trouble following the different dimensions and cut lists on the various evolutions of the plans, so I put together a single spreadsheet with materials lists and cut lists for each iteration (simple bed, simple bed with arches, daybed, and my modified daybed). If you would like to include the spreadsheet on your site, let me know and I will email it.
Thanks, again!
prewfam09
Sat, 01/10/2015 - 20:30
Hi there! Would you still
Hi there! Would you still happen to have your plans for the modified daybed that you did? I know it's a few years later, but I thought I would try and ask :)
ILuvsawdusting (not verified)
Sun, 11/07/2010 - 03:01
Please oh please post pics
Please oh please post pics and cut list of your modifications I would love to see it.
jeannet (not verified)
Wed, 11/10/2010 - 03:23
Oh, please post your daybed
Oh, please post your daybed pics and share the materials and cut lists for the regular daybed and for your modified daybed, Lynn: I need a list to take to the lumberyard, but haven't had the patience to sit down and figure it all out!
Natalie (not verified)
Sat, 12/18/2010 - 15:10
I just finished building this
I just finished building this and I am beyond excited! It was actually the first thing I've attempted to build out of wood (I've done a lot of tile work using finished wood pieces) since high school shop class and I couldn't be more proud of how it turned out.
I have to say that I got a little confused going back and forth between the three plans (I build the trundle as well) and that had me going back and forth to Home Depot more times than I'd like to admit but that's all on me. I also couldn't find affordable 4x4s. The only untreated ones I was able to find were cedar and were be $10 each. So I went ahead and made my own out of two 2x4s for $10 total. This added time and a little more effort to the overall building and had me switching around where I would have attached the 4x4s to bed because of the screws I used to make it but it all worked out in the end!
I love how sturdy this bed turned out to be and I'll echo the suggestion to either build it to disassemble or build it in sections then put it together in the room because it is HEAVY!
Thank you Ana!!!
Gorgeouse Trun… (not verified)
Mon, 12/27/2010 - 18:21
[...]
[...] http://ana-white.com/2009/12/plans-simple-daybed.html [...]
Rebecca (not verified)
Thu, 01/13/2011 - 11:41
Pretty please include the
Pretty please include the spreadsheet!!! Would love to see the modifications.
hfitz1
Mon, 03/28/2011 - 09:10
To make the trundle with this
Can I make this bed first, start to finish, then go back another time and add the trundle to it? Would I need to change the dimensions on the trundle at all or do they work well with this plan?
asroka
Tue, 05/17/2011 - 14:23
Bunk?
My boyfriend currently needs to rent out a spare room, and is thinking of putting bunks in. I have looked through all the bunk ideas... The simple ones could work, but I feel are a bit feminine for an adult boy's room, the other bunks can't separate, and there may not be enough room for the lofted bunk. So, my thinking. Does anyone think this daybed could be modified to be bunkable (and work with adults)??
I think building one with a trundle would be a good addition to the room, but I would like to think about the idea of just two "daybeds" that can stack or be separate. That way, since there's not much living area in this tiny house, they could also feel more like couches/normal seating if they were separate and less like beds.
Guest (not verified)
Mon, 08/22/2011 - 08:56
SIMPLE DAY BED
hello my buddy and I were going through your plans and stumbled across this one!!! I fell in love with it. we are now in the process of building this along with a trundle. We modified it a little by making a picket fence instead of the railing along the three sides. Also on the front of the trundle we added the fence, that way when it's all closed up it looks like a little pature for my daughters' stuffed animals. We modified the overall size to fit the room, so nothing fit but we made our own matresses and sheets along with blankets and smaller pillows. It's almost done and I can't wait to post it!!!
Guest (not verified)
Thu, 10/13/2011 - 13:38
Queen Size
How could I make this fit a Queen size mattress? I just want to extend the frame out farther but also would need to make it wider to accomodate the 60x80 mattress. I don't want the 2 sides any bigger though. My girls sleep sideways on a queen and with a daybed, we could eliminate their side rails too and make it much more aesthetically appealing.
jane42
Wed, 01/06/2016 - 20:10
Hi Ana,
Hi Ana,
I love this daybed and I want to start building it ASAP, but I'm an absolute beginner and I'm confused about exactly which parts of the simple bed plans I need to follow. I know it says here to make two footboards (instead of one plus a headboard), so do I just follow the ENTIRE simple bed plan or do I start in one place and stop in another? And then at which point in the simple bed plan does the daybed plan pick up? Do I need BOTH shopping/cut lists [omitting the headboard & doubling the footboard]? Probably very silly questions, but I want to make sure I do it right!
jane42
Wed, 01/06/2016 - 20:44
one more question
I'm also very confused about how to attach the 4x4 to the completed footboards. The instructions say "pre-drill halfway through the posts on the outside, then use long screws to screw into the center panel where it is sandwiched between the header boards." I have no idea exactly where to drill on the 4x4 or what the 'center panel' is. Sorry for so many questions!
Bjgamez
Wed, 02/15/2017 - 09:27
Nails, bolts, screws?
What kind of screws do I use, if any and how many?
What kind of bolts do I use, if any and how many?
What kind of nails do I use, if any and how many?
Brandon L Rogers
Wed, 07/01/2020 - 13:13
1x4 rail length
The rails on the simple daybed and simple bed footboard are different lengths but should be the same. (20.5” vs 23.5”)