
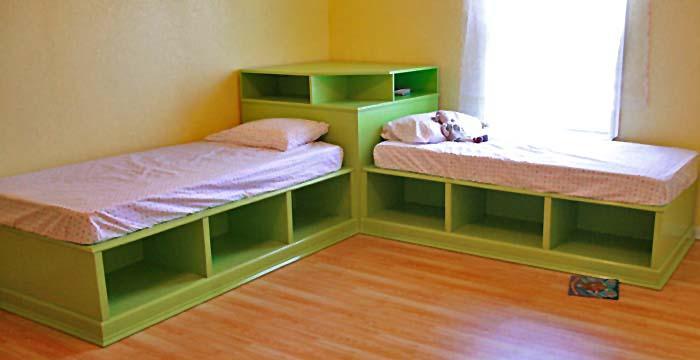

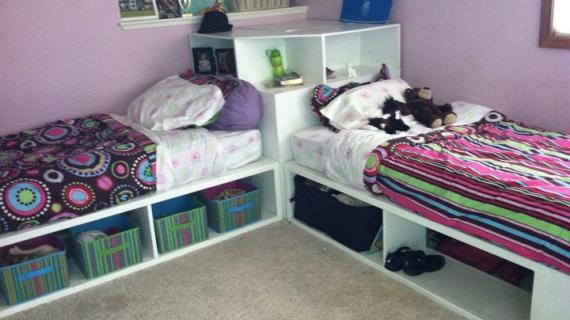
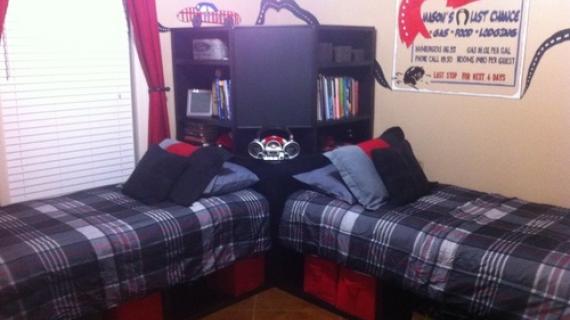
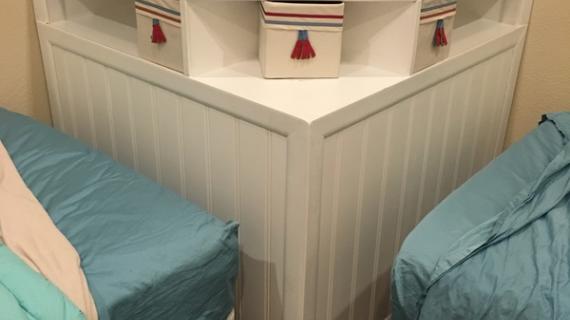
Take advantage of often wasted corner space by building a hutch for the storage beds. This hutch sits on top of the pictured corner unit.
I hope everyone had a great weekend and a special Father's Day. We were blessed with beautiful weather and good food and lots of family time! TERESA'S BEDS Last week when Teresa posted pictures of her Twin Storage Beds and Corner Unit on our Facebook Fan Page, we were all stunned. Teresa's beds were absolutely amazing, more of a knock out than a knock off of these beds from Pottery Barn Teen. Yes, you read that right. $1800, and the beds and sold out! Teresa don't be surprised if we start ordering from you!

YAY FOR COLOR! And we all loved the green. I especially love a bright color on furniture, because you can be daring where huge corporations can't afford to be daring. You can paint a bed any color you choose, without worrying about whether or not the color will sell in a store. You can build just for YOU (and your family of course).

MORE WAYS TO CUSTOMIZE You can also add your own touches, be that in bedding choices (and I love bright paint because plain white bedding is always enough on a green bed, same goes for plain white walls), or in adding little touches of moulding like Teresa did.

This is my favorite of Teresa's photos, you can see the moulding up close. Much better than my drawings, eh?

I'm still always amazed at how close the actual build is to the sketch up drawings. Well, not as nice. After seeing Teresa's photos, I was so excited about the collection that I just had to go and draw up plans for the last remaining piece. The corner hutch.
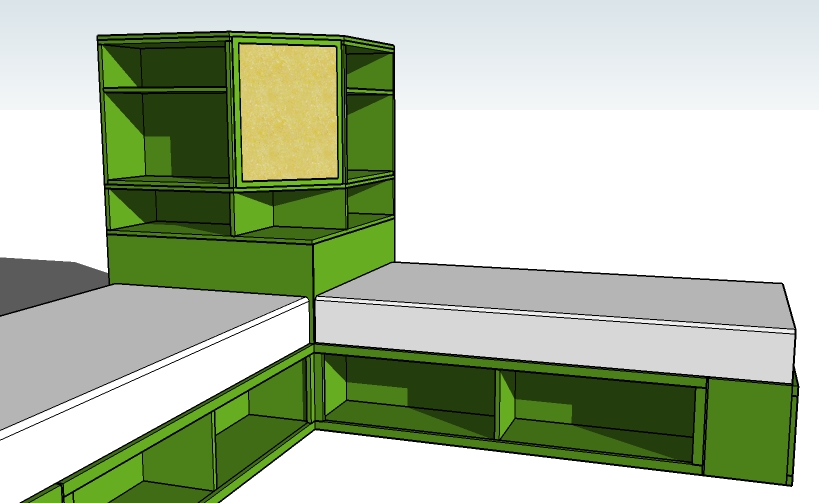
You can add a cork board or a mirror to the hutch like Pottery Barn Teen does here.

This plans is basically two simple bookcases and some MDF and a few 2x2s to get a hutch. Hard to believe that this retails for $600, you've got some high dollar skills! Don't ever under appreciate the value of your determination and hardwork. Make sure your ceiling is at least 67" high. And plan to assemble the hutch in the room. We'll build the bookcases seperately, paint and finish, and then do the final assembly in your room.
Pin For Later!
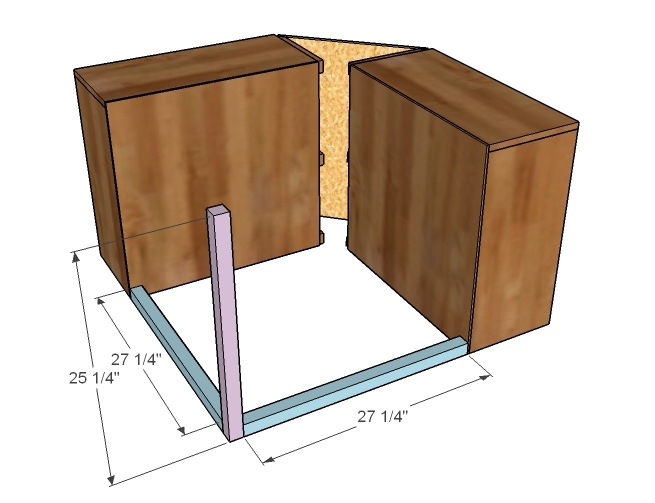
Preparation
1 – 1×2 8′ Length 2 – 1×12 10′ Length 1 – 2×2 8′ Length 1/4″ Plywood for the Backs (1 Sheet) 3/4″ MDF for the Top and Face (1 Sheet) 2″ Nails or Screws 1 1/4″ Screws 1 1/4″ Nails Wood Glue
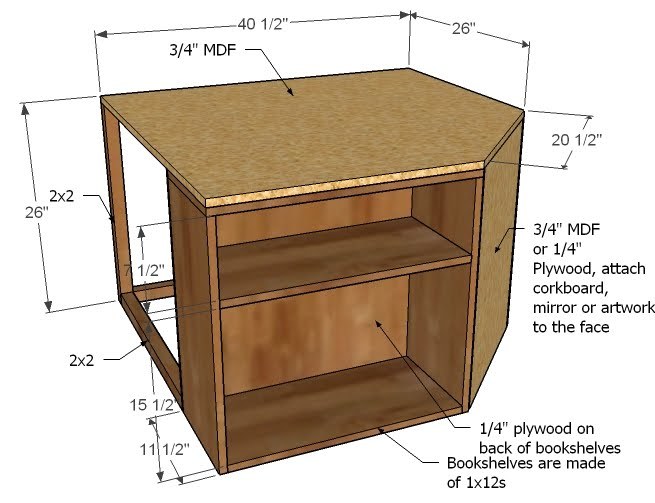
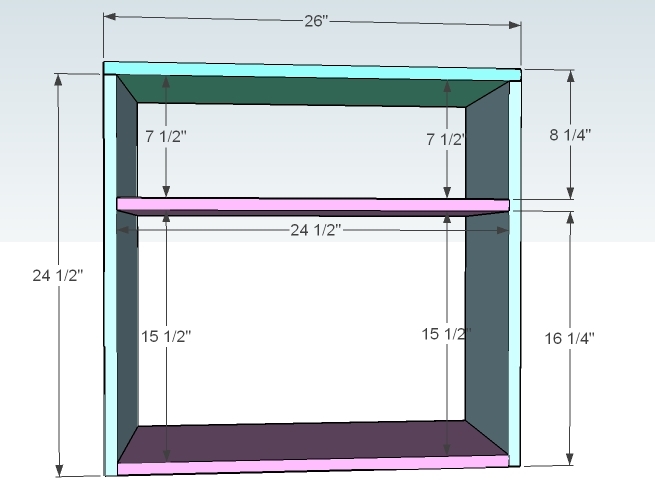
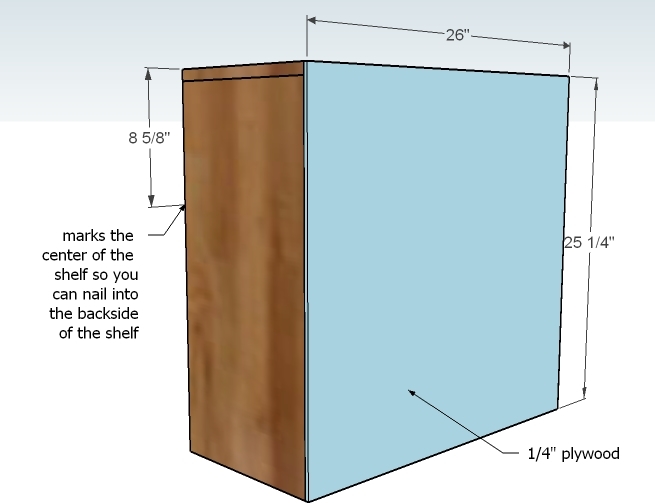
8 – 1×12 @ 24 1/2″ (Sides and Shelves) 2 – 1×12 @ 26″ (Tops) 2 – 1/4″ Plywood @ 25 1/4″ x 26″ (Backs) 8 – 1×2 @ 11″ (Cleats, one end cut at a 45 degree bevel) 1 – 3/4″ Plywood or MDF @ 19 1/2″ x 25 1/4″ (Face) 2 – 2×2 @ 27 1/4″ (Back Supports) 1 – 2×2 @ 25 1/4″ (Back Leg) 1 – 3/4″ Plywood or MDF @ 40 1/2″ x 40 1/2″ (Top, end clipped off at angle as shown in step 6)


Due to the size of this piece, it is recommended to finish the bookshelves and the top and face pieces separately, then assemble in the room. Build on a clean level surface. Be safe and use safety equipment. Use glue. Pre drill all screw holes. Have fun!
Instructions
Step 1
Build your box as shown above. You can use either 2″ screws or nails and glue. Screws will be stronger but nails (with a nailer) will be easier and easier to hide and fine for this application. Use screws if you plan on heavy objects resting on the top shelf. Build two as shown above.
Step 2
BACK
Fasten the back on with 1 1/4″ nails and glue. Make sure you also fasten to the back shelf.
Finish the bookshelves at this stage, painting as desired.
Step 3
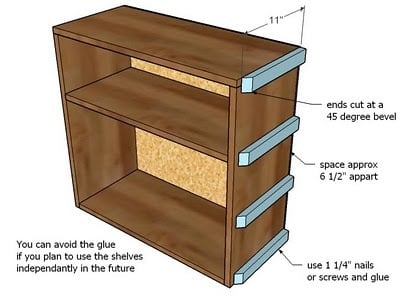
CLEATS
Use 1 1/4″ nails and glue to fasten the cleats to the side of the bookshelves, on the insides. The cleats will NOT be fastened to the same side on the two bookcases, so line your bookcases up as shown below and attach the cleats.
Step 4
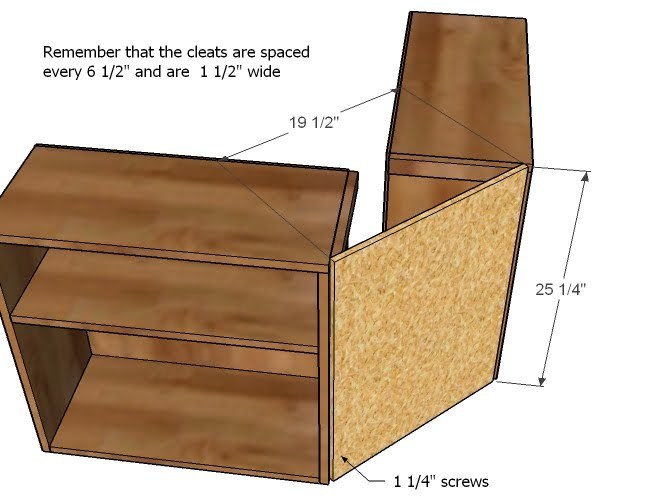
FACE
Paint or finish the face as desired at this stage. Then on room assembly, use 1 1/4″ screws to fasten the face to the cleats as shown above.
Step 5
Step 6
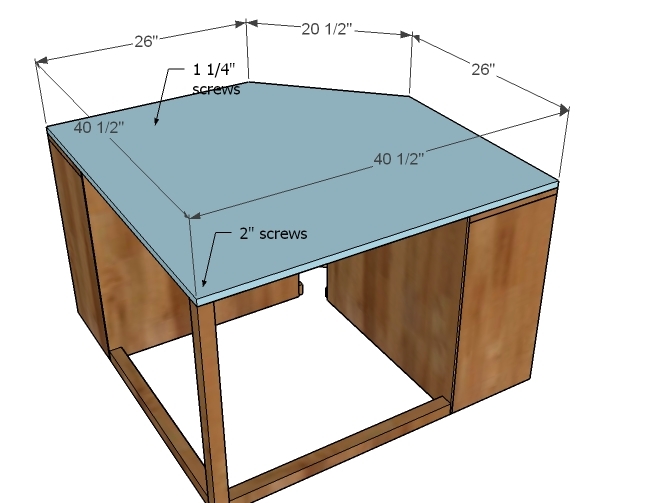
TOP
Paint or finish the top piece independently. Then on assembly, attach as shown above to the tops of the bookcases and the back support pieces. You may wish to also attach the bottoms of the bookcases to the tops of the corner unit.


Comments
Heidi (not verified)
Thu, 05/20/2010 - 09:53
WONDERFUL! You are so
WONDERFUL! You are so amazing. I can't wait to build this for my girls! This is so empowering.
Katie Petre (not verified)
Thu, 05/20/2010 - 10:02
This is SO awesome!!
This is SO awesome!!
Devon! (not verified)
Thu, 05/20/2010 - 10:05
i LOVE LOVE LOVE this!
i LOVE LOVE LOVE this!
Tanjia (not verified)
Thu, 05/20/2010 - 10:08
Now I know it's possible for
Now I know it's possible for my girls to share a room! I'm not big on bunk beds but this is FABULOUS!!
The Hojnackes (not verified)
Thu, 05/20/2010 - 10:23
I just did a post on my blog
I just did a post on my blog about you and your blog! I am just trying to figure out which plans I should use first.
Cherie Averill (not verified)
Thu, 05/20/2010 - 10:30
This looks perfect for us!
This looks perfect for us! Son #3 is a tween and he's too old for the top bunk but son #4 is too young for the top bunk. I'm off to measure their room! Thanks Ana!
Melissa (not verified)
Thu, 05/20/2010 - 10:37
Gorgeous gorgeous gorgeous!
Gorgeous gorgeous gorgeous! I have a plan to tweak this to make a bank of daybeds for the basement!
lyndyjo (not verified)
Thu, 05/20/2010 - 10:44
I was considering building
I was considering building the day beds for two of my girls and was looking at this on the PB website and wondering if I could build it, too. I've never built anything before, but would love to try. I also appreciate you including the complete dimensions. We're moving in a few weeks and I need to go measure to see if beds like this will fit in their bedroom. Love your site!
Pam @ diy Desi… (not verified)
Thu, 05/20/2010 - 10:50
I remember these beds from
I remember these beds from when I was a teenager in the 70's. They were so popular & I always wanted one because I shared a room with my sister!
Teresa Pomerantz (not verified)
Thu, 05/20/2010 - 11:17
You just made my
You just made my weekend!!!!!!!!!!!!! Off to Home Depot to have them cut the wood!
Megan (not verified)
Thu, 05/20/2010 - 11:26
Love, love, love your site!
Love, love, love your site! I've never built anything that wasn't from IKEA, but I'm taking this on! Thank you!
Liana Brooks (not verified)
Thu, 05/20/2010 - 11:55
Perfect! Sadly, the room is
Perfect!
Sadly, the room is too small. I'm wondering if we could just, y'know, move a wall? Do you think my husband would notice? Or the neighbors?
P.S. Are those twin beds the same as the Stratton Daybed plans or the new full-sized daybed you posted earlier done in twin size? I'd love the new plans for a twin size mattress.
Liana Brooks (not verified)
Thu, 05/20/2010 - 12:01
Okay, back again... how hard
Okay, back again... how hard would it be to add hinges to the top portion so that the top opened and the inside could be used for storage?
Ana White (not verified)
Thu, 05/20/2010 - 12:15
You could very easily ad
You could very easily ad hinges to the "secret compartment." Just get Full Overlay Euro Style Hinges like these http://www.lowes.com/pd_67157-89973-P6992-C_0_?newSearch=true&catalogId…
Heather (not verified)
Thu, 05/20/2010 - 12:20
Incredible!!!
Incredible!!!
Barlow Family (not verified)
Thu, 05/20/2010 - 12:24
Ok Anna, picture this. I
Ok Anna, picture this. I have twin beds set up like this in my girls room right now. (Though I totally need to make the top storage section.) The other cool part about my girls beds though, is that the table is made so that you can actually slide one bed into the open section of the table and then there's only a half bed out. You can use it as a seating area if you don't need the bed. It's really cool. I'll take pics if you want them.
Kim Comisar (not verified)
Thu, 07/19/2012 - 07:01
Hi, Could you please, please,
Hi, Could you please, please, please send me pics of this bed unit you made for your girls' room- I'm dying to see it!
Janae (not verified)
Thu, 05/20/2010 - 12:38
I love it. You are amazing. I
I love it.
You are amazing.
I love making things using your plans. Everyone thinks I'm so talented, buts all you.
Amy (not verified)
Thu, 05/20/2010 - 13:31
Yay!!! Just what I wanted!!!
Yay!!! Just what I wanted!!!
Lacking Productivity (not verified)
Thu, 05/20/2010 - 15:26
I adore you. As crazy as it
I adore you.
As crazy as it is, nothing makes me want to have kids more than this blog. I SOOOOO want to build all your adorable kid stuff...so you have to keep this thing going until I have kids to build toy chests and sandboxes and twin beds for. Deal?
trish (not verified)
Fri, 05/21/2010 - 03:54
This is almost exactly what
This is almost exactly what I'm looking for in a couch for the living room! I'd just shorten one of the 'bed' sections to be only one storage box long, and magically there are two coveted 'corner' seats. To make a back for the couch, would it be reasonable to make a simple upholstered headboard, attach it, and toss in some throw pillows? Or should I make something more structural, like the backs of the Simple Outdoor Sectional?
Vanilla Comfort (not verified)
Fri, 05/21/2010 - 07:58
I love it Ana! I might try to
I love it Ana! I might try to modify the hutch thing to put at the end of my storage daybed, if I ever finish it, lol. This looks much easier than the storage daybed. I wish I had waited. JK, I love them both. Do you think you will add plans for the piece that goes on top of the hutch, like in the PBT picture?
momtofatdogs (not verified)
Fri, 05/21/2010 - 16:55
You know what? I just saw
You know what? I just saw this same set up on Craig's List / Nashville ! Guess how much? $1000.00 ! And YOURS looks better!! I just love your site. Our computer is at the top of the stairs in our bonus room - DH says (as he's walking up the stairs) "You're not lookin at that ANA site are you???" Our "to make" list is getting longer, and longer, and longer!!
Sam
Lea (not verified)
Mon, 06/07/2010 - 02:46
Any suggestions for a room
Any suggestions for a room where there is only 99" in one direction ??
I'm at a loss as to how to make my boys room a little more functional.
The poetry of … (not verified)
Wed, 09/08/2010 - 19:27
[...] don’t mind sleeping on
[...] don’t mind sleeping on our futon on the floor (in fact, I do enjoy it quite a bit), but with beds like these, I think even my wife wouldn’t object to build one or two of them. Poetry creates artificial [...]
Lea (not verified)
Mon, 11/08/2010 - 08:37
Any suggestions for a room
Any suggestions for a room where there is only 99" in one direction ??
I'm at a loss as to how to make my boys room a little more functional.
Rebekah (not verified)
Tue, 12/14/2010 - 07:19
This is amazing!!! I'm
This is amazing!!! I'm thinking this would work and look fabulous in my 2 youngest kids room!!! I'm inspired... THANKS ANA
Tiffany (not verified)
Mon, 01/10/2011 - 08:48
I just wanted to thank you
I just wanted to thank you for this. I've been trying to come up with something for our guest room/craft room. If I can tweak this a bit to fit 12x12 scrapbook albums in the cubes one of these will be perfect!! It's almost exactly what the picture in my head looked like but yours has plans LOL
Dell (not verified)
Fri, 02/04/2011 - 02:32
I googled "Daybed" and found
I googled "Daybed" and found this. It's perfect for the spare room. Thank You!
Morgan (not verified)
Sun, 02/13/2011 - 14:59
I ran into the same problem.
I ran into the same problem. What I did was made the two beds first. Then I made the hutch a little different. I widened the hutch in both ways to ensure it was still square. But I left the bottom horizontal support off the hutch frame allowing one of the beds to slide into the hutch. I didn't allow the bed to slide all the way to the back but it still looks like it is going to work out really nice. Only two other things to consider first you can not use the cutting directions from this website for the middle hutch or anything else you build on top of it. Secondly, you will probably need another piece of 1/4" plywood to finish the inside of the hutch where the bed slides into. Hope this helps. If you have any more questions let me know.
Michelle Parks (not verified)
Wed, 04/06/2011 - 11:46
Mattresses
Where to buy the foam Matresses or do you make them or order them? Im in Mesquite,TX if you know of a placew in my area please let me know thanks!
Guest (not verified)
Wed, 07/06/2011 - 16:54
can i get the info to make the bed
Hi Ana, I just found your site last night while looking for a way to redesign my girls bedroom. However, I have been going around and round in circles on the site hunting for the plans for the two twin beds with the corner piece. I keep being redirected and the ending up on a page that says the file no longer exsists. Is there any way you could email me the pdf version of the plans? The only copy I can seem to get is the top Corner Unit for the Twin Storage Bed. So if at all possible I'd like to get the plans for the two twin beds and the bottom corner piece. I showed the girls a picture awhile ago and they are super excited, so I'm really hoping I didn't just get myself into hot water by not being able to get a copy of the plans! lol
Guest (not verified)
Fri, 09/30/2011 - 17:44
Corner unit
I really love these plans and want to build the beds for my boys. I don't see the dimensions or cut list for the bottom part of the corner unit. Like the person above, all I see are the plans for the hutch. Am I overlooking something? I would love the info if possible! Thanks!
LBad (not verified)
Wed, 10/12/2011 - 12:46
Teresa's twin storage beds
Hi
I have found your site recently and love it! I've been working on a design using your twin/full storage bed plans, however, my set up is just like this - the beds both need to be backed up against the wall so no way to access the "back" storage cubes. THESE beds are the ones I want to build, where it appears that storage does the entire width of the bed (front to back). I have some ideas of how to make this work but keep finding roadblocks. Any chance there are designs for Teresa's apple green style storage beds?
p.s.I don't know how you find the time to do all this work AND post the designs AND reply to all these comments but I sure am glad you do!!
thanks!
imalearba4
Wed, 12/07/2011 - 19:43
Teresa's green storage beds
Hi everyone- Teresa here. Just letting you know that the Storage Daybed is the plan I used. It was my first woodworking project Ever! If I can build it so can you. It looks so seamless because I used long pieces of trim to cover all the joints so it looks like a single box. I did put the divider piece in the middle of the boxes- it really needs it for the support- especially if your kids are like mine and use it as a dance stage every once in a while. Hope that helps- but if you want to ask specific questions you can email me- teresa at pomeranch.com
ange dennix (not verified)
Fri, 01/06/2012 - 10:48
new to this site
I am new to your site and just love these beds but can not find the plans for the beds themselves can you help me out ty
In reply to new to this site by ange dennix (not verified)
spiceylg
Fri, 01/06/2012 - 11:53
Welcome!
Isn't this site great?! Ana has really been instrumental in a lot of us getting into woodworking. She is the best! Here ya go! http://ana-white.com/2009/12/plan-stratton-daybed-as-request-by-you.html
Guest (not verified)
Sun, 01/08/2012 - 07:59
Corner unit or hutch?
I am probably missing something, but I cannot seem to find the plans for the actual corner unit base. It seems like these plans are for the hutch that goes on top. I know I'll be busy building the actual storage day beds for now, but I would LOVE to have the plans for the corner unit. Could someone point me in the right direction? Thank you so much, and I am loving this site-- really growing the "to make" list.
JoanneS
Sun, 01/08/2012 - 09:12
Corner base unit plan link
Guest - I think this is the link you are looking for (the bottom part?). :)
http://ana-white.com/2010/06/plans/corner-hutch-plans-twin-storage-beds
Denise Becker (not verified)
Thu, 03/08/2012 - 12:11
Corner unit twin storage bed
Where can we get the plans to build this bed? I have looked all over the web site but haven't found them. Thanks so much!
Lenae Mannino (not verified)
Mon, 04/16/2012 - 18:36
green corner group beds
where can you get the plans to build the corner beds dont know where to find them Can you please email me the plans I had the older model couch bed for my daughter for their room now I would like to make a set for my grandchildren when they come to stay with us. but also make it look like a den too. Thank you Lenae
Akiko (not verified)
Tue, 06/26/2012 - 18:17
I too would like the plans..
I too would like the plans.. the pdf link is definitely broken.. I keep getting an error message.
MrsA_42212
Sun, 08/10/2014 - 11:47
I can't find the plans for
I can't find the plans for the beds anymore....I want to make them and add backs to use as seating on our screened in porch. Can someone help! thanks!!!!
Namsiuh
Sun, 12/07/2014 - 04:57
Type of wood?
I have been to 2 Home Depot and 1 lowes and can't fine pine that would make this project anywhere near the price people are saying it would cost. Is everyone using white wood and just calling it pine? The 1x12x8 are $35 alone! Please specify the type of wood that is being used because if it is pine I might as well order the beds from pb teen and save myself the time and energy it would take to make these. Thank you in advance!
JoanneS
Sun, 12/07/2014 - 11:33
Whitewood is fine for this project
Hi Namsiuh,
Whitewood boards are just fine for this project. Our Lowes calls them Whitewood, and our Home Depot calls them Common Boards. You don't need to spend extra for the clear pine (our stores call these select pine or radiata pine boards) especially if you are painting or if you are doing a rustic looking piece (where the knots would look cool in that case). The 2x2's referred to in most plans are furring strips. In the majority of the plans when it calls for a 1x it's whitewood, or anything 2x it's stud grade lumber. You have to pick through them more to get a pretty board but they are much cheaper. You may also find nicer lumber (at a better price) if you have a local lumberyard. We don't have one where I live, but I wish we did! Happy Building1
KrafyMomma
Sun, 03/22/2015 - 19:30
Possible changes for single kid toom?
I was thinking that since my teen has her own room, I could change up the 2nd bed into more of a couch? Any suggestions on how to cushion it and hold those cushions on?