
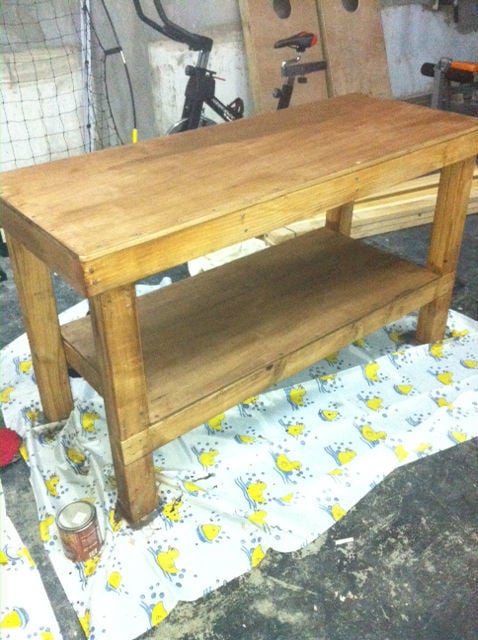

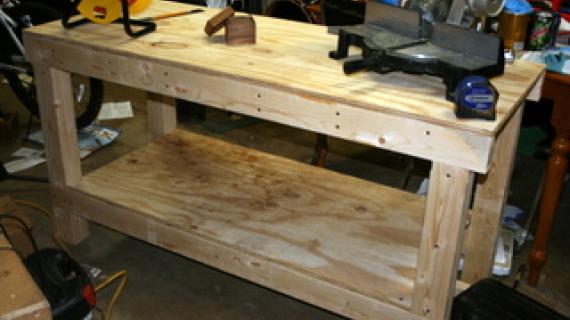
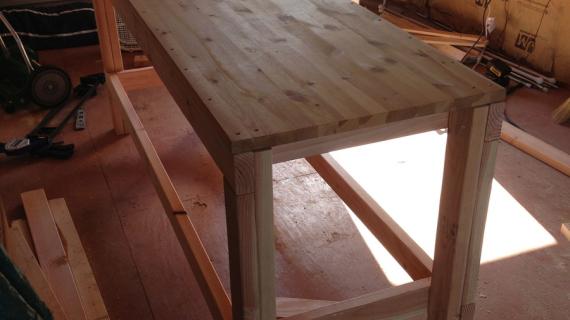
So, here I am, in the Philippines without a workbench. After finally renting out our condo, we decided we would move to a location better for the school & better for me to have peace of mind. You don't get that 22 floors up where you can't even hear the rain coming down :-/ So after 2 years, I finally had a place to build again. I started buying all new tools as using a 110-220 converter is a pain. I went and got my sliding compound mitre saw, table saw, bandsaw, tool chest, angle grinder, welder...etc etc. The one thing that never crossed my mind....was a workbench!! The biggest tool you'll ever need, and the most crucial..nonetheless, the most forgettable. So, I went looking around, and the closest thing I could find was a blank front door. Granted, it would have been better than the concrete step in which has served as my makeshift workbench, but it just seemed...I don't know, too easy :D I decided to build a 2x5 workbench out of nothing more than 2x4's, 3/4" plywood, and 1/2" plywood. I couldn't remember where I had originally stumbled across the plans, but I wrote the dimensions down at the time. I believe they are all accurately depicted to the plans I had originally found. Nonetheless, they're all the exact cuts I used for the bench. I was able to find a biscuit joiner over here, but no biscuits, so I went another route as you'll see in the photo. The one thing you will learn about the Philippines is that you will never find the matching opposite to go with what you need when it comes to tools! I'm still in search of dowel rods & it's been months!! **Start from the ground up. Wherever I read this, it said to start from the top. If you want this level, I'd suggest going from ground up :D
Always measure your wood & remember, a 2x4 is not actually 2" x 4". Especially, where I live :)
Preparation
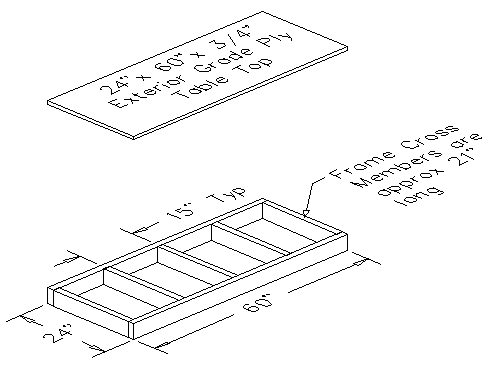
7-2x4x8'
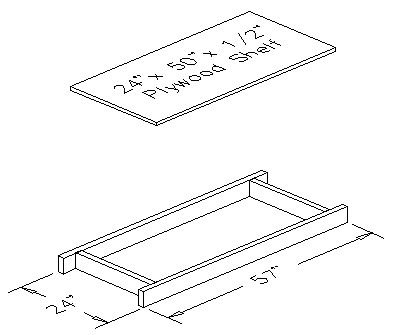
1 - sheet of 3/4" plywood, ripped into strips 24" wide x 8 feet long (use for both shelves)
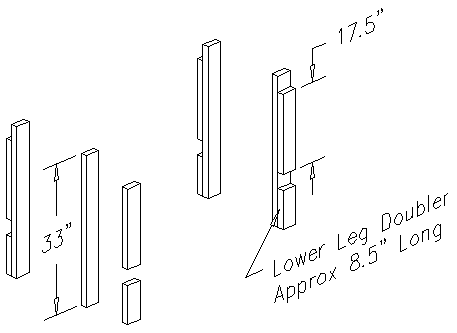
4 - 2x4 @ 33"
4 - 2x4 @ 17-1/2"
4 - 2x4 @ ~8-1/2"
2 - 2x4 @ 57"
7 - 2x4 @ 21"
2 - 2x4 @ 60"
1 sheet of 3/4" plywood ripped into strips, 24" x 96" - cut the shelf and tabletop pieces from these strips
Remember when cutting, take into account the width of the circular saw, table saw, or mitre saw in which you are using.


Please read through the entire plan and all comments before beginning this project. It is also advisable to review the Getting Started Section. Take all necessary precautions to build safely and smartly. Work on a clean level surface, free of imperfections or debris. Always use straight boards. Check for square after each step. Always predrill holes before attaching with screws. Use glue with finish nails for a stronger hold. Wipe excess glue off bare wood for stained projects, as dried glue will not take stain. Be safe, have fun, and ask for help if you need it. Good luck!
Instructions
Step 1
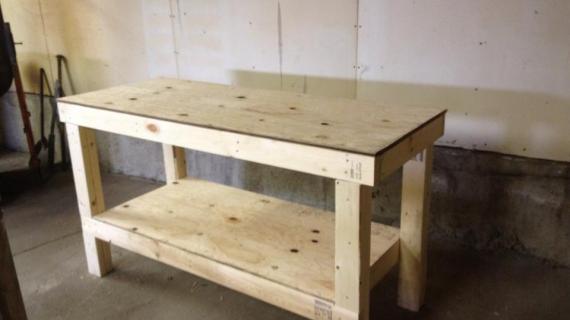
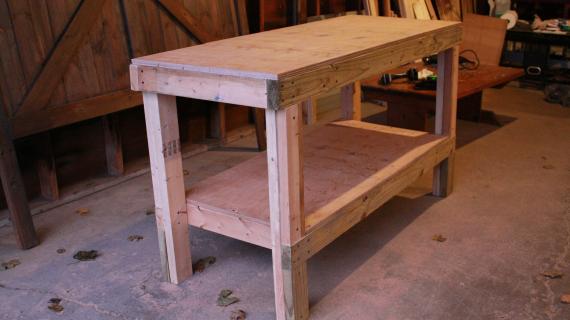
Assemble your legs
Step 2

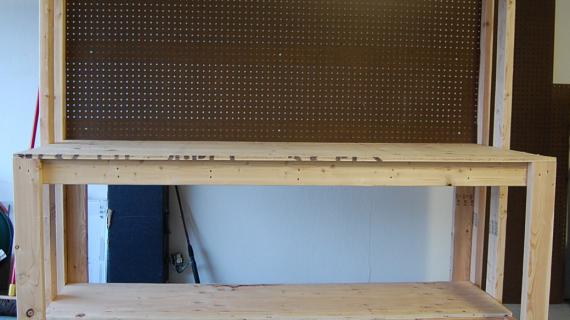
Assemble your shelf frame & cut the plywood to fit. Measure once, measure twice
Step 3
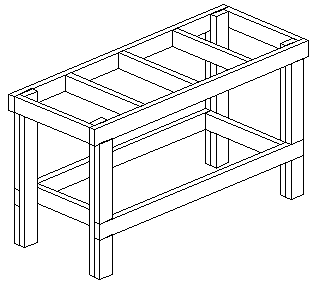
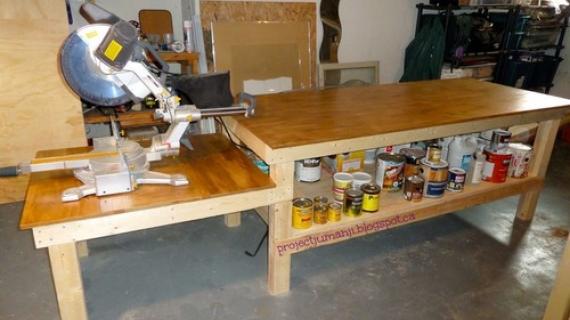
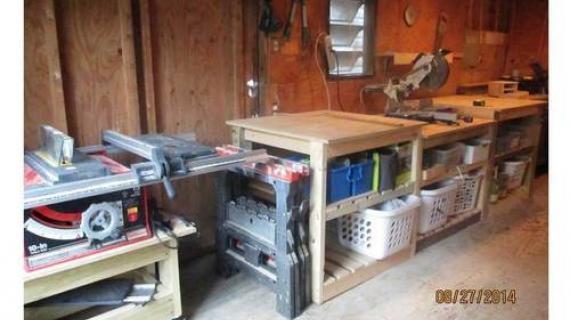
Before making your top frame for the workspace., clamp everything up & make sure it fits. Width, length, and vertical measurements are a good way of thinking. I actually spaced all under supports evenly, except, I made it to where one of the under, end 2x4's were closer to one side than the other. I have a lot of table-top tools & some of them are quite heavy. By doing this, not only do you get a little extra support underneath, but it gives you a nice stud to mount your table-top tools for permanent stay.
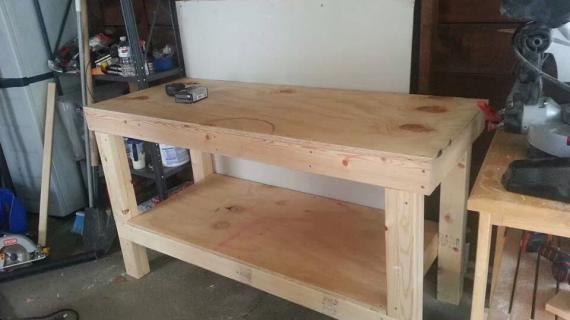
Step 4
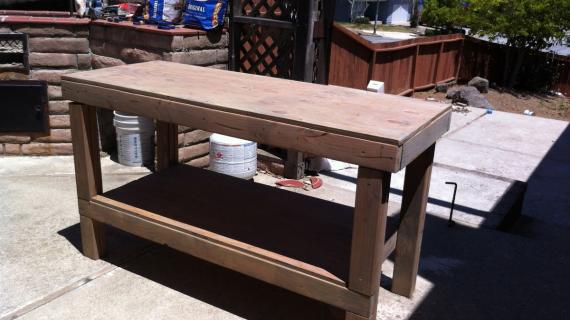
Assemble the top. I used 1 1/2" construction screws for the top plywood sheet. I countersunk the top screws because I didn't want to catch myself on them while working. You can then fill them with wood filler. I didn't, however, because it's a WORKBENCH :D
Step 5

It is always recommended to apply a test coat on a hidden area or scrap piece to ensure color evenness and adhesion. Use primer or wood conditioner as needed.

Comments
Guest (not verified)
Fri, 11/18/2011 - 10:51
Glad to see this!
Thanks for posting your plans. I've been wanting to build a work bench, but I haven't seen any plans I like until now. Also, great job on the plans; they're very clear and straight forward.
Guest (not verified)
Fri, 12/02/2011 - 09:24
Bench
http://www.flickr.com/photos/erikgomez/6255316898/in/photostream
I built this before I heard about your site on Core77. Looks similar!
claydowling
Fri, 12/02/2011 - 12:24
Workbench Plans
There are some very good plans available at finewoodworking.com and popularwoodworking.com. They're all designed to be easy to build and relatively inexpensive.
My favorite that I saw was what they called the Newfangled Workbench. Through clever use of pipe clamps they build nice vices into their workbench without paying hundreds of dollars.
That's not the bench I ultimately built, but it was pretty cool, and if I did more power tool work I probably would have built that one.
Blake Allan (not verified)
Sat, 12/10/2011 - 12:12
What I did
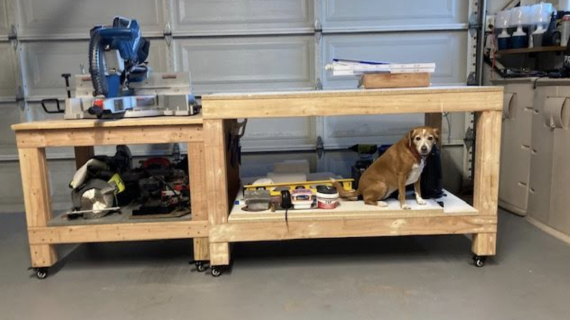
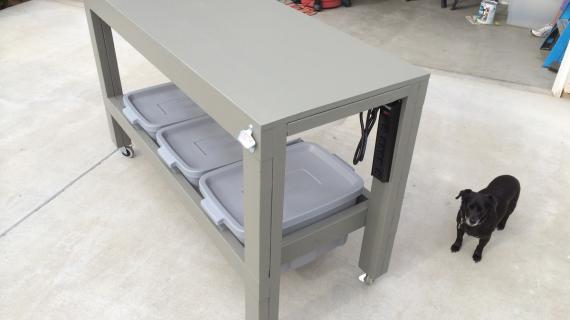
What I ended up doing with this bench was a bit of an add-on process. Add this on, take this off :P I was tired of running out of room by the time I had my vices on the bench, and had no room left for all my power tools. Now, what I have, is convenience :D Since this bench was made for convenience & not portability, it gets to be a hassle moving it from workshop to the home gym that I'm remodeling. Instead of building two (wife would kill me), I decided to make it a bit easier to move. We all want space for our mitre saws, our jig saws, our table saws, I could really go on forever. So the best work-around I found for this, was dog holes and bolts :D Set your mitre saw on the table, find out where works best, then pop a hole through the table. Do the same for your table saw, etc. Every benchtop tool I've ever seen has guide holes to mount to your bench. So, it's a bit of a hassle unscrewing that wing-nut from the bolt, but it's a hell of a lot better than having all your tools fixed to the top of the table, and no where to cut the wood. Most of my tools, while not in use, conveniently sit on the shelf below. This way, when I go to move the bench, I take the tools off of it, and it's a lot lighter :D
I also added a outfeed roller to the end of it out of pvc pipe & conduit. I'll post plans for that soon, because it's so much easier than telling the wife, "hey, hold that, ok now feed it to me, NO NO NO don't move it " hehe
Guest (not verified)
Tue, 01/10/2012 - 11:01
Plagiarism at its best
I can tell you where you found this plan. It came from the EAA Chapter 1000 website. http://www.eaa1000.av.org/technicl/worktabl/tablefig.htm. Originally published June 1992. Your drawings and cut list were taken right from the listed URL. The building instructions are there too if you would like to post them and take credit for that also. This is plagiarism at its best.
blakeallan
Thu, 01/19/2012 - 12:38
You Are A Troll
I hardly consider this plagiarism when I specifically state that these plans were NOT created by me. If you have trouble reading,
"I couldn't remember where I had originally stumbled across the plans, but I wrote the dimensions down at the time. I believe they are all accurately depicted to the plans I had originally found."
As you can see in my original post/plans/description, whatever you want to call it, I clearly stated this. I go through 100 plans (at least) the night before I decide I want to build something the following day. I then right click, save image as, and throw it into a folder. If I manage the time, and like what I see in the folder that day, I build it. Some things I make & create myself, but most are copies of something I liked that I saw online. Had, I have written down the site, I MOST DEFINITELY WOULD HAVE POSTED THE PLANS WORD FOR WORD...would have been MUCH easier than typing it out.
I'm not a carpenter by profession, much less someone who sells what they make. So you, by stating the obvious, are just someone who wants to get into an online argument that I am well above.
P.S. Guess what, I saw the outfeed roller on another plan for a sawhorse..guess that makes me a bad, bad guy for taking the initiative and building it myself & sharing with the others!
blakeallan
Thu, 01/19/2012 - 12:39
To the Troll
And, for the record, I was 5 in 1992. HAHA
Anna Rose
Thu, 04/12/2012 - 16:21
Oh hey, I found the original
Oh hey, I found the original plans:
http://www.eaa1000.av.org/technicl/worktabl/tablefig.htm
Thanks Bob Waldmiller, YOU ROCK!
And thanks "blakeallan" for the additional instructions and actual project photos. I know a lot of time and work went into this post.
If you had not found and updated these plans I would never have seen them.
Wow, that was easy! I just gave you info about the original post and I didn't have to be rude about it! :) Obviously you had no intention of "plagiarizing" Bob Waldmiller's (20 y/o) plans. I hope other posters don't discourage you from continuing to share great plans.
blakeallan
Thu, 04/12/2012 - 17:51
Hey
Hey, thanks for that! I cannot begin to tell you how aggravating it is to type up something like this with my schedule, and then have some arrogant poster throw in his two cents. I've found a few plans on here useful, so I thought I'd throw a few plans on here I deem useful as well. Some things I make myself, some things I take from other sites, photo galleries, etc. I could understand had I put "This is my plan, I created it, end of story", but I was quite frank in saying I couldn't remember where I had pulled this from. I changed a few things to "make it my own" or accommodate my needs better, but there's really only so many variations one can do of a wooden workbench. Truth be told, the original poster was probably not the first one to ever do it. Wood has been around for quite a few years haha :D
Right now, we're remodeling a unit from the ground up. I needed a place closer to my school as it's a busy year, so we rented out our condo & decided to rent a place within the same compound as the school. So we've got a 365 square space inside 4 walls. That's it. We tore the roof off, we're raising the ceilings to 17 ft, and extending the unit just a bit. Overall dimensions are 27ft x 13.5 ft. It was the biggest unit available here & I wasn't happy about it. So, I sat down for a week solid, learned CAD, and now I have a two story mezzanine being built. It should give us about 550-600 square feet of living space which is more than enough considering it's a sleeping zone for the most part. We've included an exposed shower, a brand home gym (we're talking every piece of equipment you could imagine), and an all glass window front going 17 ft high. I went for a very modern,industrial design & it's all out of metal. exposed i-beams, corrugated metal, the works.
Will post pics in about another 2 months haha :D
Cheers
lucywilson
Sat, 07/14/2012 - 14:31
cool bench
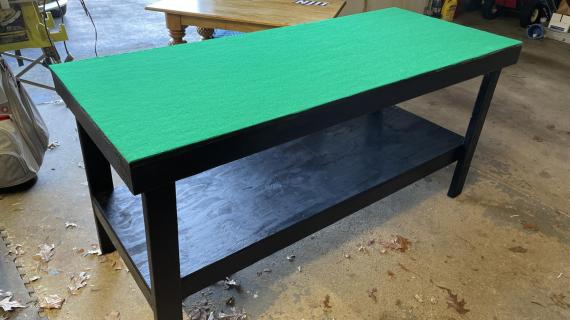
this is such a neat bench I am making it myself as my first project to be able to make custom furniture for my home :)
blakeallan
Sat, 07/14/2012 - 19:37
Good luck!
Hey, good luck wih that, and I cannot say that I envy you at the moment :-D. We're currently remodeling & decided to go the same route. Ohhhhhhh, I wish we hadn't haha. Maybe, had we not been on such a tight deadline, it would have been fun :-p.
All the best
Angie Overton (not verified)
Mon, 07/16/2012 - 22:37
Some wheels?
So I'm new to woodworking. I have made a couple do picture frames and a box. I have table top tools (miter saw, table saw, router table) and I've been wanting to build a workbench. I found some great plans and was convinced they were the ones I'd use. Well... Until I saw this tonight. I like this much better and I too wanted to have shelf underneath to store the tools. I have limited space so I do all my work outside. I need to be able to wheel my workbench in and out of the garage. It looks simple enough to just add wheels to bottom. I guess I would just need to subtract the height of the wheels from the bottom? I plan on getting the locking casters. Any input would be great.
Angie Overton (not verified)
Mon, 07/16/2012 - 22:40
Some wheels?
So I'm new to woodworking. I have made a couple do picture frames and a box. I have table top tools (miter saw, table saw, router table) and I've been wanting to build a workbench. I found some great plans and was convinced they were the ones I'd use. Well... Until I saw this tonight. I like this much better and I too wanted to have shelf underneath to store the tools. I have limited space so I do all my work outside. I need to be able to wheel my workbench in and out of the garage. It looks simple enough to just add wheels to bottom. I guess I would just need to subtract the height of the wheels from the bottom? I plan on getting the locking casters. Any input would be great.
Oh.... And I don't care where the plan came from:)
blakeallan
Mon, 07/16/2012 - 23:19
Wheels
Hey, you're on the right track. I've built a couple of these & I chopped about 3 inches off the bottom in the initial cutting. I used big stainless steel casters that nearly covered the bottom of the leg ( both 2x4s ).. I was lucky to find them, and I didn't want to put the caster just on one of the 2x4s. I doubt that putting a small caster centred on the bottom of the leg will hurt any, but not planning to build another anytime soon, I decided I'd take the high road & cover as much surface area on the bottom of the leg as I could for bracing. If your casters are smaller & you can't find the bigger ones where you live, you could always 1/2" to 1" plywood square on the bottom of the legs, and then drill you caster into that. At least you've have a brace if you can't come across the casters like I've found. And yes, I'd definitely recommend locking casters because the regular ones have wheels that only turn when you don't want them to haha.
blakeallan
Mon, 07/16/2012 - 23:20
Wheels
One last thing, you might want to see if you can find adjustable height wheels if yo has an uneven or rugged floor/garage.
danniels
Mon, 07/23/2012 - 03:12
You certainly have a way to
You certainly have a way to explain things to make everything look easy! I could use such a workbench for my welding supplies storage so starting next week I'll have it built. I really hope it will look just as good as this one!
ChrisLoved (not verified)
Fri, 08/24/2012 - 13:34
Outfeed Rollers
Hey there,
Great plans! Thanks for sharing them. I was wondering if you've had time to put together more info on the outfeed rollers you added later. I would love to know more about them. Thanks!
scotthammett
Thu, 11/05/2020 - 12:37
Thanks for the plan, Anna. …
Thanks for the plan, Anna. Simple and very sturdy. I tweaked the plan to yield a lip on the top that can be clamped to by reducing the 21" supports to 20".