
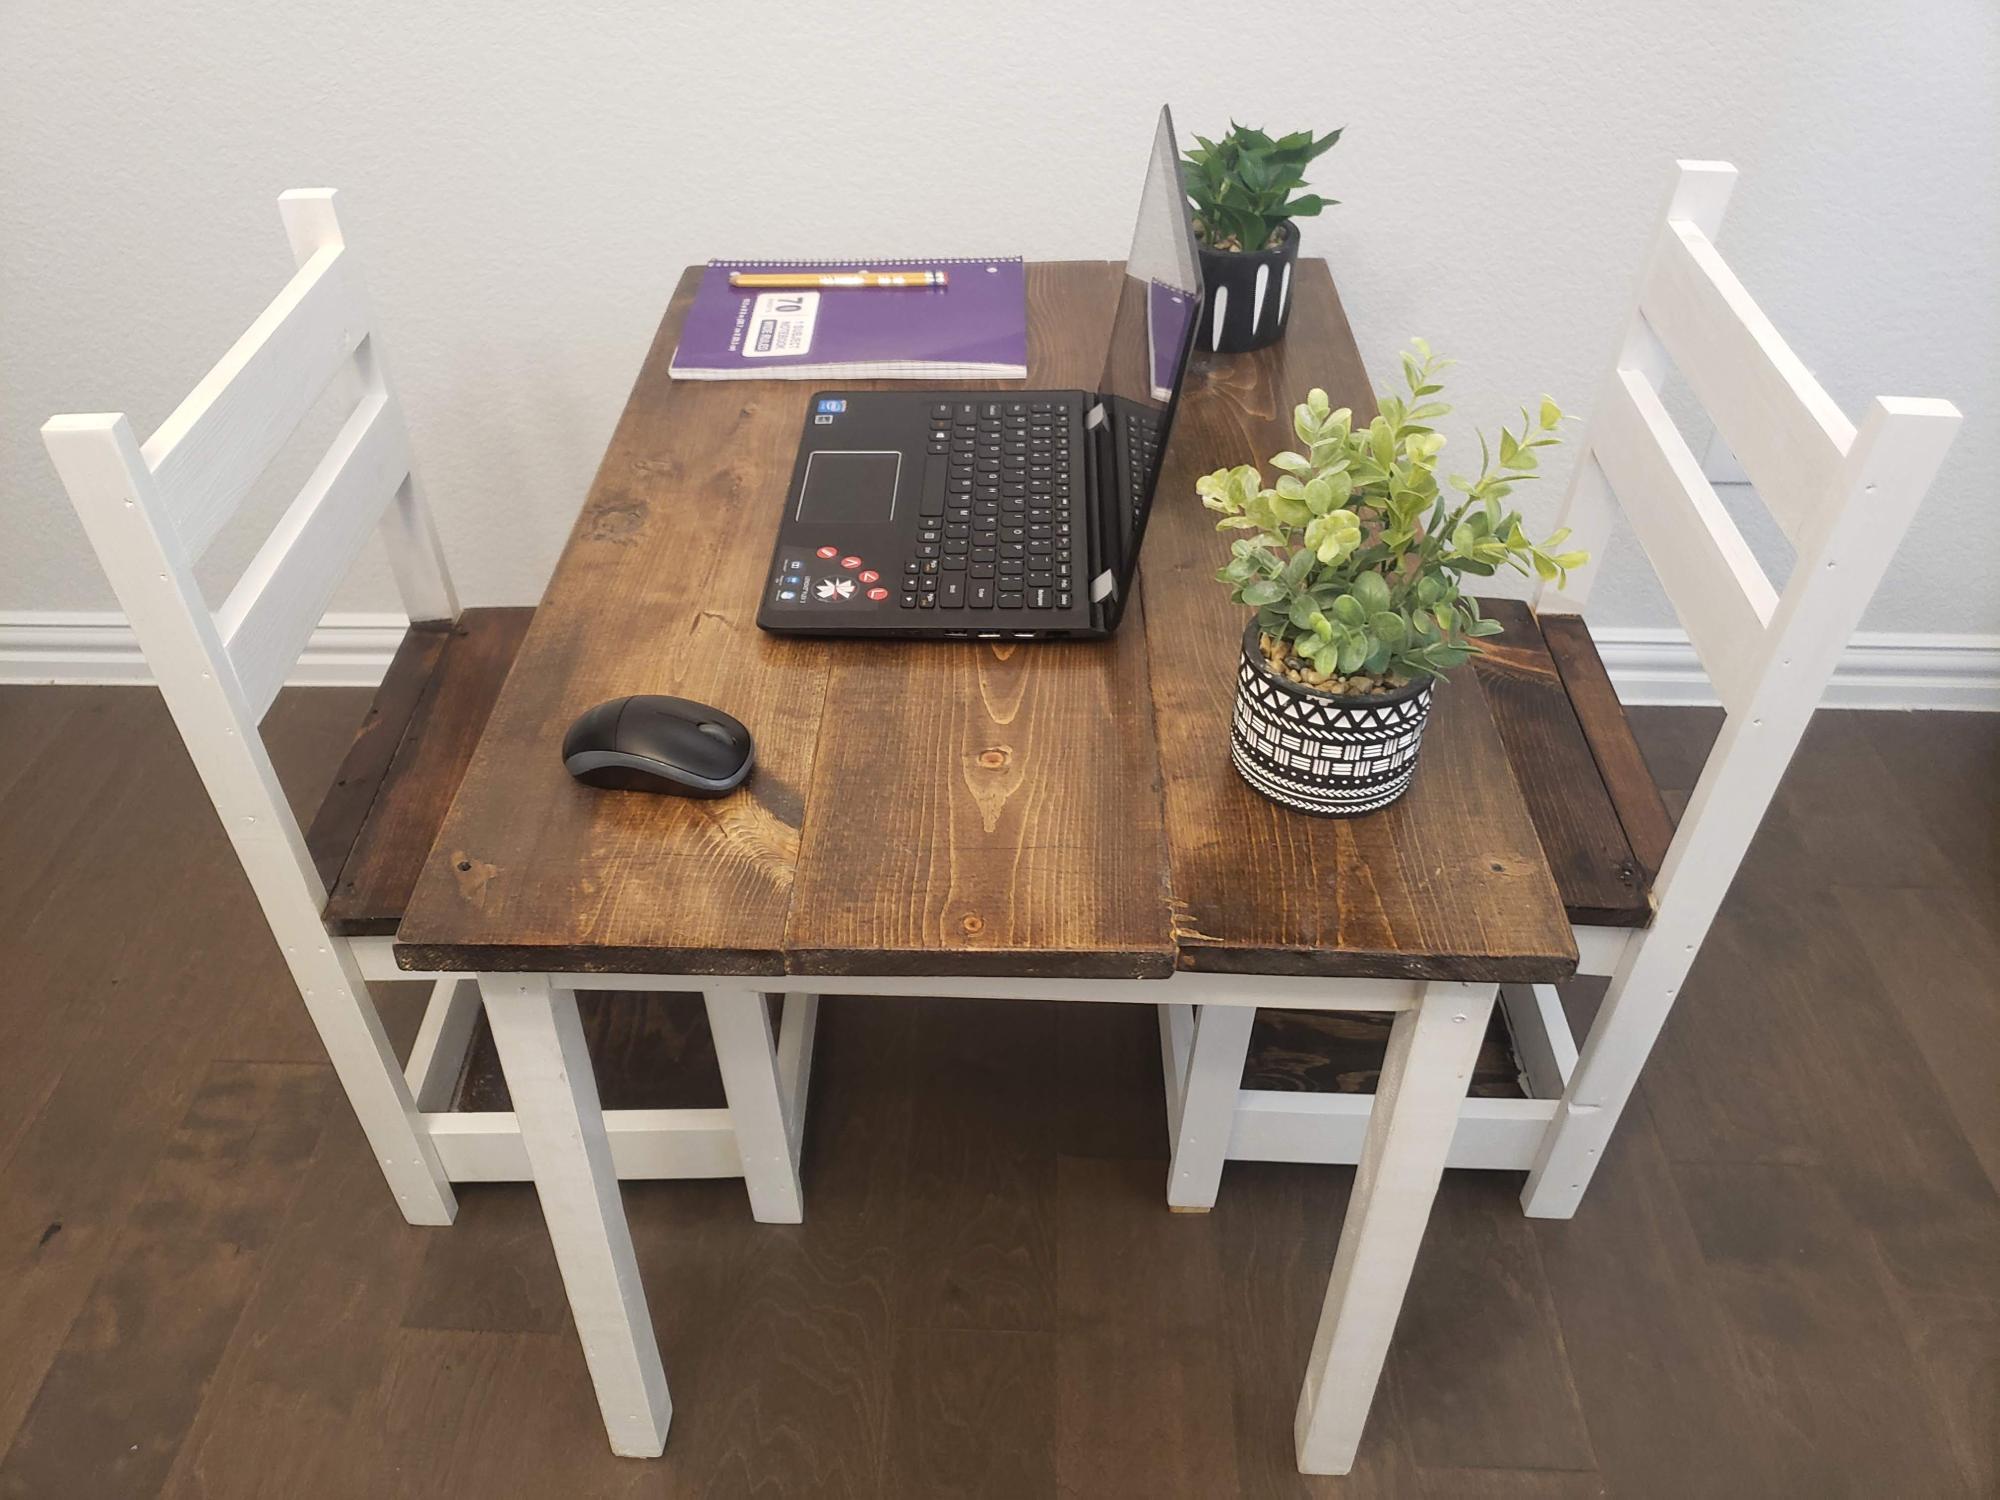

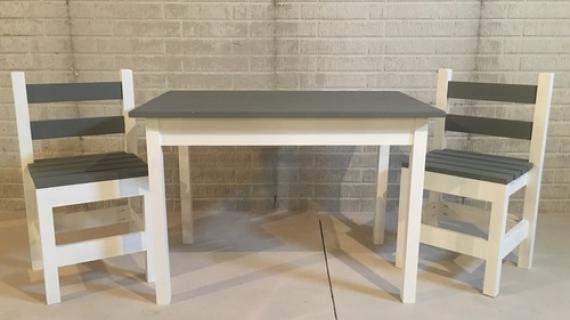
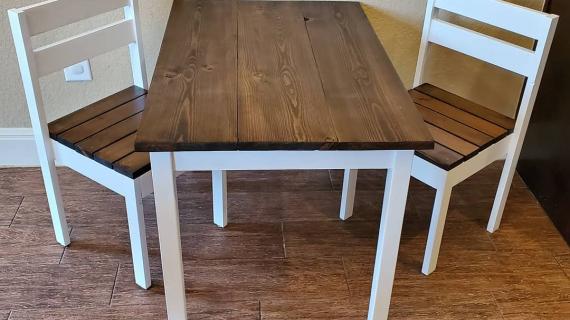
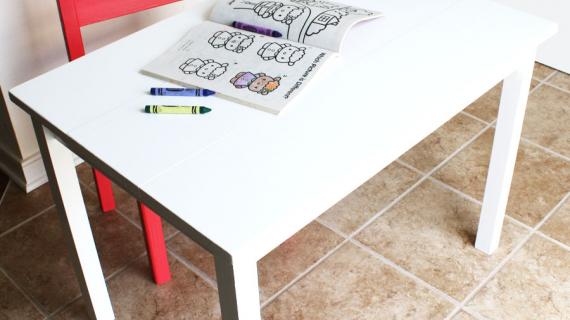
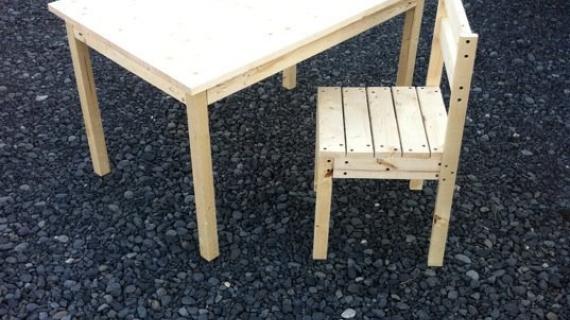
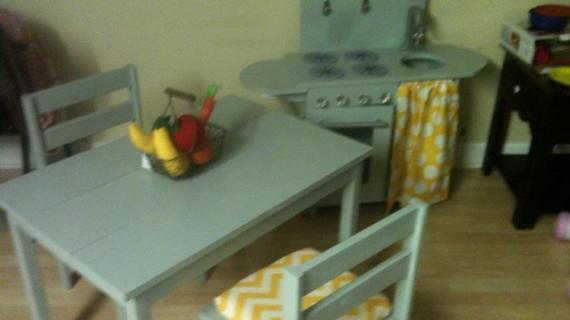
This simple children's play table is easy and economical to build, at the perfect height for toddlers and preschoolers. Use pine boards to build. Free step by step woodworking plans from Ana-White.com

Preparation
- 1 – 1×8, 8 feet long
- 1 – 2×2, 8 feet long
- 1 – 1×3, 8 feet long
- 1 1/4″ Pocket Hole Screws
- Wood Glue
- 3 – 1×8 @ 32″ (if your 1×8 is 96″ long, cut these boards at 31 7/8″ to account for the saw blade waste (kerf))
- 4 – 2×2 @ 21 1/4″ (legs)
- 2 – 1×3 @ 17 1/2″ (End Aprons)
- 2 – 1×3 @ 27″ (Side Aprons)


Instructions
Step 1
Cut your Boards and Drill Pocket Holes
Many of you do not have a Kreg Jig™. My sister, who took wood shop in highschool, has built quite a bit of furniture, and showed me how to use a circular saw the first time, has never seen a Kreg Jig™. After this project, she’s getting one. Also consider this. A similar table and chair set runs around $240. My cost for this table? Seventeen dollars. Spend the cost differential on a Kreg Jig™. Its worth it.
Cut your boards, according to the cut list. Measure the 1x8s and make sure they are in fact 7 1/2″ wide. Mine up here in Alaska are, but others say theirs are 7 1/4″ or 7 3/8″. If your 1x8s are narrower, take the difference, multiply it by three, and subtract that from the cut length of the 1×3 side aprons.
Next, drill all your pocket holes. I like to make Xs where all the pocket holes go as I cut.
Step 2
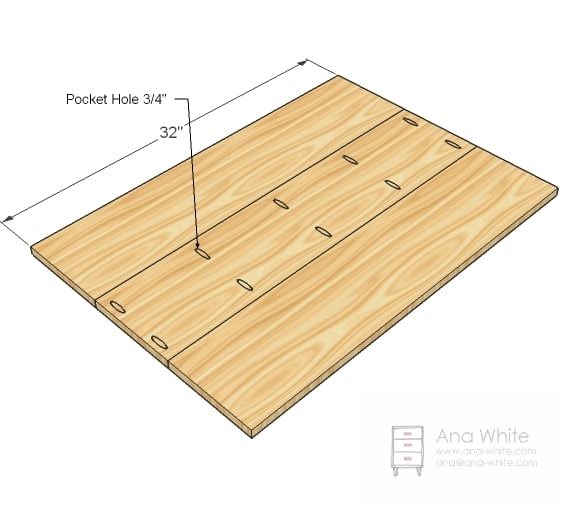
Build the Tabletop
There are other ways to build this tabletop without pocket holes, but in order to get a tabletop worthy of coloring and cheap, this was the answer. I love using solid wood in this application because you can always sand and refinish – and you just might have to. This table was left unfinished for about 3 hours. When I got the paint brush out, it was covered in very large awkwardly written Gs. A few minutes of sanding beats being upset any day.
Step 3

Base
Drill all your pocket holes first (see step 4) and then attach the legs to the aprons. I like to either inset my aprons slightly or to drill my pocket holes on the outsides to keep the legs from splitting. Adjust for square.
Step 4

Tabletop
Now is the fun part. Line the table top up with the base and screw together. The coolest thing about pocket holes is that it sucked up any differences in the tabletop. Sometimes when you join boards that are not perfectly square, your tabletop isn’t smooth. The pocket holes forced the tabletop square with the aprons.
Please excuse my typos. Today’s post was put together with the help of an 18 month old, a three year old, and a six year old. Keyboards must be fun if Mom spends so much time using one


Comments
Faith (not verified)
Mon, 11/08/2010 - 20:05
Perfect for our toddlers!
Perfect for our toddlers!
Can you suggest a "Starter" list of tools that could be used to make a lot of your furniture? I'm planning on making shelves, beds, a table (or two) and would ultimately like to make my dream entertainment/media center. The only thing stopping me is the lack of time (twin toddlers!) and TOOLS! I know it would be an awesome outlet for me! I'm definitely a hands-on, build-a-house kinda girl, but have no clue where to start when it comes to BUYING tools. (And I'm the handy one in the family! LOL) Any suggestions for "must-haves"?
Thank you so much! I can't wait to start building & creating a home I love, where everything inside reflects our love! :)
Guest (not verified)
Thu, 11/24/2011 - 22:15
Suggestion for tools to buy for building
The "Kreg Pocket Hole Jig" is a must-have. I've always used a nailgun, but when I tried this "Kreg Pocket Hole Jig" it makes builing furniture so EASY!! I've only seen them sold at Lowes or lowes.com and ranging from about $50 to 150 depending on which kit.
veronica (not verified)
Mon, 11/08/2010 - 20:26
I was just going to ask the
I was just going to ask the same question as Faith. I would love to start building, but as far as tools go I have nada! Would love suggestions on what one would need to get started.
Mahalo!! Love all your work.
Audre O. Taylor (not verified)
Mon, 11/08/2010 - 20:41
Anna this is adorable! Thank
Anna this is adorable! Thank you so much, you are awesome! Wow my list of stuff to build keeps growing...
Tara Morin (not verified)
Tue, 11/09/2010 - 02:17
Can you do a post on how to
Can you do a post on how to do pocket holes as well as what you need to make pocket holes??? I LOVE your stuff and website. We're getting ready to move provinces, so we're depleating lots of furniture. Once we get settled into a new home again, I can't wait to make all of my 'favourites'!! Until then, I will continue to enjoy your site! Thank yOU!
Tracie (not verified)
Tue, 11/09/2010 - 02:54
Love the table too!!
Love the table too!!
Tanja (not verified)
Tue, 11/09/2010 - 02:57
Faith.... take a look on this
Faith.... take a look on this web site at the top where Ana put a tab called "Get Started". Click on it & scroll, scroll, scroll (past the beginner plans) and you will see the whole list of all basic tools for beginners. :)
Valerie (not verified)
Tue, 11/09/2010 - 03:18
Just when I thought I knew
Just when I thought I knew exactly what I was getting my kids for Christmas! My girls would love this. I wonder if I can build it without them knowing? Hmmmm.
Thanks Ana, this one is going into the faves folder.
Stephanie (not verified)
Tue, 11/09/2010 - 04:14
Faith, go to Ana's homepage
Faith, go to Ana's homepage and click the the second pink tab "Getting Started". There you will find a list of tools to get you started.
leah S. (not verified)
Tue, 11/09/2010 - 04:36
Can you do this with a solid
Can you do this with a solid top? Maybe using a sheet of plywood or MDF??? IDK????...
Nan Tovar (not verified)
Tue, 11/09/2010 - 04:44
Great job, Ana! If only I
Great job, Ana! If only I had a bigger house, I would make *all* of the playthings for my daughter, and the rest of the furniture for my hubs and I :)
Sarah Moore (not verified)
Tue, 11/09/2010 - 05:10
Is it strange that every time
Is it strange that every time I see new plans I try to imagine where to put it? I LOVE EVERYTHING on this site! I just finished the farm house bed and the storage bed for 2 of my boys and I cant figure out what to make next!(p.s I have pictures to post but am waiting until my husband finishes his book shelf and other projects to post them all together! Were obssesed)
Jaime (not verified)
Tue, 11/09/2010 - 05:36
ANNA!!! What do I need to
ANNA!!!
What do I need to buy to make "pocket holes"?
I am new to this and this looks very fancy shmancy!
Rebecca (not verified)
Tue, 11/09/2010 - 07:15
Faith, If you look for the
Faith,
If you look for the tabs at the top of the page there is a GET STARTED tab next to the HOME button. Scroll down and you will find a list of tools you need to get started. Happy building!
Carol Ann Sandell (not verified)
Tue, 11/09/2010 - 07:22
Great Job! This would be
Great Job! This would be perfect in the corner of my family room. I would love some help editing this plan to accommodate a six year old (and hopefully last a few years of growing.) Can you help?
Lisa RoomByRoom (not verified)
Tue, 11/09/2010 - 08:08
http://ana-white.com/get-star
http://ana-white.com/get-started
Ana White (not verified)
Tue, 11/09/2010 - 08:32
Absolutely!
Absolutely!
Emily (not verified)
Tue, 11/09/2010 - 09:16
I was going to ask for the
I was going to ask for the same thing! I've done a couple of projects already (dollhouse and closet shelving) and they've turned out great! But have no idea what pocket holes are or how to do them and it's holding me back from a couple of projects I'd like to try, including this darling table and chairs!
Ana White (not verified)
Tue, 11/09/2010 - 10:16
Carol, what I would do is add
Carol, what I would do is add a few inches to the legs. But also, you will need to add a few inches to the chairs. My niece Hannah is 7 and she sits comfortably at this table too.
Lisa (not verified)
Tue, 11/09/2010 - 10:22
What is a pocket hole? I
What is a pocket hole? I have never heard that term before. Please explain. Thank you
rhilborn (not verified)
Tue, 11/09/2010 - 10:54
Ana, You posted plans for
Ana,
You posted plans for me a month or so ago in the Community for a PB inspired Carolina craft table. Now that I see these plans and the fact that the table top is lovely solid lumber and not plywood...I might make this with chairs instead and wait to make the craft table until we have more kids and are in a bigger space. Thanks so much for the crazy simple, crazy awesome plans. I just feel bad that you made up plans and I may not use them yet:(.
Ana White (not verified)
Tue, 11/09/2010 - 14:44
Don't stress it :) the plans
Don't stress it :) the plans are actually pretty much the same! And someone will find use for the larger table plans.
Bradi (not verified)
Sun, 10/28/2012 - 21:43
PB inspired Carolina table
I've searched all through the site to try and find a table that's slightly larger than the Clara table and found this post about the plans for a PB inspired Carolina table, but I can't find the actual plans! I'd love to see these plans or any plans for a simple table like this that is just slightly larger!
NicoleEM
Fri, 08/15/2014 - 22:02
http://ana-white.com/2010/09/
http://ana-white.com/2010/09/pb-kids-caroline-craft-table
Ana White (not verified)
Tue, 11/09/2010 - 19:31
Lisa, a pocket hole is simple
Lisa, a pocket hole is simple a hole drilled at an angle, so you can join two boards together edge to edge. I will be putting out a video to describe pocket holes in more detail soon. A pocket hole jig is simply a hand tool that positions your drill so that you can drill clean, straight pocket holes easily.
Niki (not verified)
Tue, 11/09/2010 - 20:28
If you're just getting
If you're just getting started Go with the mini Kreg Jig http://www.kregtool.com/Kreg-Jigreg-Mini-Prodview.html -- I got mine at Lowe's (aka Blue) for $20. Right next to the Kreg Jig were pocket hole screws, and a special driver bit that had a square tip for the kreg pocket hole screws.
I highly suggest the "Getting Started" tab up at the top. There is a list of tools, and great beginner projects.
Niki (not verified)
Tue, 11/09/2010 - 20:31
If you’re just getting
If you’re just getting started Go with the mini Kreg Jig http://www.kregtool.com/Kreg-Jigreg-Mini-Prodview.html — I got mine at Lowe’s (aka Blue) for $20. Right next to the Kreg Jig were pocket hole screws, and a special driver bit that had a square tip for the kreg pocket hole screws.
I highly suggest the “Getting Started” tab up at the top. There is a list of tools, and great beginner projects.
Niki (not verified)
Tue, 11/09/2010 - 20:34
Love this. I made a modified
Love this. I made a modified version of the storage table last week. Except in my modifications.... I botched it pretty good. So I set it aside in the garage until I could come up with a way to salvage it. This has given me the perfect solution, and I may end up with 2 tables because of it :) The chairs will be a perfect addition!
Jennifer Doherty (not verified)
Wed, 11/10/2010 - 06:00
If you want tips on how to
If you want tips on how to use a Pocket Hole jig, go to Kreg's website.
http://www.kregtool.com/Pocket-Hole-Jigs-Prodlist.html
They have an entire YouTube channel dedicated to using their jig.
http://www.youtube.com/user/KregToolCompany Also, when you buy a Kreg Jig, it comes with a Getting Started DVD guide. Their YouTube videos have been my favorite. :)
Jaime (not verified)
Wed, 11/10/2010 - 10:46
Thankyou! :)
Thankyou! :)
Emily (not verified)
Sat, 11/13/2010 - 15:30
Thank you, ladies!
Thank you, ladies!
Jeff Novak (not verified)
Mon, 11/15/2010 - 13:35
Hello, I like your
Hello,
I like your simple-to-build table but I also like the chair design. You said these chairs were stackable? Where did you get them? They look like they would be relatively simple to build. If you built them do you have the plans for that also?
Thanks,
Jeff
Ana White (not verified)
Mon, 11/15/2010 - 14:32
Jeff, the chairs are
Jeff, the chairs are stackable and super easy to build. Plans are here http://ana-white.com/2010/11/four-dollar-stackabe-childrens-chairs.html
Michelle (not verified)
Fri, 11/19/2010 - 04:48
I love the table but would
I love the table but would love to make it verstile with lego boards on one side and flat on the other. Any suggestions?
Amy R (not verified)
Mon, 11/22/2010 - 14:06
I'd like to know how to make
I'd like to know how to make the table without pocket holes. A friend of mine wants me to make the table and chairs for her daughter for Christmas, because we are in S. Korea, and have a hard time getting anything shipped over here in less than a month (especially something big like a table and chair set). I do not have a pocket jig, and probably won't be able to order one until the 1st at least, which would leave me barely any time to get the table made by the time I got it in. Any help would be appreciated. :)
Jeff (not verified)
Mon, 11/22/2010 - 15:04
Ana, thanks so much for the
Ana, thanks so much for the link to the stackable chairs. Now I'm ready to build a set for my grandgson (only they won't be pink!:)). By the way, I've made a couple of different projects using the Kreg jig for pocket holes....and it's super easy and rock solid. I will be using the Kreg jig on this project as well.
kate @ www.bro… (not verified)
Sun, 11/28/2010 - 09:49
I was thinking the same so I
I was thinking the same so I could paint the table top with chalkboard paint. My question is if I just use plywood or mdf for the top can I get away with just countersinking for the rest of the project instead of using a kreg jig which I do not have? I'm just starting out with these projects and need to pace myself in buying tools.
Larry (woody) (not verified)
Tue, 11/30/2010 - 17:25
My daughter has just sent
My daughter has just sent this link to me and appears that I might be building some furniture for my one year old GRANDdaughter. It appears that you might have used Google Sketch Up to create the drawings.
If so, could you share the files for the table and the chairs. Thanks, Larry
Lynne1 (not verified)
Mon, 12/13/2010 - 07:36
I am so impressed with this
I am so impressed with this project Ana, you rock. I love that you offer so many suggestions for low cost projects, and also, have suggestions for recycling palettes. I have an eco blog, and I just posted an article about what you do, and why I think it's so great for an Eco DIY-er. You can find it at www.greenertoday.blog.ca Keep up the good work.
Ellen Farrow (not verified)
Wed, 12/15/2010 - 06:50
I built this table last
I built this table last night, and my kids already love it- even without the sanding and painting! The hardest parts were creating the inset for the apron pieces (optional,I know, but I like to make everything harder!) and centering the legs/apron on the table top- because that actually required calculation, marking, and the screaming child upstairs (being watched by daddy) made those things almost impossible ;). The ingredients listed glue, but there was none mentionned in the instructions? I put some where I thought it would help...Now I have to make the chairs! Thanks for the plans, Ana!
Paige (not verified)
Thu, 12/30/2010 - 21:20
Ana, I love this table, but I
Ana, I love this table, but I need something a little larger for about 6 kids aged 8 and under. I noticed that someone posted earlier that there was one. Where would I find it? Could I make it with a solid prefabbed table top? Thanks Ana!
NicoleEM
Fri, 08/15/2014 - 21:59
http://ana-white.com/2010/09/
http://ana-white.com/2010/09/pb-kids-caroline-craft-table
Paige (not verified)
Thu, 12/30/2010 - 22:03
I tried printing as a pdf &
I tried printing as a pdf & there was something wrong with the pdf. 1/2 the pictures were over to the right & cut off the edge. I tried shrinking it down & it didn't work. I also tried changing the orientation of the page & that didn't work. Is it just my pdf reader that is off or is anyone else having that problem?
Julie (not verified)
Mon, 02/28/2011 - 21:51
I just finished building this
I just finished building this table and just need to tweak my finish. I Love your site!!!! This is my 4th project in five days. I'm going to build the (kids) kitchen set soon but wanted to practice on some less expensive pieces first. I have 4 kids and am always looking for affordable options. Thanks for all you are doing!
On a side note: My brother had a Kreg Jig sitting in his garage not being used that he graciously let me borrow. I see now it is totally worth the money and once he needs his back I will be buying my own for sure!
https://lh3.googleusercontent.com/-fClnjkUYy10/TWygHWNxVQI/AAAAAAAAA_M/…Jeff Akins (not verified)
Mon, 03/07/2011 - 15:22
Ana, I tried my new Kreg
Ana,
I tried my new Kreg Jr. on some scrap wood today and definitely like it (I wish I had it when I built a custom toybox a while back). But I'm not sure how I'm going to put the vertical pocket hole (for attaching apron to tabletop) next to the leg when I already have 2 horizontal holes going into the leg and have a reasonable amount of wood left. Any advice?
-Jeff
Paul H. (not verified)
Mon, 11/14/2011 - 11:32
Making this for 18" Dolls
I am making this doll sized for some 18" AG dolls. The over all dimensions are going to be 12 3/4" H X 18" W X 16 1/2" D.
I plan on using a 1 x 6 for the top instead of a 1 x 8. Hopefully, my math is correct...
Cut List:
3 - 1 x 6 @ 18" (Top)
4 - 2 x 2 @ 12" (Legs)
2 - 1 x 3 @ 12 1/2" (End Apron)
2 - 1 x 3 @ 13" (Side Aprons)
I will be converting the $4 stackable chair plans as well...
tannisg
Mon, 11/14/2011 - 18:25
great idea!
the AG dolls are so nice, but I haven't found the furniture to be all that great, and its soooo expensive!
be sure to post pictures!
Paul H. (not verified)
Tue, 11/15/2011 - 06:20
The expense is why we are
The expense is why we are building a bunch of furniture: Two bunk beds (finished assembling them last night) plus the table and chairs. We are probably saving a couple hundred bucks by building them. Once they are done, I will try to post some pics.
I might build a Living Room set as well but I have to make the plans for those on my own. Ana's plans are so easy to work with...
pjhaan
Wed, 11/16/2011 - 06:49
Doll sized plan updates...
I built this last night but changed the size on the fly. As It turns out, a 12 3/4" table would be up to the dolls chin. I found the original dimensions on a CraigsList item stating they had used Ana's plans. I knocked it the height down to 10 3/4". It is a little taller than it should be but it allows the doll to fit under the table/apron while sitting in an appropriately sized chair (5" seat).
I also changed the length from 18" to 15 1/2" so the cuts could be made from a 4ft board.
3 - 1 x 6 @ 15 1/2" (Top) (1 @ 4ft)
4 - 2 x 2 @ 10" (Legs) (1 @ 4ft)
2 - 1 x 3 @ 10 1/2" (End Apron) (1 @ 4ft)
2 - 1 x 3 @ 9" (Side Aprons)
The apron is 1 1/2 inches.
Up next, a four pack of doll sized $4 stackable chairs. I am still working out the new dimensions for the plan since I got the dimensions for the chairs from the same Craigslist item...
I will try to post this on the brag board once it is painted...
pjhaan
Mon, 12/26/2011 - 09:23
Just posted pictures to the Brag board
I have posted pictures to the brag board so you can see the finished product. I think they turned out great.