Book or Magazine Ladder Shelf

Difficulty
Starter Projects
| Print this plan

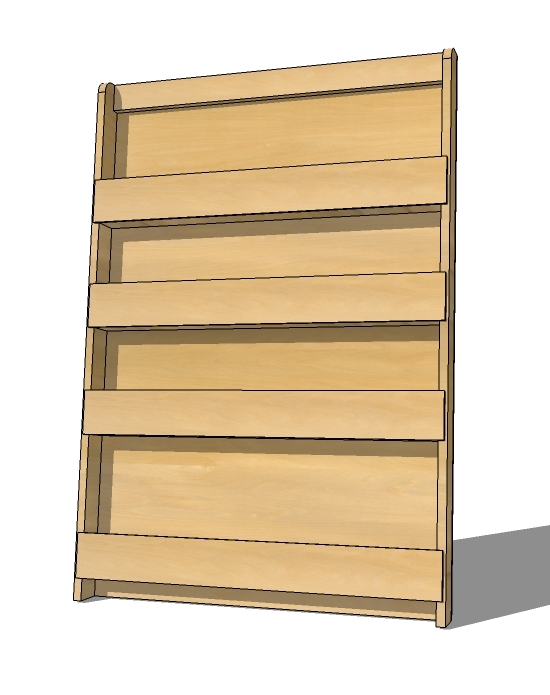
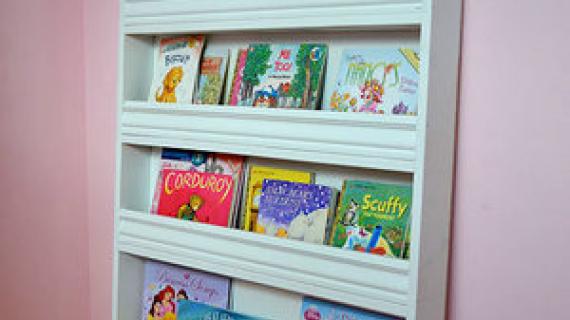
Build your own forward facing bookshelf or magazine rack! These easy to follow plans include everything you need to DIY your own bookshelf designed to help kids put their own books away!

Have you already heard?

Katie and Sherry asked me and Erin to join them for the Pinterest Fall Edition!  
OF COURSE I said yes!!!  What girl wouldn't take the challenge to make something from a Pinterest pin?
Now the big question is ...
Are YOU on board?
It's pretty simple, all those Pinterest pins on your to-do list?  Just commit to making one of them, and share with us next Wednesday.  You can get the full details over at Bower Power or at Young House Love.  
So what to take on for my Pinterest Challenge Project?
With Christmas (and Grace's Birthday) right around the corner and my daughter learning to read, a bookcase that allows books to face forward is high on my priority list.  But I also want something incredibly easy and cheap to build, and takes up just about no space.  
Sooooo ... here's my plan, a forward facing bookshelf so she can put her own books away, filled with her favorite books!  
Now for the Pinspiration ....

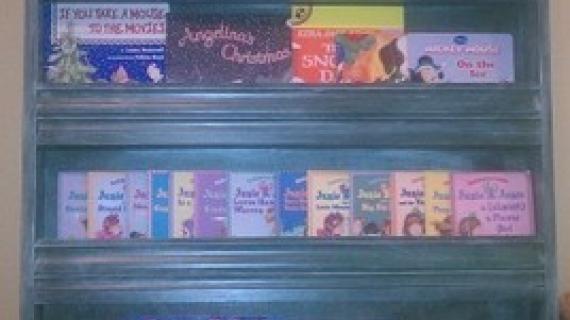
Source: kidsrooms.co.uk via Ana on Pinterest


Perfect!

So today I will post the plan, and next Wednesday, I'll debut my finished project!  
You can join me in building this Pocket Bookshelf - plans follow - or take on your own Pinterest Challenge Project.  Either way, it's going to be FUN!!!

I'm off to build - will be adding an intersting spin to my project! Looking forward to seeing yours! Best luck building - Ana

Dimensions
Dimensions are shown above.

Preparation

Shopping List

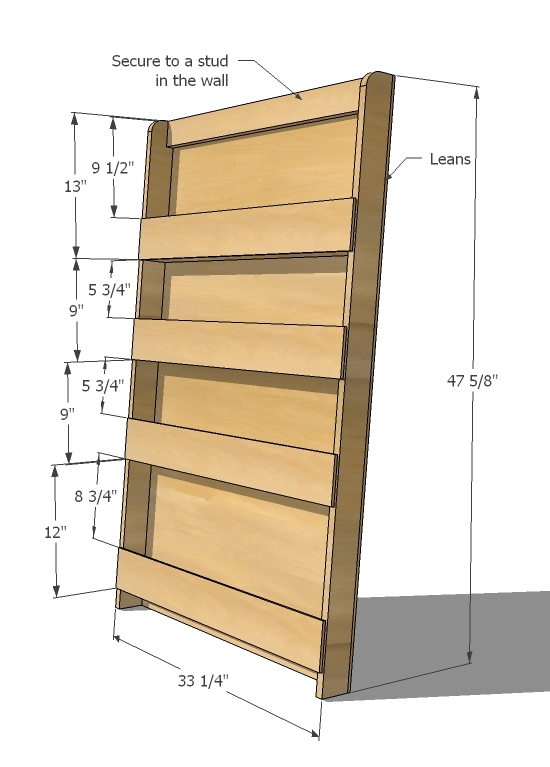
1 - 1/4" Plywood or Hardboard full sheet (8 feet x 4 feet)
3 - 1x3 boards, 8 feet long (you can use 1x4s for deeper shelves)
Either pocket holes or 2" screws

Common Materials
2 inch screws
3/4 inch finish nails
1 1/4 inch finish nails
120 grit sandpaper
Cut List

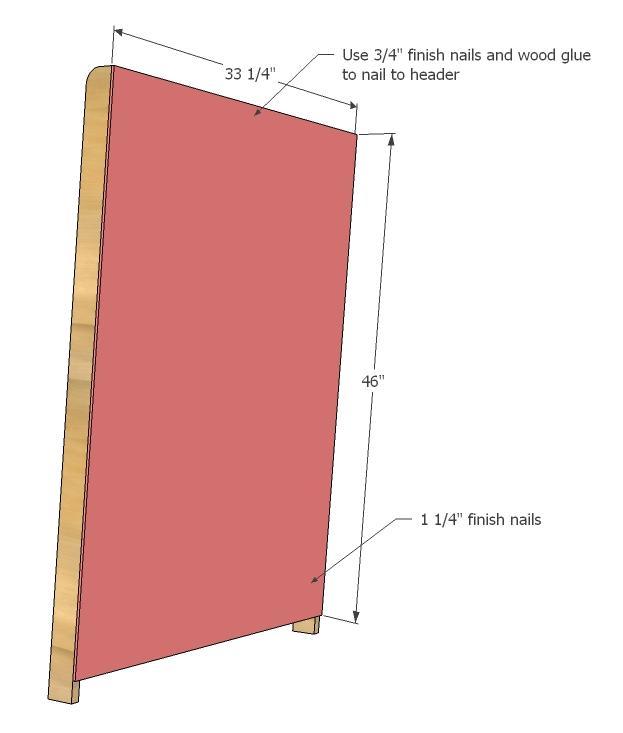
2 - 1x3 @ 47 3/4" (Short point to short point, one end cut at 10 degrees off square)
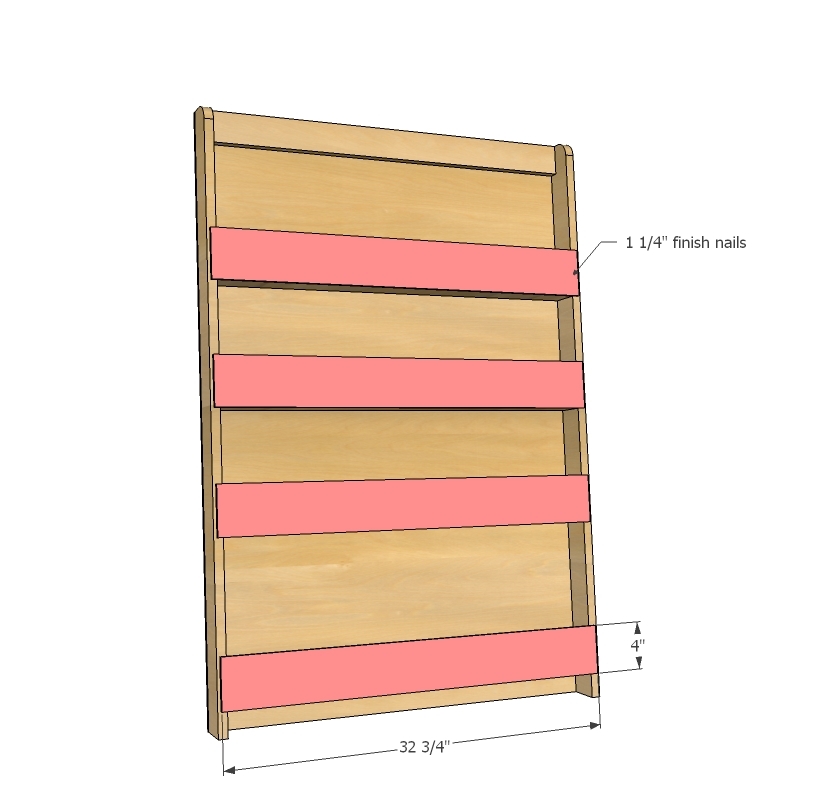
5 - 1x3 @ 31 3/4" (Shelves)
1 - 1/4" plywood @ 46" x 33 1/4"
4 - 1/4" plywood @ 4" x 33" (if you are staining, cut the strips with the grain)

Tools
Tape Measure
Speed Square
Pencil
Safety Glasses
Hearing Protection
Kreg Jig
Drill
Jigsaw
Brad Nailer
Power Sander
Drill Bit Set
General Instructions

Please read through the entire plan and all comments before beginning this project. It is also advisable to review the Getting Started Section. Take all necessary precautions to build safely and smartly. Work on a clean level surface, free of imperfections or debris. Always use straight boards. Check for square after each step. Always predrill holes before attaching with screws. Use glue with finish nails for a stronger hold. Wipe excess glue off bare wood for stained projects, as dried glue will not take stain. Be safe, have fun, and ask for help if you need it. Good luck!

Instructions

Step 1

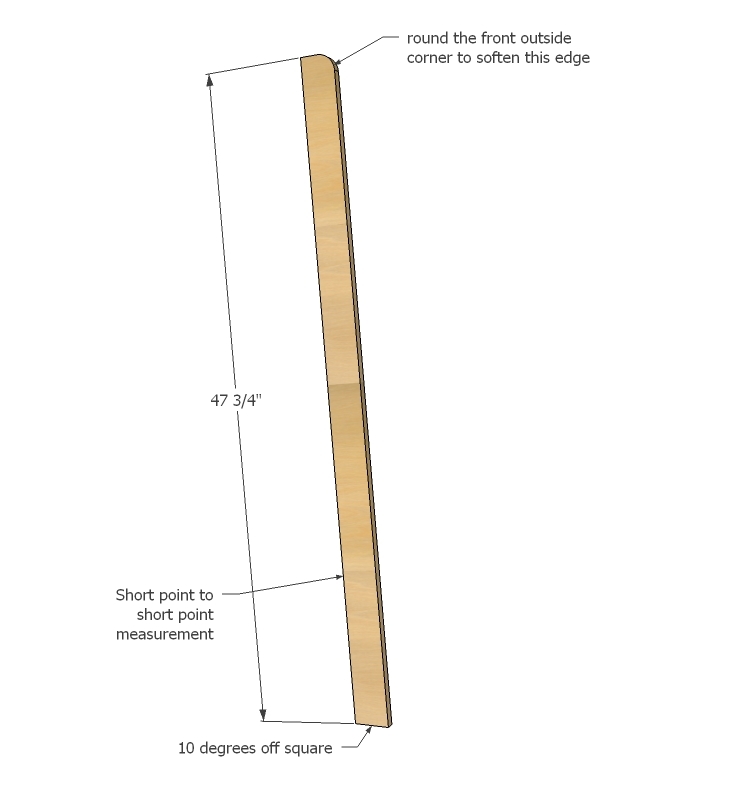
Cut your 1x3 sides as shown above. NOTE: I ended up cutting the bottoms at a 5 degree angle - felt the 10 degree was just a little too much.

Step 2

Mark location of all shelves and predrill holes. You can either use the Kreg Jig or countersunk screws from the outsides.

Step 3

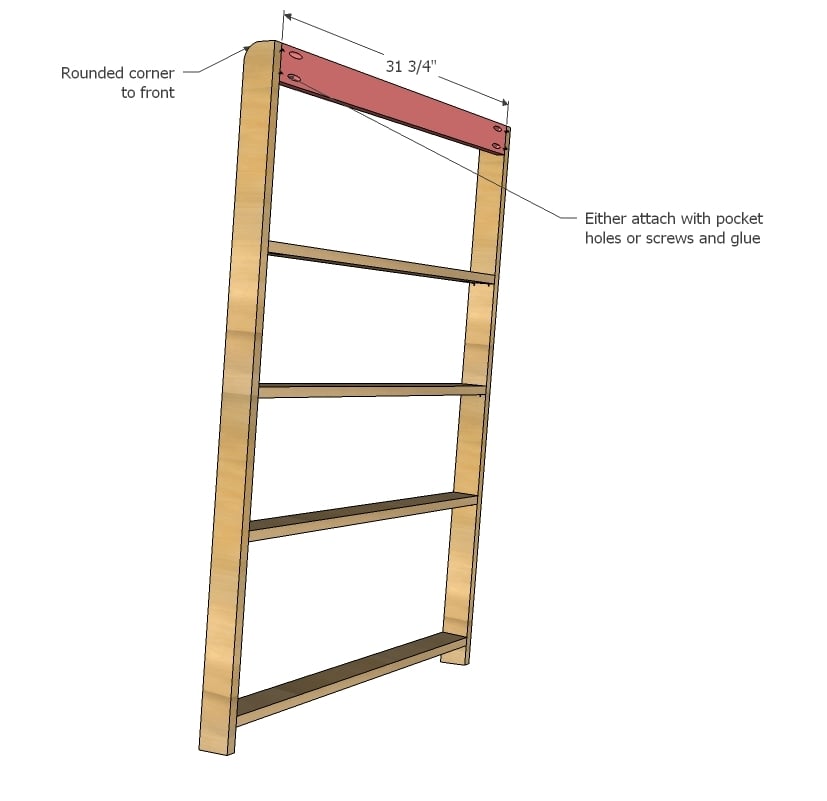
The back is attached flush on top as shown above.

Step 4

Then just apply glue to back edges and nail plywood on.

Step 5

Step 6

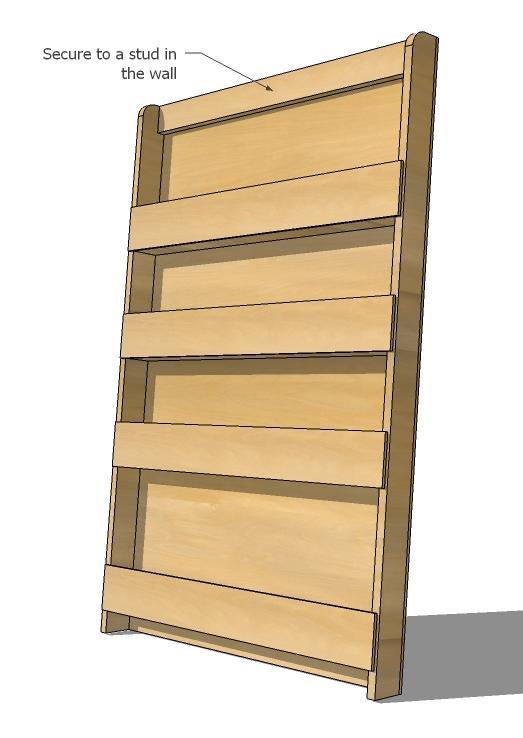
Make sure you secure the bookshelf through a predrilled hole to a stud in the wall to keep the bookshelf from falling forward.

Finishing Instructions
Preparation Instructions
Fill all holes with wood filler and let dry. Apply additional coats of wood filler as needed. When wood filler is completely dry, sand the project in the direction of the wood grain with 120 grit sandpaper. Vacuum sanded project to remove sanding residue. Remove all sanding residue on work surfaces as well. Wipe project clean with damp cloth. 

It is always recommended to apply a test coat on a hidden area or scrap piece to ensure color evenness and adhesion. Use primer or wood conditioner as needed.

Comments

Jean (not verified)

Wed, 03/07/2012 - 04:19

Can you explain how you secure this shelf to the wall? I am wondering if one screw is enough and also, where do you drill the hole in the shelf to put the screw? Because it leans, the top piece will not be flush with the wall.
I am considering using a cleat to secure it to the wall, but I am not sure how I would do that either.
Thanks,
Jean

Frequently Asked Questions

Wood Questions

What kind of wood should I use?
Most of our plans use standard construction lumber like pine or fir. It's affordable, easy to work with, and easy to find. It's also rapidly renewing and biodegradable, so a great eco friendly choice!

Can I use hardwoods instead?
Yes—just keep in mind they're heavier, cost more, and can be tougher on tools and harder to join together and finish. I recommend not tackling a hardwood project until after you have built several softwood projects.

What if my boards are warped?
Choose the straightest boards at the store. You can often work around slight warps by cutting them into shorter pieces.

What wood should I use for outdoor furniture?
Use red-toned or pressure-treated 2x lumber for framing, and cedar or cedar fence pickets for the decking. Outdoor furniture should be built like a deck—your local home center can help recommend the right wood for your climate.

Will my wood move or warp after I build?
Potentially, especially in humid climates. Let your wood acclimate indoors before building. Once acclimated and kept in a stable environment, movement should be minimal. Remember, most houses are built using framing lumber - it's all about keeping moisture down indoors.

Cutting Questions

Do I need a miter saw?
A miter saw is great, creating fast, safe, and precise cuts, even for beginners. But most plans can be built with a circular saw and a straight edge. If using a circular saw to cut, take time to practice, and get good at making cuts, before cutting your project boards.

How do I get clean cuts with a circular saw?
Clamp your board, measure twice, cut slow, and use a sharp blade. This takes practice, so spend some time making cuts. I go through becoming proficient at freehand cutting in my course, it is worth taking if you want to master this skill.

Will the store cut my wood?
Yes—most stores will do rough cuts to help you transport your materials home. But from store to store, the quality of cuts could greatly vary.

Joinery Questions

What screws should I use?
We recommend star-head self tapping screws for framing, most common sizes are 2-1/2", 1-3/4". Pre-drill if close to the edge or you find your wood is splitting.

Do I have to use pocket holes?
Pocket holes are the cheapest, easiest and fastest way to do some joints - like edge to edge or a hidden fastener joint. There are other methods, but these can be time consuming and expensive. We recommend using pocket holes as indicated in plans for best results.

How do I keep things square?
Use a speed square and measure diagonals after each step. Always clamp joints before screwing to keep them tight and flush.

Finishing Questions

Stain or paint before or after building?
A quick sand before and a full finish after gives the best results. Pre-finish if you're doing two-tone or detailed finishes.

What type of finish?
Use oil-based or water-based stain. For paint, cabinet-grade latex or enamel works great. High use surfaces on indoor projects should get a coat of polyurethane, I recommend a Helsman or Spar or other flexible poly that won't crack or peel with wood movement. For exterior projects, use a finish suitable for exterior fences.

How to get a smooth finish?
Start with a well sanded project. Sand between coats (220 grit), wipe clean, and apply light coats with a foam brush or roller.

Plan Questions

Can I change the size?
Many people do, and that's the great thing about building your own furniture! But do keep in mind going bigger might mean more supports are required, and often plans are optimized for minimal material waste.

Are these beginner-friendly?
Yes—plans are written with simple tools and clear steps in mind, with every effort to make plans as simple as possible.

Can I sell what I build?
Absolutely! Just don’t resell or repost the plans themselves.

General Questions

What tools do I really need?
A drill, circular saw, tape measure, square, and a few clamps will get you through most projects.

Do I need a workshop?
Nope! A driveway or small patio is plenty to get started, just make sure you have a level place to work. If you find you are building several projects a year, creating a small workbench is a great way to store tools and have a dedicated workspace.

What if I mess up?
Wood filler, sanding, or flipping boards goes a long way. Mistakes are part of the process!

What can I do to make my projects look more professional?
Start with straight boards, make accurate cuts, clamp all joints, and line up everything neatly. Sand thoroughly, use a neutral finish, and apply it in light coats for a clean look.

I've never built anything before. Where should I start?
Start with a few smaller softwood projects to get hands-on experience. Or if you're tackling a big project, buy a little extra lumber and practice your cuts and joints first. If possible, work with someone who has a bit of experience.

Care & Maintenance

How long will my furniture last?
With good joinery and regular care, your DIY furniture can last for decades. I have pieces in my own home that are over 20 years old and still going strong! One of the best parts about DIY furniture is that it’s easy to repaint, refinish, or repair—so your projects can grow and adapt with you.

How should I care for outdoor furniture?
Lightly pressure wash or hose it down once or twice a year. Tighten screws and reapply finish as needed to protect it—just like a deck or fence. A little upkeep goes a long way in extending the life of your furniture.

How about indoor furniture?
Regularly dust or wipe with a damp cloth. If it starts to look worn, a light sanding and touch-up paint or stain can refresh it in no time. DIY pieces are meant to be durable and fixable—so don’t be afraid to give them some love now and then.

Want to Build with Confidence?

Check out my ebook: 12 Skills to Build Your Own Furniture
It walks you through the core skills every builder needs—measuring, cutting, joinery, and finishing—so you can build beautiful furniture that lasts.

Still Have Questions?

Email us anytime at [email protected] and we’ll be happy to help!