
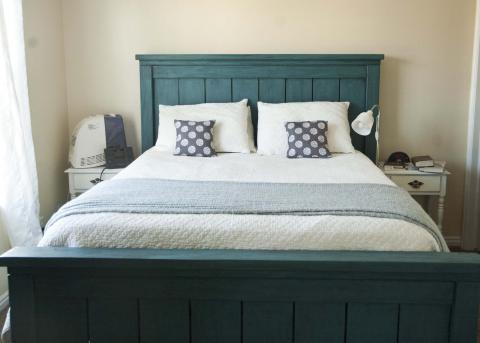

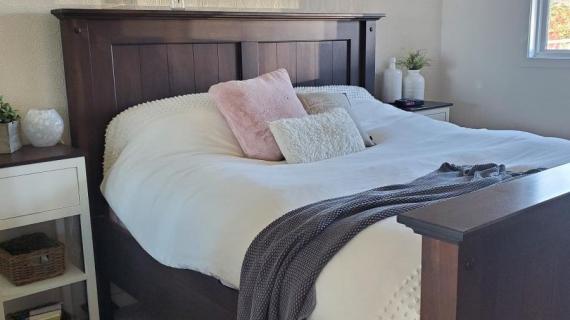
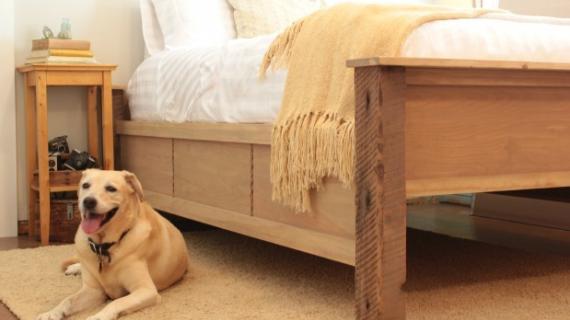
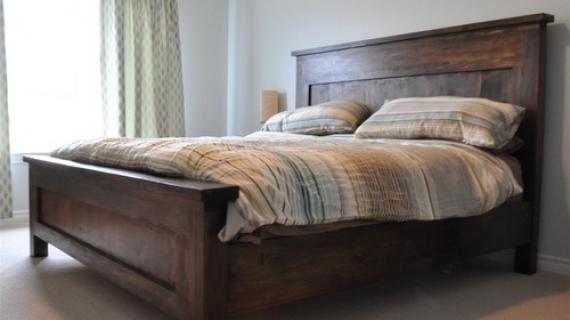
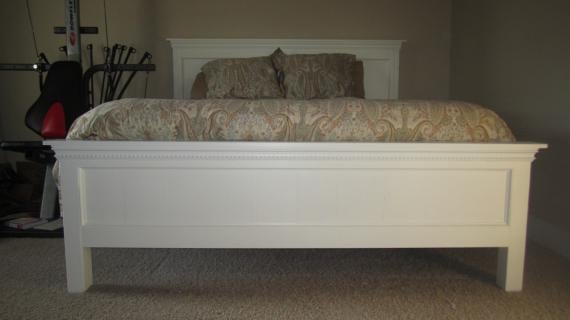
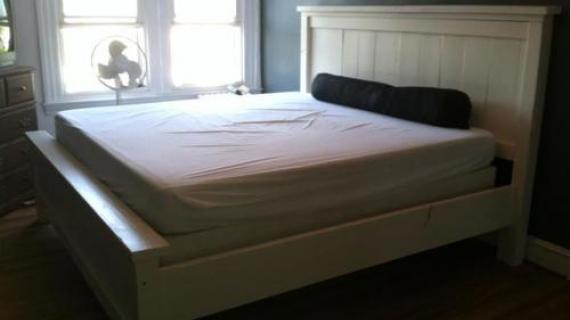
The blog favorite Farmhouse Bed, now in California King! This bed plan is a must read, as the construction is a tad different to accommodate no 4x4 posts and an easier method of joining the siderails with the headboard. Special thanks to JME Blog for their marvelous photos!


Preparation
9 – 1×8 boards, 8′ Long
1 – 1×3 board, 8′ Long
2 – 2×6 board, 8′ Long or Stud Length (doesn’t matter)
13 – 2×4 boards, 8′ Long or Stud Length (doesn’t matter, you may need more or less depending on if you have a box spring or not)
3″ self tapping wood screws
2 1/2″ self tapping wood screws
2″ self tapping wood screws
1 1/4″ nails for a brad nailer
Headboard
- 4 – 1×4 @ 72 1/2″ (Panel Trim)
- 2 – 1×3 @ 30″ (Ends of the Panel)
- 9 – 1×8 @ 30″ (Main boards in the Panel)
- 2 – 2×4 @ 34 1/2″ (Inner Leg for Headboard)
- 2 – 2×4 @ 54″ (Outer Leg for Headboard)
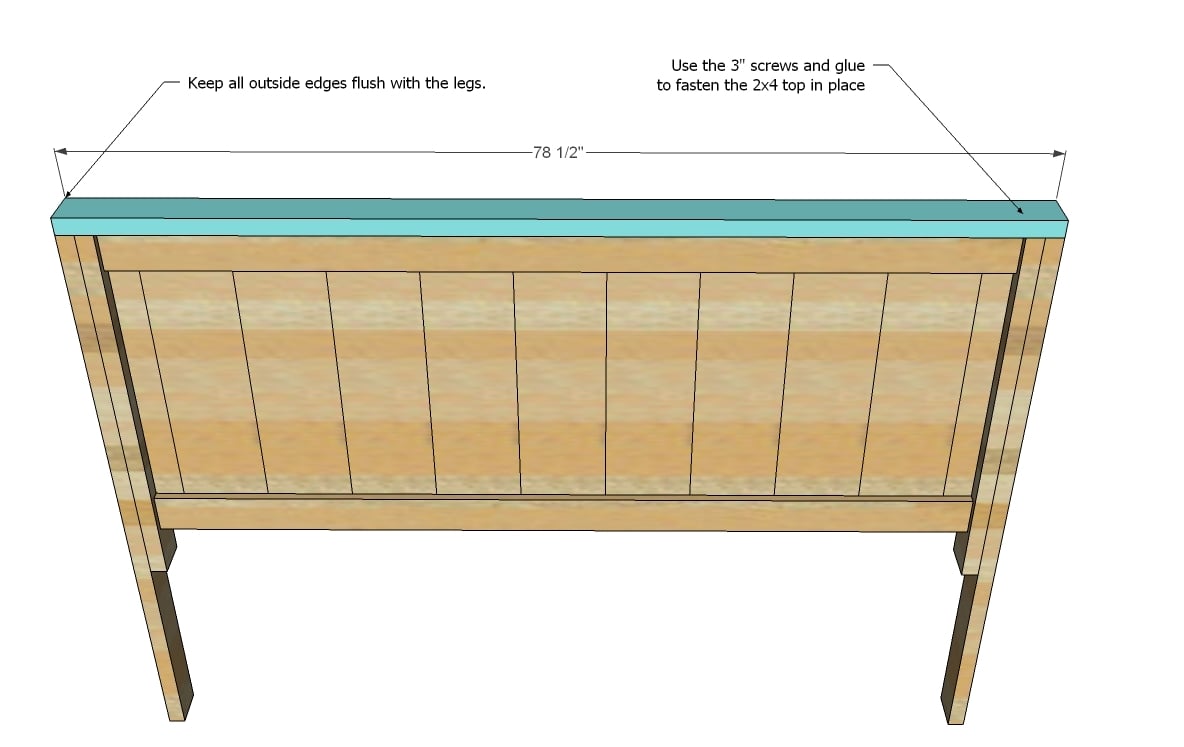
- 1 – 2×4 @ 78 1/2″ (Top of Legs and Panel for Headboard)
- 1 – 2×6 @ 80 1/2″ (Top of Headboard)
- 2 – 2×4 @ 10″ (Bottom Leg Piece for Headboard)
Footboard
- 4 – 1×4 @ 72 1/2″ (Panel Trim)
- 2 – 1×3 @ 15″ (Ends of Panel)
- 9 – 1×8 @ 15″ (Main Boards in the Panel)
- 4 – 2×4 @ 21″ (Legs)
- 1 – 2×4 @ 78 1/2″ (Top of Legs and Panel for Headboard)
- 1 – 1×6 @ 80 1/2″ (Top of Headboard)
Siderails and Frame
- 2 – 2×10 @ 87 1/2″ (Siderails)
- 2 – 2×4 @ 88 1/2″ (Side Cleats)
- 8 – 2×4 @ 69 1/2″ (Joists, you can use less if you have a box spring, may need more if your mattress is flimsy or you choose not to add plywood to top)
- Optional plywood on top of joists


Instructions
Step 1
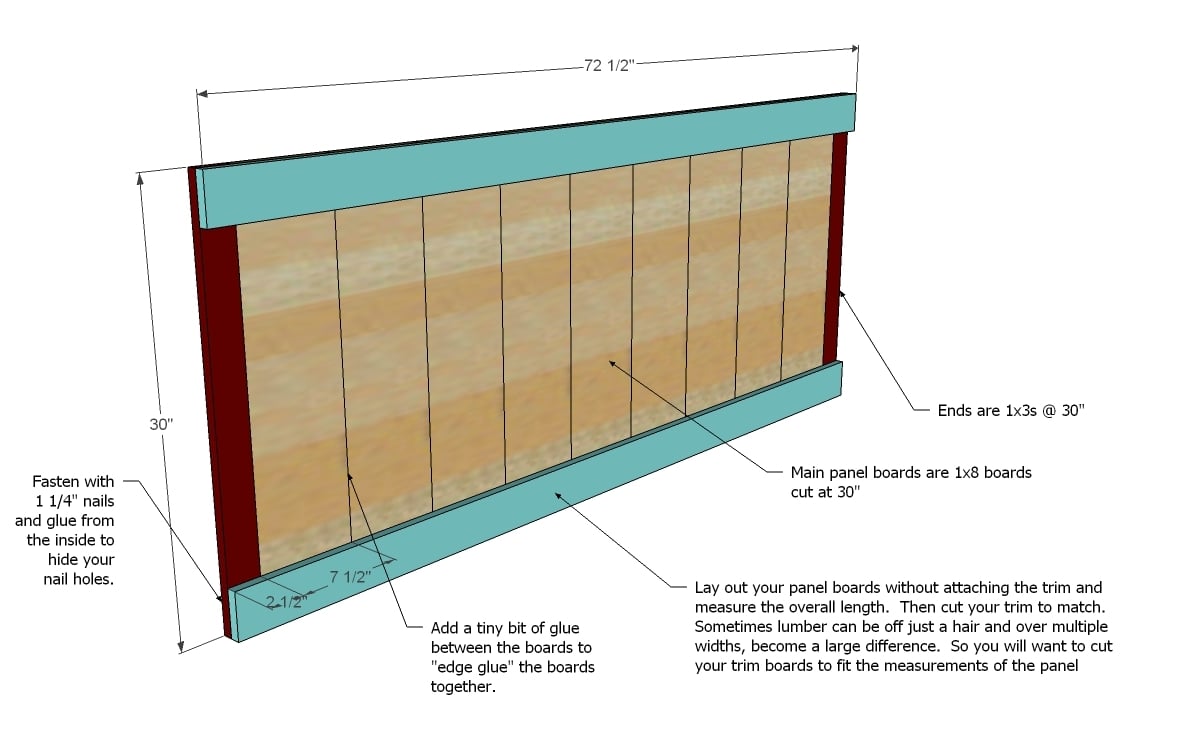
Front of Headboard Panel. Lay out the panel pieces on a clean level surface. Take a measurement of the total length and cut your trim boards to this measurement (approximately 78 1/2″). Then fasten the trim pieces to the panel as shown above. Use the 1 1/4″ nails and glue. Attach from the back to hide your nail holes.
Step 2
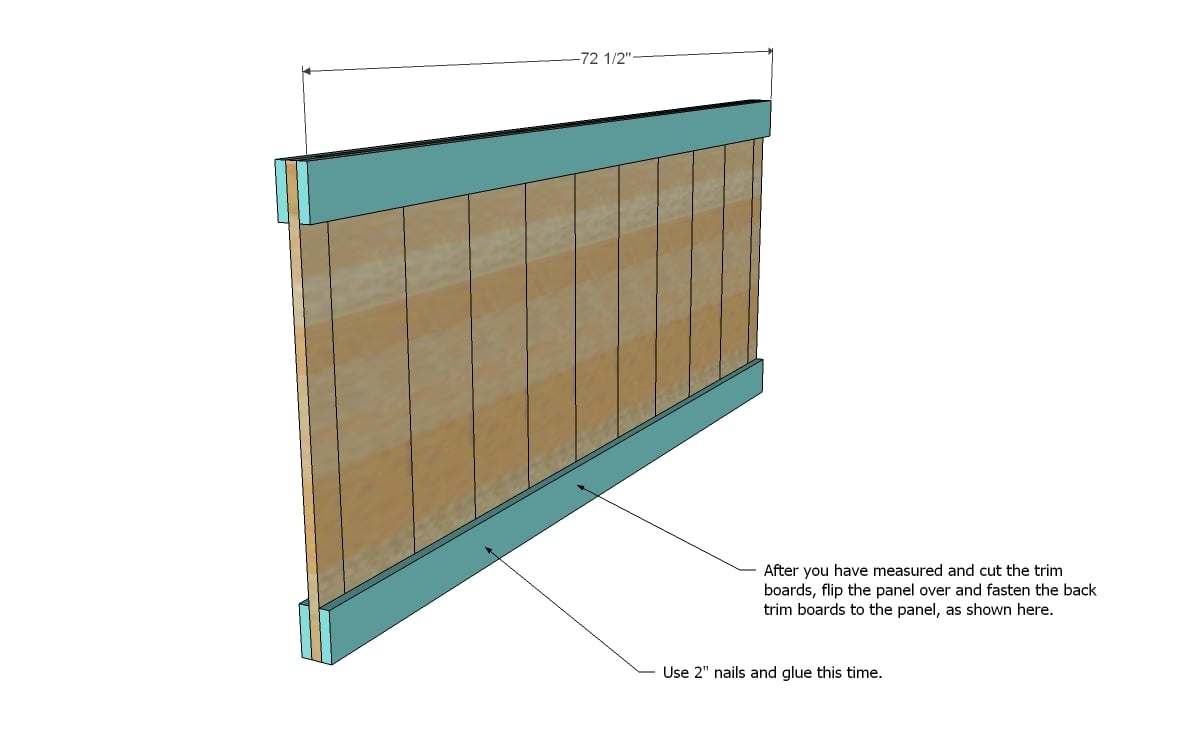
Back of Headboard Panel. In the same manner as step 1, fasten the back trim pieces to the headboard. This is shown above. Use glue and 2″ nails. This will be the back of the headboard, as your nail holes are showing.
Step 3

Inner Leg. Predrill and countersink your screws, attaching the inner leg to the headboard panel as shown above. Use glue and the 3″ screws.
Step 4
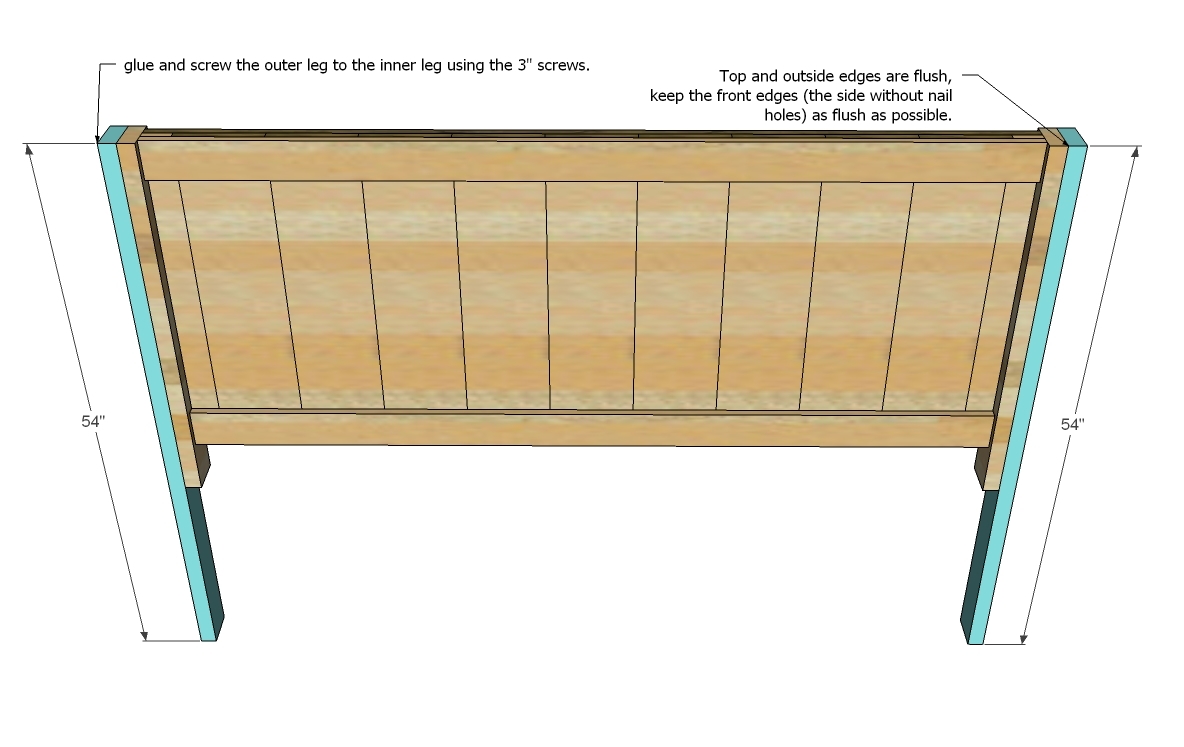
Outer Leg. Fasten the outer leg to the inner leg, using the 3″ screws and glue. Again, use the countersink bit. Keep top and outside edges flush.
Step 5
Step 6
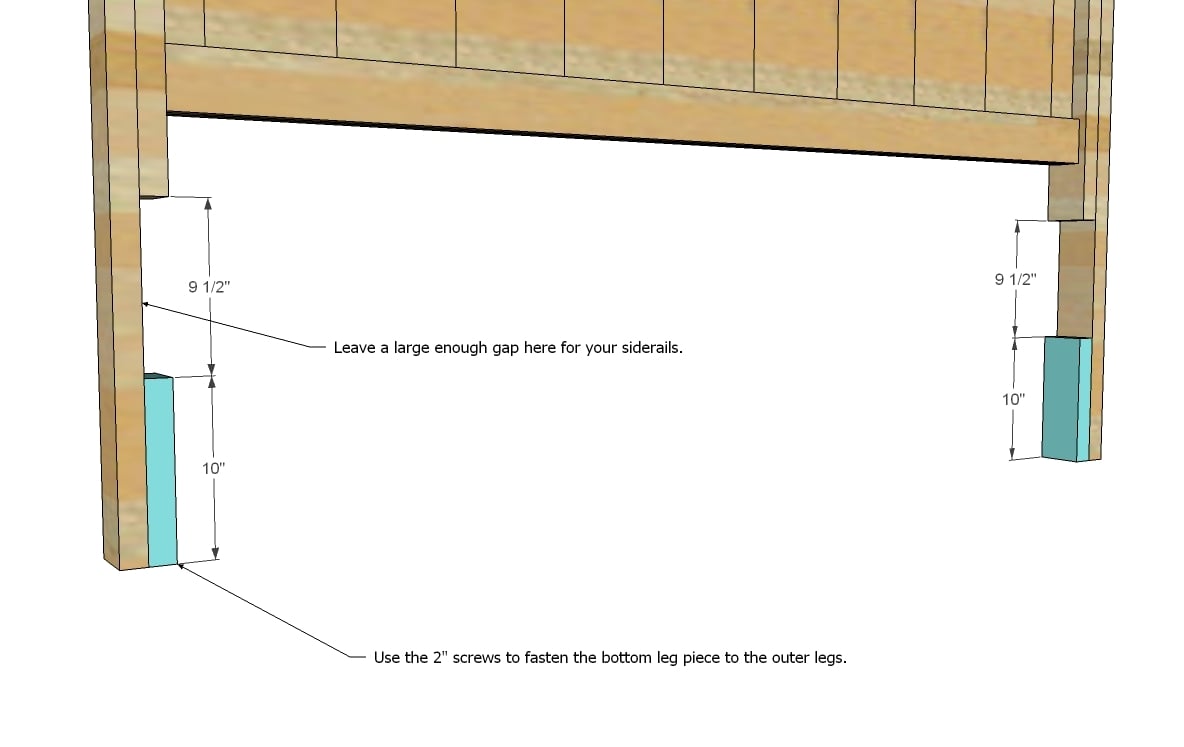
Bottom Leg Piece for Headboard. Use the 2″ screws and glue to attach the bottom leg piece. Countersink your screws. You may need to shorten or lengthen the bottom leg piece, depending on the thickness of your side rails. Take a measurement of your side rails before cutting this piece.
Step 7
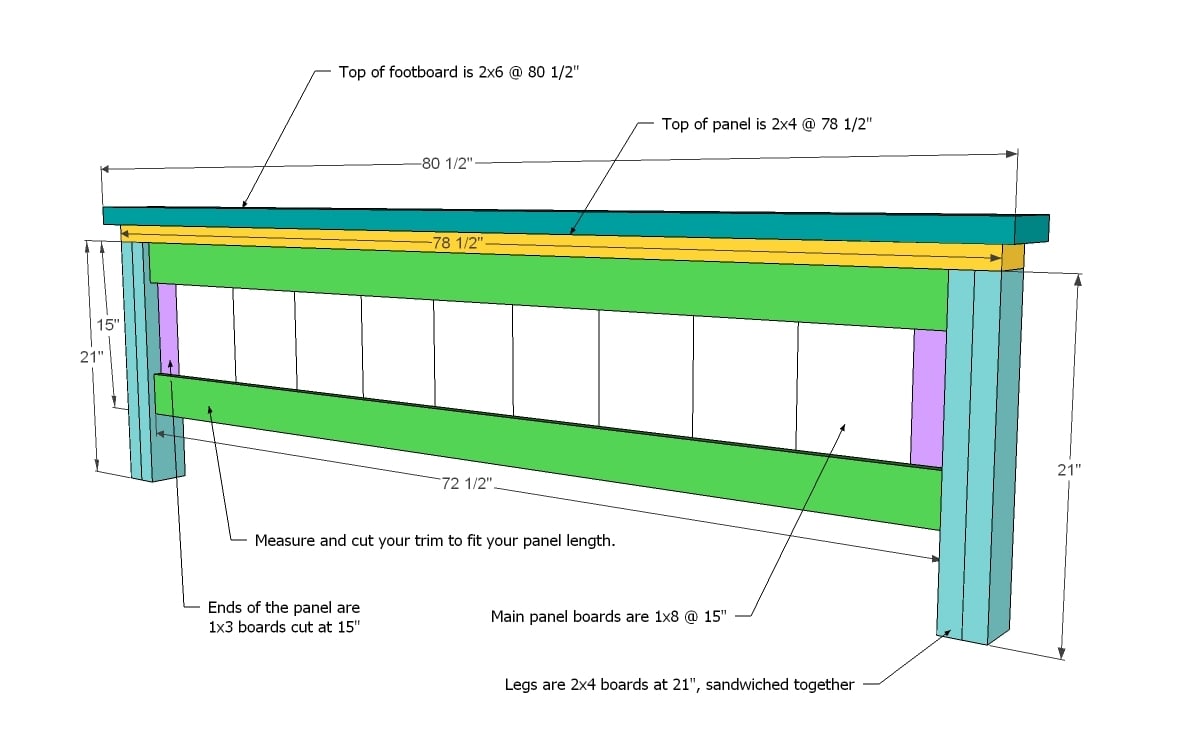
Footboard. Except for the changes in the legs as shown above, the footboard will be assembled just like the headboard. The footboard leg pieces are identical in size and there is not bottom leg piece.
Step 8

Siderails and Frame. Begin by building the frame using 3″ screws and glue. The above joists are shown spaced every 12″. You may need to add more if you are not using a box spring (standard maximum slat spacings is 6″), and you could possibly get away with less if you have a good box spring. Remember, king beds often have 2 box springs.
After you have built the frame, attach the side rails to the frame. Keep the front edges flush. The bottom edge of the frame will overhang the siderails by 5/8″. Please note that you can adjust the height of the frame to suit your needs, higher for no boxspring, lower to accomodate a box spring.
Step 9

Attaching the siderails to the Headboard. You will only need a few screws on each side rail to attach the siderails to the frame because the bottom leg piece holds the weight. Predrill and countersink your screws, using 2 1/2″ screws. Do not use glue here.
Step 10
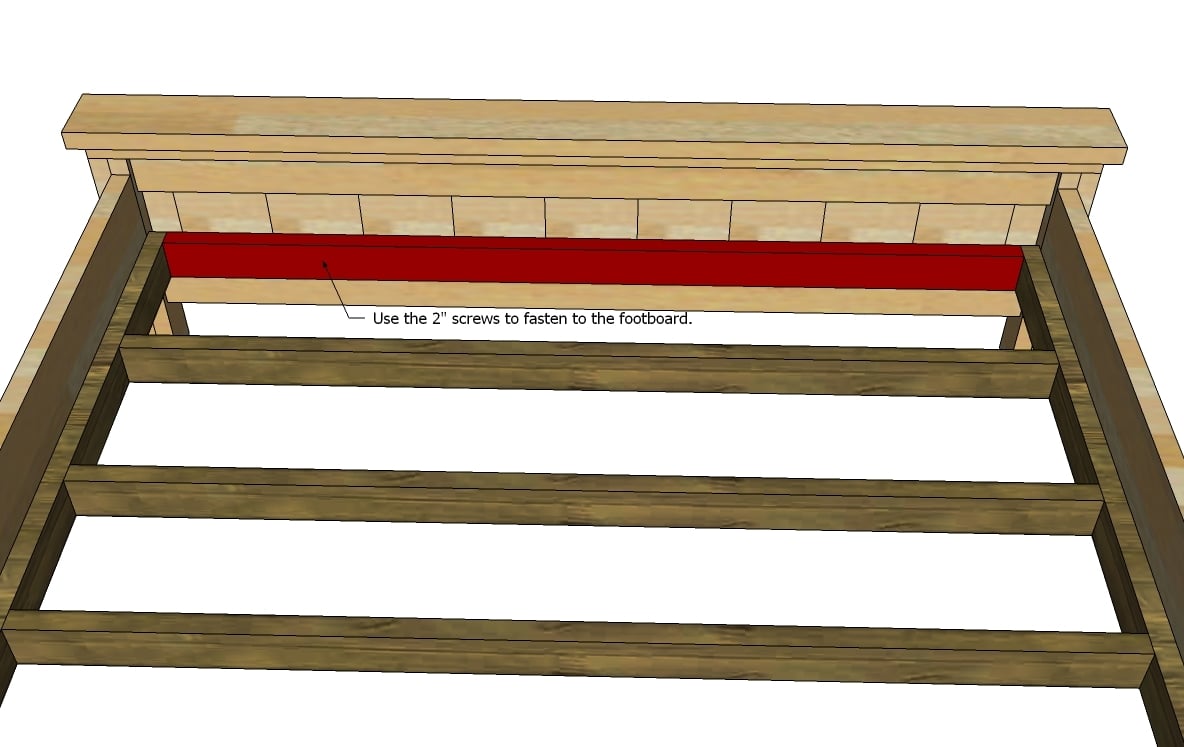
Attaching to the Footboard. Fasten the bottom frame joists directly to the footboard panel as shown here. Use the 2″ screws, but no glue.


Comments
banananutmeg (not verified)
Mon, 03/01/2010 - 03:51
Every mother needs an outlet.
Every mother needs an outlet. Let yours be furniture. Buy the paper plates! :)
Have you posted plans for a twin size farmhouse bed yet? I searched and didn't find one, but I could have missed it.
The Snyder Family (not verified)
Mon, 03/01/2010 - 05:08
banananutmeg here is the twin
banananutmeg here is the twin sized one...I am making this right now! Yay!
http://knockoffwood.blogspot.com/2010/01/plans-how-to-modify-farmhouse-…
I also think you should buy the paper plates...and think I will start using them on my more stressful days...Great idea actually! I wish my bed was Cali King so I could make this one...mostly for the size, but I guess it will be the queen version for me! Thanks for the great plans!
Kiama Dawson (not verified)
Mon, 03/01/2010 - 05:12
I love paper plates! It
I love paper plates! It doesn't matter how busy your day is, I believe a just having a child entitles you to a break from dishes now and then. What you do on this blog inspires so many people! I only discovered your blog about a week ago, and already, I have a list of the top ten projects that I want to make. I admire your knowledge that you have with wood, and appreciate the time that you put into these plans that make it possible for people like me to make these amazing things that you have created! I hope you never stop!
Christy (not verified)
Mon, 03/01/2010 - 05:16
I would lean towards the
I would lean towards the paper plates. It doesn't make you less of a housewife, or less of a mom, it makes you a paper plate consumer. And if you recycle them, rather than throw them away, you're doing the environment a favor by #1, recycling and #2, conserving water by not needing to wash dishes. ;o) Just my $.02 - take it for what it's worth.
Rayna (not verified)
Mon, 03/01/2010 - 06:00
I agree with everyone else.
I agree with everyone else. Buy the paper plates. I am an atrocious housewife because I can't seem to keep on top of things like the dishes and laundry (though I do try.) I didn't decide to be a stay at home mom so I could keep the house clean, I decided to be one because we wanted one of us to be home when the girls were little. That decision had nothing to do with other 'housewife' duties.
I am the one that does the cleaning,etc, but it's always been that way (he simply doesn't care.) He doesn't hold the messes against me, and he would be the first one to suggest paper plates to give me a break.
Give yourself a break and make things a little easier. You deserve it.
RuthAnne (not verified)
Mon, 03/01/2010 - 06:33
I can't wait to get started
I can't wait to get started on this bed! Am I missing something? Are the 1x4's missing from the shopping list?
In reply to I can't wait to get started by RuthAnne (not verified)
Luvahog2
Mon, 12/05/2016 - 10:59
The 1x4's, 2x10's, and 2inch
The 1x4's, 2x10's, and 2inch nails are also missing
TCK (not verified)
Mon, 03/01/2010 - 06:39
I vote for the paper plates.
I vote for the paper plates. It doesnt change the taste of the food. It makes it easier on you and less of a mess. Dishes...I hate them. I am a stay at home mom of 3 and we use them. Husband actually buys then. Sometimes he even gets the bowls and spoons for easy clean up in the mornings.
I LOVE YOUR site. I found it about a month ago. I have not got up the courage to try anything yet but I do have a list. I will get there.
Danielle (not verified)
Mon, 03/01/2010 - 06:40
If you don't mind eating off
If you don't mind eating off paperplates, buy them. I can't stand eating off them. :shrug: But since there are just the two of us I have plenty of dishes to get us through a few days if I don't feel like doing dishes.
Love your plans and think you are amazing.
WestSacHoney (not verified)
Mon, 03/01/2010 - 07:14
Oh this made my Monday.. My
Oh this made my Monday.. My boyfriend said he would make something... But he didn't say how big! =) We just scored some 4x4 posts for CHEAP and they are clear redwood!
SaraReno (not verified)
Mon, 03/01/2010 - 07:35
Buy the plates and then use
Buy the plates and then use them for backup and you get the best of both worlds. It's the same reason that once a week we eat out because I'm too tired to cook dinner. You've been a housewife for a few years but now you also have a second job on top of it and you can hardly be expected to do everything (none of us are really Super Woman, no matter how we try).
The modification for the 4x4s is really interesting. I have them available here but I may do it this way anyhow since the extra support under the side rails would be nice (my kids tend to jump on beds a lot).
Thanks again for another great plan!
lynnor (not verified)
Mon, 03/01/2010 - 09:06
Our cal king beds have always
Our cal king beds have always had extra legs/supports down the middle under the slats. Should those be added here, or not since the boards are not "flat" but on their side?
Cara M (not verified)
Mon, 03/01/2010 - 16:17
I think these are your best
I think these are your best plans to date! The detail you have added since the first farmhouse bed post is incredible! I love your blog!!!!
Ana White (not verified)
Mon, 03/01/2010 - 16:34
Thank you Cara, and thanks
Thank you Cara, and thanks for reading. I have noticed a big improvement also when I go back and edit plans myself, so thanks to all the readers for keeping me going and suggesting how I can improve.
Lynnor, I have thought the same as I was putting the plans together. My bed is a a regular king and spans more than the cali king and no center post and it's fine. I think the point where you will need to worry about the center post is when you use split box springs. You can easily add a center post by placing a 2x4 under the joists, running perpendicular down the center. Then add a "leg" made of a 2x4 from the center of the support to the floor. This should take care of any worries.
Hope this helps, Ana
Jen @ Sunshine… (not verified)
Mon, 03/01/2010 - 17:03
Ana, when a housewife is our
Ana, when a housewife is our only job (and it's a HUGE one) we know how much of our love we put into even washing a plate. I think that it's more about the love we think we aren't able to put into "here's your paper plate."
You're putting your love into other things than washing plates these days...Letting your child see you flourish as a businesswoman and artist. Letting your child see the joy you get from success. Letting your child know that it's okay to rearrange things in your life when you need to focus on something that is about to explode into blessings for the family.
By the darn plates, girl. Or buy a dog to do the first rinse cycle on the dishes before you toss them into the dishwasher for proper cleaning and sterilization. :)
Jessica (not verified)
Mon, 03/01/2010 - 20:47
Ana, You Rock!!!I love this
Ana, You Rock!!!
I love this bed and am looking forward to making it. I love Julianne's modification on the foot board and was wondering if we could get the dimensions and such that she changed. Thank you so much for everything you do and thanks to your hubby for sharing you with us!
Heather - Doll… (not verified)
Mon, 03/01/2010 - 21:37
I have had that paper plate
I have had that paper plate talk w/my husband too... I can't help it, I love my website. :)
Beth (not verified)
Thu, 03/04/2010 - 16:27
Hi Ana, in Ontario our King
Hi Ana, in Ontario our King size mattress measures 76"(w) x 79.5"(l). What would the cuts be for the Farmhouse Bed?
Katherine Klegin (not verified)
Tue, 03/09/2010 - 09:04
Hey Ana,My dad and I have
Hey Ana,
My dad and I have begun building this bed and found out that you do not need [9] 1x8's. You only need 5. You should be able to get [3] 30" sections out of each 1x8 and (obviously) [6] 15" sections out of each board. Also, rather than having the two 1x3's on the end of the panel section, we found that simply adding 1 more 2x8 made it come out to 72.5" I will be posting my progress on my blog and will email you when I'm finished. Thanks so much for this plan!
Pink Little Ladies (not verified)
Thu, 03/11/2010 - 06:45
Is the bed put together so
Is the bed put together so that if you needed to move you could take it apart or once its built is it one piece and unable to disassemble? I would like to make two twin beds for my girls but there is a possibility we may be moving in the next few months and would be sad if the beds couldn't come with us.
Rachel (not verified)
Thu, 03/11/2010 - 14:55
Is it okay if I tell you I
Is it okay if I tell you I LOVE you??? LOL I have been looking for this exact bed!!!!!! I'm sooo excited, thank you thank you!!
You are no less of a wife or mother for eating off paper plates!
Ana White (not verified)
Fri, 03/12/2010 - 15:36
This bed can be easily
This bed can be easily assembled and disassembled. Just use screws and no glue when you connect the frame to the headboard and footboard. Even retail beds often just have predrilled holes to connect the frames to the headboard.
Amanda (not verified)
Sat, 03/27/2010 - 06:11
Is there a quick reduction in
Is there a quick reduction in some lengths to modify this plan for a traditional King size rather than a California?
Marisa (not verified)
Mon, 04/05/2010 - 14:12
Hey Ana! I love your blog, i
Hey Ana!
I love your blog, i just discovered it recently! It's amazing and i already have several projects in mind! Thanks so much for all of your hard work on this!
Just one quick question, I'm having my hubby help me make this bed, w/ the modifications for the California King size, and I didn't see the 1x4's on the shopping list.. i've looked at teh other plans and some say 8 or some say 7.. So how many should i Buy? Thanks so much again!! :)
llegue (not verified)
Wed, 04/07/2010 - 06:14
I love it! Do you have the
I love it! Do you have the dimensions for a queen?
Becky Jean (not verified)
Fri, 05/21/2010 - 21:19
There are Four beds in my
There are Four beds in my house and not a one with a headboard or footboard. Would it be weird if we all had matching beds? I love it, thanks for the great job!!!
Becky Jean (not verified)
Fri, 05/21/2010 - 21:21
oh yeah, and go for the
oh yeah, and go for the paper plates because you are conserving water :)
Melinda (not verified)
Mon, 08/23/2010 - 07:41
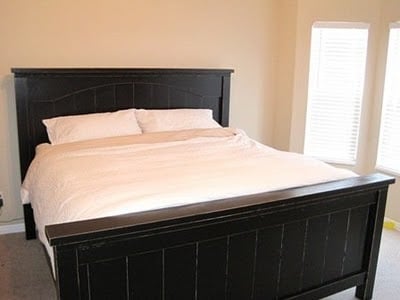
I made my farmhouse bed this
I made my farmhouse bed this weekend!!(ok, my dad and husband helped a little!) Yeah! Now I want to paint it that antique black you have in the picture but I bought paint and did a practice block and it looks horrible! HELP!! How do I get that look!?
Scott SS (not verified)
Sat, 09/04/2010 - 19:11
I'm so excited to make this
I'm so excited to make this bed. It's my first project and I have a few questions.
We have a Cal-King and it's a latex bed without box springs. I'm trying to figure out the height the bed will need to be to avoid having a gap below the headboard, and if we should make the footboard and/or headboard taller. I also wanted to make sure that 2x4 slats would be a good idea, since I'm about 240lbs. the bed is for my wife and I, with the heavier latex bed. I'd appreciate any extra tips. I've been getting used to the new site and combing through it looking for any other tips. I couldn't find the modification that someone did to make the footboard taller...
Thanks again! You're an inspiration!
Ana White (not verified)
Mon, 09/06/2010 - 06:42
Hi Scott, my husband is over
Hi Scott, my husband is over 200 pounds and we have this bed in a king, so 78" wide x 80" long. We've had our bed for quite a few years, and it's still as sturdy as every! What I did with my bed is build frame with 2x6s (shown in the queen sized plans) and then topped it with plywood. BUT this method doesn't allow your mattress to breathe, and if you live in a humid climate, can cause mold growth. So that is why I recommend the slats. The most foolproof way of adding extra support to the center would be to add a third cleat down the center, and then a fifth leg in the very middle of the bed. You will never have an issue with support if you got that route. Good luck with your bed - and making the footboard taller would just be a matter of adding a specific number (for example 6 to make your footboard 6" taller) to the legs and the panel boards. Super easy. Ana
Gwenevere (not verified)
Thu, 10/14/2010 - 00:53
Yeah, I knew I would find the
Yeah, I knew I would find the modification I was looking for. It's not that I didn't believe you when you said your bed was fine without a center support, it's just that I was fairly confident that with my luck, the bed I make wouldn't be. Thanks for the tip
Ariel Blayney (not verified)
Fri, 11/05/2010 - 07:06
Hey I really would like to
Hey I really would like to make this bed in a regular king size and not a califonia king. Any plans for that? I need the demensions and a list of what I need because this is the first thing I am going to be making. Can you help me out?
Ariel
Tsu Dho Nimh (not verified)
Sat, 11/20/2010 - 05:52
Ariel - If by "first thing".
Ariel - If by "first thing". you mean that you have never done a woodworking project, work your way up to the bed. Make a couple of the $10 ledges, and some crates first, to get used to making square cuts, drilling, countersinking and the rest. These plans are simple, but the cuts and alignment has to be very precise.
http://ana-white.com/2010/01/plans-how-to-modify-farmhouse-bed-to_09.ht… has plans for a standard king.
Farmhouse Bed … (not verified)
Sat, 12/04/2010 - 18:50
[...] King size mattress? Ana
[...] King size mattress? Ana White provides the plans and all you need to know to be successful here Many of her readers have used her plans to build their projects The photo’s of their finished [...]
Valerie (not verified)
Fri, 02/18/2011 - 12:49
Wow! I'm really excited about
Wow! I'm really excited about this! I can't wait for my husband to get home so I can show him what he's building this weekend! LOL
stephd
Sun, 03/20/2011 - 21:30
(No subject)
Bryan Feil (not verified)
Fri, 04/08/2011 - 23:35
needed updated supplies
really excited to build this bed for my wifes birthday, however, i just bought the wood that is listed at the top and began to build and then realized that i needed a lot more wood that what was said at the top, such as 1x4s, 2x8s and 2x10s. Ended up being a lot more money that i thought.
lollypoppy
Tue, 05/03/2011 - 21:32
Supply list missing items?
I'm going to be getting my lumber for this project and see that 2-2x10 & 4-1x4 are missing from the shopping list...but I didn't see any 2x8 like Bryan says. Am I missing something?
I'm so excited to work on a large project like this since my $10 ledges were such a success :) Thank you Anna!!
~Krista
Guest (not verified)
Sat, 05/14/2011 - 14:28
So excited!
I finally went and bought the wood for the side rails and frame. I finished the head and foot boards months ago. Just haven't gotten back to it. I can't wait for my husband to get home from Afghanistan and see what I built for him.
Guest (not verified)
Tue, 05/24/2011 - 10:30
Missing Shopping List items
I too, have noticed that the 2-2x10's and 8-1x4's are not on the shopping list. Can anyone else confirm this? I am about to start building this, bought my wood and was going back through the plans and noticed this. I just finished my Cabin Collection nightstands and they turned out great! My wife is anxious to get the bed done and in the room!
zgporter (not verified)
Sat, 07/02/2011 - 14:04
Materials Bought...Here we go!
Here is my list (a little different than the one above)...
13 2x4x8
5 1x8x8
8 1x4x8
2 1x6x8
2 2x10x8
1lb 3" screws
1lb 2.5" screws
1lb 2" screws
1 bottle of wood glue
= $145
I have the finish nailer and nails. I let you know how it goes.
Guest (not verified)
Mon, 08/01/2011 - 14:48
Cali King - Farmbed
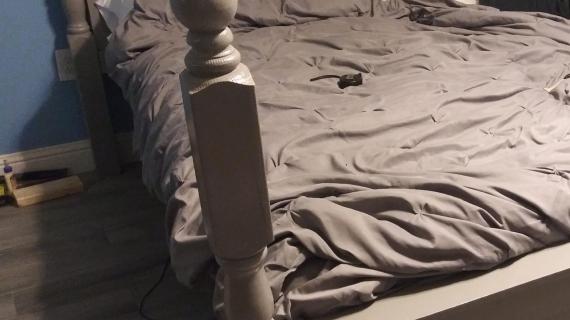
Just Wondering, in the pics above i can't see the seems of where the 2 2x4 posts where put together to make each bed post? Where 4x4 used or is just hard to see b/c of the picture quality?
For that matter, can i use 4x4's?
Thanks for the tips in advance, i'm in the planning and gathering materials stage right now. Should get underway the 2nd weekend of Aug.
Happy Staining!
Christine (not verified)
Sun, 10/09/2011 - 12:28
Paint color
My husband built the twin size version and now we are struggling to figure out what color to paint it for my sons room. What color is the blueish/ green color that you used for the picture for the king size bed? Any suggestions? Thanks
Lora (not verified)
Fri, 10/14/2011 - 12:02
Paint color
The link to JME blog is broken and I am wondering if you remember how she finished this bed. My Farmhouse bed is together and ready to be painted! Thanks Ana!
skichiiwa
Sun, 10/30/2011 - 20:52
Ana- HOw would you reccomend ....
how would you recommend adding that 3rd leg to support the split box spring? Im building the king size with the 2 twin box springs and want to support it ,as my mattress is very heavy.
Im wondering what to tie into at the head board?
also I want to use the 4x4 and not 2x2's . do you recommend bulking up the side rails and the joists.
thank you very much.
scott
*jencon* (not verified)
Thu, 11/10/2011 - 09:03
Shrinkage
This is going to be my first build. I have a question..... I just purchased some pine lumber and my husband says that in a few months this wood may shrink leaving gaps in my head and footboard (like a fence tends to do). Anyone that built this bed, do you find this happen to you??
mtubin
Sat, 07/13/2013 - 07:27
Thanks Ana
Hi from Israel,
I'm done building my first ever bed. It was a little expensive (Around 350$).
I had a lot of fun; I made some changing in the connection between the bed frame and the footboard.
I also had to convert the measurement to centimeter and to the European mattress measurement.
Again thanks a lot.
Muly Tubin
VMSommers
Sun, 04/06/2014 - 11:32
KING shopping list
I converted the measurements for the cut list to the measurements needed for a standard king. still having trouble with making this in to a narrowed shopping list. could some one help?
jeffreyropp
Wed, 09/24/2014 - 00:18
Question on Direction of Joists for Bed Without Box Spring
I'm planning to build the Farmhouse for a Cal King Bed. I'm buying a memory foam mattress without a box spring and need to have good slat support running from rail to rail. For that reason, would it make sense to run the joists between the headboard and footboard (rather than rail to rail)? Would this be just as sturdy?
Many thanks for your thoughts.
Best, Jeff
Colby032
Wed, 09/24/2014 - 09:21
Worked for me
I made that exact change on a king size bed that I was not using boxsprings, and it has worked just fine for me. If I remember right, I ran an additional 2x6 on the headboard end to attach my north/south (headboard to footboard) joists.
However, I have an innerspring mattress, so I have no idea whether the small gaps that result from using slats is okay fo a memoryfoam mattress (you may want to check before getting too deep into your build). If slats/gaps aren't good for the memoryfoam, you can top your rails with plywood as support - and if you do this, you can keep your joinsts running rail-to-rail if you like. You can drill some holes into the playwood for breathability if needed - I have no idea whether that's desirable for a memoryfoam mattress.