


Make a work apron! Lined with construction grade fabric, this apron is as pretty and hardworking as you are! Full free instructions.
I've been searching for years for the "perfect" work apron.
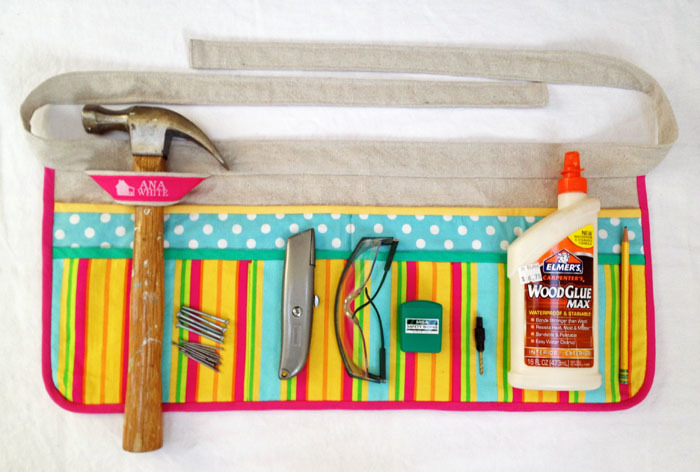
You know, something to hold screws and earplugs and safety glasses and pencils and tape measures. Something I can be excited about wearing, but also saves me time and keeps my supplies within easy reach.
I've tried tool belts. Too bulky and cumbersome and heavy. Tool belts are great for construction work, but for DIY projects and woodworking, more than anything, a tool belt would just get in my way.
I've tried aprons. Aprons are cute and made me want to wear them ... BUT I found they just do not function well in the shop. Aprons are not meant for holding a pound of sharp pointed screws, a tape measure, and I've never seen an apron with a hammer loop.
Unable to find a hybrid of a tool belt and a pretty apron, I asked my friend Jaime from That's My Letter, to help me out. Jaime is always building projects, so she understands all too well my apron/toolbelt dilemma.
But unlike me, Jaime can sew.
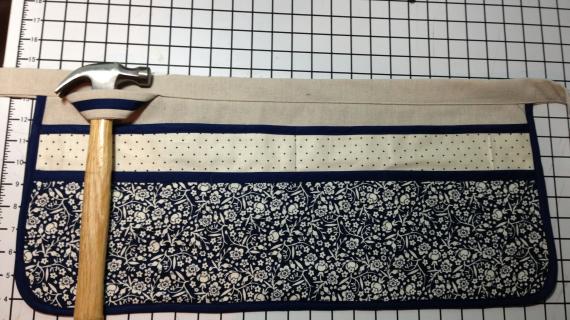
And this is what Jaime sent me.
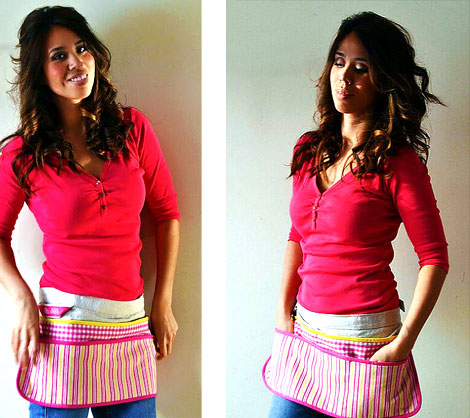
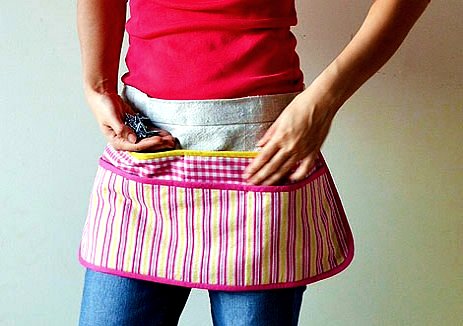
I can't tell you how much I love this Work Apron!!! Not only does it save me time and work in the shop looking for my pencil or tape measure, but I am excited to wear it because it's so cute and pretty!
I spent the better part of today wearing this work apron, and for the first time, ever, didn't look for my pencil once! I normally don't keep a hammer on me, but with the cute hammer loop, I thought I'd give 'er a try. The hammer loop is positioned on your hip, so you forget you are wearing it and there is no obstruction as you work or bend. I keep my tape measure in the left pocket, pencil in the right, so taking measurements is quick and efficient. For the builder short on time, this is a must have!
Make this Apron!
I loved this apron so much, I wanted you to also be able to have it. So I worked with Jaime to create a free tutorial to make your own work apron. The full instructions follow, and Jaime also posts on her blog lots more photos and tips to help you succeed.
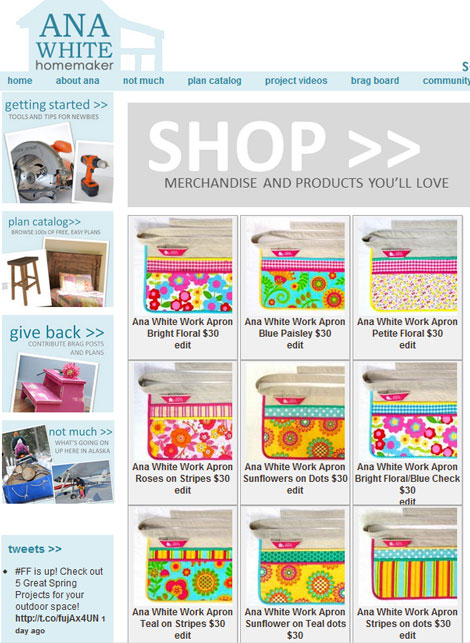
Or Shop for It!
But then I though that some of you may be sewing challenged like me, so I asked Jaime who sews professionally and in bulk to make up a few more that you can buy.
Isn't this exciting?
Make sure you check out the new SHOP section of the site, where you can find cute handmade things for the girly builder. We hope to add more colors and styles as well, so check back often!

And of course, you can make this apron yourself! The free instructions follow.
Preparation
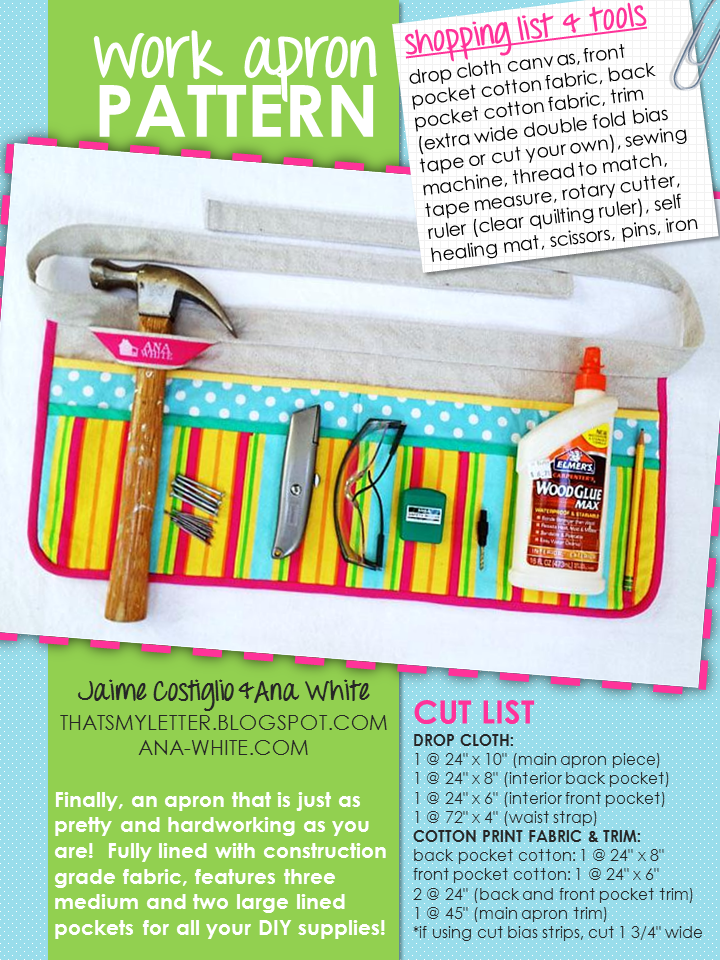
drop cloth canvas, front pocket cotton fabric, back pocket cotton fabric, trim (extra wide double fold bias tape or cut your own), sewing machine, thread to match, tape measure, rotary cutter, ruler (clear quilting ruler), self healing mat, scissors, pins, iron
DROP CLOTH:
1 @ 24" x 10" (main apron piece)
1 @ 24" x 8" (interior back pocket)
1 @ 24" x 6" (interior front pocket)
1 @ 72" x 4" (waist strap)
COTTON PRINT FABRIC & TRIM:
back pocket cotton: 1 @ 24" x 8"
front pocket cotton: 1 @ 24" x 6"
2 @ 24" (back and front pocket trim)
1 @ 45" (main apron trim)
*if using cut bias strips, cut 1 3/4" wide
Please read through the entire plan and all comments before beginning this project. It is also advisable to review the Getting Started Section. Take all necessary precautions to build safely and smartly. Work on a clean level surface, free of imperfections or debris. Always use straight boards. Check for square after each step. Always predrill holes before attaching with screws. Use glue with finish nails for a stronger hold. Wipe excess glue off bare wood for stained projects, as dried glue will not take stain. Be safe, have fun, and ask for help if you need it. Good luck!
Instructions
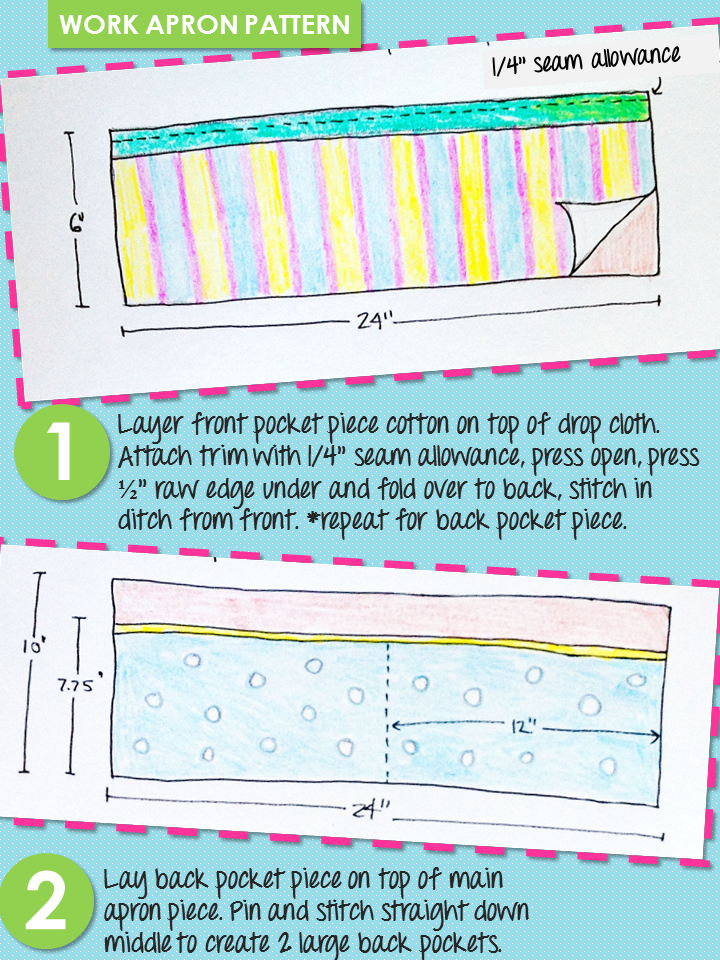
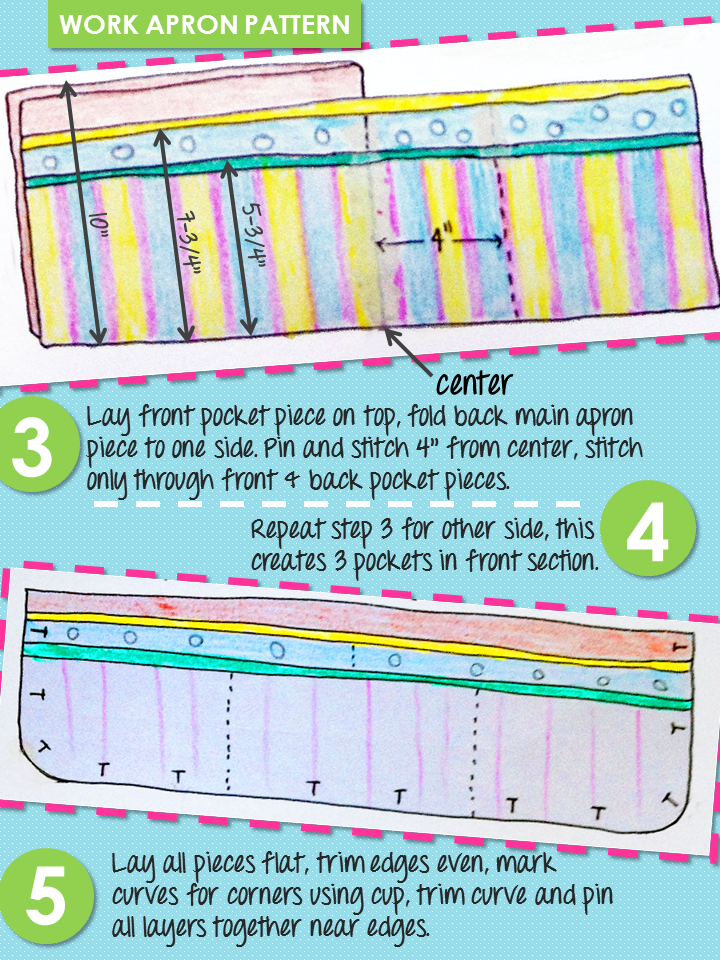
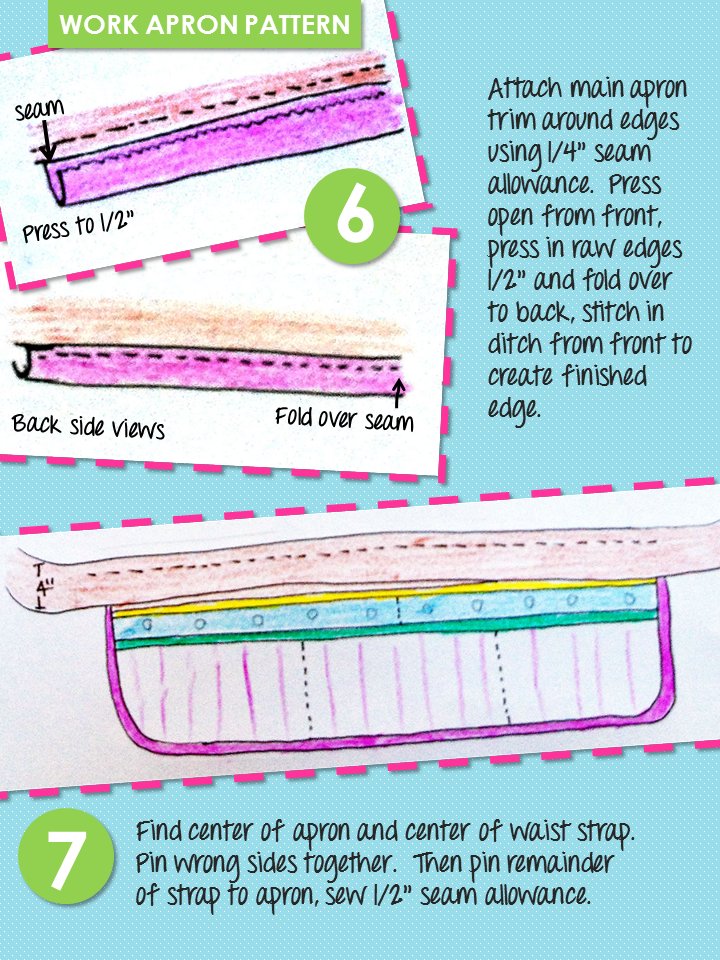
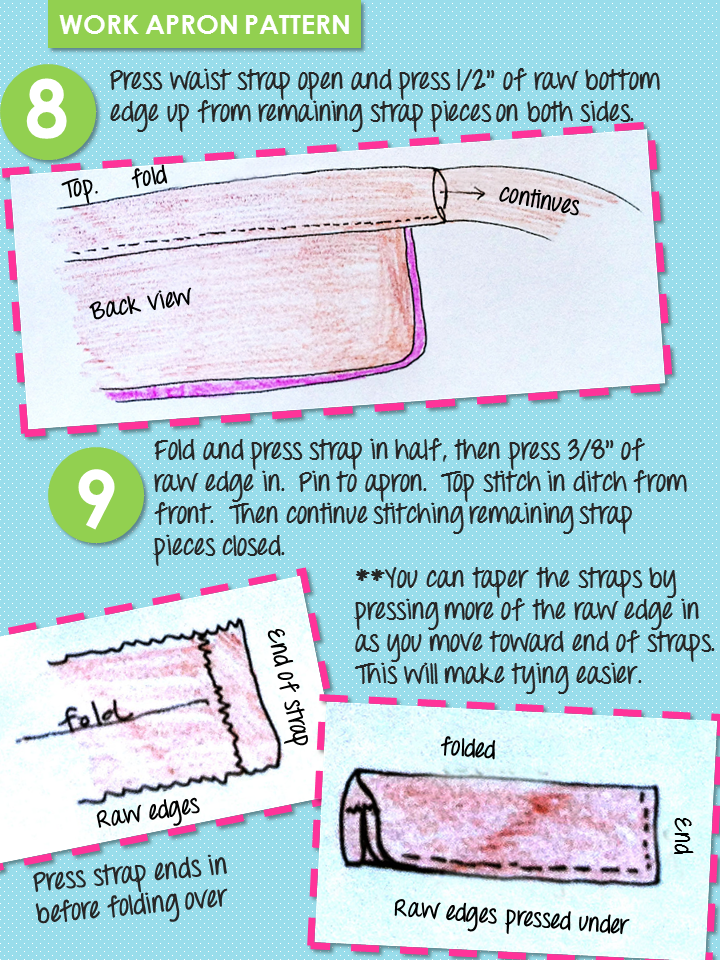
Step 1

This pattern is available as a free PDF that you can download here.


Comments
whitney_smith
Mon, 03/26/2012 - 05:03
Hello!!
Lovin that logo hammer loop!! Fabulous idea to add the shop feature to the site and I REALLY hope you'll think about adding more soon.... like a "Homemaker" tee!
Ana White
Mon, 03/26/2012 - 09:35
Thanks Whitney!!! I'm
Thanks Whitney!!! I'm working on some designs for t-shirts too!
In reply to Thanks Whitney!!! I'm by Ana White
tracysmith
Tue, 03/27/2012 - 01:32
I'm so excited!
I can't wait until payday!!! I'm getting an official Ana-White tool belt and I can't wait to see the t-shirts! This is great!!!!!
tonjacoy101
Mon, 03/26/2012 - 09:43
Love this!
Love, Love, Love!!! Will order one since my sewing projects seem to take *ahem* years......
In reply to Love this! by tonjacoy101
Pam the Goatherd
Mon, 03/26/2012 - 12:49
My sewing projects have taken
My sewing projects have taken a back seat to my building projects ever since I discovered Ana! If I want one of these aprons (and I DO!) I'd better just go ahead and order one rather than waiting until I have the time to make one. It's worth the price just to get the official Ana White logo on the hammer loop! =)
Ana White
Mon, 03/26/2012 - 16:08
So happy you all like the
So happy you all like the apron!!! And a big thank you to those of you who went ahead and purchased aprons! You'll have to send us photos!
ferbit
Mon, 03/26/2012 - 18:02
Purchase???
Where can I purchase the apron? How in the world did I miss that? LOL
Edited to add: DUH! I didn't read the last part of your post! :) I see where to buy it now. Very cool!
bhoppy
Mon, 03/26/2012 - 18:38
Awesome!
Jamie you are "sew talented" lol I can't sew a stitch so I can't wait to order one!
In reply to Awesome! by bhoppy
jaimecostiglio
Mon, 04/02/2012 - 17:14
Thanks bhoppy
We'll be restocking the shop periodically, if only I could sew faster!!!! Please check back for more styles soon.
dananryan
Thu, 04/05/2012 - 17:52
Love it!
I got mine today. Sewing is definitely not my forte but I had to have this apron. It's just perfect. Stylish and practical. Thanks Jamie!
In reply to Love it! by dananryan
jaimecostiglio
Fri, 04/06/2012 - 17:43
You're welcome
So glad to hear you're loving you new apron. Please use it and send us pics from the workshop!
zookeeperjay
Tue, 03/27/2012 - 05:56
I can't decide whether to
I can't decide whether to make one or buy one, but they are lovely, and I definetly have to have one! Way to go Jamie and Ana! :o)
3pageprincesses
Tue, 03/27/2012 - 06:58
I think I need this.....
Oh these are so cute!! I am just getting started into making my own stuff. My hubby bought me the Kreg Jig and now I think I need one of these to start off my first project! Thanks Ana for everything :)
Guest (not verified)
Wed, 03/28/2012 - 08:06
ur so pretty
Not only are these aprons super cute but u r such a pretty model. TY so much for all of ur ideas n free plans. My boyfriend n I just finished building the modern farm table n we love it. We still need to stain it. Do u have any tips on a nice dark stain that wont look orangy on some of the grain. I was thinking of trying the minwax dark walnut, heve u used it before on this type of wood (2x6 studs)? We also built our little babygirl a kitchen for christmas, not with ur plans but we used it for inspiration. It was the first thing we ever built. We r very proud of ourselves, u give us confidence with these easy beginers plans.
Daly @ DogFood… (not verified)
Wed, 03/28/2012 - 09:14
Practical and beautiful
I like it! And you can use it for other stuff as well! Like when you play with your kids outside, you always need some stuff for that.
cecimoreno
Wed, 03/28/2012 - 19:03
LOVE the one your wearing in the pic!
Super cute!! I want the one your wearing in the pic! Any chance you'll be selling some in that style? Your genius! I had been looking for something exactly like this....
In reply to LOVE the one your wearing in the pic! by cecimoreno
jaimecostiglio
Mon, 04/02/2012 - 17:16
Thanks Ceci
We'll definitely be adding more aprons to the shop periodically. I will be getting more of the stripe fabric Ana is wearing soon as folks really like her apron, check back soon!
KarinJoan (not verified)
Fri, 03/30/2012 - 12:40
nice to 'meet' you
Hi Anna,
just discovered your website and video-tutorials. Love it!! You've even got pink trestles, woow! Love the combination of the builder and the girly. Love your apron :-) Keepmup the good works. I'll be coming around again.
Kind regards from Holland (EU)
KJ
www.24homes.nl
spiceylg
Sun, 04/08/2012 - 04:15
Jaime
Just received my apron and I love it! Top quality not to mention adorable, too! Great job Jaime, you are so talented!!! Thank you Ana for offering it on your site! You both rock!
In reply to Jaime by spiceylg
jaimecostiglio
Fri, 04/20/2012 - 02:18
Your're welcome
So glad you're enjoying the apron, it truly was fun to make and even better hearing your positive feedback.
cecimoreno
Wed, 04/11/2012 - 07:40
Thanks for the Apron!
Hi Jaime and Ana, I received my apron as well this weekend and I have to say I love it!! It really is great quality and its so functional for all types of projects, from building to art, and even house cleaning! Thanks!!
In reply to Thanks for the Apron! by cecimoreno
jaimecostiglio
Fri, 04/20/2012 - 02:21
You're very welcome
And great ideas for all the possible uses. It's truly multi-functional besides being super cute just to wear! So nice to hear the comments, makes it all worth it.
Heather Foster (not verified)
Sat, 09/15/2012 - 09:31
Aprons
Jamie I LOVE these aprons!! I can't sew and would love to buy one but they are all sold out. Any chance you will be making more?