
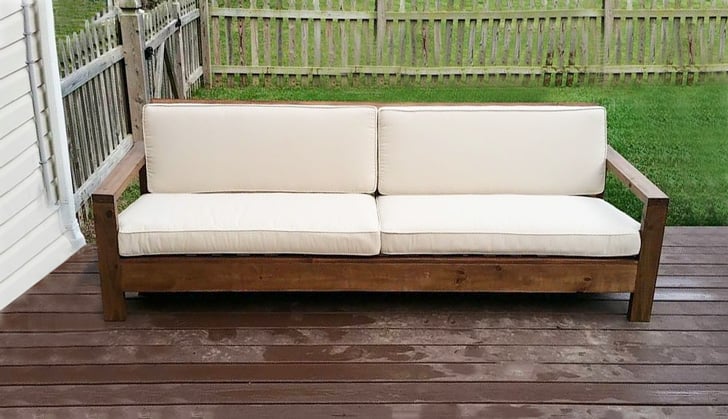

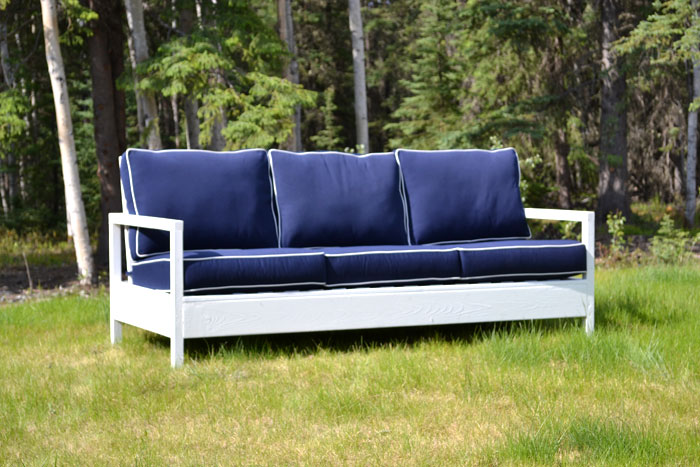
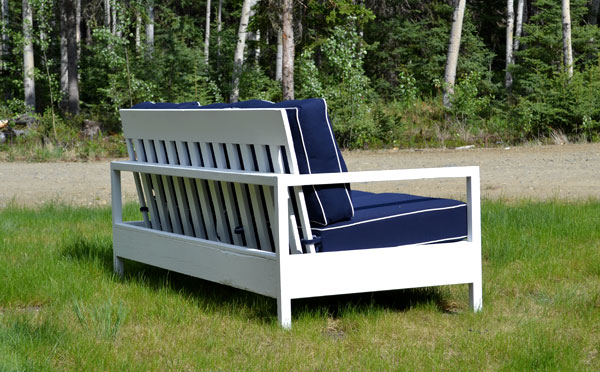
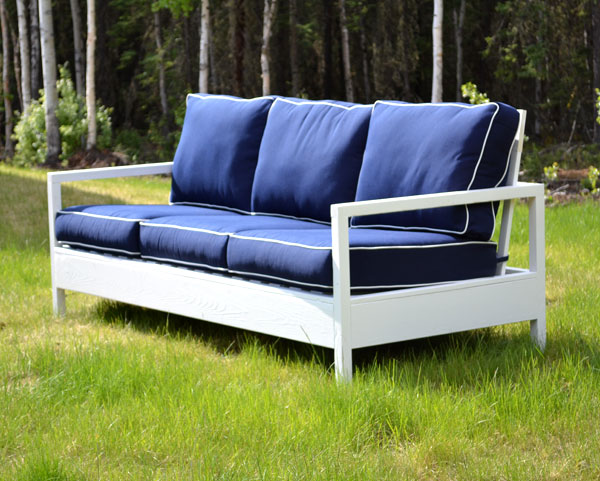
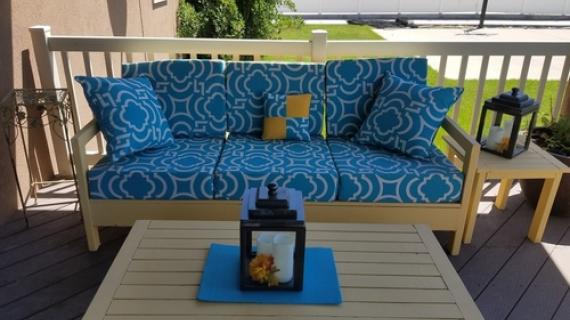
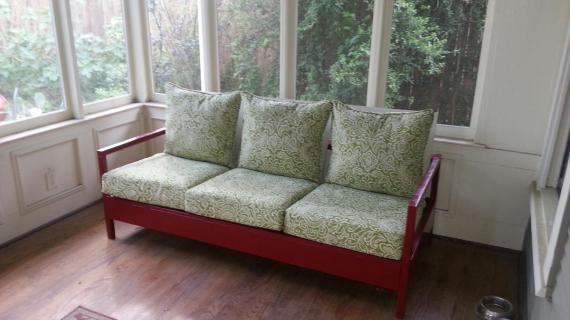
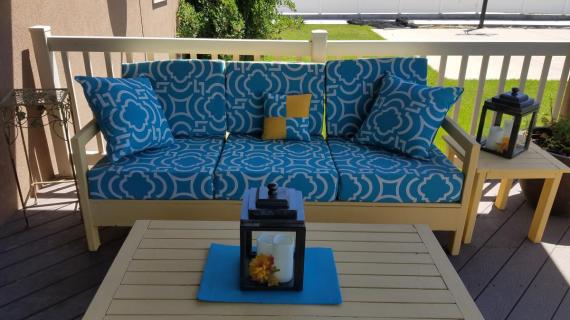
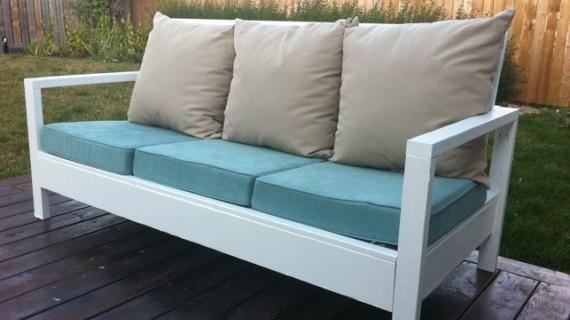
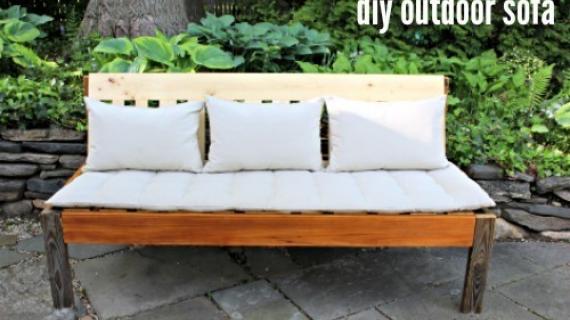
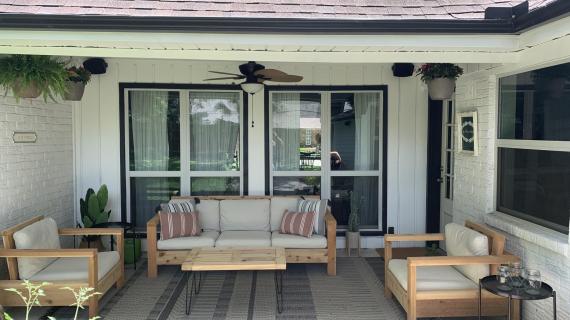
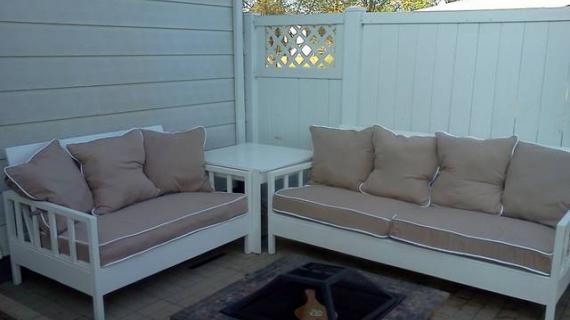
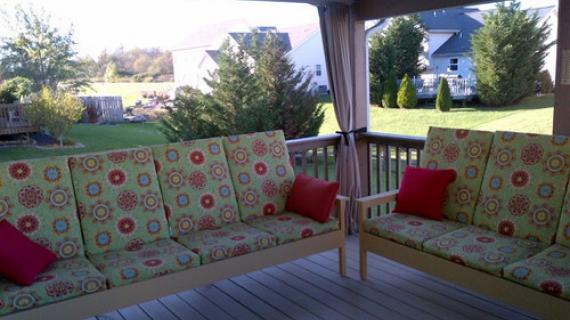
Build your own outdoor sofa. Modern style, reclined seat and back for increased comfort. Fits standard 25" x 25" deep seat cusions. Free step by step plans from Ana-White.com
Matching loveseat plans available here and matching chair plans available here.
What Type of Wood to Use?
Where to Get Cushions?
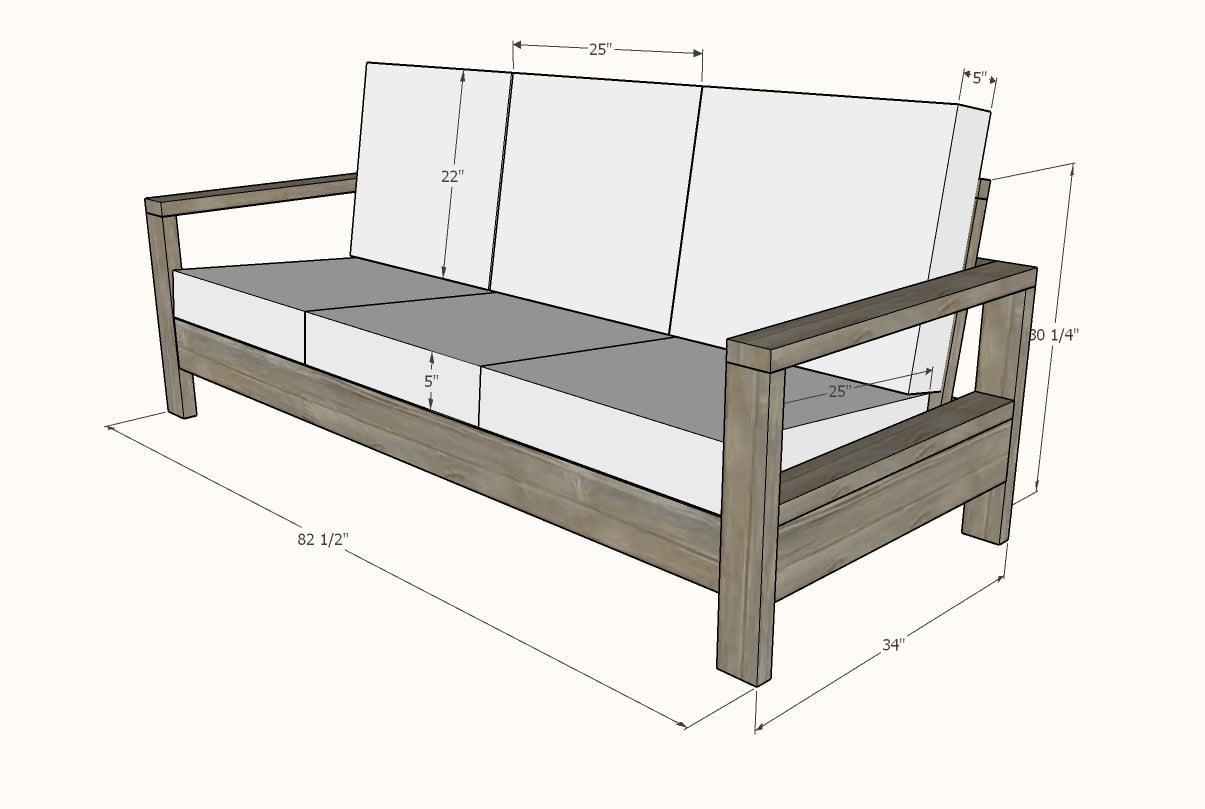
- This plan is based off a 25" x 25" x 5" deep seat cushion and a 25" x 22" x 5" deep back cushion (most popular option Amazon affiliate link).
- You can also use a 24" x 24" deep cushion with minimal modification, but will need to make the distance between the arm rests 3" less.
- If you use 24" deep x 22" wide cushions, you will need to make the distance between the armrests 9" less.
- Back cushions should match width of the seat cushions, the pillow height should be between 18" and 25" to cover the wood back rest.
Updated Plans

Preparation
3 - 2x2 @ 8 feet long
4 - 2x6 @ 8 feet long
6 - 2x4 @ 8 feet long
2 - 1x4 @ 10 feet long
(50) 2-1/2" self tapping exterior wood screws
(50) 2-1/2" pocket hole screws
(20) 1-1/2" self tapping exterior wood screws
4 - 2x4 @ 22" - legs
2 - 2x4 @ 34" - arm rests
2 - 2x4 @ 31" - arm supports
2 - 2x6 @ 31" - arm supports
2 - 2x6 @ 75-1/2" - bases
1 - 2x4 @ 75-1/2" - back
1 - 2x2 @ 75-1/2" - back rest top
9 - 2x4 @ 23-3/4" - back slats
1 - 2x6 @ 79-1/2" - back base
2 - 2x2 @ 79-1/2" - seat slat cleats
10 - 1x4 @ 23-1/2" - seat slats
Cut boards with a compound miter saw.


Instructions
Step 1
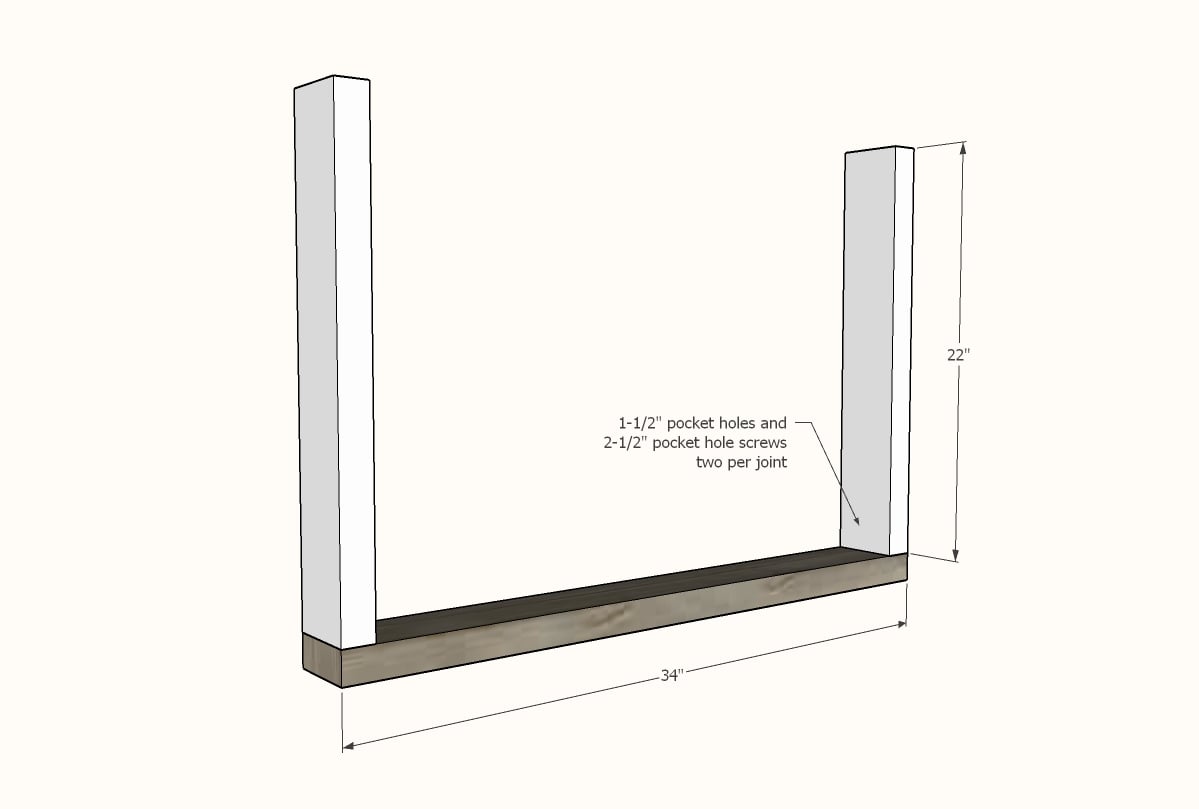
Drill two 1-1/2" pocket holes on top of each of the legs.
Attach to the arm rest from underneath with 2-1/2" pocket hole screws.
Leg is shown upside down.
Step 2
Drill two 1-1/2" pocket holes on each end of the 2x4 side supports.
Attach to the insides of the legs with 2-1/2" pocket hole screws.
Leg is shown upside down.
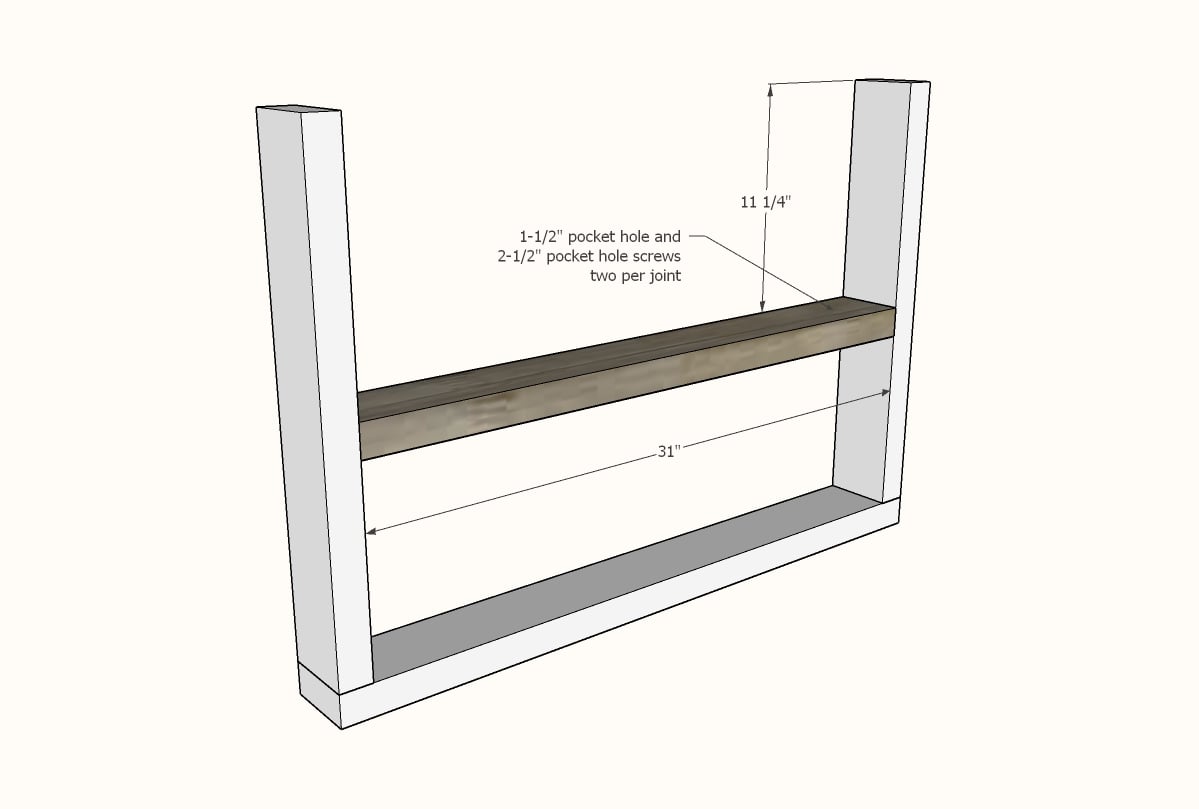
Step 3

Drill two 1-1/2" pocket holes on each end of the 2x6 end aprons. Also drill three 1-1/2" pocket holes along one edge.
Attach inside the leg, flush to the outside, pocket holes hidden on insides, with 2-1/2" pocket hole screws.
Leg is shown upside down.
Step 4
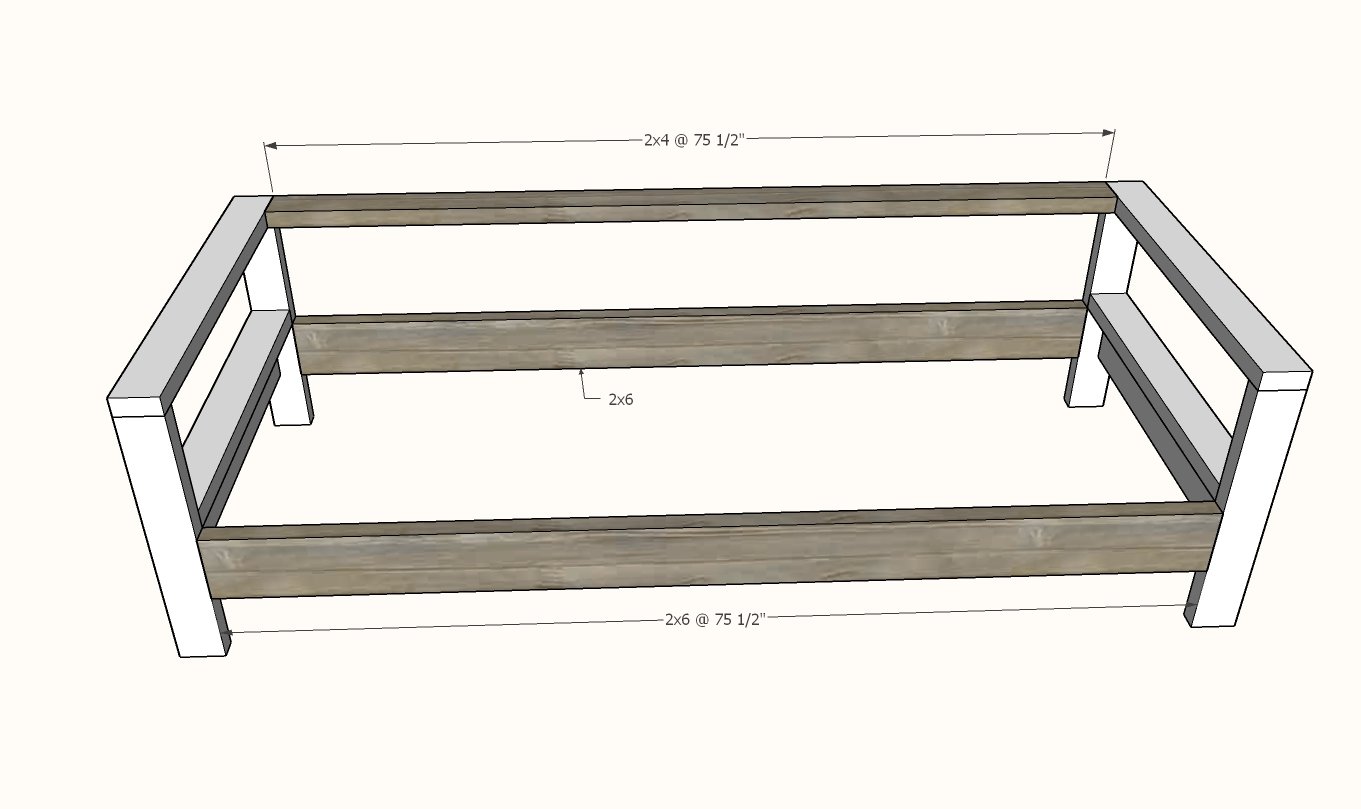
Drill two 1-1/2" pocket holes on each end of the 2x6 and 2x4s shown.
Attach with 2-1/2" pocket hole screws to the legs, all pocket holes are on the insides, or facing downward.
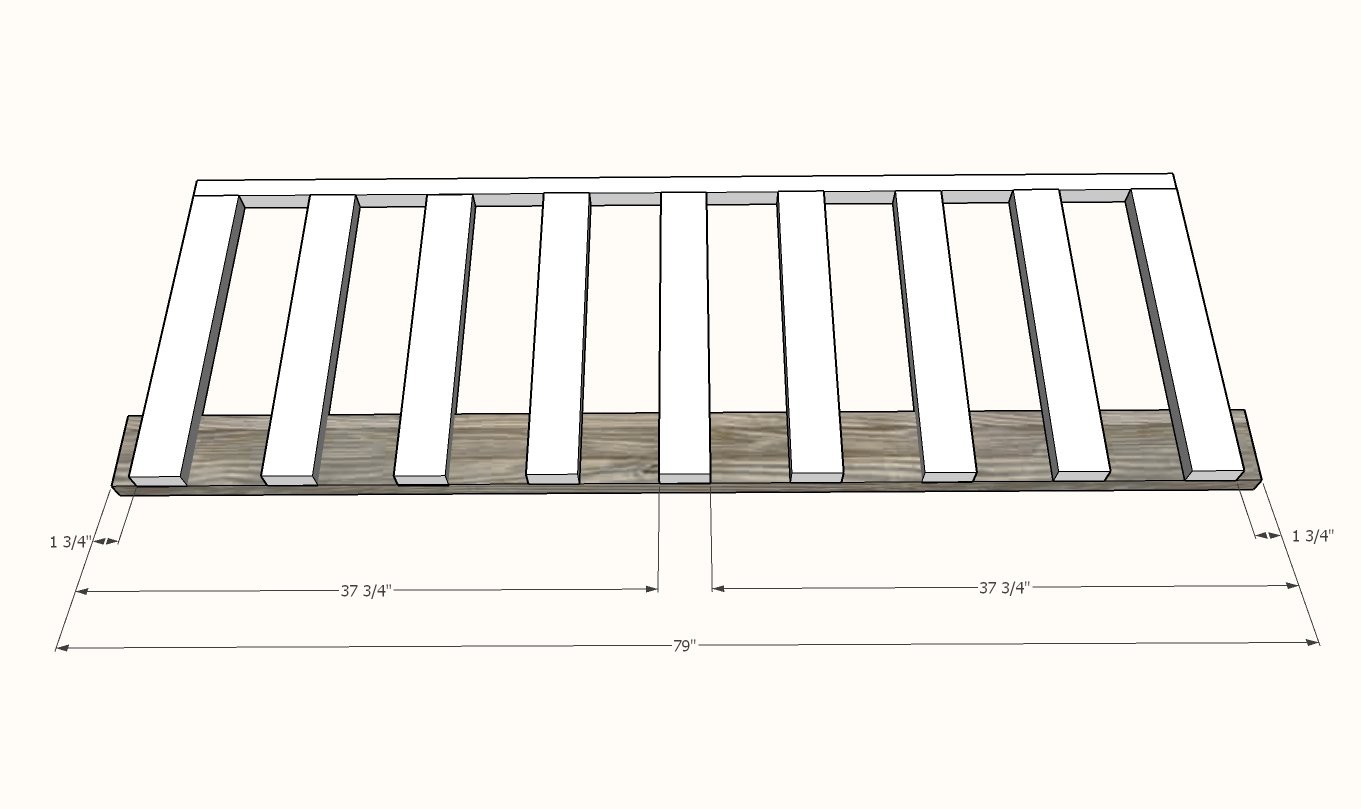
Step 5

Attach 2x2 to the back slat pieces with 2-1/2" exterior self tapping screws. Two screws per joint recommended.
TIP: Attach ends and middle first, then evenly space remaining, to avoid uneven gaps between the back slats.
Step 6
Attach back to the base with 2-1/2" self tapping wood screws, with a 2" gap on each end, keeping the same spacing as the top.
Two screws per joint recommended.
NOTE: There is an error in this diagram, the base should be 79-1/2" long and the overhangs on the ends should be 2" long.
Step 7
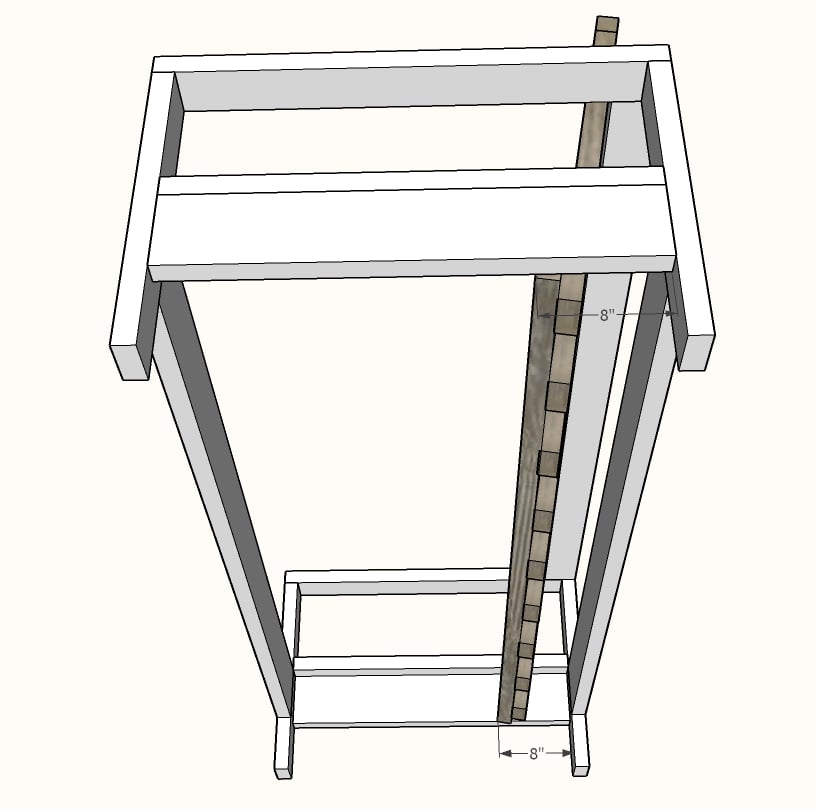
Place the back inside the sofa frame and attach at the base 8" inward with 2-1/2" self tapping screws.
The top leans on the back (see next step).
Step 8
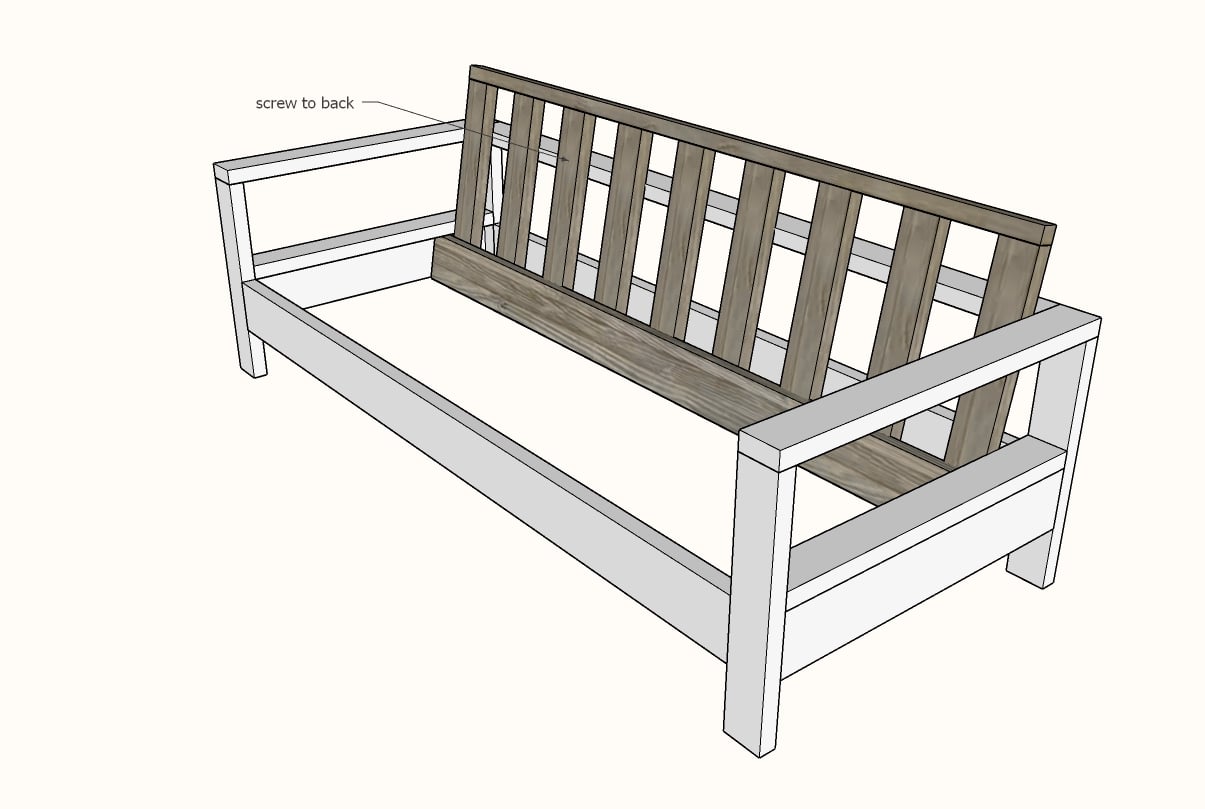
Attach a few of the back slats to the back with 2-1/2" self tapping screws.
Step 9
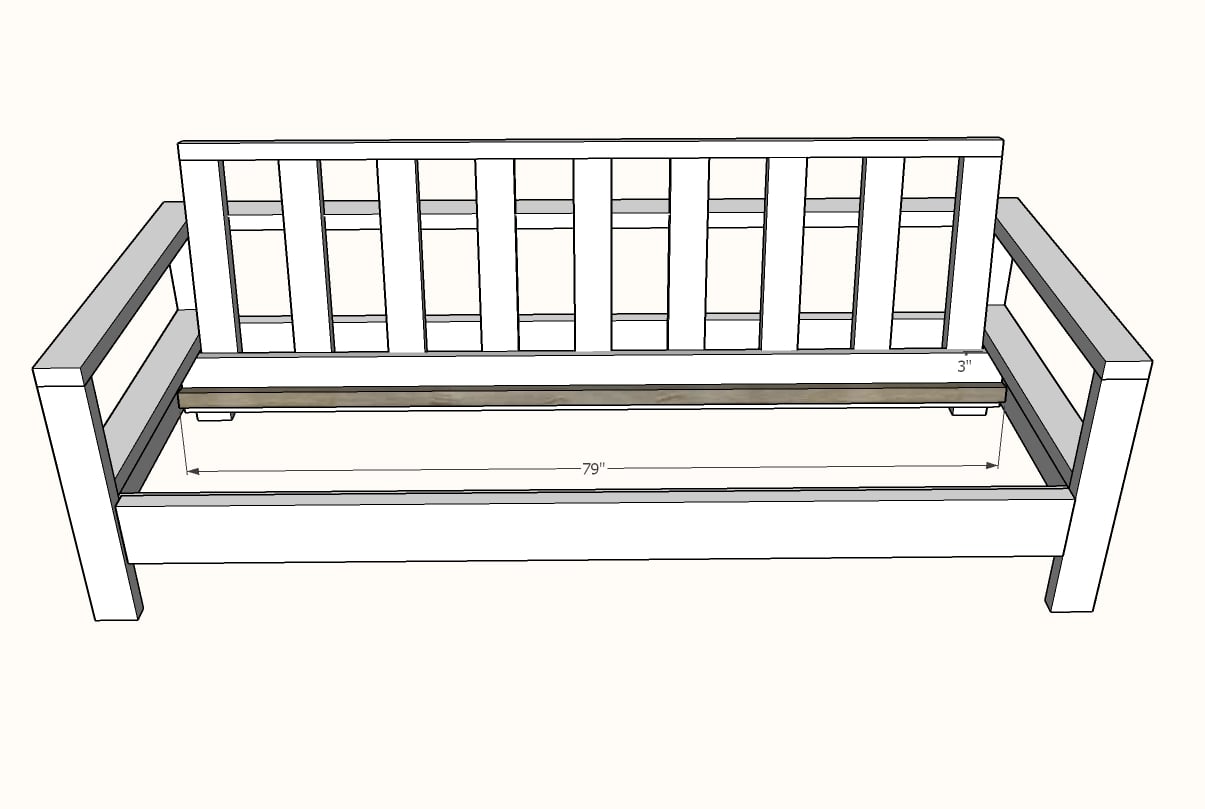
Attach 2x2 to 2x6 with 2-1/2" self tapping screws, screws about every 12".
Step 10
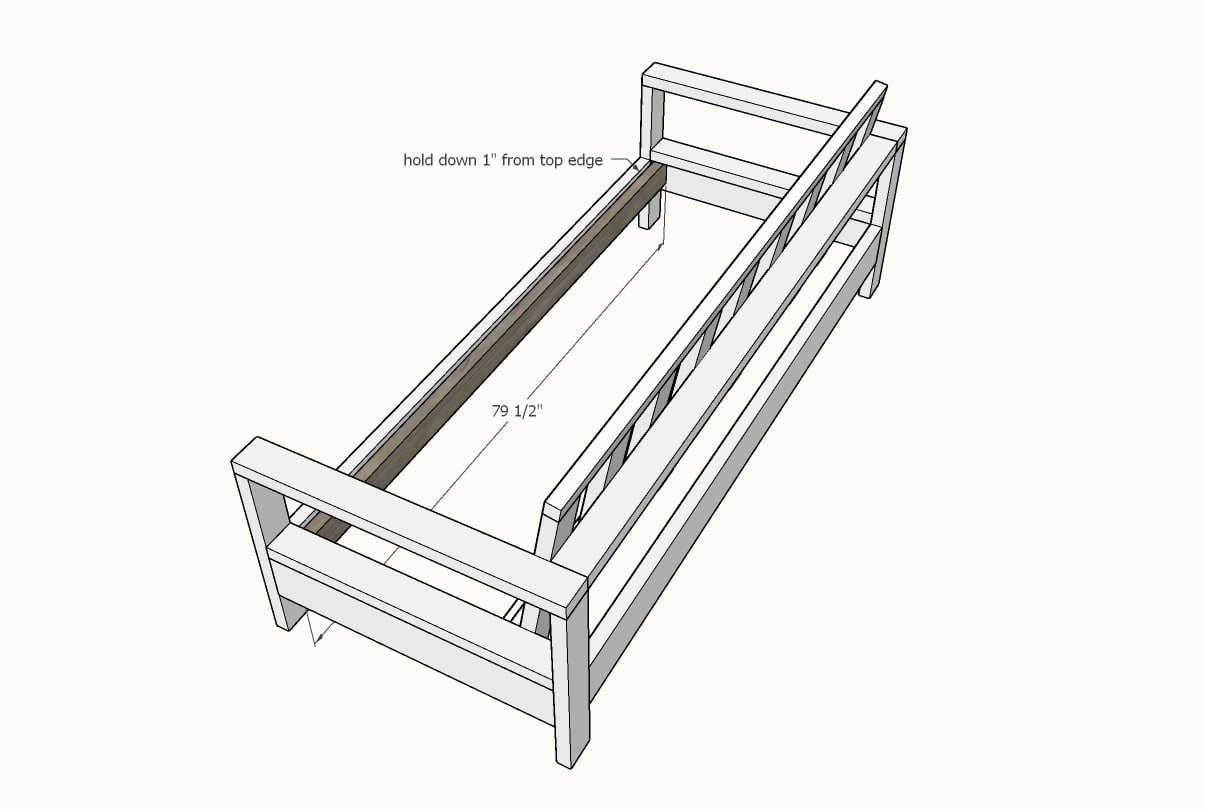
Add the front cleat with 2-1/2" screws to the front, about 1" down from the front top edge.
Step 11
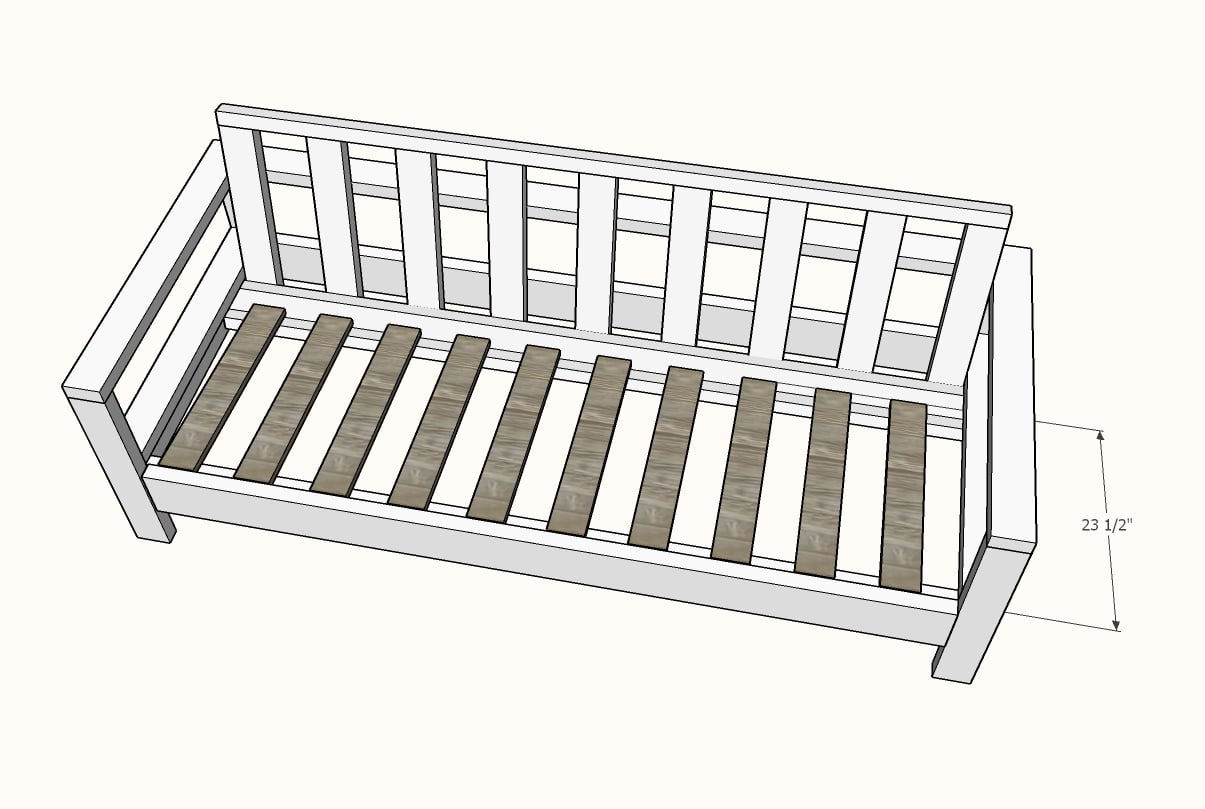
Place seat slats on top of the 2x2s and screw down with 1-1/2" screws (only one per joint is needed).


Comments
chirp219
Tue, 10/23/2012 - 09:52
great job
you did an awesome job, and love the stain! I myself cant draw a sraight line... i was interested in having someone build this for me, curious if you would be interested in building sofa, 2 chairs, 2 endtables and coffee table? Located in texas.. thanks
chirp219
Tue, 10/23/2012 - 09:52
great job
you did an awesome job, and love the stain! I myself cant draw a sraight line... i was interested in having someone build this for me, curious if you would be interested in building sofa, 2 chairs, 2 endtables and coffee table? Located in texas.. thanks
In reply to Great plans by Jarmahead
herzo1852
Fri, 08/09/2013 - 18:33
I took your advice and stained as I assembled!
Thanks for that - I would have hated staining between all these slats!
RaeRae (not verified)
Sat, 06/16/2012 - 10:56
Can you believe this guy?!
So... I was on eBay looking for some cushions to go along with the Weatherly sofa I'm going to build and found this:
http://www.ebay.com/itm/Deck-Patio-Yard-Porch-Cushion-Living-Room-Den-S…
Woodchuck2245 (not verified)
Sat, 06/16/2012 - 13:10
He is selling Ana's plans on eBay!!!!!
HE IS USING ANA'S PICTURES AND SELLING HER PLANS FOR THIS FOR $12.50!!!!!
http://www.ebay.com/itm/Deck-Patio-Yard-Porch-Cushion-Living-Room-Den-S…
Awnay (not verified)
Sat, 06/16/2012 - 20:15
ACk!
Go to the listing and to the right of the shipping line is a 'report item' url. It doesnt give an exact match to report, but just work your way through it, and post the link to here. =)
Chrisie (not verified)
Sat, 06/16/2012 - 20:51
How horrible!! I just clicked
How horrible!! I just clicked the link and went and reported him!!
hammertime
Sun, 06/17/2012 - 05:59
Reported it too...
I just reported it to ebay too. Hopefully that will be off there soon. How awful.
givehugsprn
Mon, 06/18/2012 - 22:58
EBAY SCAMMER!!!
This same guy is also selling other plans off Ana-White! He sold 5 copies of this plan for $7.00 each. I have sent him an e-mail and am waiting for a response.
Raised Flower Garden Deck Patio Back Yard Plantar Boxes
Neece (not verified)
Tue, 06/19/2012 - 10:04
Ebay Scammer
I physically called Ebay and let them know that the seller was selling items that were not his to sell. I couldn't figure out how to report him otherwise. They were very helpful in taking the information and I hope he is unable to sell through Ebay again.
David L (not verified)
Mon, 07/23/2012 - 22:17
Drawing arch on back support
Having trouble drawing the arch on the top piece of the back support. Anyone have any tips?
patrick1973 (not verified)
Sat, 09/15/2012 - 06:14
which kreg jig works best?
i plan to bui9ld my wife the sofa and chairs and i am not sure which Jig to purchase? either the $40 R3 or the $99 K4.
i know for sure i will build these 3 pieces so wondering which is easiest to use on this furniture. may tackle some other products in the future,, so should i just spring for the $99 K4?
thank you,
Patrick
slyerly
Wed, 09/19/2012 - 08:09
i did it!
http://ana-white.com/2012/09/outdoor-sofa-chair
gary
Wed, 02/20/2013 - 12:57
Outdoor sofa too Futon
I love what you have done with the sofa, but would like to see the necessary mods to turn it into a Futon. Need some seating/sleeping on our house boat and this look would work wonderfully. Is this something that would merit your time?
thanks Gary
stamhow
Thu, 08/08/2013 - 08:17
I would also love to know if
I would also love to know if it can be converted to a futon, queen size. That would be fantastic!
herzo1852
Wed, 04/10/2013 - 10:31
The box cushions link has moved - here is the new one!
http://www.bettsykingston.com/2010/08/box-cushions/
I am using it for my loveseat!
Patteeh Manalo
Thu, 07/11/2013 - 23:17
cheap lumber?
HI Ana I feel so lame for discovering you sooo late! But I was super excited to start building this sofa cus I saw that the lumber would run me around $30. And i even ordered a Kreg Jig on Amazon. But after going through the lumber at Lowe's and Home Depot, they will be running me close to $150 :( Where can I find it cheaper? The lumber stores are way more expensive!
bredemann
Sun, 03/02/2014 - 05:33
Suggestion for attaching side aprons to legs
Just built this bench this weekend! Turned out great. I found the cost of the wood to be $175. I used Poplar for the legs and arm tops. I used a mixture of Top Choice and Select pine for the rest of the sofa. I used the Poplar because it is a harder wood. Also bought a Kreg pocket hole tool. First time to use and REALLY liked it. Was well worth the $40.
Here is one TIP that I'd like to share.
Before attaching anything, I drilled all of the pocket holes in the aprons.
When I went to attach the side aprons to the legs, the 4 right angle joints (back and side, side and front) had the pocket holes at exactly the same height. This meant that tips of the screws were right on top of each other.
Doing it again, I would have offset the pocket holes from each apron so that when the screws went into the legs, they would have not come close to intersecting.
bredemann
Mon, 03/03/2014 - 06:17
Painting Tip
I assembled the entire sofa and then started to prime / paint. Since this is going to be outdoors, I wanted to make sure that I had really good coverage and didn't leave any bare spots.
I had trouble getting paint into the section where the bench is attached to the back rest, due to the angle.
If I were to do this again, I would have painted this tough to reach spot, prior to attaching the back to the bench.
I still haven't figured out how to get paint in this "V" area. I'm going to look into finding an oil based spray primer and paint.
jostj
Wed, 04/29/2015 - 16:40
Wood Type
What type of wood are people using for this sofa? I can't imagine they are using framing lumber??
amiealejandro
Tue, 06/09/2015 - 16:56
I just built this using your plan!
Thank you so much for sharing this, I just finished my very first project following your plan and I am inlove! I used 2x4 for the arms for extra support since I made mine longer and they turned out really pretty! Thank you again Ana!
TomInPort65
Sun, 08/02/2015 - 06:57
Outdoor sofa made in HPDE?
Has anyone tried to construct this design from HPDE (aka Polywood) material? Wondering if there are any changes required to use that material. Thanks!
Newbiebuilder
Thu, 07/07/2016 - 15:04
Plan modification
The simple white outdoor sofa plan is beautiful and would be a great plan to modify into a bi-fold futon. So many of the elements are already there.
deb12
Tue, 05/16/2017 - 17:17
sofa/couch
can't get pdf button to work goes to error and not finding print button
deb12
Tue, 05/16/2017 - 17:17
sofa/couch
can't get pdf button to work goes to error and not finding print button
In reply to sofa/couch by deb12
Ana White
Thu, 05/18/2017 - 15:09
printer friendly
Hope this helps http://www.ana-white.com/print/2546
Caterpillar11
Sat, 09/16/2017 - 07:13
Sectional
Is there a way to make this a 2 piece sectional or would it be awkward
looking since there is a back rest? I really like your other sectional design, but this one looks a little bit more modern and would go with my home better. Is it possible to modify by just making a second one without one side arm, or would it look silly?
thanks so much! Love your site!
In reply to Sectional by Caterpillar11
Ana White
Tue, 09/19/2017 - 18:00
Do a google image search for
Do a google image search for "ana white 2 piece sectional" there are quite
a few options. Hope this helps! Jen
Spirit910
Tue, 03/26/2019 - 16:55
Tables
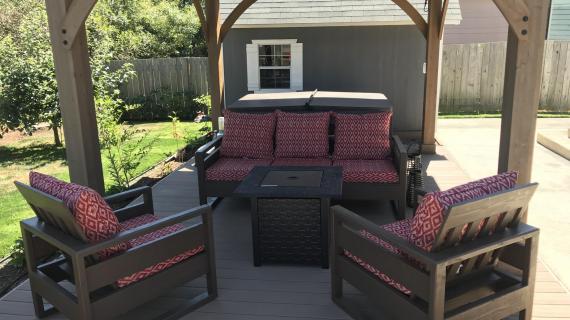
I love the sofas! Really perfect for the pergola in my backyard. I was wondering if there are plans available for those 30x30 tables? I love how they complete the whole sofa sets. Are they on the Ana White website?
Ana White Admin
Tue, 03/26/2019 - 18:01
Tables
Which tables are you referring to? Do you have a link or photo?
madbugger
Fri, 04/10/2020 - 23:04
Original plans
Really like the Simple White Outdoor sofa, but would love to get the original plans. The updated ones here use 2x4s that will make this much bulkier and heavier than the original. Any chance of getting the original plans for this sofa?
dante1013
Wed, 04/29/2020 - 09:37
Wider Arm Rests
Hi Ana, thanks for the great plans. I'm planning to build two of these this weekend. Would it be possible to replace the end arm rest pieces with 2X6"s instead of 2x4"s. I'm trying to go utilize wider arm rests for setting drinks and such down on it. Thanks!
dark7622
Mon, 06/15/2020 - 07:58
wider arm rests is possible
I built two of these, you can change it but you will have to at least modify the back base. Note I had to shim my bases, I put in a correction that it should be 80" instead of 79.5. But in your case it means the whole thing would be deeper and hence the base of the backer will be different.
Another thought is maybe using a 1x6 instead and screw that on top of the 2x4, or leave the legs 2x4 and just make the arm rest alone 2x6, but I would screw some screws from the top down instead of just the pocket screws, with it being wider without wider support if someone sits on it, it could mess it up.
rozim
Fri, 05/08/2020 - 22:44
Step 3 instructions
Love the design and I'm currently trying to build this piece.
Step 3 says
"Drill two 1-1/2" pocket holes on each end of the 2x6 end aprons. Also drill three 1-1/2" pocket holes along one edge."
And I'm thrown at the very least by "three 1-1/2" pocket holes along one edge" -- wouldn't it be pocket holes on both edges, and if it is along one edge, which one?
The way we're proceeding is doing 1 hole on each side of the narrow dimension (the nominal 2" wide edge) and 2 holes on each of the wider dimension sides, since this wood doesn't seem to be bearing that
much load it's not clear that it needs 3 screws, and anyway the Kreg jig we have just does 2 holes.
thx,
Dave
dark7622
Mon, 06/15/2020 - 07:53
My project
I might have gone overkill, but since the jig I have makes two holes I put 4 holes in every 2x6 where pocket holes were needed. worked fine and was pretty solid
dark7622
Mon, 06/15/2020 - 07:51
More slats for individual cushions
If you use individual cushions (like a set of 3) its ideal to have more slats, at least 4 to 5 more.
pagail118
Thu, 07/30/2020 - 19:03
Straight seat option
Hi !
I am looking to build a sectional sofa, and most I found have straight back which I think is not as much comfortable.
This one seems great, but I think the reclined seat would not work as a sectional.
Do you think it could be adapted easily to have flat seat while keeping the reclined back, so that it can be made a sectional ?
I think of putting the cleats at the same height, like at step 9 put the cleat higher.
What are your thoughts ?
Thank you !
grvitas
Tue, 09/01/2020 - 22:27
Accessories
Where did you buy the cushions?
alexandru.pop
Mon, 02/08/2021 - 13:33
Hello, i have a question ,…
Hello, i have a question , for the pocket hole conection do you use a kreg HD?
Rmwdmw317
Fri, 04/09/2021 - 14:12
converting to sectionaL
I built this couch ew years ago and absolutely love it. I want to somehow convert it into a sectional this year but not exactly sure what would work best. would just taking off one armrest and building a second couch or loveseat work? any help on the corner part would be awesome
Rmwdmw317
Sat, 04/10/2021 - 15:47
where are the plans for the…
where are the plans for the sofa as pictured? I need those
Rmwdmw317
Sat, 04/10/2021 - 17:46
where are the plans for the…
where are the plans for the sofa as pictured? I need those