
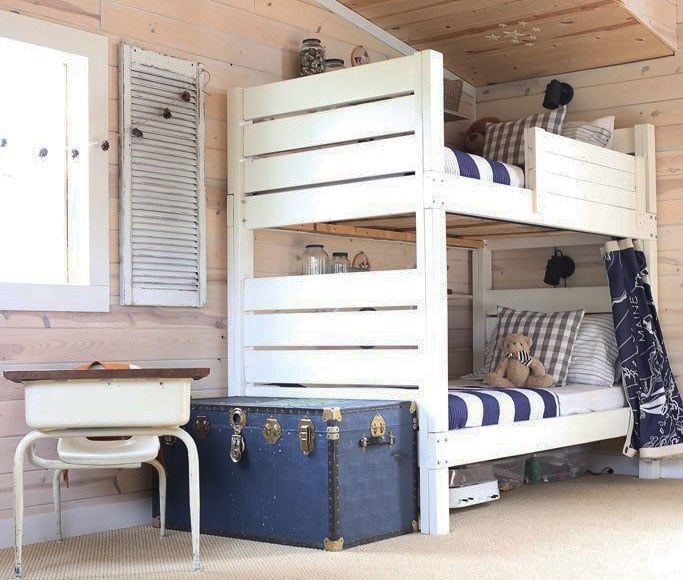

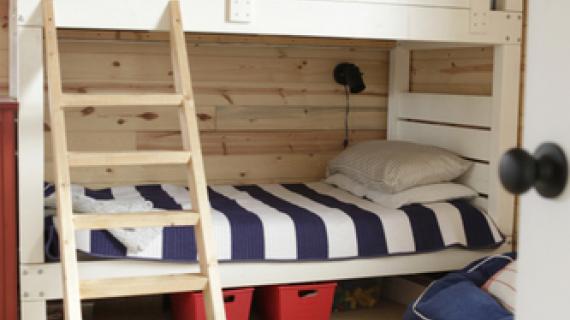
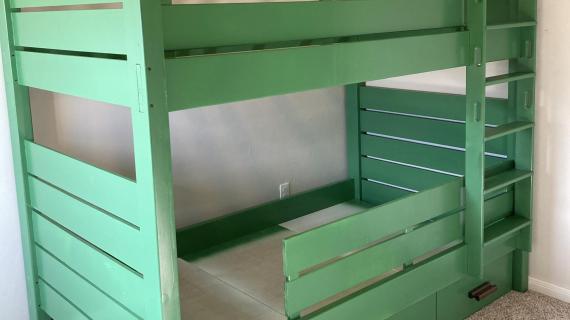
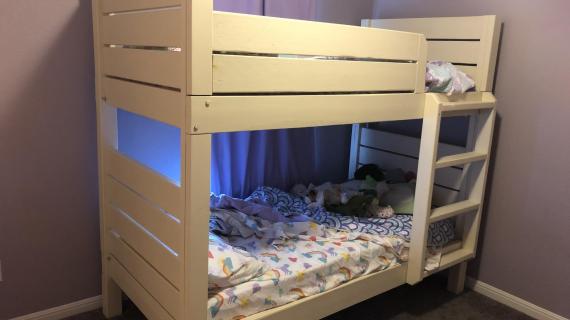
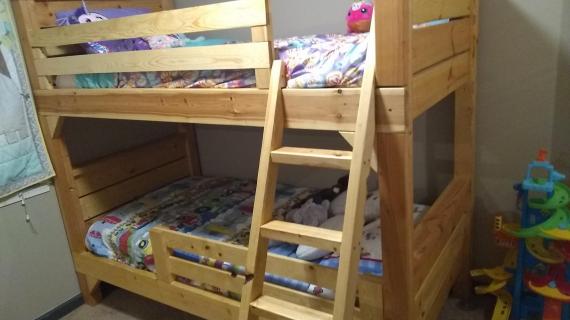
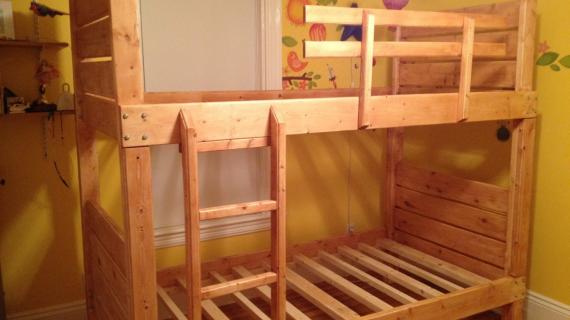
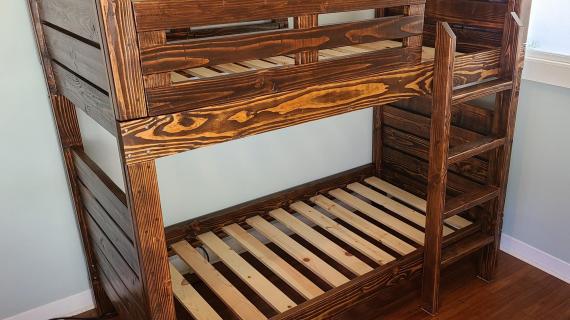
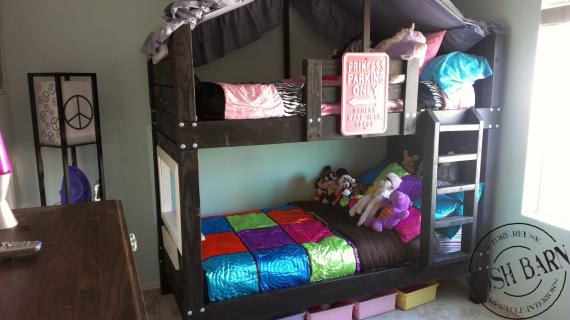
2x4 bunk beds that look anything but! We love the modern look of these sturdy bunk beds. Built in sections, it's easy to move in and out of a room. There's good reason this plan is a reader favorite.
You'll love how easy and inexpensive they are to build! Our free step by step plans include diagrams, shopping list and cut list.
Preparation
- 7 - 2x4 @ 8 feet long
- 6 - 2x6 @ 10 feet long
- 4 - 2x6 @ 8 feet long
- 2 - 2x2 @ 8 feet long
- 2 1/2" self tapping wood screws for most of the joinery (about 150)
- If you have a brad nailer, 2" brad nails would be nice to use in step 2
- 2" self tapping wood screws for attaching the slats (about 50)
- Recommend using 32 - 3 1/2" bolts with nuts and washers for attaching siderails to headboard/footboard
- You'll also need wood to create the slat system if you mattress is not a "bunkie board". We recommend 1x4 lumber, spaced about 4" apart - you'll need about 10 1x4 at 8 feet long.
- For each guardrail, you'll need another 2x6 @ 8 feet long and about 3 feet of 2x4s
- For the ladder, you'll need two more 2x4 @ 8 feet long
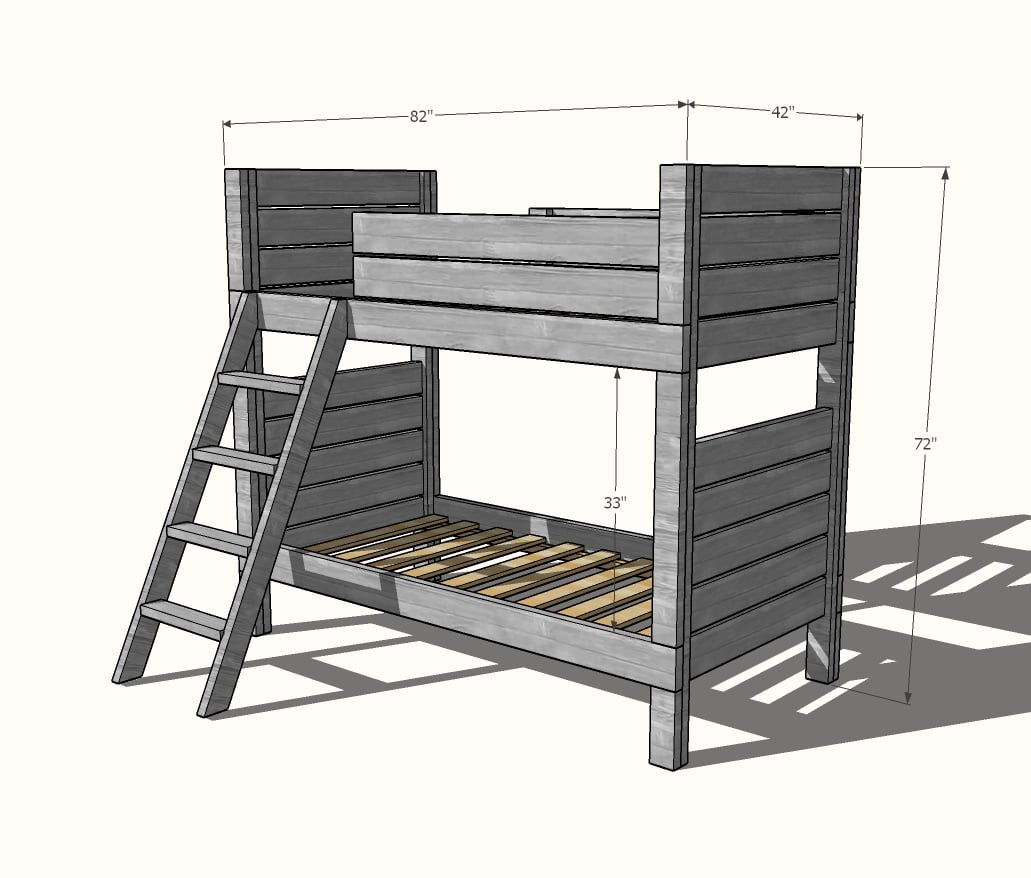
Bunk Bed Cut List
- 18 - 2x6 @ 36"
- 4 - 2x4 @ 72"
- 4 - 2x4 @ 18"
- 4 - 2x4 @ 33"
- 4 - 2x4 @ 10"
- 4 - 2x6 @ 82"
- 4 - 2x2 @ 75"
- Slats cut at 39" or bunkie board
Guardrail Cut List (for one guardrail)
- 2 - 2x6 @ 48"
- 2 - 2x4 @ 16"
Ladder Cut List
- 2 - 2x4 @ 59-1/4" - long point to short point measurement, both ends cut at 25 degrees off square, ends ARE parallel
- 4 - 2x4 @ 17-1/2"


Please read through the entire plan and all comments before beginning this project. It is also advisable to review the Getting Started Section. Take all necessary precautions to build safely and smartly. Work on a clean level surface, free of imperfections or debris. Always use straight boards. Check for square after each step. Always predrill holes before attaching with screws. Use glue with finish nails for a stronger hold. Wipe excess glue off bare wood for stained projects, as dried glue will not take stain. Be safe, have fun, and ask for help if you need it. Good luck!
Instructions
Step 1
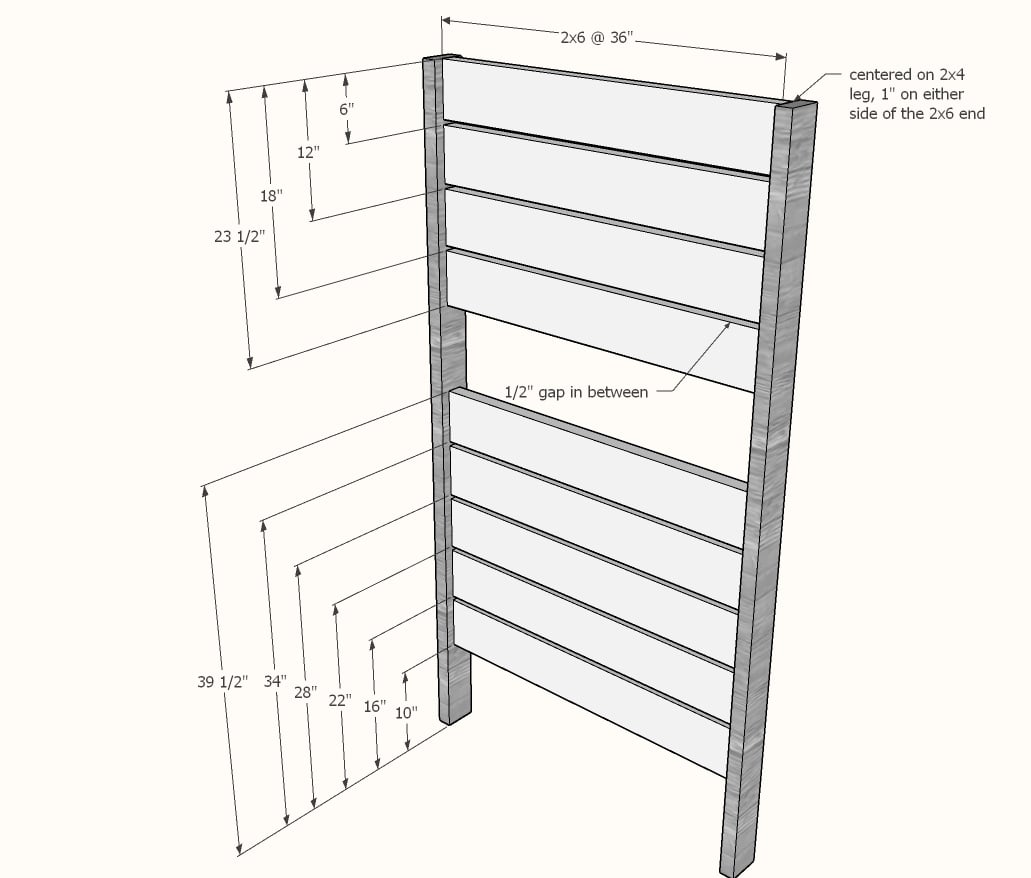
Build the two bunk bed ends by attaching the 2x6 @ 36" to the 2x4 legs. There should be a 1/2" gap in between the 2x6 slats, and 1" on space on either side on the 2x4 legs.
We recommend two 2-1/2" self tapping screws per joint to attach from the outside - don't worry about it looking nice, this all gets covered.
Step 2
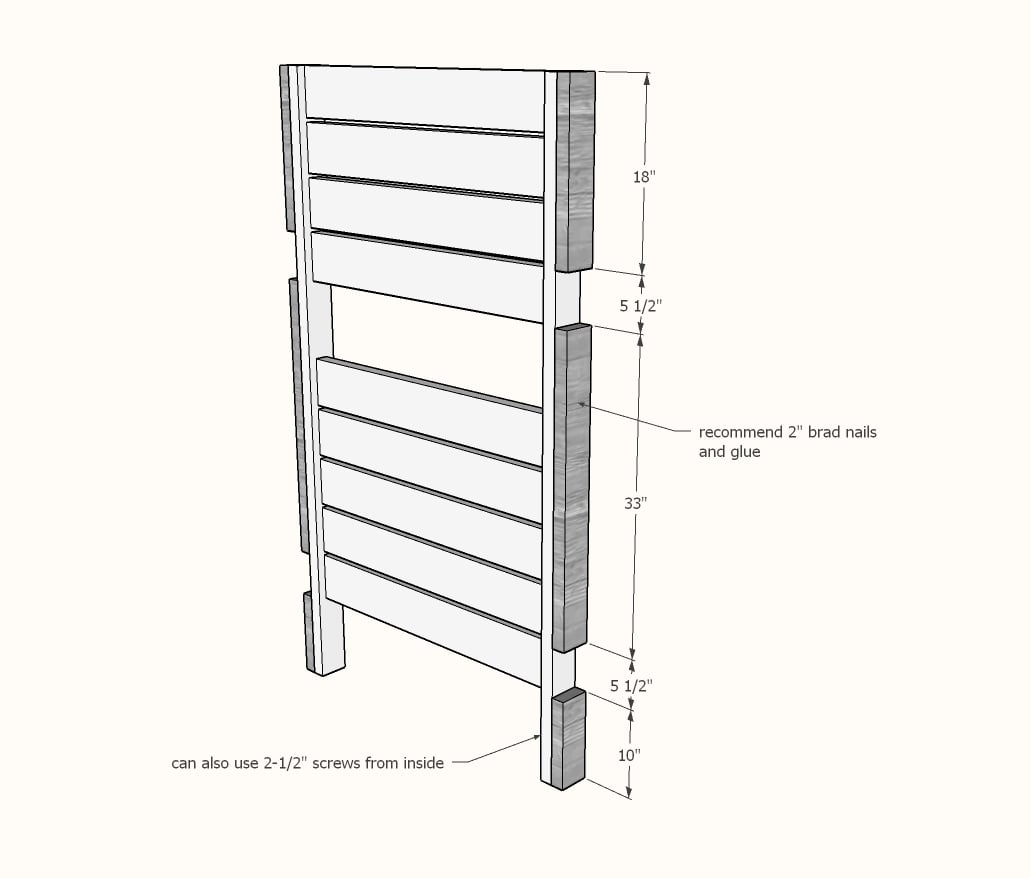
Once your ends are built, add the leg spacer trim pieces. Now this plan assumes your 2x6s are 5 1/2" wide. I would use a scrap 2x6 piece as a spacer to make sure you are getting the right gaps for the next step. Start at the bottom and work your way up. TIP: Cut the top sections last as they may be long or short depending on the width of your 2x6 boards.
We recommend using 2" brad nails and glue to attach, as the nails are easy to hide.
Sand, paint or stain the two end panels and your 2x6 @ 82" siderails now.
Move the pieces into the room.
Step 3
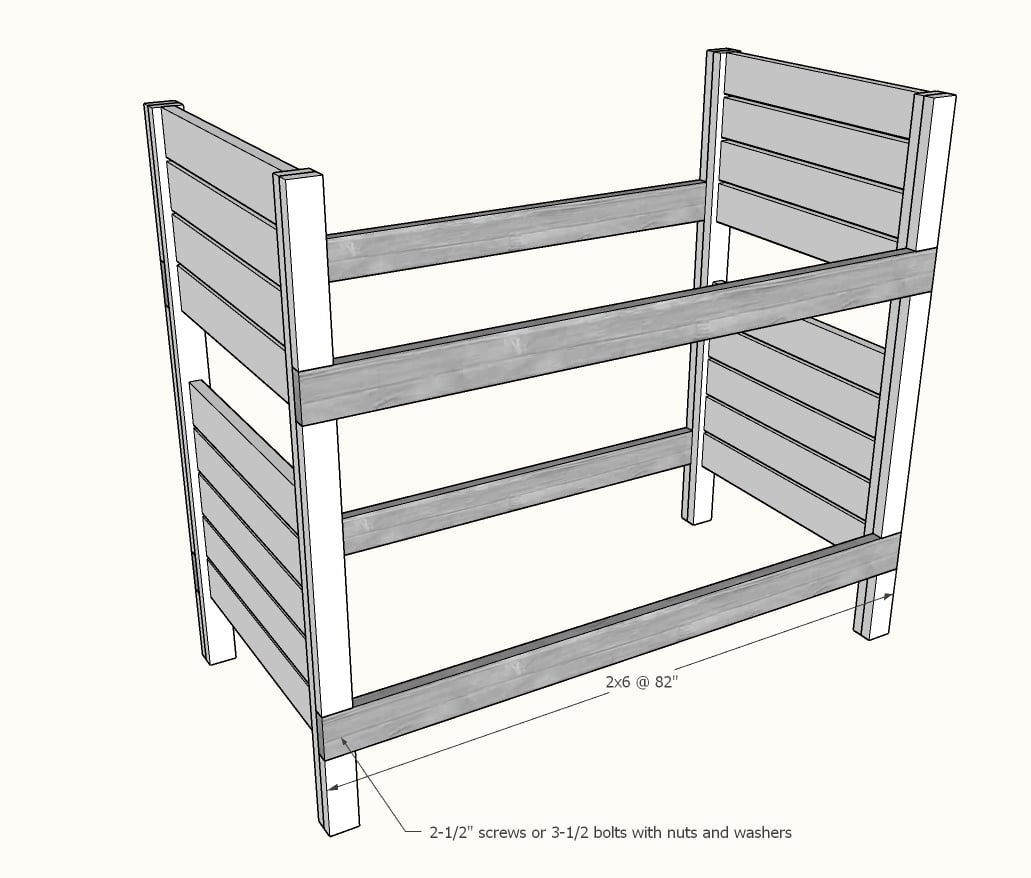
To assemble, drill four holes in pattern on each end of the siderails, through the legs. Attach with bolts and washers. This way, your bed can easily be taken apart and moved.
Step 4
Screw 2x2 cleats to the inside of the siderail with 2-1/2" screws and glue, screw about every 8-10".
Step 5
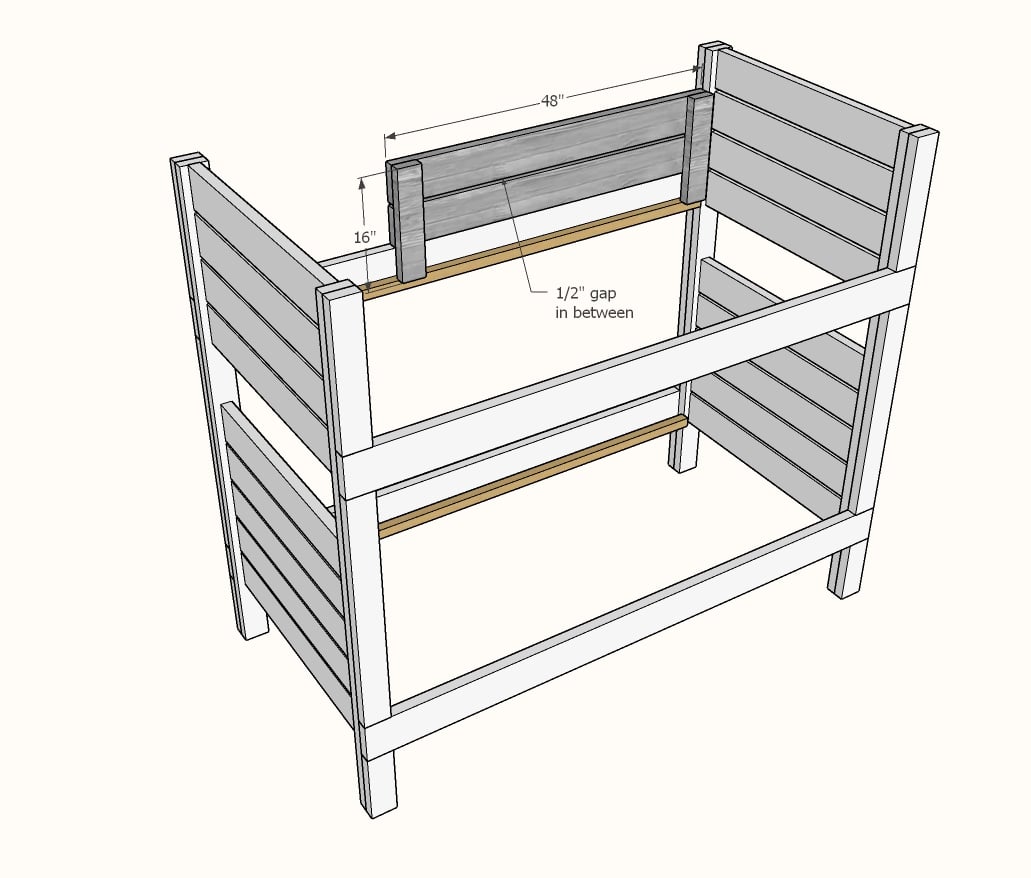
Optional Guardrail
Screw 2x6s to 2x4s from inside, leave a 1/2" gap in between.
Screw guardrail to back side of the bed siderails.
Step 6
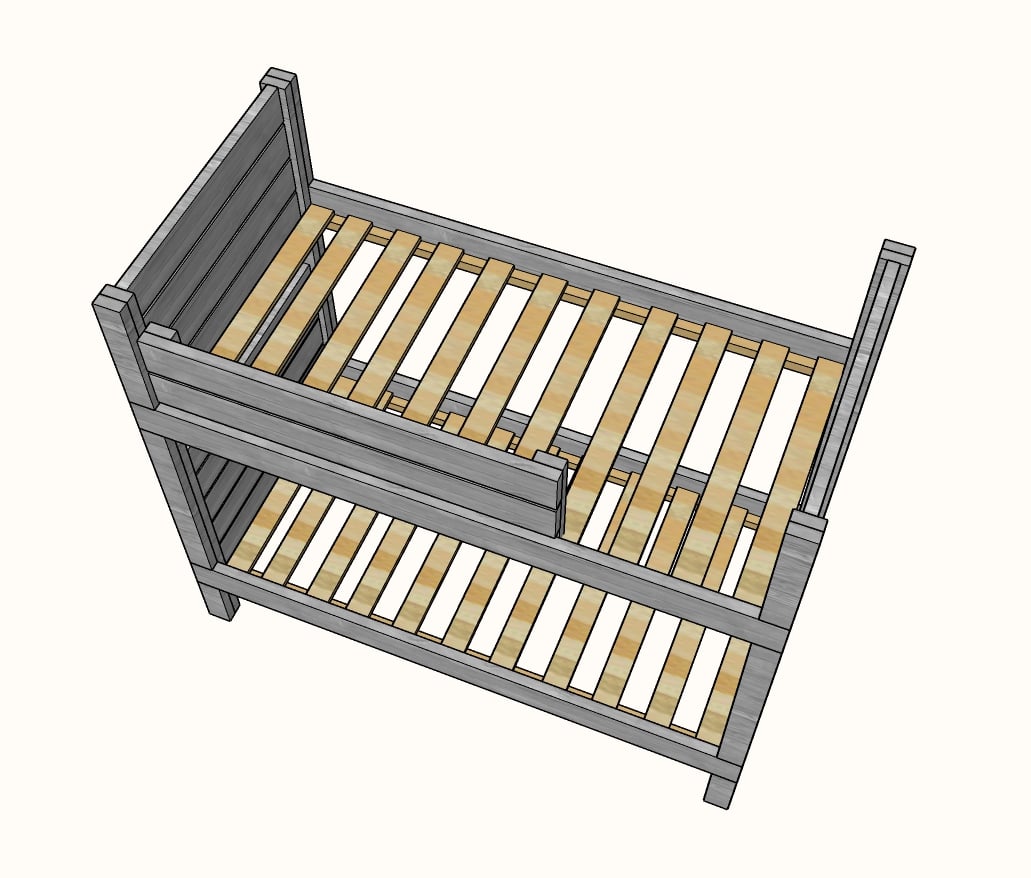
Mattress slats - use 1x4s or similar laid on top of the 2x2 cleats to support the mattress. We recommend 2" screws for keeping the slats secured.
Place the slats around the guardrail legs.
Step 7
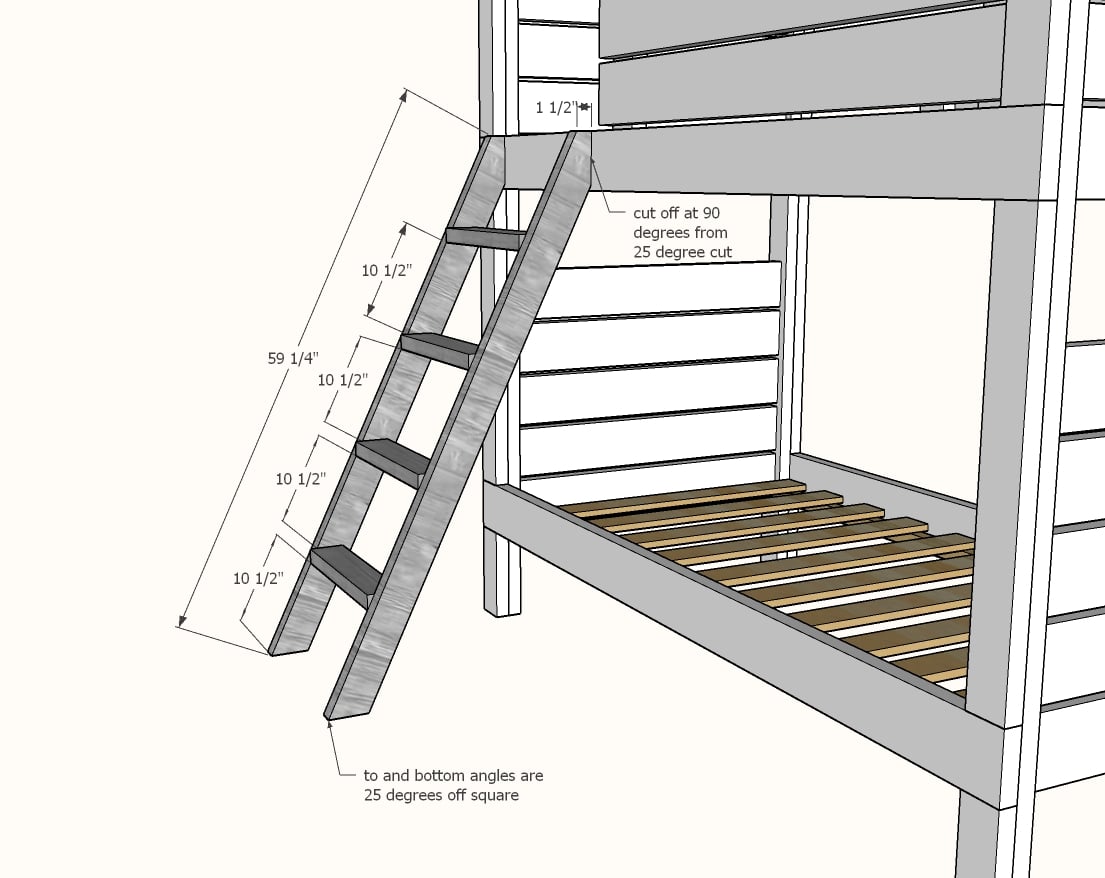
Cut the mattress legs at 25 degrees off square, long point to short point measurement, ends ARE parallel.
Then cut the top end off, 1-1/2" back, at a 90 degree angle from the top angled cut end.
Use 2-1/2" self tapping wood screws to attach ladder rungs to the ladder legs.
Attach ladder from inside of the siderail with 2-1/2" screws.
It is always recommended to apply a test coat on a hidden area or scrap piece to ensure color evenness and adhesion. Use primer or wood conditioner as needed.


Comments
Kate (not verified)
Wed, 03/07/2012 - 12:46
Your "vintage" plans are
Your "vintage" plans are still wonderful... I'm in the process of building a farmhouse bed right now!
Guest (not verified)
Wed, 03/07/2012 - 12:54
Don't sell yourself short...
You are stunning. Keep up the great work.
Guest (not verified)
Wed, 03/07/2012 - 14:05
Thank you so much for these
Thank you so much for these plans Ana! I promised my daughter I would make her a bunk bed as soon as I finished my farmhouse bed and I just couldn't settle on any of the plans. I knew I wanted it to be as simple as possible with the use of 2x4s and here you come like a knight (what's the female version?) in shining armor to save the day! She will be thrilled!
JBtje
Thu, 03/08/2012 - 00:36
LOVE THIS SITE
Hi Ana!
Your site is absolutely wonderful!!!!!
I was trying to find building plans in my native language, but couldn´t find anything. When I searched in English, your site came up and I´m totally excited building the bunk bed and other stuff!!! Thank you sooooo much
Alex (not verified)
Thu, 03/08/2012 - 03:44
End ladder bunk?
I have been searching for an end ladder bunk, to save space. (We had one growing up). Is there any reason that I can't just space the end pieces a little further apart, like a ladder? I can't think of a reason, but would love some reassurance here :)
Cheers and thanks :)
Darrel (not verified)
Mon, 06/04/2012 - 07:49
End Ladder Bunk
I built a similar design for my nephew and spaced it like you said and it is still working fine for him. Going on three years of use and still solid. I didn't use as many 2x6's for the ends but it is still a solid design.
KAW1019 (not verified)
Wed, 08/08/2012 - 08:45
Is the shopping list
Is the shopping list incorrect stating two 2x2's needed? A cleat for each side rail is needed and therefore should call for four 2x2's unless I am missing something (which could be the case). Can someone confirm? We are enjoying building these beds. Thanks!
Gloria (not verified)
Wed, 09/26/2012 - 18:31
Ladder for bunkbed
Hi, I am going to build the bunk bed ladder, but im having trouble reading
the measurements for the spacing on the ladder steps/rungs. could you please email the spacing to me. I would really appreciate it! BTW I love you website and all the wonderful things you have made! :)
Mae (not verified)
Sat, 12/08/2012 - 14:47
PDF Broken
I can't print the PDF to do the project. Looks good, but adding lots of steps of printing out JPGs and coming in and out of the house for the next steps.
Brett (not verified)
Wed, 12/26/2012 - 07:53
PDF broken
We love these plans, but can't print them because the PDF is broken.
swpagnani
Sat, 12/07/2013 - 20:38
HELP PDF BROKEN!!!!
I'm needing to build these bunk beds ASAP could you please fix the PDF?
mleav880
Sun, 05/04/2014 - 17:37
PDF
The link to the PDF is broken. Is is possible to fix this?
samantha0401
Wed, 05/21/2014 - 06:15
PDF link broken!
Can you please update the link for the PDF version of the plans for the Side Street Bunk Beds? Thanks!!!
rjc1218
Fri, 01/02/2015 - 16:53
Can't see plans for ladder or rail
I'm in the process of making the bunk beds. The PDF link is brken, and I don't see plans for the ladder or rail. Any chance you could post them or e-mail them? [email protected]
In reply to Can't see plans for ladder or rail by rjc1218
Ana White
Sat, 01/03/2015 - 12:45
Have you seen this planhttp:/
Have you seen this plan
http://ana-white.com/
truemc
Tue, 06/23/2015 - 14:09
Full PDF Plans
The link to the pdf is broken and I can not see the plans for the ladder and side boards. Could you please fix and/or send them to me. Thanks
In reply to Full PDF Plans by truemc
Ana White
Wed, 06/24/2015 - 10:00
http://ana-white.com/2010/01
http://ana-white.com/2010/01/plans-how-to-modify-the-simple-bed-to-a-bu…
Click on the "printer friendly version" or "pdf version" at the bottom of
this plan
derekwilcox1110
Wed, 07/29/2015 - 11:16
Wood Type and Bolts?
I am very new to wood working and this is going to be my first big project. Is Douglas Fir a good wood to use on these bunk beds? Also, you mention 3 1/2 inch bolts. Should I use carriage bolts or something else? Thanks for your help!
amu16d
Tue, 01/05/2016 - 19:18
Ladder and Top rail
Could you provide instructions on how to build the ladder and the rail on the top bunk? I don't know if maybe the instructions are in the PDF or not, but I am unable to open it. I want to make this bed for my daughters. Also, does anyone have an idea as to what the weight limit would be for the top bunk? It just seems that there isn't a whole lot of support there and I am a little concerned about my child falling through it.
In reply to Ladder and Top rail by amu16d
Ana White
Fri, 01/08/2016 - 20:00
Take a look at this post.http
Take a look at this post.
http://www.ana-white.com/2010/01/plans-how-to-modify-the-simple-bed-to-…
COamatuer
Sat, 07/30/2016 - 19:52
Pocket holes?
Do the pocket holes that secure the 36" end boards to the legs go on the exterior face of those 2x6s....or the tops and bottoms? If top and bottom...does this mean only 4 screws per board?
Thanks in advance!!!
gbenedict
Wed, 05/08/2019 - 13:50
I love this bunk bed. My…
I love this bunk bed. My boys are not ready for a bunk bed yet. But we need the crib back. Any suggestions on how to make this into to twins that can be converted to a bunk?
Trisha1981
Sun, 01/12/2020 - 10:54
Print?
Why can’t I find how to print the plans? No PDF link or anything... anyone?
Juliette1373
Thu, 02/13/2020 - 15:58
That’s beautiful. I would…
That’s beautiful. I would like to make this in a queen size. Would I just add 21 inches to the headboard and footboard and 5 inches lengthwise?
thank you
caroline
bjerfr
Sat, 07/11/2020 - 10:04
Full over full
Do you have this plan but for a full over full?