
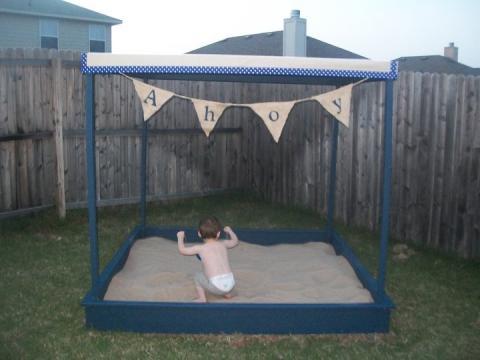

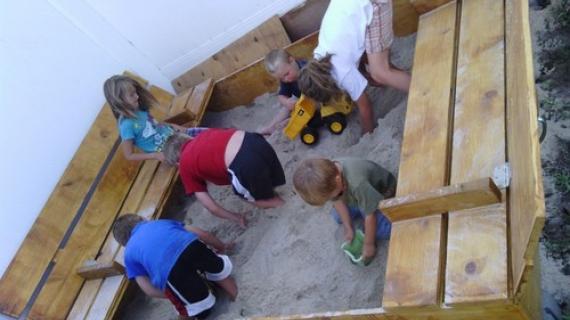
Provide endless hours of play under shade with this easy to build sandbox. Featuring a large play area and canopy, this sandbox will bring all the fun of the beach to your back yard.

Preparation
4 – 2×8 Boards (8′ Length)
2 – 2×8 Boards @ 76″ (Sandbox Sides)


General Instructions. Cut your boards and sand and paint as desired, sealing all edges with an exterior sealant. Make sure the finish is appropriate for child use. As you build, check for square after each step. Also check for level. Predrill and countersink your screws. Use necessary safety precautions and equipment.
Instructions
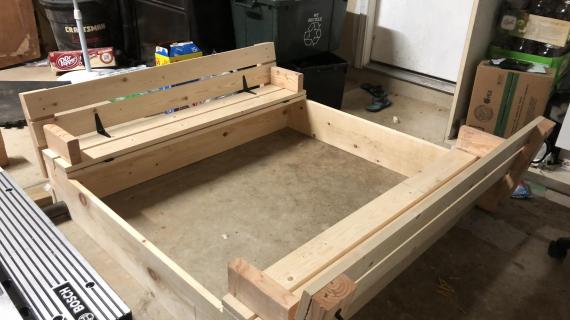
Step 1
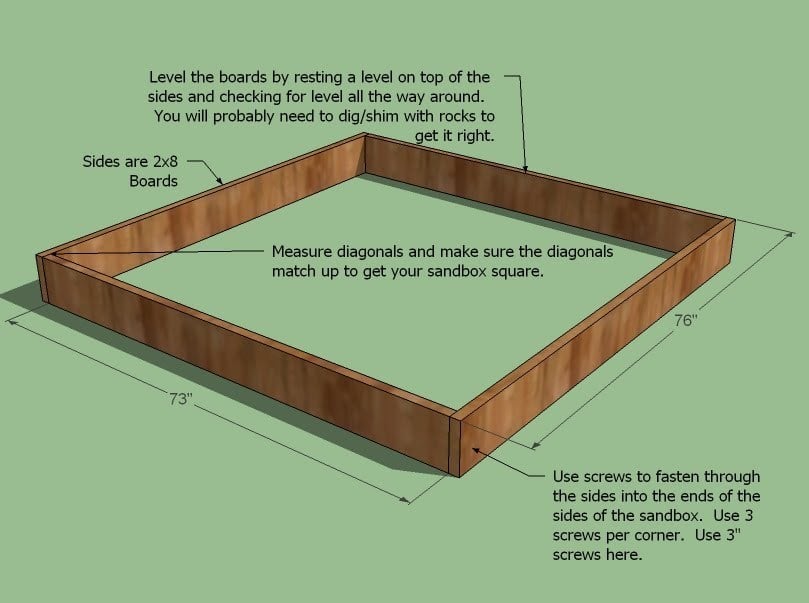
Dig. That’s right. Dig. Rake, whatever you need to do, create a level surface for your sandbox. Then build the sandbox as shown above, using 3″ screws to fasten the corners. Predrill and countersink your screw holes. Level the sandbox by using rocks as shims or digging down high points.
Step 2
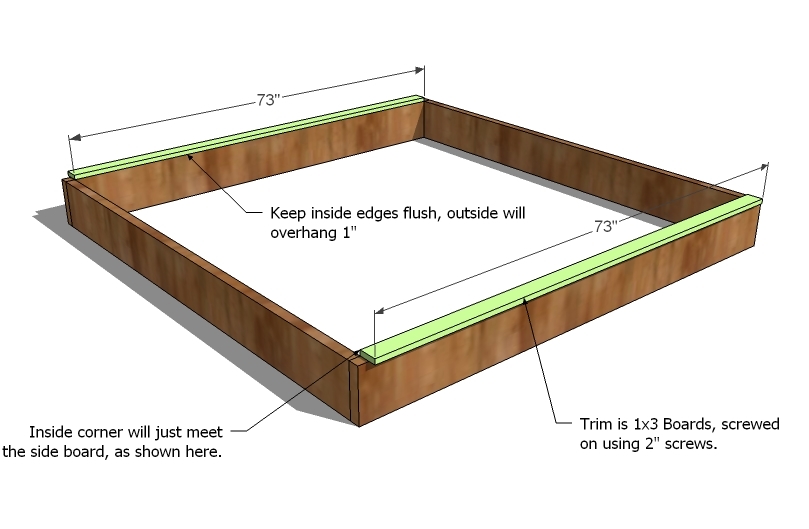
Trim. Fasten the top trim to the LONGER sides, as shown above. Use the 2″ screws. Keep inside edges flush.
Step 3
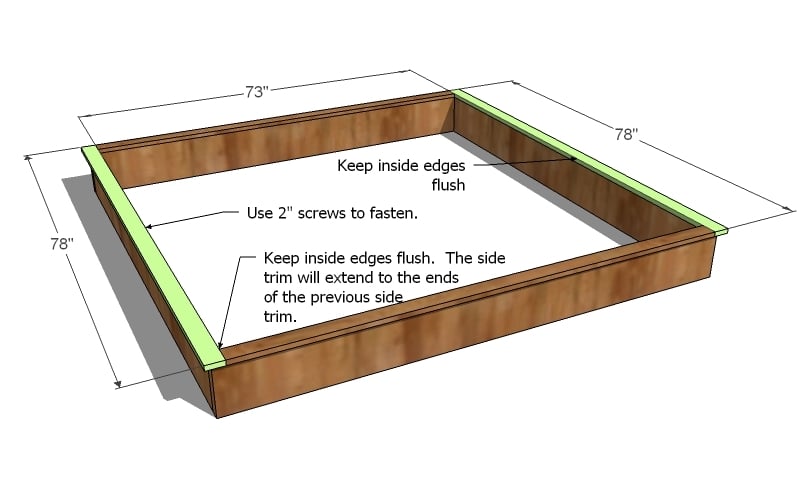
Trim. Finish the trim, as shown above, screwing in place using 2″ screws. Notice how this trim overlaps the joint on the sandbox sides? Make sure you fasten to both sides of the sandbox sides to reinforce the joint.
Step 4
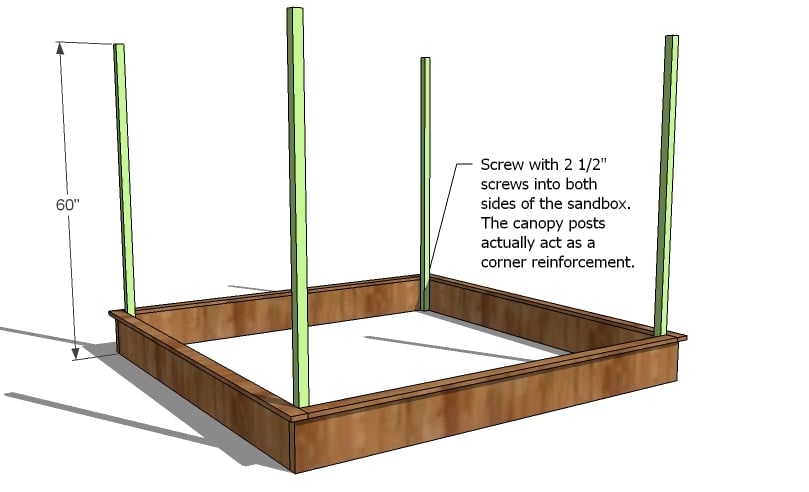
Canopy Posts. The canopy posts actually act as corner blocking to strengthen your corners. Be sure to screw the corners to both pieces of the sides, two screws per side, for a total of 8 screws per corner.
Step 5
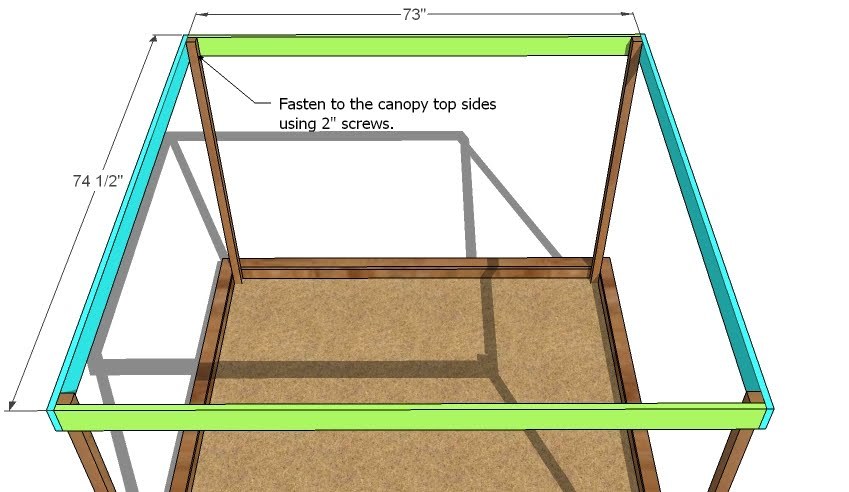
Step 6
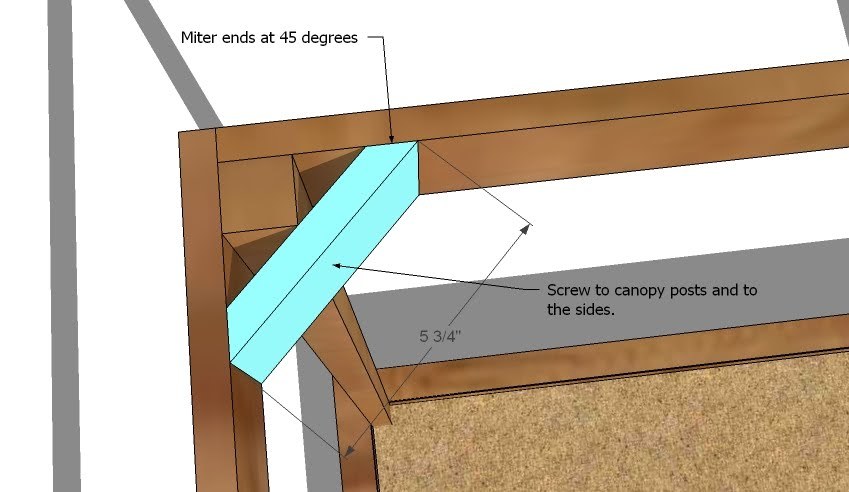
Canopy Corners. To keep the top straight, add corner blocking as shown above. Make sure your canopy is square before attaching the blocking.

Comments
Kristine (not verified)
Tue, 04/20/2010 - 21:03
Wow! What perfect timing. I
Wow! What perfect timing. I already have the sandpit, 4 big railway sleepers, I'll have to adopt the canopy to fit, but I was just thinking this weekend we need one to keep the sun off. We are in sunny Australia and the coolest it gets here in Winter is 0deg C, but the middle of the day is still pleasent.
Russ and Amy (not verified)
Wed, 04/21/2010 - 01:08
My husband and I were JUST
My husband and I were JUST looking at this in the magazine and were going to try to build it! Thanks for saving us the time! Was wondering if anyone has any ideas as to ways to make a roll up , moveable side flap- so that it can be used as a sun shade depending on where the sun hits (know what I mean?)
Chris (not verified)
Wed, 04/21/2010 - 01:13
How would you build a cover
How would you build a cover to keep cats and other critters out of the sand when not in use? Cause that would make yours WAAAY cooler than the PB one, but the canopy posts could make it tricky.
Amanda (not verified)
Wed, 04/21/2010 - 01:55
Just a thought, putting in
Just a thought, putting in little triangles in each corner for seats amps up the awesome just a bit. We built a much less fancy box last year and sunk in little seats and it makes it much more fun for mom and dad to play along.
Rachel McPhillips (not verified)
Wed, 04/21/2010 - 02:05
Do you know that my looking
Do you know that my looking for THIS sandbox is what brought me to your blog last week!! Ahh.. it's like you read my mind/google and made it appear!
Heather Bee (not verified)
Wed, 04/21/2010 - 04:15
Little corner seats that
Little corner seats that someone else mentioned are a great idea. The box my father built my brother and I ages ago had the same and as we got older we could still play in the sand without being completely in it.
Also, I believe it helps to have some type of plastic or gardening paper (or whatever you prefer) under the box to keep the sand as sand and not muddy sand after a couple rainstorms.
JackieSue (not verified)
Wed, 04/21/2010 - 05:43
I'm in love! THANKS! I agree
I'm in love! THANKS! I agree a cover would be awesome. So the sand doesn't get mucky and dirty with leaves and bugs, etc. We'll have to experiment with that a little ourselves. =)
Tara M (not verified)
Wed, 04/21/2010 - 05:57
Click on Ana's link to Bob
Click on Ana's link to Bob Villa and there is an example for a cover that you could modify.
Linda (not verified)
Wed, 04/21/2010 - 06:08
I just have one little thing
I just have one little thing to add from experience..do NOT buy the colored sand. It's a mess and sometimes the colors just dont come out of anything. At least I was at my sisters house when we tried this HAAAA :D
Crunchy Clean (not verified)
Wed, 04/21/2010 - 06:15
Any ideas on how to build a
Any ideas on how to build a cover? We have lots of cats in our neighborhood!
THANKS ... WE'VE BEEN LOOKING FOR SOMETHING LIKE THIS!
Kelly Tillotson (not verified)
Wed, 04/21/2010 - 06:17
Oh my gosh, I am so excited
Oh my gosh, I am so excited you did this....when I requested it a while back I thought you would be too busy to do plans for it....thank you thank you thank you! now hopefully i can find a friend that knows a thing or two about carpentry so I can make this my first official project!!! I hope I will have a nice finished project to show off to you within the next monthhhhh !! Thank you again!!!!
*Kelly Tillotson
Jenny Hillman (not verified)
Wed, 04/21/2010 - 06:28
Serendipity! My husband and
Serendipity! My husband and I were talking LAST NIGHT about building a sand box for our lil' guy's birthday coming up next month! We wanted to have a Dino Dig party, and thought it would be fun to have a place to dig up dino 'bones' and 'eggs'. Perfect!!! Thank you, Ana!!
xo Jenny
The Oxford Family (not verified)
Wed, 04/21/2010 - 06:30
My mom built me a sandbox 25+
My mom built me a sandbox 25+ years ago! It had triangle like seats on each of the 4 corners and we loved them! I hope to someday build this...with the seats :)
todddemars (not verified)
Wed, 04/21/2010 - 07:15
Check your local hardware
Check your local hardware stores for replacement screen for windows and doors. Look for the extra heavy duty kind which is sometimes labeled as UV protector. This is simply thicker and heavier duty, but reflects more UV rays. Add grommets and/or snaps like Julie said and you have your sun shade for the top or sides. We rolled the side shades around dowels and used cord for mini blinds as pulls to roll them up out of the way. And 'Yes' we kept the cords wrapped higher than the kids could reach.
Kent (not verified)
Wed, 04/21/2010 - 07:25
Looks really nice. I like the
Looks really nice. I like the sun cover. It could use a cover for the sand to keep out the cat poop, though!
Rae (not verified)
Wed, 04/21/2010 - 07:33
Love this. you guys had same
Love this. you guys had same thoughts as me - I'd say use that black landscaping fabric for the bottom. love the triangle seat ideas, or you could do straight benches along opposite sides and then you'd have a much easier time creating a cover for it. I wish I had a house to build this, lol.
Mary (not verified)
Wed, 04/21/2010 - 07:46
We built a sandbox a few
We built a sandbox a few years ago, without the canopy, tho we did make seats on each corner with triangle pieces. We also used black landscaping fabric on the bottom to keep out weeds- it works amazingly well!
Renanda (not verified)
Wed, 04/21/2010 - 09:08
How do you keep bugs out? Or
How do you keep bugs out? Or is that a stupid question? I remember being terrified of the sand box as a kid because it always had pincher bugs in it. Yes, that's the scientfic name, pincher bugs ;)
Danielle (not verified)
Wed, 04/21/2010 - 15:59
I love it too. The link to
I love it too. The link to the pottery barn pictures shows a canvas fabric laid across the top of the sandbox that ties at each corner which would work quite well to keep out the animals. I've seen covers similar to the one on Bob Dila's site made of screen instead of lattice. I think the lattice is MUCH prettier. His is for a smaller sandbox, so if making one this big...just to make it easier to handle, maybe making two half-sized frames with lattice would be easier...plus, you wouldn't have to worry about whether you could angle it in to fit it under and between the canopy posts.
The fabric solution looks nice and easy though...although I'd probably use a solid dark red canvas or something so that animal footprints (and child footprints) don't make it so dirty instead of the one they show with white stripes.
I'm wondering if for the fabric one, you could make a pocket, kind of like you would for a curtain rod on one edge, and insert some kind of pole (like PVC), and then when you take it off, you could roll it up around the pole, so it could lean against the house or something while it's off...or even be somehow permanently attached so that when the kids are done playing for the day, they can just roll the cover back out.
Ana, I absolutely LOVE your plans and haven't made anything yet, but I am dreaming of several projects that I will be trying really soon.
Thanks so much for creating these.
gkey (not verified)
Wed, 04/21/2010 - 17:47
dear Sand-Play in the Box,I
dear Sand-Play in the Box,
I love this idea! sounds like several have great input for more ideas to go along with too.
love,
Thinking of fun in the box
in
NE
satakieli (not verified)
Fri, 04/23/2010 - 01:31
This is great! I was just
This is great! I was just thinking about building a sandbox for my son. Sadly we have a shared yard though and his has to be moveable, so I will be taking a look at these plans and then drawing up something smaller for us!
Thanks!
famr_4evr (not verified)
Fri, 04/23/2010 - 05:26
When my DH built us a play
When my DH built us a play fort (aka Fort Kirk which resembles Fort Knox)he added a fence around with a swinging gate/door to keep the critters out (aka neighborhood cats). It works great and eve the little ones can open the gate to enter and exit.
Channyne \ˈsha-nən\ (not verified)
Mon, 04/26/2010 - 22:24
Thank you so much for
Thank you so much for creating and sharing these plans. I'm eager to start first thing tomorrow... I'll be heading to Lowes right after I drop my oldest at school!! Any chance you're working on a cover... lots of out door cats in our neighborhood. TY TY
Kidzaplenty (not verified)
Sat, 05/01/2010 - 21:19
I really like this design. I
I really like this design. I have not made it yet, but it is soon to be on my list.
I was just thinking, with few modifications, I could make the top canopy raise and lower, then it could be a sun cover as well as a cover over the sand to keep stuff out when not in play. Should not be too difficult and it would be really cool that way!
Kristi (not verified)
Wed, 07/07/2010 - 16:10
How much did this cost about?
How much did this cost about? Also, where did you find a canopy cover for it? What about a cover for over the sand to keep animals out when not in play? Thanks!!
Brooke (not verified)
Mon, 08/16/2010 - 04:22
Has anyone made this with a
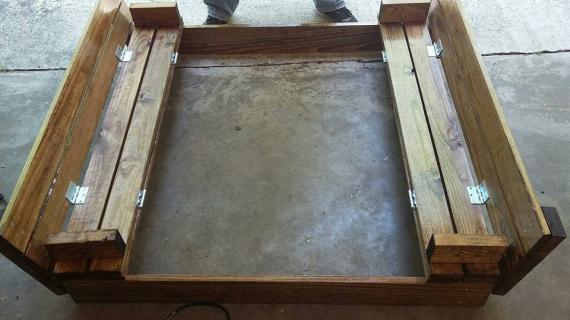
Has anyone made this with a bottom? We will have this on cement slab, so I think a bottom will be necessary. I would also like to make the finishing boards on top bigger to be used as seats, rather than putting in corners. I guess I would need some additional supports underneath, then? Or Maybe make the whole thing a tad longer and add hinged seats that run the width of the box to serve as a combo seat and toy box. Can't wait to experiment!
kelly tillotson (not verified)
Wed, 09/01/2010 - 08:35
hey kristi- the picture of
hey kristi- the picture of the navy blue sandbox with the little boy is actually the sandbox we made using anna's plans. the total cost of EVERYTHING {sand, cover material, ribbon etc.} was $167. A similar sandbox that PB sells when you factor in shipping is about $700....so a great savings...and you can customize it however you want! Thanks, again Ana!
http://babybrigham.blogspot.com/2010/06/our-new-awesome-sandbox.html
*kelly
Ana White (not verified)
Wed, 09/01/2010 - 09:57
Kelly, thanks so much for
Kelly, thanks so much for adding your blog link! I LOVE your sandbox! :)
Megan Carter (not verified)
Sun, 10/03/2010 - 09:58
My husband and I built this
My husband and I built this sandbox as our first project. We had to adjust the length to be 8x4 instead of what the plans called for. The twins love it! Partly because we painted it an iced cranberry color.
Nicole (not verified)
Mon, 10/11/2010 - 20:12
I love this! I am just
I love this! I am just wondering if the canvas top sags under the weight of rainwater, and mildews?? Is there a way to arch it so rainwater runs off?
Guest (not verified)
Sun, 06/12/2011 - 20:04
Easy Cover Idea to keep out cats, sticks, & leaves
Hi all,
My husband built a sandbox for our little ones, but we definitely have a neighborhood cat so we wanted it to be covered. We wanted the cover to be something our 4 year old could remove & replace by himself--my husband used window screen material to make a cover--on one side of the sandbox, he tacked the material down well (he started with staples but had to go back & add roofing tacks to secure it), then on the opposite side of the sandbox, he draped the window screen material to hang over the side of the sandbox. To that end of the material, he attached a 1"x1"x4' board (he bought them as stakes but you could cut down a board as needed) and secured the window screen material to that as well. Our 4 year old can pull the piece of wood back & throw it to the side of the sandbox, then when it's time to come inside, he can replace it. It has also kept out leaves & sticks since our sandbox is under a tree. We wanted it to be something the little ones could handle themselves to make them responsible for helping keep the cats out of the sandbox. It does not attach to the sandbox on the 2 other sides, but the weight of the wooden stake makes the material taut & keeps animals from getting inside the sandbox.
Rebekah (not verified)
Thu, 06/30/2011 - 08:15
Multi-use
That is an excellent base for a small storage shed! I could see putting in floor joists and going from there! My wheels are turning!
Marita (not verified)
Fri, 07/15/2011 - 14:34
I too would like to see plan for a a cover
I'd would love to see some sort of cover, possibly something that would be hinged fold accordian style over top of a sand toy storage box : ).That would be awesome!
Stephanie (not verified)
Mon, 05/07/2012 - 07:13
I can't wait to start on this
I can't wait to start on this project! My one question/concern is that the canopy posts on the cut list call for 4@ 671/2" but the entire box height is supposed to be 60", am I missing something ?...
Thank you!
:-)
PS- thank you for making projects easy enough for me so that I don't have to ask my husband for help :-)
Kandis (not verified)
Sun, 08/12/2012 - 11:18
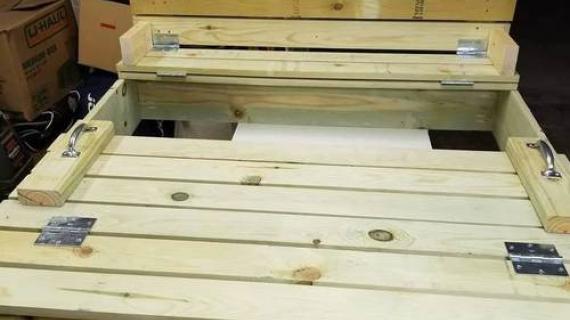
Combination of both
I love your other design with seats that fold down to make the cover. Is there a way to combine these 2 designs. I have a friend with a 3yr old that can't play outside for long because his heart medication makes him sick if he gets too much sunshine. This would be a great birthday present for him if I could combine the lid benches with the canopy.