
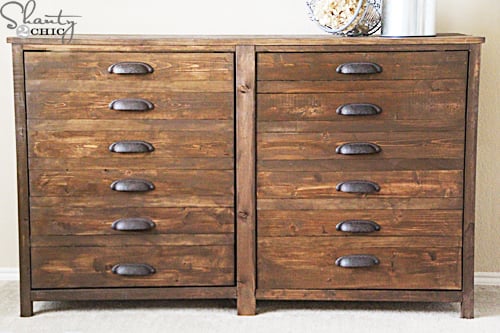

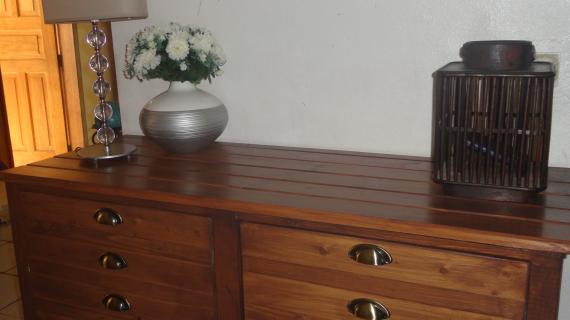
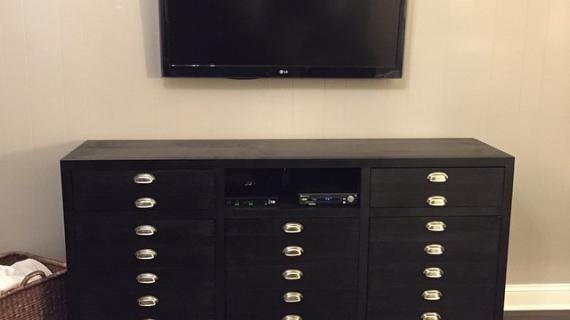
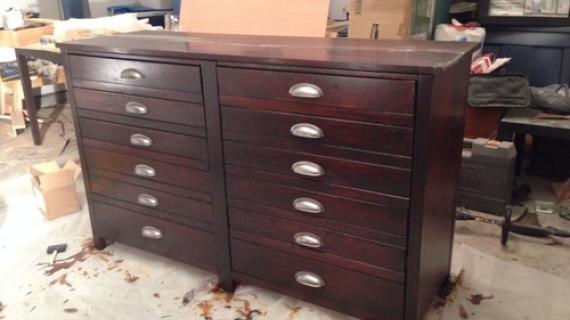
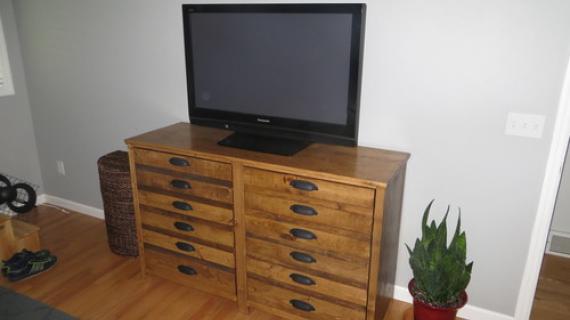
This easy to build console table features large shelves behind doors. The doors look like smaller drawers, for a vintage printers cabinet feel. Free step by step plans from Ana-White.com
Prepare yourself. You may have to drop everything you had planned for today. The dishes might just have to wait. Can you order pizza tonight? Because you are going to want to build this!!!!!  This console was built by Ashley from Shanty2Chic from plans we worked on together that follow. From Ashley: I was so excited for Ana to get to work on the plans for this beauty! At about 10% of the cost, I was able to not only build a functional storage cabinet for our bedroom but I was able to customize it to our taste as well! This was a super easy build and I love how the planked doors give the illusion of drawers! Thank you Ana! Please stop over and check out Ashley's build post for tips, tricks, and lots more photos! Thank you Ashley! And if you can't drop everything today ... make sure you pin this plan for when you do have time to build it! Thank you!

Preparation
- 2 – 2x2 @ 8 feet long
- 1 – 2x2 @ 8 feet or stud length
- 5 – 1x2 @ 8 feet long
- 2 – 1x4 @ 12 feet long
- 2 – 1x6 @ 10 feet long
- 2 – 1x3 @ 8 feet long
- 1 sheet 3/4" plywood cut into strips 15 ¾” wide (referred to as 1x16 throughout plan) x 8 feet long
- Optional back 1 ¼” PH screws
- 1 ¼” brad nails
- 2 sets euro style inset hinges or narrow profile hinges (installed in gap between door and face frame)
- Optional ¼” plywood for back
- 24 knobs or handles
FACE FRAMES
- 4 – 2x2 @ 35 ¼”
- 2 – 2x3 @ 35 ¼”
- 4 – 1x2 @ 26 ¼”
- 2 – 2x2 @ 26 ¼”
DRAWER FACES
- 10 – 1x4 @ 26”
- 2 – 1x6 @ 26”
- 10 – 1x2 @ 26”
- 4 – 1x3 @ 30 ½”
BOX
- 2 – 1x16 @ 56 ½”
- 2 – 1x16 @ 33”
- 1 – 1x6 @ 30 ¾”
- 2 – 1x6 @ 27 7/8” (shelves)
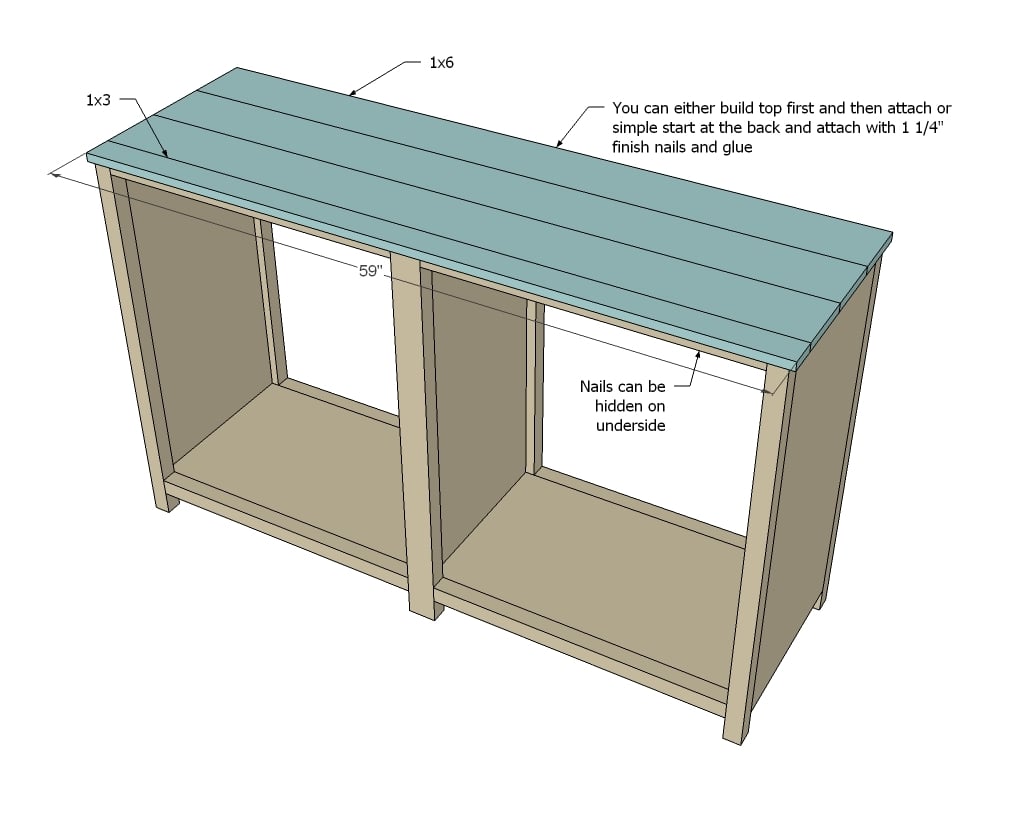
TOP
- 3 – 1x6 @ 59”
- 1 – 1x3 @ 59”
BACK
- 1 – ¼” plywood 58” x 33”


Please read through the entire plan and all comments before beginning this project. It is also advisable to review the Getting Started Section. Take all necessary precautions to build safely and smartly. Work on a clean level surface, free of imperfections or debris. Always use straight boards. Check for square after each step. Always predrill holes before attaching with screws. Use glue with finish nails for a stronger hold. Wipe excess glue off bare wood for stained projects, as dried glue will not take stain. Be safe, have fun, and ask for help if you need it. Good luck!
Instructions
Step 1
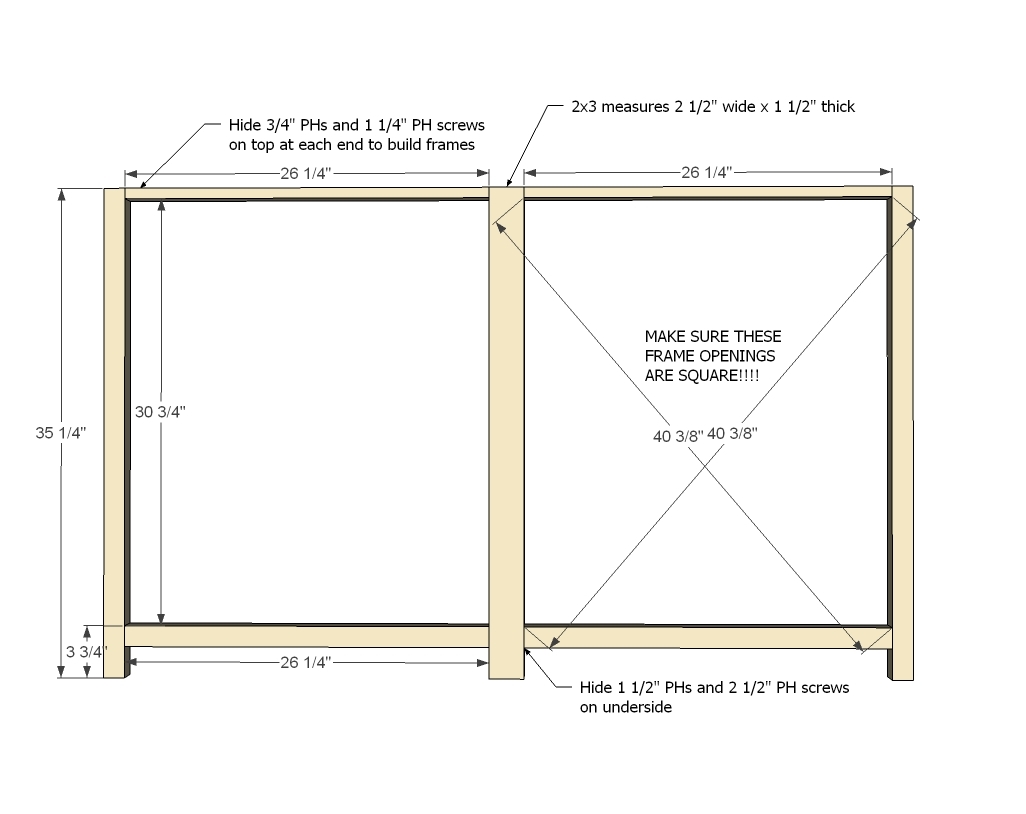
You'll want to build the face frames first so you can make sure those drawers fit in there good!
Step 2
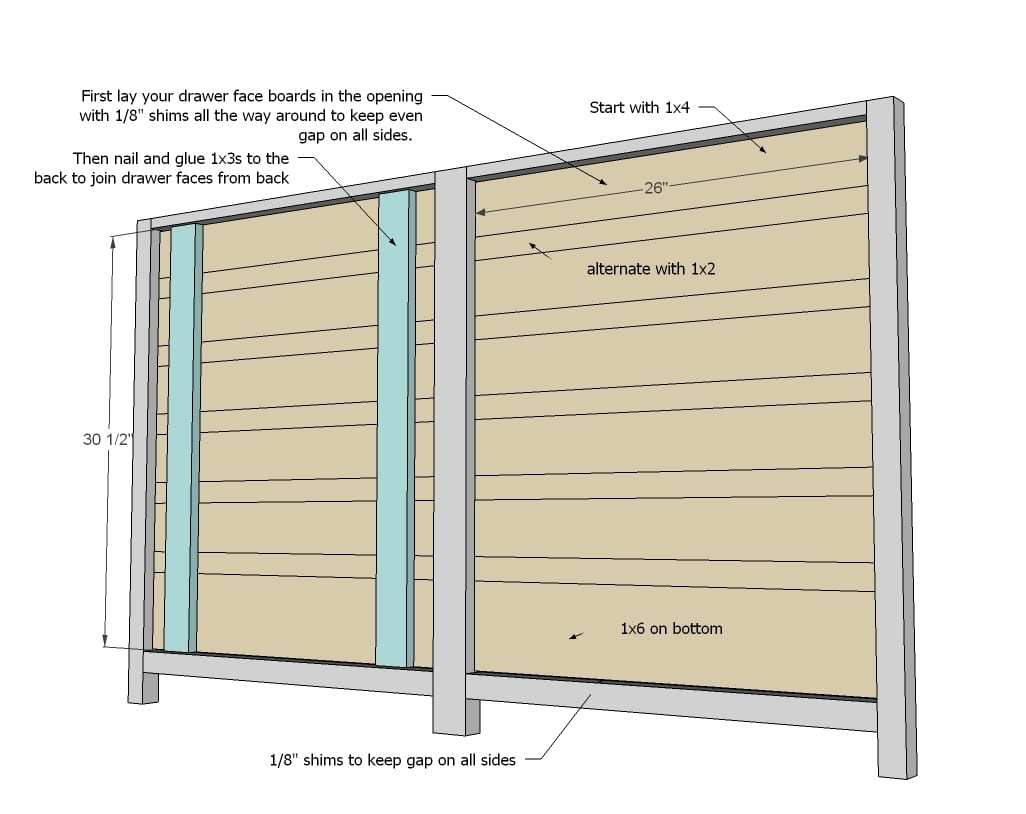
And then build your doors to fit the openings. You can even attach with hinges and keep in place with catches. It will certainly be much easier to do this now than later!
REMEMBER what door goes in what opening :)
Step 3

IMPORTANT!!!! Before attaching ANY of the box pieces, drill ¾” PHs on front and back edges of all box pieces so you can attach face frame easily in later steps. Hide PHs on inside, underside or top of cabinet.
Step 4
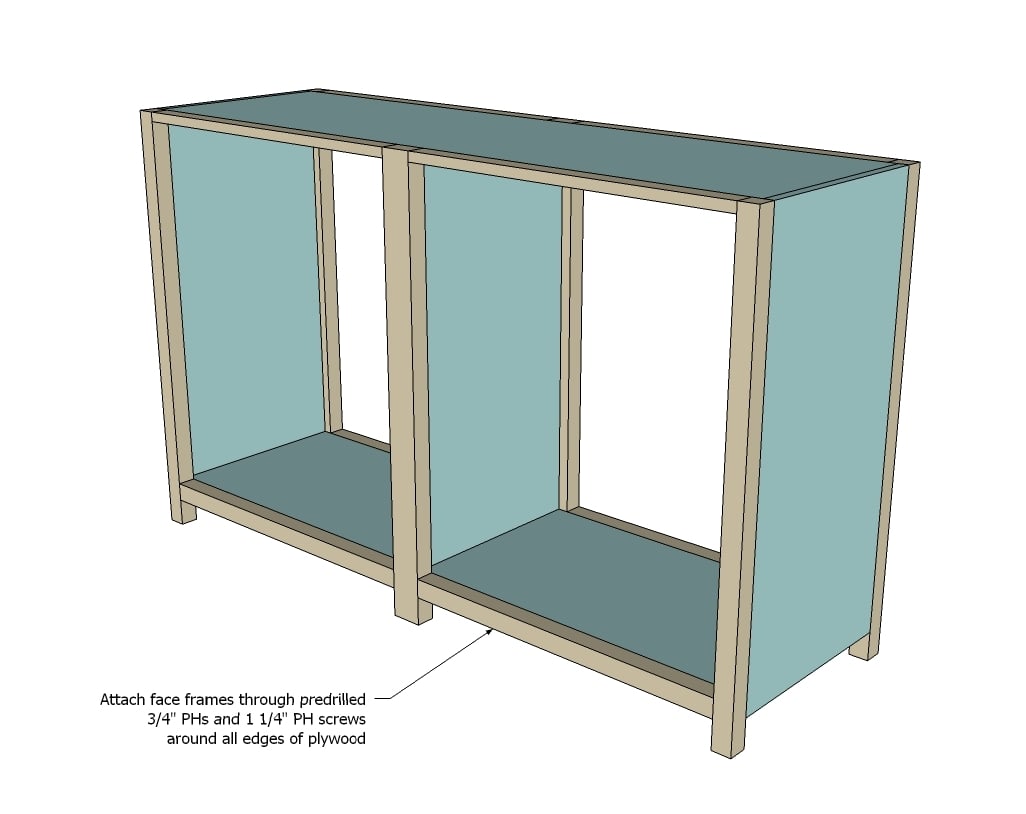
Now attach those face frames to the box ....
Step 5
Step 6

Step 7

Add shelves if desired at desired locations.
Step 8
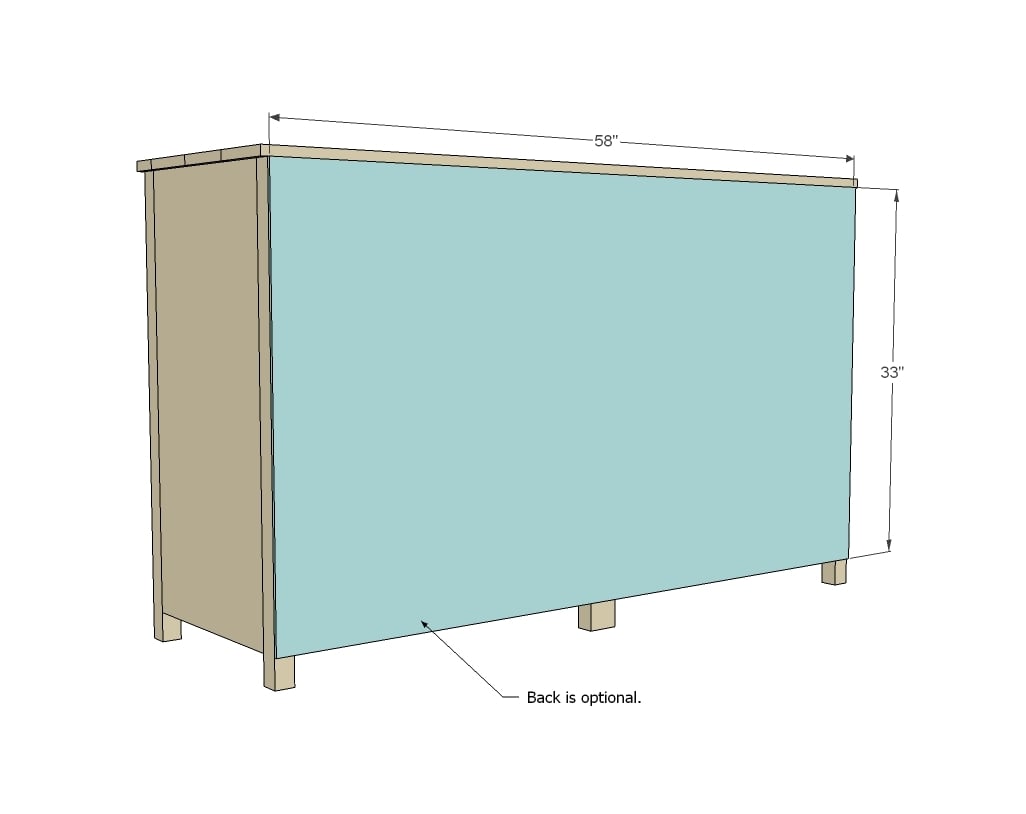
And then a back in desired.
It is always recommended to apply a test coat on a hidden area or scrap piece to ensure color evenness and adhesion. Use primer or wood conditioner as needed.

Comments
dmcarwin
Mon, 08/20/2012 - 11:55
WOW!!!!
WOW!!!!
courtneywilson
Mon, 08/20/2012 - 12:48
Can't wait to get my hands on this!
Perfect for a buffet or part of an island in my kitchen!
kaytrishjr
Mon, 08/20/2012 - 12:53
Wow!
I don't even know where I'd put this, but I WANT it!
baklund
Mon, 08/20/2012 - 13:13
Love this!
Any chance on adding plans to do drawers instead of doors?
Nicole 1016
Mon, 08/20/2012 - 14:44
Beautiful!
I am wondering the same thing about thew drawers. This would be even more fabulous if all of those faux drawers were actually drawers!
lisah (not verified)
Mon, 08/20/2012 - 17:32
Oh my god. i might have to
Oh my god. i might have to tweak the plans and only build it half-width to make bedside tables
Guerrina
Tue, 08/21/2012 - 11:12
Stunning!
Grabbed my attention RIGHT away! As with Lisah, I'd love for nightstands and with a bit more tweaking for a bathroom vanity in the full bath and a narrower version for my small dining room for linens and such! Ahhh! The possiblities!
ferbit
Tue, 08/21/2012 - 11:52
Will you be finishing the Printer's collection?
I know you did quite a bit of the Printer's media collection, but they have a beautiful modular office set as well. It mixes and matches well with the glass doors.
This piece is SO gorgeous!!!!! Great job!
Joni
Tue, 09/04/2012 - 17:12
Typo on Cut List
I think the plans have a typo in them, and the last 2 items under the Cut List (for the box) should be changed from 1x6 to 1x16.
Crystal A (not verified)
Sat, 09/08/2012 - 21:34
I agree with Joni, the plans
I agree with Joni, the plans do look like they have a typo. Unfortunately, I've already made all my cuts, so I'm off to buy more 1x6's. Also, I think you will need 3- 1x3's, not 2. I made all the cuts as indicated, with little waste, and I'm short about 90" of 1x3 material
I'm excited about starting to put this together!
Crystal A (not verified)
Sat, 09/08/2012 - 22:21
I read the cut list wrong. I
I read the cut list wrong. I was cutting 1x3's in place of 2x3's...oops!!
Runarc (not verified)
Sun, 11/18/2012 - 14:13
Typo?
Also, don't you need to cut 4 2x2's at 26 1/4" instead of the 2 listed?
Brown (not verified)
Sun, 01/06/2013 - 15:54
Shopping list corrections
I've only just started but I've noticed the typos as well. After my first two 2x2 cuts I only have 2 ends at about 25 inches left and the first cut list calls for two 26 1/4. Ha, I double checked with a calculator but it's right... they don't add up. So I think you'll need at least one more 2x2 or 2 longer than 8 feet. And I agree with the earlier comment... I think you need four 2x2's at 26 1/4, not two.
TeresaA
Sat, 03/23/2013 - 19:56
Too much frustration! Need help!
My husband is in the middle of the printer console. We made all the cuts together and according to plan, but now that we are putting it together, it seems that the center piece is too short and the front and back frames do not fit properly (step 4). When they are on, they are several inches off. Did anyone else come across this problem? We have double checked the cuts. We have run into a couple things on these plans, but I'd love some advice from a person that completed this project.
Jamaunzie
Sun, 03/24/2013 - 19:30
TeresaAIt is really hard to
TeresaA
It is really hard to tell by your description but if I was to guess when you say to short on the center piece are you allowing for 2 ¼ inches space with your 1X16 @ 56 ½ off the Bottom of your box ? That could account for the Shortness. As for the Face frames go, The plans are a little confusing make sure you have the 1X2’s at the top and the 2X2’s on the Bottom of the Frames and there is a space from floor to bottom of 2x2 also. I not sure but from what I see there should be 4 – 2X2 @ 26 ¼ but the plans say just 2 I would double check
Hopes this helps
Weezie1987
Sun, 09/28/2014 - 07:21
Door/drawer help!
Hi. I am currently building this cabinet as my first project. I'm wondering if I have gone wrong somewhere or is there a typo:
The space for fitting the door/drawers in the frame is 30 1/4inch in height, but the total of the planks that make up the doors come to 36 inch in height. (5 1x2, 5 1x4 and 1 1x6)
Has anyone else working on this project come across this, or have I been looking at it for too long that I've just comvinced myself that I've gone wrong (and that I need to go back to school to resit maths)?! haha!
Please help - it would be much appreciated as I am trying to prove to my boyrfiend that I CAN make this without his help haha! Thanks :)
In reply to Door/drawer help! by Weezie1987
Stephen Peters
Sun, 09/28/2014 - 15:49
Lumber Math is goofy!
Weezie, Your math is right on. The problem is with the "Lumber gods"!
The Lumber gods that sell lumber think that:
a 1x2 = 3/4" x 1 1/2"
a 1x4 = 3/4" x 3 1/2"
a 1x6 = 3/4" x 4 1/2"
They are selling you the lumber before it was cut with their saw and planed down to thickness.
Now do the math using "their" numbers and I think you will come closer. :) Even though it doesn't make sense.