
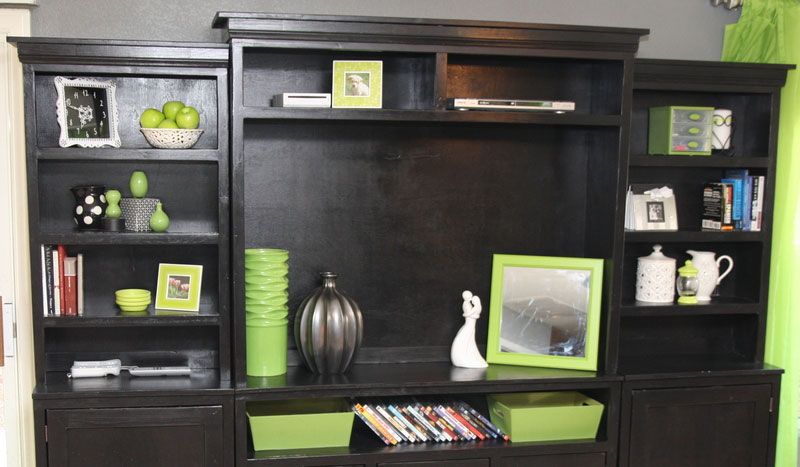

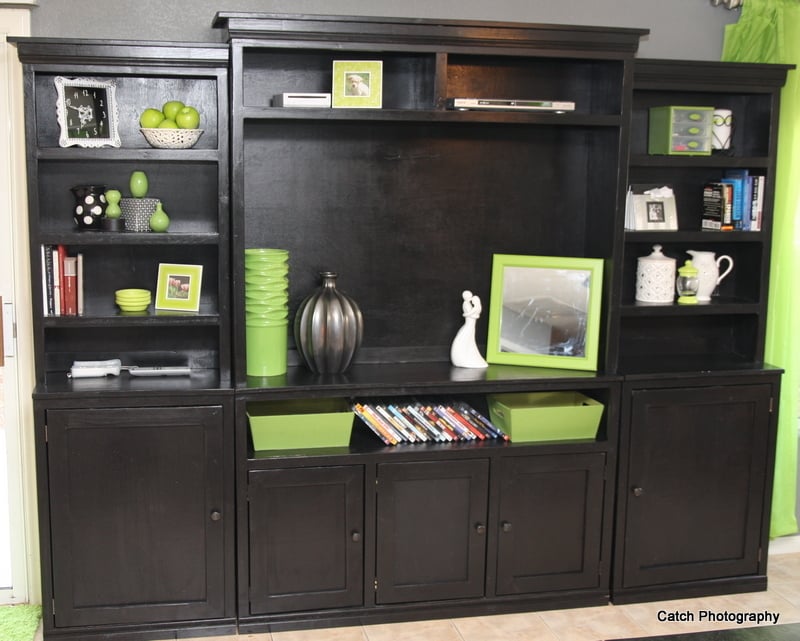
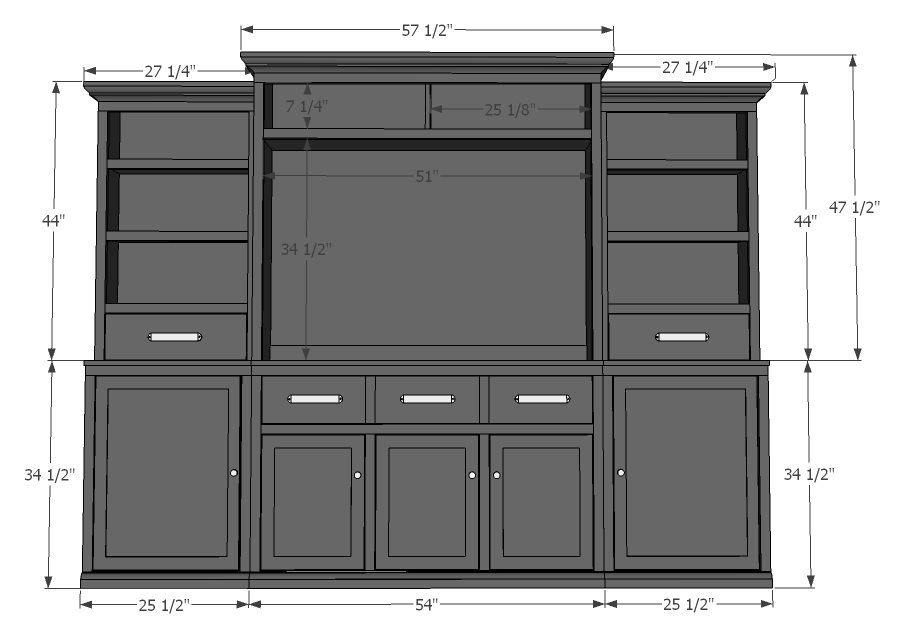
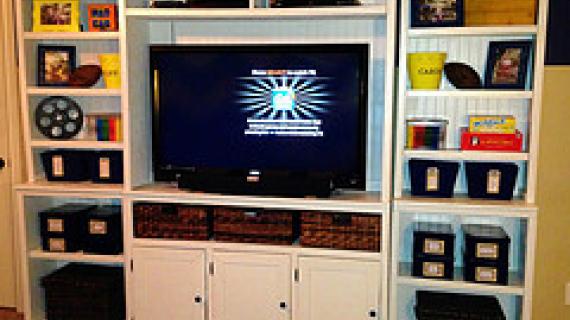
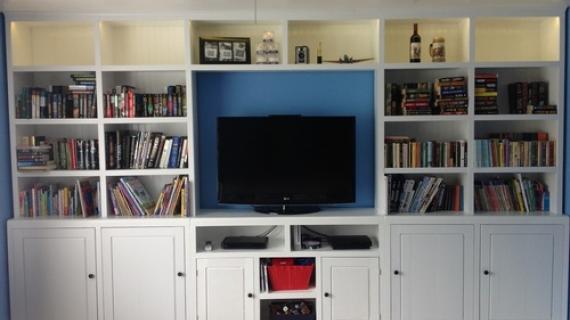
A hutch can dress up a tv and make it a beautiful focal point in your living room. This woodworking plan is adjustable to fit your tv. Pair this hutch with our center console plans and the rest of our Rebecca Media Suite collection.
All plans are free and include step by step diagrams, shopping list and cut list.
This media wall suite was built in collaboration with Rebecca:
From Rebecca:
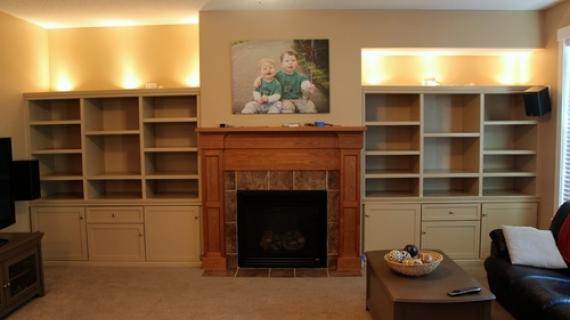
Here is the final piece to make it all worth it. The center hutch is the same width as the base so it creates this really nice dimensional structure to look at. It fills up the wall and is such a nice height that it looks really complete. Everyone that has come over says, "Wow, you built that? Like from scratch? It's beautiful!" It warms my heart. Isn't that why we do this? Oh and how about it cost me a 1/5th of the price to buy anything CLOSE! This space is big enough to hold up to approx. a 55" tv!
You can build all the pieces in this media suite.
Preparation
- 1- sheet 3/4" plywood
- 1- sheet 1/4" plywood
- 3- 8ft 1x2's
- 1- 8ft 1x3
- 1- 8ft 1x4
- 83" of molding for top
3/4" Plywood
- 2 @ 11 3/4" x 46 3/4"
- 1 @ 11 3/4" x 57 1/2"
- 1 @ 11 3/4" x 52 1/2"
- 1 @ 11 3/4" x 10 3/4"
1x2's
- 2 @ 43 1/2"
- 1 @ 51"
- 1 @ 57 1/2"
1x3's
- 1@ 52 1/2"
1x4's
- 1 @ 54"
Moulding
- 1 @ 57 1/2" (cut on miter, make your own measurements before cutting)
- 2 @ 11 3/4" (cut on miter, make your own measurements before cutting)
See cutting layouts at end of post.


Please read through the entire plan and all comments before beginning this project. It is also advisable to review the Getting Started Section. Take all necessary precautions to build safely and smartly. Work on a clean level surface, free of imperfections or debris. Always use straight boards. Check for square after each step. Always predrill holes before attaching with screws. Use glue with finish nails for a stronger hold. Wipe excess glue off bare wood for stained projects, as dried glue will not take stain. Be safe, have fun, and ask for help if you need it. Good luck!
Instructions
Step 1
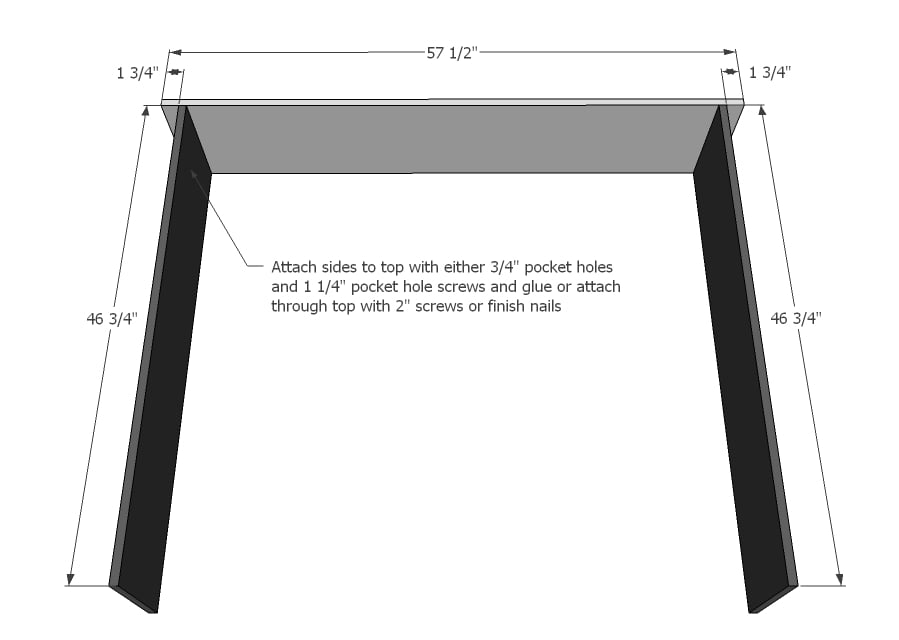
Attach top to sides. You can use your pocket hole jig or screws countersunk here.
Step 2
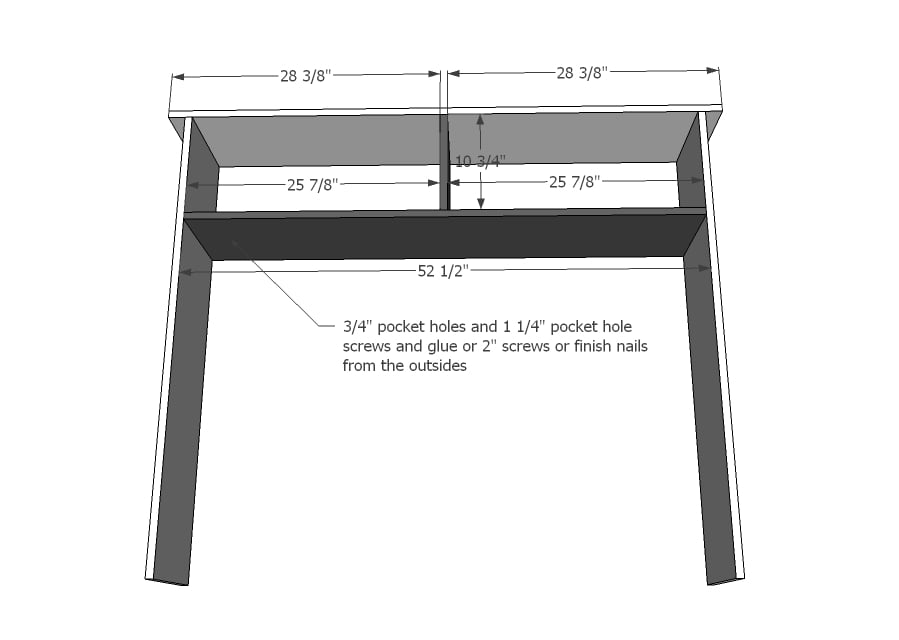
Now add the shelf and dividers.
Step 3
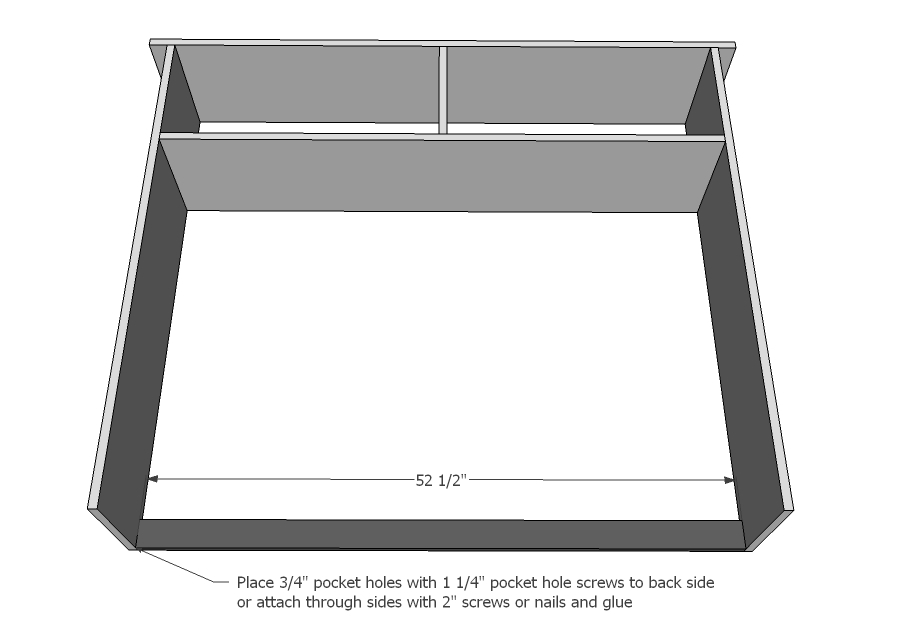
And the back support.
Step 4
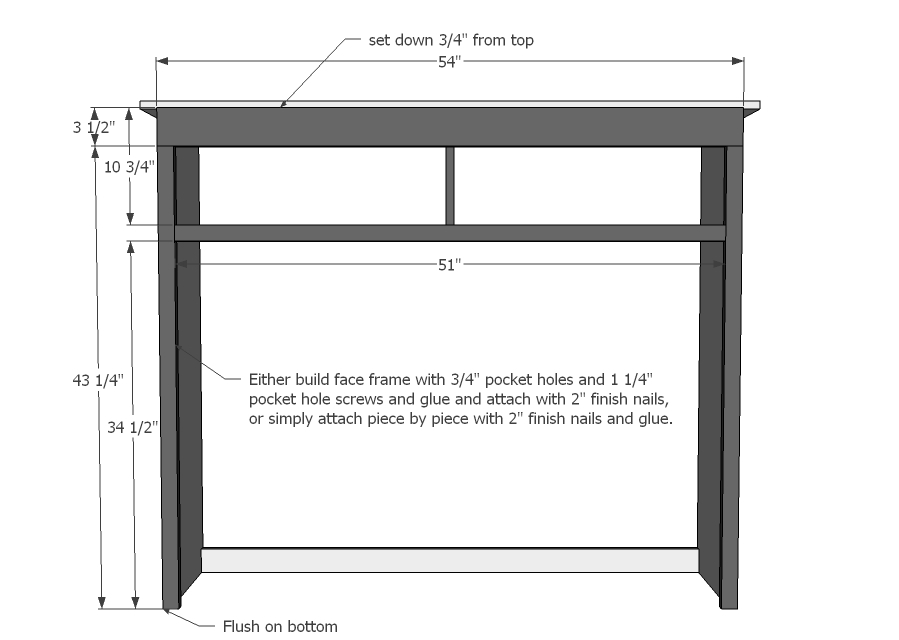
Attach face frame pieces to box as shown here. If you have a pocket hole jig, build first, the attach .... Also see Rebecca's note next.
Step 5
Step 6
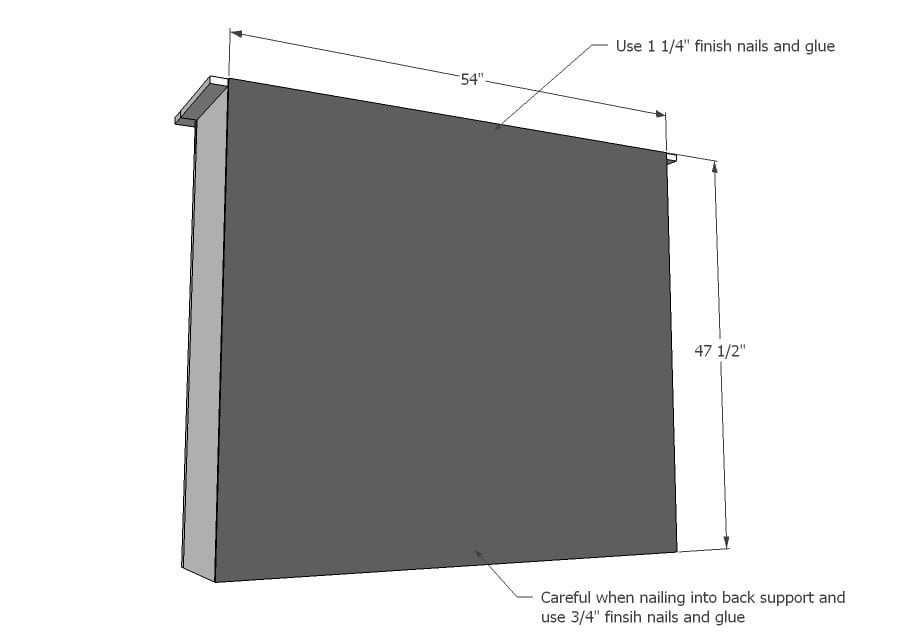
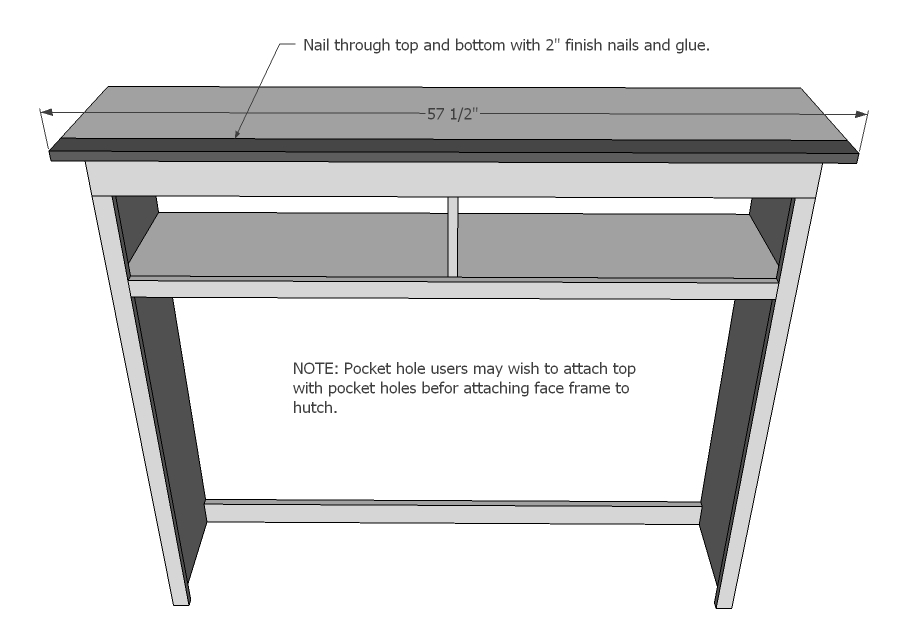
Then add the back.
Step 7

And cut crown, metering corners as shown above.
Step 8

Cutting layout .....
Step 9
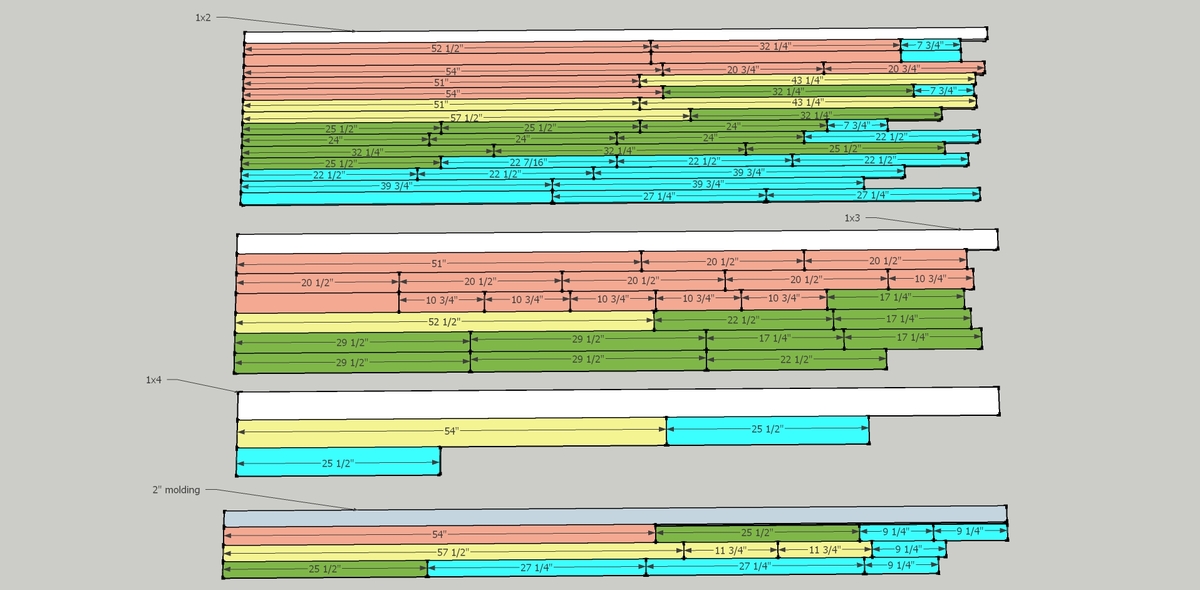
Cutting layout ....
It is always recommended to apply a test coat on a hidden area or scrap piece to ensure color evenness and adhesion. Use primer or wood conditioner as needed.

Comments
Ashley S (not verified)
Mon, 04/23/2012 - 12:39
Can you tell me a rough
Can you tell me a rough estimate of how much this cost for all the materials?
Ana White
Mon, 04/23/2012 - 12:58
Hi Ashley, Rebecca's budget
Hi Ashley, Rebecca's budget was around $300 for solid wood!
Patricia Diaz (not verified)
Mon, 04/30/2012 - 10:10
I love Rebecca's Media center
Very nice! proof I needed to show my [talented] hubby he can do this... he'd rather just buy one but I think this is much better than the quality out there!
Lisa Simon Zubek (not verified)
Mon, 07/30/2012 - 11:54
Center Piece Base Unit?
I'm new to this site and the Rebecca's Media Center plans caught my eye as a project for my hubby. Am I missing something in reading the plans? I don't see information on building the center base of the unit. We don't have enough wall space for the two side units and the base would fit just perfectly for our space.
Thank you!
JoanneS
Mon, 07/30/2012 - 15:06
Center piece base unit link
Hi Lisa,
This is the link to the center piece:
http://ana-white.com/2012/04/plans/rebecca-media-center-console-piece
The top, bottom, and side pieces of the media center each have their own plans. If you do a search on "rebecca" it will bring you up the plans for all the pieces. You are going to love this site - Ana's plans are fabulous!
Lisa Simon Zubek (not verified)
Fri, 08/03/2012 - 11:32
Thanks so much, Joanne! I'm
Thanks so much, Joanne! I'm so happy I found this site. Ana is totally inspiring!
Brittney Garrett (not verified)
Sat, 08/18/2012 - 10:00
Absolutely love this
Absolutely love this entertainment hutch, i understand the plans are put up separately but was the $300 wood estimate for the TV portion only or for building the entire hutch with all pieces included?
In reply to Absolutely love this by Brittney Garrett (not verified)
redhead_61
Fri, 10/19/2012 - 11:53
This budget was for the
This budget was for the entire project! Awesome right?
David Heitzman (not verified)
Mon, 12/31/2012 - 13:42
Budget
What kind of wood did you use? I may be missing something but adding up all the wood for all the parts, I come up with 4 sheets each of 3/4 and 1/4 ply, 128 linear feet 1x2's, 56 lf 1x3's, and 16 lf 1x4's. That alone, without moulding or fasteners or accessories, comes out to about $500 at Home Depot or Lowes.
Melanie S. (not verified)
Fri, 08/24/2012 - 15:18
Beginner
Hi! I found Ms. White's site on Pinterest, and there are so many things I want to build now! I desperately need a new entertainment center, and I think this one is just what the doctor ordered.
I'm a complete beginner when it comes to carpentry... Would you ladies rate this as something a beginner could manage? Also, I don't have a table saw, but I have a circular saw. I know that it's probably less than ideal for efficiency, but would it be possible to build this project (in reference to the entire project, not just this part), without a table saw?
In reply to Beginner by Melanie S. (not verified)
redhead_61
Fri, 10/19/2012 - 11:56
Totally doable
I actually did not even use my own table saw. Home Depot or Lowe's will cut your wood for you. This is the main reason that I do a cut list in Sketchup so that I can visualize the best way for them to cut it, then I can make sure to watch that they are getting it right and can show them too.
This is a big project, but the only thing that is remotely harder is cutting the molding on top, which you could leave off.
MrsANS
Wed, 04/17/2013 - 07:53
55" TV?
Hi, we love this plan and we have a 55" TV but we measured the TV itself and I'm not sure it would fit in the space provided. Is there any information on how to expand the center piece to accommodate an extra 2-3 inches? Thank you!
Tanya (not verified)
Sat, 09/22/2012 - 08:28
hi! this is amazing, I was
hi! this is amazing, I was wondering if we were to put some holes for the wires, where would be a good place to put them (how many inches from base of the back board for the tv), and how big the circumference of the hole should be. Thanks!
In reply to hi! this is amazing, I was by Tanya (not verified)
redhead_61
Fri, 10/19/2012 - 12:00
Holes
I actually just did my holes. I did one right in the middle of the middle unit about an inch above the base 1x3. You could also put one right in the middle of the back seeing as your tv will hide it anyway. I also drilled one hole in each of the top sections in the hutch part. Really it is all how you want to set up your unit. I think I drilled a 1.5" hole. It just needs to be big enough for the power cord to fit through. Good luck
Tsu Dho Nimh
Sat, 09/22/2012 - 12:38
Size of hole for cable and power connections
Tanya -
I measured my screen's connectors, and the biggest one is about 2 inches by 1-1/4 inches (at the BIG end - it has a much smaller connector at the other end). The entire cable bundle after all the things are hooked up is less than 1 1/2 inches diameter.
The "best place" would depend on where you are going to have the DVD players, computer, or whatever is the source of the images.
If I were building this, I would have the DVD player and/or computer in one of the bottom cabinets under the screen (with good ventilation), with a power strip, and run the wires up through the top of the shelf for the TV, not through the back.
Then the power strip would have a hole through the lower back to get to an outlet.
milkdudengr
Sat, 01/24/2015 - 19:00
New to Woodworking
I'm new to woodworking, and I'm in the process of finishing up the center console unit. When I get around to building this hutch, what is the best way to secure it to the console?
lchnd203
Tue, 06/16/2020 - 06:26
How to connect all 3 pieces to make media hutch
I am new at this and have built a few things from this site. I love it! Is there a section that shows us how to connect all 3 pieces to make up the entire media hutch. I am asking because they have 3 different plans.