


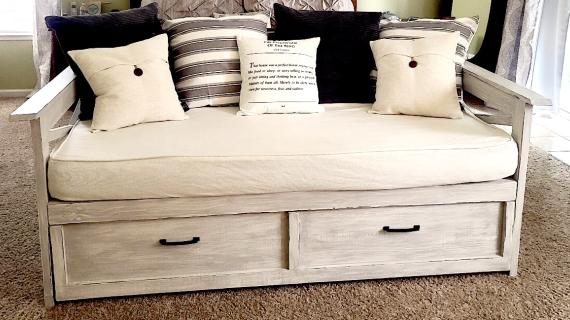
Free plans to build an easy daybed with storage trundle drawers! Gain tons of storage with this clever design!


We are crazy for traveling two and a half days, some 8,000 miles, to go to my sister's baby shower and spend just 2 and a half days with my sister. Last night I came home, exhausted, and my husband asked if the trip was worth it.
And I said, Of course it was!
I will do crazy things for the children in our family. Because to me, the children are the most important part of our lives, and I am so excited to be getting a new niece!
I remember when Grace was born, and it shocked me how much stuff baby's get! Strollers, car seats, playpens (are we still calling them pens???), swings, chairs, walkers, gyms, vibrating chairs .... Baby sure can take up a lot of space!
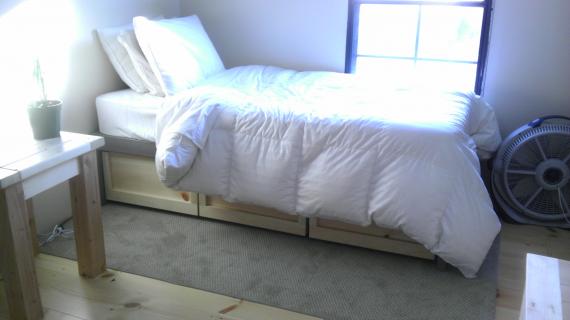
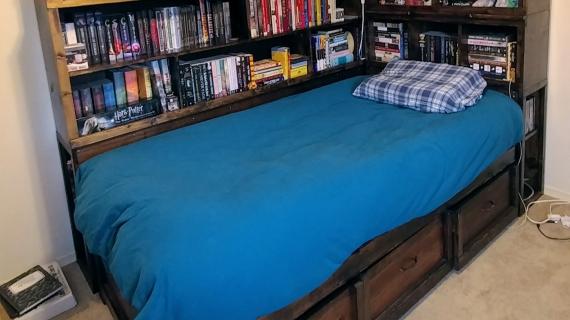
So when my sister said she needed a new daybed, I said, No, you need a daybed with some STORAGE!
We have some daybed plans with storage, but we wanted something super inexpensive, easy for my sister to build (she's in her last trimester), and the space under the bed fully accessible. I immediately thought of our trundle coffee table.

Why not make a daybed similar to it? So I drew up a new plan.
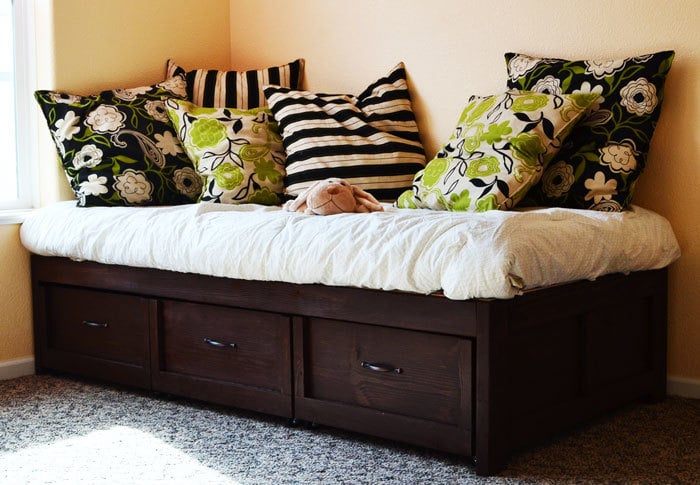
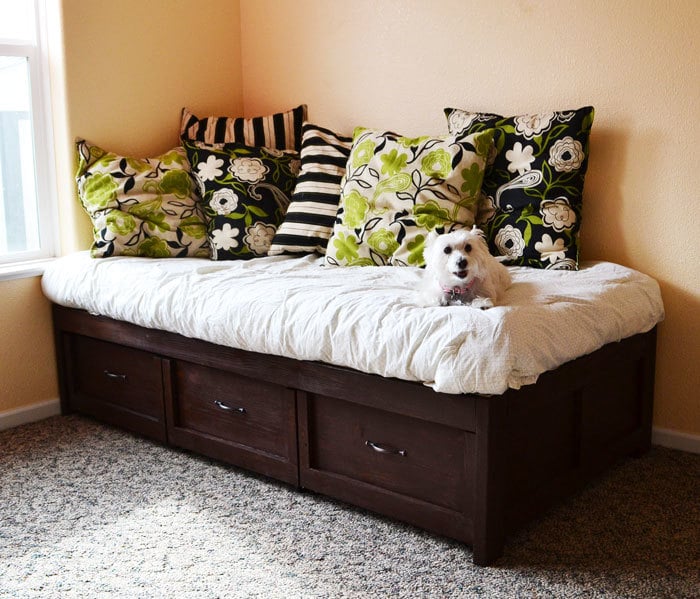
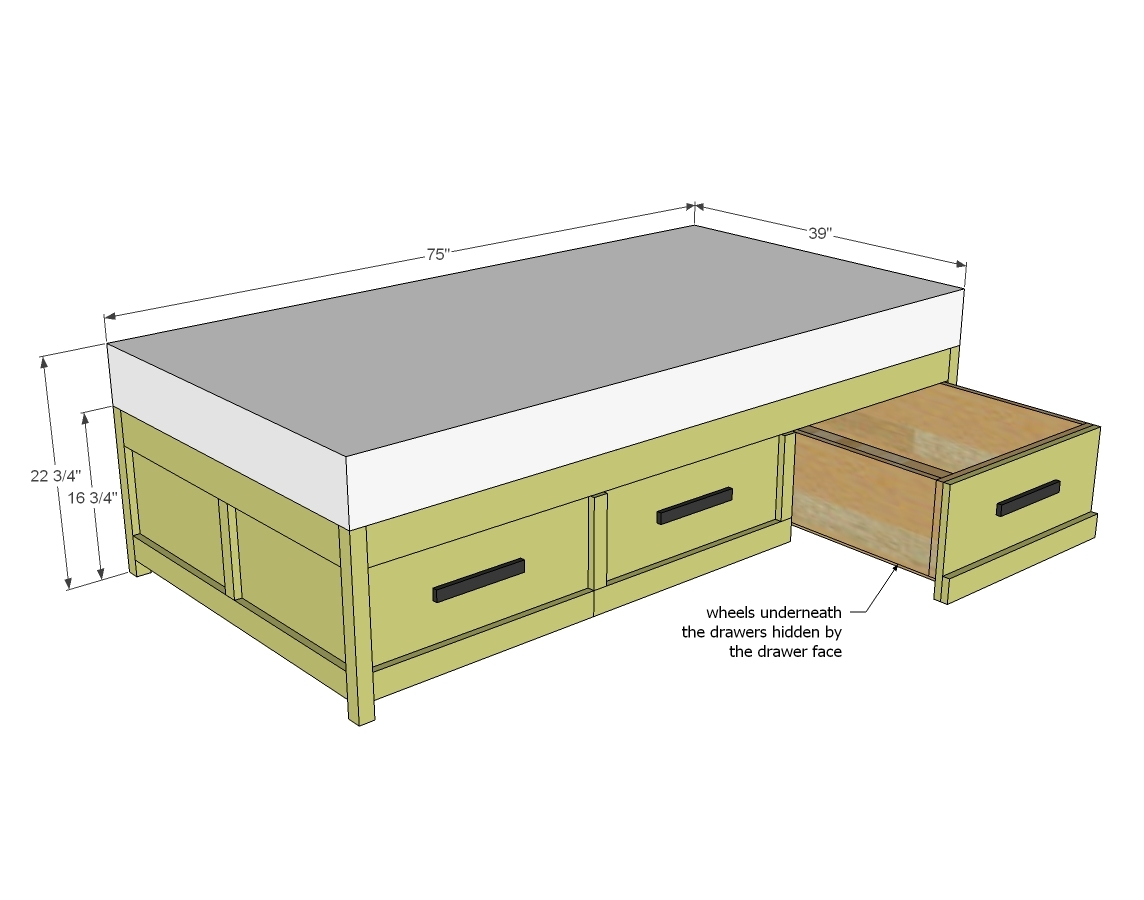
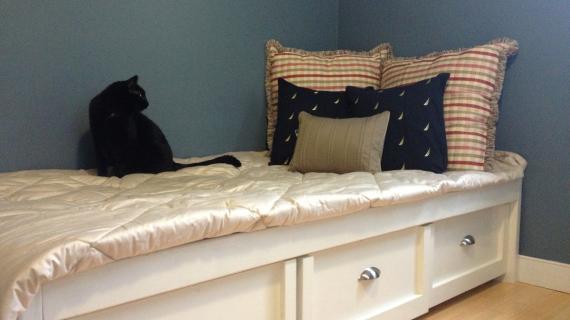
And this is what she made for about $110 in lumber!
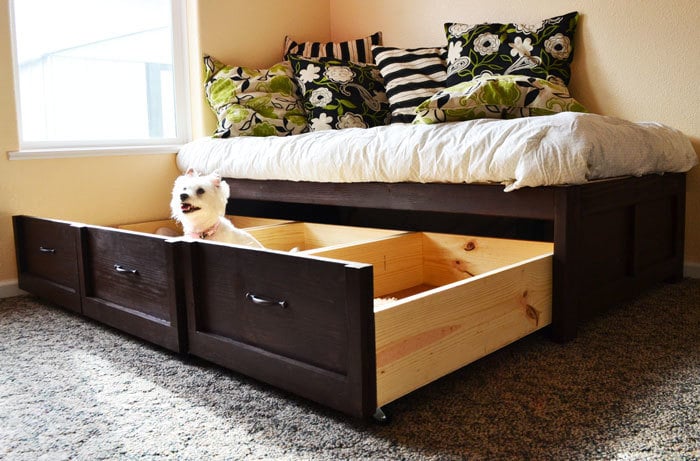
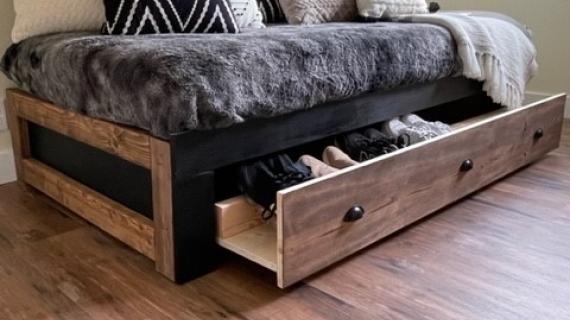
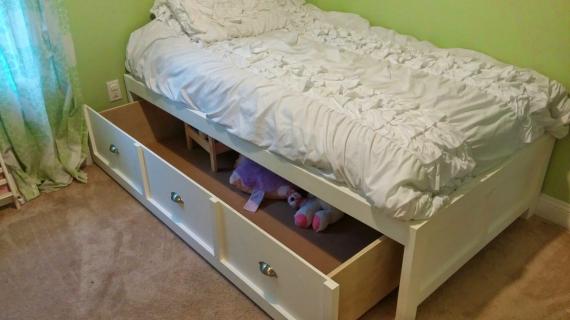
And there is a TON of storage under it that is very easy to access!
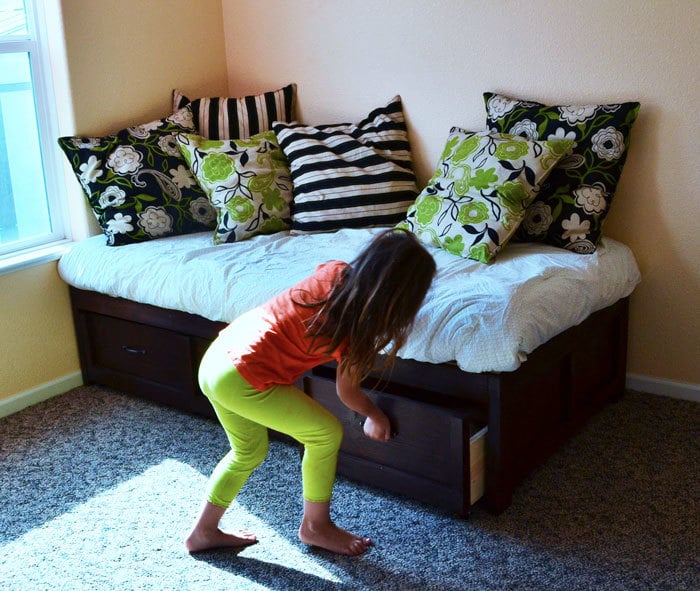
Even my big girl Gracie could put the drawers back in neatly.
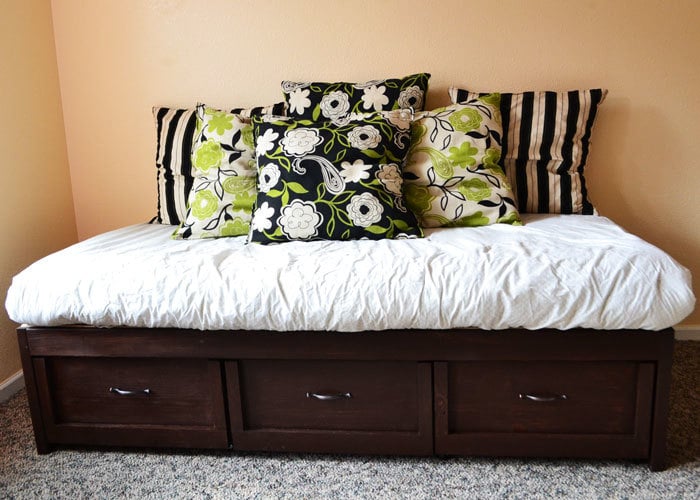
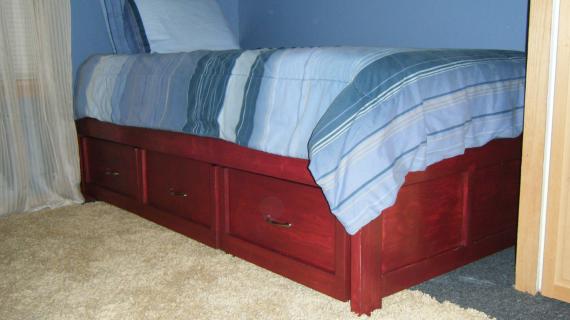
The daybed was finished with Minwax Gel Stain in Red Elm, a favorite of my sister's. You can check out the finishing tutorial here.
And of course, plans to build the bed follow!

Preparation
3 - 1x8 @ 10 feet long
2 - 1x12 @ 6 feet long
6 - 2x4 @ 8 feet long
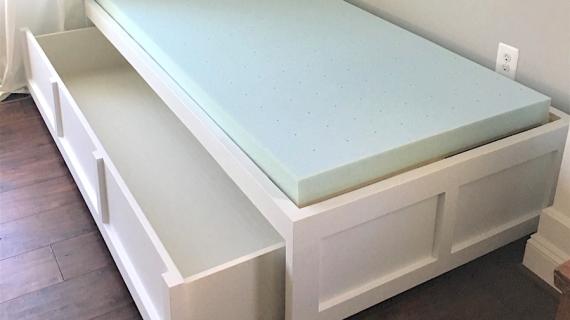
2 - sheets 1/4" plywood (for drawer bottoms and bed top)
2 - 1x3 @ 8 feet long
1 - 1x2 @ 8 feet long
3 sets of straight caster wheels (non swiveling kind)
2 1/2" and 1 1/4" PH screws
ENDS
2 – 2x4 @ 32”
2 – 1x12 @ 32”
4 – 2x4 @ 16 ¾”
2 – 1x2 @ 9”
2 – 1x3 @ 32”
FRAME
2 – 2x4 @ 72”
2 – 2x4 @ 69”
2 – 2x4 @ 36”
DRAWERS
6 – 1x8 @ 36”
6 – 1x8 @ 22”
2 – ¼” plywood 23 ½” x 36”
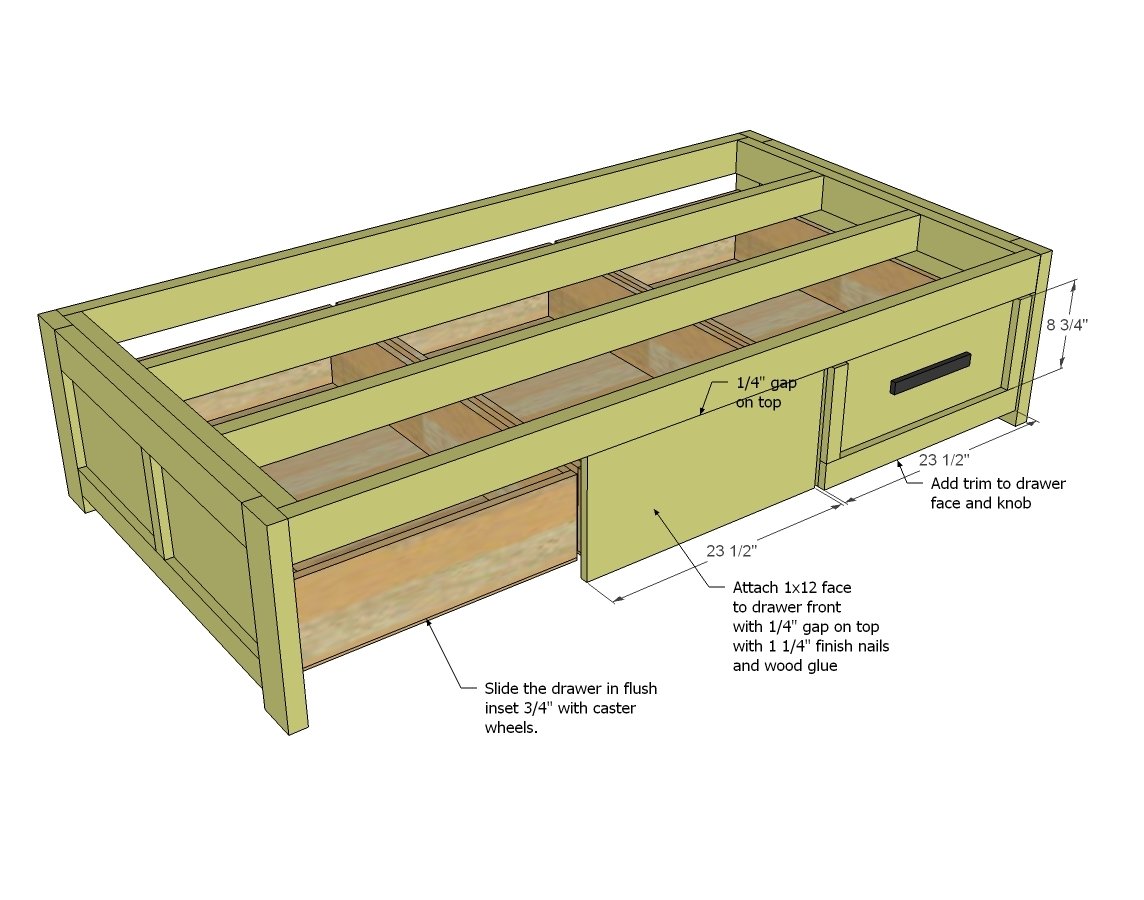
DRAWER FACES
3 – 1x12 @ 23 ½”
3 – 1x3 @ 23 ½”
6 – 1x2 @ 8 ¾”
Cut 2x4 boards for base (the longest 2x4 cuts) first, and then cut smaller cuts from the scraps to conserve boards, or you'll need to buy another 2x4.


Please read through the entire plan and all comments before beginning this project. It is also advisable to review the Getting Started Section. Take all necessary precautions to build safely and smartly. Work on a clean level surface, free of imperfections or debris. Always use straight boards. Check for square after each step. Always predrill holes before attaching with screws. Use glue with finish nails for a stronger hold. Wipe excess glue off bare wood for stained projects, as dried glue will not take stain. Be safe, have fun, and ask for help if you need it. Good luck!
Instructions
Step 1
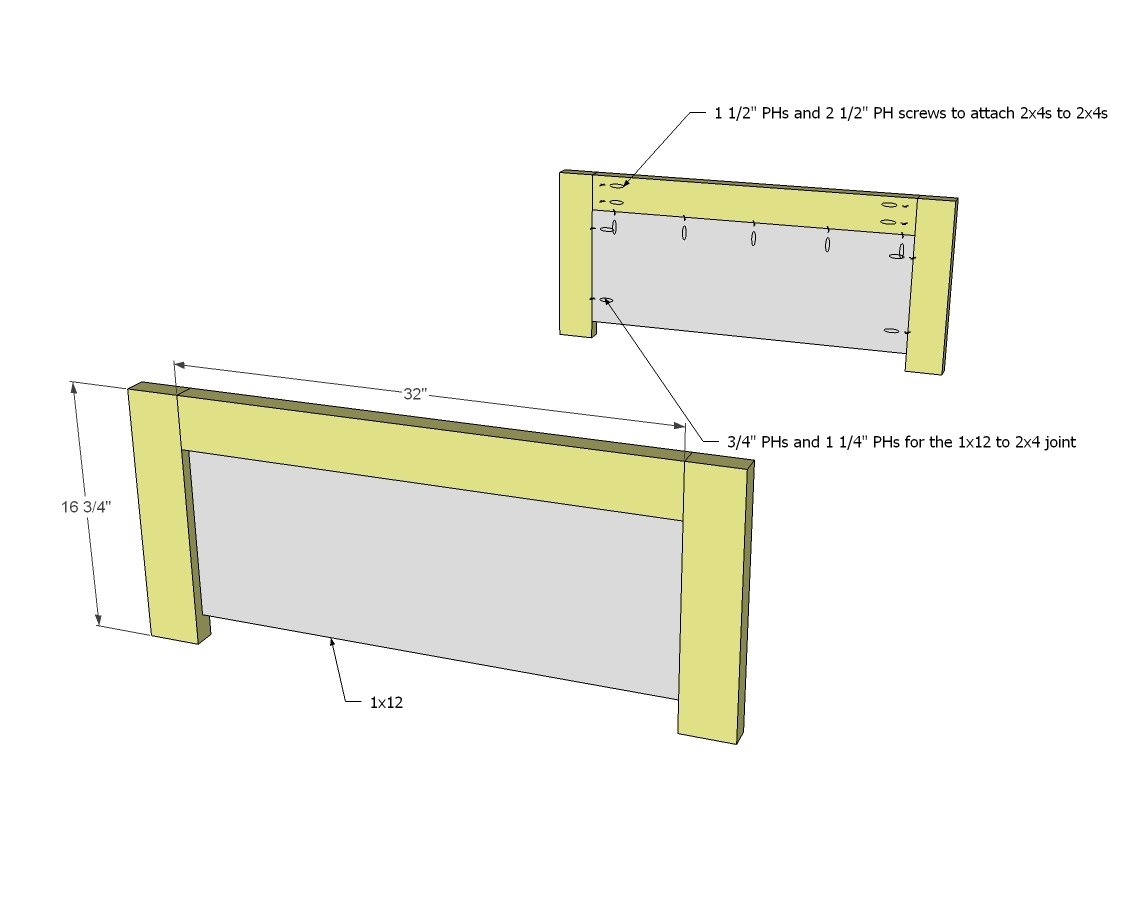
Drill 3/4" PHs around top and sides of end panels. Then attach to top header and legs with 1 1/4" PH screws and wood glue. Keep back edges flush.
Step 2
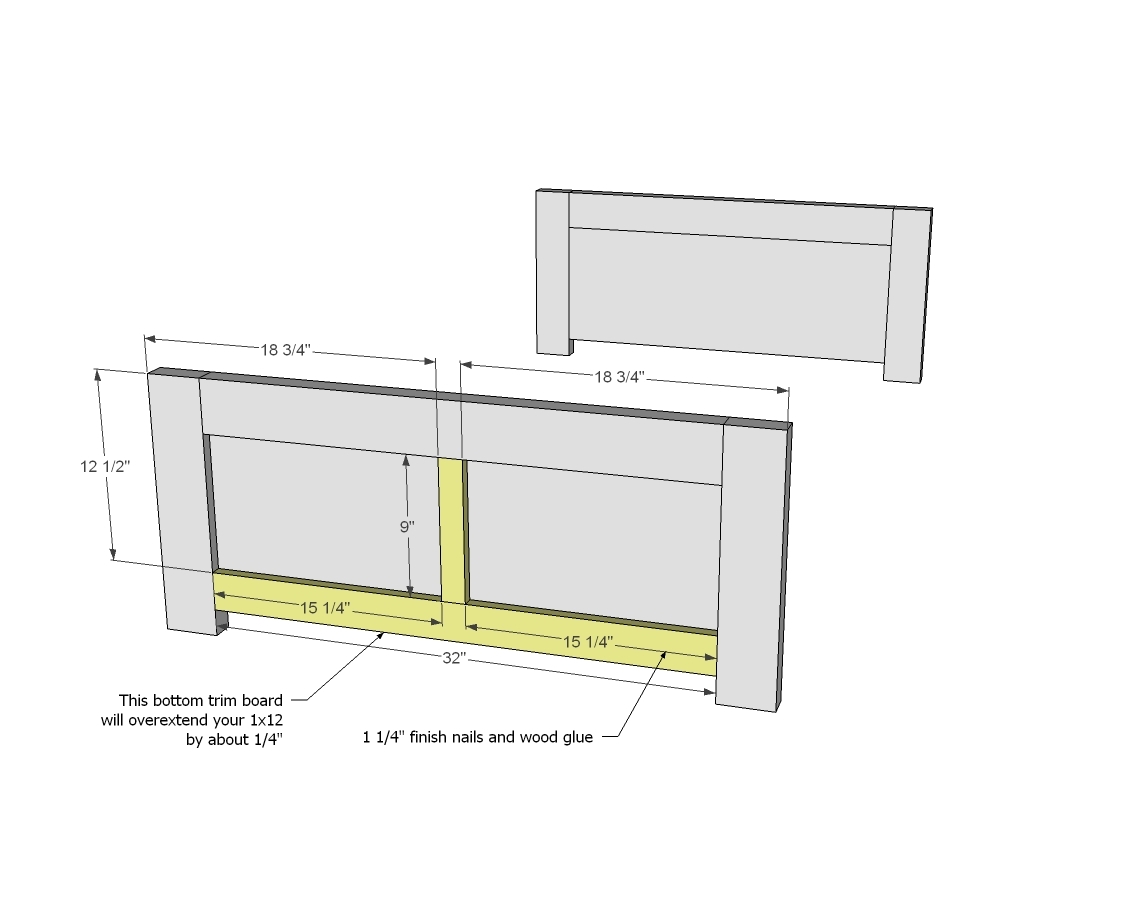
Add decorative trim with 1 1/4" finish nails and wood glue.
Step 3
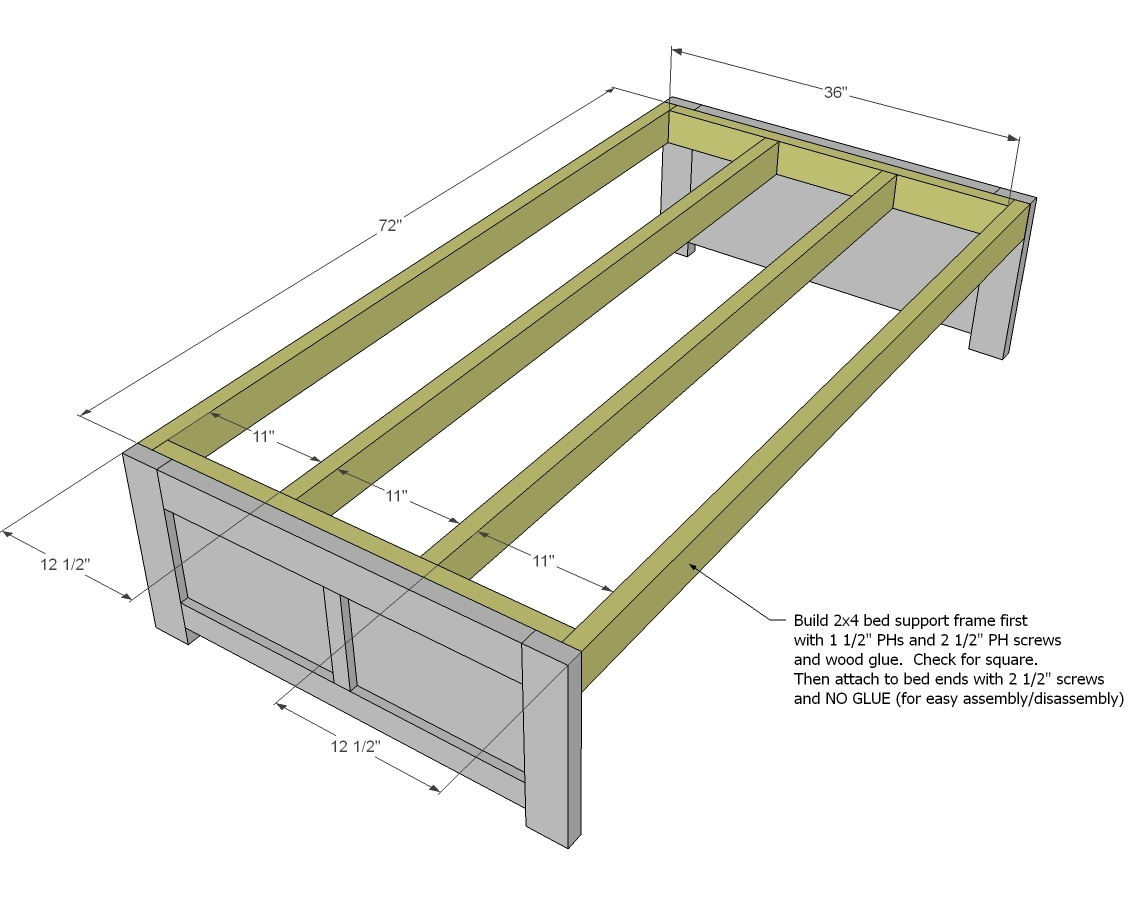
Build frame. You can just frame up with wood screws or attach with 1 1/2" PHs and 2 1/2" PH screws and glue. Attach frame flush to top with ends as shown in diagram using 2 1/2" screws.
Step 4
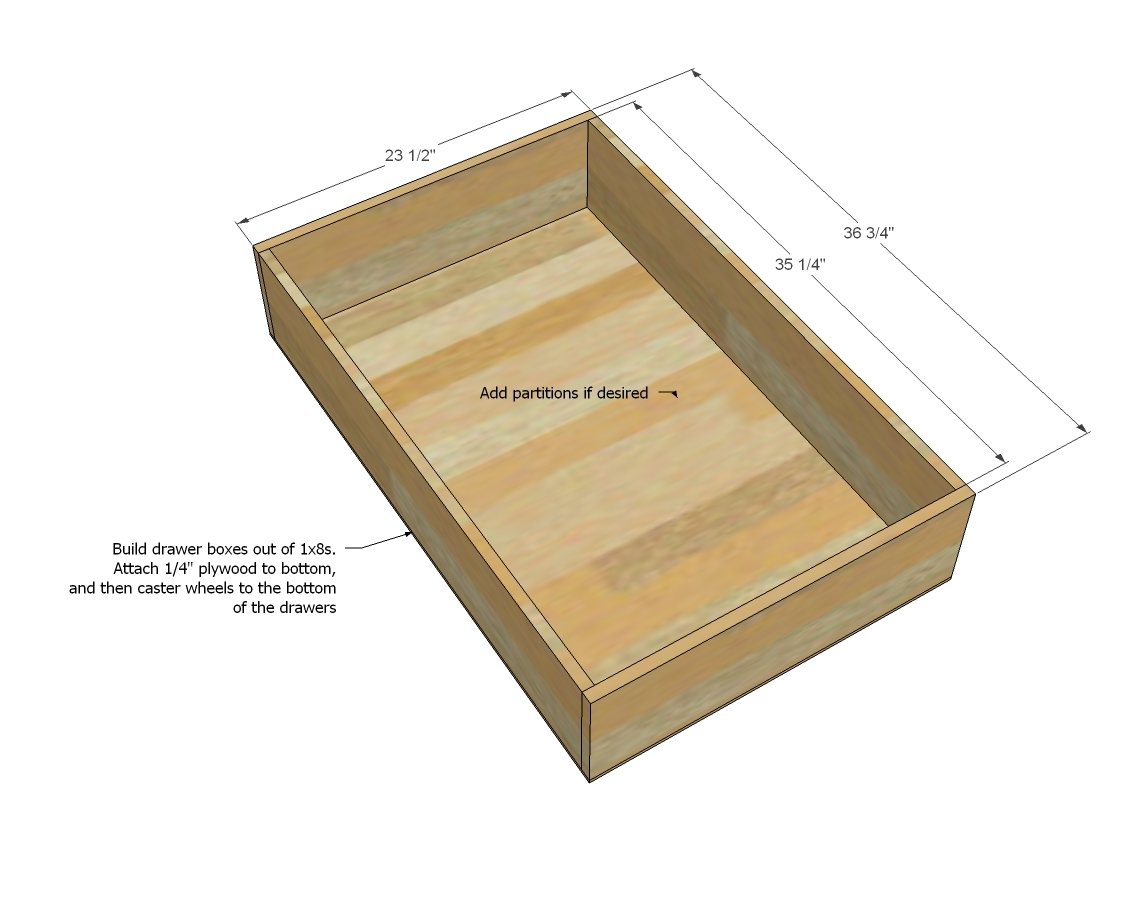
I changed up the drawers so the sides overextend the front in the cut list. If you do this, you can place ¾” PHs on the outsides and attach with 1 ¼” PH screws. Then when you add the drawer faces, it covers the PHs up. I also shortened the drawer to 36” overall length so you can put drawer faces on both sides if desired.
Step 5
Step 6
My sister used 1/4" plywood on top of the 2x4 frame.
Step 7
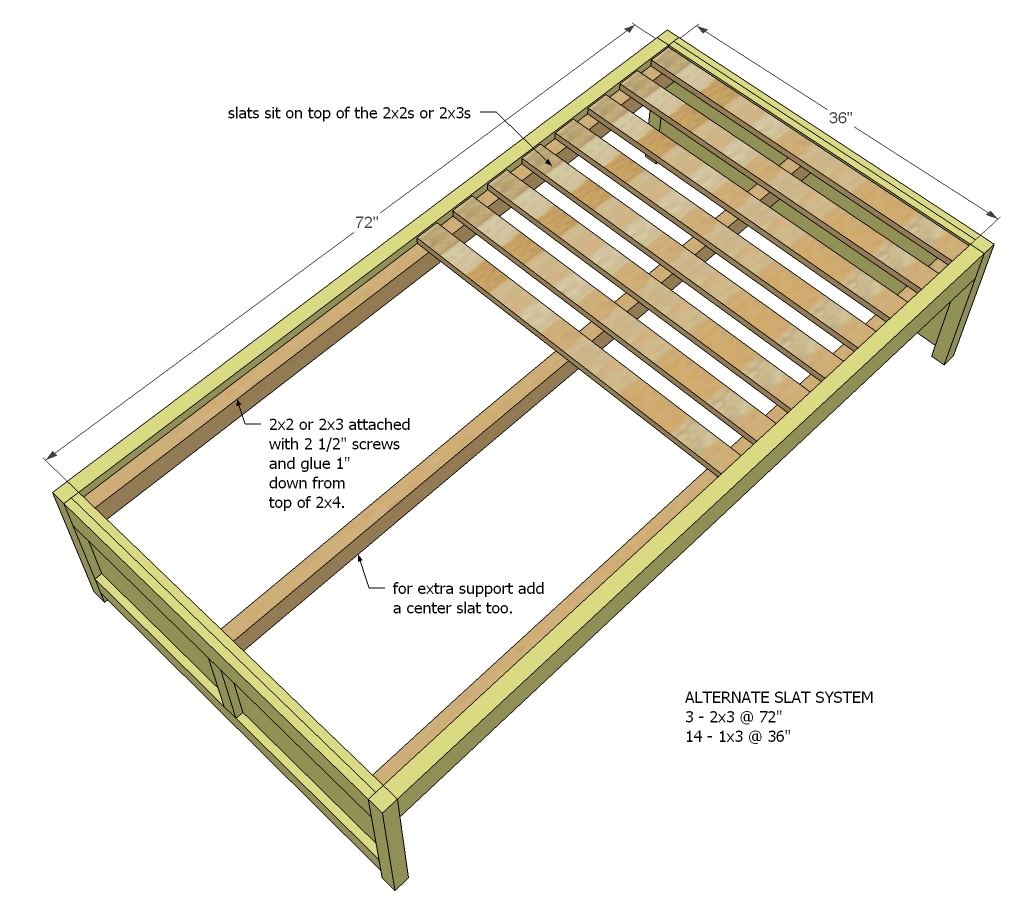
Here's an alternate slat system that you could use if you prefer that.
It is always recommended to apply a test coat on a hidden area or scrap piece to ensure color evenness and adhesion. Use primer or wood conditioner as needed.

Comments
Corky King (not verified)
Wed, 08/29/2012 - 11:01
Storage trundle day bed
Hi Ana,
Love this day bed plan! Question: could this be modified so that the drawer unit pulls out all together, and a solid top was above them? I.k.e.a. has a storage trundle bed that allows the drawers to remain fixed but the "trundle" portion pulls out. It's called Hemnes Day Bed.
An extra mattress flips down to create a larger bed. This would be perfect for a guest room I'm planning. I need more than a twin, but don't have space to allow for a queen / king unless it's actually bedtime!
Thanks for all you do to inspire us, Ana!
Corky
ethidda
Tue, 09/11/2012 - 09:12
The HEMNES day bed is not easy.
I actually bought a (used) HEMNES day bed and built it, and it's not easy to make, which I suspect is why there is no plan for it yet, even though for every day bed post I see here, Ana gets at least one request for that plan.
In order for the HEMNES bed to work as it should, there is a metal piece, quite flimsy, which is about two inches wide. It holds the slats together from the top and attaches to the head and foot boards. It's thin enough that if you put a mattress on it, you don't feel it on top of the slats. This allows the other slats underneath to slide through them. (i.e. the end of the slats are not capped.)
I have no idea where you would get such a thin metal piece, made to this exact length, and bent in the right shape.
Even if that were cheap to obtain, the rest of the bed still requires a lot of precision. Which I'm not saying is impossible, but definitely harder than most of the plans, where if you mess it up, it just doesn't look good. If you mess up the HEMNES, it doesn't work at all.
In reply to The HEMNES day bed is not easy. by ethidda
PurelyNicole
Thu, 07/02/2015 - 11:02
Seconded.
I can confirm what ethidda says about the HEMNES daybed. I recently bought the BRIMNES daybed, which is basically HEMNES in a different aesthetic, and it was a PAIN to assemble. I don't doubt you could possibly find the hardware at a specialty store, but as ethidda says it takes a lot of precision. Mine is off a bit in the front and you certainly tell.
sylvialh
Fri, 01/08/2021 - 08:44
hmmm I was definetly…
hmmm I was definetly planning to attempt this hemnes / brimnes build and or to buy a used one but now I'm giving it a second thought thanks! (but would still love to see if one day ana can achieve this as I know there are several DIYs online that achieved it although nothing that as polished as what ana does
MeghanP (not verified)
Wed, 08/29/2012 - 11:37
Help! PDF not working!
Love this . . . this is exactly what we've been needing for our daughter's room! But . . . the PDF link isn't working. Help me, please :)
BTW, love your stuff. You do great work!
spiceylg
Thu, 08/30/2012 - 06:24
Nice!
Love it. This is not a criticism, just curious. This is very similar in looks to the storage bed in which you could also use drawers, yet of course they are built differently. Is there a reason you didn't go that route? Is one easier than the other?
how2home (not verified)
Thu, 08/30/2012 - 11:13
LOVE THIS! ive been thinking
LOVE THIS! ive been thinking about making something like this for a while and now that i see what it could look like, im totally sold! Thanks for sharing these fantastic instructions with us Anna!
Chowie (not verified)
Sat, 09/15/2012 - 18:22
Hi Ana, We are working on
Hi Ana,
We are working on this and everything seems to be going well. But we just wanted more detail on the caster wheels. What size did you use and where are they attached under the drawers? And how many casters on each drawer?.. Two?
Ginger (not verified)
Wed, 09/19/2012 - 18:15
Chowie, Would you mind
Chowie,
Would you mind sharing what size casters you used? I have the same question.
THANKS!!!
Justin Mouser
Sun, 09/16/2012 - 16:14
Almost done
I just happen to stumble across this and it was perfect for what we need. Almost done, just can't decided to paint or stain! Plans were fairly easy. I made a few modifications here and there. When I brag it I'll be more specific. Thanks!
Ginger (not verified)
Wed, 09/19/2012 - 18:14
I had the same question as
I had the same question as Chowie about the caster size.
LOVE your plans!!!
In reply to I had the same question as by Ginger (not verified)
chowie
Thu, 09/20/2012 - 05:58
Casters
We used 4 casters per drawer and they were 2inch casters. Worked great.
melcurt8179 (not verified)
Sun, 09/23/2012 - 14:08
Mattress
I would like to use this bed frame with the corner hutch storage twin beds. I like the idea of the drawers instead of the cubbies. Do you think that would work? Also, will a twin size mattress work on this? Thanks. They are probably silly questions, but his is all new to me! I'm still trying to convince my husband that we can do this!
smelvin20
Sun, 10/18/2015 - 14:28
Can it be used with corner hutch?
I cannot see the reply to the original comment.... Can it be built with the corner hutch?
smelvin20
Sun, 10/18/2015 - 14:28
Can it be used with corner hutch?
I cannot see the reply to the original comment.... Can it be built with the corner hutch?
Tori (not verified)
Fri, 10/05/2012 - 13:03
Plans for sectional with two daybeds and storage?
Do you or anyone else on your site have any plans that I could use to make two daybeds and put them together for a sectional. I would like storage too if possible. Any ideas? Help would be appreciated. love your site.
Saved By Grace (not verified)
Sun, 11/04/2012 - 10:16
Plywood drawer bottom
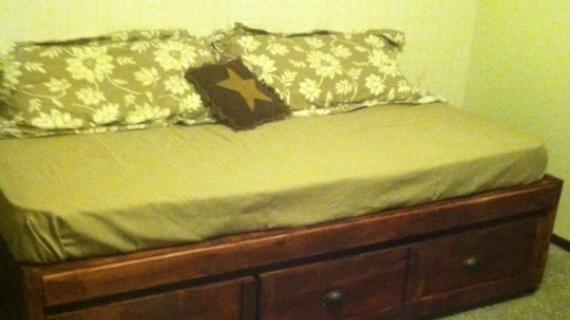
Hello! I am building this bed for my son for his 13th birthday. It is my first project, and so far is going very well. I was wondering, what is the best way to attach the plywood to the bottom of the drawers. Glue and finish nails?
Jen Crisp (not verified)
Fri, 11/09/2012 - 18:42
Cushion
Love this design! What did you use for a cushion?
JEY (not verified)
Sat, 01/19/2013 - 15:50
Daybed with drawers
I love this idea only I'd love to use this for a double bed instead of a twin which is 48 inches wide instead of 42. Do you have modification plans for that already? I think this will work great in our old small 1920's bungalow house's guest bedroom!
Matt_Nels
Wed, 03/06/2013 - 12:19
Stain
I am building this bed now, my first project, and i am starting on the drawers and was thinking ahead to finishing it and was wondering how much stain do you think this would take? A couple of quarts? I have never stained anything and have no clue how much a can really can cover.
Any ideas?
ctmkgw03
Fri, 03/15/2013 - 04:43
Want this
WOW this is AMAZING! I have a hard choice to choose from with all the plans on your site.
best grandma
Mon, 07/15/2013 - 17:36
XL Twin
I would like to make this to fit an XL twin mattress. I think I can make the adjustments to the materials but thought I would ask if anyone might already know them to save time. Thanks in advance,
taimeaka16
Fri, 03/27/2015 - 08:21
Full Size?
I am in love with this design but need plans for a Full size bed. I know I will have to change the width for the frame, but what about the drawers? Any help will be greatly appreciated!
Imadeit
Wed, 07/20/2016 - 13:37
Adapting this to be base for king bed
I want to make a storage platform for my king mattress. Looking at this plan's finished size, I think that by making it 5" longer and 1" less wide, I could put two of these together and have the right dimensions. I imagine that I would bolt the two units together where they meet in the middle for extra stability. Anyone out there see a reason this would not work?
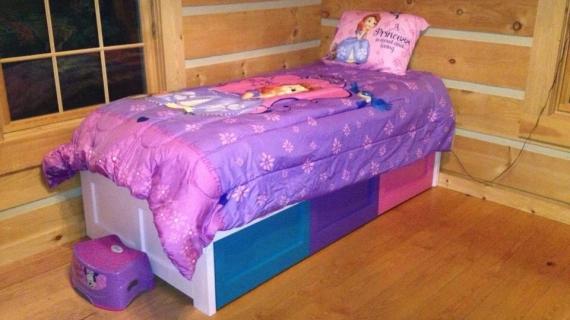
amyturnbull
Mon, 01/09/2017 - 10:12
day bed
for Claire and Laney's room
amyturnbull
Sun, 01/29/2017 - 13:38
Notes
So, a few things I learned along the way..
1. use 2 inch fixed castors
2. when attaching the faces to the drawers turn the faces over and measure from the bottom of the face (the part with the trim on the bottom) 3/4 in from the side and about 15/16 from the bottom and draw marks to line your drawers up and then shoot them with a one inch brad nailer. This should provide the correct clearance for the drawers to open and close smoothly. I did 7/8 and it is tight but it looks nice.
3. When attaching the bottoms to the drawers, pay attention to wear you put your fasteners so you can attach your casters without a bottom fastener being in the way.
I think that's it...but I am sure I did other things wrong along the way...lol. But they look good. Just need to paint and add the hardware.
derek.parish@g…
Sat, 01/15/2022 - 08:35
Would it not be advised to…
Would it not be advised to make the slats be recessed into the frame so that the bed would sit down “inside” the frame rather than on top of it? I know the length and width would have to be increased a bit to fit it but just wondering.
derek.parish@g…
Sat, 01/15/2022 - 08:36
And when I say sit down…
And when I say sit down inside like only an inch so that it gives a clean look and doesn’t allow the bed the slide off.