
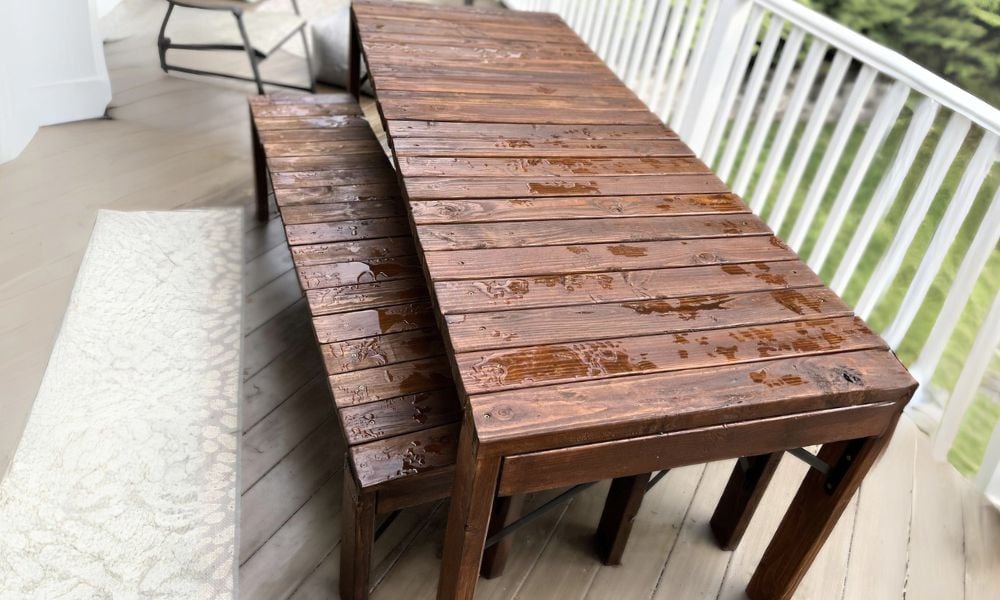

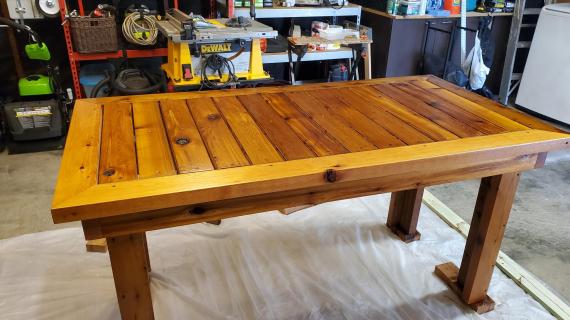
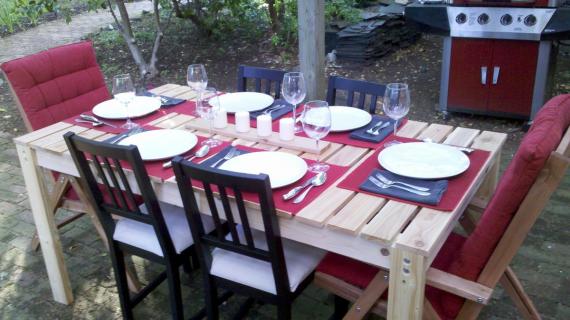
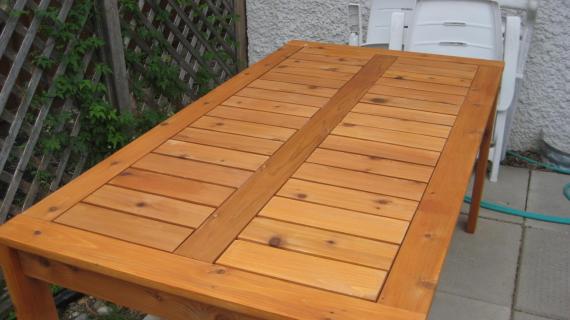
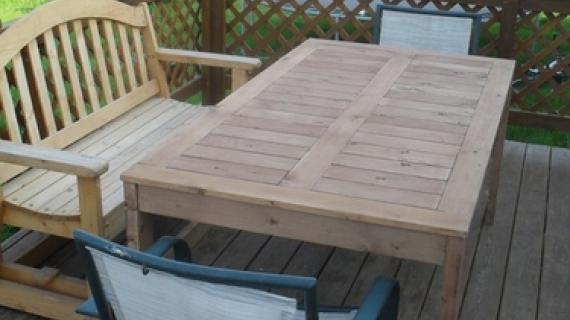
Build your own outdoor table! We love the simple styling and clean lines of this outdoor table. This simple plan requires no special tools and is beginner friendly! Build and enjoy this weekend! Free plans by ANA-WHITE.com
Preparation
- 4 - 2x4 @ 8 feet long (cut longest boards first)
- 5 - 1x4 @ 8 feet long
- 100 - 1-1/4" to 2" long - self tapping exterior screws (look for star bit ones)
- 25 - 2-1/2" long self tapping exterior screws
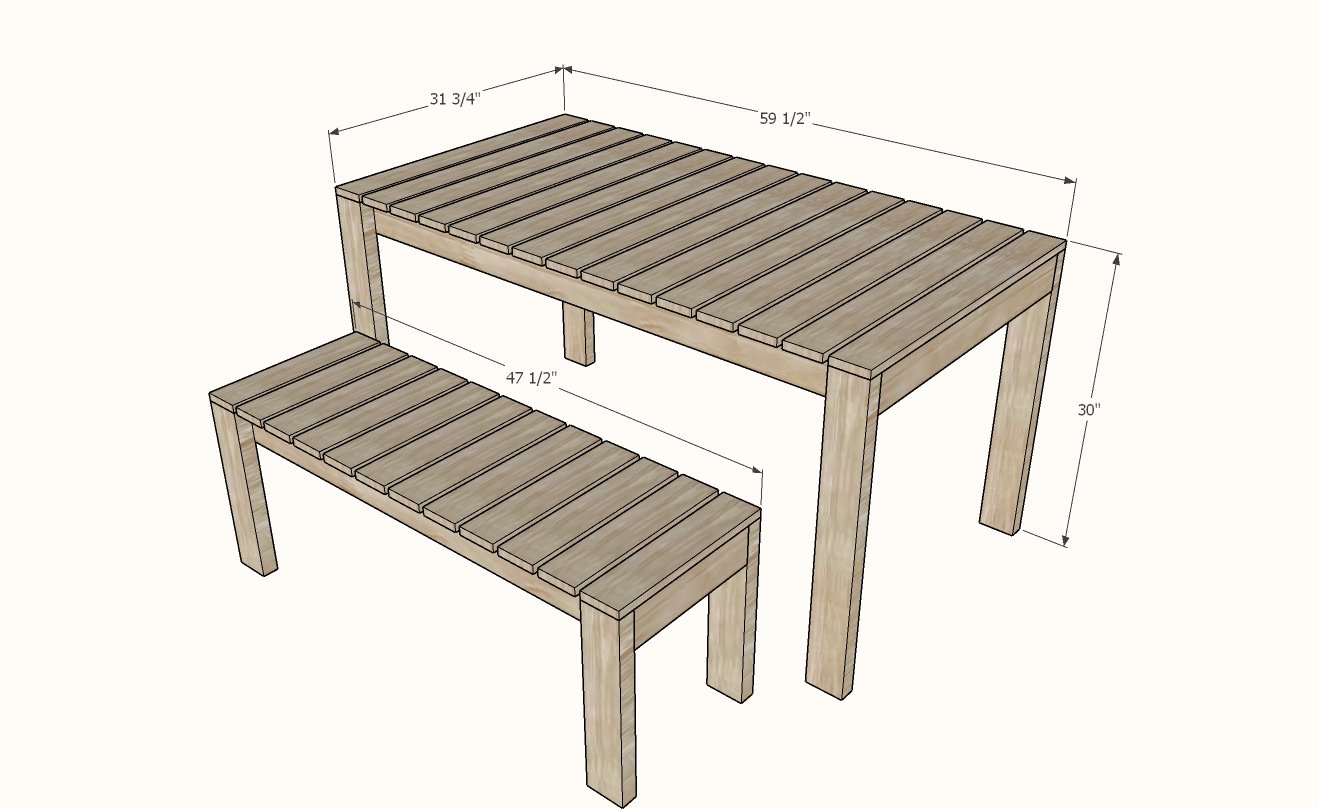
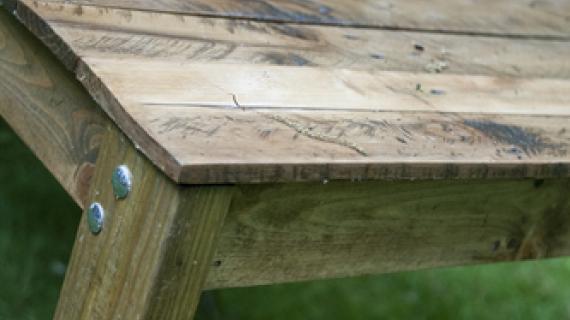
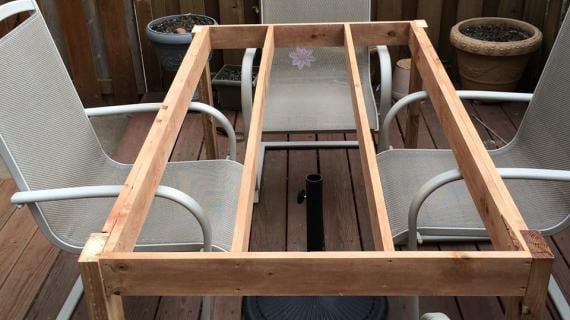
3 - 2x4 @ 56-1/2" - frame
2 - 2x4 @ 28-3/4" - frame ends
4 - 2x4 @ 29-1/4" - legs
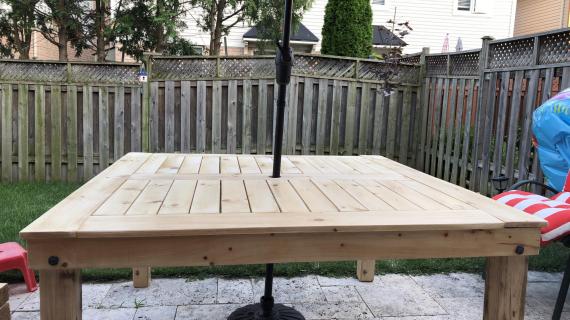
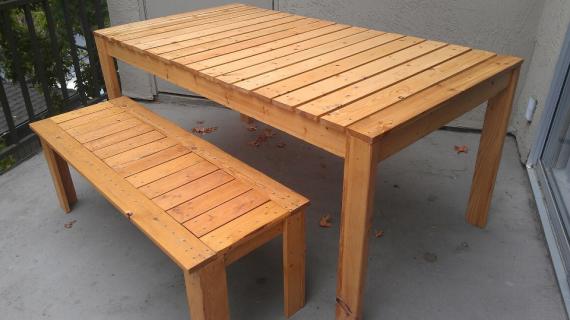
15 - 1x4 @ 31-3/4" - tabletop boards


Instructions
Step 1
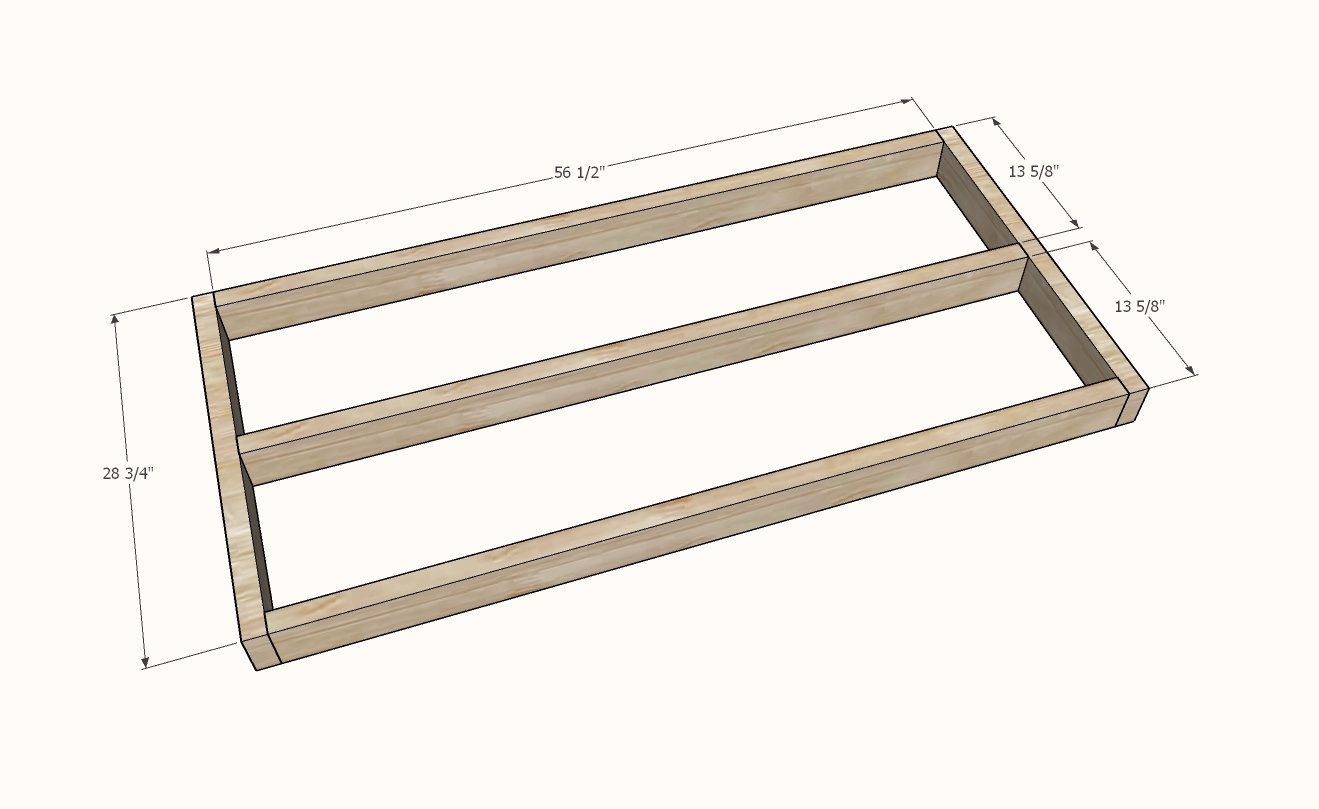
Build the frame of the table with the longer screws, two screws per joint.
Adjust for square by taking opposite diagonal measurements and adjusting until the opposite diagonals match.
Step 2
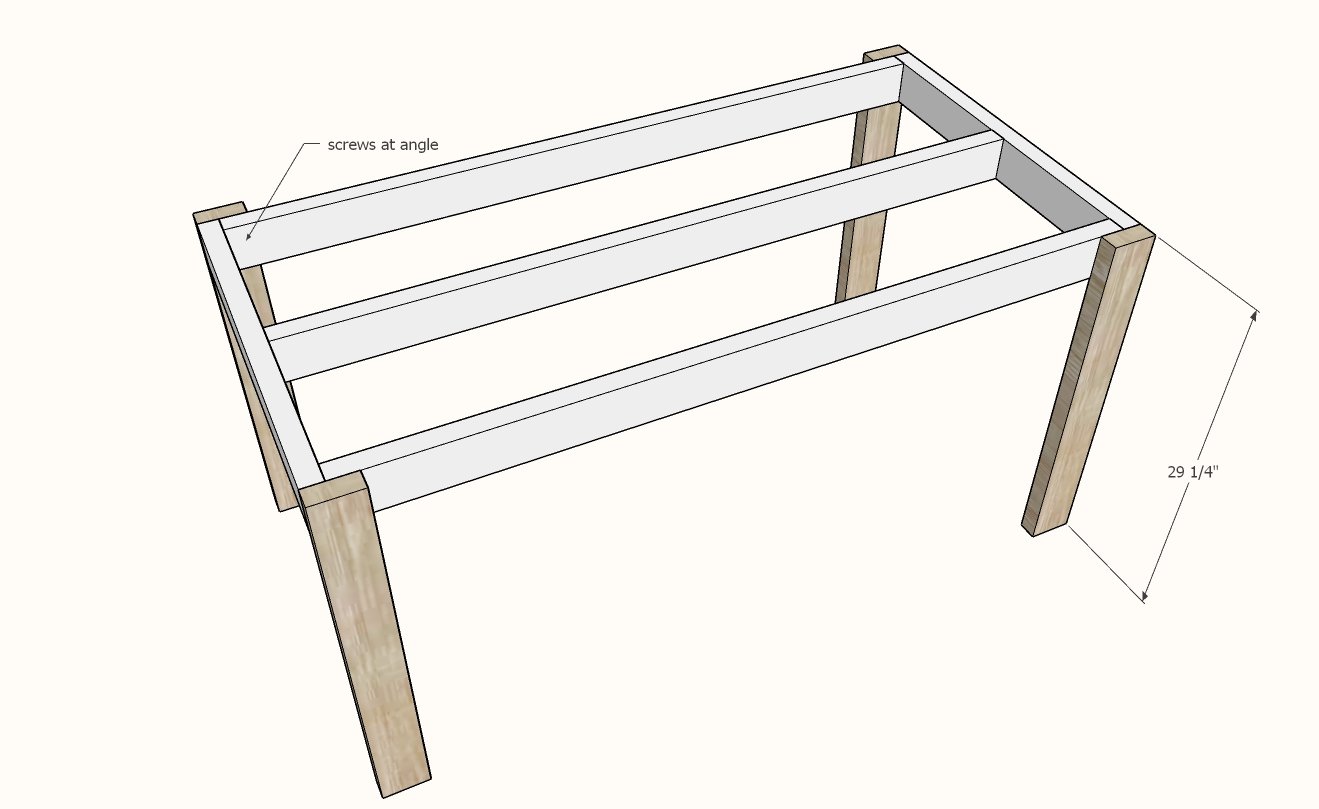
Attach legs to the frame (will be easiest upside down). Multiple screws at an angle into the legs will be stronger than screws straight on.
Step 3
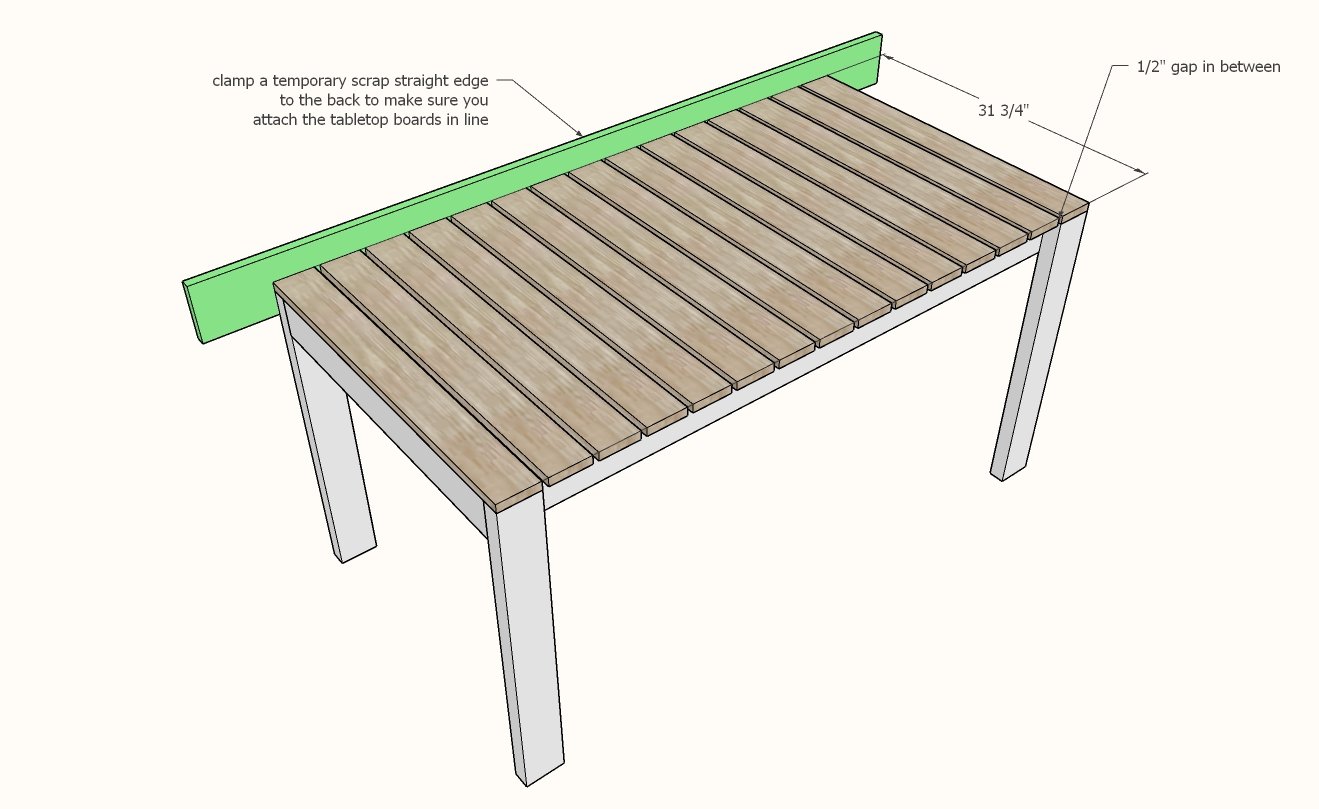
Clamp a straight edge to the outside of the table and lay out the tabletop boards with a 1/2" gap in between. Screw down with the shorter screws.
For the end boards, screw to the end of the frame too - this will add considerable strength to your table.


Comments
Anthony S (not verified)
Mon, 05/07/2012 - 20:30
Use Galvanised Screws or coat the ones suggested
Nice design.
Using galvanized screws in the construction of this outdoor
table will prevent fixing points from rusting in the outdoors.
The screws suggested here could also the sprayed with a
galvanized coating available from hardware stores prior to
assembly.
Chele (not verified)
Fri, 05/11/2012 - 11:54
You could use stainless steel
You could use stainless steel screws, that is what we used on our deck.
brooke jenkins (not verified)
Sun, 05/13/2012 - 20:03
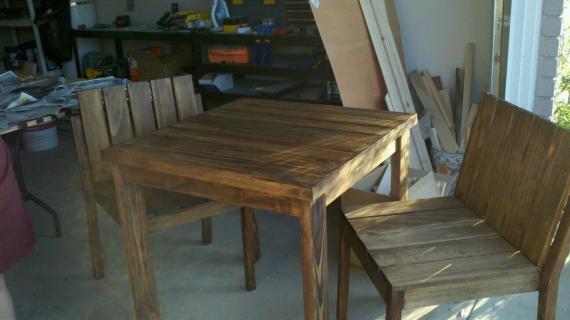
did you also make the chairs
did you also make the chairs yourself? i love the way this looks!!
travelnFog (not verified)
Tue, 06/05/2012 - 12:29
Plans for the bench and chairs
I love the table. Can you put in a link to the bench and chair build pages if they exist? if not it might be an idea....
thanks for a great DYI blog.
Céline (not verified)
Wed, 06/27/2012 - 09:28
Help for European reader !
Dear Ana and readers,
Thank you very much for all those plans. Like others have said many times, your website gives me the boldness to try and build something myself. But... I am one of your European readers and, since we don't use the same measurements or standards, I'm not sure how to interpret your instructions.
Could you, as an example, explain to me the following line ?
5 – 8′ – 1×4
Then I could "translate" the intructions more easily for the various projects in the future.
I very much hope someone can help me! Thanks a lot in advance !
Céline from Italy
Secret Agent Mom (not verified)
Sat, 07/07/2012 - 09:14
conversion
Celine,
I am building this table now!
5 - 8' -1"x4" is:
Five total boards measuring eight feet long that are one inch by four inches width/depth. This symbol ' means feet and this " means inches.
In metric conversion I believe it would be something like this:
Five total boards measuring 2.4 meters that are 2.54 x 10.16 centimenters width/depth.
I used this chart: http://www.calit2.net/~jschulze/misc/spinoff/metric-conversion.htm
I hope that helps!
In reply to conversion by Secret Agent Mom (not verified)
Lady Goats
Sat, 07/07/2012 - 14:26
Just to note, nominal widths
A 1x4 tends to be closer to 3 1/2 inches, not 4, exactly. If you can't find something comparable to 4", look for the 3 1/2" conversation.
cricachat
Tue, 07/17/2012 - 10:05
conversion
Yes, it helps a lot ! It is indeed much clearer now for me.
Thanks a lot for your explanations and the link to the chart.
I am now ready to try for myself!
Good work on your table and thanks again for taking the time to answer!
Céline
Suzanne B. (not verified)
Wed, 07/25/2012 - 16:40
Gray & White Deck
I'm curious if you could give me the products you used to stain the actual deck? I love the gray and white! Thanks! :)
mrhelton
Mon, 09/03/2012 - 17:03
Next Project!
I have to say, I really like this table! I just made one of your adirondack chairs, and after I make the second, I'm going to be making this table (though a shorter version to sit at comfortably with those chairs.
I can't wait. This site is awesome.
mfgtcb (not verified)
Wed, 09/05/2012 - 09:27
table built with Kreg Jig
does anyone have picutres of where and how many kreg jig holes are used to fasten this together. For example how are each of the table top boards attached to each joist? with 2 hole/screws or just one on each of 4 joists?
Also any addtional details on how the legs are attached would be helpful.
Sureka (not verified)
Sat, 09/22/2012 - 18:02
Kitchen Table???
I want this for a Kitchen Table....are there any suggestions or modifications I would need to make?
Sureka (not verified)
Sat, 09/22/2012 - 18:02
Kitchen Table???
I want this for a Kitchen Table....are there any suggestions or modifications I would need to make?
Jason Kermeen (not verified)
Sun, 10/07/2012 - 21:00
Chairs
Great table Ana. Do you have the plans for the bench seats..
Also what wood would you suggest using.
Cheers from Australia
Roxie (not verified)
Wed, 12/05/2012 - 09:35
10-12
Love this site!! I want to build this to seat 10-12 people. I have read all the comments and don't get it. Can someone please be more specific as to how much material and cuts I need. This will be my first woodwork project!! Thanks Much!!!
cheryl xavier (not verified)
Thu, 01/17/2013 - 13:44
wonderful wooden table!!!!!
Hi ana,i love your web site! i am a single mama in columbia s.c. and i love to do projects too. I am looking for a web site to build me a 24x24 ft. house for me and my little girl . i am looking at some land down here and i hope some one can give me a few ideas. if you have any pointers please send them to me . thanks and keep up the awsome craft projects and WONDERFUL web site!!!!!!!!!!!! I WILL be looking back on here.
Jared C (not verified)
Thu, 01/17/2013 - 15:35
Are the gaps necessary due to
Are the gaps necessary due to weathering or is it just cosmetic?
JessicaHardy
Tue, 01/29/2013 - 10:09
Plans for the Chairs?
Hello! I just came across your site and fell in love!! Are there plans to these chairs and bench?
Thank you,
Jessica
JessicaHardy
Tue, 01/29/2013 - 10:09
Plans for the Chairs?
Hello! I just came across your site and fell in love!! Are there plans to these chairs and bench?
Thank you,
Jessica
mybartmart
Wed, 03/27/2013 - 02:04
question about the location of the legs
do the legs have to be installed on the outside? could they be done inside the framed table top ? just wondering if outside is a structural thing? Doe the apron also add strength.
mybartmart
Wed, 03/27/2013 - 02:04
question about the location of the legs
do the legs have to be installed on the outside? could they be done inside the framed table top ? just wondering if outside is a structural thing? Doe the apron also add strength.
Knelgm
Tue, 04/30/2013 - 18:34
Chairs and Bench Directions?
Why can't I find the directions for the chairs and bench? Please help, I am sure that is is right in front of me...I just can't locate them :)
Ang Dly
Wed, 05/01/2013 - 13:21
Will adding tile add Weight?
I have some wonderful mosaic tile bought in bulk from the "Habitat for Humanity ReStore" and was thinking of creating a tile tabletop for this outdoor table - Instead of wood slats, I think a 3/4" plywood would serve as the top to place the tiles on. My Question -Would replacing the slats with plywood and Tile increase the weight of the top enough to require more support from the bottom?
If so, is Ana and Claydowling's suggestions of replacing the 1x 4s with 1x6s or 2x4s the answer, or does tile and plywood react so differently than wood planks to require different support?
This is an amazing website - all the accomplishments here are very motivating!
kazey
Wed, 05/15/2013 - 18:04
This is truly great for
This is truly great for mommy's out there. You can make your own like this at home since the materials are truly affordable. - YOR Health
Rachel M
Tue, 06/18/2013 - 07:44
First timer and a lounge chair under the belt.
Hey Ana,
I am so in Love with this site. Thank you so much for posting these plans.
I built this and the little bench yesterday. It took 6.5hrs. and well worth it. Such sturdy sturdy builds. I no more finished but we had dinner on it!!! My husband approves. I am also going to build the small stools/tables so it all can tuck under the table. I have enough scrap from this project to and the lounge chair to build the stools FREE.So $100 total got me a table, bench, and chair. Since our HD only carried 1x4's in 8' I bought 5 extra to make up for the 12' you called for. This gave me plenty of excess to play with.
Thanks again next is the Couch. Think Big and girl power to all!!
whitebunnyflock
Tue, 01/06/2015 - 18:52
bed plans?
That is an amazing bed! Would you have any plans available for it that you would be willing to share?
thanks,
Craig
Thatpatrickbrewer
Tue, 09/10/2013 - 12:20
Link to the chair plans
Lots of people had questions about where you could find the chair plans. I had to do some digging but here they are.
http://ana-white.com/2010/04/plans-simple-stackable-outdoor-chair.html
I'm excited to build this set this winter!
Shadoglare
Fri, 06/06/2014 - 21:47
So much for that
So less than two years after I built it, this table went in the trash last weekend. It appears pine is no match for midwest weather, even with a thick coating of outdoor paint. The wood had gone bad already and the table pretty much collapsed on itself when my wife put a bunch of plants on it while working in the garden - thus pretty much turning this project into a huge waste of time & money.
wonderwoman1993
Wed, 07/16/2014 - 08:47
The bench for this table
I found the plans for the chairs, but I still need the bench. Any clue when the plans will be out for it?
Thank you!
wonderwoman1993
Wed, 07/16/2014 - 08:50
Found the plans!
http://ana-white.com/2010/04/plans/build-simple-outdoor-bench
wonderwoman1993
Wed, 07/16/2014 - 08:50
Found the plans!
http://ana-white.com/2010/04/plans/build-simple-outdoor-bench
rnfryrlife
Mon, 05/11/2015 - 08:38
modifications
Do you have plans to make this for 8? I am new at this and not very confident in making my own adjustments. Also, I made the picnic table from pressure treated wood. Didn't think about it not being safe to eat on. I did paint it . What do you recommend for outdoor furniture that is outside in coastal weather? Any recommendations for the best sealer to use?
It needs to last? thanks
NatEllis65
Sun, 07/19/2015 - 16:00
Great Plan
I made this with some leftover Tigerwood deck material. I adjusted the legs to redwood 4x4. Made the matching benches with the same material, but modified the legs to 2x4 redwood.
genegenie7
Fri, 05/06/2016 - 07:29
Love it too!
I love it too, but where are the plans to do the modified square table with the prependicular design? Sorry but maybe I just haven't looked deep enough into the site!
Thanks
ramacb
Wed, 01/03/2018 - 22:59
Types of wood for this table
Great plan - functional table. What type of wood is recommended for outdoor tables/ chairs like these? Especially for california weather. Also is there a plan for the chair?
wdrosado
Sat, 03/28/2020 - 05:47
Ana this table is great…
Ana this table is great exactly what I am looking for, but how would I go about using this table with an outdoor umbrella? Would you be able to suggest this modification?
cprivara
Mon, 05/11/2020 - 11:31
bench
Would 4x4's be better for the legs?
neeyukah
Sat, 07/18/2020 - 14:10
Table top instruction
Anyone know if you screw this through the top of table top or bottom?!?