

Free plans to build a mini farmhouse bedside table from Ana-White.com
One of my fav plans I've done (with over 50 brag posts too! Thanks for sharing!) was this Farmhouse Bedside Table.
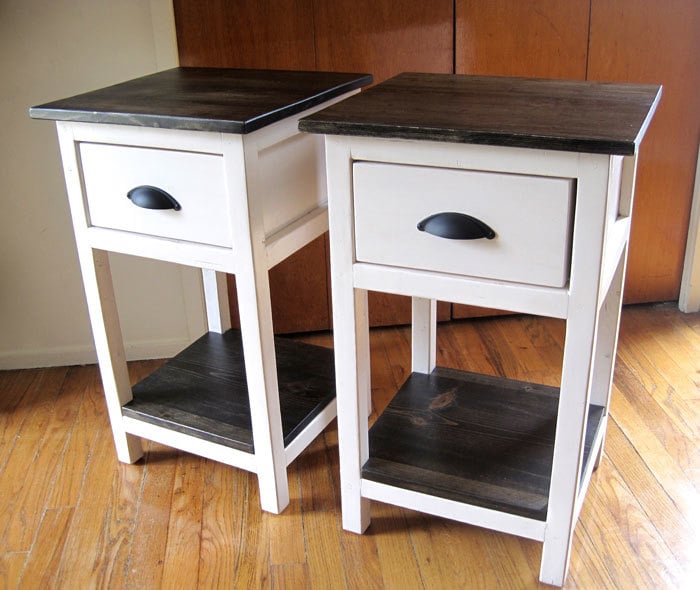
Some of you have made this table in a smaller version to better fit your space.
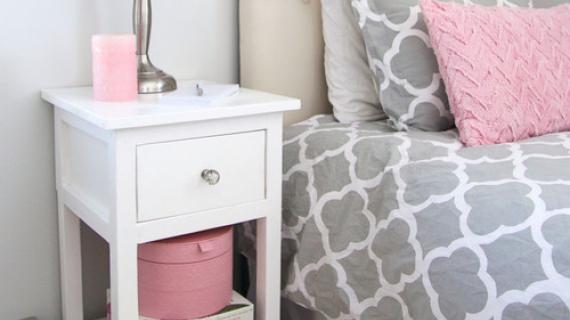
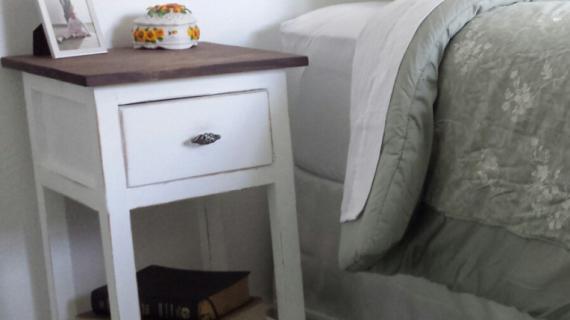
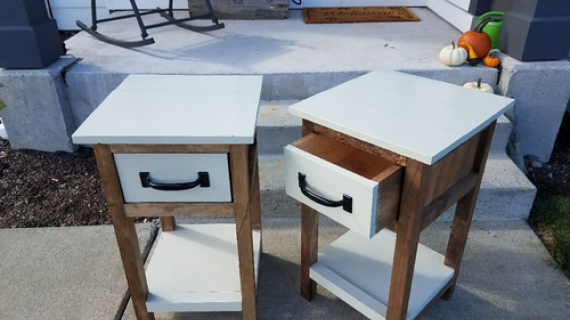
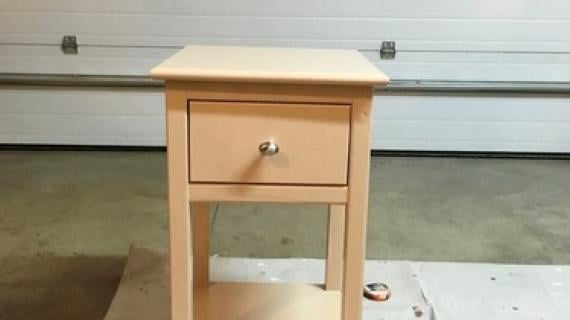
These mini farmhouse table beauties were handmade by Danicarby - aren't they darling?
After a few requests, I wanted to share the smaller plans with you as well! And remember, you can make these tables just about any size you like - just add or subtract to the width boards!
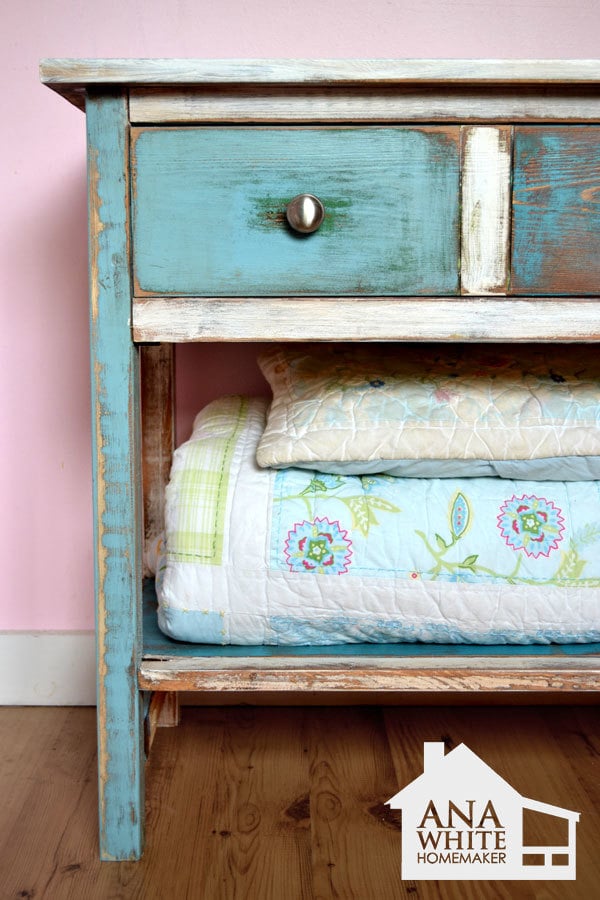
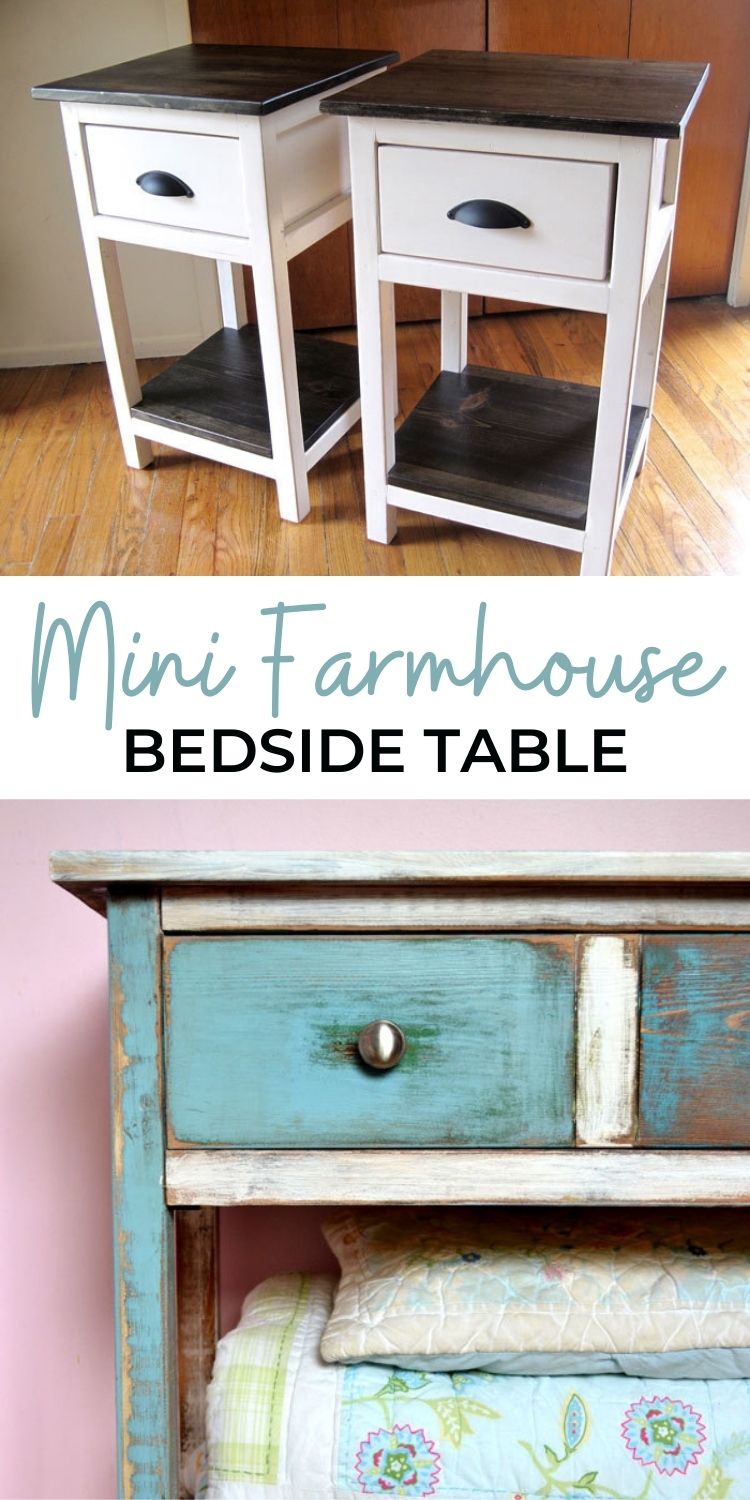
Pin For Later!
Preparation
- 1 - 1x12 @ 4 feet long
- 1 - 1x2 @ 6 feet long
- 2 - 2x2 @ 8 feet long
- 1 - 1x6 @ 8 feet long scrap
- 1/4 plywood piece for back optional recommend
- 2 1/2" and 1 1/4" pocket hole screws for joinery
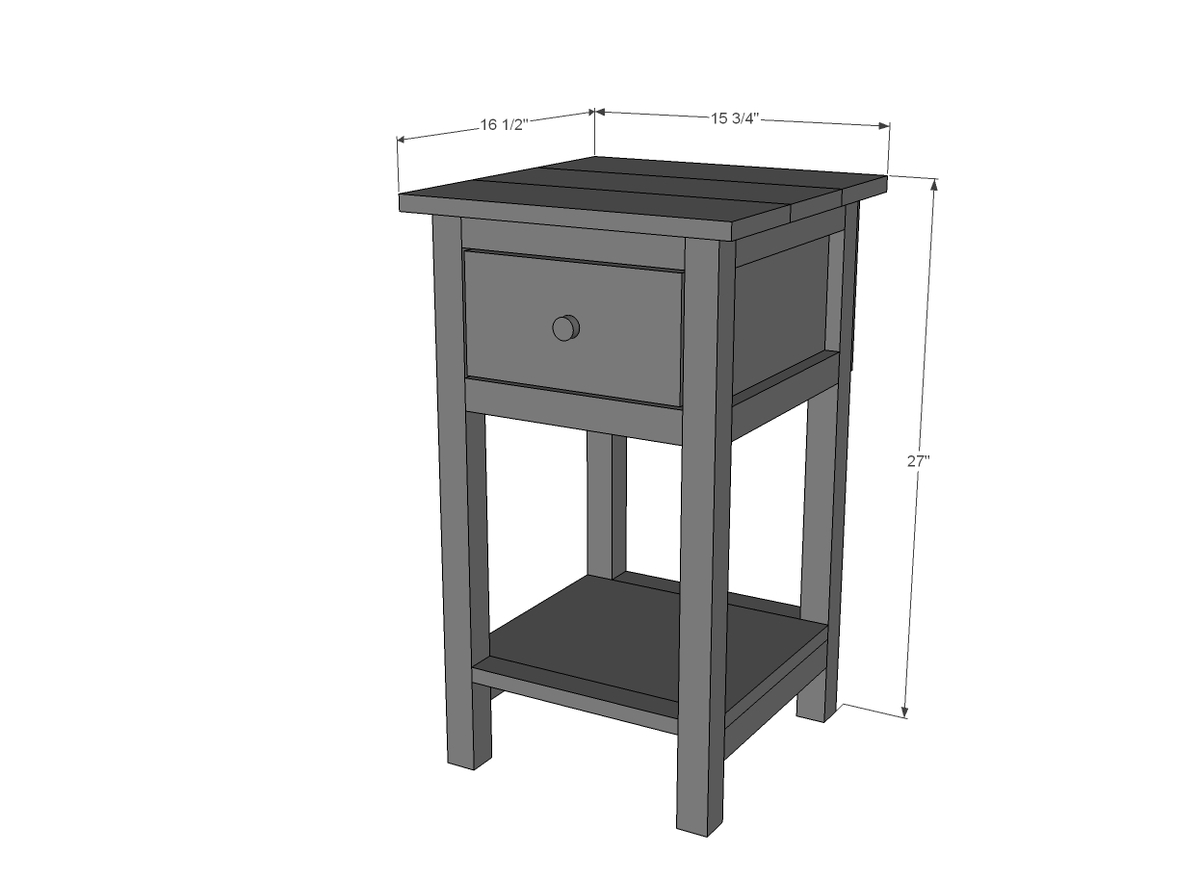
- 2 – 1×12 @ 8 3/4″ (Sides)
- 4 – 1×2 @ 11 1/4″ (Side Trim – needs to be width of your 1x12s)
- 4 – 2×2 @ 26 1/4″ (Legs)
- 2 – 2×2 @ 11 1/4″ (Side Stretchers, same width as your 1x12s)
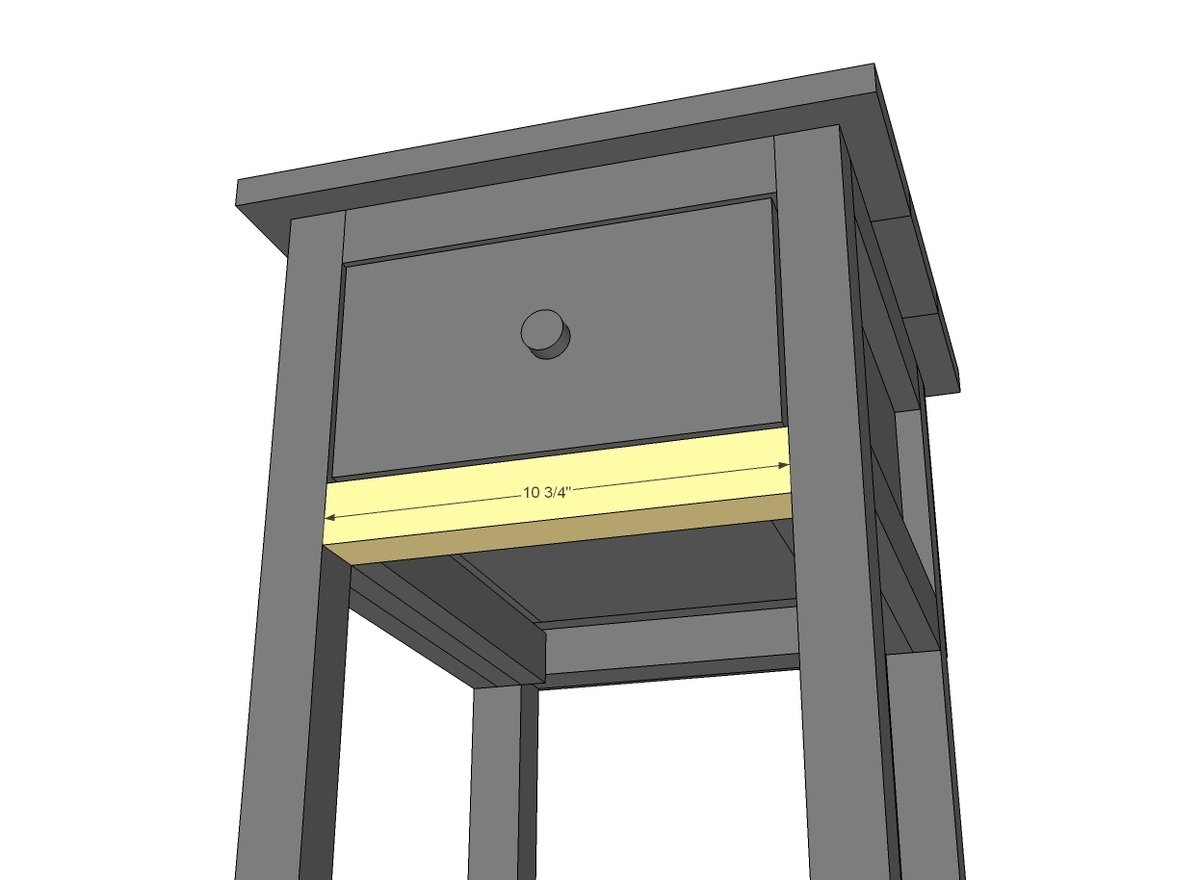
- 6 – 2×2 @ 10 3/4″ (Front/Back Trim)
- 1 – 1/4″ Plywood or paneling or other sheet goods @ 13 3/4″ x 8 1/2″ (back, optional)
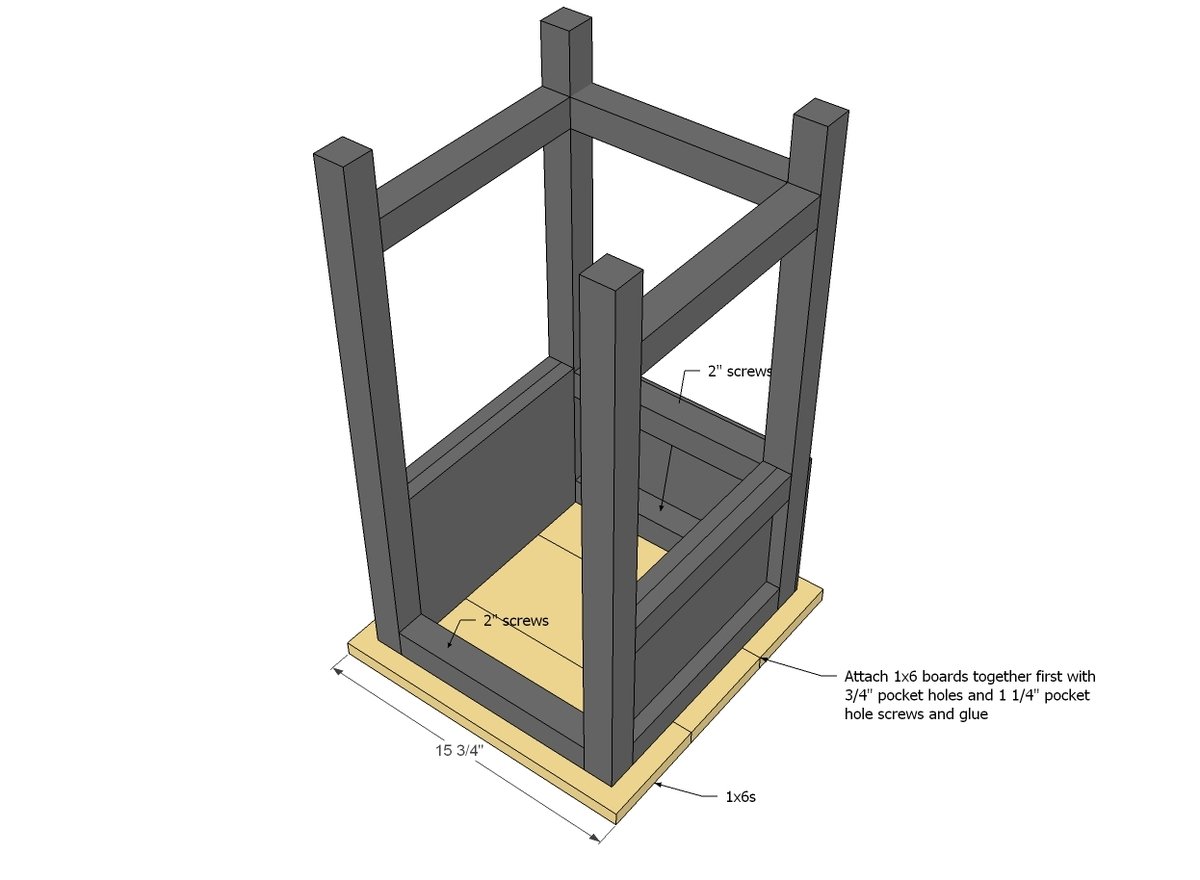
- 3 – 1×6 @ 15 3/4″ (Top)
- 2 – 1×6 @ 10 1/2″ (Front and Back of Drawer)
- 2 – 1×6 @ 11 1/4″ (Width of 1×12 – Sides of Drawers)
- 1 – 1×12 @ 9″ (Bottom of drawer)
- 1 – 1×12 @ 13 3/4″ (Bottom Shelf)
- 2 – 1×2 @ 10 3/4″ (Bottom Shelf Trim)


Please read through the entire plan and all comments before beginning this project. It is also advisable to review the Getting Started Section. Take all necessary precautions to build safely and smartly. Work on a clean level surface, free of imperfections or debris. Always use straight boards. Check for square after each step. Always predrill holes before attaching with screws. Use glue with finish nails for a stronger hold. Wipe excess glue off bare wood for stained projects, as dried glue will not take stain. Be safe, have fun, and ask for help if you need it. Good luck!
Instructions
Step 1
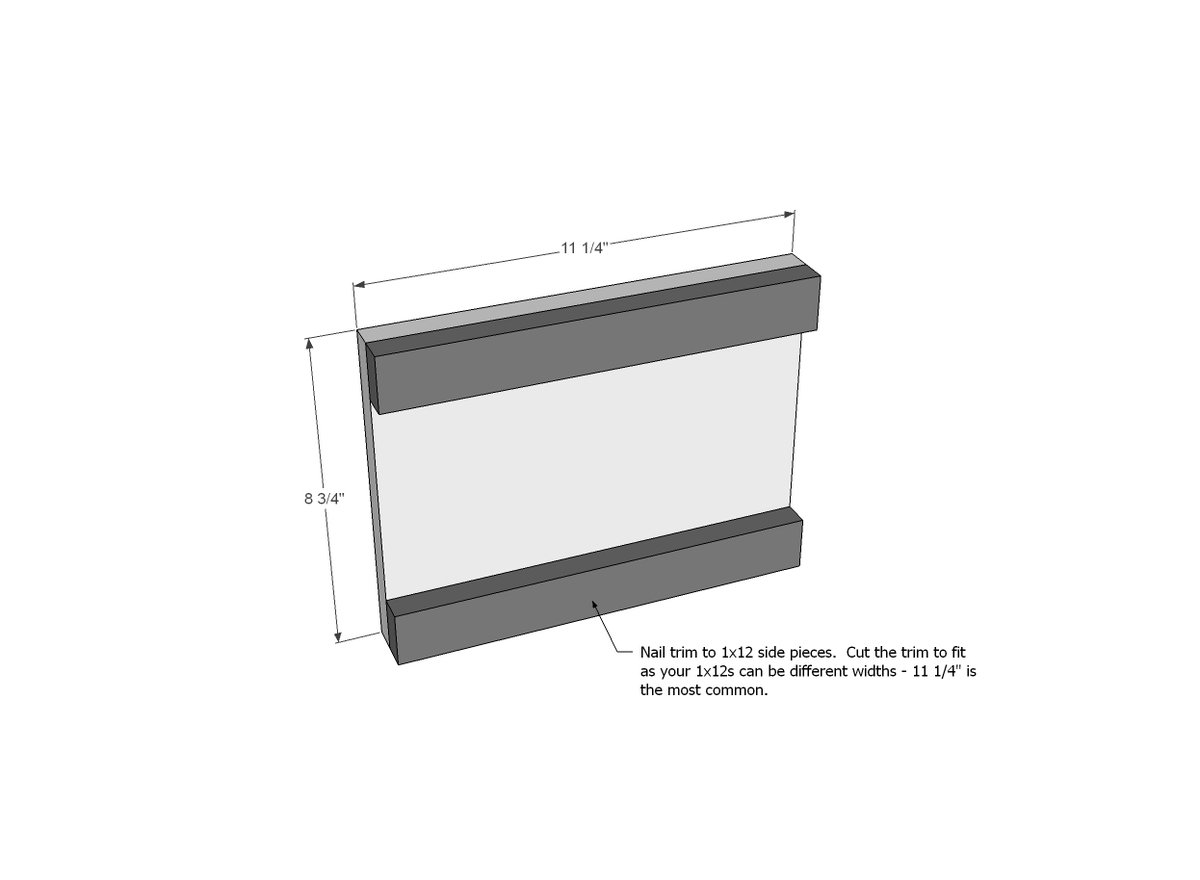
Start by attaching trim to the side 1x12 pieces - a nail gun from the inside will do the trick and keep nail holes hidden. Use 1 1/4" nails and glue. Do this for both sides.
Step 2

I recommend attaching the legs with a Kreg Jig - set it for 1 1/2" pocket holes when joining 2x2s together and use 2 1/2" pocket hole screws. For any joints with 1x boards, use the 3/4" setting and 1 1/4" pocket hole screws. Do this for both sides.
Step 3
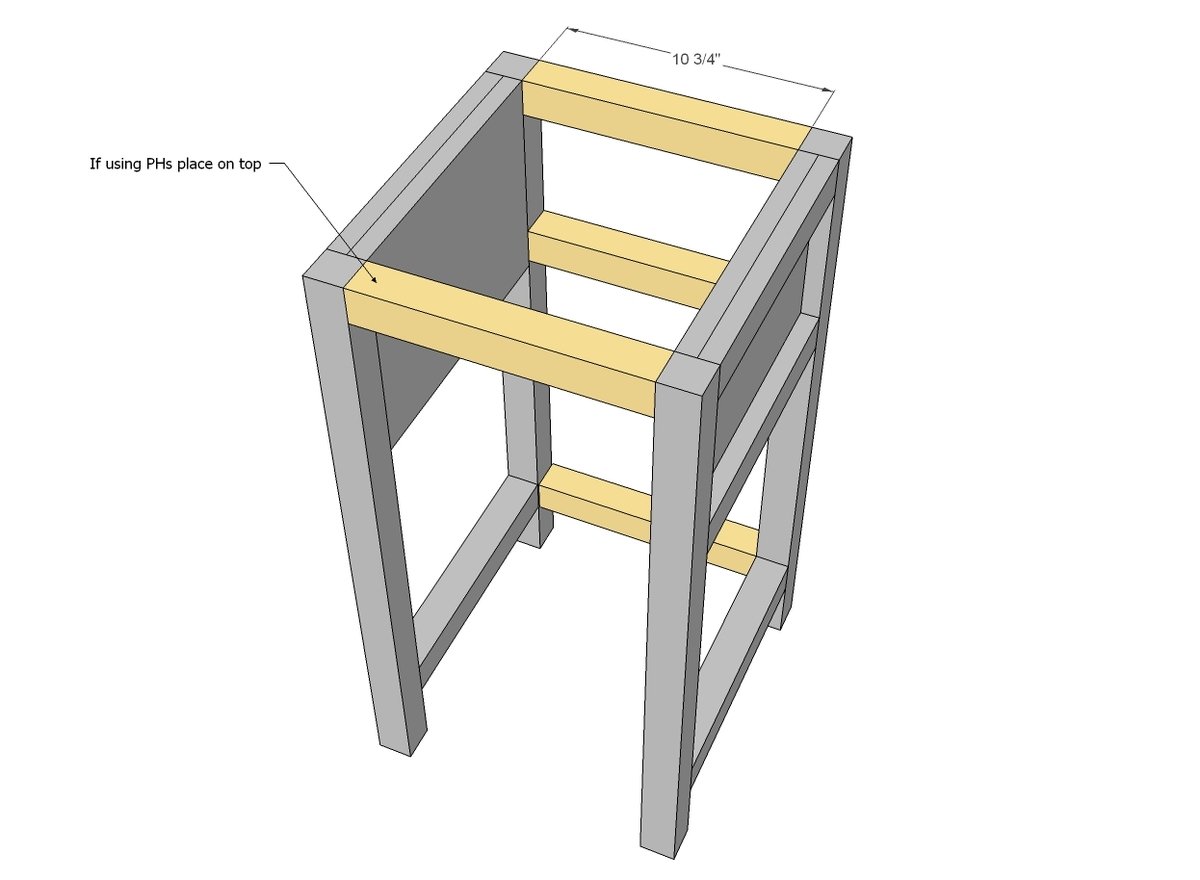
Then connect the sides together with the front/back trim boards.
Step 4
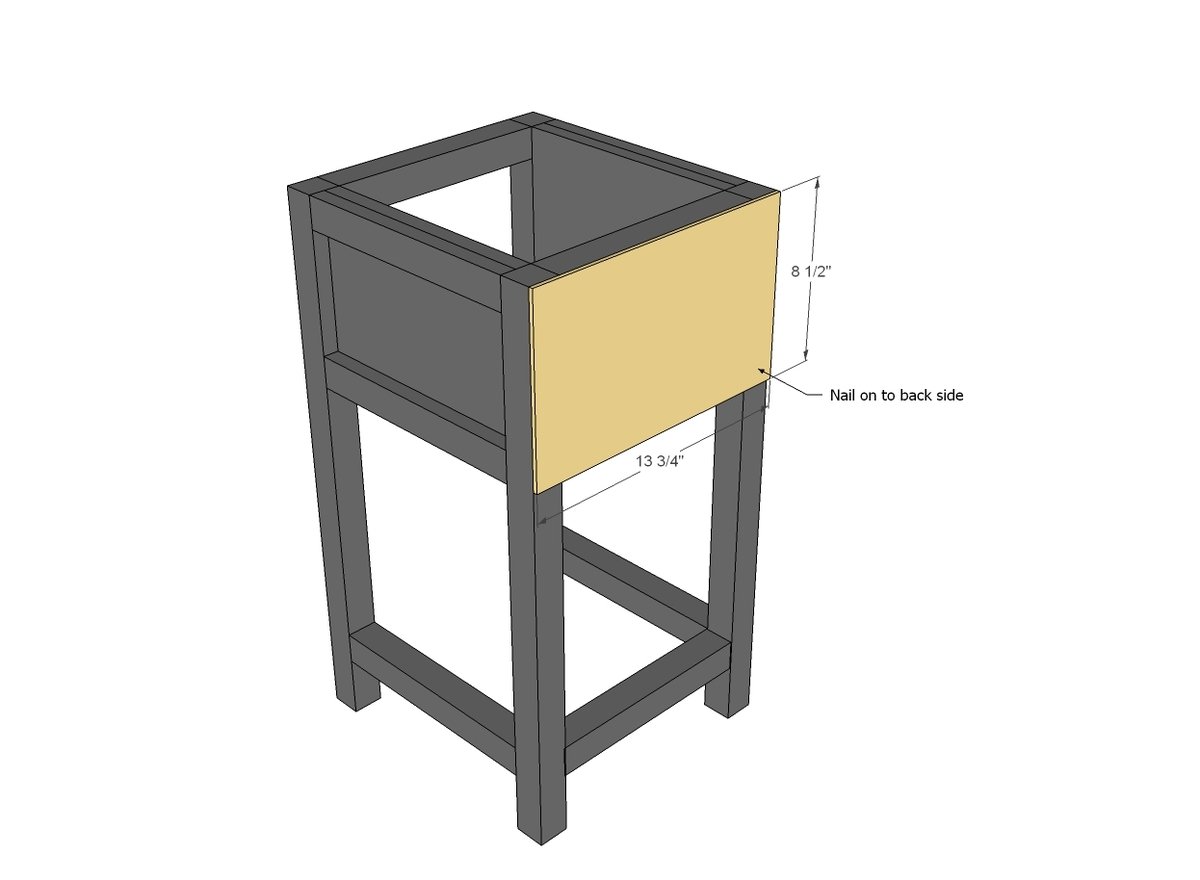
Attach 1/4" plywood to back with nails and glue.
Step 5
Step 6

Now build your drawers. The bottom is just another 1x12 to use materials you have on hand. Bottom can be attached on underside with 3/4" pocket holes and 1 1/4" pocket hole screws and glue.
Step 7
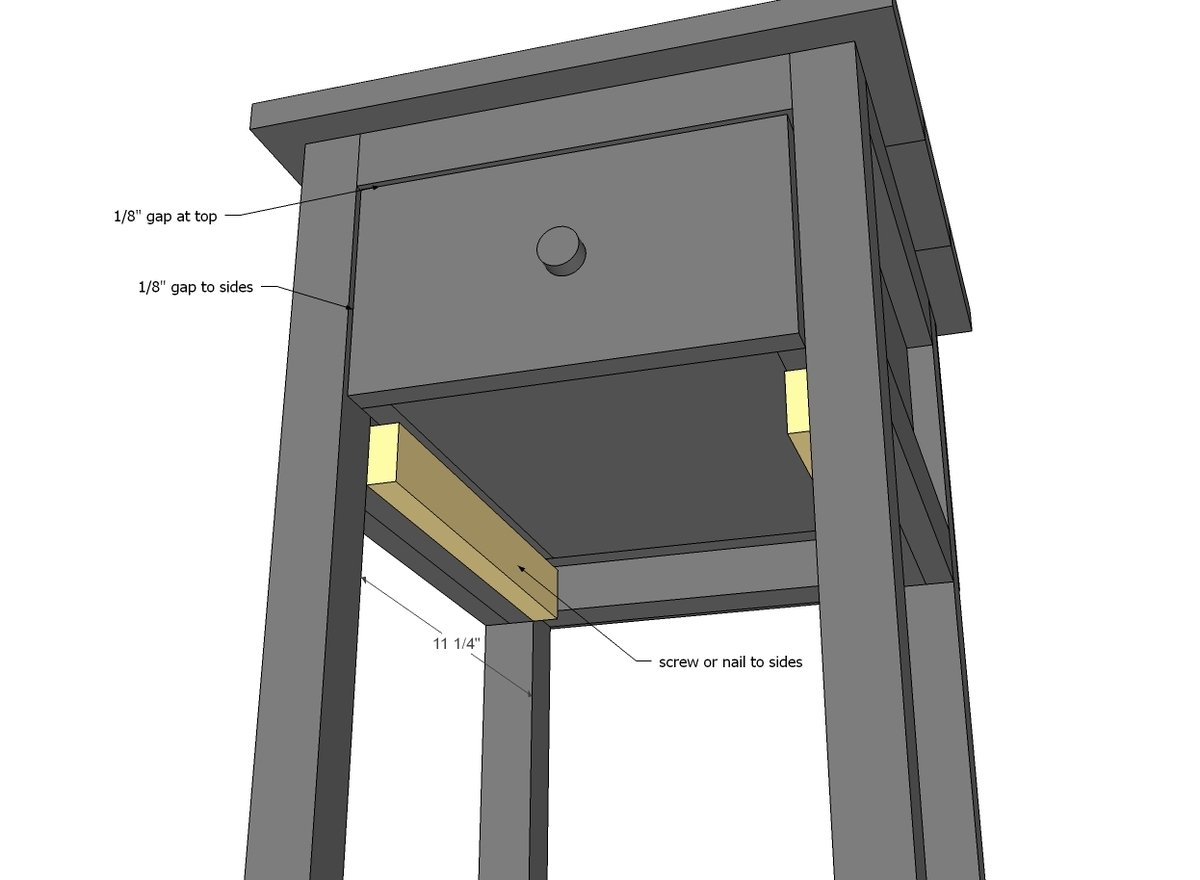
Now the slides .... remember, you'll want an 1/8" gap around all sides of the drawer face. So attach the slides so the drawer sits down about 1/8". Adjust the slides until your drawer slides easily. Candle wax on top will really help the drawer slide better.
Step 8
Then trim out the front with the remaining 2x2.
Step 9

And then build your bottom shelf as you did the top with 3/4" PHs/1 1/4" PH screws and attach on top of the bottoms stretchers.
It is always recommended to apply a test coat on a hidden area or scrap piece to ensure color evenness and adhesion. Use primer or wood conditioner as needed.


Comments
CGCouture
Thu, 05/23/2013 - 17:00
Perfect!
These are exactly what I want for nightstands! I feel like I don't say this enough, but thank you SO MUCH for all your awesome hard work!
IHEARTmygluegun
Mon, 06/03/2013 - 17:12
I LOVE these!
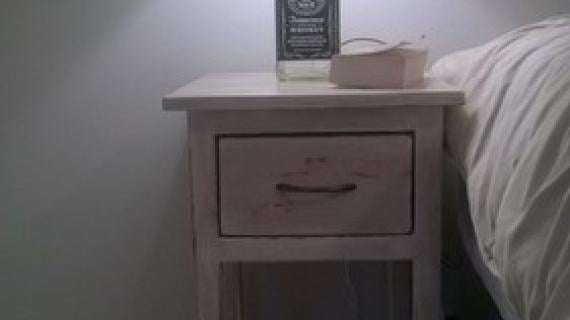
Hey friend! I built these, I LOVE how they came out!
http://www.iheartmygluegun.com/2013/06/diy-nightstands.html
www.iheartmygluegun.com
tlhorinek
Tue, 01/14/2014 - 19:34
Helpful info...
In order maximize your wood, Each 2x2 board must be cut like this:
26.25(leg), 26.25(leg), 11.25(side stretcher), 10.75(trim), 10.75(trim), 10.75(trim).
This totals the 96in for the 8' board.
Do the same for the next piece.
AND, you need 4 - 1x2 @ 11.25(side trim) ... not 2.
papabear
Wed, 02/04/2015 - 20:06
you forgot something
You need to make an adjustment for the1/8 inch lost on each cut
JuliaG
Mon, 04/28/2014 - 13:19
Slides on step 7
Hi, I'm brand new to this site and absolutely LOVE LOVE everything on here!! You're truly amazing! I am looking at this bedside table that I love but am having issues with step 7 where you talk about the slides. I didn't see them in the shopping list items and am wondering if you can tell me more about them. Are they just two pieces of wood that the shelf sits on or are they actual metal drawer slides? How big are they? Thanks!!
NoëlD
Wed, 10/22/2014 - 22:31
Slides
Julia,
The slides are just two lengths of wood. They should be the same length as the width of the 1 x 12 that you use. I have built two of these myself - just need to sand and stain them.
Noel
DuoofDeath1
Wed, 10/22/2014 - 10:47
a few questions
I am also confused about the whole slider comment and was looking as the tool list and was wondering what exactly i needed the compound miter saw for in this project. I have only basic tools and that is not one of them but would like to tackle this project without having to either buy that tool or attempt to do it without the proper equipment.
Thanks
NoëlD
Wed, 10/22/2014 - 22:34
Compund Miter Saw
You don't really need a compound miter saw for this build. I have built two of these and used a power miter saw - it made it easier to saw the boards so they would match lengths where necessary.
nengel21
Sun, 11/02/2014 - 05:52
Pocket hole jig
I too only have the basic tools...how important is the pocket hole jig? I am sure I can buy one or find one but don't want to get started until I know whether I absolutly need one. Thoughts?
In reply to Pocket hole jig by nengel21
CSaintD
Sun, 11/02/2014 - 09:34
Kreg Jig
I love my Kreg Jig and highly recommend it. Though it's not strictly necessary (you can do it with nails, or a power nailer and glue), I have a hard time building things without it. I talked my Mom into buying me one for my birthday last year and it's the best gift I ever got. They are about $100 at Lowes and HD and well worth the cost if you are going to make a lot of items.
In reply to Pocket hole jig by nengel21
Doug560
Sat, 04/11/2015 - 09:57
Pocket hole jig is a must have
If you're planning on building furniture items and you want the end result to look somewhat better than something created in a 7th grade shop class, a pocket hole jig is essential equipment. You don't have to get real fancy. Just the basic clamp on jig is all you need. You can get the Kreg Mini Jig Kit on Amazon for $20 bucks. It's one of the most used tools in my shop. Yes, dowel rods and glue also create strong invisible joints, but those require a jig as well and make disassembly nearly impossible. Using pocket holes allows you to create strong invisible joints that can be easily disassembled. Get the basic $20 jig kit. The only other things you'll need to use it is a clamp and a 3/8" drill -- and of course some pocket screws.
lisamgo
Mon, 08/29/2016 - 10:29
Cut list
I chose this as my first project and am having fun with it! I think the cut list should call for 4 pieces of side trim (1×2 @ 11 1/4″), not 2.
tealwindmill
Mon, 12/18/2017 - 12:13
Are the drawer slides in the cut list?
I'm not seeing the drawer slides in the cut list. Where do they come from? I mistakenly thought the bottom trim pieces were the drawer slides. The slides look like 1x2 pieces, but the 6 foot 1x2 piece isn't long enough for them.
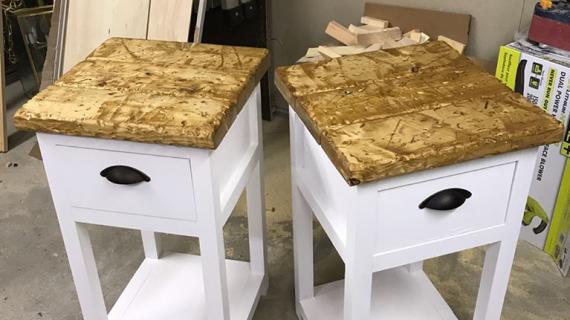
BenchDogWoodShop
Tue, 06/18/2019 - 16:43
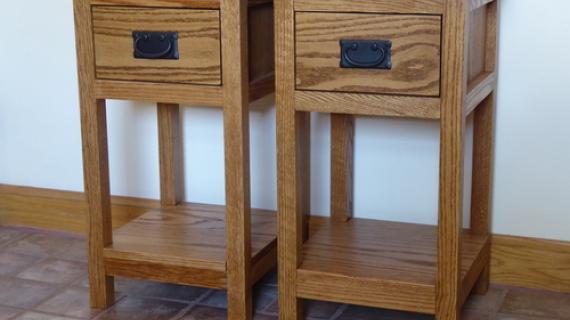
Enjoyed building this table.
I built this side table recently. Decided to use oak from a tree that fell on our property.
Pics attached below.
https://imgur.com/a/uKu8QSj
Buildinghobby
Sat, 08/24/2019 - 22:26
Can you clear up step 9 for…
Can you clear up step 9 for me? Is the bottom shelf sitting on the 2x2?
And if so how do you attach the 1x2 to the bottom shelf? Wouldn’t the back of the 2x2 then not be flush?
Buildinghobby
Sat, 08/24/2019 - 22:31
Is the diagram missing a 2x2…
Is the diagram missing a 2x2 in the front? On the bottom shelf? Which is where the 1x2 would be added? Otherwise it won’t match all the way around right?
Buildinghobby
Sat, 08/24/2019 - 22:23
Question on step 9
Can someone clear up step 9 for me? I’m confused on the 1x2 on the bottom shelf. And the 1x12. Do they sit on top of the 2x2? If so how are you firing the back 1x2 ??
ThatGuyThatBuilds
Tue, 12/17/2019 - 10:18
Cuts
tlhorinek has the right idea but you would also have to take out the thickness of the blade you are cutting with. (usally1/8") and that would be for each cut you make.
26 1'4" + 26 1/4" ( 1 cut minus 1/8")
11 1/4" (- 1/8")
10 3/4" ( -1/8")
10 3/4" (-1/8")
10 3/4" (- 1/8")
26 1/4" + 26 1/4" + 11 1/4" + 10 3/4" + 10 3/4"+ 10 3/4" = 96" + (1/8 x 5 cuts) = 96 5/8"
In reply to Cuts by ThatGuyThatBuilds
ThatGuyThatBuilds
Wed, 12/18/2019 - 09:58
Cuts
If you drop the Legs to 26" and cut...
2 (legs) @ 26" 3 (Front/Back Trim) @ 10 3/4" and 1 (Side Stretcher) @ 11 1/4" You get 95 1/2" With 1/2 of material of waste for cuts.
grh219
Fri, 04/17/2020 - 08:22
Question
This cut list is to only make one table correct or no? Trying to make sure before I start cutting everything.
Myron3
Sun, 05/17/2020 - 15:40
Drawer Stop
Is their a way to add a stop to the drawer?
grafb
Thu, 06/18/2020 - 19:33
Take a small piece of wood…
Take a small piece of wood and nail it to the back of the drawer.
grafb
Thu, 06/18/2020 - 19:32
I know you set the Kreg at 1…
I know you set the Kreg at 1 1/2” for the pocket holes. Curious what you set the big at?