
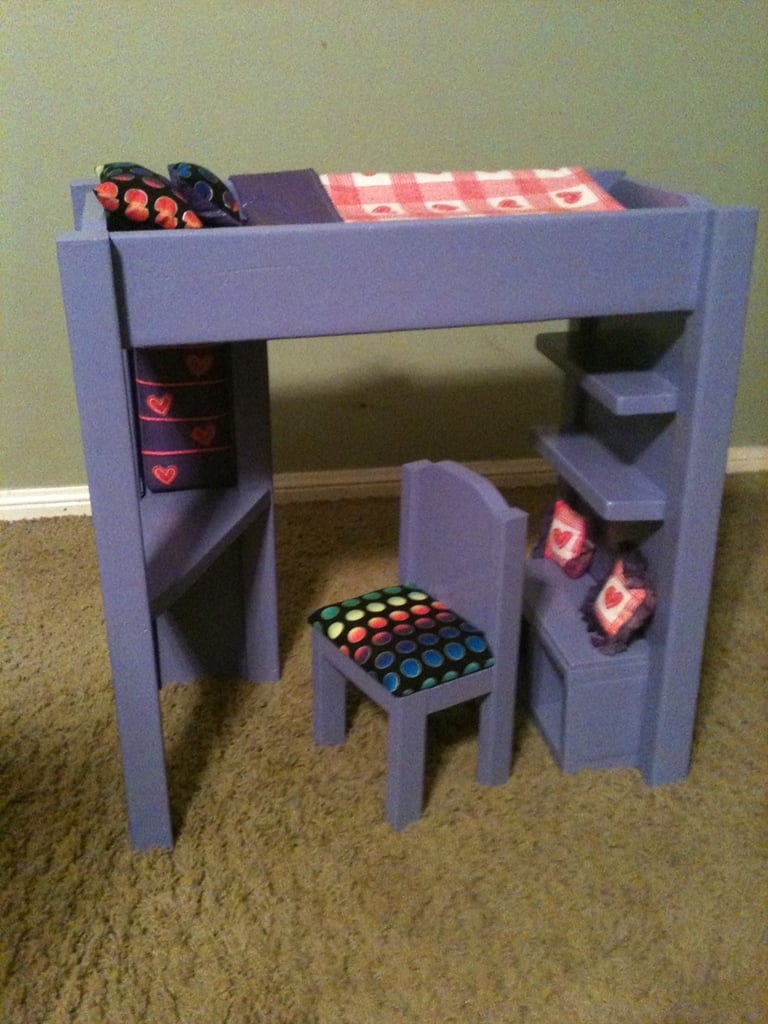

Here are the plans for the Loft bed for 18" dolls. This is my first time to share plans. I hope I don't confuse any of you ;) If you would like the plans for the chair, they are now posted on my blog. theporchswing.blog.com
Preparation
4-2x2 @ 22 ½” (legs)
1-1x10 @ 22 ½” (ladder wall)
1-1x4 @ 9 ¼” (foot board cut to the same width as 1x10)
2-1x4 @ 19” (side rails)
3-1x2 @9 ¼” (cross slats for mattress)
3- 1x4 @ 3 ½” (bench sides and divider)
5-1x1 @ 4” (steps for ladder)
¼” plywood scrap cut to fit back desk wall
1-1x10 @ 7” (desk top) cut at 30 degrees (pic explanation below)


Please read through the entire plan and all comments before beginning this project. It is also advisable to review the Getting Started Section. Take all necessary precautions to build safely and smartly. Work on a clean level surface, free of imperfections or debris. Always use straight boards. Check for square after each step. Always predrill holes before attaching with screws. Use glue with finish nails for a stronger hold. Wipe excess glue off bare wood for stained projects, as dried glue will not take stain. Be safe, have fun, and ask for help if you need it. Good luck!
Instructions
Step 1
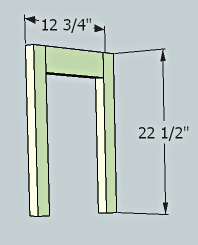
Attach two of the legs to the 1x4 foot board. You can either use pocket holes or pre drill and use 3” screws through the outside of the legs.
Step 2

Attach the other two legs to the solid
Ladder wall. If using ph, make sure you drill the holes where your shelves and bench will go. This way they can be hidden.
Step 3
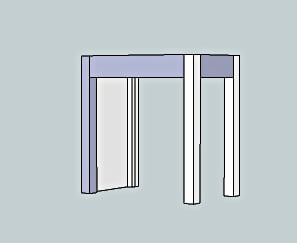
Attach the side rails to the legs on either side.
Step 4

Cut your desk top. For this step, take the 1x10 that you cut for your desk top and measure 1 3/4" on the long side (this will be the same measurement as the width of your 2x2 leg) Draw an angle from this mark to the opposite corner on the short side. I know this is confusing, so I included a photo of it.
Step 5
Step 6
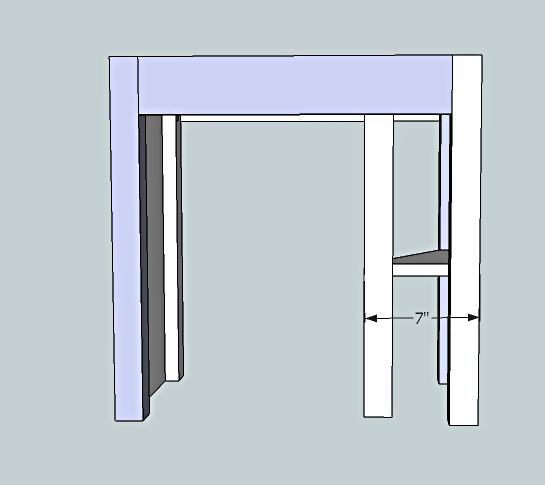
Measure from the base of the back rail to the bottom of the leg. Cut a 2x2 to fit. I attached mine with ph from the top rail into the leg, and then from the under side of the desk.
Step 7
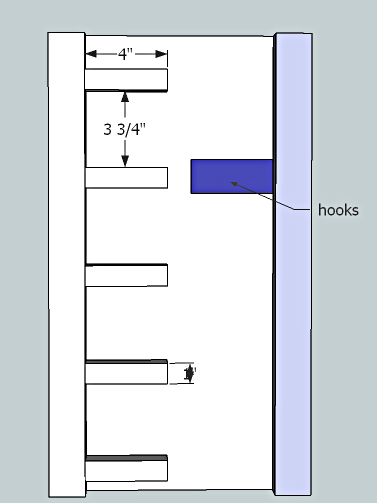
Using glue and nails or hot glue, attach your steps to the ladder wall. I used a 1x4, between the steps, for a spacer.
I also mod podged a piece of fabric to a scrap piece of ¼” plywood for the back of the coat hanger. Then, I took 3 small cup hooks and attached them to it.
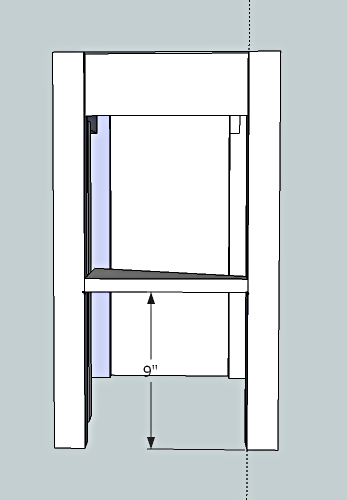
Step 8
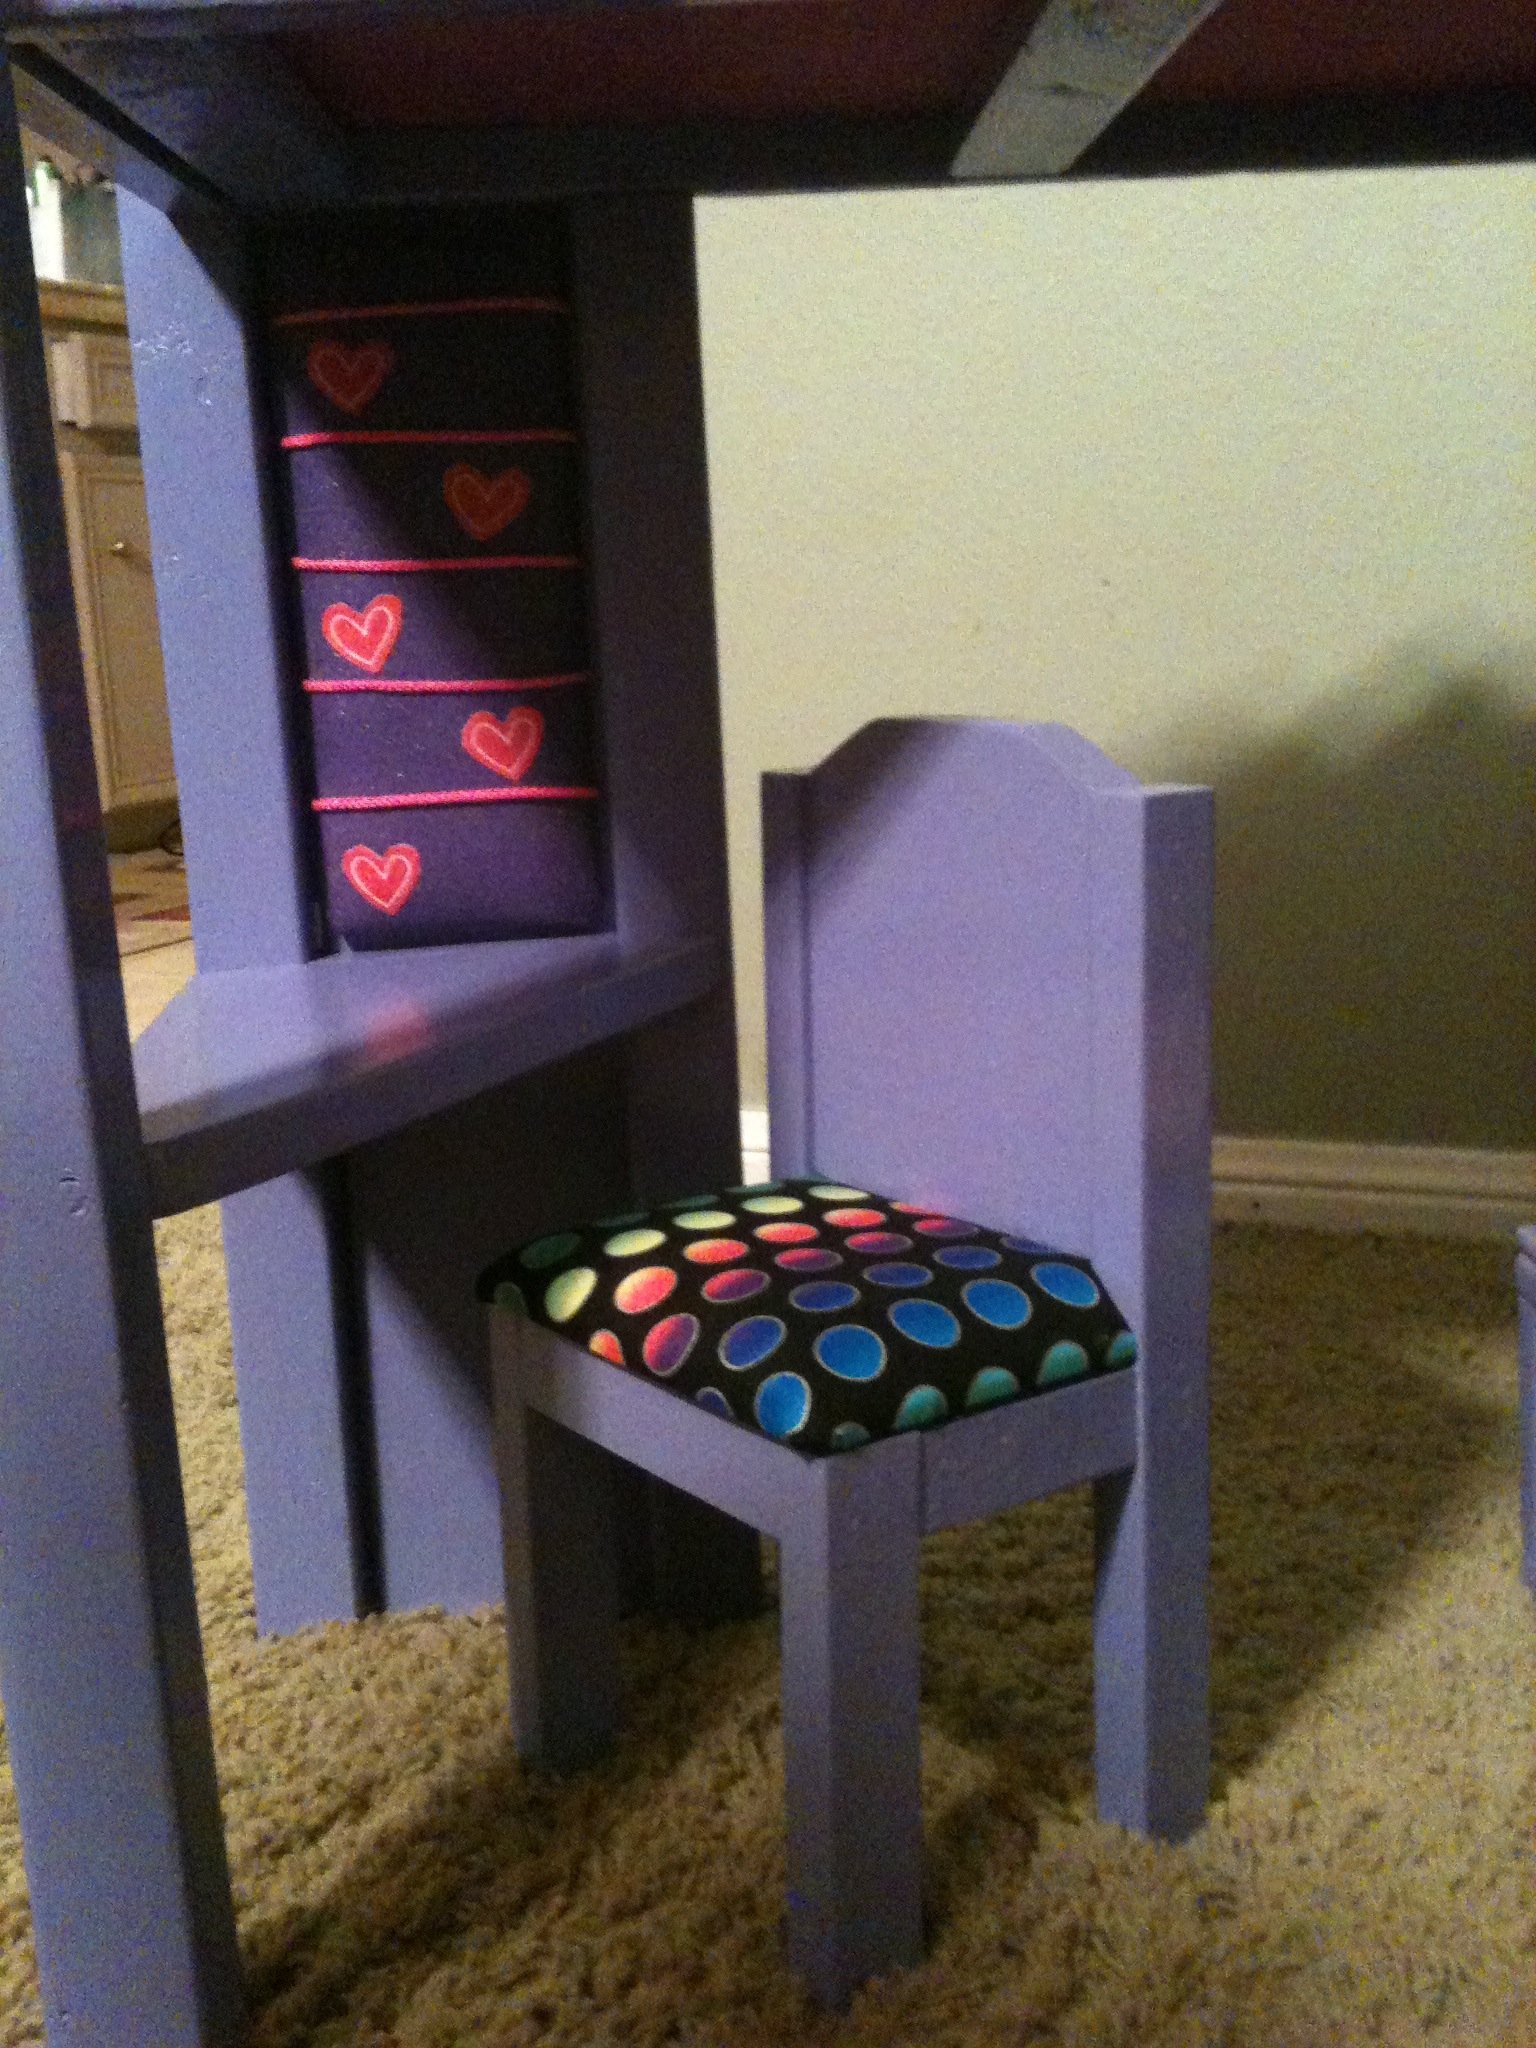
Then, attach your shelves to the inside of the ladder wall. Put your bench together with nails and glue and attach it to the ladder wall with ph screws from the top of the bench. Then, nail your slats to the side rails and cut a piece of 1/4" plywood or strong cardboard to fit under the mattress .Take the scrap plywood you cut for the desk wall and attach it to the back legs with glue and nails. I also cut a scrap piece of plywood and glued a piece of foam to it. Then, I covered it with fabric and some yarn to create a bulletin board for the desk.
It is always recommended to apply a test coat on a hidden area or scrap piece to ensure color evenness and adhesion. Use primer or wood conditioner as needed.


Comments
margjack
Sat, 11/10/2012 - 06:48
Love it!
Thanks so much for the plans! I'm planning on making this for my niece! Is there any way you could post plans or just dimensions for the chair? Thanks!
Juanita_r
Mon, 11/12/2012 - 02:33
So incredibly cute!
This is so cute... if we had the space i would absolutely be making this for miss 2, she'd love it!
Anonymous Coward (not verified)
Thu, 11/15/2012 - 13:50
Question on step 4
The text says 1 1/4 and the drawing shows 1 3/4
Which is it. or should it be "whatever matches the width of the 2x2 leg? (because we all know it is not 2")
In reply to Question on step 4 by Anonymous Coward (not verified)
little stuf
Sun, 11/18/2012 - 11:41
step 4
Thanks for catching that! Yes, it should be the same dimension as the width of your 2x2 leg. I fixed it on the plans.
jeffparlee
Thu, 11/29/2012 - 15:27
American Doll loft Bed and Chair
I am not able to find the blog that has the chair plans. I am building the American Doll loft Bed for my grand daughter for Christmas. Please help me find the Bolg site or e-mail the chair plans to me. Any help would be appreciated.
Jeff
Andrea G (not verified)
Sat, 12/01/2012 - 19:21
http://theporchswing.blog.com
http://theporchswing.blog.com/?p=70
try that link, that is what I found
Jeff Parlee (not verified)
Tue, 12/04/2012 - 14:51
Loft Chair Plans
Hi Andrea,
Thank you for the help! The link worked great. It is now in my favorites. Best wishes,
Jeff
Jaz (not verified)
Thu, 12/27/2012 - 10:24
ph
What does "ph" stand for?
cbellin (not verified)
Tue, 01/01/2013 - 12:57
Kreg Jig
First, Ana, thank you for sharing all your wonderfaul plans! I sew, but have never worked with wood. Your plans are exciting - I have 4 grandaughters and 5 (so far) great nieces! Which Kreg Jig do I need to make your 18" doll beds - they have four levels and I'm not sure which to order.
Thanks,
Carol
In reply to Kreg Jig by cbellin (not verified)
Jake
Tue, 01/01/2013 - 15:37
Which Kreg Jig
I'll jump in and give you my opinion. Start with the $30 kit called the Kreg Jr. If you have another $20 get an extra drill kit with the mini jig. I find the mini works best when you are drilling PHs in 1x2s. Also splurge and get the Kreg clamp. It really works well with the jig. Now you can spend up to about $140 but it is not needed to start. I have been using the PH system for three years and still don't need the expensive set. You will also need a few other clamps to hold everything in place when you set the PH screws. They exert a lot of torque and your setup will be out of line in an instant if everything is not held in place in all directions. Good Luck. You will, I promise you, become addicted.
cbellin (not verified)
Fri, 01/04/2013 - 14:05
kreg-jig
Thanks so much, Jake. Just the info I need. I appreciate your jumpiing in and giving your opinion.
Carol
A Brit Across … (not verified)
Thu, 01/17/2013 - 10:48
American Girl Bed
I am thrilled to have found this! I have made this bed (with a few alternations) for our niece, and would love to share my brag.
I don't seem to be able to register though! What am I doing wrong?
mollyb
Mon, 07/08/2013 - 09:34
Is a 2"x2" is actually 1-1/2"x 1-1/2"?
Once again, a newbie here at building with wood. Discovered that the 2"x2"s I purchased for this project are actually 1-1/2"x1-1/2" and are referred to as furring strips. Is this typical?
In reply to Is a 2"x2" is actually 1-1/2"x 1-1/2"? by mollyb
Jake
Mon, 07/08/2013 - 10:53
Wood Size
In lumber there is a difference between nominal size and actual size. Here is a link that will give you the info you need. http://diyhousetips.com/314/nominal-lumber-size-dimensions-chart/
The plans dimensions are based upon actual lumber size so keep that in mind when reviewing plans and especially if you change the plans for any reason.
Furring strips are really just inferior lumber used where strength and beauty is not needed. I have used furring strips with limited success and certainly not where strength is a requirement.
At Big Blue or Big Orange you will find furring strips , then #2 grade lumber (SPF = spruce, pine, fir) and finally a #1 grade lumber. I only use the top grade for projects that require staining or I do not want to see knots. #2 grade is great for most projects and is not that much more expensive than furring strips.
In reply to Is a 2"x2" is actually 1-1/2"x 1-1/2"? by mollyb
Jake
Mon, 07/08/2013 - 10:58
2 x 2s
I forgot to mention something about 2x2s (actual 1.5x1.5). They are available in the project wood section but rather expensive. I prefer to glue two 1x2s together to come up with one 1.5x1.5 (or nominal 2x2). With a little care in lining the pieces up, good gluing process, and a little sanding you will have a nice result.
Another source is the fencing and decking sections of the lumber section. They have some nice 2x2s in 36" and 48" lengths.
mollyb
Tue, 07/16/2013 - 17:28
wood size follow-up
Jake, Your follow-up to my sizing question was much appreciated. Before building anything, I thought it was going to really mess me up that the measurements weren't the same size as called for. Now that I'm slowing learning the wood/lumber world and have started on my project, it's all making a bit more sense! Thank you.
mollyb
Tue, 07/16/2013 - 17:39
Steps 1 and 2
Being this is my first wood building project, I'm finding it difficult for me to improvise because I'm having a difficult time seeing where I'm going and nervous I'll run into problems later in the project.
A question about the footboard and ladder wall. Are they both attached to the MIDDLE of the 2x2s legs or are they flush against the outside of the bed frame?
BTW, I never thanked Little Stuf for these plans. My daughter saved her own money for American Girl Doll McKenna and I know the loft bed was something she really would like to have had. I showed her the other doll bed plans on this site and this is what she wanted!
mollyb
Tue, 07/16/2013 - 17:50
doll loft bed bench and shelves
I would like to add the shelves and bench to the inside of the loft bed. I am seeing the photo with the shelves and bench, but not the instructions.
The cut list lists 3 - 1x4s @ 3.5" for the bench and divider. These cut sizes seem to big for the bench. I am wondering if I am missing something. What is the "divider" that is referred to in the cut list?
The bench and shelves seem to be same dimension of wood. Is that right?
Thank you for your patience with my questions!