
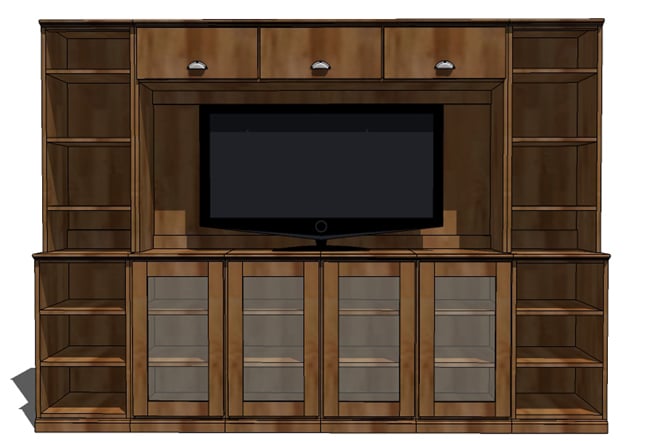

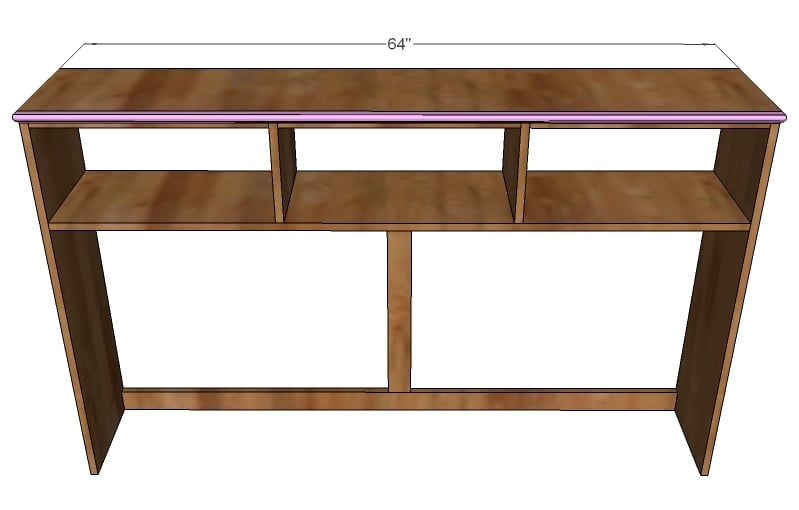
A large hutch featuring three large overhead doors for the Basic Collection.
Inspired by Pottery Barn Printer Collection
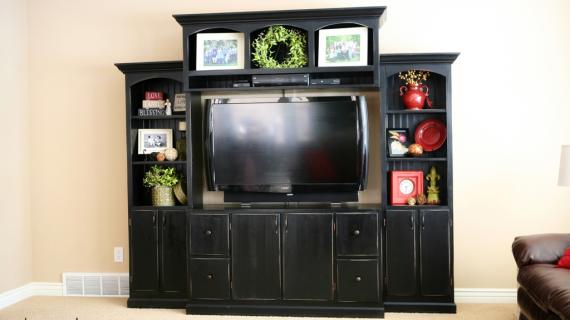
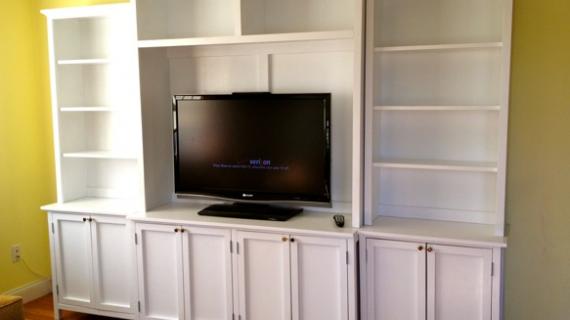
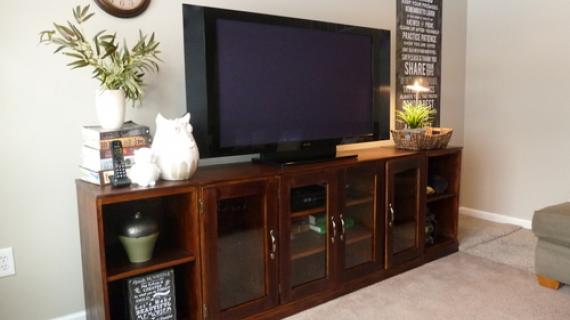
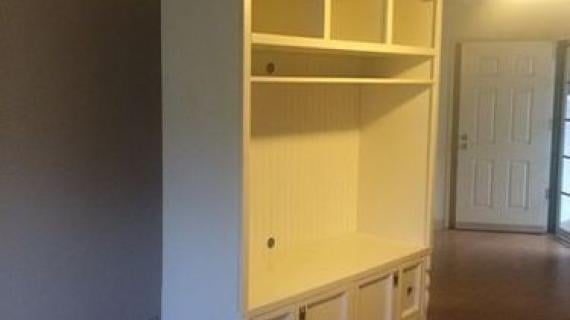
 Welcome to your new media suite. With today's plan, the hutch, you have all the components to build this exact system.
 You will simply need to build six of the bases, four doors, two bookcase hutches, and today's media hutch.
 And because today's plans is actually a hutch - not just a bridge - you can actually leave off the side bases and hutches for a smaller room.

And of course, we are going to have to start working on more plans in this collection - so you can use this plan as a hutch in your dining room or even a hutch over your desk in your office.
The most important thing to remember when building modular components is to make sure all the pieces are square. Because when you go to line six different units up, if they all aren't perfectly square, they are not going to line up! So start by making sure your work surface is perfectly level. Keep your work surface very clean, too. Even the slightest amount of sawdust can end up making big differences in your projects. Then make sure the boards you are working with are straight. Finally, as you build, check for square after each step. You can do this be measuring diagonally, from opposite corners of the project. Measure in both directions. Then make sure those measurements match - if the don't, adjust by pushing the two corners that have a greater measurement together.
 Make sure you measure your tv - like the Pottery Barn Printer hutch, there is only 28 1/2" of clearance for a flat panel. For a larger tv, you should either leave off the top drawers on just stick with the bases and side hutches.
And because we have a new print feature that is just amazing, we are going to work with blog posts again. Let me know how the print feature works for you. Try saving as a word document - then you can customize the plan to save you ink!
Preparation
2 – 10′ 1×12 Pine or Whitewood Boards (Pottery Barn Printer Collection is built with Particle board and pine boards)
2 – 8′ 1×3 Pine or Whitewood Boards (Look for furring strips in good condition to save tons)
1 – 8′ 1×2 Pine or Whitewood Board
64″ of 3/4″ Edging or Nosing or Beading (to trim out the top face of the hutch)
1 – sheet of 1/4″ sanded plywood (for the back)
1 – 6′ 1×10 or pine select 1/2 x 10 for thinner doors (for the doors)
3 sets of self closing surface mount overlay hinges
3 – pulls, handles or knobs
3/4″ brad nails
1 1/4″ finish nails
2″ finish nails
Pocket hole screws or 2″ finish nails for building the box
Wood glue
Finishing supplies
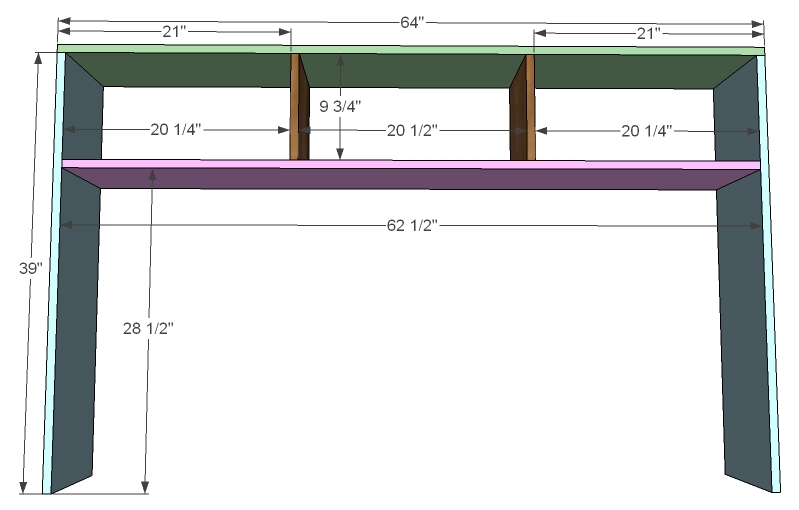
2 – 1×12 Boards @ 39″ (Box Sides)
1 – 1×12 Board @ 64″ (Box Top)
1 – 1×12 Board @ 62 1/2″ (Shelf)
2 – 1×12 Boards @ 9 3/4″ (Cubby Dividers)
2 – 1×3 Boards @ 62 1/2″ (Back Frame)
1 – 1×3 Board @ 23 1/2″ (Back Frame Support)
2 – 1×2 @ 20 1/4″ (Side Cubby Top Trim)
1 – 1×2 @ 20 1/2″ (Center Cubby Top Trim)
1 – 3/4″ Edge Trim @ 64 (Top Trim)
1 – 1/4″ Plywood @ 64″ x 39 3/4″ (Back)
3 – 1/2 x 10 Boards @ 20 3/4″ (Door Faces) (Can also use a 1×10 board, 3/4″ thick instead of 1/2″ thick)


Instructions
Step 1
Build the Box
As you know, my preferred method to build boxes is pocket hole screws. I just find I am able to build a square project on the very first try, and the pocket hole screws are much easier to start, then say lining up and countersinking screws from the outside. I use a Kreg Jig™. You could also use glue and a finish nailer, being that this is a hutch, and no one will be sitting or climbing on it. It’s up to you. If you do use a finish nailer, use 2″ finish nails and wood glue.
Step 2
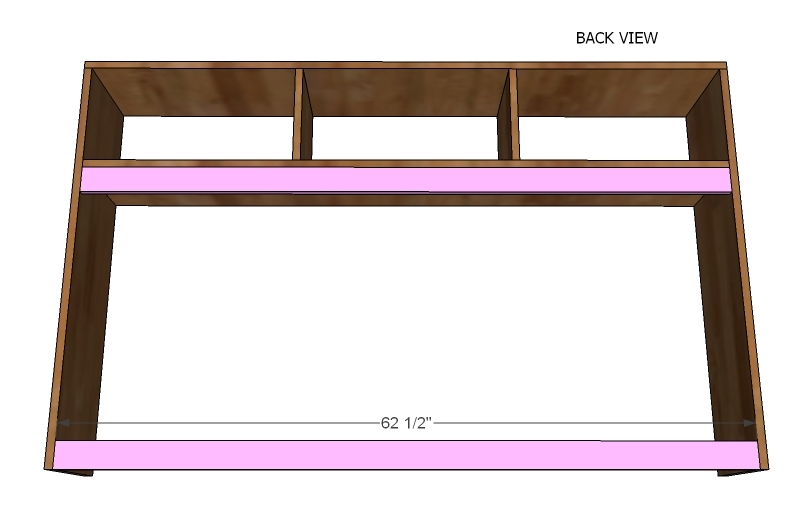
Back Frame
Add the back frame to the back. This gives you something to nail the back plywood to and adds support and structure to the hutch. Keep edges flush to the back, and make sure you use pocket hole screws to attach the top back frame piece to the shelf (or you could use nails from the top).
Step 3
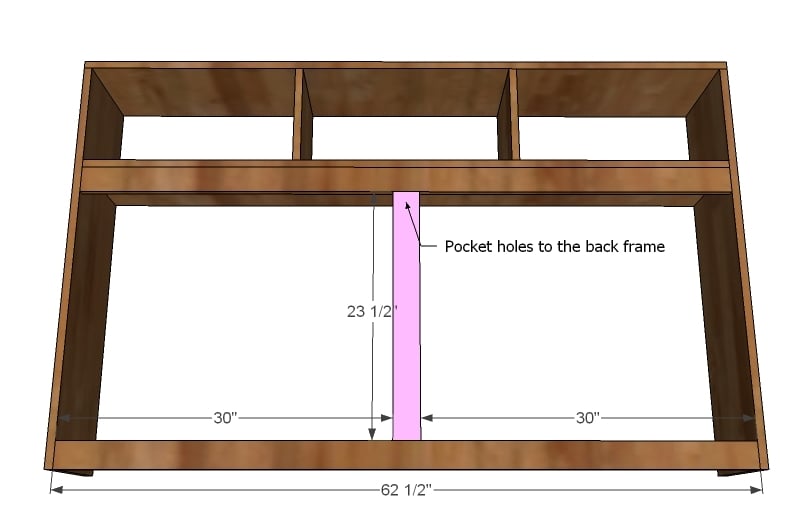
Center Support
Because 62 1/2″ is a long way for plywood to go without support, the center support with tie it all in. Attach to the back frame with pocket hole screws.
Step 4

Top Trim
Use 1 1/4″ nails and glue to attach the top trim pieces inside the cubbies. Your piece should begin to feel much less flimsy at this stage.
Step 5
Step 6

Back
The back plywood will reinforce everything, so make sure you nail to all of the shelves and back frames. Nail to anything that you can to reinforce all joints. Just make sure when you nail into the back frame that you are using brad nails less than 1″ long, or you will go through the board. Use glue. Also, make sure your project is square before applying the plywood back.
Step 7

Doors
The final step is to add the doors. The doors are simply 1x10s, 1/2″ stock unless you choose to use 3/4″ stock for the glass doors below. Simply attach with surface mount hinges, designed for partial overlay doors. I like the self closing ones myself.

Comments
Erin (not verified)
Thu, 09/02/2010 - 08:06
This question might sound
This question might sound really dumb, but how does all these pieces stay together. Is there anyway you can hook them together, so when a child climbs on the piece (hopefully not, but you never know) it will not fall over or come apart?
Thanks!
erin
Ana White (not verified)
Thu, 09/02/2010 - 08:20
Erin, you should definitely
Erin, you should definitely secure the hutch to a stud in the wall behind the hutch and also screw all of the pieces together from the insides with 1 1/4" screws. You won't need many screws, and because all of the sides are solid wood, you should have no trouble finding a hidden spot to attach the components together. This is a great question, thanks for asking. Ana
ildaura (not verified)
Thu, 09/02/2010 - 09:14
Thanks for the plans Ana!
Thanks for the plans Ana! Erin's question made me think of something else. How do you work around base molding, especially if you want pieces to look like built-ins? Do you notch out the bottoms? Would doing that usually affect the soundness of structure too much? Also, if you create plans for the drawer bases will you just be adding to these bases?
Ana White (not verified)
Thu, 09/02/2010 - 09:20
Hi Ildaura, Cutting from
Hi Ildaura,
Cutting from the cabinet to accommodate base moulding should not affect the structure of your piece. In fact, you could build with this in mind when you build the cabinet! Depending on the height of your base moulding, you may need to bring the bottom shelf of our base up, and then you would just simply notch out the sides, and bring the plywood down to the shelf instead of the floor (for the back). Another easy option is to remove base moulding from your wall and just save it.
The other bases will be the same size and based off this base, but the shelves will be different to accommodate drawers. Because the drawers are deeper, I am going to go with drawer slides and trim between the drawers instead of full shelves. Hopefully will add these bases soon!
Alicia (not verified)
Thu, 09/02/2010 - 13:37
It seems like these plans are
It seems like these plans are pretty similar to the Thomas collection. I saw your "skinny" Thomas plans but I was wondering about the Armorie Thomas collection. Is there any way you could modify those into this bigger plan? http://www.potterybarnkids.com/products/thomas-narrow-media-system/popu…
I have to build something with enough hidden space to hide the Wii drums that my hubby loves but I hate looking at!
Sherry (not verified)
Thu, 09/02/2010 - 14:42
Hi Ana, I got really
Hi Ana,
I got really excited when I saw this plan since I thought it would be perfect for my TV room. But I've noticed one difference with the Pottery Barn version that might not work for me. While they have separate units on the sides, the section with the two middle doors are one double sized unit which allows larger home theatre components to fit. Mine won't all fit in the 14 1/2 wide base unit. Any chance of a plan for a two-door middle cabinet plan?
Thanks!
Ana White (not verified)
Thu, 09/02/2010 - 16:08
Alicia, this collection is
Alicia, this collection is one of my favs and I would definitely consider adding more plans to it! Thanks for your suggestion.
Ana White (not verified)
Thu, 09/02/2010 - 16:09
Sherry, you are too smart!
Sherry, you are too smart! That is a great idea . . . It would just mean modifying the base, not the doors. Going to have to add the double base.
Kristen (not verified)
Thu, 09/02/2010 - 16:55
I was actually wondering if
I was actually wondering if you could help me with a project. It seems like it would be simple for someone like you, and I just need to be pointed in the right direction. A friend has been letting me use a beautiful old bench of theirs and I've fallen in love. Now they want it back and I'd like to make something similar.
Ana White (not verified)
Thu, 09/02/2010 - 18:59
Kristen, can you post a photo
Kristen, can you post a photo to our community under project suggestions? www.ana-white.com/community
allison (not verified)
Fri, 09/03/2010 - 14:03
Sherry -- I had exactly the
Sherry -- I had exactly the same mental dilemma last night when I was printing all the plans out. For one thing, a standard sized DVD player would never fit in such a tiny base, but I also didn't want the cabinet to overheat with the door on it, so I was pretty sure I would have to have a double base just to be able to put a DVD player, DVR / Satellite box, and a PS3 in it without burning down the living room.
My current knock off PB media base (made 4 or 5 years ago from a modified dresser) is open shelving, but still sort of overheats itself pretty easily, even though it has no doors.
Glad to know I wasn't the only one who thought about the width!
I will hopefully be starting this collection tomorrow!!
Ana White (not verified)
Fri, 09/03/2010 - 18:51
Hi Allison, Sherry, you just
Hi Allison, Sherry, you just made me think of something - why not build a simple base like the Pottery Barn Logan one for the media console? And then make your hutch a little taller (don't go over 48" or you will have to do something different for the back) and then keep the side hutches? That way your tv would be lower too! I'm so glad you read and comment, these are things I might not have thought of! Thanks so much, Ana
Alanna (not verified)
Tue, 09/07/2010 - 09:32
Hi Ana! I am looking for
Hi Ana! I am looking for something similar to the Rhys media collection (and living collection) for our tv. I love the clean lines with the classic look. Any plans for plans for this or modifications i can do on the Logan or Printer plans? The TV base is going to be my first project, with the classic as my choice if the Ryhs is out. We have folks coming Saturday....as in four days away Saturday for football....any suggestions, or am i out of time?
bigjake80
Tue, 01/14/2014 - 23:04
Help
hi new to the site
In reply to Help by bigjake80
JoanneS
Wed, 01/15/2014 - 01:54
Media Center Plans
Hi Bigjake80,
These are the links to the other plans in the Basic Collection.
The base unit (open)
http://ana-white.com/2010/08/plans/open-base-basic-collection
Bookshelf hutch:
http://ana-white.com/2010/08/hutch-plans-for-inspired-by-pottery-html.h…
Cabinet Base:
http://ana-white.com/2010/09/cabinet-base-basic-collection
Glass doors:
http://ana-white.com/2010/09/glass-doors-open-base
Happy building!