

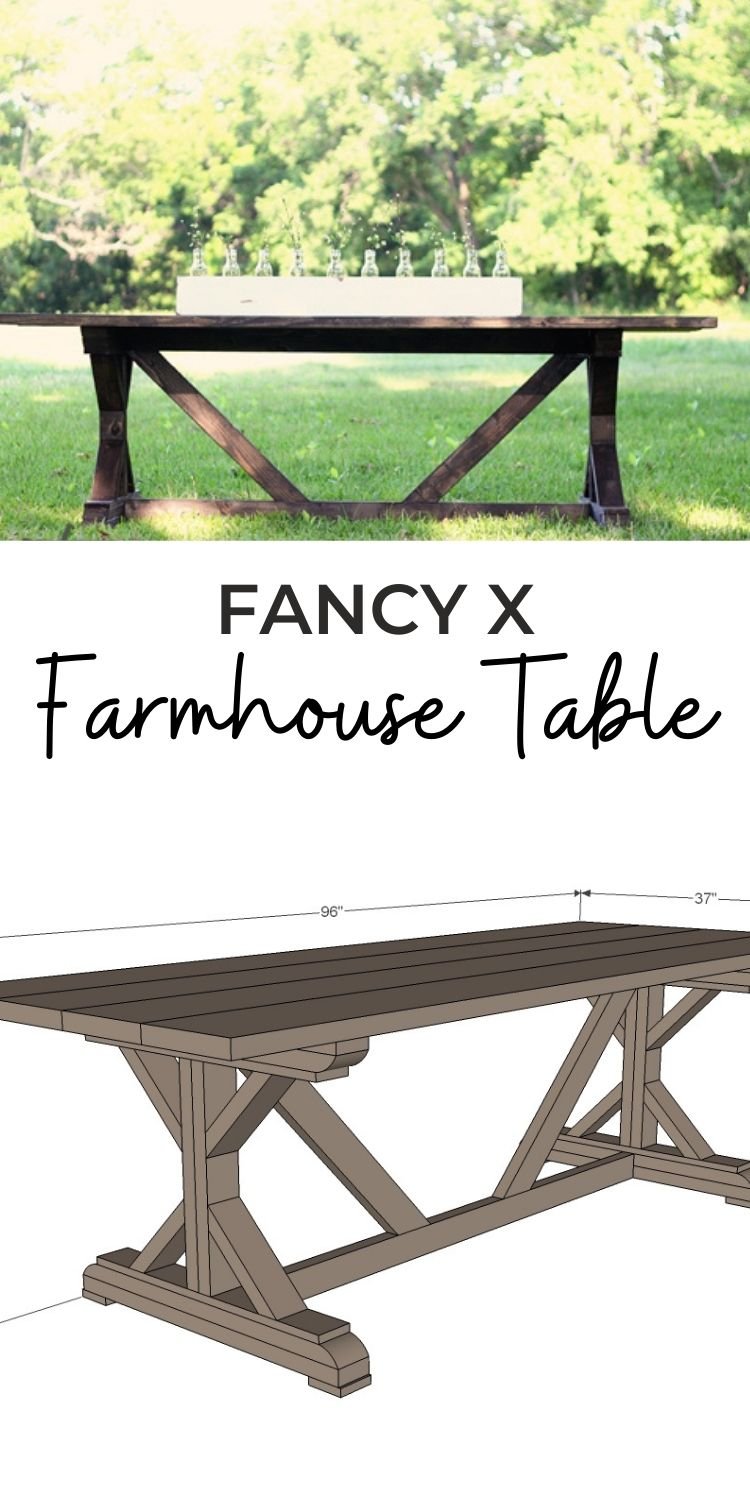
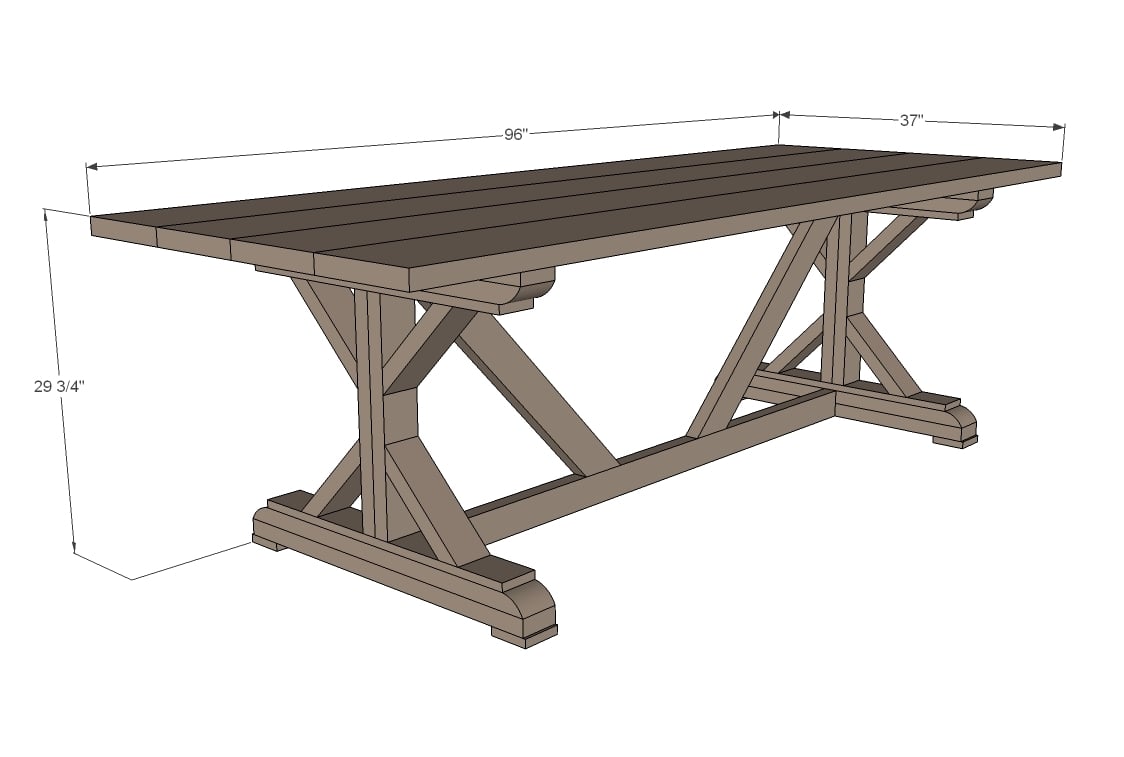
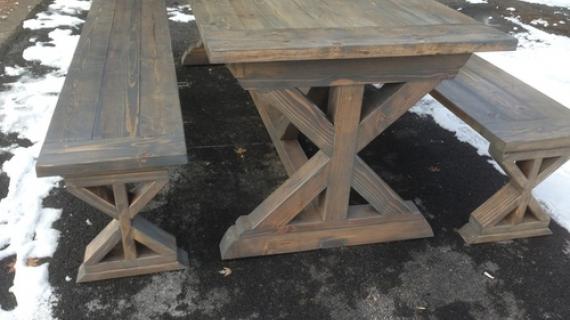
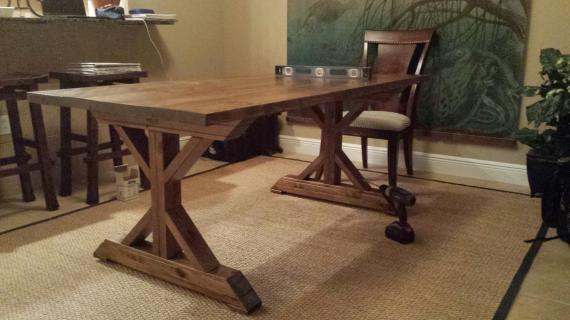
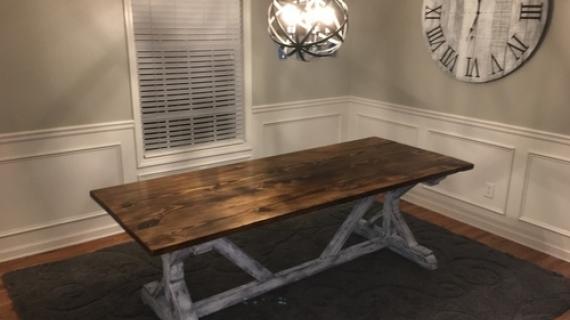
Build the Fancy X Farmhouse Table from 2x4s and lumber for $65. A reader favorite, this table has been built thousands of times!
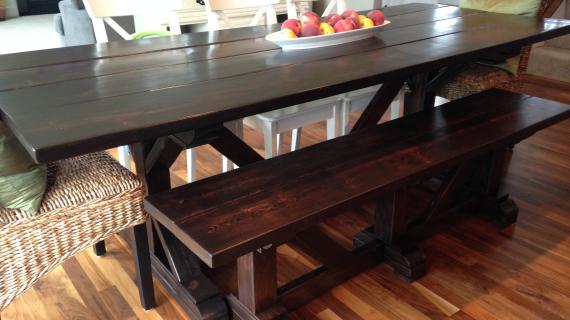
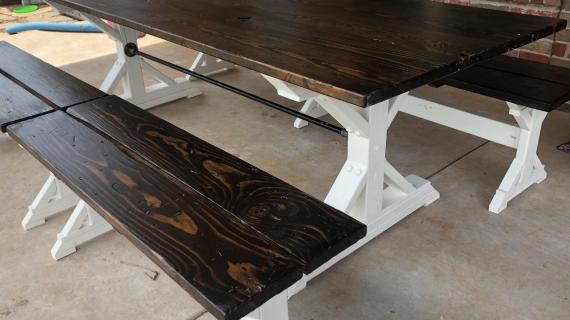
We also have plans for a matching bench and lots more farmhouse furniture plans.

Video - Watch this Table Being Built!
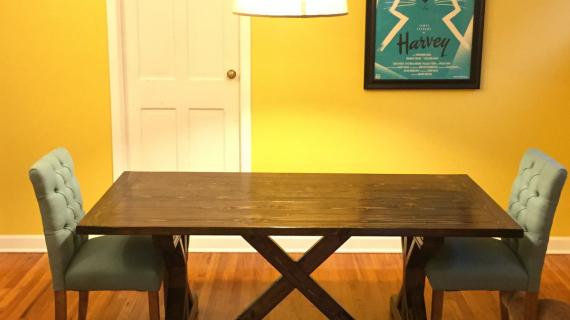
See More Photos and Build Post
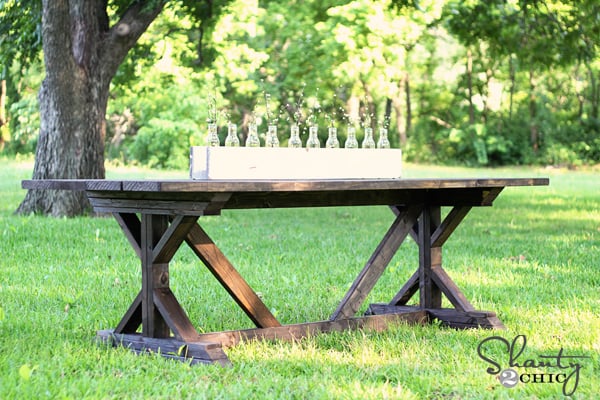
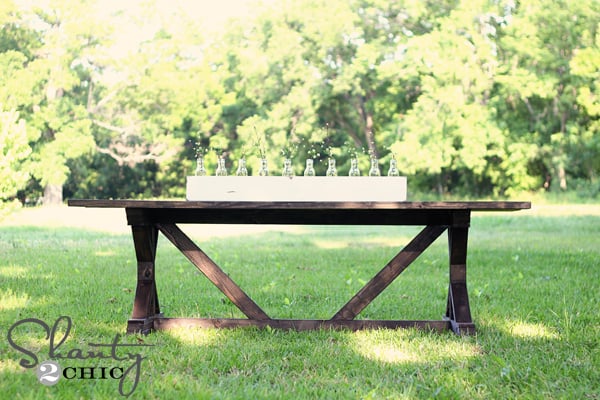
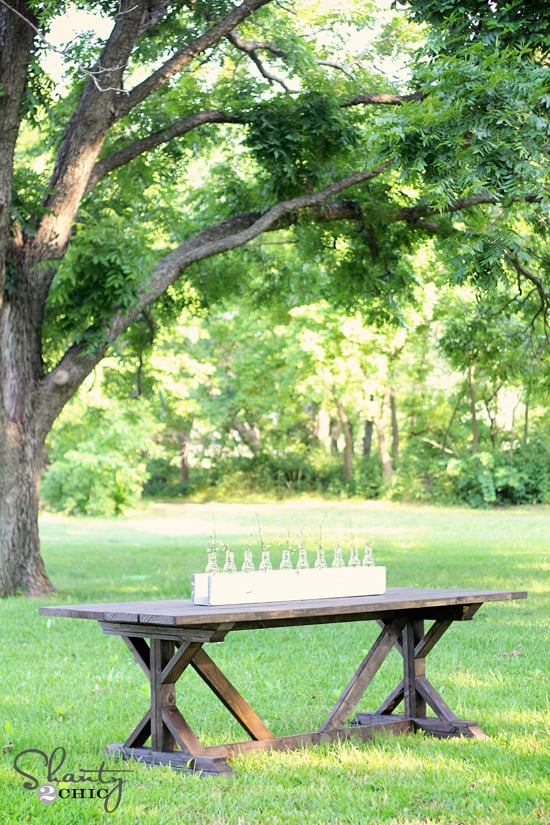
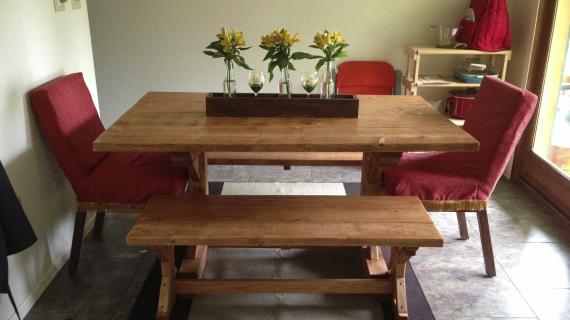
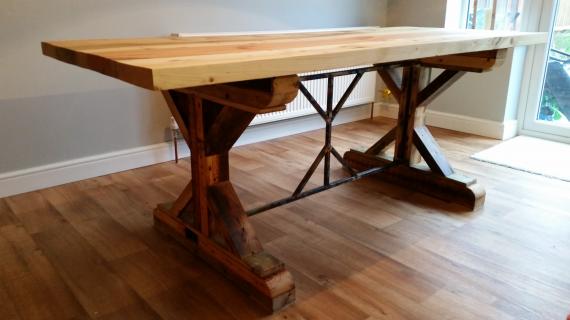
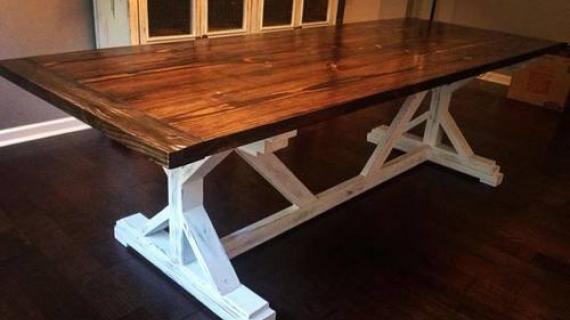
This table was built in collaboration with my friend Whitney from Shanty2Chic. Whitney has a family of seven, and wanted to build a sturdy and strong farmhouse table with a little bit of fancy to it to dine on outdoors this summer.
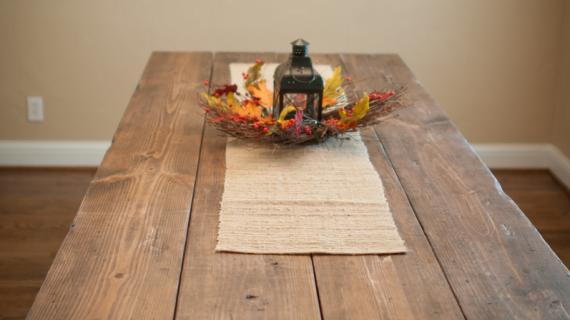
This is my very favorite build yet! I have been in serious need for an outdoor table to seat my family of 7. When we stumbled upon a beautiful, long farmhouse table from Anthropologie, I knew it was love at first sight. Everything was perfect about it... Except that $2,000 price tag... Ouch. That hurts to even write. But... I knew who to call to help me make my own at a very small fraction of that cost! This baby only cost me $65!
Head over to visit Whitney at Shanty2Chic to get all the details, lots more photos, and a peek at her construction process!
Thanks Whitney!!!
Pin For Later!
Preparation
4 – 2x10 @ 8 feet long
7 – 2x4 @ 8 feet long
1 – 1x4 @ 12 feet long
3” self tapping wood screws
2 ½” pocket hole screws
2” finish nails
ENDS
- 8 – 2x4 @ 11 3/8” (ends cut at 45 degrees off square, longest point measurement, NOT parallel)
- 4 – 2x4 @ 20”
- 4 – 1x4 @ 28 3/8” **
- 8 – 2x4 @ 32 5/8” CUT TO FIT **
- 4 – 1x4 @ 3 ½”
MAIN TABLE
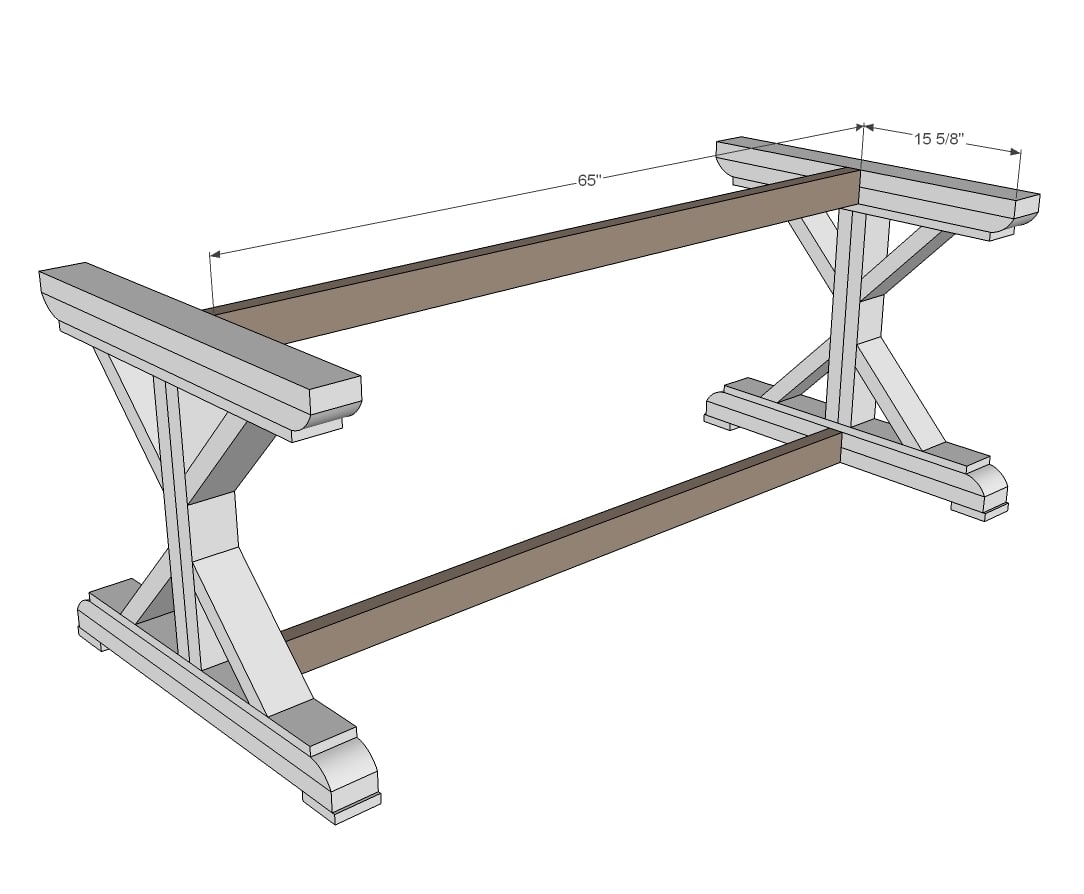
- 2 – 2x4 @ 65”
- 2 – 2x4 @ 30 3/8” (both ends cut parallel at 45 degrees off square)
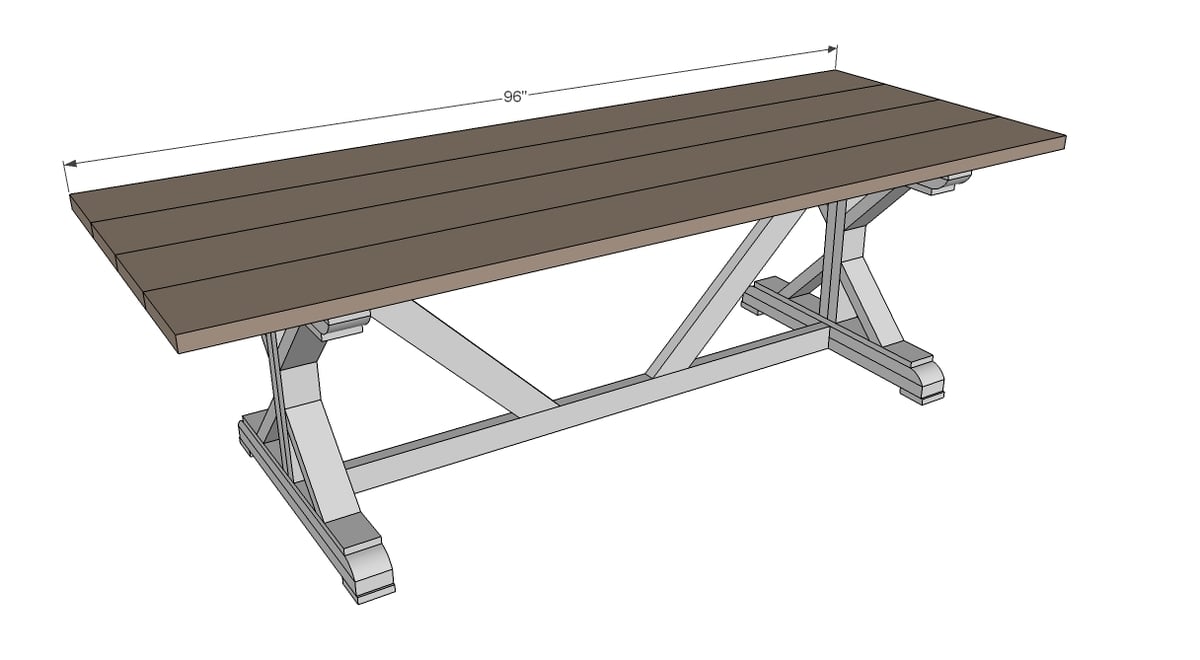
- 4 – 2x10 @ 96”
** For 45 degree cut tops and bottoms (easier) on the legs top and bottom (see steps 3-5 and step 10), replace these cuts with:
- 4 - 2x4 @ 31" (both ends cut at 45 degrees off square NOT parallel long point measurement)
- 4 - 2x4 @ 34" (both ends cut at 45 degrees off square NOT parallel long point measurement)
Please read through the entire plan and all comments before beginning this project. It is also advisable to review the Getting Started Section. Take all necessary precautions to build safely and smartly. Work on a clean level surface, free of imperfections or debris. Always use straight boards. Check for square after each step. Always predrill holes before attaching with screws. Use glue with finish nails for a stronger hold. Wipe excess glue off bare wood for stained projects, as dried glue will not take stain. Be safe, have fun, and ask for help if you need it. Good luck!
Instructions
Step 1
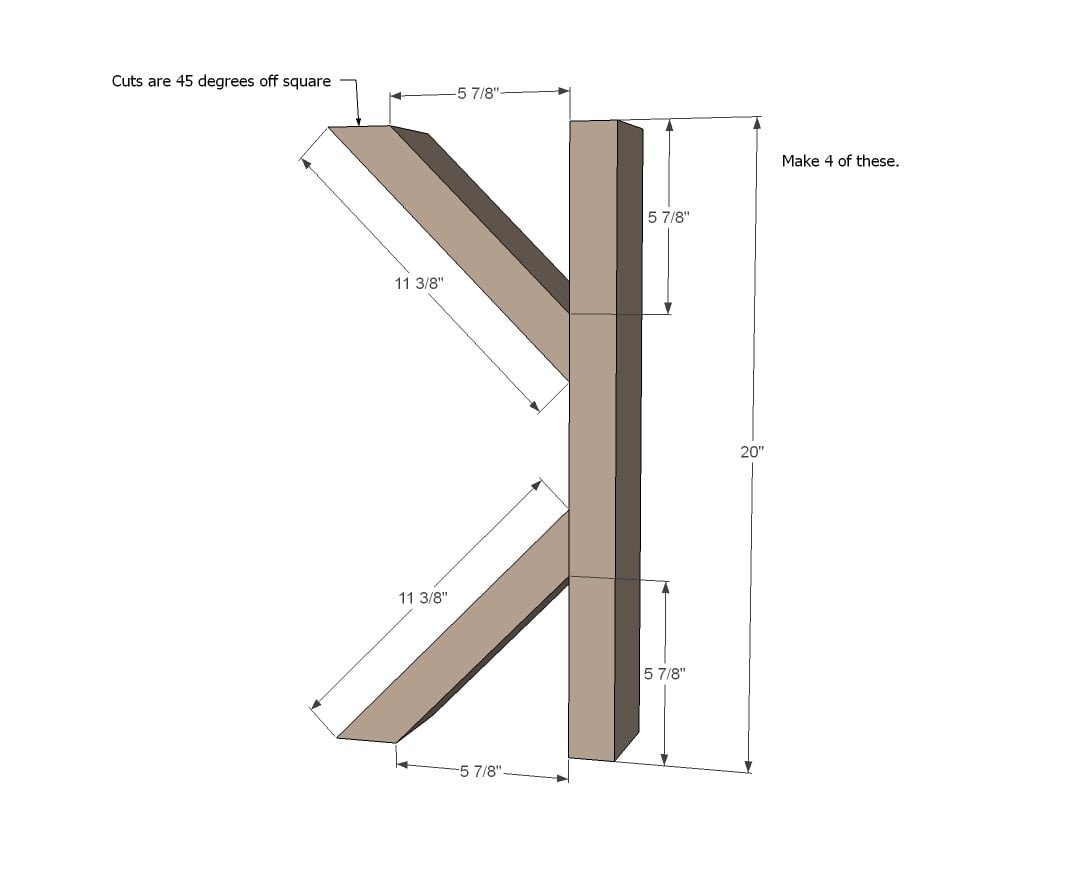
Build four of these. I’d simply countersink screws from the backs into the ends of the cross braces using 2-1/2" self tapping wood screws
Step 2
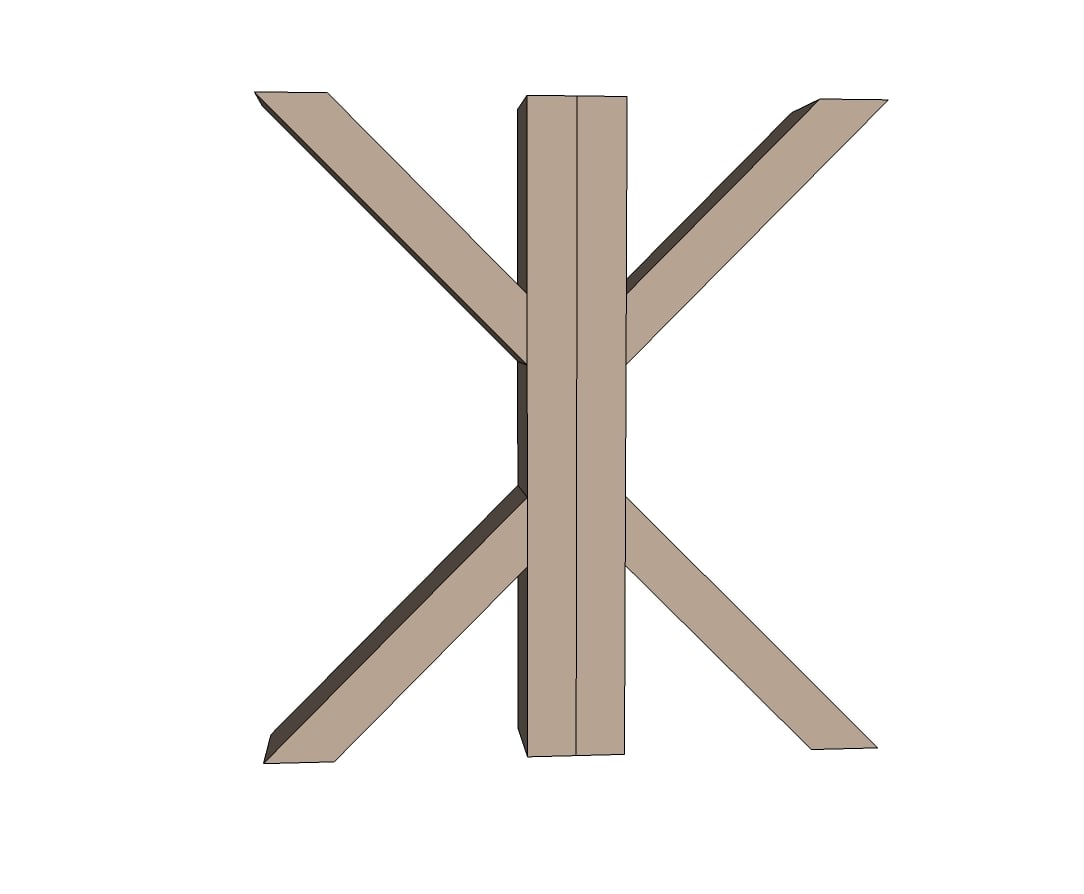
Then just attach two of the leg pieces together with glue and 2” finish nails from each side
Step 3
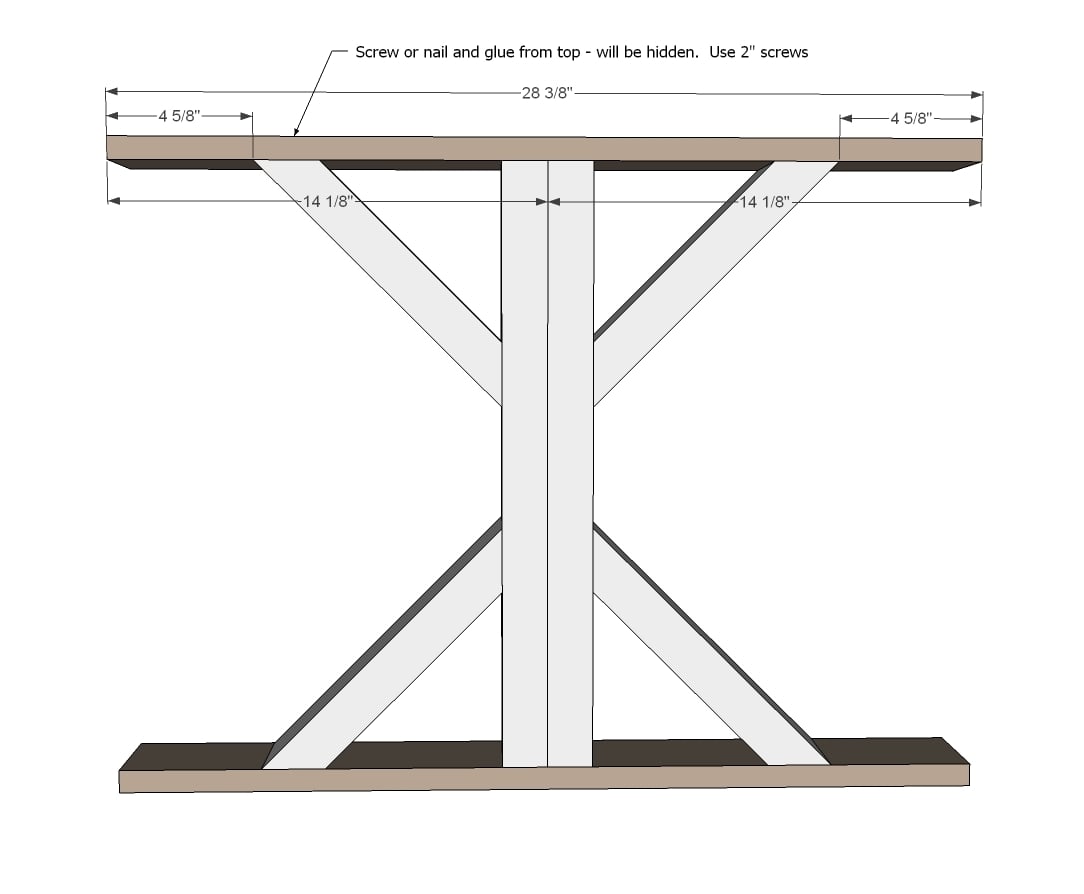
And add the top/bottom. You can use 2” screws or nails here and glue.
Step 4

And then add the curved pieces. The ends may be a challenge – what I do is first cut a 2x4 32 5/8” long with both ends cut at 30 degrees off square, ends not parallel. Then make a second cut at 45 (or more if your saw cuts higher degree bevels) degrees off square and cut that same board 28 3/8” short point to short point.
Step 5

Repeat for the next layer of 2xs to build up your leg ends
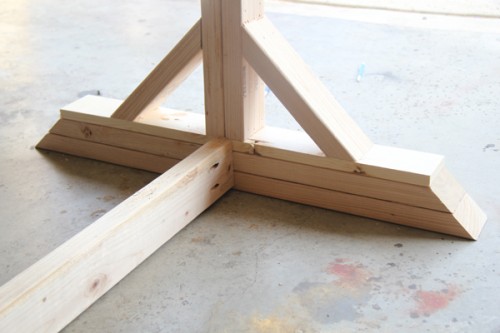
Step 6

Followed by the little feet ...
Step 7
I'd recommend 1 1/2" PHs and 2 1/2" PH screws here ... hide on top and bottom edges
Step 8

The easiest way to attach cross braces is with pocket holes. But you will have to fill later with wood filler.
An alternative is to glue and screw through the cross brace into the top and bottom 2x4s with longer screws.
Step 9
And finally the top! I recommend building the tabletop first with pocket holes and then attaching.
If you are using the table outdoors, leave a little space between the boards for water drainage.
Step 10

And for the alternate ends like Whitney did - just use 45 degrees off square cuts.
Step 11
For more photos and construction details, please stop over and visit Whitney at Shanty2Chic!
It is always recommended to apply a test coat on a hidden area or scrap piece to ensure color evenness and adhesion. Use primer or wood conditioner as needed.


Comments
WandaR (not verified)
Sat, 12/22/2012 - 11:39
Attaching the table top?
I have figured out where to place the screws and such for the base of the table, but have no idea how to attach the 4 2x10s together to make the table top or how to the attach the base to the table top. Any advice?
Annette Davis (not verified)
Mon, 12/24/2012 - 17:44
larger farm house table
Hi! I love the plans for the farm house table! I need a larger table that will seat 12 -14 people or larger. HOW WOULD YOU ADAPT THE PLANS FOR A LARGER TABLE?
I can easily handle a table up to 14' long or 8' x 8' sq. on the patio I am building. I prefer the square design.
monalogy
Tue, 01/20/2015 - 12:03
larger farm house plans
Hi there,
I was hoping to get plans for a larger table too and wanted to know if you were sent them?
Thanks,
Monica
Ginnie Jones (not verified)
Tue, 01/22/2013 - 19:57
Fancy X Farmhouse Table
Love this style of table. i plan on making two tables from this pattern. A long one for outside with the bench seating. A smaller version for the dining area in my home. My dining space is rather small. A similar version of this table is also featured in the Better Homes and Garden Magazine, February issue. The chairs in the article are mix-matched in two different styles. They are also painted in two different colors. I cannot decide if I want benches for seating for the inside table or paint the chairs.
Ginnie Jones (not verified)
Tue, 01/22/2013 - 20:19
Can't wait to build this table plan.
Love it Love it! I am going to build two tables. A long version for outside with the bench seating. A smaller version to use in my dining area space. The Better Homes and Garden magazine shows a similar version of this table in the February editon. In the article the mix-matched chairs are painted in two different colors. Its a really great idea. I am kind of torn between chairs or benches. But in the end I think it will be chairs that will be used inside. My husband would prefer chairs.
Missysue
Tue, 01/29/2013 - 08:45
Help please...
How do you attach the cross braces? I read somewhere that someone suggested using countersink screws from the bottom and top. I can't find 5 inch screws. This is my first project.
Thank.
Wintonae
Thu, 07/25/2013 - 21:27
Did you get an answer?
I am confused about that too. Perhaps on the narrow top edge of the 2x4? I am still wondering how to attach the top as well. Are the boards joined together before screwing them down?
Shadoglare
Sat, 02/16/2013 - 13:22
Ugh
So I've now been working on the project for I think two or three months, and so far it's pretty much been a total nightmare. 2x4s and especially 2x10s are not easy to work with other than for simple crosscuts. When I built the base of the table I was having constant issues with not being able to get the cut angles consistent (using a circular saw - I've seen bought a small table saw, partially because of my frustration with this project), and when I eventually got that to a point I called "good enough," the top of the table has proved to be da**ed near impossible. I've probably spent hours sifting through 2x10s (which in itself is not easy work) trying to find the rare few that weren't badly cracked or otherwise damaged, and what I thought was at least reasonably straight, only to get them home and find that they warped or cupped after sitting in my basement for a few days. Then even more frustrating is none of them seem to be cut perfectly straight down the sides, so I'm unable to join them together in a way that makes it look like a single surface - I might as well have been building a picnic table to stick in our dining room. My next step is probably going to be to see if I can find some better quality kiln-dried wood to see if it works better for the top - but it doesn't come in 2x10 form, apparently only 1x10. Side note - I don't know where the $60 materials price came from, but even not counting mess-ups I'd say closer to $100 is probably more accurate once you've included hardware, stain, etc even if you stick with the low-end construction pine - just the 2x10 boards for the tabletop are close to $10 a pop (so hopefully I'll find another use for them since they're basically garbage now that it looks like they're unusable for the table).
bubblybunnie
Thu, 04/16/2020 - 22:02
I have not yet started my…
I have not yet started my table other than measuring and marking my wood but the materials I purchased yesterday excluding the wood glue cost us $120.00 I suppose it may depend on your area. I went to lowes for our supplies
HannahLucio
Sun, 01/17/2021 - 05:58
Table cost is not $65
I just bought supplies for the table and benches and it cost $237.00 😬. I believe this table cost should be updated.
Jake
Sat, 02/16/2013 - 18:13
Reply to Ugh
Really sorry you are having such problems. Those of us that patronize Lowe's and Home Depot live with similar problems on every project but I guess we get use to it. We learn that sometimes you have to go to both stores to get the total shopping list. But I would suggest that you make your interest and needs known to a "local" lumberyard. They typically stock pine in No 1 grade which is usually straight, un-warped, and the fewest knots. And the price is less than at big Blue or big Orange. Mine even lets me rummage through their pile of sticks and pick my own.
You can cut good joints with a circular saw but try and find yourself a used chop saw. Probably $50 will get you a great saw but equip it with a really good blade which will cost you another $40 but well worth it.
The last comment I have is to ignore the posts that brag about how quickly or how cheaply (or both) they build a project. I would double every number you see in that respect. Hey pockethole screws cost nearly 10 cents each so on a big project with 100 PHs that is $10 by itself. Add in glue, sandpaper, paint or stain and you are nearing $50 and haven't bought wood. So build at your own pace. We all do.
seejaneread
Mon, 04/15/2013 - 07:09
Is there a Formula for Modifications?
We love these plans but want to make the table "skinnier". Is there a basic formula for making it, say, about 30" across the top, instead of the 37"? (or something around there, whatever makes the math easier)
Colin97
Fri, 08/09/2013 - 07:08
Extensions
Love this table! I saw the desk version on shabby-chic and am going to attempt it starting today. WISH ME LUCK....THERE IS A FIRST FOR EVERYTHING. However, for the dining room table I was wondering if there are any ways to add extension on the ends? I have seen tutorials for such tables, but didn't know if you had suggestions or plans for this particular table to add extension underneath. Thanks for your help and can't wait to test my skills!
Shadoglare
Sun, 08/18/2013 - 14:17
I gave up
So it's probably been something like 10 months that I've been working on this project off an on, including countless hours of sifting through piles of lumber in hopes of finding the best stock (wasted time since it all warped after I got it home anyway), cutting, hand planing (OH so much planing), and sanding - all to still end up with a curved tabletop. I threw in the towel today - I give up. I'm just hoping I can find another use for the probably $70+ worth of lumber I've got put into this thing. Mind you my expectations probably exceeded what the project was designed for - I wanted a flat, seamless tabletop created from multiple boards. I've seen countless commercially made tables made this way so I figured I should be able to do it was well - but it just isn't going to happen. I did also notice going through photos of other peoples' work that it seems the majority of projects that turned out really nicely were *not* made with pine. If you're someone who's OK with having a tabletop made with multiple, slightly warped, disconnected boards, this project I'm sure is fine. I just had to learn the long, hard way that this thing wasn't going to work out the way I personally wanted it to.
In reply to I gave up by Shadoglare
Sleeps with dogs
Sat, 08/24/2013 - 19:13
I gave up
Your frustration is quite evident. I would suggest two things: First, the goal of any project, especially something you are new at is: To Finish. This means, whatever it takes. If it isn't finished, it doesn't exist, and so has little or no use, little is learned and nothing is gained. This applies to earning a Black Belt, earning an MD, running your first race, earning anything you set as your goal; finish.
Second: Accept the result as reflecting the best you can do at this time, and let it go at that.
I once saw a brand new hand built aerobatic aircraft, built by a master German builder named Walter Extra. It was very expensive, a bit less than half a million, and the most beautiful aircraft I had ever seen, but I had an idea. I said to Walter who was there in person from Germany delivering the aircraft, what do you think you could have done better. His eyes lit up and he started in about the paint, and this fitting with that, and on and on... Exactly as I had thought. To the builder it was far from perfect, and to me, experienced with aircraft, the most beautiful creation I had ever seen outside of the military.
Now back to your farm house table; I believe your expectations exceeded your ability and experience, and you weren't willing to accept what you had built as the best you could do. I firmly believe if you could have done better you would have. So, that said, finish it. What ever it may look like, make it so. Use all the ingenuity you poses, use all the determination you poses, use all the tools you poses, finish it, make it live. If you have to use different wood for the top, if you have to use steel underneath to tame the warp, if you have to use biscuits, set a reasonable time limit, say 1 week... and finish it. Then except it for what it is, the best you can do at this time.
Many of the tables you see here looking so beautiful, up close would show many of the same problems and failures you encountered. A picture hides many a flaw that the eye would normally spot.
Your table will be uniquely yours. Use it as you see fit, for a dining table, for an outside table, as a work bench for the next project you tackle, building on what you learned on this one, or give it away. Don't let failure be yours; don't own it, don't accept it, don't settle for it, don't let failure in your house.
gralf
Fri, 09/13/2013 - 09:05
hi, one question
I surfed the web searching for a table and that´s it, this is my next to do job.
I´m writing from Spain, and I was trying to translate units, we use to work in decimal system so I decided to take inches to centimetres.
The point is that
the 4 2x10@96 you use to do the top does not match my lengths because
4 x 10 = 40
and the painting shows
37 inches wide
¿where are the 3 inches left?
sorry about my english, and thanks in advance
In reply to hi, one question by gralf
Shadoglare
Thu, 11/14/2013 - 23:27
hi, one question
A 2x10 is not truly 10" wide by the time it is shaped and gets to the lumber store - actual width is about 9-1/4"
geovanim
Sun, 11/03/2013 - 21:35
Length
the length of the table is 96''. Which is too long for my dining room. If i want it to be 72'', will the dimensions change for the other parts?
In reply to Length by geovanim
Shadoglare
Thu, 11/14/2013 - 23:21
Length
I did the same - I also shortened the base by 24" - this resulted in the lengths and angles of the two angled boards in the middle of the table changing. After some trial and error I eventually decided to handle this by leaving them off.
geovanim
Tue, 11/05/2013 - 20:05
Tools
I want to make this table along with other projects. What tools would I need to complete this project?
Shadoglare
Thu, 11/14/2013 - 23:33
Finally got it done
I eventually gave up on the 2x boards for a table top, they just weren't working to create the type of surface I wanted. I ended up buying two pre-glued pine panels and putting them together (at about $30 a pop) and although the tabletop is less than half the thickness of the original plan, I'm much happier with it, and it's taking place of honor in our dining room. I just entered a "brag" post which is on page 15 of the above slide strip if anyone is interested.
Not even counting the wood that got tossed (which was a bunch, although I did re-use the 2x10s by making raised garden beds with them), I'd roughly estimate this project ended up costing about $120, or about twice what is stated at the top of the plan page. That's for 2x4s, the two pine panels, hardware, stain, polyurethane, etc.
It was an amazingly frustrating experience as I think I had pictured something in my head that just wasn't going to happen with these materials, however I'm pretty happy with the eventual end result.
beejay
Mon, 06/09/2014 - 01:32
those warping boards
I've just been reading through all the comments on this project, and I saw that you had repeated problems with 2x10s warping _in your basement_. Don't know what your basement is like, but it's bound to be damper and colder than your dining room, as you said you were wanting to build a dining room table. You should really let the wood acclimate where it's going to be used.
When we built our deck, we left the wood out back of the house for a week before we started. Luckily, our very careful screening for bad boards paid off and we could use all but one out of more than 100. Same procedure for wood flooring, letting it rest in the room(s) where it will be used.
Anyway, if you're making a picnic table, let the wood adjust to its new environment outside. A dining room table, let it wait in the dining room. You're much less likely to have nasty surprises as your project "ages," if the wood was fully acclimated before you started to cut and assemble. HTH
Buston_83
Fri, 01/31/2014 - 12:52
Length
Does anyone have a plan or know of where I can get a plan for this but in shorter length? The table I have right now is 64 inch and would like to have it similar to that.
RLP314
Tue, 02/18/2014 - 18:09
Matching Bench Plans Here!
After building the table and deciding I wanted matching benches for it I started looking for plans, with no luck. I decided to use the 2/3 method and it worked great. Here are the measurements for one bench.
I used four 2"x4"x8' and two 2"x10"x8'
Cut List: (All are 2"x4" Lumber except when noted.)
4 - 13 3/8" Cut flush on ends (Bench Leg Spine)
8 - 7 5/8" Cut 45 degrees off center on both ends (X's)
4 - 16 1/2" Cut 45 degrees off center on both ends
4 - 16 1/2" Cut flush on ends
2 - 57" (Bench Stringers)
2 - 17" Ends Cut 45 Degrees parallel (Bench Stringer Supports)
2 - 86" 2"x10" (Bench Seats)
I left the 1x lumber out of the benches because I did not do the rounded look and I wanted them to be about 21" tall.
I began assembling the legs just like the table, measure 5 1/2" from each end of the 13 3/8" pieces and mark a square line on each. This is there you line up the X pieces. Assemble just like you did the table legs until you have both of your frames.
Next, I screwed the 16 1/2" 45 degree off center piece onto the X in place of the 1"x4" from the table, short side toward the X, this lined the miter up with the angle of the X for a nice clean look. Next, I screwed the 16 1/2" flush cut piece to the mitered piece, finishing out that side. I repeated this until both frames were complete.
The distance between my table legs was 65 1/4" and I wanted the bench legs to slide just inside of the table legs. I decided to make the outside distance of the bench legs 64". With 7" in width on the legs I made the stringers 57" each. Screw them to the top and bottom of the bench legs just like you did with the table.
I then attached the 17" seat stringer supports with screws, finishing out the frame.
****Note**** I went ahead and sanded the frame because it was much easier to get to without the seat boards attached.
I then attached the seat boards to the legs with an 11" overhang on each end. I sanded and finished it to match the table. It is drying in my shop as we speak.
I hope this made sense, if anyone has any questions feel free to ask.
Tera
Mon, 02/09/2015 - 09:27
Thank You!
Thanks Robert for taking the time to post plans on here for the benches! I am moving into my first house in May and plan to make the table and a bench for the new house. Please keep an eye out for questions in May! :)
Sahmamma
Wed, 02/26/2014 - 12:16
Make more narrow?
Is there any way to make this table a little more narrow? Instead of 37 inches wide, say.....32/33? Maybe use 2x8's instead of 2x10's for the top? We have a narrow eating area and the table as is is a bit too wide.
ewhite7380
Thu, 05/22/2014 - 12:42
Table Top
This is my first project and I'm super excited about it. The plans don't say how to attach the table top. Any suggestions?
In reply to Table Top by ewhite7380
tom_in_hawriver
Sat, 05/24/2014 - 11:04
I used kreg screws...2 on
I used kreg screws...2 on each end of the 2x10's and filled with dowels and wood glue and sanded smooth...looks great
In reply to Table Top by ewhite7380
tom_in_hawriver
Sat, 05/24/2014 - 11:04
I used kreg screws...2 on
I used kreg screws...2 on each end of the 2x10's and filled with dowels and wood glue and sanded smooth...looks great
tom_in_hawriver
Sat, 05/24/2014 - 10:59
this table!
The plans are simple and clear! Thank you Ana and Shanty2Chic! I used a vintage style finish by cover each piece in white acrylic paint....distressing with 100 grit, and then lightly rubbing in weathered gray stain. The look is incredible!
mommywoodgo
Wed, 07/30/2014 - 06:50
HOW TO ATTACH THE TOP WITH OUT SCREWING FROM THE TOP
ok...Im not sure why an administrator has NOT addressed this issue (i mean its kinda an important step:)
so what i did was add (2) 2x4 flat between the 2 legs flush with the top of the legs (i placed them towards the outer edge of the legs)..... i attached the 2x4's with 2 pocket screws at either end....Place your top upside down on the floor and set your "base" where you want it, then screw thru the added 2x4 into the top (counter sink your screws)......hope this helps all of you who DONT want to see the tops of screws as you're eating dinner on your beautiful new table :)
ps. you can modify this by adding just 1 2x4 in between the two legs (centered)
dynamic1
Thu, 10/02/2014 - 07:41
Can I get a poll of what type
Can I get a poll of what type of wood people used?
Drebin
Sun, 10/05/2014 - 14:12
I'm in the Pacific Northwest
I'm in the Pacific Northwest and most lumber around here is Hemlock or Douglas Fir. I think they just mix it and call it Hem Fir at Home Depot.
dynamic1
Thu, 10/02/2014 - 08:12
Type of Wood
Can I get a poll going to see what type of wood people used for this project?
Drebin
Sun, 10/05/2014 - 14:10
question regarding PHs on the 65" cross beams
Hi. I have a question regarding attaching the 65" cross beams between the two legs. Above, it said:
I'd recommend 1 1/2" PHs and 2 1/2" PH screws here ... hide on top and bottom edges
Does this mean you stacked the pocket holes, one atop the other, on the 2" (1.5) side of the 2x4 so the holes would be hidden by the table top? If that's the case, I had no idea I could do that with the Kreg.
Or did you mean to put a 1 1/2" pocket hole on the bottom edge and a 2 1/2" pocket hole on the top edge, or vice versa? If that's the case, why the difference in the two hole depths?
Thanks,
Drebin
Dan in RI
Tue, 11/04/2014 - 10:49
Drebin
Drebin
A 1 1/2" pocket hole depth would be the appropriate depth for a 2 1/2" PH screw, in general. That way it's penetrating 1" into the other piece of wood...I considered your idea (that is, 1 hole up top and one on the bottom) but instead used wood pocket hole plugs, glue and filler to hide the holes and they are virtually invisible. Good luck.
Dan in RI
Mon, 10/20/2014 - 14:54
I just submitted my first
I just submitted my first brag post ever. It's a 7 ft version of this table:
http://ana-white.com/node/13247
Please let me know if any edits are necessary.
Keden
Tue, 01/20/2015 - 13:44
Wood
Having trouble finding the dimensions for the wood. I can find them in Douglas Fir but don't want to use Fir. From AZ does anyone know of a good lumber store besides lowes and Home Depot?
monalogy
Tue, 01/20/2015 - 16:46
Larger Table Plans
Hi there,
I'm hoping to make a table that can accomodate 10 (4 on each side and 1 on each end). When researching dimensions for comfortable seating, 9-10ft seems like the magic range.. I was wondering if anyone had plans for a larger table or can i just adjust the table top length and keep everything the same? would this create a balance or make it wobble?
thanks so much!
brandihessenius
Wed, 02/04/2015 - 10:30
Made a 7' version as a housewarming gift for my best friend!
These plans were so easy! I made the table 7' and changed up some other things because they worked best for me. I'm in a "build to learn" phase (not sure that will ever end.) I'm a beginner. My favorite part about this project is the confidence I gained upon completion. I questioned every thing I did during this project - and it's my fifth Ana White build, but in the end it was all small stuff I was sweating and it turned out incredible! If I can give ONE piece of advice about this build, it would be this, have faith that you can do this. If you can't see on the plan where they screw 'this' or how 'that' is attached, or whatever, trust that you can probably figure it out on your own. You're playing with power tools! You can figure out how to attach a table top. If you're thinking to yourself "geez, I could probably do it this way too" You're right, you probably can.
But since I can give more than one piece of advice, here are some things I learned along the way.
A. The Table Top. This is the one thing I that was questioned the most in the comments. And in the end I decided I'd figure it out on my own. Since this was a gift, one that I was traveling four hours to give to my best friend, I waited to stain and attach the top until I got to their house. It would not have fit in my truck bed assembled. I presented my recipients with three options for attaching the top. 1. Whitney over on Shanty2Chic responded to a comment and said she just screwed through the top and filled the holes with wood filler. I had a taken stainable wood filler but I was concerned if they ever needed to remove the top for transport. It was 7' long by the way. 2. We could go purchase some more decorative screws and screw through the top with the intention of the screw heads showing. 3. We could use L brackets from the bottom of the table. I saw another blogger do this. We decided on the L brackets. We had to spray paint them black because silver looked to industrial and black went with the feel of the table.
B. I shortened the table to 7' because of the space in their home. I was worried about the cross braces not looking right but as you can see, it turned out great.
C. I plan on making this again for my back patio - just as Whitney did at Shanty2Chic - and I think I'll replace the 2 upright 2x4's with one 4x4's for the X bases and just screw the 2x4's in from the front. Also, I'll probably replace the angled pieces with one 2 x 4 as opposed to lining up 2 - 2 x 4 angles.
D. This is a no brainer for me because I want to know other peoples experiences, I ALWAYS read the comments. I like to read the issues other people may have encountered as well as read other bloggers' posts on the projects. It takes a lot of the edge off when I head into a project and I know where I can find an answer. She says to do this in every plan and I think it's worth taking the time to do so!
Thanks!!!
www.houseofhessenius.com
In reply to Made a 7' version as a housewarming gift for my best friend! by brandihessenius
brandihessenius
Wed, 02/04/2015 - 11:05
Correction
I would probably replace the angled pieces on the top and bottom of the X braces with 4 x 4's instead of two 2 x 4's.
I'm sure that could cause some confusion!
Also, I thought I could post a pic but I wasn't able to. Anyway, turned out beautifully!
loricastellani…
Sun, 02/08/2015 - 21:40
How do you protect the table from the weather
My husband has made wooden outdoor tables for us in the past and I feel that they get ruined so much quicker due to the weather. What have people used to protect the wood or what type of wood did you use.
mtairymd
Sun, 03/22/2015 - 12:07
Matching desk & end table
Thanks for the inspiration. Below are my attempts at matching designs.
End Table:
http://ana-white.com/2015/03/DIY_furniture/rustic-end-table
Book Shelf:
http://ana-white.com/2015/03/DIY_furniture/rustic-book-shelf
Build Instructions:
http://www.instructables.com/id/Rustic-End-Table/
rnixon
Sun, 03/29/2015 - 07:30
Novice needs help attaching table top
The final step 9 instructions just say "And now the top". How are the table top boards secured? Shouldn't this be on the underside to keep the top clean of screw holes and filler? Thx!
In reply to Novice needs help attaching table top by rnixon
Ana White
Sun, 03/29/2015 - 10:30
There are a couple of options
There are a couple of options to attach the top. Take a look at these for
tips and tricks
http://jennasuedesign.blogspot.com/2014/04/kitchen-chronicles-building-…
http://diyonthecheap.com/anthro-inspired-outdoor-farmhouse-table-benche…
http://www.diypete.com/how-to-build-a-farmhouse-table/
Hope this helps!
rjminn59
Sat, 06/20/2015 - 17:13
how do you attach the top of
how do you attach the top of the table?
mggardner
Sun, 07/05/2015 - 17:59
Suggest some changes.
Having just built this, I have a few thoughts. We were kind of in a hurry. I built the K sections, put them together and attached the 1x4 pieces - but because the world isn't perfect, the 1x4's got pulled down slightly when screwed to the X pieces. Not a big deal, except then the 2x4's also got pulled down and we ended up with legs that weren't entirely flat. Also - we didn't want to put screws in from the top. SO, We cut two more 2x4's with angled ends and drilled sideways through them and attached them the top of the legs with 5 inch construction screws. That gave us a nice flat surface to screw the table top boards into from the bottom. We were using Select Yellow Pine for the top - but construction lumber is never perfect, so we did some planing to get the boards to fit nicer and belt sending to level them out (it is an inside table).
If I were to do one of these again, I think I would start the same way, but not attach the 1x4 and 2x4's to the top of the leg assembly. I'd glue and screw those together, then drill a pair of holes all the way through just above the inside of the X parts (counter sink a 1/4 inch deep hold first with spade bit), then attach the three pieces to the rest of the leg with 5 inch lag bolts. The bottom pieces could be done the same way but its not so necessary. The lag bolts will require a longer drill bit than most people have, but I think it will save time and build a nicer piece.
Better yet, replace the top 2x4 with a 2x6 or 2x8 - then you can drill pilot holes and screw the table boards from the bottom. If you want a screw to pull two boards together, either you need to drill through the first piece or make sure you use screws with threads only where they contact the second piece.
hannahkvick
Sun, 07/26/2015 - 16:56
1x4 12' long
Im super confused about the cut of the 1x4 (its used in the last step correct??)
The cut instructions say to cut 4 pieces of the 12' 1x4 into 3 1/2'' and 4 28 3/8'' cut-- it is MORE than 12 feet.
where are the 1x4s used?!
JimmyC
Tue, 09/15/2015 - 05:51
Remember, 1x4 is technically 3/4" x 3 1/2"
4 cuts @ 28 3/8" = 113 1/2"
4 cuts @ 3 1/2" = 14". These are the square feet on the bottom side of the legs.
113 1/2" + 14" = 127 1/2". 12 ft = 144". You'll have some wood leftover too.
wachobf
Sun, 08/23/2015 - 21:38
Connections???
So how did you connect the cross bracing on pgs 13 and 14 of the plan set? (Steps 7 and 8)
I'll assume the PH (most likely the 2 1/2") screws went in from the top and the bottom of the horizintal braces, but what did you use to secure the diagonal vraces to the horizontal braces.
Thanks.