


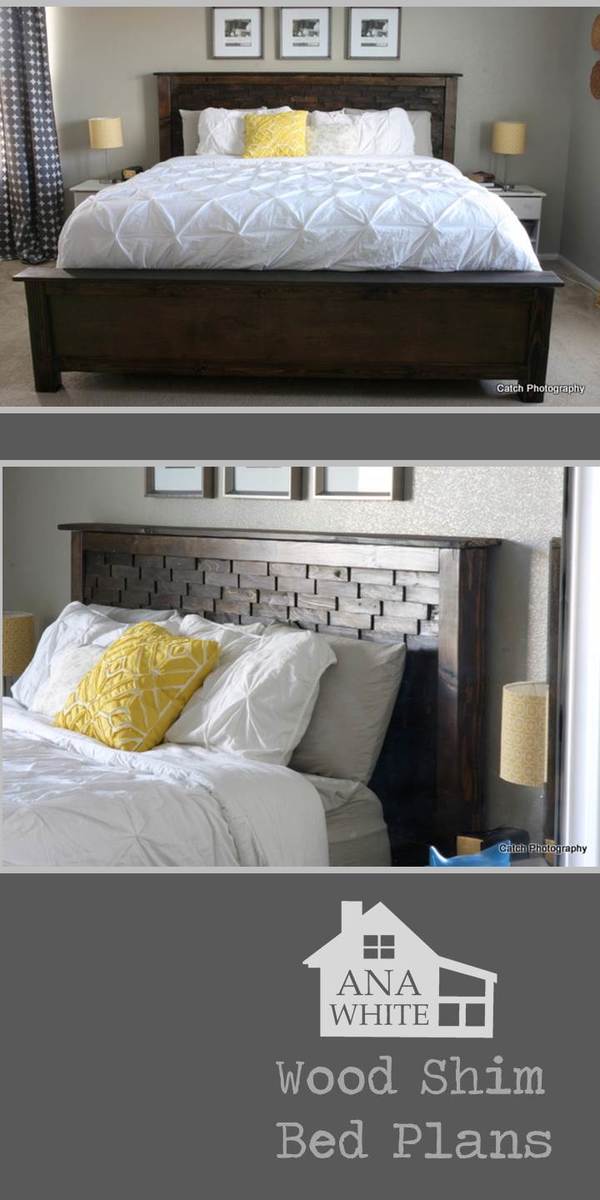
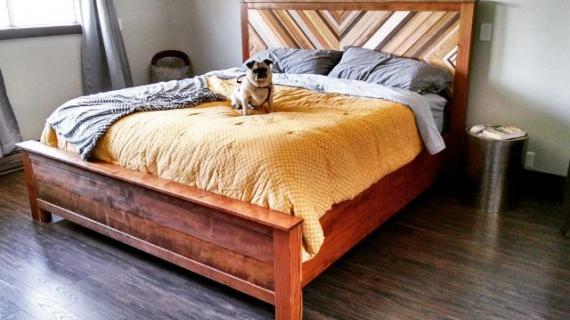
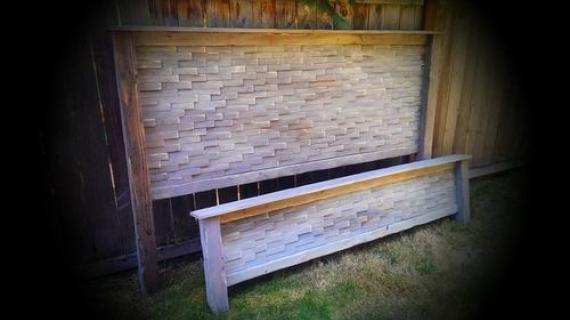
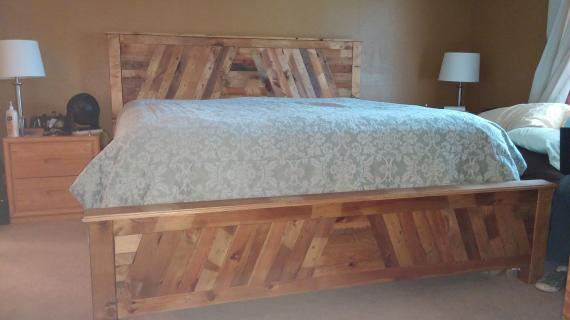
Wood shims fancy up this headboard! Free DIY bed plans (king) from Ana-White.com


 So .... I thought I'd never be buying a pack of wood shims again for the rest of my life!
Much less hundreds of them!!!
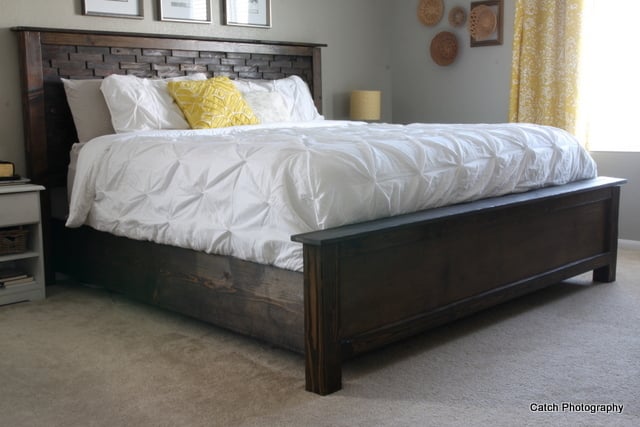
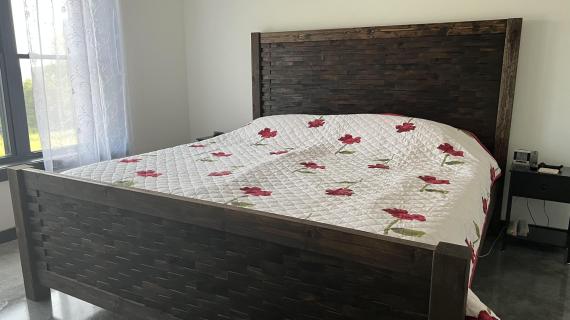
My friend Rebecca from Dreaming for More Hours in a Day wanted to create the perfet bed for her sister-in-law. Inspired by wood shim artwork found on Pinterest, Rebecca created this bed:

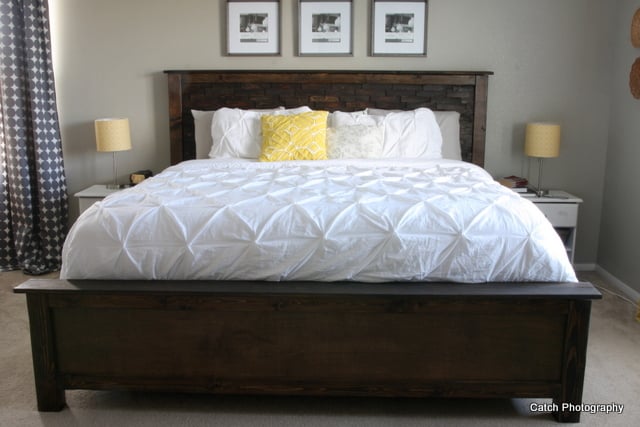
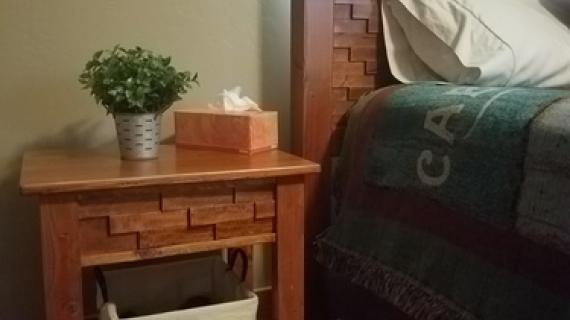
And a close up of those wood shims:

Isn't that detail just beautiful?
And the best part is the entire bed cost Rebecca about $130 to make!!!!
Dang, I bet the bed spread cost more!!!
Here's from Rebecca:
"My sister in law asked me to build her a bed. There was MUCH deliberation and many hours on the computer for her to figure out what just the perfect bed would be. I decided to send her a pic of a piece of artwork made from shims I had seen on pintrest or a blog somewhere. We decided to have an adventure and went for it. I never knew that it would turn out as amazing as it did. The shims give this headboard a beautiful 3 Dimensional affect and she loves it and I love it. I got so excited about it I had to show the pictures to Ana even before I had the whole thing assembled at her house. My heart just swelled with pride when she wrote back that she loved it too. Thank you Ana for putting this together so others can enjoy it as well. I feel like you are my little tiny claim to fame when I tell me people that my latest build can be found on Ana White!
If you choose to make the headboard with shims, steal some time away. It was a beast and took much longer than I thought. I think it took about 13-15 packs of shims to complete. I laid them out a few rows at a time deciding the layout I wanted. We decided to offset each row for uniqueness. You could of course do them like bricks, but we thought that might be a little 70's for this large of a project. I then scooted the rows down and glued and nailed with a nailer. Just make sure not to nail too close to the tapered end because it will shoot right through. Then do it about 400 more times and fill all those lovely holes, sand all those lovely holes and THEN you can stain it. I think just building it took me 4 hours.
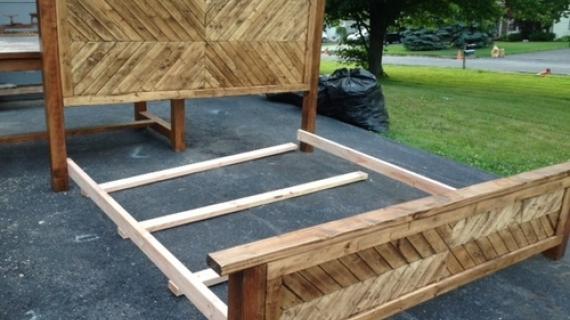
This can be taken apart so there is a headboard, footboard, and support system, which I like because I have built and un-built many a bed because they don't fit upstairs!
I used dowels and clamps to attach the header for the headboard and footboard if you want to go that route. I was staining and I HATE filling holes for some reason. And after filling 300 of them for the headboard... well you know
I might recommend adding a flat metal bracket to the inside of the leg and side rail just as extra support from wiggling. My sister in law hasn't complained and this is a solid bed, but just in case.
This is measured to fit a king mattress pretty tightly. If you want to tuck in a bed spread you might want to add an inch or two to the sides. There is plenty of room at the foot board though"
Now Rebecca did the design and build of this bed all on her own, but she asked me to post the plans because she wanted to make the plans as available to the most amount of people. Isn't she the sweetest, most thoughtful person?
So please take a second to visit Rebecca here to read more about this bed and see more photos, and check out more of her projects!
Thank you so much Rebecca - can't wait to work with you on another project!
XO
Ana
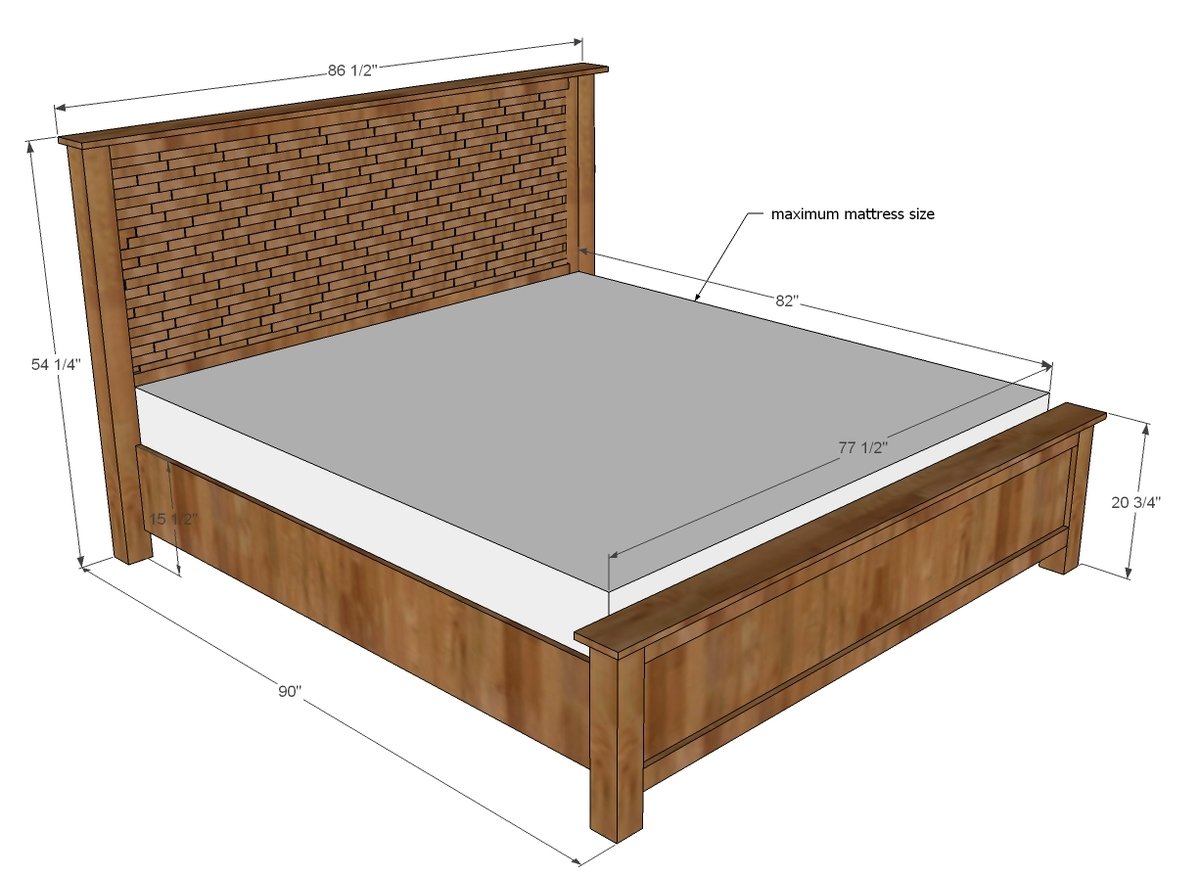
Preparation
- 1 - sheet 3/4" plywood (full 4x8 sheet, hardwood preferred)
- 2 - 4x4 posts, 8 feet long each
- 4 - 1x3 @ 8 feet long
- 6 - 2x4 @ 8 feet long
- 2 - 1x12 @ 8 feet long
- 2 - 1x6 @ 8 feet long
- Approximately 13-15 packs wood shims (for headboard)
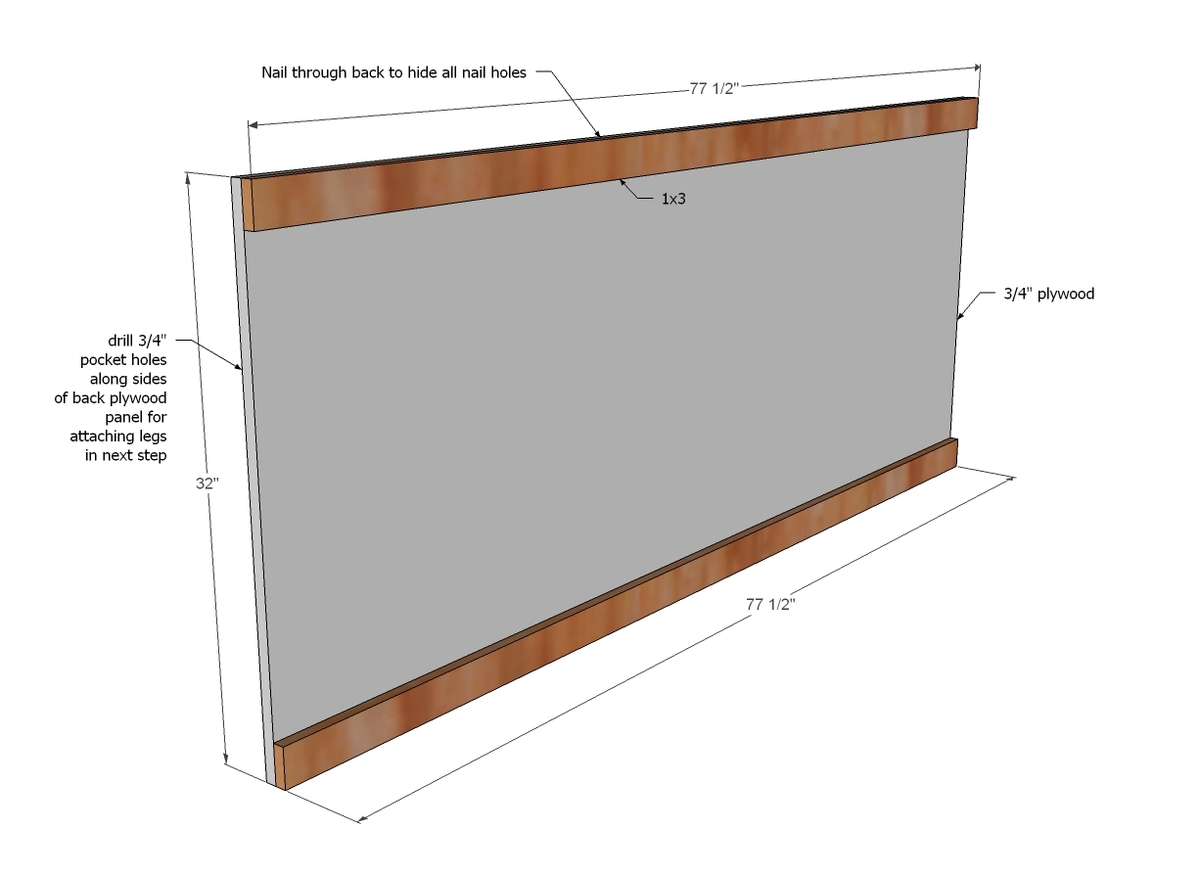
- 4 - 1x3 @ 77 1/2" (panel trim boards)
- 1 - 3/4" plywood @ 77 1/2" x 32" (headboard panel)
- 1 - 3/4" plywood @ 77 1/2" x 16" (footboard panel)
- 2 - 4x4 @ 53 1/2" (headboard legs)
- 2 - 4x4 @ 20" (footboard legs)
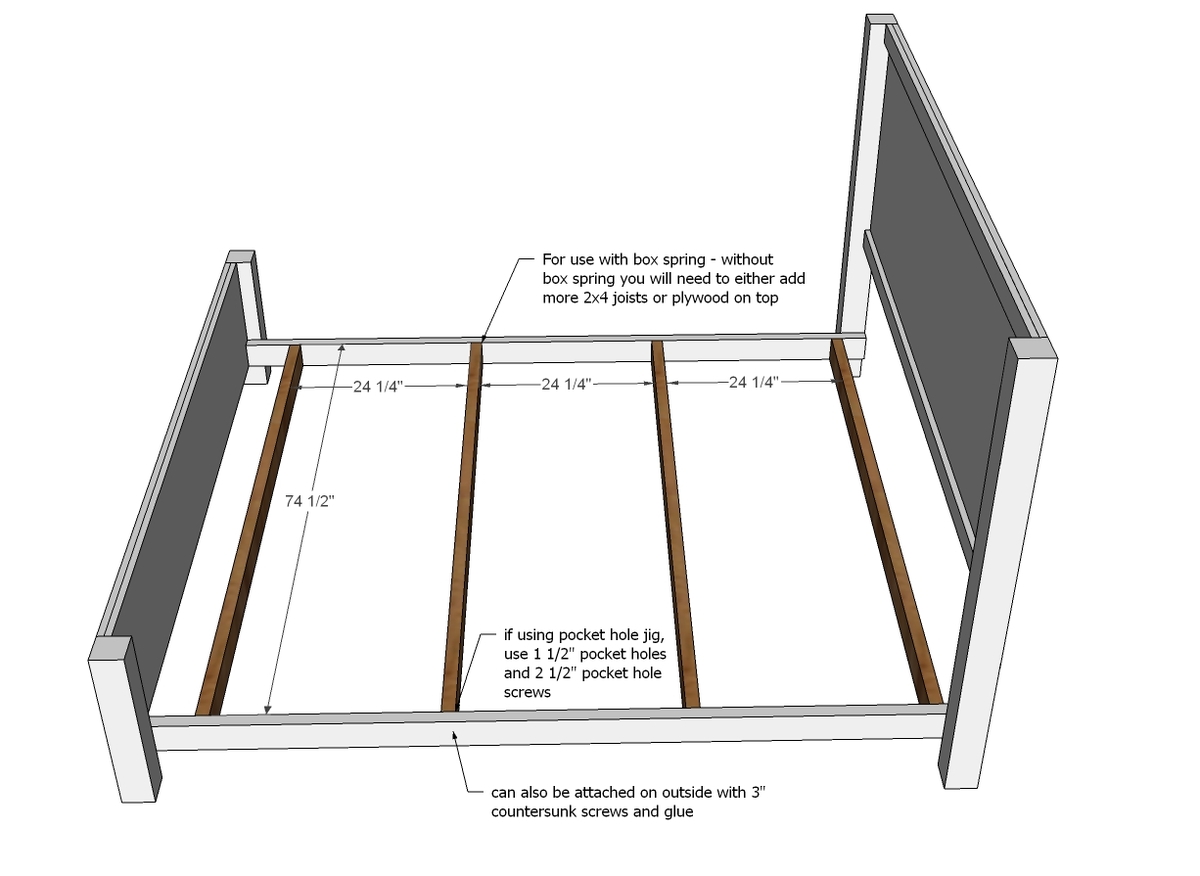
- 2 - 2x4 @ 88 1/2" (inner siderails)
- 4 - 2x4 @ 74 1/2" (frame supports - for extra support, add addtional 2x4 supports)
- 2 - 1x12 @ 83" long (siderails - can also use 2x12s for extra support)
- 2 - 1x6 @ 86 1/2" long (headers)
To cut the plywood, first cut the plywood to 77 1/2" x 48". Then cut the remaining piece into a 32" and 16" wide piece.
Please read through the entire plan and all comments before beginning this project. It is also advisable to review the Getting Started Section. Take all necessary precautions to build safely and smartly. Work on a clean level surface, free of imperfections or debris. Always use straight boards. Check for square after each step. Always predrill holes before attaching with screws. Use glue with finish nails for a stronger hold. Wipe excess glue off bare wood for stained projects, as dried glue will not take stain. Be safe, have fun, and ask for help if you need it. Good luck!
Instructions
Step 1
Attach 1x3s to the headboard panel. You can also do the same with the footboard panel.
If you are using pocket holes, drill 3/4" pocket holes along side and top edges every 6"-8" of plywood pieces for attaching legs and headers in later step prior to attaching the 1x3s.
Rebecca also added the wood shims to the headboard at this step rather than waiting until the end - it's up to you.
From Rebecca:
"I attached my shims before the side 4x4's so I could sand the sides down and make sure they were even. I suppose you could even run a circular saw along he edge to make it easy. I did not run my 4x4's through the table saw first to make them more square and a flush to the front. So there is a little disconnect between my headboard and the legs. That is a personal decision though. My husband brought it up. "
Step 2
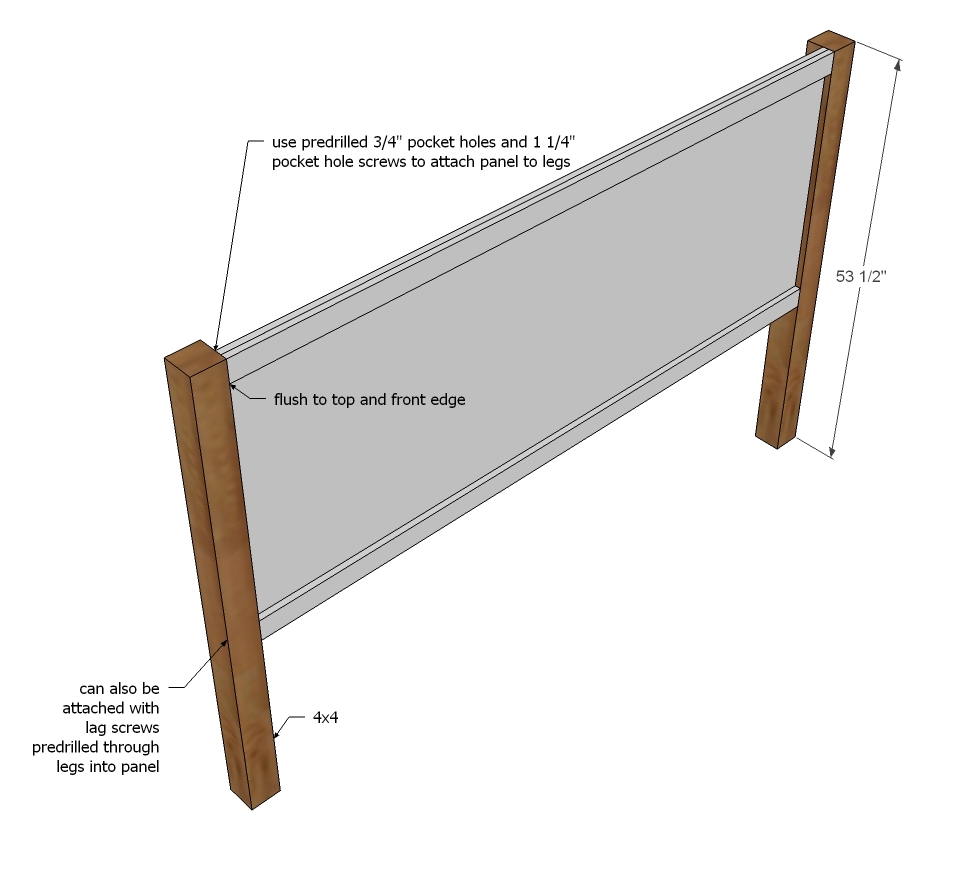
Attach legs to headboard. If you don't have a pocket hole jig, you can also attach the legs via long (depending on how deep you countersink) lag screws or hardware brackets on back side.
Step 3
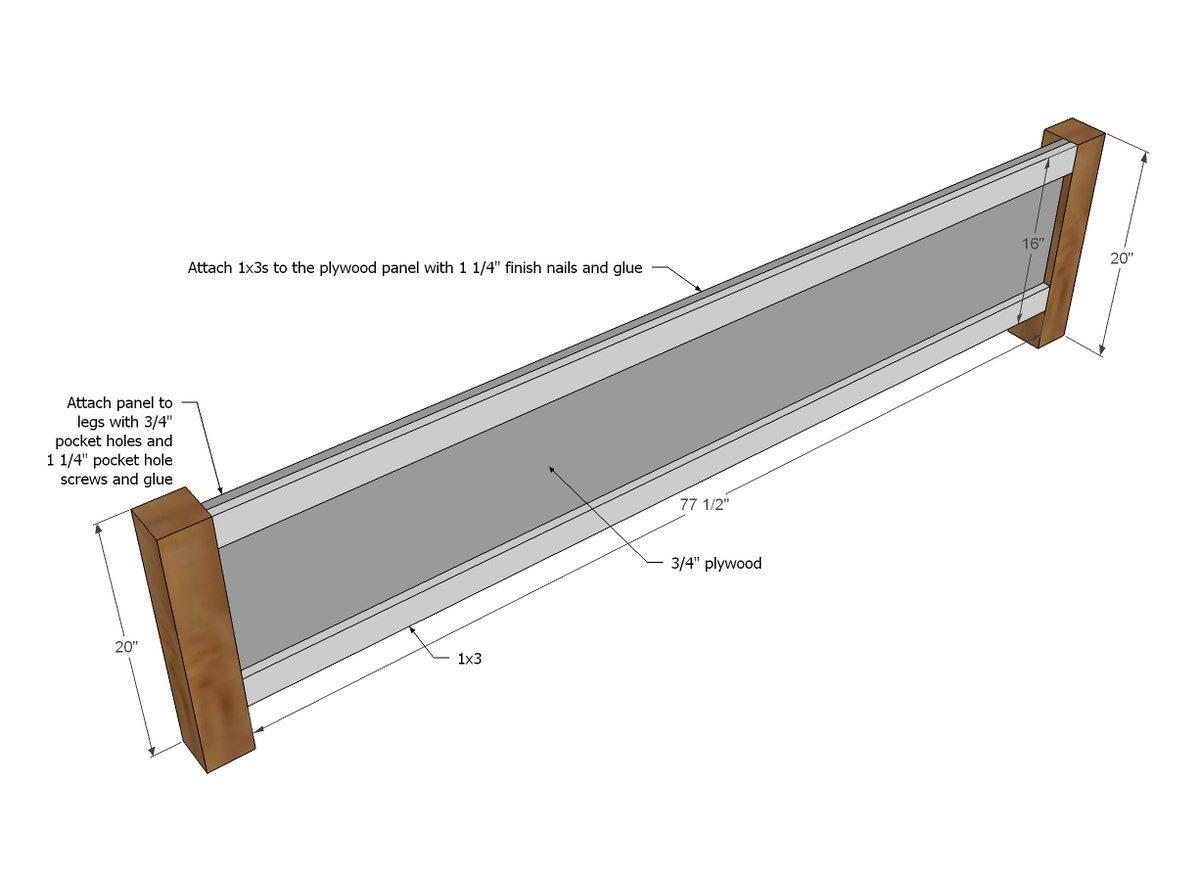
Repeat the same steps for the footboard as you did the headboard.
Step 4
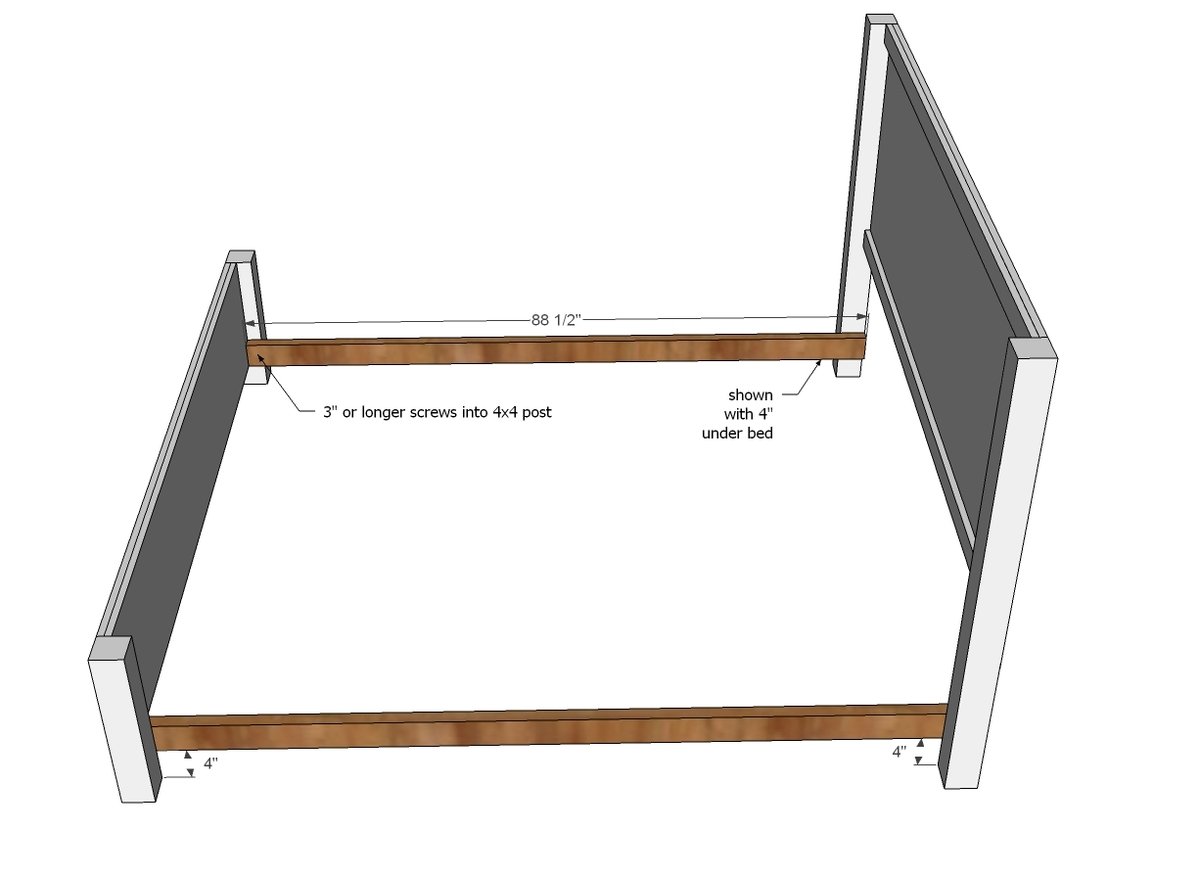
You'll want to make these guys somewhat removeable to get the bed in the room, so no glue here. Attach with screws at least 3" long into the legs.
Step 5
Step 6
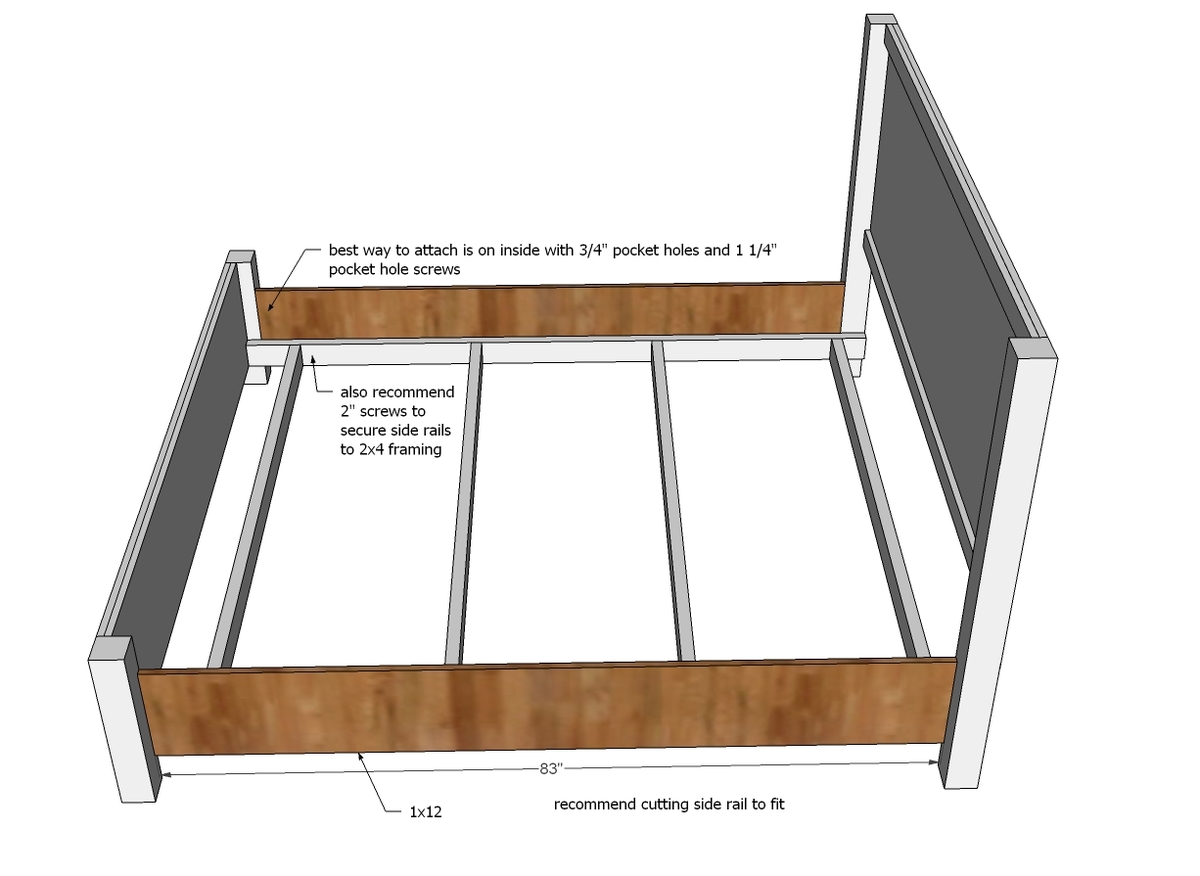
Attach siderails to the sides of the bed. Again, these will need to be removeable.
Step 7
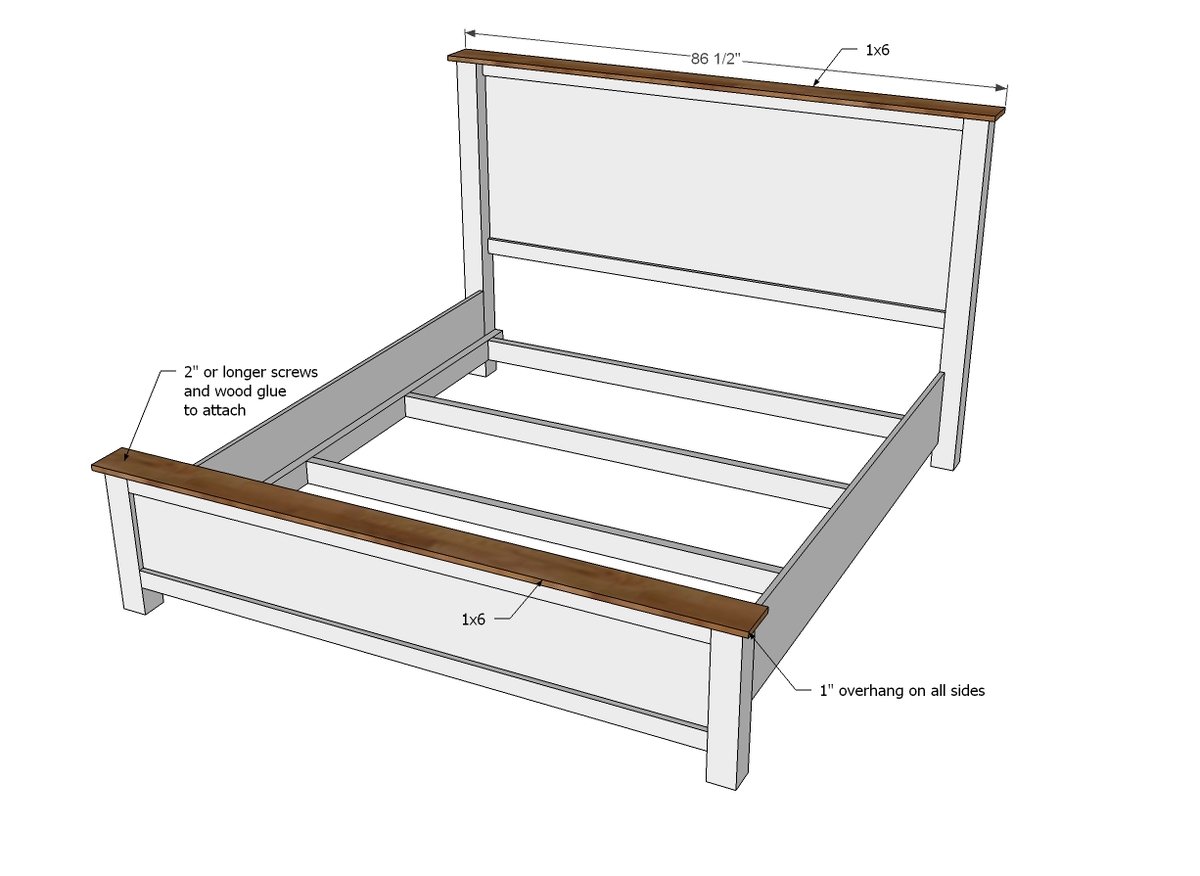
Attach headers to the footboard/headboard. If you drilled pocket holes facing upward in your panels, attach with 1 1/4" pocket hole screws. I recommend screws to attach headers just because they may try to come up over time. Try trim screws - they have a tiny screw head that will be much easier to hide.
Step 8
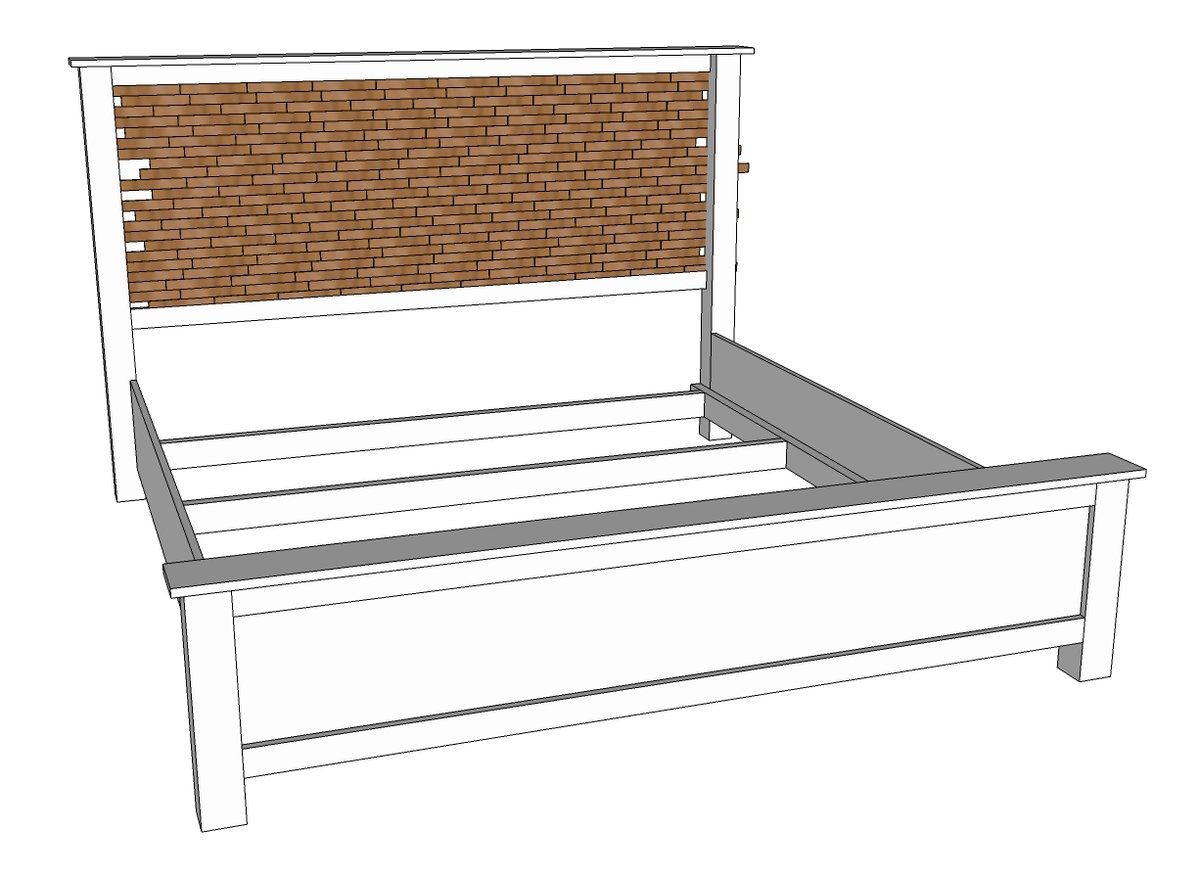
Fill headboard with wood shims with glue (hot glue would be awesome here) or small nails (I'd go with 3/4").
Done deal!
It is always recommended to apply a test coat on a hidden area or scrap piece to ensure color evenness and adhesion. Use primer or wood conditioner as needed.


Comments
bullitt453
Thu, 08/08/2013 - 13:01
Awesome!
Very cool. May modify this to a full size and use it in my son's room. Only I would paint the shims a mix of black, white, vintage gray, and orange (the colors used in his room).
Marie320
Thu, 08/08/2013 - 16:50
how can you modify to a queen
how can you modify to a queen size ?? what would be the cut list?? I love this one but don't know how to modify
ffsangel1
Thu, 08/08/2013 - 19:06
Love this plan!
Showed this plan to my daughter who is getting married soon. She loved it so much that this is what she asked me to make for her wedding gift from me. Will have to figure out how to modify to a queen, but she is so very excited. Thank You so much Ana and Rebecca for the plans.
darkjuan
Fri, 08/09/2013 - 13:42
wood shims
Ana,
i have a couple question regarding the wood shims, what is the length size?
11-7/8 or 7-7/8
and also, do you stain them before install them on the headboard or after?
In reply to wood shims by darkjuan
redhead_61
Fri, 08/09/2013 - 18:00
I used 7 7/8" shims on this
I used 7 7/8" shims on this headboard. I stained after I glued them on. You could use the hot glue glue idea Ana had and then you might want to stain before. Not sure what would be easier.
michelle_newbie
Mon, 08/12/2013 - 13:02
Type of Wood
This is a very newbie question. What type of wood is normally used on these projects? Cedar? Pine? Other?
Thank you. I LOVE this plan and LOVE this website.
elslap1
Sat, 12/28/2013 - 08:03
project order
after completing this project I have one major recommendation for the order of the project. It came out beautiful in the end but was a heck of a lot of work. I thought of a few changes that may help make the project easier and quicker. I highly recommend the headboard in this order
1. frame the headboard
2. Stain the headboard (if this is not done before placing shims than you spend an increcible amount of time trying to stain between the shims evenly vs a very easy coating before "shimming")
3. sand each shim on all sides except the back (I can't begin to tell how difficult it was to sand the tops and especially edges of each shim with the limited space due to surrounding shims) I found that the backs of the shims were particularly rough and wound have been much easier to have pre-sanded.
4. attach shims to headboard (I layed the headboard flat on the ground and attached the shims with glue, never even to use my pin nailer)
5. stain when you stain the rest of the project.
Hope this helps save some people some time!
Elliot
In reply to project order by elslap1
MsKirstenChute
Wed, 03/19/2014 - 20:12
Thanks for the Tip :)
Your advice will definitely be used when i start this project this weekend! Thanks again for the VERY helpful tip!
dgahunia
Sat, 03/15/2014 - 11:54
Strengh of the rails
Hey everyone,
to the people who have already built this bed.... how strong did you find the bed to be with the rails installed as shown in the plan... did the bed squeak... or could the rails split or crack over time because they are just being held up by screws.
Its definitely a beautiful looking bed
dmozer74
Thu, 12/24/2015 - 13:31
I realize I'm answering a
I realize I'm answering a rather old question here, and even then I'm not really answering...Next week I will build this bed and intend to add 2x4 blocks below the mounting point at the headboard and footboard for the side rails to rest on. I will also add 2x4s below the center support 2x4s at exactly 4 inches in height. That should keep the squeaks to a minimum. I'll report on the success in my brag upon completion.
efischer
Sat, 08/16/2014 - 06:36
strength of rails
I am wondering if anyone answered dgahunia's question about the rails? Are the screws strong enough. If so, what size screw did you use and can you take them apart to move the bed? Are their any other options for the rail attachment? Thank you. I am just about done with my bed and want to double check I attach the rails correctly.
ga_stone
Sat, 11/01/2014 - 19:32
Stain Colors and Brand, plus question on Step 3
This is a great plan but and I really like the color of the stain in the pictures at the beginning of these plans. Can you please let me know the stain brand, color, and whether you did a coat of poly on top of the stain?
Also, in the diagram for Step 3, it seems like the panel for the headboard if flush with the back of the posts instead of the front of the posts (as all the other pictures of the finished be seem to be). Was this just an oversight?
Thanks again. Great design!
hwinger
Tue, 12/23/2014 - 21:37
We made this bed in the king
We made this bed in the king size. DEFINITELY sand each shim prior to gluing it down. It is definitely no fun rolling over in the night and hurting my hand on the rough shims. I would also recommend staining the headboard (the base for the shims) prior to gluing down shims so that any holes between shims blend in with the stain color underneath. We did not and there are a couple spots that you can see the plain wood under the shims. Also, we did what they recommended in the plans to secure the side rails. The bed is not very stable and squeaks. We keep talking about altering it somewhat, but it's so dang heavy that we have been putting it off. One other thing that I wish we had done would have been to sand off the corners of the end of the footboard. We've gotten a few bruises from walking into the ends. It cost more than we expected and it took longer. But overall, we love it and are very happy with it. Just wish we had known now to do some things differently.
smithknk
Thu, 05/28/2015 - 13:22
using existing rails?
Would using an existing mattress frame work for this and just attach the headboard and footer to the frame? Love the headboard and all the hints people have given to make it easier!
elslap1
Sat, 03/05/2016 - 08:17
using existing rails
I ended up doing this. I planned to build the bed as depicted but I already had a king frame that we had been using. I ended up drilling holes in the metal frame and screwing from the metal frame to the 4x4's attached to the side pieces (1x12's). I used 1.5" screws as the width of a 2x4 is roughly 1.5". It is important to factor in the width of the bed frame, as it may be different than the official plans, so you may need to make the headboard and footboard slightly narrower to attach to the side rails in the original fashion. I hope this helps, please let me know if anybody needs specific advice on how I modified the measurements or adapted the different widths and I will be happy to help.
-Elliot
Trauberman
Sun, 08/23/2015 - 16:39
Master Bedroom - Frame
Potential Idea
dmozer74
Wed, 12/16/2015 - 13:13
Build Price
Can you give some guidance on how you had such low costs on this project? I can't seem to get the costs below ~$250 for the wood alone, plus stain.
Hollymomof4
Fri, 02/26/2016 - 19:31
Assistance Needed
I love this bed and am going to make it! Instead of a foot board I need to build some steps up so that our elderly little pup can make it up onto the bed. I want to make them the full width of the bed but am not sure how to plan this out, can someone suggest an easy way to do this?