
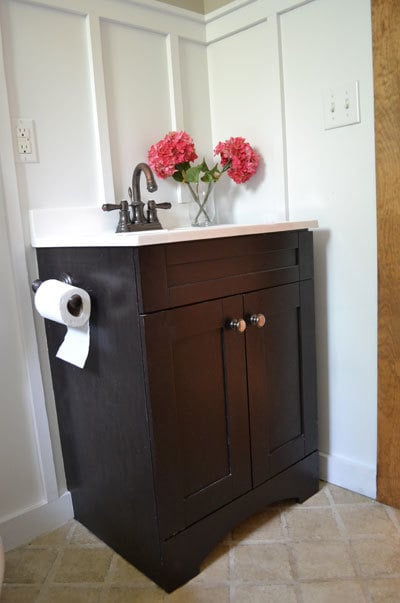

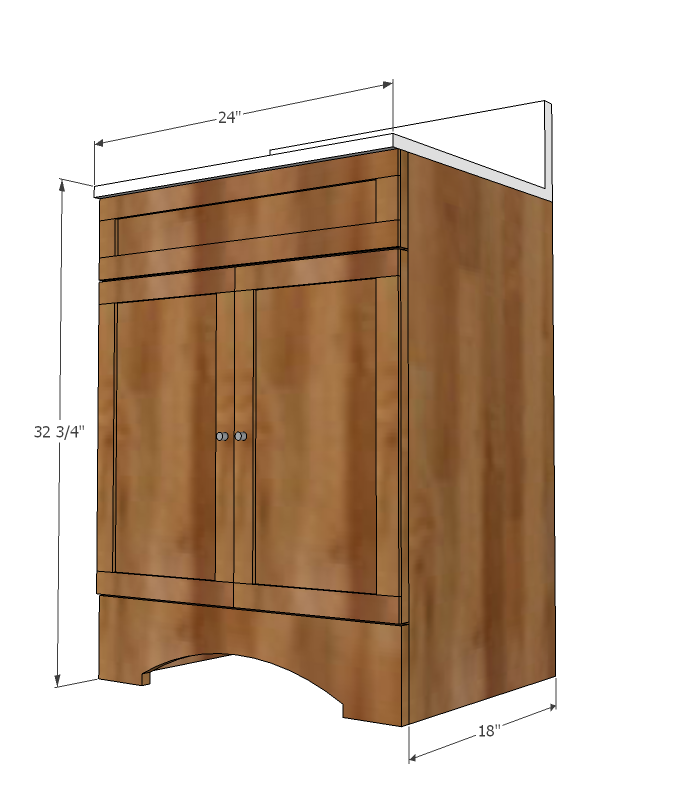
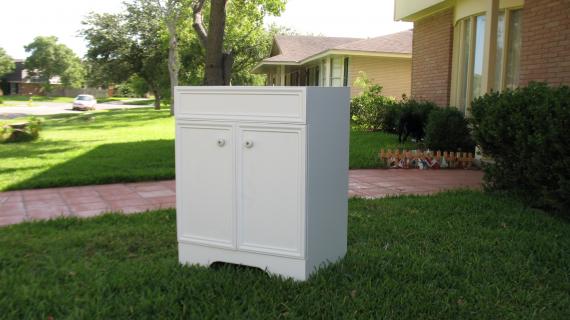
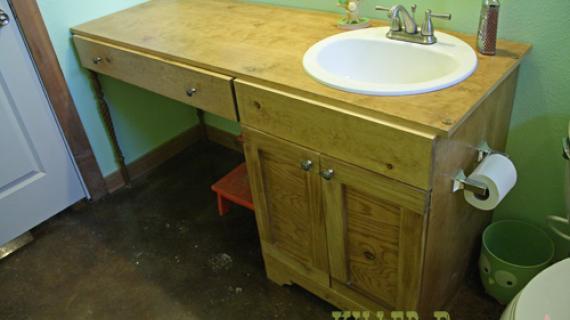
Build a small bath vanity with storage. These simple, step by step woodworking plans are designed for the beginner and can be built from a single sheet of plywood.
I'd be the first to tell you that I'm not alot of things. I'm not perfect. I'm not tough. And I'm not wasteful.
Preparation
- 1 Sheet of 3/4" Plywood
- 1 - 1x3 @ 8 feet long
- 1 - 1x6 @ 4 feet long (optional)
- 1 - 1x2 - 1/4" thick stock @ 8 feet long (optional decorative door trim)
- 1 - 25 foot long roll edge banding for stained finishes
- 3/4" finish nails or brad nails if you are applying decorative trim
- Either pocket hole screws or countersunk screws/finish nails
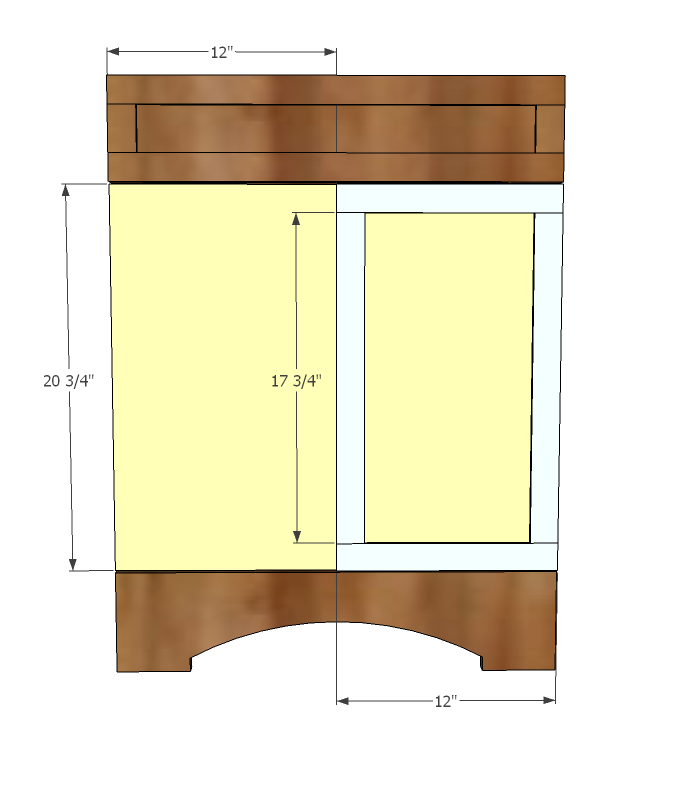
- 1 - 3/4" Plywood @ 22 1/2" x 18"
- 2 - 3/4" Plywood @ 32" x 18"
- 2 - 3/4" Plywood @ 30 3/4" x 12"
- 2 - 1x6 OR 3/4" Plywood @ 24"
- 4 - 1x3 @ 24"
- Cut trim pieces to fit door faces


Please read through the entire plan and all comments before beginning this project. It is also advisable to review the Getting Started Section. Take all necessary precautions to build safely and smartly. Work on a clean level surface, free of imperfections or debris. Always use straight boards. Check for square after each step. Always predrill holes before attaching with screws. Use glue with finish nails for a stronger hold. Wipe excess glue off bare wood for stained projects, as dried glue will not take stain. Be safe, have fun, and ask for help if you need it. Good luck!
Instructions
Step 1
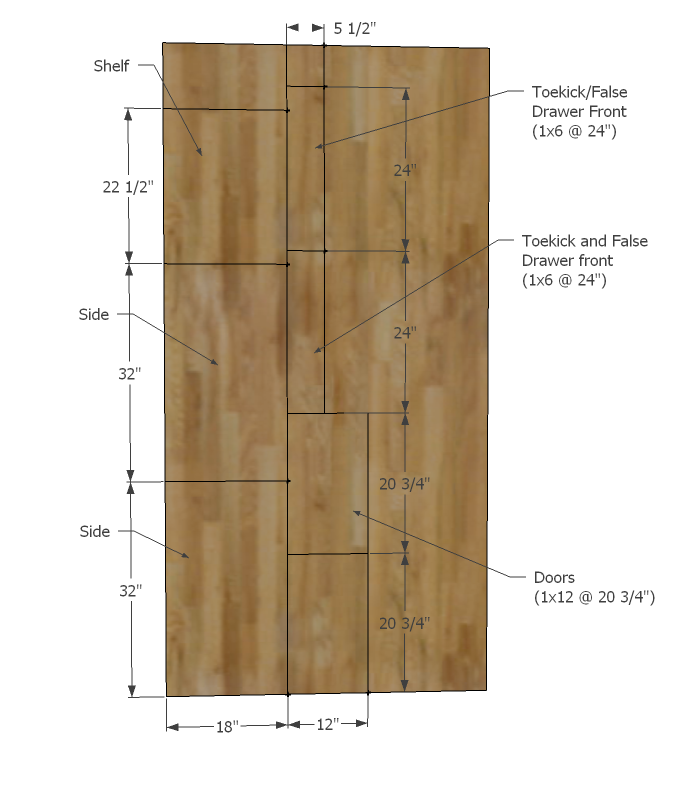
Cut plywood as shown above, with the grain, cutting long cuts first. So you would cut an 18" wide strip off of your plywood, and then from that 18" strip, cut the sides and shelf. You can ask the lumber store to make the cuts for you, and your plywood will be easier to transport and store.
Step 2
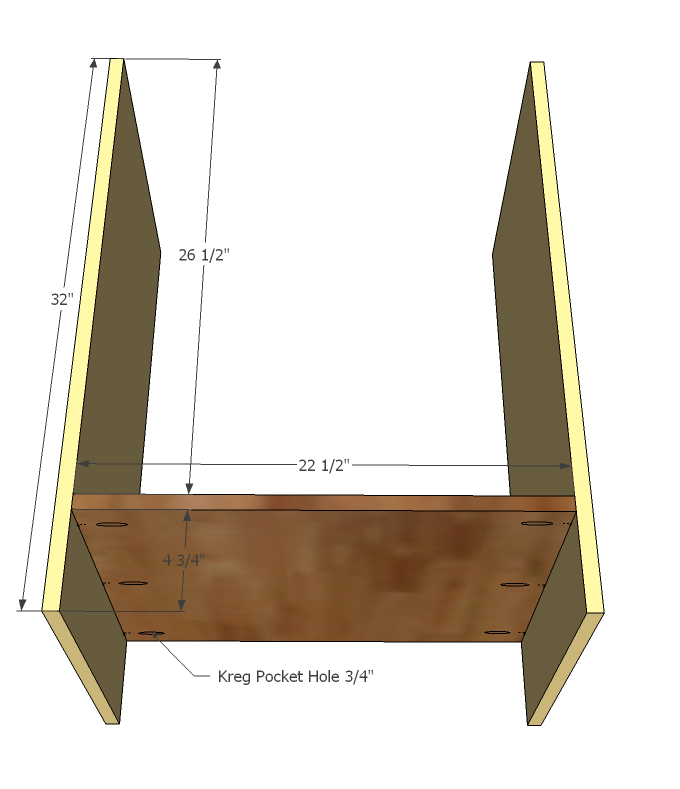
Place the bottom shelf as shown above between the sides, either using the Kreg Jig or countersunk screws or 2" finish nails and wood glue.
Step 3
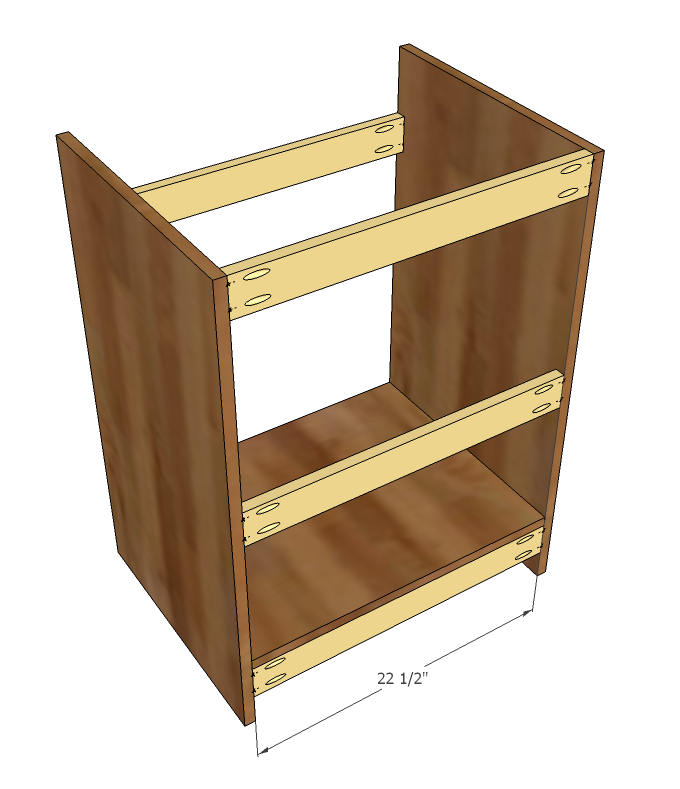
Attach the 1x3s as shown above. The front 1x3 needs to be placed with a 4" space above it. The back 1x3s need to be placed at the top, bottom of the bottom shelf, and centered.
Step 4
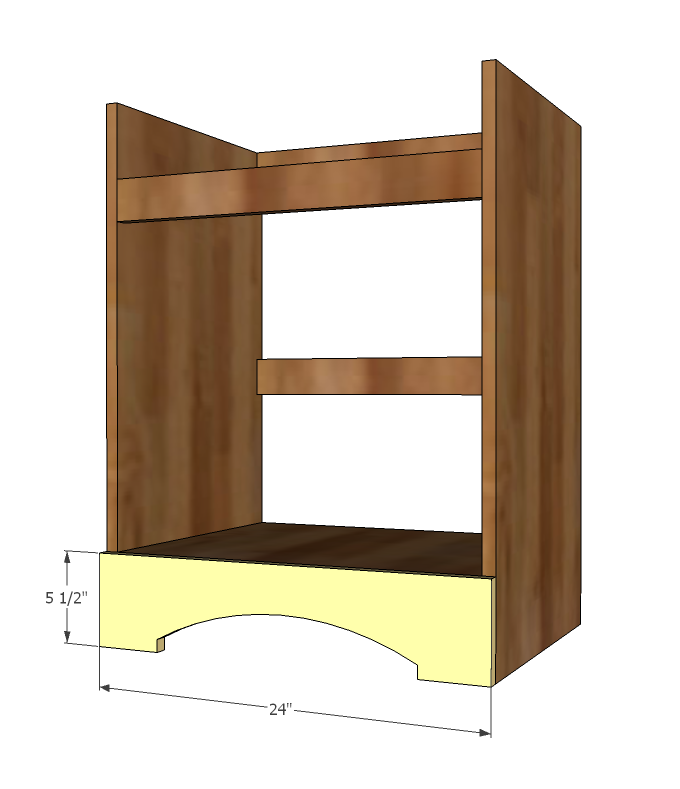
Now the toekick. Cut out and attach with 2" finish nails and wood glue.
Step 5

Step 6
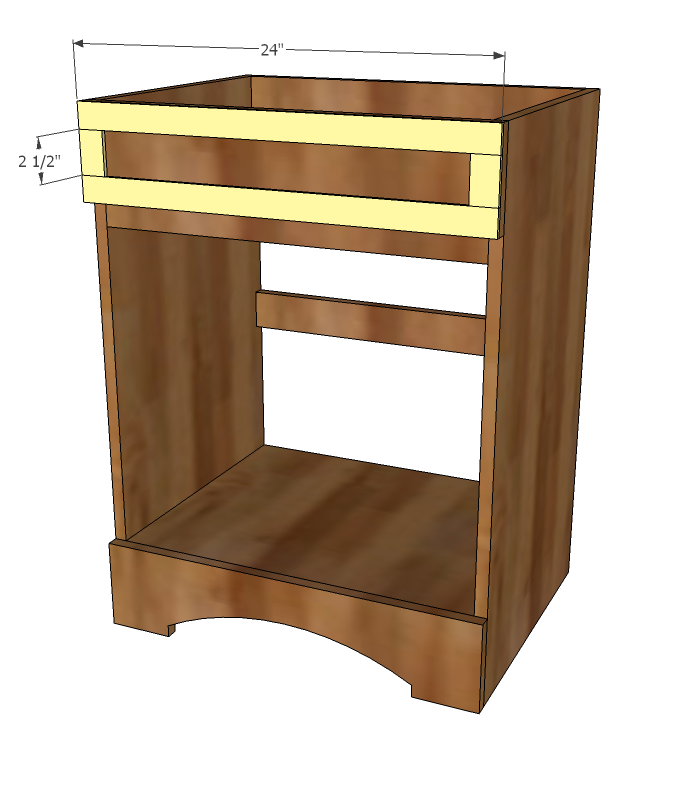
For the front apron, you can glue and attach the 1/4" trim pieces as shown above.
Step 7
And the doors. You can attach trim pieces as well. The best hinges I've found for doors like these (full overlay) are these ones from the Home Depot:

It is always recommended to apply a test coat on a hidden area or scrap piece to ensure color evenness and adhesion. Use primer or wood conditioner as needed.

Comments
birdsandsoap
Fri, 07/08/2011 - 11:15
You never fail to amaze me.
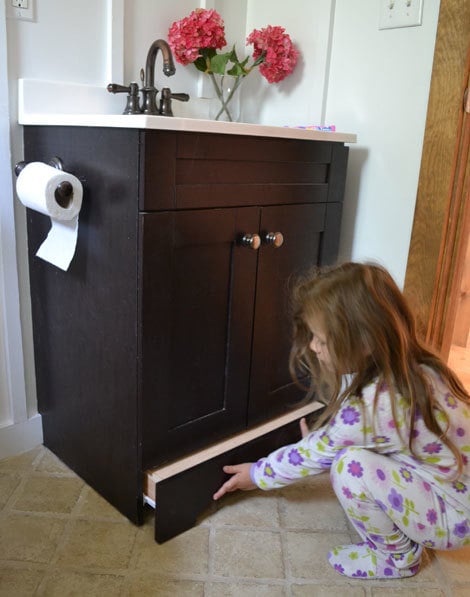
I love the drawer under the vanity, in fact I almost purchased one at Lowes when we redid our bathroom- All that storage gone to waste! But I think I like the step idea for my little ones even more...Anyway, I read the toe-kick step plan the other day and thought "Gee, I bet Ana will come up with a vanity plan soon." And here you go, days later, taking it up to eleven! I think if I had to make a vanity, I would slap that puppy with some beadboard and call it "Cottage Chic!
Carrie Howell (not verified)
Fri, 07/08/2011 - 11:16
great!
I love that you did this! I am totally making one!
emmarosemc
Fri, 07/08/2011 - 11:40
Perfect timing ana! this one
Perfect timing ana! this one definitely goes on the list.
Guest (not verified)
Fri, 07/08/2011 - 14:00
Love this! Thank you so
Love this! Thank you so much. Do you think I would need any additional stability if I add 10 inches to make it 36 inches wide?
Stacy (not verified)
Sat, 07/09/2011 - 20:50
I am an absolute novice at
I am an absolute novice at building, but want to change that status. How would I go about adding drawers to the left side?
Guest (not verified)
Mon, 07/18/2011 - 14:14
Thanks
This is great, I am working on it right now. It looks like there is a typo in the cut list section, it says the cuts for the doors are 30 3/4" instead of 20 3/4.
Thanks so much for the plans, I just love your site.
Rachel
Guest (not verified)
Fri, 08/12/2011 - 16:41
Hidden drawer link?
I love the idea of having a pull out step drawer at the bottom! I tried clicking the link and it doesn't seem to be linked properly. I tried searching for it and couldn't find anything that resembled instructions for making that portion of the vanity. I love these designs! Thank you!
Guest (not verified)
Mon, 09/12/2011 - 09:27
Pull Out Step
I also am having issues with the link to the step drawer at the bottom. I assume you would do it just like a regular drawer but how do you reinforce it to hold the weight?
In reply to Pull Out Step by Guest (not verified)
birdsandsoap
Wed, 09/21/2011 - 02:29
weight bearing
I think I remember some discussion of casters underneath the step over on the toe kick drawer plan. You can buy those little wheels anywhere and they can take the load.
BeeNuss (not verified)
Fri, 03/23/2012 - 07:57
Step Drawer Link
The step drawer link is now working if you ladies would like to check it out. It worked for me anyway... :)
linj2fly (not verified)
Fri, 04/20/2012 - 04:16
modification...
Any reason why I couldn't make this a 30" vanity? Would you suggest any additional support pieces?
Stefanie Lynn (not verified)
Fri, 06/29/2012 - 14:00
Feet?
Hi Ana, Love your site, thanks so much for posting this! I love the idea of building my own vanity but I'm curious can I alter the plans to make the sides only 26.5" and attach feet to the bottom of the cabinet rather than the toe-kick look you used? I don't see why 4 feet couldn't support the weight of the cabinet just as well as the extended sides, but though I would ask the question anyway. Looking forward to your response, thanks!
Cheers -
SLC
Robin11249
Fri, 07/20/2012 - 02:30
Wider?
Hi Ana! I LOVE your site, I have been on here for hours already and will definitely start with some of your starter projects, but this one caught my attention because I am planning on replacing the floors in my bathrooms and I would really love to do this too. But I was wondering if you know if I would have to add any additional parts if I need to make it 31" wide? Thanks for any help!
FrankL (not verified)
Thu, 08/09/2012 - 13:47
Full overlay hinges
This turned out to be a great project. But I ran into a bit of a snag...I have the full overlay hinges pictured above, but the corner of the door swings out 1/4" past the vanity side and is hitting the wall. So the door will not open or close completely. Does anyone have a remedy to this problem?
Thanks!
FrankL (not verified)
Thu, 08/09/2012 - 13:49
Full overlay hinges
This turned out to be a great project. But I ran into a bit of a snag...I have the full overlay hinges pictured above, but the corner of the door swings out 1/4" past the vanity side and is hitting the wall. So the door will not open or close completely. Does anyone have a remedy to this problem?
Thanks!
frankl (not verified)
Thu, 08/09/2012 - 13:53
Full overlay hinges
This turned out to be a great project. But I ran into a bit of a snag...I have the full overlay hinges pictured above, but the corner of the door swings out 1/4" past the vanity side and is hitting the wall. So the door will not open or close completely. Does anyone have a remedy to this problem?
Thanks!
amellon
Sun, 12/14/2014 - 04:40
Hitting the wall
Did you get an answer to this problem? I want to make this vanity and I'm wondering if I need to leave a gap next to the wall.
jgriffin
Fri, 02/07/2014 - 10:07
makeup vanity
I just love the step drawer at the bottom of this vanity! I wish Ana would come up with plans for a makeup vanity for the bedroom! I have searched the internet everywhere and nothing : (
trefoil
Thu, 12/31/2015 - 13:06
stepstool support
Hi, if the slideout step sits on the kickplate for support, how does it clear the floor for sliding out?
Or, if it clears the floor to slide out, how does it lower to rest on the floor without bending the drawer slides?
Thanks!
nubiti
Tue, 01/16/2018 - 11:05
Kreg Jig
Hi Ana, I have visited your site many times and I am truly envious of what you do, and thank you for sharing your projects. I guess I consider myself fairly crafty, but have never attempted carpentry. I wish there was a beginners course around where I live but nothing available. I guess the best thing to do is to jump right in and do it! I am now living on my own and would like to make some updates to my home, one being a bathroom makeover especially the vanity. This project looks fairly doable to me, and so I would like to invest in a Kreg jig for pocket holes, and so I am not certain as to which one I should purchase. When I go to the Kreg site it becomes so overwhelming with the many model choices to pick from. Could you help me narrow down the process please??? Thank you!
In reply to Kreg Jig by nubiti
Ana White
Thu, 01/18/2018 - 12:00
https://www.amazon.com/Kreg
https://www.amazon.com/Kreg-K4MS-Jig-Master-System/dp/B0044BBOQK/ref=sr…
spaglia
Mon, 02/08/2021 - 07:21
Cut List
I noticed the cut list states to cut the 1x3 at 24" but it should actually be 22-1/2"