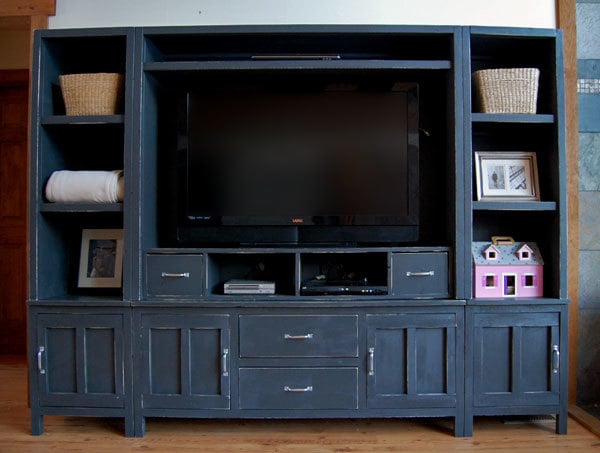
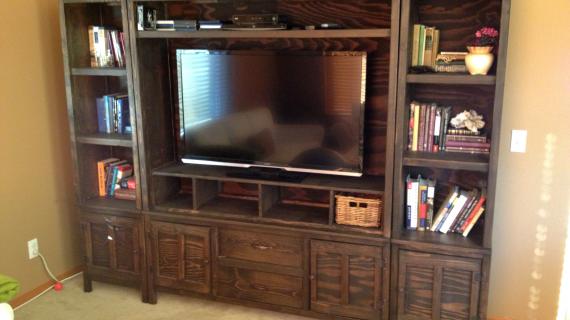
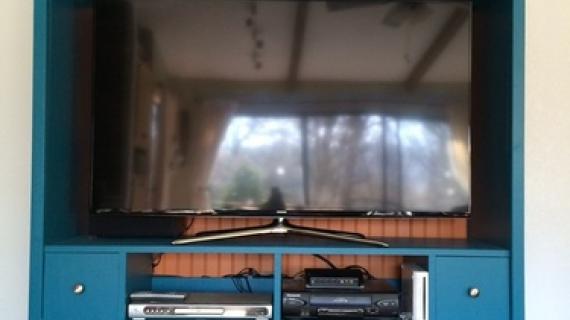
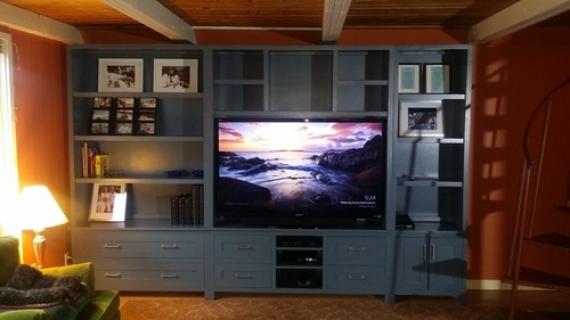
A beautiful media hutch to match the Cabin Collection. Features two large open shelves for controllers, two drawers for remotes, and a large shelf to customize the fit of the tv and store additional controllers, games, or books.
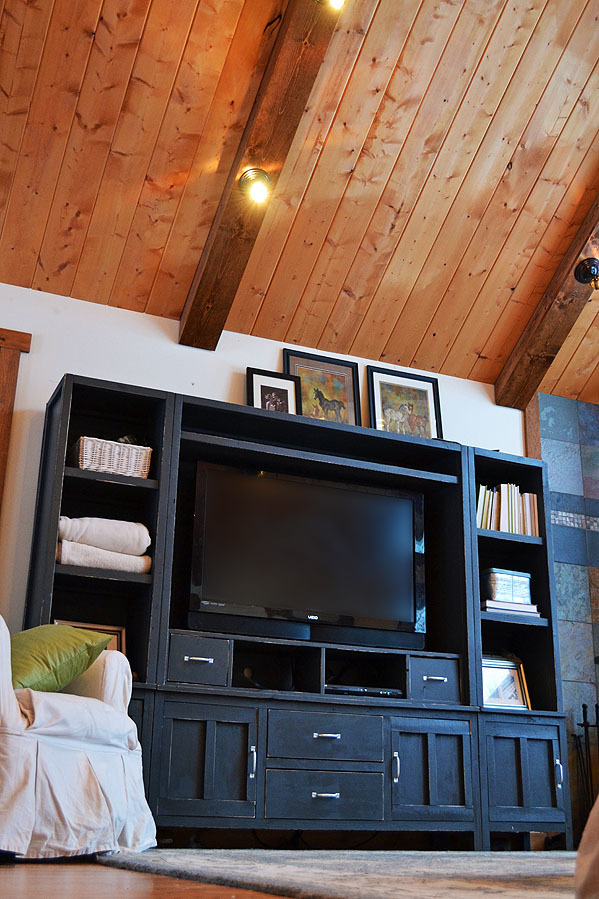
You don't hear me talk a whole lot about finishing because it's not the exact science of screw board A to board B of construction. Probably what you hear more than anything is comments that go something like this . . . . "building was the easy part, finishing . . . that was the real work!"
The problem with finishing is that there really isn't a "wrong" way to finish something. If you have achieved the look that you are after, than you have succeeded. (Of course, you should read instructions on your paint cans to make sure that finish is durable and safe.)
For those of you looking to achieve that edge rubbled finish, most recently seen on my Cabin Entertainment Center, I thought I would put together a few tips for you. These are just tips, and you should always build to suit your needs first and foremost.
The clear top coat also brings out the color, but in my opinion, the slight distressing warms the entire look up. So here is exactly what we did:
- Sand the entire piece in the direction of the wood grain with 120 grit sandpaper. Make sure you clean off any sanding residue with a vacuum and a damp cloth.
- Spray on one coat of flat paint with primer in it. A roller would also work (try those cabinet ones with the sponge rollers) but avoid brushing because a brush will put a heavier coat of paint on, completely covering the wood grain. I also avoid separate primer because then you got this white coat under the colored coat.
- Let the coat of primer dry completely. If you start distressing too soon, chunks of paint will come off.
- When dry, with a piece of 120 grit sandpaper, lightly rub exposed edges that would receive natural wear. Concentrate on corners, outside corners, tops, and around handles - areas likely to wear naturally. Resist the temptation to use a power sander. It's too easy to remove to over distress.
- Avoid over distressing - just a touch here and there is all you need.
- Vacuum off all sanding residue and wipe clean again with a damp cloth.
- If you painted a light color, you may wish to glaze the exposed wood with a glaze. You can buy glaze in the faux finishing aisle, but I like to use Minwax Express Color. Note that the stain may also add color to the painted areas. If you wish to keep your paint color from accepting the stain, you will need to apply a clear coat BEFORE you distress edges, glaze, and then apply your final clear coat. I like to work my glaze in with a rag by hand, but others use brushes. Rags tend to use less glaze, and glaze can be spendy. Work the glaze into the exposed edges, wiping off and reapplying. Your weather (hot dry climates will dry very fast) will determine just how long the glaze needs to be left on (and what color you are trying to achieve) so be patient and do lots of testing.
- For inside corners, you can apply glaze and wipe clean. Glaze will remain in cracks and tight corners, creating adding dimension on your finish.
- My cabinet was not glazed because I love natural wood and dark gray. We sprayed on a clear coat of water based poly to give the project a dustable and durable finish
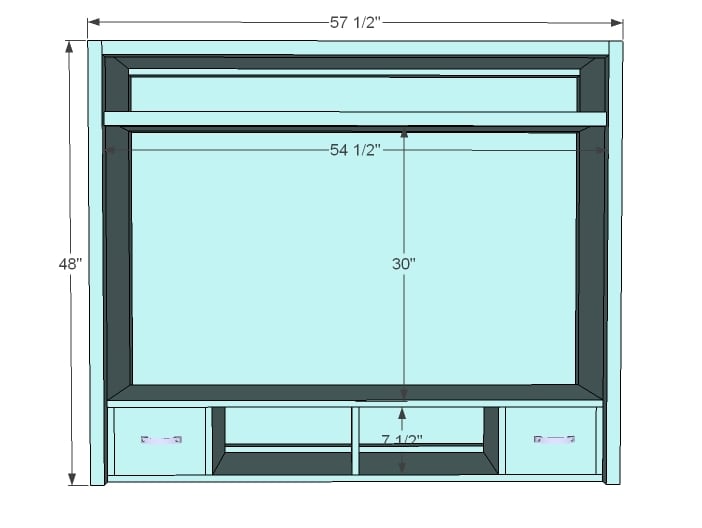
Just like the finish, you should build this around your needs. Measure your TV and make sure it fits.
Preparation
1 – 1×12 @ 8 feet long
2 – 1×12 @ 10 feet long
6 – 2×2 @ 8 feet long 1 – 1×2 @ 8 feet long
1/4″ plywood for back (to do both side hutches and the center, you can use the same piece of plywood)
2 – 1×8 @ 10″ long (scraps for drawer fronts)
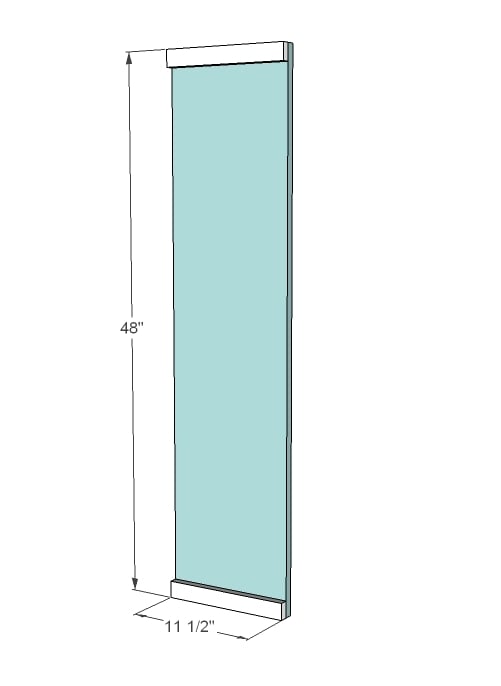
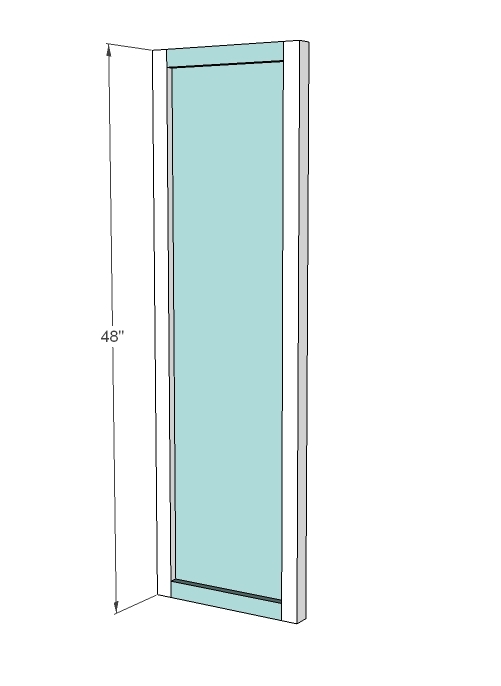
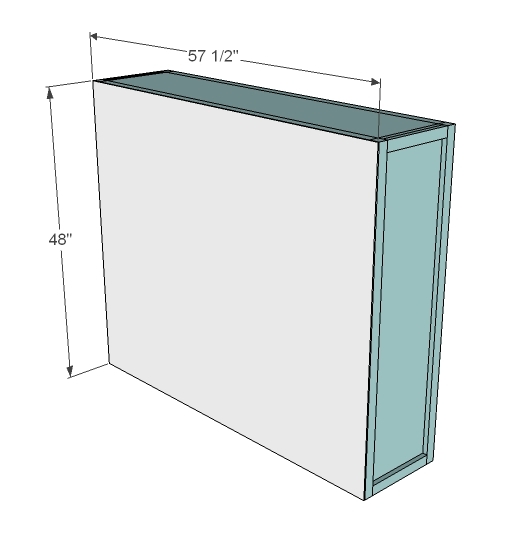
2 – 1×12 @ 48″ (Sides)
4 – 1×2 @ 11 1/2″ (Trim for sides, cut it to match the width of your 1x12s)
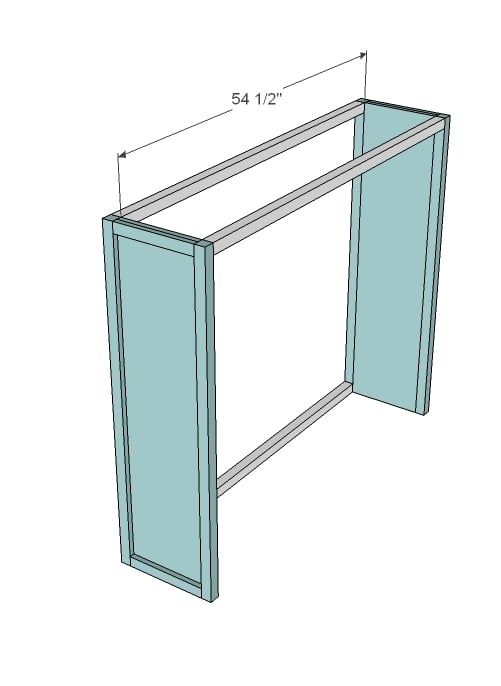
4 – 2×2 @ 48″ (Legs)
4 – 2×2 @ 54 1/2″ (Front/Back Trim)
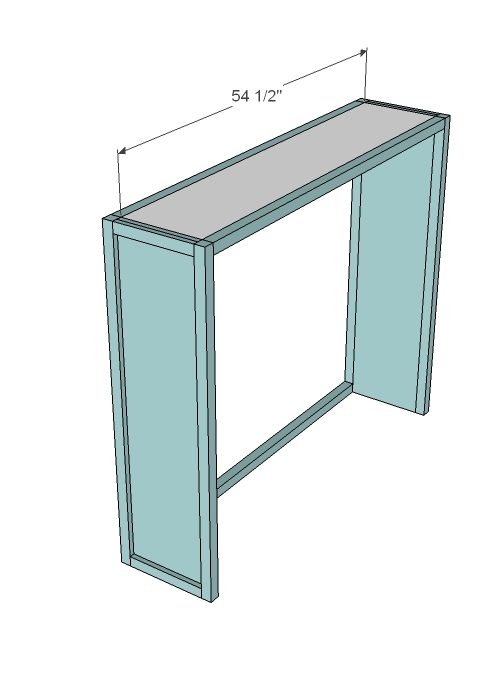
4 – 1×12 @ 54 1/2″ (Shelves/Top)
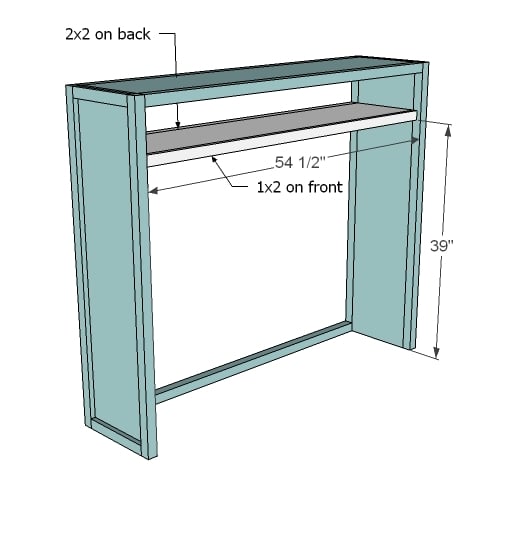
1 – 1×2 @ 54 1/2″ (Shelf Trim)
1 – 1/4″ plywood @ 48″ x 57 1/2″ (Back)
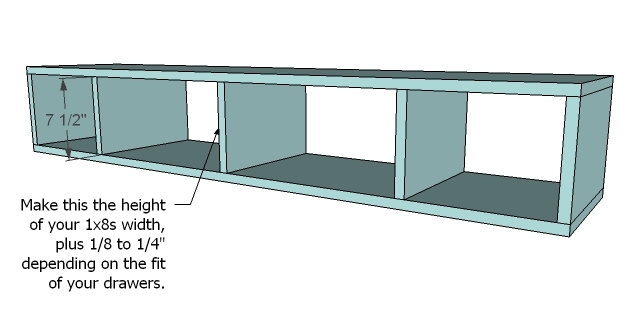
5 – 1×12 @ 7 1/2″ (Assuming your 1×8 drawer fronts are 7 1/4″ wide – adjust to fit your 1x8s)
2 – 1×8 @ 10″ (for 10 1/4″ wide drawers)
Instructions
Step 1
Step 2
Step 3
Step 4
Step 6
Step 7
Build the Controller Shelf
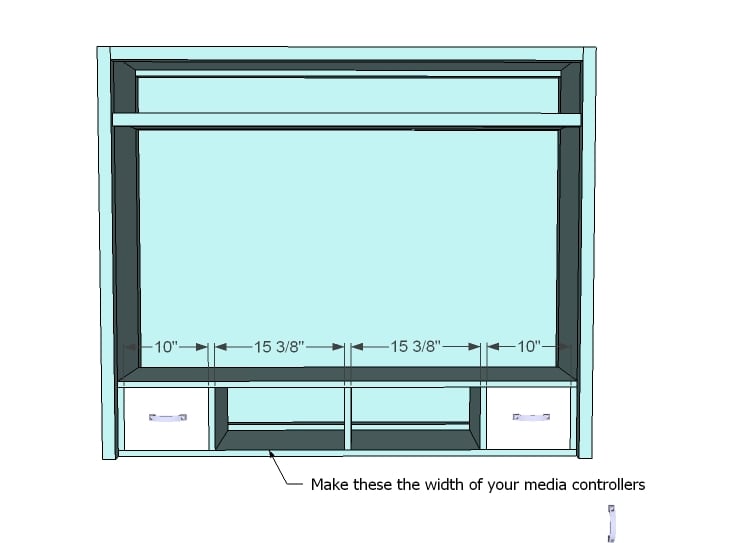
The controller shelf not only adds dimension to the look of the piece, not to mention increased useability, but it also strengthens up the base unit. Measure your 1x8s drawer fronts (you should have some leftover from the media base unit) and cut your 1×12 dividers to 1/8″ (tight fit) to 1/4″ (loose fit) longer than the width of the 1x8s. Also, measure the width of your controllers (as shown below) and make your two center cubbies a width fit for your controllers.
Step 8
Adding the Controller Shelf
We screwed the controller shelf directly to the bottom of the hutch. There is a 1 1/2″ gap behind the controller shelf for wires. The drawer fronts are simply 1x8s on hinges – perfect spot to hide remotes and to place charging cords.



Comments
Erin Dietrich (not verified)
Wed, 02/02/2011 - 10:16
Thanks for the insights on
Thanks for the insights on finishing - its comforting to know that no matter what I do, it won't be wrong (as long as I read the can directions!) I'm nervous to do my first distressed look finish - but excited at the same time!
tedk72
Fri, 10/11/2013 - 07:30
bottom center hutch
Hi do you have any idea where i can find the plans for the center bottom piece of media hutch, the piece with the two drawers ?
Jen (not verified)
Wed, 02/02/2011 - 11:43
Thanks for sharing, Ana! I
Thanks for sharing, Ana! I love the color and finish on this piece, it reminds me a worn blue jeans. :)
Wendy (not verified)
Wed, 02/02/2011 - 11:50
I LOVE the color of the above
I LOVE the color of the above piece... would you mind sharing what exactly you used - Brand/Color? My husband and I are building the Brady Entryway pieces this week :) Thank you!
Ladd (not verified)
Wed, 02/02/2011 - 12:29
Ana: When you say you
Ana:
When you say you sprayed on a finish, are you talking about spraying from a can or from some setup using your compressor? If from the compressor, please talk about your setup.
Thanks!
mamma_joy (not verified)
Wed, 02/02/2011 - 14:17
She listed some of those
She listed some of those details on a previous post:
"2 Cans of Flat Enamel by Valspar in Mark Twain Gray Brick"
and
"For this project, we pulled the sprayer out (a first for me on furniture projects) and I found the sprayer gives a more even finish, but does not necessarily cover imperfections in the wood as a brush might. Our sprayer was purchased to paint the exterior of our home, but it worked great for this application as well. We also sprayed a top coat on to give the piece a dust-able finish. "
Kathy (not verified)
Wed, 02/02/2011 - 14:53
The color was in yesterday's
The color was in yesterday's post: Valspar in Mark Twain Gray Brick :)
Kathy (not verified)
Wed, 02/02/2011 - 14:54
Can you or anyone recommend a
Can you or anyone recommend a sprayer? TIA
Lisa (not verified)
Mon, 02/07/2011 - 11:32
see now finishing for me is
see now finishing for me is the easy and fun part! Maybe it's because I usually remodel/refinish stuff rather than build from scratch. Your website is pushing me towards the building side, which I might tackle this summer.
I guess if I had a couple tips - always stay with matte finishes until the last step. If you build with poplar or furniture grade pine, then you paint with a matte color, distress or rub what you like, THEN you can stain (with an normal stain - not a stain/poly combo) and it shouldn't change the surface texture of the piece. If you need to touch up with some matte paint, it should be ok. Milk paint is a little absorbed into softwood (pine, poplar) so you can get a bit of shading in your colors although the color spectrum is quite limited.
Then after you're done, follow with the poly sheen of your choice: matin/satin/gloss. But I find color/stain finishing with matte to be the most predictable.
Rebekka (not verified)
Wed, 04/20/2011 - 11:39
Paint/Primer
I hope this isn't a stupid question...you mixed the primer in with the paint? Does it not change the color or was the primer colored?
Rebekka (not verified)
Wed, 04/20/2011 - 11:59
Paint
Also, am I imagining it or does the hutch have a bluish tint? I love it but when I look the paint color up it's all gray
Cara (not verified)
Mon, 06/06/2011 - 07:06
TV
TV
Guest (not verified)
Tue, 12/27/2011 - 20:43
The bottom units
LOVE IT and more importantly so does my wife. I printed both plans, the enter and side shelves, and looked for the plans for the bottom pieces. I may have passed them due to that after searching the internet for hours and just got tired. But... would you be able to point me in the direction of where I could find the DIY instruction to build the bottom pieces too? Depending on how I do with building those I was wanting to complete this as my first DIY building project.
In reply to The bottom units by Guest (not verified)
spiceylg
Wed, 12/28/2011 - 01:55
media console
http://ana-white.com/2011/01/media-console
spiceylg
Wed, 12/28/2011 - 01:57
bottom side pieces
These are for the sides but also can be used as nightstands. Best wishes on your build!
http://ana-white.com/2011/01/cabin-collection-nightstands.html
Zoo house mom (not verified)
Wed, 03/14/2012 - 16:12
sinks
Hi. My first time writing on a blog! yikes. Wondering about finding good deal on sinks. Looking for a double sink for bathroom with two faucets and one rectangular sink or a big rectangular sink and one faucet. really love this blog!! Have possible dresser for vanity but three small boys and a small bath.
mrsg08
Thu, 03/22/2012 - 13:03
Paint Color
Hi Ana,
My husband and I are getting ready to tackle this entire project. We currently have a deep sage color sofa and eventually would like to upgrade to a chocolate leather sofa. Can you offer a paint suggestion for us to paint the Entertainment Center once we're done building it?
Thanks!
aklab
Thu, 04/24/2014 - 07:18
PDF plans
Help! I want to build this but the PDF link is broken (here and on the media console page). Any plans to replace the plans there?
aklab
Thu, 04/24/2014 - 07:18
PDF plans
Help! I want to build this but the PDF link is broken (here and on the media console page). Any plans to replace the plans there?
aklab
Thu, 04/24/2014 - 07:19
PDF plans
Help! I want to build this but the PDF link is broken (here and on the media console page). Any plans to replace the plans there?
Spadeddmommy
Thu, 02/05/2015 - 22:51
Modifying the plans?
Do you think I could modify the plan to accomidate a 60" tv? And not sacrifice stability of the bottom counsel ?
jenbeck
Mon, 06/17/2019 - 08:25
I'm new to this site. I love…
I'm new to this site. I love it! But I'm curious why I can't always find the project cost? When I searched it came up, but when I got myself an account, I never can find it? Thanks!