

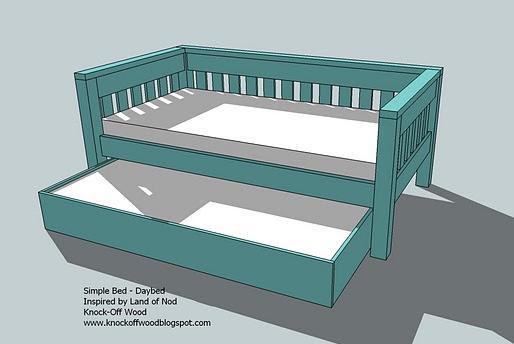
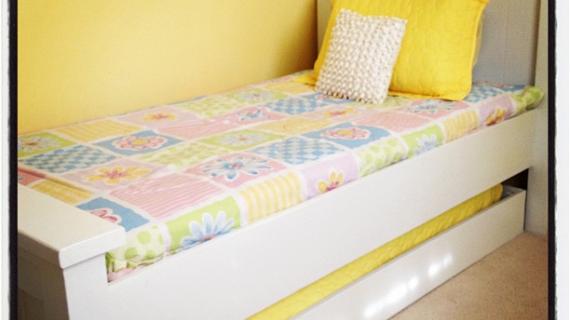
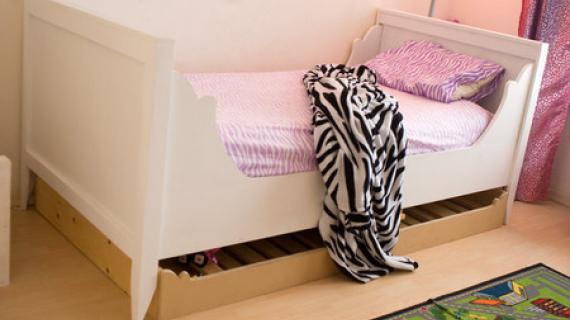
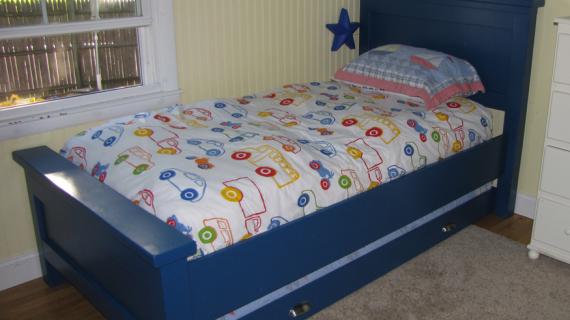
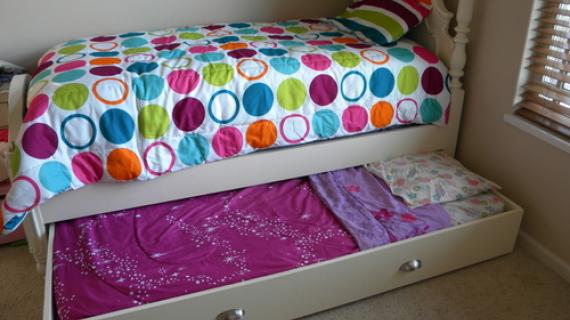
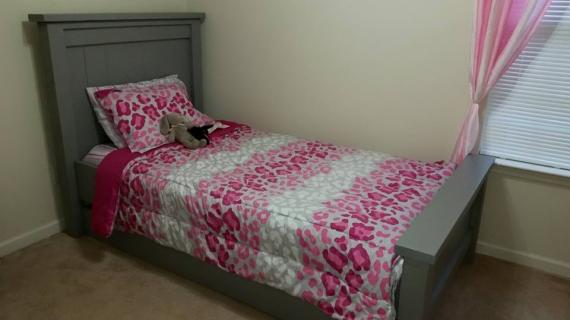
A trundle can add so much extra storage or even an additional sleeping space to a room. This trundle features a clever design that creates a solid bottom on the trundle.
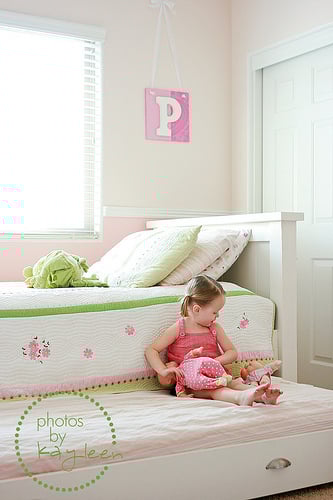
Special thanks to Kayleen for her amazing photos.
Preparation
1 sheet of 3/4″ Plywood or MDF
3 – 1x8s or 1x10s (depending on the height of your trundle)
2″ screws
wood glue
wood putty
sand paper
finishing supplies
6 Caster wheels, overall height at least 2 1/2″
Screws to attach caster wheels
Please reference the instructional steps for cut list as this trundle is designed to custom fit to your bed.


The most important factor in building a trundle is ensuring it will fit under the bed. With this in mind, I am going to encourage you to build your trundle to the specifications of your bed. If you would like to use the trundle with a standard twin mattress, the overall clearnance length of your bed (the length between the legs on the sides) must be at least 77″. If you are building a bed, make note of this and build your bed so the side rails are 77″ long.
Instructions
Step 1
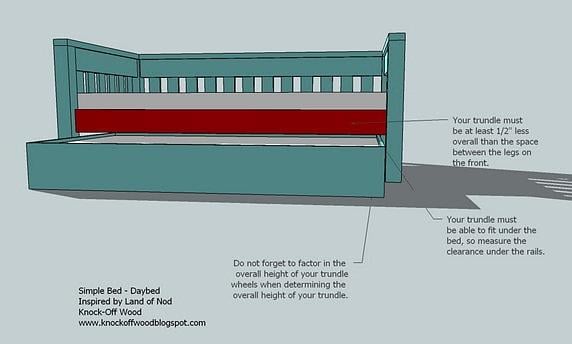
You must also understand the overall height of the trundle. Make sure your trundle will fit under the bed. The trundle I designed uses 1x8s, and you will need at least 8″ of clearnance under the bed. If you have more clearance, you can use a 1×10.
Measurents you will need:
A) Overall height or clearance under the bed
B) Overall distance between the legs of the bed (or the length of the siderails)
C) Width of the bed. Overall width of the bed is approximately 39″ for a twin.
Subtract 2″ from the overall height (A). This is approximately the greatest height you could make your trundle at. Of course you could make the trundle shorter.
Subtract 1/2″ from the overall measurement (B). This is the greatest possible length of the trundle. Of course, you can make the trundle smaller.
Remember, a standard trundle mattress measures 75″ x 39″. I recommend staying close to these dimensions in order to use a standard twin mattress, standard twin sheets, etc. I will note, however, that I did make the top of my playhouse bed loft 72″ x 36″ and a mattress fit fine up there.
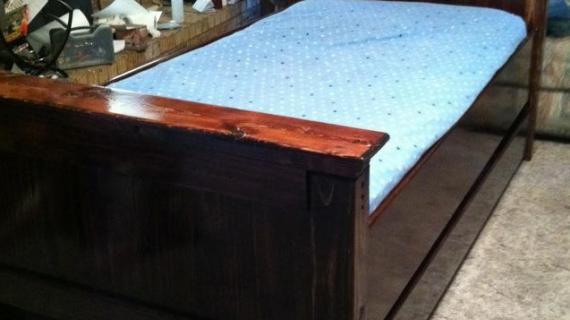
Step 2

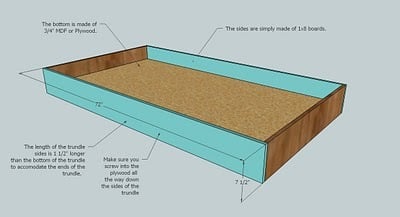
Cut your plywood equal to the distance figured for C as the width of the plywood. Cut the length of your plywood the distance of A – 1 1/2″. In this example, B = 72, so the plan shows the trundle to be cut at 70 1/2″. C = 38 1/2″, and the plywood is cut at 38 1/2″. (Also note that these are the correct dimensions for a storage trundle for the Simple Daybed.)
Attach the ends, as shown above. This example shows the use of 1x8s. For a deeper trundle, you can use 1x10s (if your bed has at least 10″ of clearance). Leave a 2″ clearance under the plywood when attaching the trundle sides, this is shown above. Use the 2″ screws to predrill through the trundle sides and screw into the bottom. If you are using MDF, make sure you predrill the entire depth of the screw and use drywall screws NOT wood screws. Avoid screwing within 1″ of the end edges of the MDF.
Step 3
Attach the Trundle Sides. Attach the trundle sides in the same manner as step 1. However, make sure you also screw into the end edges of the trundle side ends.
Step 4
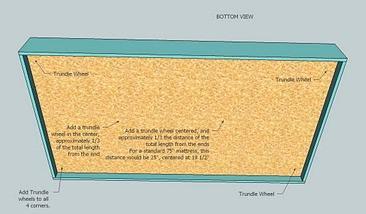
Caster Wheels. Worried about the middle of your trundle sagging? Don’t be. This trundle is not going to sag. Add trundle wheels to each of the four corners and two wheels in the center of the trundle, as shown above. The center trundle wheels will act as a support and prevent the center of the trundle from sagging.

Comments
Marcella (not verified)
Tue, 01/12/2010 - 09:31
thank you so much for this
thank you so much for this ana! i think this would be better for my 3 and 2 year olds instead of bunk beds. something tells me one of them would break their leg trying to fly or something!
Anonymous (not verified)
Tue, 01/12/2010 - 12:39
Yippee!!Thanks for listening,
Yippee!!
Thanks for listening, Ana! It's one of the next things on the list.... I am now thinking of maybe converting this plan to TODDLER size so that I can use a crib mattress! SO EXCITED!!
THANK YOU!! YOU ARE AWESOME!!!
K in CA
Zimms Zoo (not verified)
Wed, 01/13/2010 - 11:15
We have 6 kids with 4 girls
We have 6 kids with 4 girls in one room. I was looking for something that would make their room feel more open and girly. This is it!
I can't wait to try this. I found you via Ucreate.
Well Seasoned (not verified)
Fri, 01/15/2010 - 06:30
I've been scouring craigslist
I've been scouring craigslist for a bed I can afford, but you are a genius and saved the day.I can't wait to get started!!
Julie (not verified)
Sun, 01/17/2010 - 14:03
I love this. We are moving
I love this. We are moving our daughter into a twin bed pretty soon and I was dreading shopping for a decent bed frame. Now we might just have to try one of your plans and this trundle would be perfect storage for now and as a bed in the future.
Bekah (not verified)
Sun, 01/17/2010 - 15:47
This is exactly what I was
This is exactly what I was looking for. We have a twin bed with plenty of room for a trundle. I can't wait to make this and surprise my husband! He will be so proud of me!
Williams Five (not verified)
Tue, 01/19/2010 - 08:32
Ana, Do I have to make the
Ana, Do I have to make the daybed to use the trundle or could I just make the simple bed?
Thanks you are amazing!!! I am so excited I found your blog.
Thanks,
Ana Williams
Ana White (not verified)
Tue, 01/19/2010 - 08:39
Hi Ana, the trundle can be
Hi Ana, the trundle can be used with any bed. Just make sure you build the trundle to fit under your bed by measuring the length of the bed and the clearance under the bed, as shown the plan.
Melissa (not verified)
Wed, 01/27/2010 - 09:44
We are going to get the wood
We are going to get the wood for the day bed and trundle today!!! I will definitely let you know how it all turns out! Thank you for such a fun website!
Rae (not verified)
Mon, 02/22/2010 - 07:05
Question - is the trundle
Question - is the trundle only supported by the side walls? Is there a weight capacity? It just seems like you would get bending wood in the middle if you have a larger person on it.
bequi (not verified)
Thu, 03/11/2010 - 10:57
Rae, the last step says to
Rae, the last step says to add caster wheels in the middle to keep it from sagging. ;)
Rolenthegreat (not verified)
Sun, 03/21/2010 - 10:27
This is the perfect solution
This is the perfect solution for me. I am headed home to measure the length of my mattress. Just want to post some encouragement because I LOVE your blog.
jadedone2many (not verified)
Mon, 06/28/2010 - 07:30
I just found your website
I just found your website last week and I am SOOO thrilled to try out some of your projects! You are such an inspiration!
The trundle bed in particular is going to be very exciting for me to try out, as I have been wanting to buy one for a LONG time for my daughter's bedroom. Since my mother already bought the bed set (and dresser, armoire, vanity, & night stand!), I will just match this trundle to her existing bed set. And I might even make some shelving for her from your plans! :)
Angie (not verified)
Tue, 08/24/2010 - 06:00
I just found your website
I just found your website yesterday and spent hours searching all the plans. I can honestly say I don't think I'll be buying furniture ever again. I get to buy power tools with the savings right?
I would love it if you could make plans for the West Elm Daybed here http://www.westelm.com/products/overlapping-squares-daybed-p054/?pkey=c… I love the look of it and it would be great in a den for those unexpected guests. I took a look at it and thought it was possible to build but I would have no idea how. Might be a little too intricate but any modern daybed would be a great addition to your plans
Love the site and I cant wait to build something!
cjojo43789 (not verified)
Fri, 09/17/2010 - 17:45
I am really looking forward
I am really looking forward to this and the bed x2 lol this is what I've had in my head this whole time and mine will definatly be for storage!
Rooms You Can … (not verified)
Mon, 11/08/2010 - 19:02
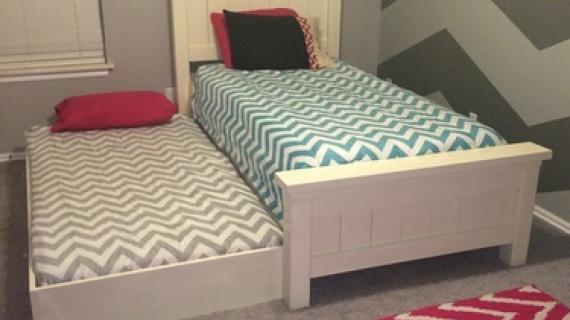
[...] And this bed also
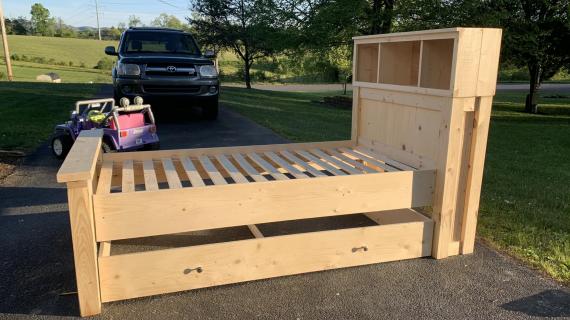
[...] And this bed also boasts a trundle. Would you like to make this room too? Kayleen used plans for the twin Farmhouse bed, but made the headboard and footboard the same heights. Then she added this trundle plan. [...]
April JoAnne (not verified)
Sat, 11/13/2010 - 16:26
This is perfect, I'm
This is perfect, I'm definitely going to plan this all out and hopefully I can afford to make it :)
I'm thinking I may even get an extra piece to make an inset of sorts so I can use the trundle for storage but add a board on top when someone comes to visit so all we have to do is set the extra mattress over it without having to take the stuff out from the drawer!
JG (not verified)
Wed, 12/08/2010 - 22:21
Now is that ever smart,
Now is that ever smart, April!!! storage AND a bed...
Gorgeouse Trun… (not verified)
Mon, 12/27/2010 - 18:26
[...]
[...] http://ana-white.com/2010/01/plans-trundle-bed-or-storage-pottery.html [...]
Imadreamer
Tue, 04/26/2011 - 22:29
Picture Size
Is there someway to enlarge the pictures? I'm finding it difficult to see what is written on them, notes, sizes etc...
alb007 (not verified)
Thu, 10/13/2011 - 09:30
Trundle full size specs?
I've looked at the project plans and wondering if there's a modification for a full size trundle?
I'm looking to do this like Room and Board's example but using a wood base.
http://www.roomandboard.com/rnb/product/detail.do?productGroup=19579&ca…
I think I would need 2 pieces of plywood and possibly use a piano hinge.
Do you have a recommendation?
Thanks!
Guest (not verified)
Sun, 12/11/2011 - 15:20
Adding Storage?
Hi, I love this design! I think I'm going to have to build my own trundle b/c we bought a twin xl mattress and finding a trundle to fit has been impossible! I'm wondering if you could help me figure out how to/where to add enough height underneath the trundle portion for a set of drawers?
thanks!
Guest (not verified)
Thu, 03/01/2012 - 09:41
Bedding
Would you mind sharing where the bedding is from?
wimsy (not verified)
Thu, 06/21/2012 - 06:46
Platform with trundle under it
I have a very small guest room, and I think I'll build this trundle bed in queen size (60 x 80), but instead of storing it under another bed, I want to fit it under a platform floor for a dresser with secretary top (your plans!), a chair, and a reading lamp. Haven't worked out the details yet for making the platform strong enough to walk on, since it must be hollow underneath to allow for the trundle bed. Any suggestions for the platform will be appreciated! Can I just modify the plans for a loft bed and put flooring boards on it? Thanks! wimsy
melissawski (not verified)
Fri, 09/28/2012 - 10:09
thank you! any idea how much the materials cost?
I bought my daughter a red race car bed when she outgrew her crib. She has always loved it but shes 3 now and I think its time for a girly bed and this is perfect! Does anyone have an idea how much all the materials cost? I know its a fraction of what someone would charge to make one. Thanks so much for posting this!
handy woman (not verified)
Mon, 11/12/2012 - 11:18
Trundle Question
Am excited about the trundle design. We have limited height under our bed and are looking at using Melamine board on bottom so the trundle could slide on the carpet instead of using casters. You mention a Kreg jig in the tools list. Did you kreg Jig the screw joints from the inside plywood into the framing. I did not see any specifics of where you used the Kreg Jig.
future handy woman (not verified)
Mon, 11/12/2012 - 11:27
Trundle bed/storage
Thanks. I love the trundle plans. We have limited space under our bunk beds and I am thinking we could decrease the 2” height from the floor by making the bed flush with the floor and using a ¼” melamine board on the bottom of the plywood to help it slide on the carpet, the same idea as the furniture moving gliders. Where did you use the Kreg Jig? Did you drill into the plywood then toward the outer framing box?. I did not see any specifics of where you used the Kreg Jig.
Eldon (not verified)
Mon, 01/21/2013 - 14:20
Sizing of trundle
Above you state that a twin mattress is 75" x 39", yet your inside dims for trundle is 70 1/2" x 38 1/2". How will the fit the mattress?
I measured my mattress and it is 75" x 39".
I agree with one of the statements above, it is very difficult to read some of the dims. Even when zoomed up the 200 % .
Thanks these are good ideas.
annbow22
Sun, 01/27/2013 - 08:48
trundle
Ana I was wondering if you knew any way to make the trundle into a pop-up version, all the ones I find online are metal???
kanram
Mon, 02/25/2013 - 00:04
Trundle for the twin bed
Hi,
i am new to this website and in love with the twin farmhouse bed and this trundle. But i want to know if u have any plan for a twin with the trundle together? Otherwise i guess i need to raise the twin bed a little higher to fit this trundle under it.
Any help will be helpful
Ramya
kongk
Tue, 05/21/2013 - 07:12
The website is looking bit
The website is looking bit flashy and it catches the visitors eyes. Design is pretty simple and a good user friendly interface.
CN Tanks Tips
Michele123
Tue, 01/21/2014 - 12:14
I think you have spam...
I just wanted to point out that the two most recent comments are actually spam...
angibrian123
Fri, 01/24/2014 - 11:00
Alternative for casters...
Hi ana! I built this a few months ago for my girls who share a small room. I used the simple bed plans for the footboard and headboard. I didn't want the height so high with the casters, as the current height was already overwhelming the small room. After much thought I found a solution! We used gorilla glue to attach several furniture sliders to the bottom of the trundle (we have carpet). Several months later and it still works wonderfully (as was very inexpensive)! It pulls in and out with ease! Thanks for all your great plans! I'd attach a picture but a) the room is never that clean and b) it's hard to get a picture due to the size of the room and placement of the bed...
keitho23
Sun, 06/08/2014 - 20:22
Input Greatly Appreciated
I am just getting into DIY, sewing and building . I really want to build a pop up trundle for my little girl's room . I can't find any information on the internet but to buy one . Any ideas ???? That would be magnificent and much appreciated by me and my two little girl's . :-) What I'm looking for is how to make the pop up frame part ... Do you think just building a frame with criss cross legs and a locking mechanism would work ???
bcrooks
Thu, 03/19/2015 - 09:42
Bed frane
Do you have plans for the actual bed? This is exactly what I've been looking for my sons big boy room! :)
In reply to Bed frane by bcrooks
Ana White
Thu, 03/19/2015 - 12:00
Please take a look at this
Please take a look at this plan
http://ana-white.com/2009/12/plans-simple-daybed.html
As stated, please be sure to build your trundle according to the bed
dimensions. Hope this helps!
SaltGypsy
Thu, 05/13/2021 - 17:58
Could you perhaps place a…
Could you perhaps place a piece of plywood that would lie under the mattress that you could slide out onto the top of the drawer to lay a mattress on top of the drawers to make a bigger bed without unloading the drawers? The mattress could be stored on top of the other mattress when not used.
Estapel
Fri, 10/22/2021 - 05:09
The printer button doesn't work
The printer button doesn't work