


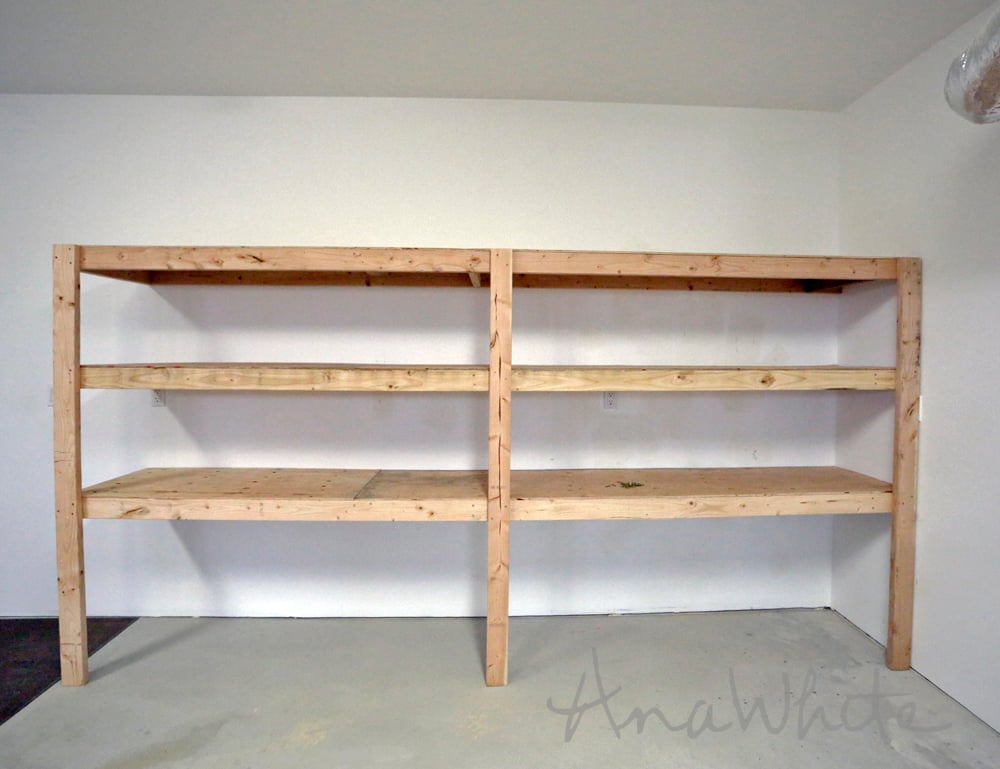
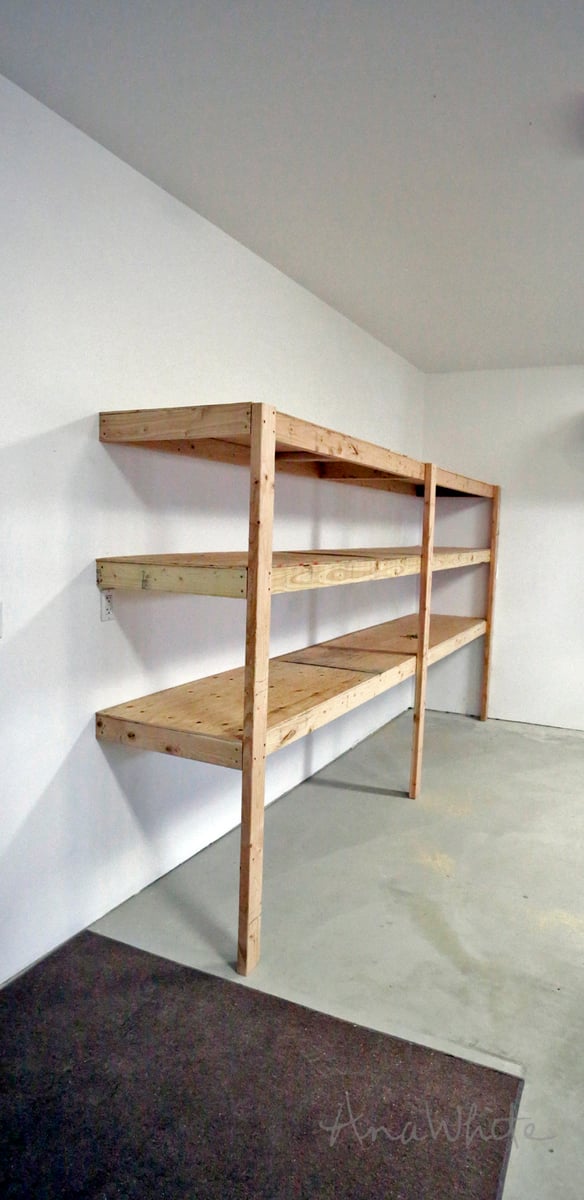
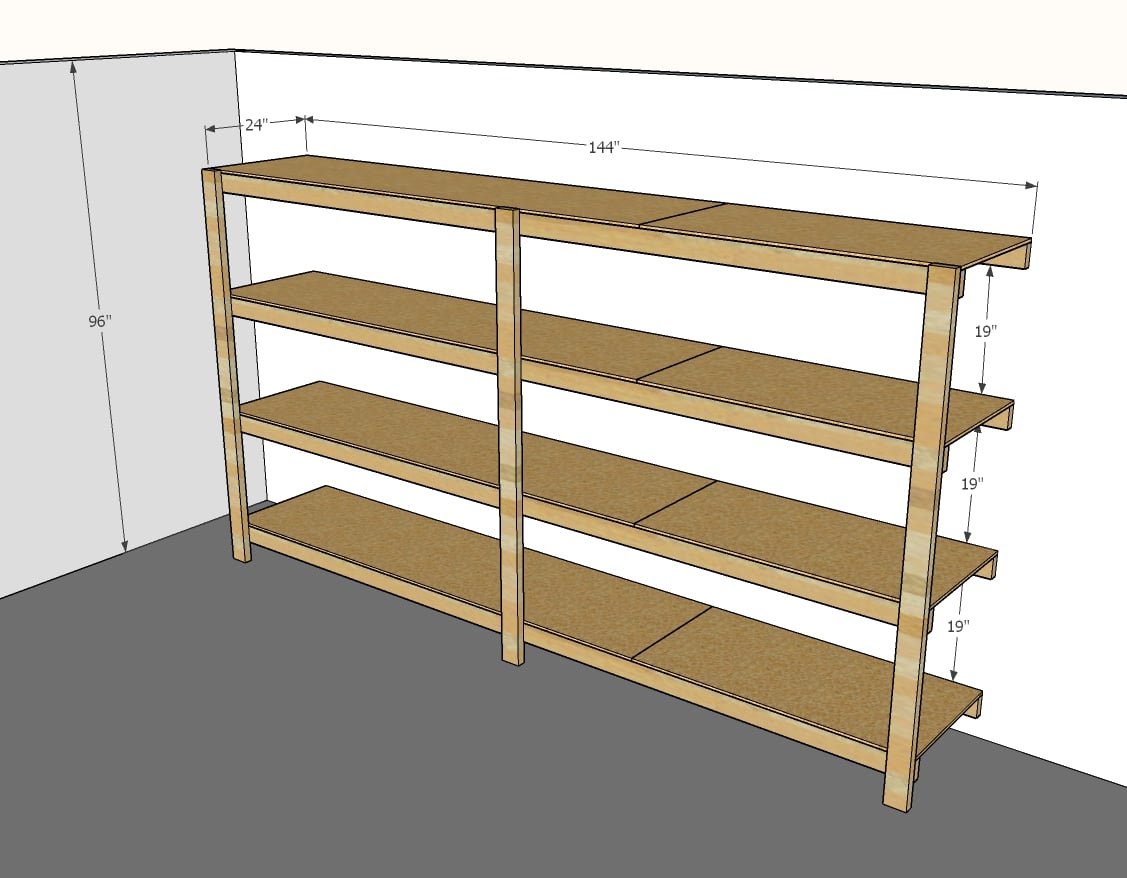
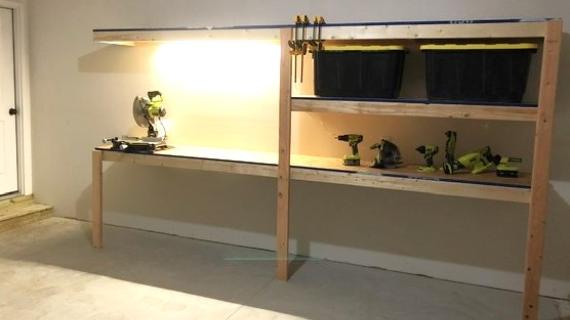
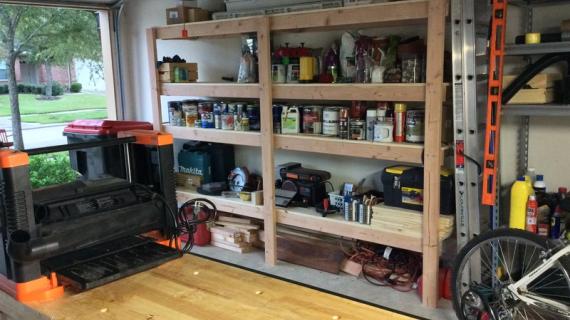
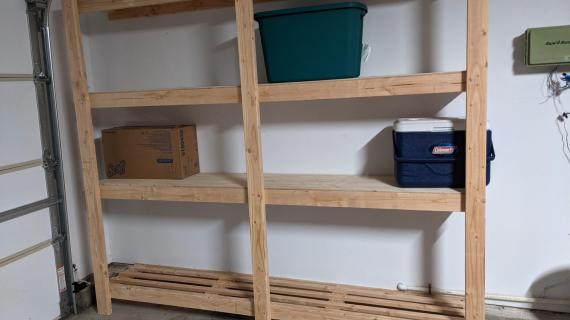
This is the fastest and easiest way to building garage shelves. At about $10 a linear foot to build for four shelves, up to 8 feet tall and 2 feet deep, you can add a ton of storage and organization to your home for a great value. Build with just a couple of tools.
Need temporary garage shelving? Try this freestanding plan.

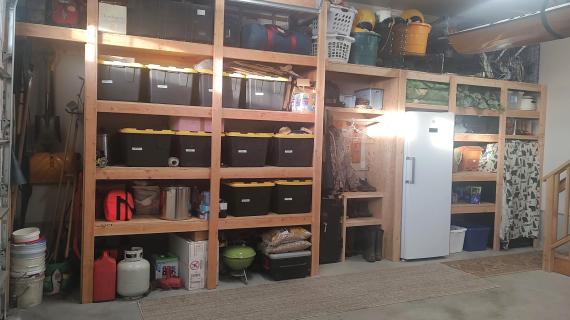
Do you need more storage in your garage, basement, or utility room? You know, to put all those totes and camping gear away?
You found it - our most favorite utility shelving plan - that has been built thousands of times. This one anyone can build with just a couple of basic power tools and 2x4s and some plywood.
Just 2x4s and plywood. Nothing special there.
How this humble garage shelf is special is in HOW it is made.
This will change your life. Seriously. It's already changed mine.
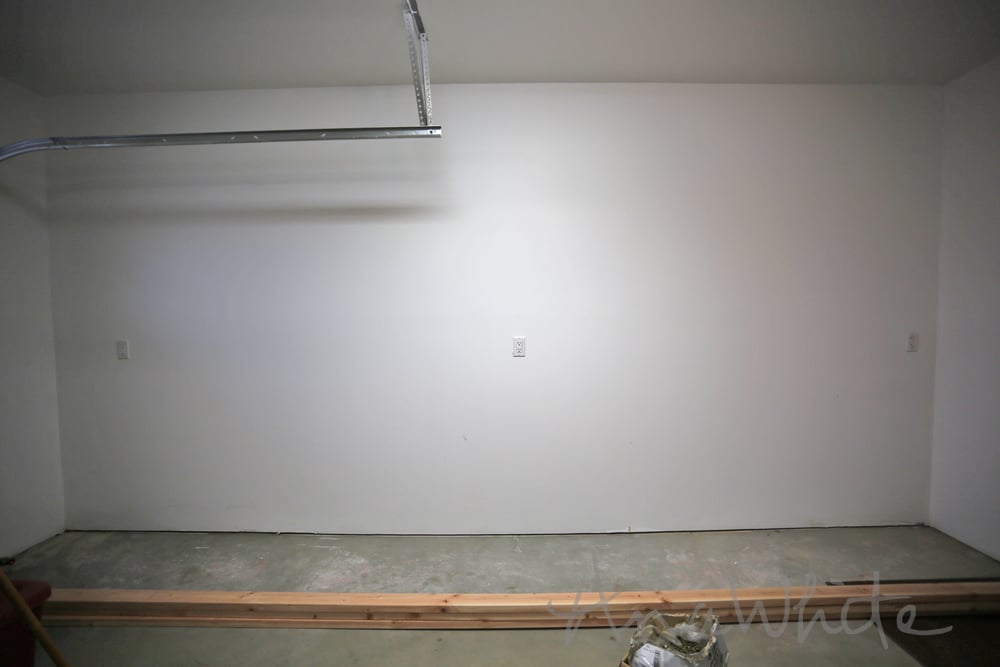
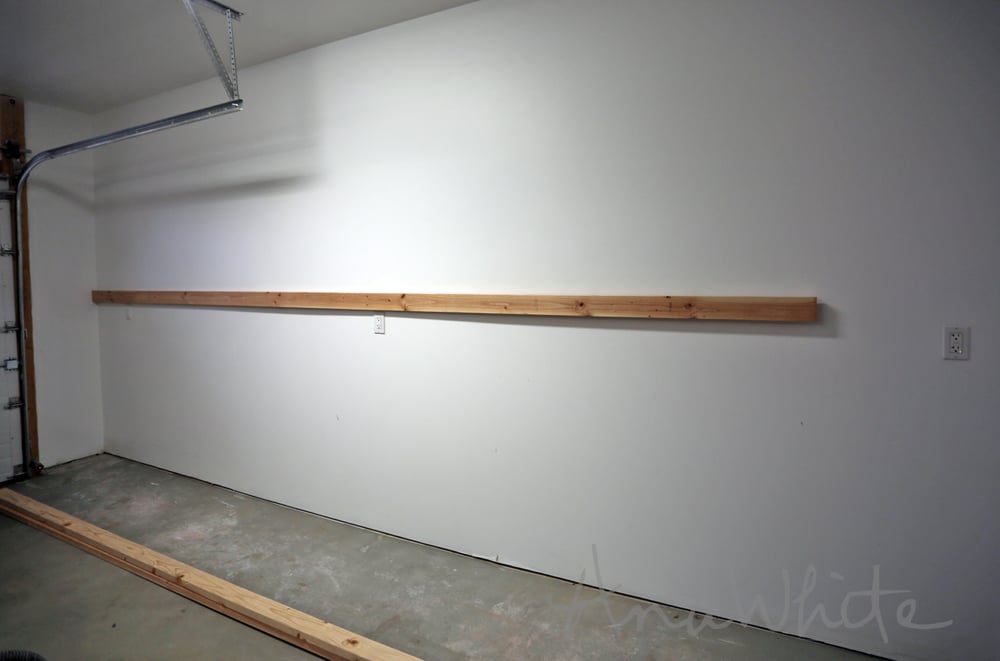
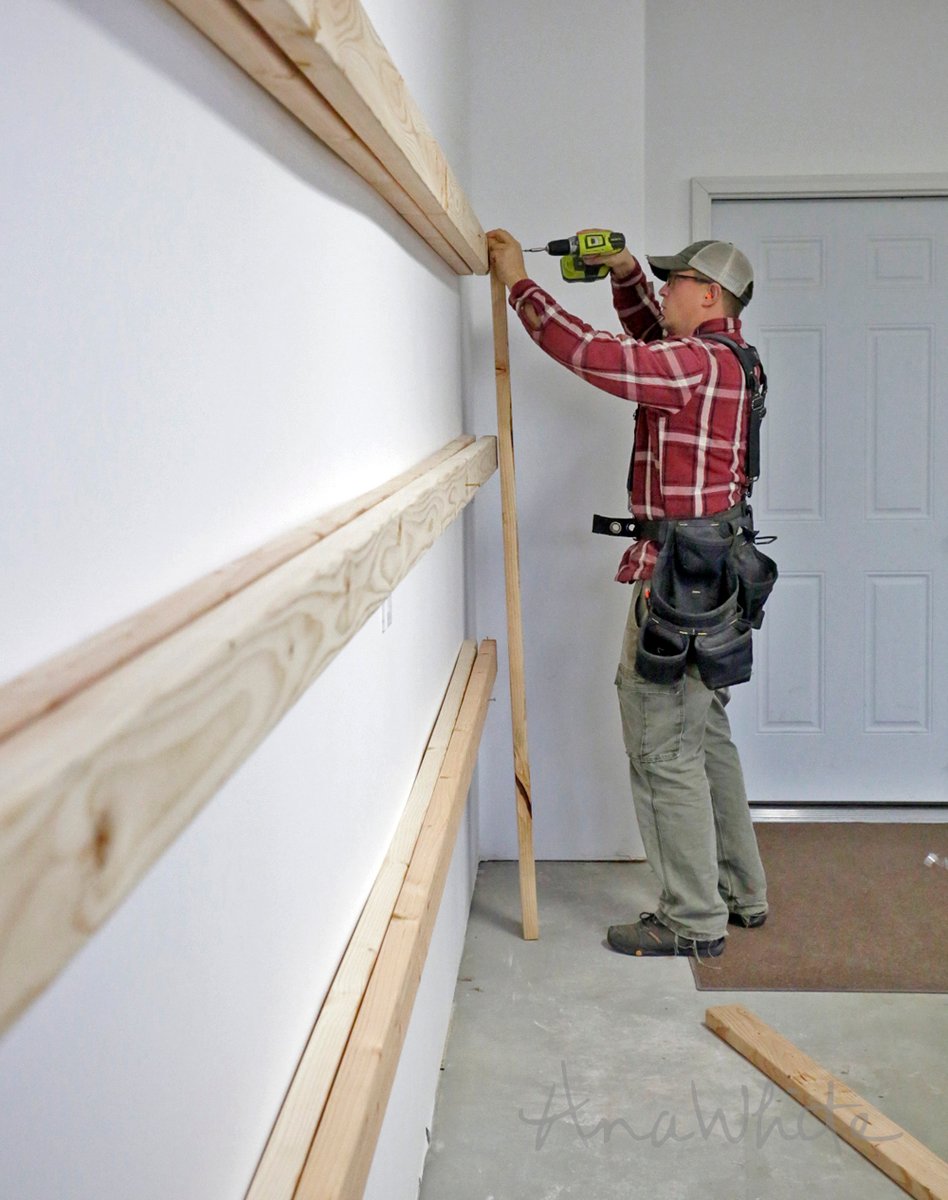
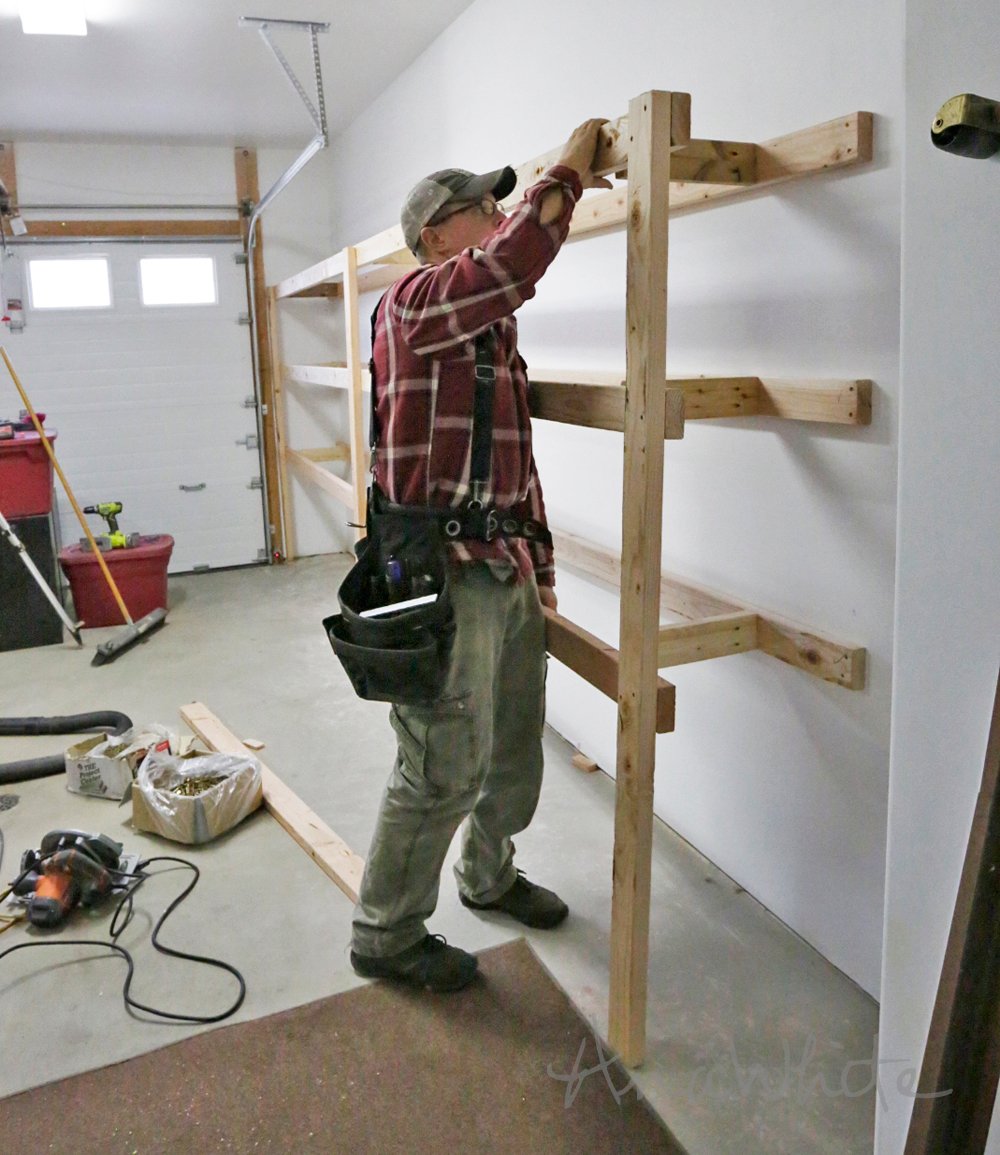
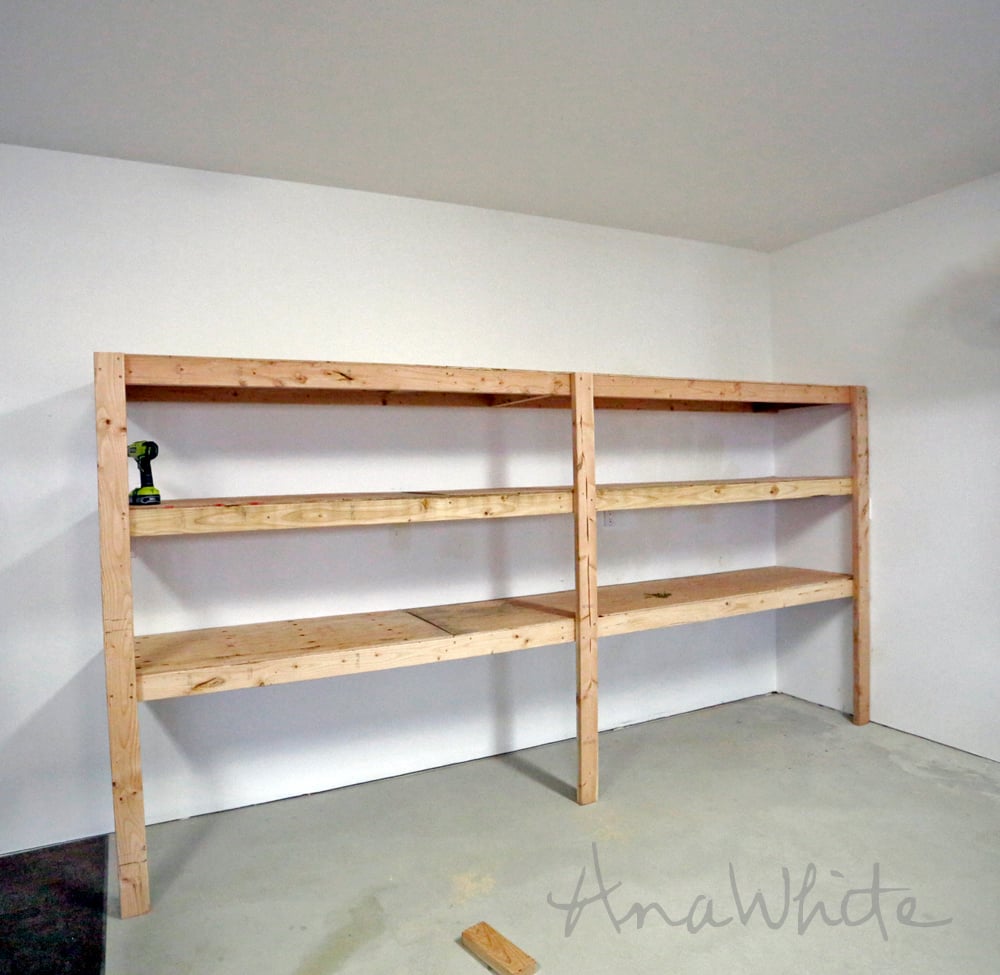
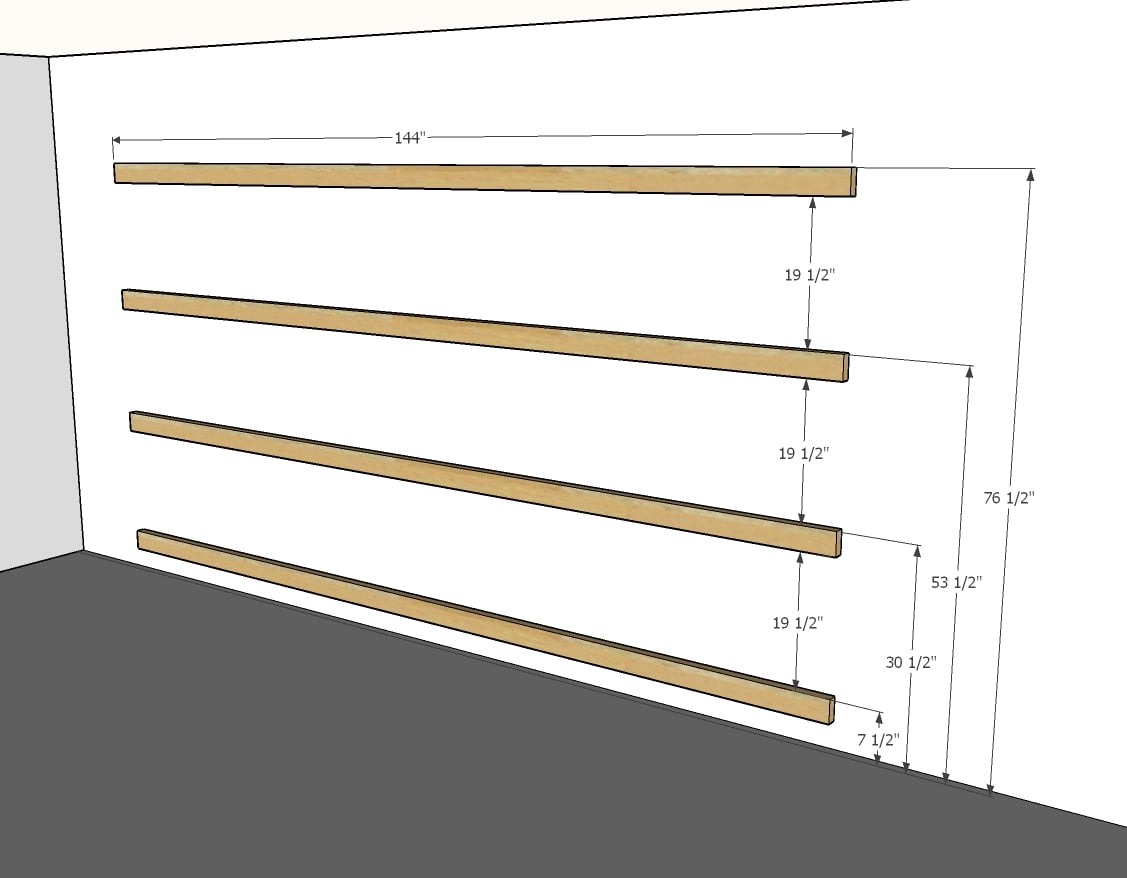
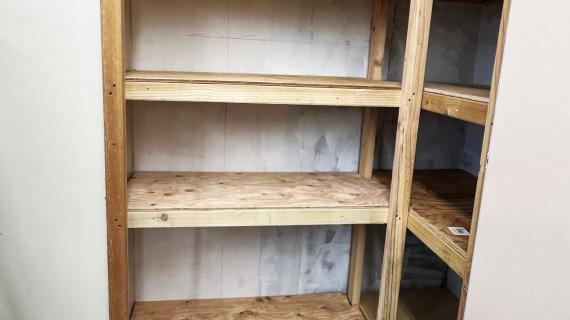
So you start with your wall. It has to be a wall that you can screw into studs or otherwise anchor in to the wall. If you don't have that type of wall, maybe check these plans out.
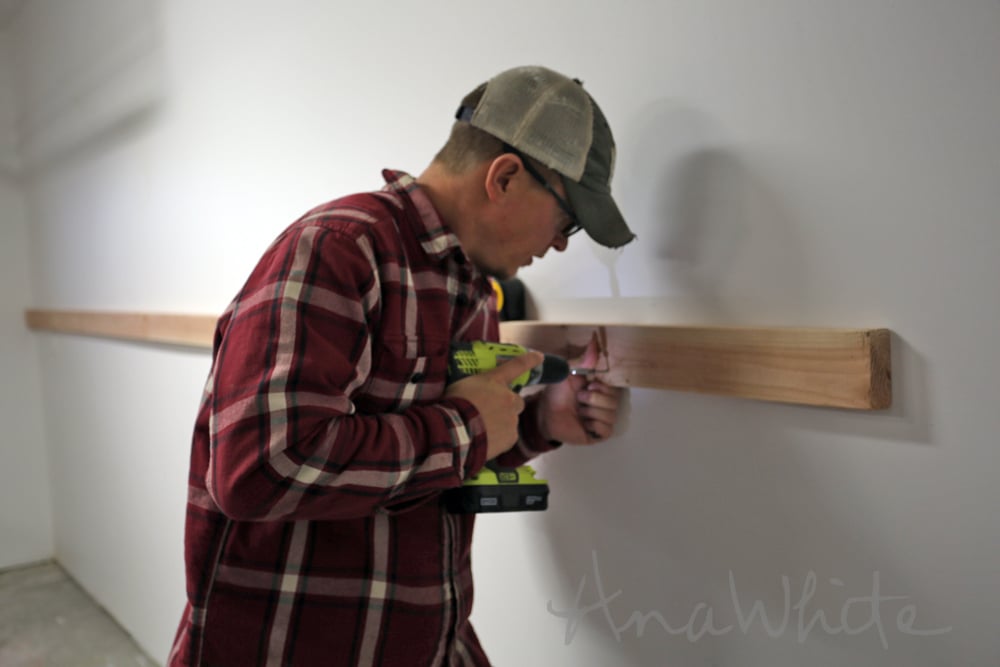
Mark out all the studs in the wall and attach a 2x4 in the desired shelving length to the studs in the wall, wherever you want a shelf.
Yep, just screw a 2x4 to the wall wherever you want a shelf, however long.
You can also piece 2x4s (for example use two 8 foot long 2x4s instead of a 16 footer) - just make sure you adequately attach to studs in wall.
Use 3" or longer screws (depending on wall construction). Use a level to make sure you attach the 2x4 to the wall level. I highly recommend self tapping wood screws to make driving screws easier.
TIP: Consider making your shelves 8, 12, 16 or 20 feet long to optimize plywood and wood use.
There's the first one up.
That's not hard, right?
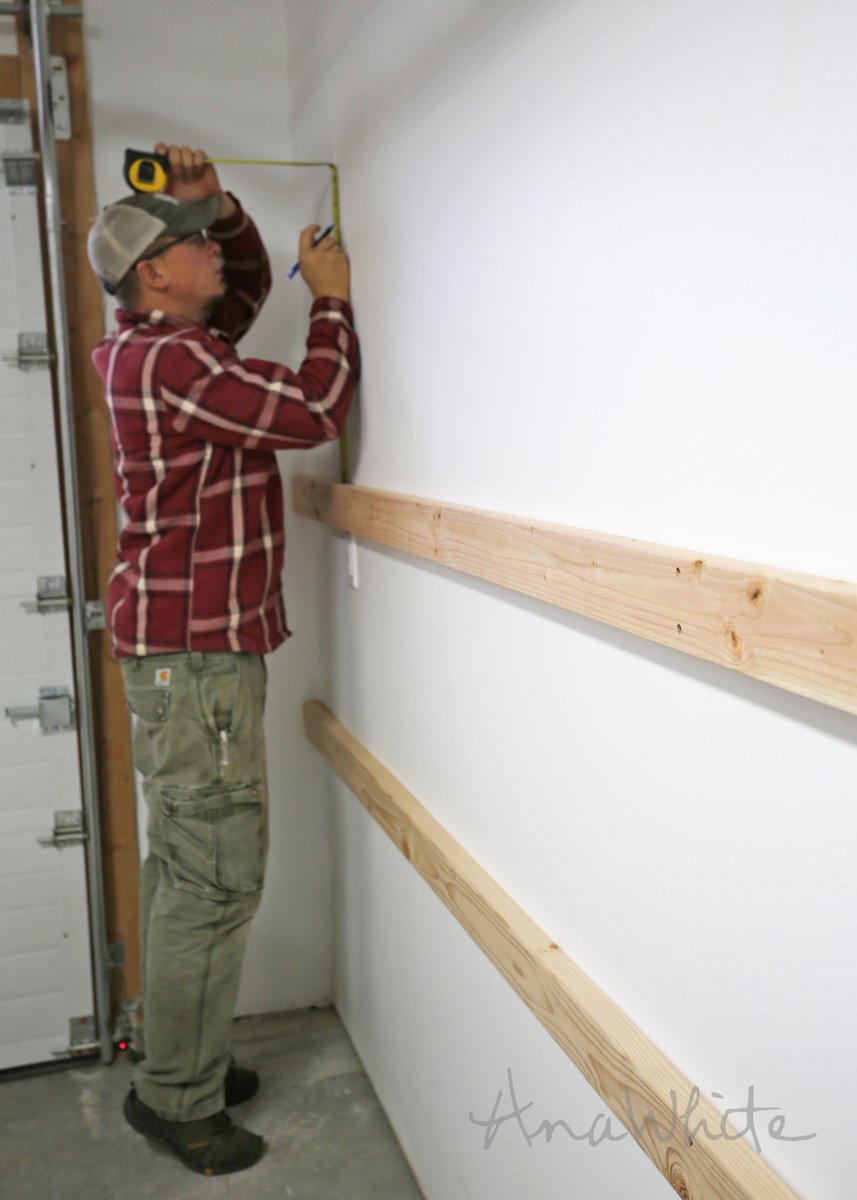
Once you have the first one up, you can just measure off of it to attach your remaining shelf boards.
Might I suggest figuring shelf heights to fit totes or whatever you may be storing in these shelves?
TIP: You can cut two scrap wood 2x4s and uses as spacers to find the height between the 2x4 shelf boards.
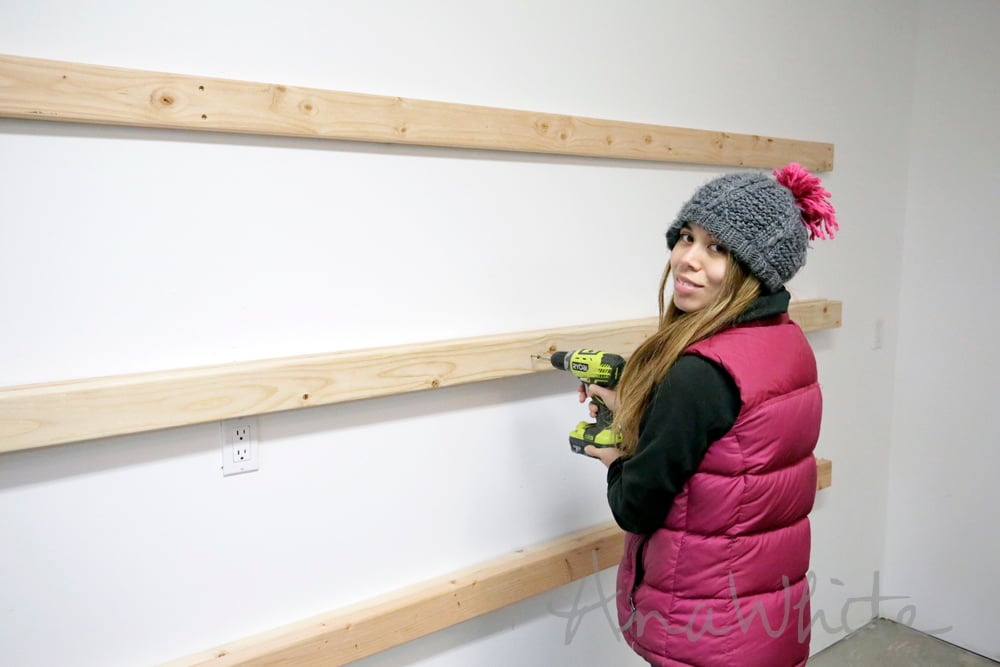
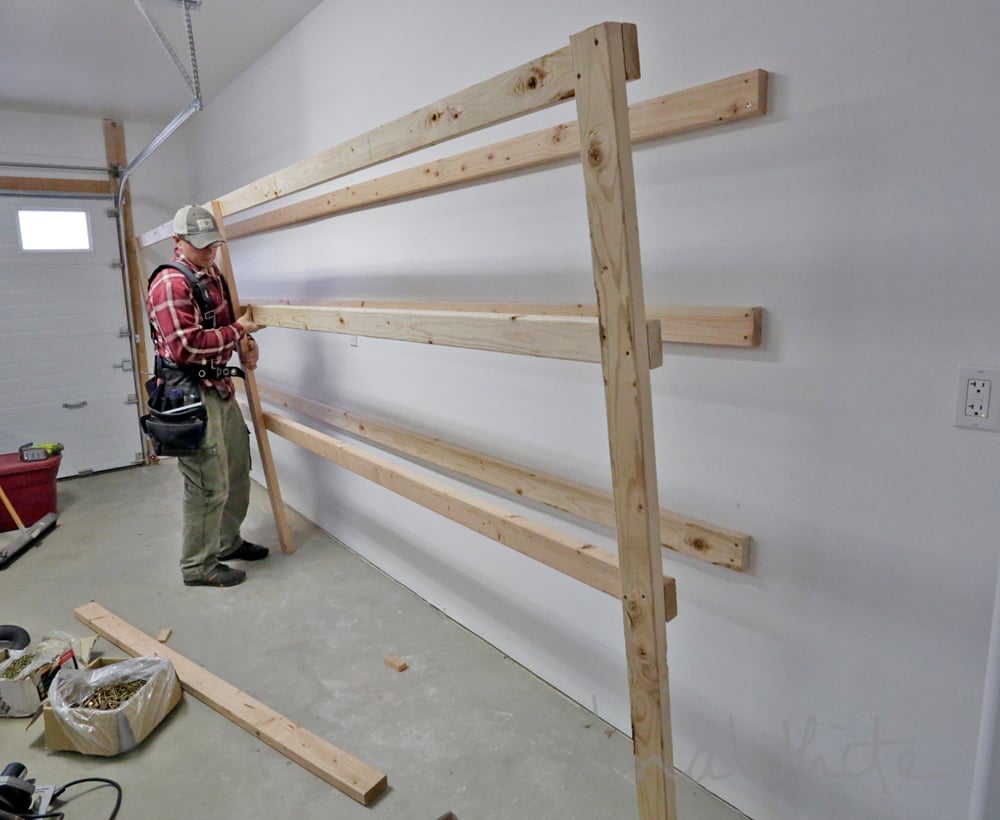
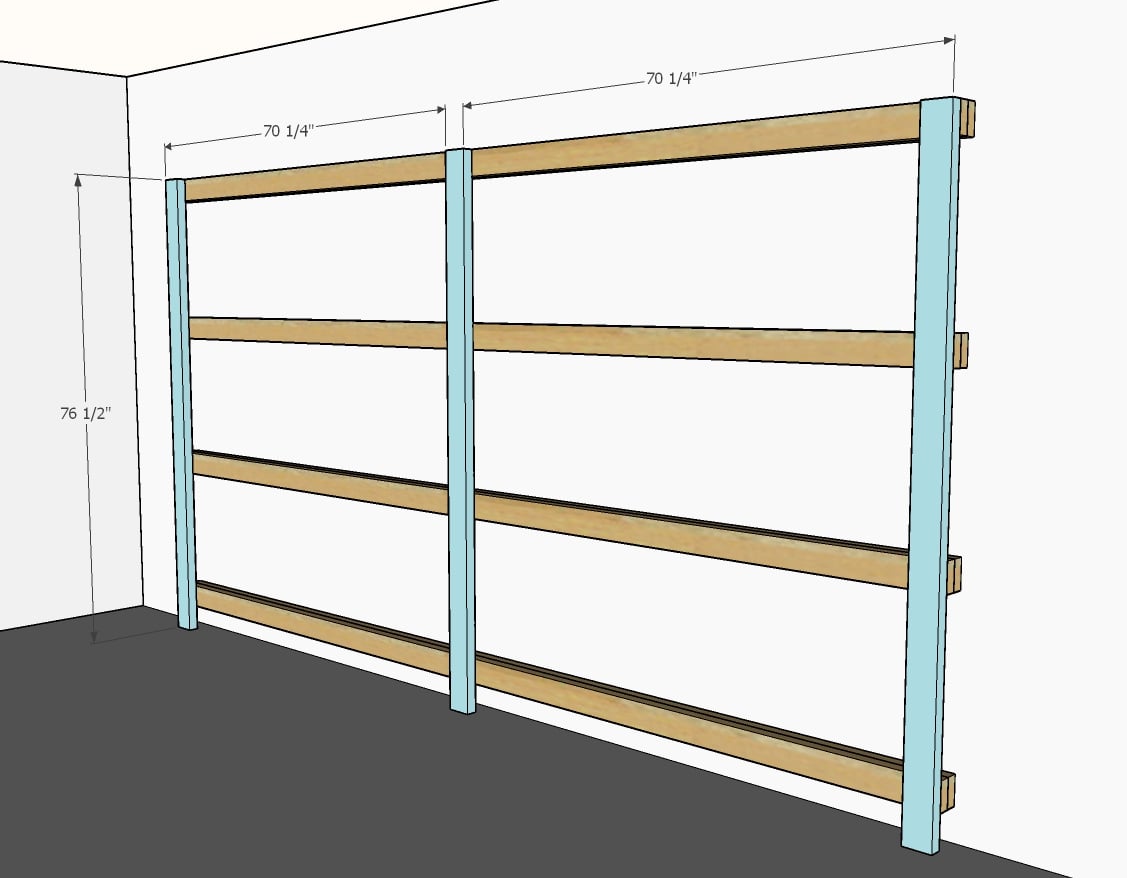
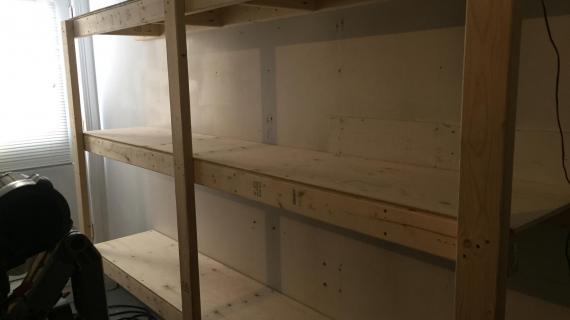
Okay here's where it gets awesome.
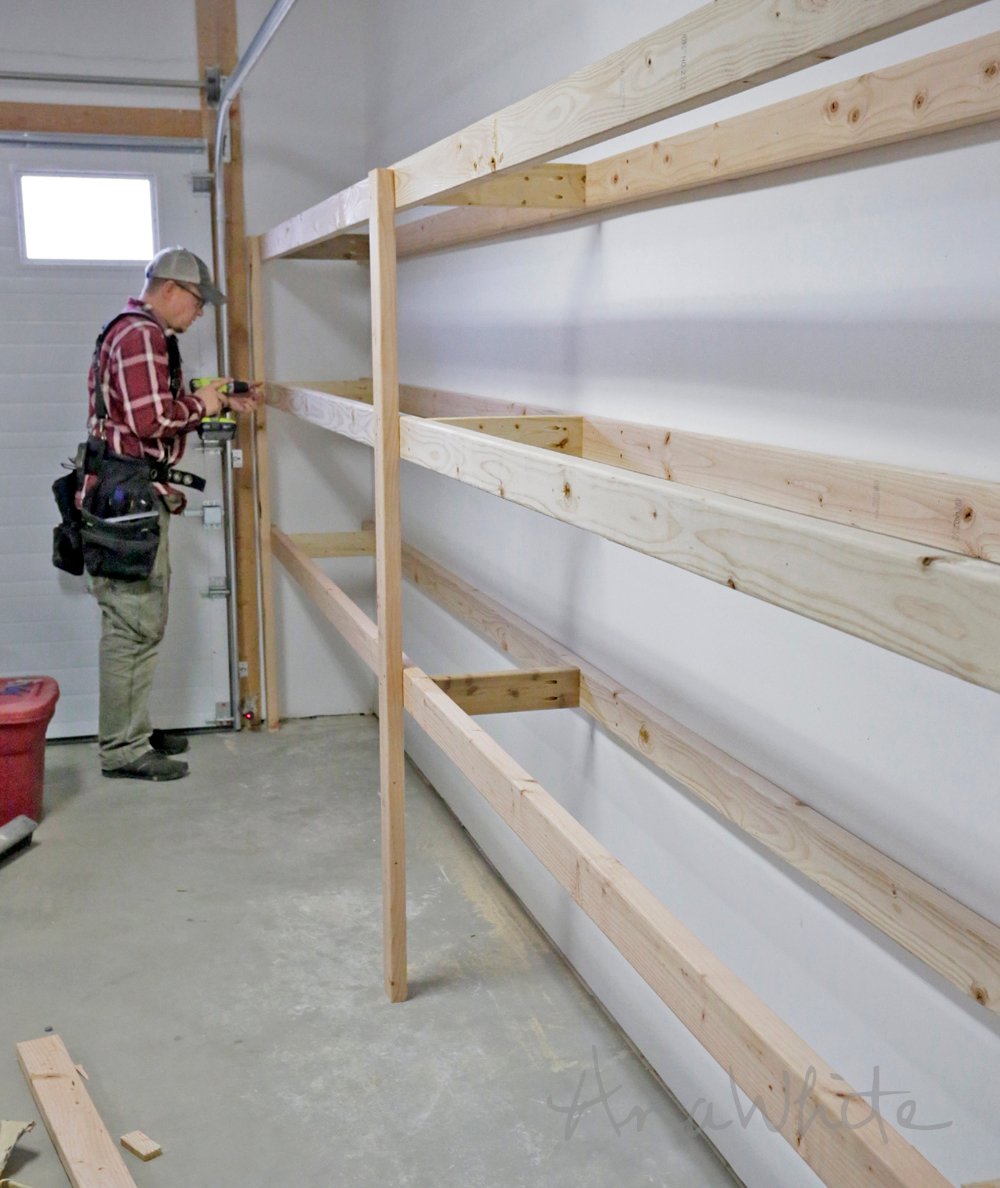
Next, screw a second 2x4 to the first 2x4, in the same length.
Yep, just screw it right on top.
Don't screw the screw all the way in, and only put two screws in each board.
Next, cut 2x4s legs to the height of your top shelf, and screw to the second 2x4 with 3" or shorter screws.

You'll want a leg on each end, and then middle legs depending on your span. 2x4s can span about 8 feet, so we added one leg for this 16 foot long shelving unit.
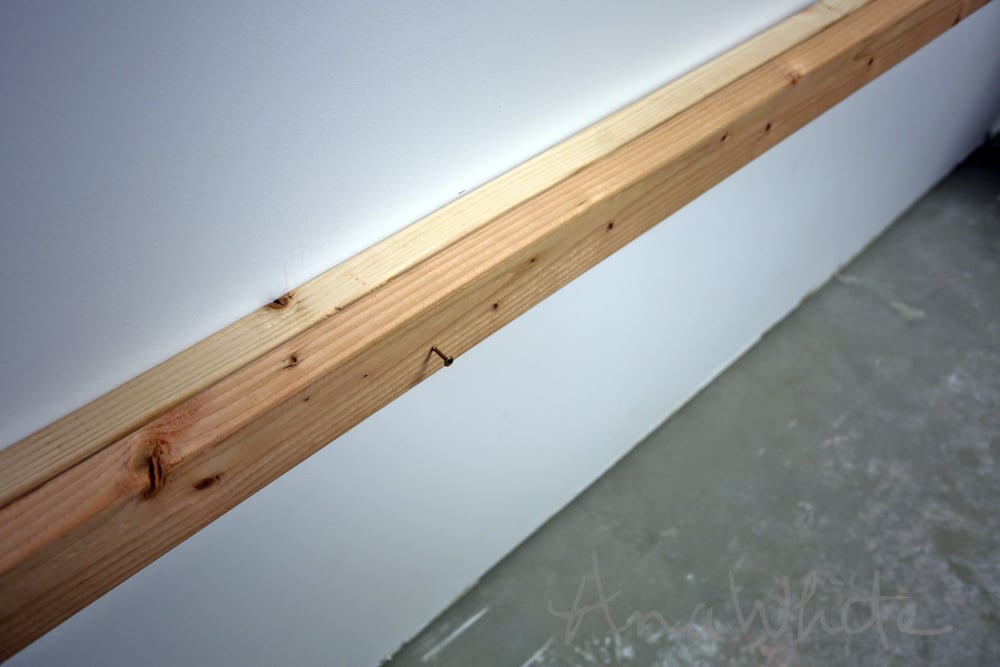
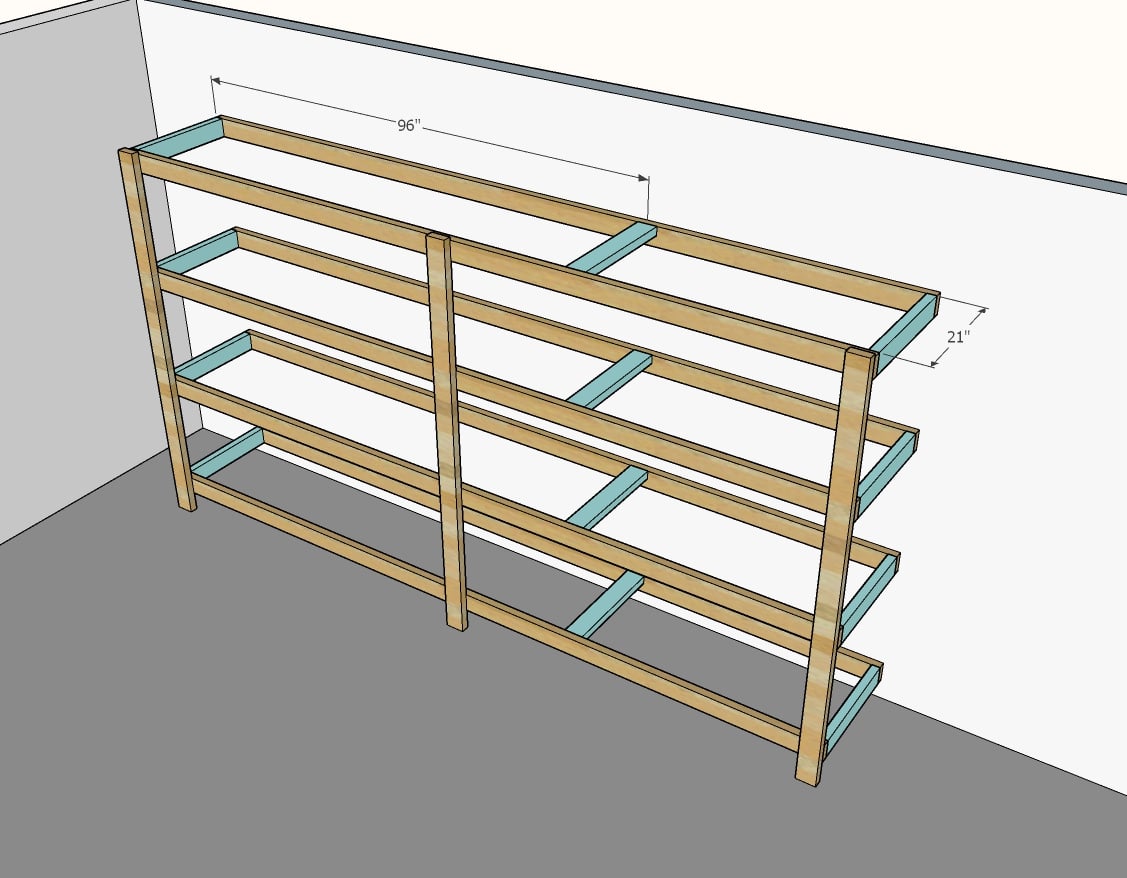
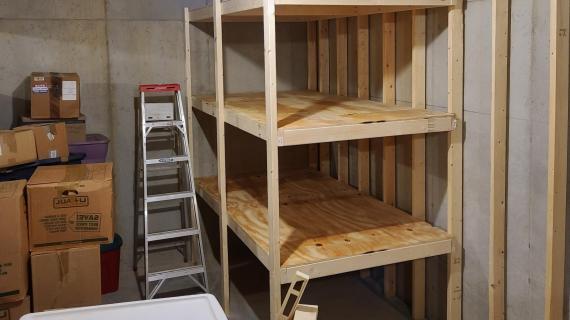
Now unscrew those screws attaching the second 2x4s to the first ones, and remove the entire front of the shelving unit.
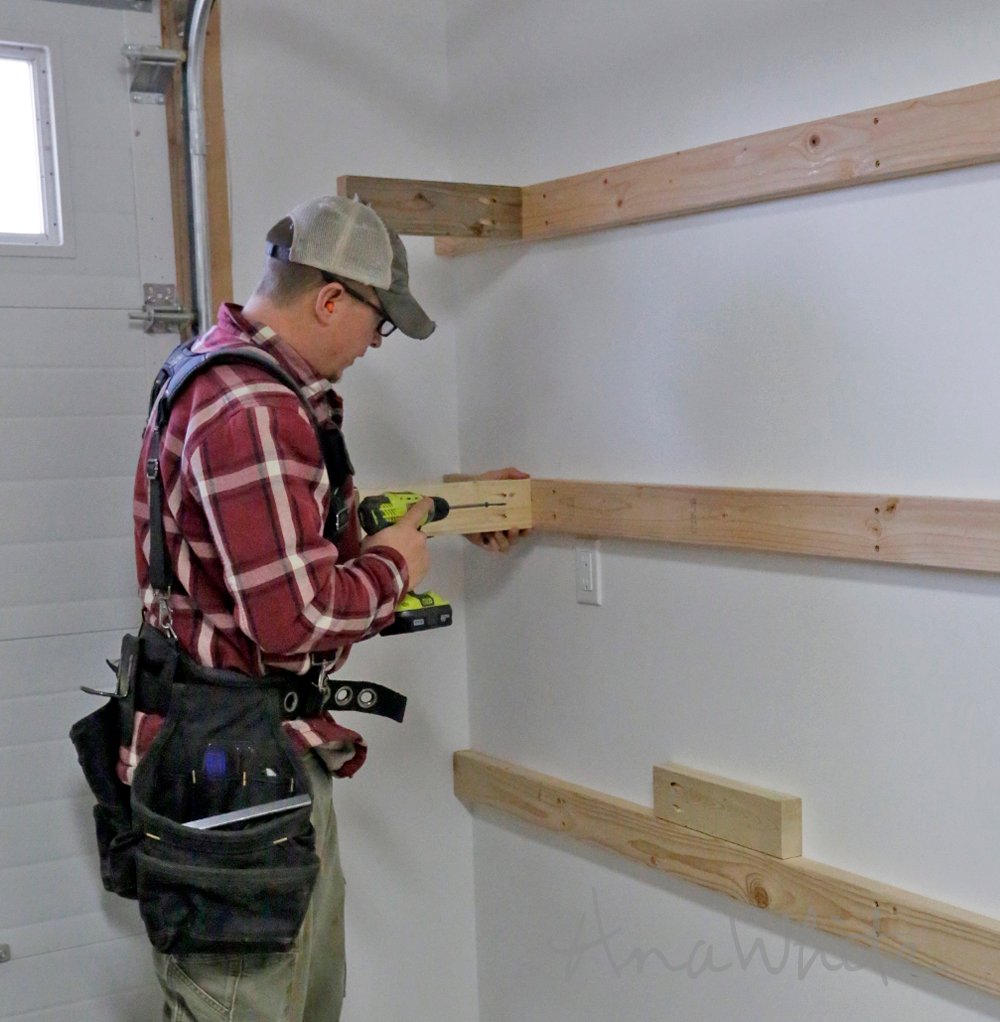
This isn't necessary, as the plywood on top will tie the second leg set to the first, but it can help with assembly. We cut 2x4s to 3" less than our plywood shelving pieces, Kreg Jigged pocket holes in one side, and attached to the first shelf boards. If you don't have a Kreg Jig, get one, but until then, you can drive screws at an angle into that first row of 2x4 boards.
TIP: To optimize plywood use, plan your shelving to be 12", 16" or 24" in width. Then you can rip your plywood into either four 12" wide strips, three 16" wide strips or two 24" wide strips with no waste. This means the 2x4 cleats would be 9", 13", or 21" long, respectively.
We placed cleats near the middle and ends, and where we knew we'd have a plywood seam, avoiding areas that would overlap the legs and be hard to screw into.
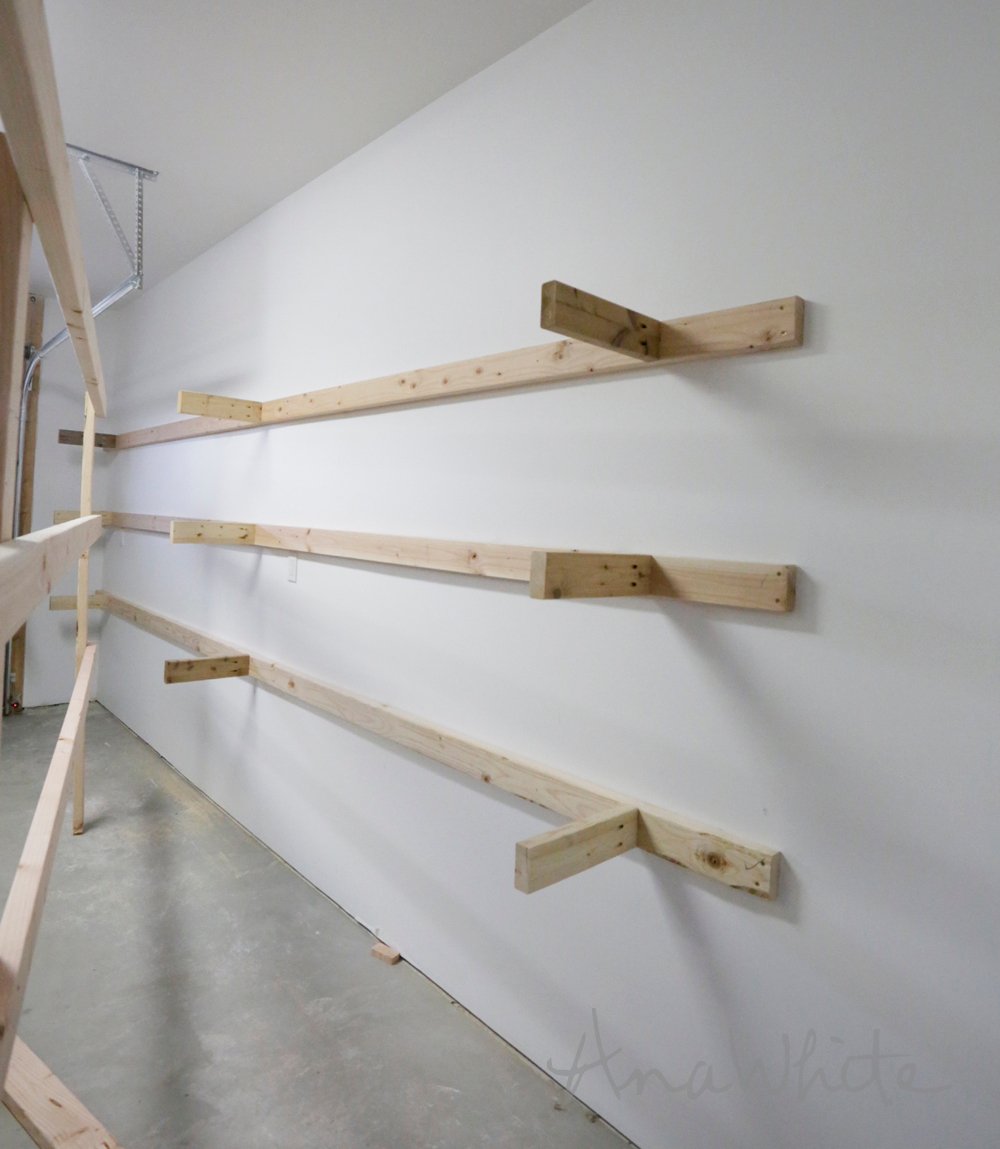
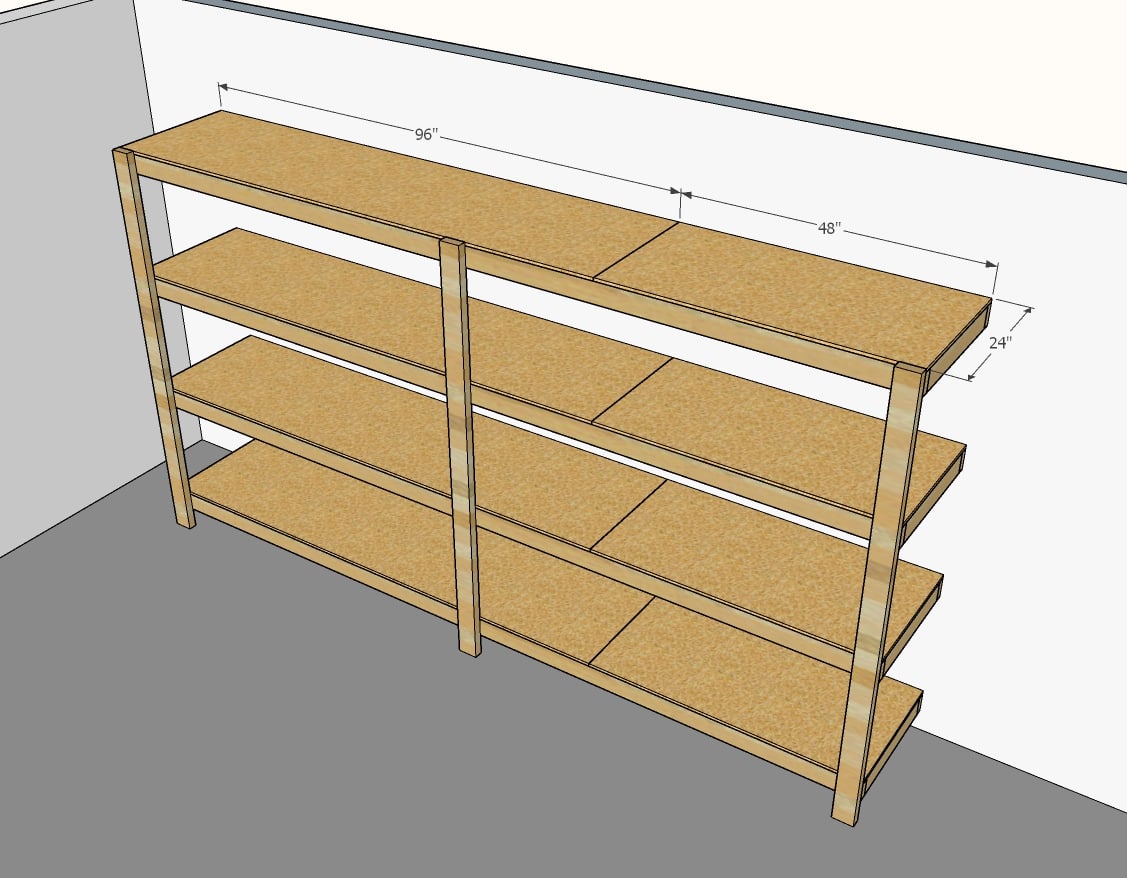
Then we just screwed the entire front of the shelving back on,
TIP: If your floor slopes or is uneven, as most basement and garage floors do, you can easily shim under the legs to level out your shelves. We shimmed with metal washers to bring the wood up a tiny bit from the garage floor, allowing water drainage around the legs, hopefully preventing the bottom of the 2x4 from every rotting out (and mitigating the need to use treated lumber).
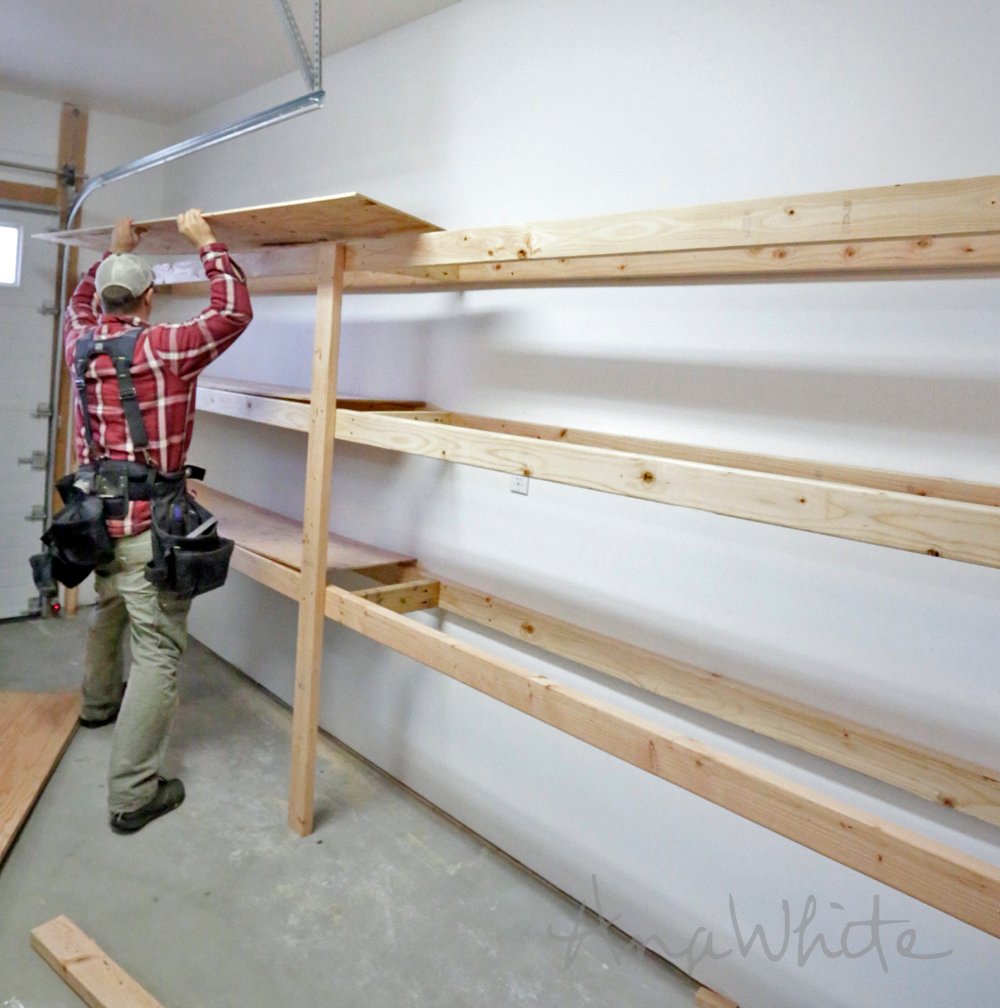
We ripped plywood into 15-3/4" strips so it would fit easily inside the shelves and also accounts for the saw blade width, and layed the plywood on the shelving. We use 1/2" plywood for the 16" width shelving - perhaps go up to 5/8" or 3/4" if you do 24" wide shelving or have especially heavy loads destined for these shelves.
TIP: If you don't have a table saw or a truck to haul full sheets of plywood, just have your home improvement store rip the plywood for you - accuracy is not essential in this project.
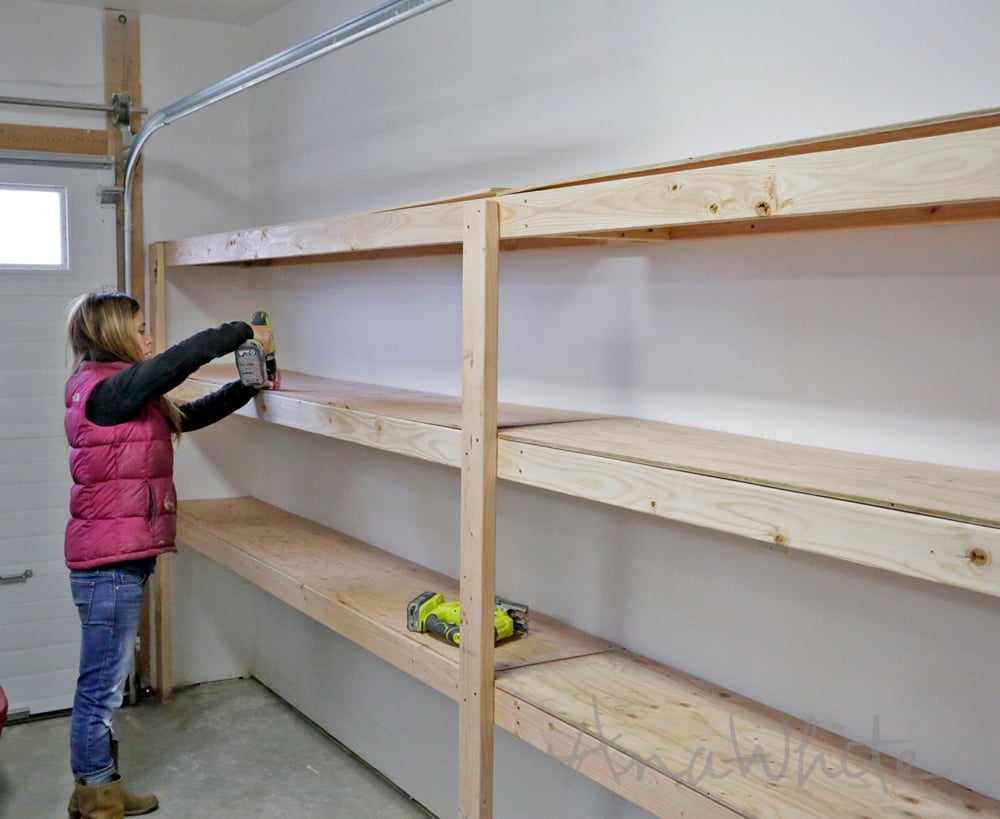
Then we just screwed all the plywood down. I think we used 1-1/4" screws (was burning up whatever we had leftover in the shop). You won't need a ton of screws, just enough to keep the two 2x4s together and the shelving plywood down.
So fast and easy, we ended up making three different shelving units - and have gone on to build countless more versions of this shelving.
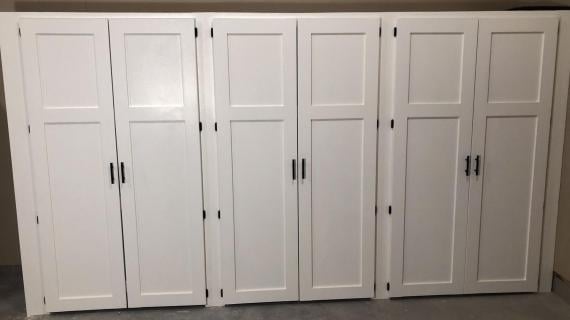
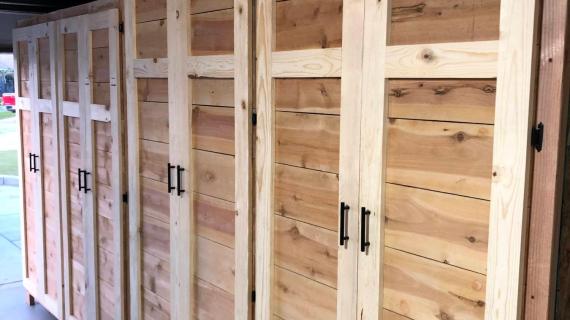
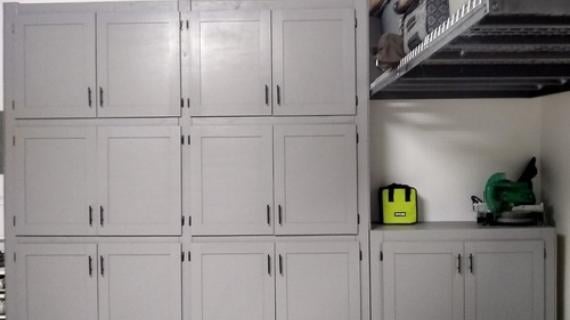
UPGRADED IT: Add Doors
We love how one of our readers CarolinaL used these plans but added doors to upgrade her garage shelves.
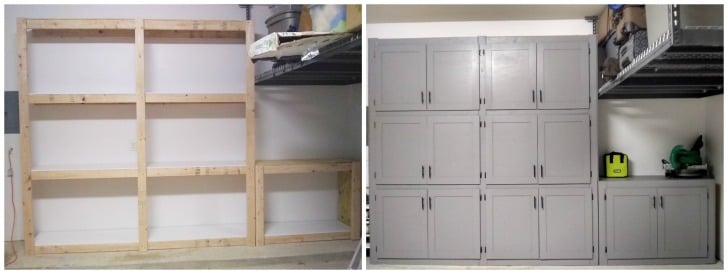
More photos and details are available here.
VIDEO TUTORIAL: DIY Garage Shelves
You can also check out this quick video we put together on this shelving unit.
PLANS: DIY Garage Shelves
For your convenience, we also put together plans for shelving 8 feet long x 6 feet tall with three shelves, to help you get started.
Pin For Later!
Preparation
- 8 - 2x4 @ 12 feet long
- 6 - 2x4 @ 8 feet long or 92-5/8 stud length
- 3 sheets of 1/2" plywood, OSB or similar, ripped in half, two strips 24" wide x 8 feet long
- 3" self tapping wood screws (about 150)
- 2" self tapping wood screws (about 100)
- 8 - 2x4 @ 12 feet long
- 3 - 2x4 @ 76-1/2"
- 12 - 2x4 @ 21"
- 4 - 1/2" plywood @ 24" x 96"
- 4 - 1/2" plywood @ 24" x 48"


Instructions
Step 1
Locate studs in the wall and mark.
Use a level to mark the entire stud, vertically, on the surface of the drywall with a pencil.
Mark heights of shelves.
Attach 2x4s to the wall where the shelves will be placed with 3" screws into studs in the wall, two screws per stud in the wall.
Step 2

Tack the second 2x4 on top of the first in two places, using 3" screws, avoid the ends and the middle where the legs will get attached in next step.
Step 3
Attach legs to the ends and middle with 3" screws. Use a level to make sure the leg is attached plumb.
Step 4
Untack the front of the shelving from the back 2x4.
Attach 21" long 2x4s in between the front of the shelving and the back. Use a Kreg Jig if you have one, or screw at an angle to attach.
Place flat 2x4s where there will be seams in the 8' long plywood shelving strips.
Step 5
Lay plywood shelf tops on the framing.
Screw down with 2" screws, screws about every foot is fine.


Comments
yubbie2
Sun, 01/10/2016 - 12:34
Cleats
Hi Ana - great plans, just what I was looking for! Instead of using 5/8 or 3/4 plywood, could I just add a few more cleats and stick with 1/2 plywood?
Armstrong3012
Sun, 01/17/2016 - 10:29
Plywood
I have built shelves similar to this several times. This weekend, I built them using these plans from Ana. I have used 7/16 OSB for all of my shelves and had no issues whatsoever. I always have a "runner" on each side lengthwise like Ana's plans call for and then short pieces spaced at the ends of each 8' long piece of OSB.
One set of shelves has been up since early 2013 and I have not had any significant sagging at all. I have totes with quite a bit of weight on my shelves.
So, in short, my answer to your question is you won't have any issues with 1/2 inch plywood. If you want to add extra cleats for support, it would certainly help, but I don't believe you will need it at all.
Dirk Medema
Sat, 06/04/2016 - 11:27
Rather than adding cleats, if
Rather than adding cleats, if you move the cleats out to the end, and add 1 or 2 more full length 2x4's, you could even use thinner shelving. Then the plywood isn't carrying any load. It's just a skin on the wooden frame. I've done it with 1/8" or 1/4" luan ($5 - $10).
Armstrong3012
Sun, 01/17/2016 - 10:34
Easy Garage Shelving
I built these yesterday. They turned out great! I've built similar style shelves several times in the past and I can say this was the easiest, sturdiest build so far.
I built my shelves 24" deep to hold standard size storage totes. I spaced my shelves apart 17.5" between the top of one board and the bottom of the next to allow just enough room for storage totes.
I used GRK fasteners from Home Depot and they worked great! The HD SKU is 489745.
The biggest challenge was anchoring the boards to the wall as my stud finder was not cooperating. I wound up locating one stud precisely and measuring off of that for the other studs.
Great plans!
Chubbz
Mon, 05/30/2016 - 19:17
So easy even I could do it...
Hi. Just wanted to send a quick thank you for the idea for these super simple shelves. I have done some home improvement stuff but never put up shelves from scratch before. When I saw the YouTube video for this I knew I needed to make some. I did a 15 foot set in the garage and a 10 foot set in the basement storage area. Really appreciate the helping hand!
mlitofsky
Wed, 11/30/2016 - 07:44
Plans
Where can I get the shopping list for this project? The shopping list and cut list are blank on the website.
Thanks.
mameza08
Mon, 12/19/2016 - 18:25
Any update on the shopping
Any update on the shopping list?
mongcoco
Mon, 12/19/2016 - 20:32
Great
I will order one, we are in need of it
imjrwise
Sat, 01/20/2018 - 14:40
2×4 Shelf?
Hi Ana!
Would this work using 2x4's for the shelves instead of plywood like you did with the garage storage?
MiriamB
Fri, 02/09/2018 - 05:44
Could I add doors to this shelve nit?
I have watched this post over and over and I think I can make it. First I wanted to know if there are plans per se to download because i could not find them. Second I wanted to know if I put more vertical legs, could I actually add doors? thanks ahead for the response!
In reply to Could I add doors to this shelve nit? by MiriamB
Ana White
Fri, 02/09/2018 - 07:38
Doors
Check out this post for doors http://www.ana-white.com/2018/01/DIY_furniture/garage-shelves-doors
Since this is such a variable plan, it should be built to fit. You can find more detailed plans here too: https://www.ryobitools.com/nation/how-tos/built-in-shelves_10632
lonhanson
Sat, 07/06/2019 - 22:39
Would these work for 36"…
Would these work for 36" deep shelves or would I need to make changes?
CenCoast_DIY
Wed, 02/12/2020 - 19:00
Modification to shelving
Hello Ana,
These plans will work great for a shed I recently built. The shed walls I will be building the shelves on are 10 ft across and 113" tall. I wanted to build the shelves 8 feet across and include three or four shelves at about 20" in-between each shelf. I am planning on making the shelving 3' in depth, but I wanted to make a loft type area on each side of the shed, and was planning on the loft spanning across the top of the shed and measuring 4' in width and the full 10' in length across the top. Using your shelve plans, do you have any ideas on following the plans up to a certain hight and then adding a wider and longer shelf as the top to create the loft or a longer and wider top shelf? Thanks.
duncanbell3
Thu, 05/28/2020 - 23:52
My 2nd project
This was my 2nd ever woodwork project - the 1st was Ana's sturdy workbench.
My garage was an absolute bomb site and I thought that whilst we are in a UK lockdown I'd try and sort it all out!
I had dangerously wobbly metal freestanding shelves and was always worried they were going to come down - with 2 small children I simply had to do something.
I stumbled across this shelving unit on youtube but have since signed up to the website.
REALLY simple plan and I encountered no problems - I'm a complete beginner!
I did have 1 slight very minor issue though.
Most people in the UK do not have basements but instead garages and most are brick and stone.
Attaching the unit to the brick wall is harder than drilling straight into studwork but I figured it out but the trick is lining the screws to the rawl plugs in the brickwork.
Figure that out and it's easy.
These shelves are so good and strong.
I'm 115kg and I can walk up them and hang they are so strong!
WhatAerYouDoingDave
Sun, 02/07/2021 - 06:29
This couldn't be easier
I used these plans in my garage. it was super easy. I had to frame the back and shorten it to fit. It's easy to customize. I made this video of my build. youtube.com/watch?v=H5u8wxpcYYg&t=29s&ab_channel=WhatareyoudoingDave%3F
ryantoday
Sun, 02/28/2021 - 08:57
Great shelves
I just made these yesterday. I went with the 12 foot design. I did cleats every 4 feet, this only used an additional 2x4x8. I went with 3/4 plywood. Instead of going the height in the design I did 8 Foot 2x4's for the legs. I started 24 inches up and went up from there. We used a Kreg jig to do the fronts and backs of all the cleats. This thing is rock solid. I put 900 pounds on the one shelf and it is not sagging at all.
Ilove2DIY
Thu, 06/24/2021 - 14:02
Perfect storage plans
These plans are awesome. If you are hesitating at all, just go for it. We have used these plans time and time again. Easy, simple and so effective.
jfhector
Sun, 01/02/2022 - 11:28
Is it ok to use 2x2s instead of 2x4s?
Hello! I'm loving those designs and I'm planning to build them later this month. It'll be my first wood working project.
## Question:
At my hardware stores, 2x2s are much cheaper than 2x4s (less than 1/4 of the price). So I'm tempted to use 2x2s instead of 2x4s. Do people think that this would be a significant safety risk?
I'd compensate for that with more screws in the wall, and maybe one more leg. But I'm imagining that 2x2s will be enough given the designs.
I'd like to know what others think. Thanks!
Daniel_ram
Mon, 01/03/2022 - 16:41
I just did a 8ft long this…
I just did a 8ft long this past weekend Jan 1, 2022. I went to homedept to get supplies and spent about $150 with ~25 for screws (avoided spending another 40 plywood sheet by including smaller 1x2s for the bottom shelf, I'll post a pictures in a bit. I did use the 2x4 and I think it is probably too much for my garage storage needs. I have mostly Christmas boxes, regular camping gear, some old paper boxes and whatnot. This shelf is very strong with the 2x4s and likely too strong for my needs, if I'd do it again I'd probably use 2x2s. Wood is expensive these days! So I'd say you'll be fine with 2x2s if you don't expect to store heavy stuff. Good luck!
henryaroberts50
Mon, 01/09/2023 - 17:18
Garage shelves (Attached to Walls)
Where do you find the pdf plans for the shelves. I looked for the plans and shopping list, but did not find a location to download.
Thanks,
Henry