
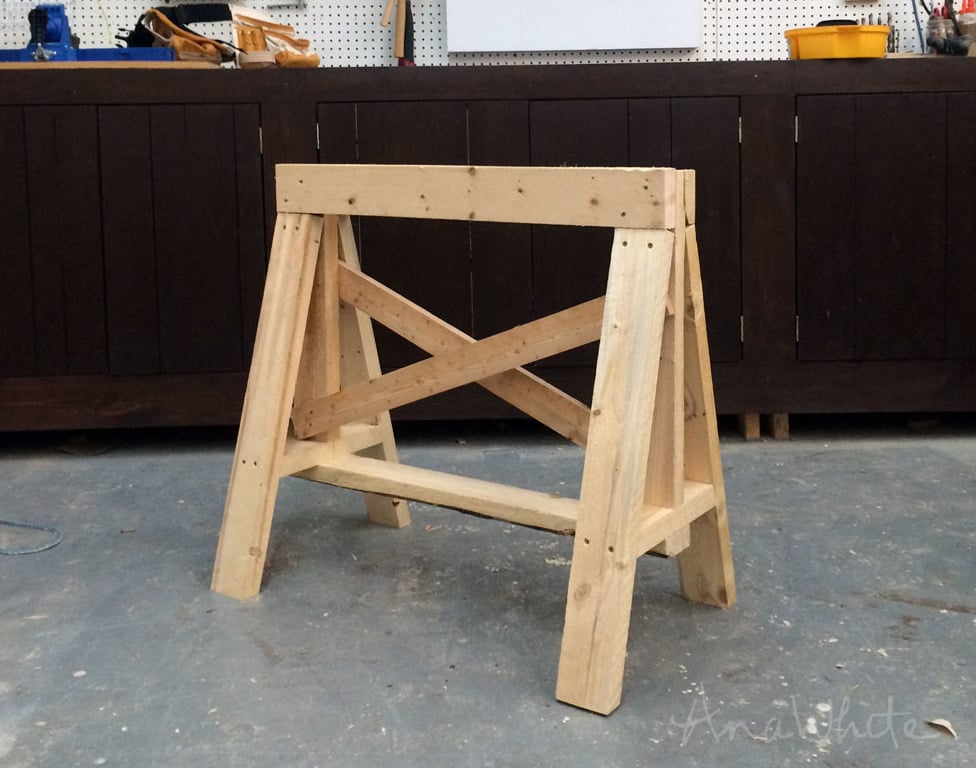

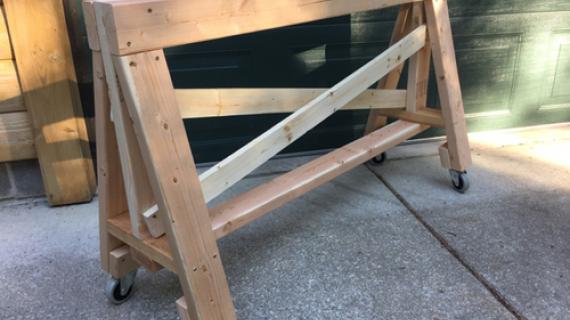
The ultimate sawhorses - easy to build and extremely sturdy. I've been using these same sawhorses for over ten years. If you are looking for a long term, heavy duty sawhorse, these are the ones to build. Free plans by ANA-WHITE.com
Heavy Duty - Used for over 10 years in construction
Quick Build Video
Preparation
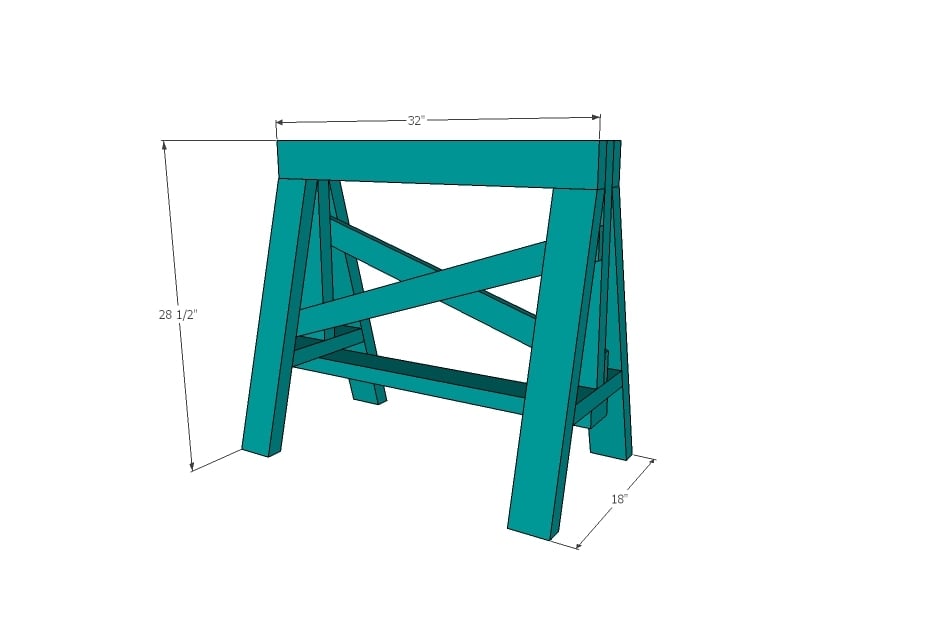
FOR TWO SAWHORSES
- 4 - 2x4s @ 8 feet long
- 2 - 1x3s @ 8 feet long
FOR TWO SAWHORSES
- 4 - 2x4 @ 10-3/4" (both ends cut at 15 degrees off square, ends are NOT parallel, longest point measurement)
- 4 - 2x4 @ 19-1/4"
- 8 - 2x4 @ 25-7/8" (both ends cut at 15 degrees off square, ends ARE parallel, long point to short point measurement)
- 6 - 2x4 @ 32"
- 4 - 1x3 @ 33 -5/8" (both ends cut parallel at 18 degrees off square, long point to short point measurement)


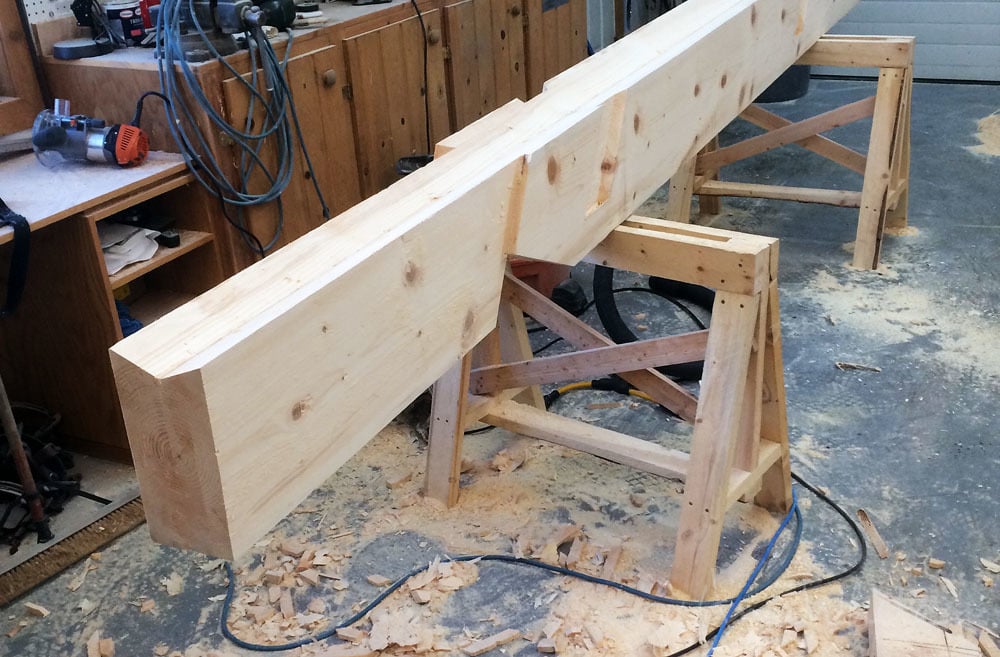
Please read through the entire plan and all comments before beginning this project. It is also advisable to review the Getting Started Section. Take all necessary precautions to build safely and smartly. Work on a clean level surface, free of imperfections or debris. Always use straight boards. Check for square after each step. Always predrill holes before attaching with screws. Use glue with finish nails for a stronger hold. Wipe excess glue off bare wood for stained projects, as dried glue will not take stain. Be safe, have fun, and ask for help if you need it. Good luck!
Instructions
Step 1
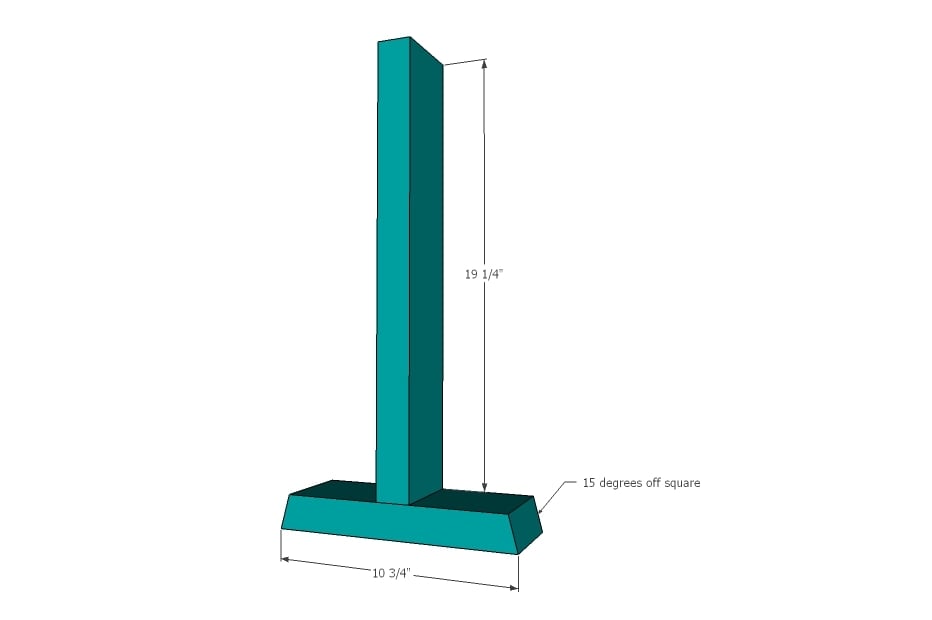
Attach with 2-1/2" screws bottom piece to center piece, aligning center of bottom with center piece.
Step 2
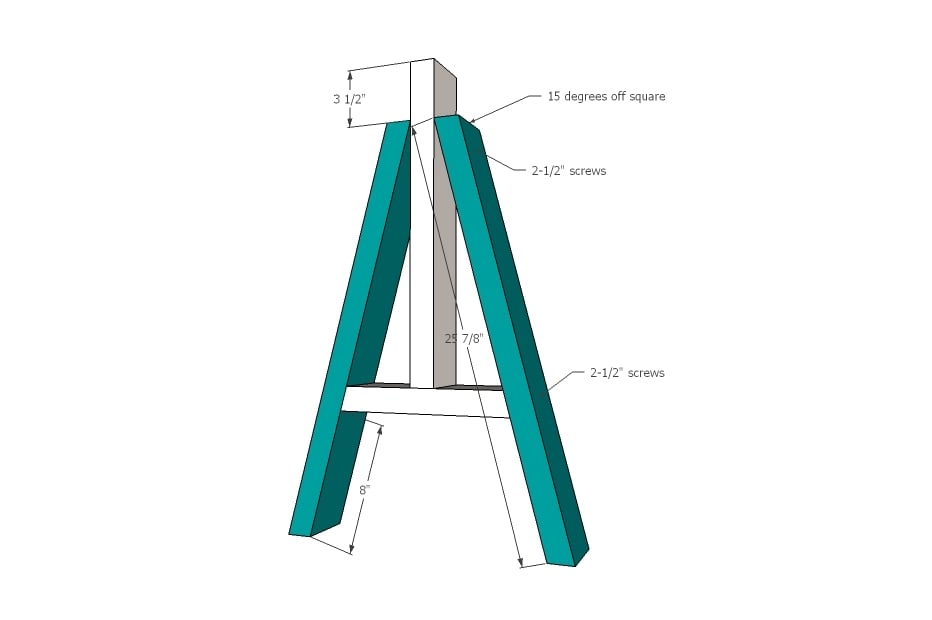
Attach legs to bottom center piece with 2-1/2" screws, 8" up from bottom of leg. Attach with 2-1/2" screws tops of legs to center piece.
Build two of these leg sets per sawhorse.
Step 3
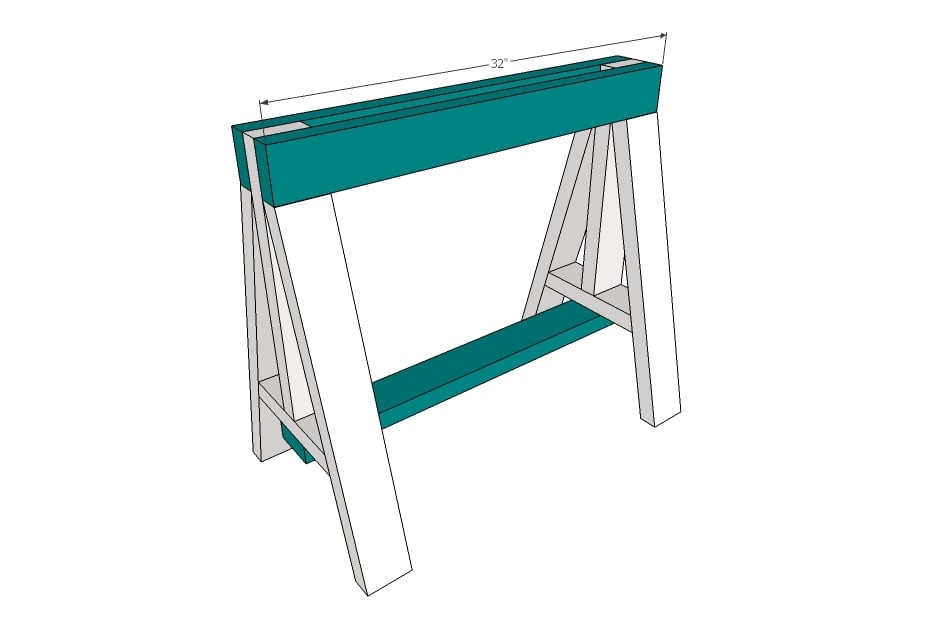
Attach with 2-1/2" screws the top 2x4s and bottom support 2x4.
Step 4
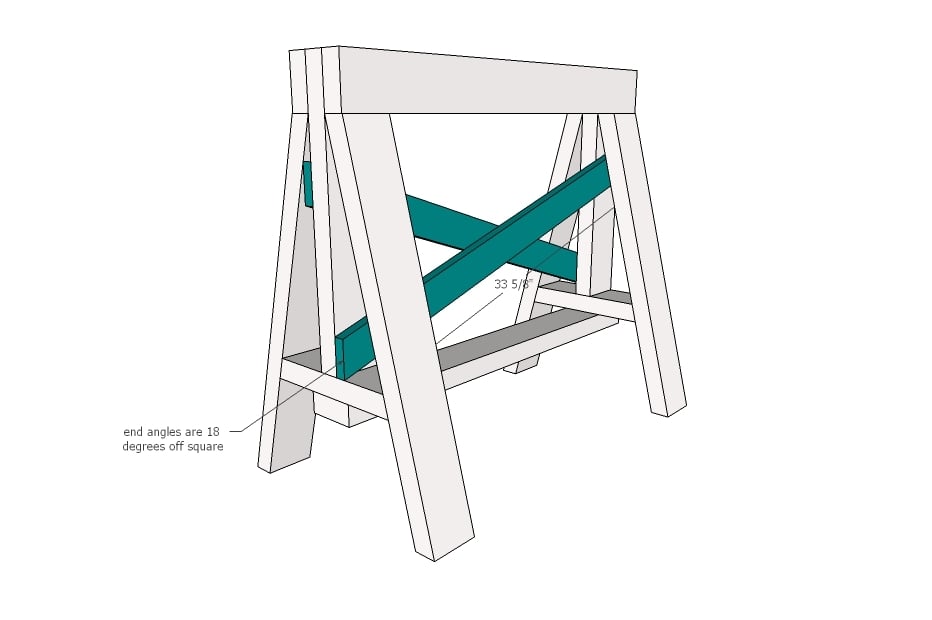
Place the cross pieces inside the sawhorse and attach with 1-1/2" screws (or similar size).
It is always recommended to apply a test coat on a hidden area or scrap piece to ensure color evenness and adhesion. Use primer or wood conditioner as needed.

Comments
prettygully
Mon, 04/27/2015 - 15:57
just what I need!
thanks ana, can't wait to build them
yhk98civil
Mon, 04/27/2015 - 20:26
I was about to buy couple plastic ones...
Thanks, Ana! I am building a couple tomorrow!!! Saved me $30+... :)
yhk98civil
Wed, 04/29/2015 - 20:48
You may want to add couple more 2x4's
I built them earlier today. I ended up using 7 - 2x4 @ 8 feet.
x-ray_dren2005
Sun, 07/12/2015 - 04:40
Truth
I had the same problem. I sat with a pen, paper, and calculator for an hour trying to configure this project into 4 - 2x4 @ 8ft. I thought maybe it was a typo and it was 10ft 2x4's, but that didn't work either. Back to the store I go!
NMexFisher
Fri, 04/01/2016 - 11:01
I like this sawhorse!
Hi Ana, I've been looking at various saw horse designs and I really like yours. I wanted to point out that because you have left the slot along the top, you could use it to place different accessory pieces into like a makeshift shelf or boards with carpet on them that would protect your workpiece. I really enjoy checking out all the projects you've accumulated. I wish I had more time to build some of your projects. Thank you. - Mario
In reply to I like this sawhorse! by NMexFisher
Ana White
Tue, 04/05/2016 - 11:00
Thanks for stopping by Mario!
Thanks for stopping by Mario!
jacksdad3
Wed, 06/15/2016 - 05:13
Heavy Duty Saw Horse Plans
Ana, these are terrific saw horse plans! So many plans are overly complex or just too darned rickety!
I am recently retired and need a couple of sturdy saw horses for my "shop" at our 5th Wheel RV site. I will use your plans to get my "shop" started.
Debbie742
Wed, 02/22/2017 - 04:01
Saw horse question
Thanks for the plans, and i'll be building these pretty quick. Is the drill you are using the impact drill, or just a normal drill? And which drill do you find you use most? Also, you mention counter height saw horses?? What height would that be, and for what purpose? AND do you have a preference of self tapping screws?? Sorry for all the questions, but I might as well get this build right the first time eh!! Thanks bunches!!
Debbie
Debbie742
Sun, 02/26/2017 - 11:08
Saw horse question
What is the difference between the counterheight and table height? And what would the adjustments be?? Also, which drill are you using, and is it the spax screws that you used??
thanks bunches. I did post a question a few days ago, but it didn't post...I don't think.
Debbie.
RobbieOrr
Thu, 08/15/2019 - 20:16
Great sawhorses for slabbing logs.
Thanks for the plans- I saw several and these were far and away the simplest. I modified them in a few ways:
1. Shortened it to 24” as I am using them for slabbing logs.
2. Made them 56” wide to be able to roll the logs for debarking.
3. I allowed for about 6” overhang beyond the legs to be able to keep the cross braces at 48” and add a pivoting stop block on one end.
4. I used pressure treated lumber and exterior wood glue as they will be spending a lot of time outside.
I have photos to share if you’d like.
rdgsc
Wed, 09/23/2020 - 10:46
Hey Ana: I really like the…
Hey Ana:
I really like the design of your sawhorses: simple, sturdy, and easy to build. I believe that you mentioned in your video that you built another taller set. If so, did you just change the length of the legs? And, did anything else change?
Best,
Linda K Adkins-Smith
Fri, 10/15/2021 - 08:44
Thanks!!
Girl you truly inspire me and others. I have plans now to design me a workshop. I have used your site for several projects and they have all turned out. You just make it so simple. Except I still have those dang drawer slides that are truly a pain to get to fit and work. I even ordered a Kreg drawer kit and still have problems. I figure practice makes perfect. Thank you for all you do to help us