
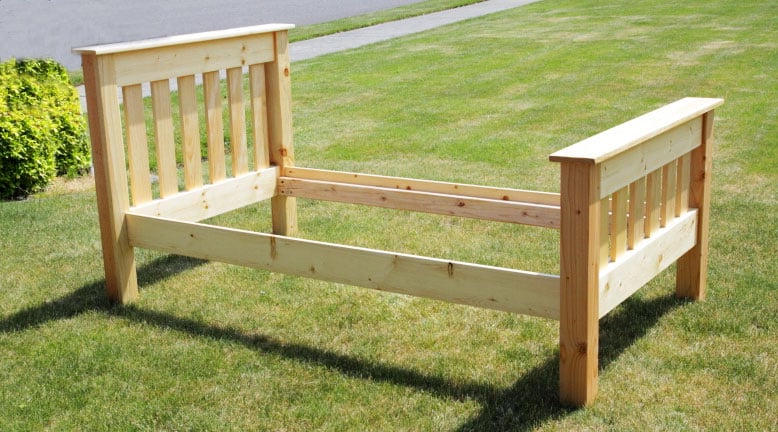

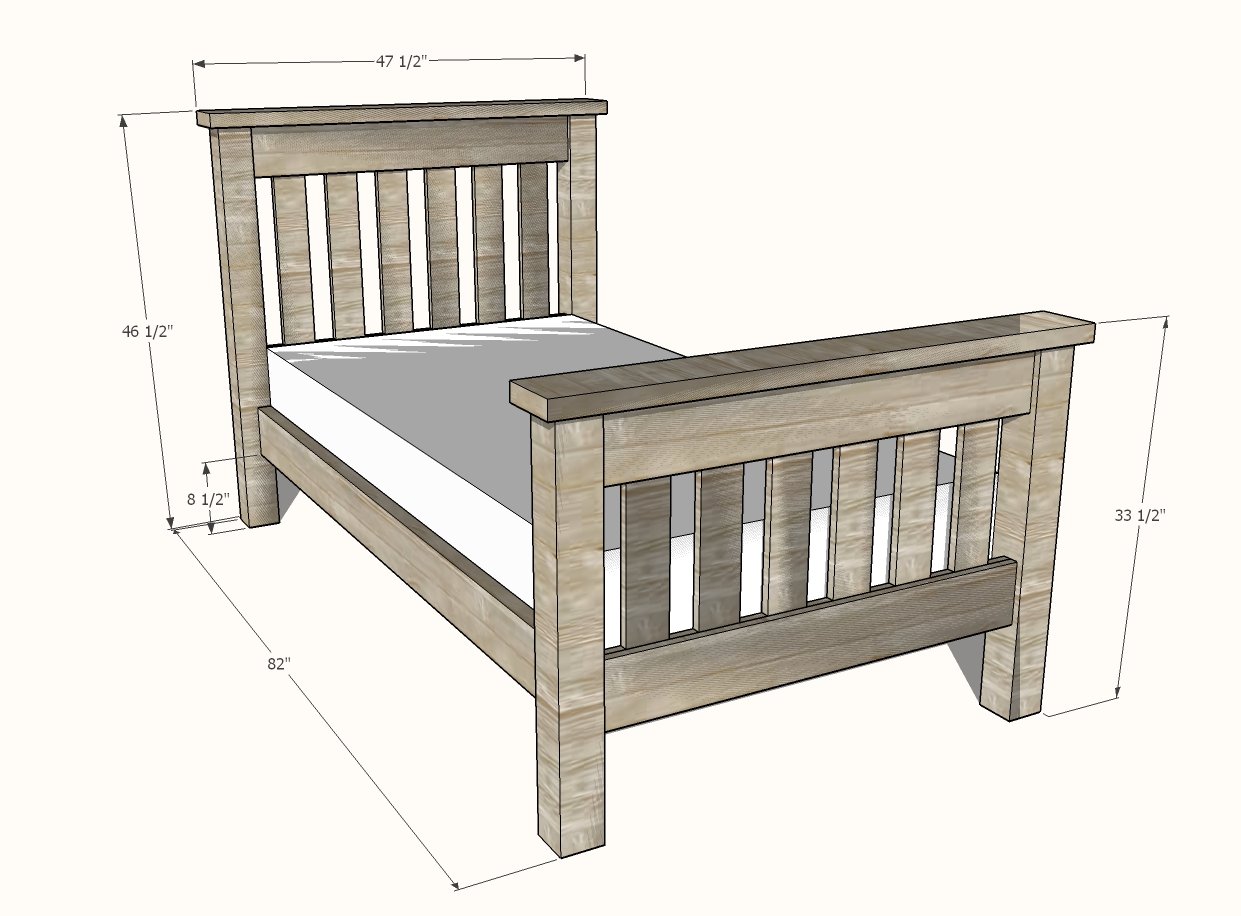
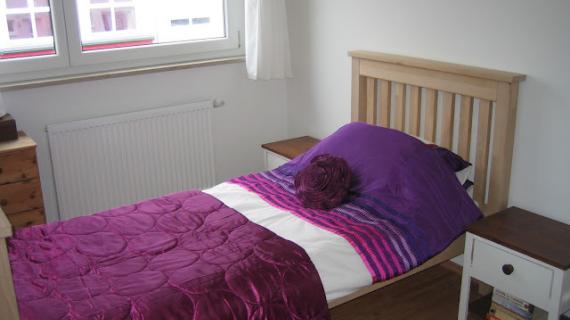
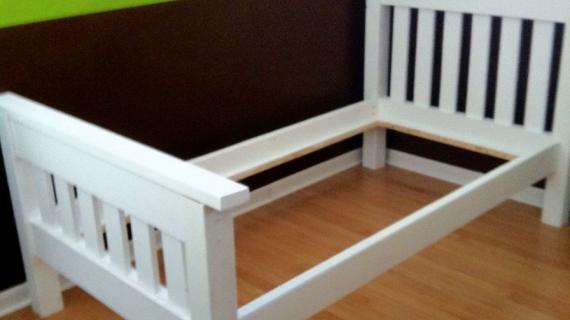
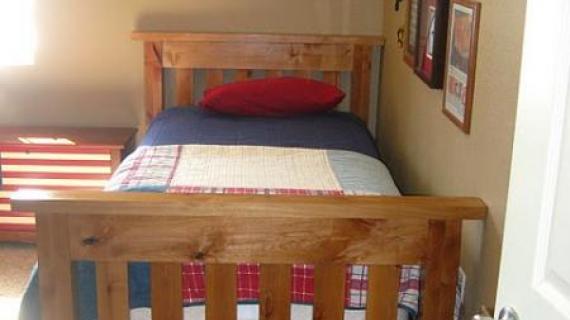
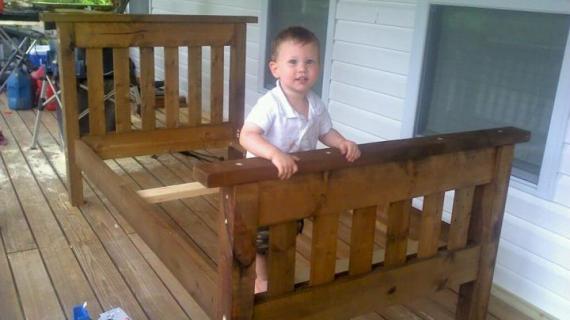
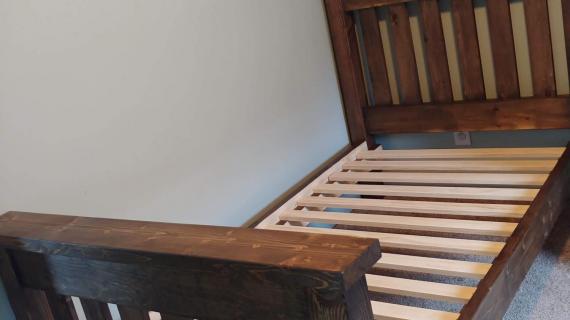
Build your own simple bed frame with our step by step tutorial and off the shelf lumber and minimal tools. We love the classic mission style, the easy construction, and the sturdy final product, sure to last and last. Boxsprings are optional. Free woodworking plans by Ana-White.com
Preparation
3 - 1x6 @ 8 feet long
4 - 1x4 @ 8 feet long
1 - 4x4 @ 8 feet long (for headboard posts)
1 - 4x4 @ 6 feet long (for footboard posts)
4 - 2x6 @ 8 feet long
2 - 2x4 @ 8 feet long
7 - 1x3 @ 8 feet long (or similar for bed slats)
1 - 1/4" long brad nails (a couple hundred)
16 - 5" long self tapping wood screws OR 2-1/2" pocket hole screws if you have a Kreg Jig
40 - 2-1/2" long self tapping wood screws
HEADBOARD
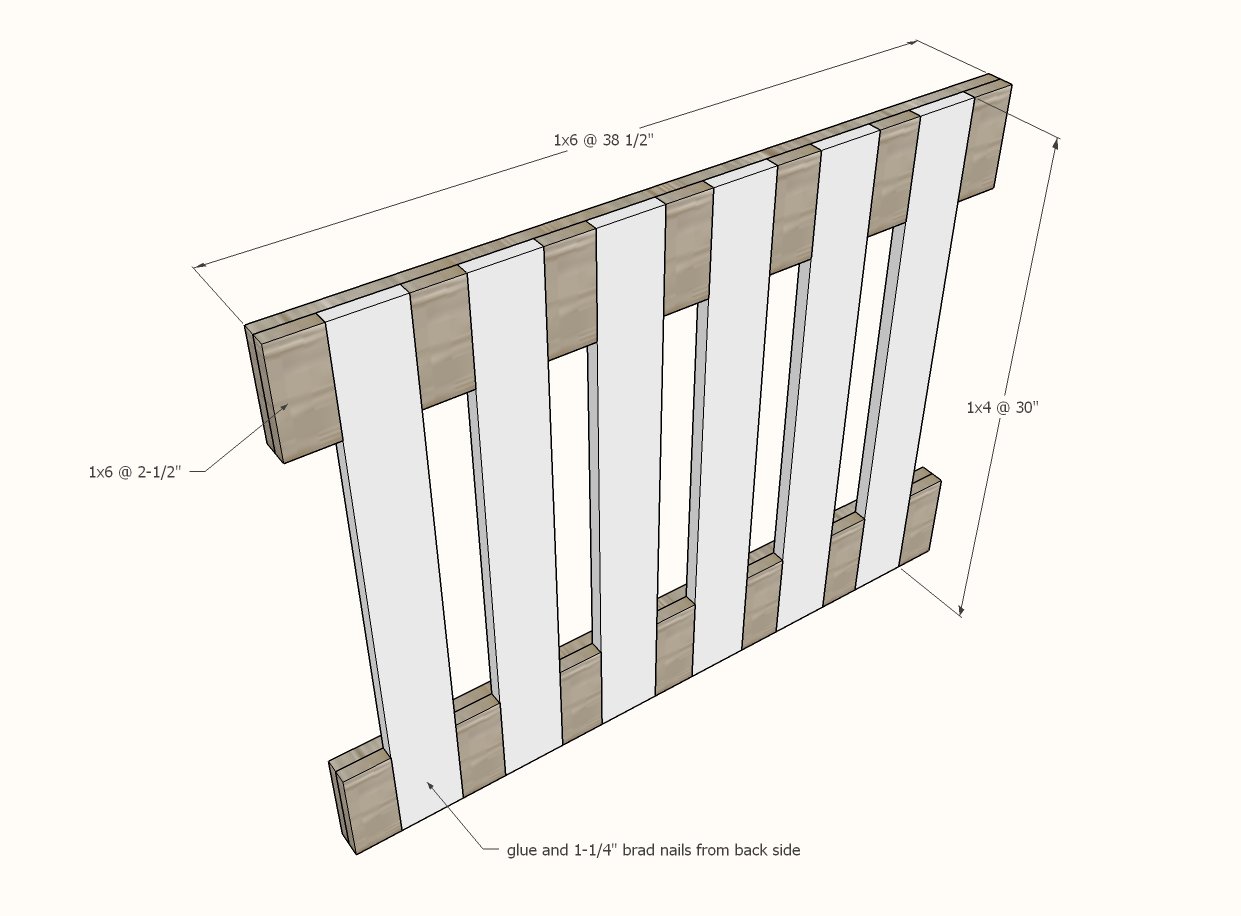
- 2 - 1x6 @ 38-1/2"
- 14 - 1x6 @ 2-1/2"
- 6 - 1x4 @ 30"
- 2 - 4x4 @ 45"
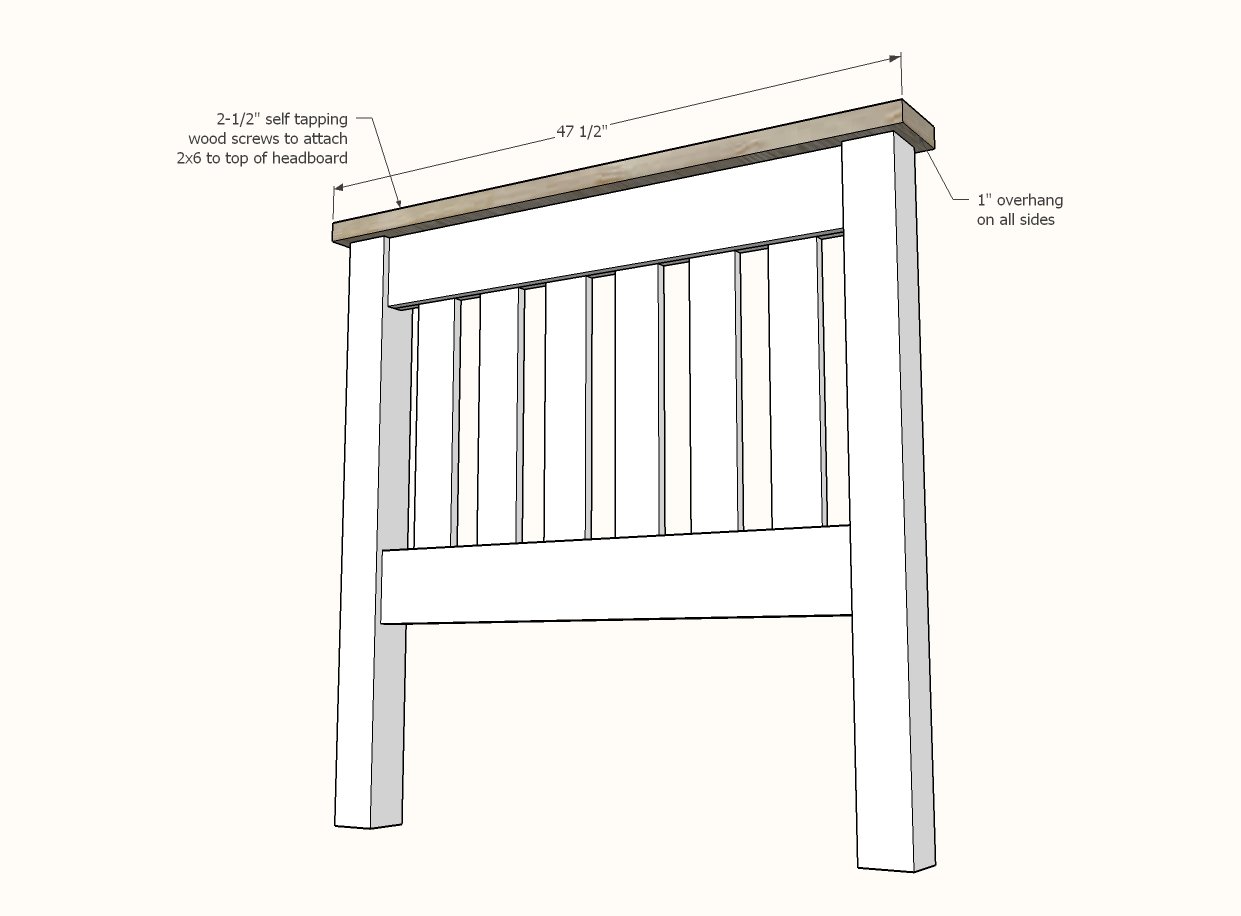
- 1 - 2x6 @ 47-1/2"
FOOTBOARD
- 3 - 1x6 @ 38-1/2"
- 14 - 1x6 @ 2-1/2"
- 6 - 1x4 @ 23-1/2"
- 2 - 4x4 @ 32"
- 1 - 2x6 @ 47-1/2"
BED FRAME
- 2 - 2x4 @ 79-3/4"
- 2 - 2x6 @ 75" (cut to fit)
- 14 - 1x3 @ 38-1/2" - slats
Cut boards with a compound miter saw (preferred) or a circular saw with straight edge.
Avoid cutting very small pieces - instead, cut a small piece from a larger piece.


Instructions
Step 1
Headboard Construction
Lay out headboard panel as shown in diagram.
Glue and nail from the back side to hide nail holes.
The final small piece should be cut to fit for a perfect fit.
NOTE: If you plan to join the headboard panel to the legs with pocket holes, carefully place nails at the outer edges of the board to allow room for drilling pocket holes in next step.
Step 2

Headboard Construction
Attach the headboard panel to the legs with either 1-1/2" pocket holes and 2-1/2" pocket hole screws (most recommended since holes will be hidden) or use screws from outside of 4x4 legs drilled into panel (fill with wood filler for final finish).
Step 3
Headboard Construction
Attach top 2x6 to headboad with 2-1/2" self tapping wood screws and glue.
Step 4
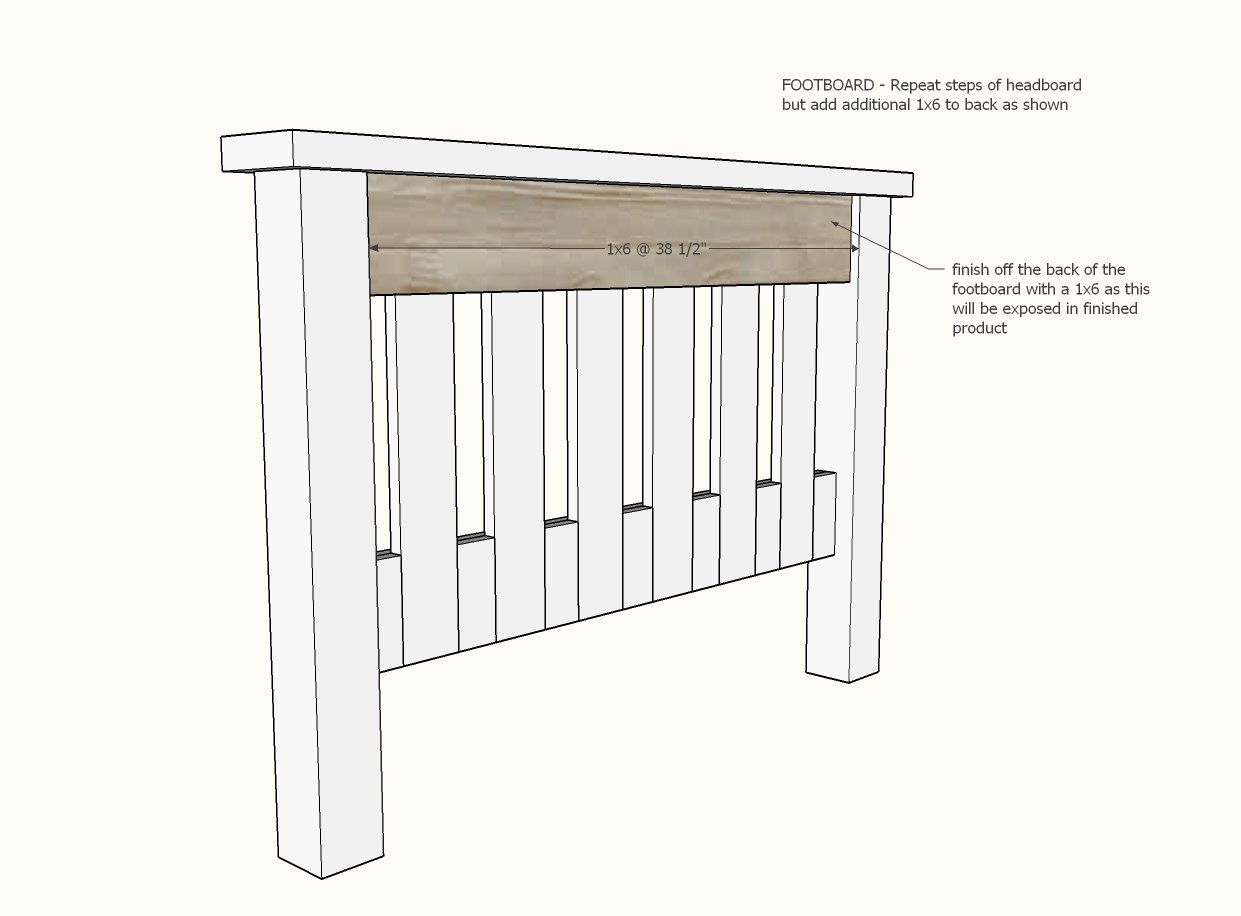
Footboard Construction
Build the footboard as you did the headboard, but finish the back side of the top of the footboard with remaining 1x6 as this will be exposed in the final product.
Step 5
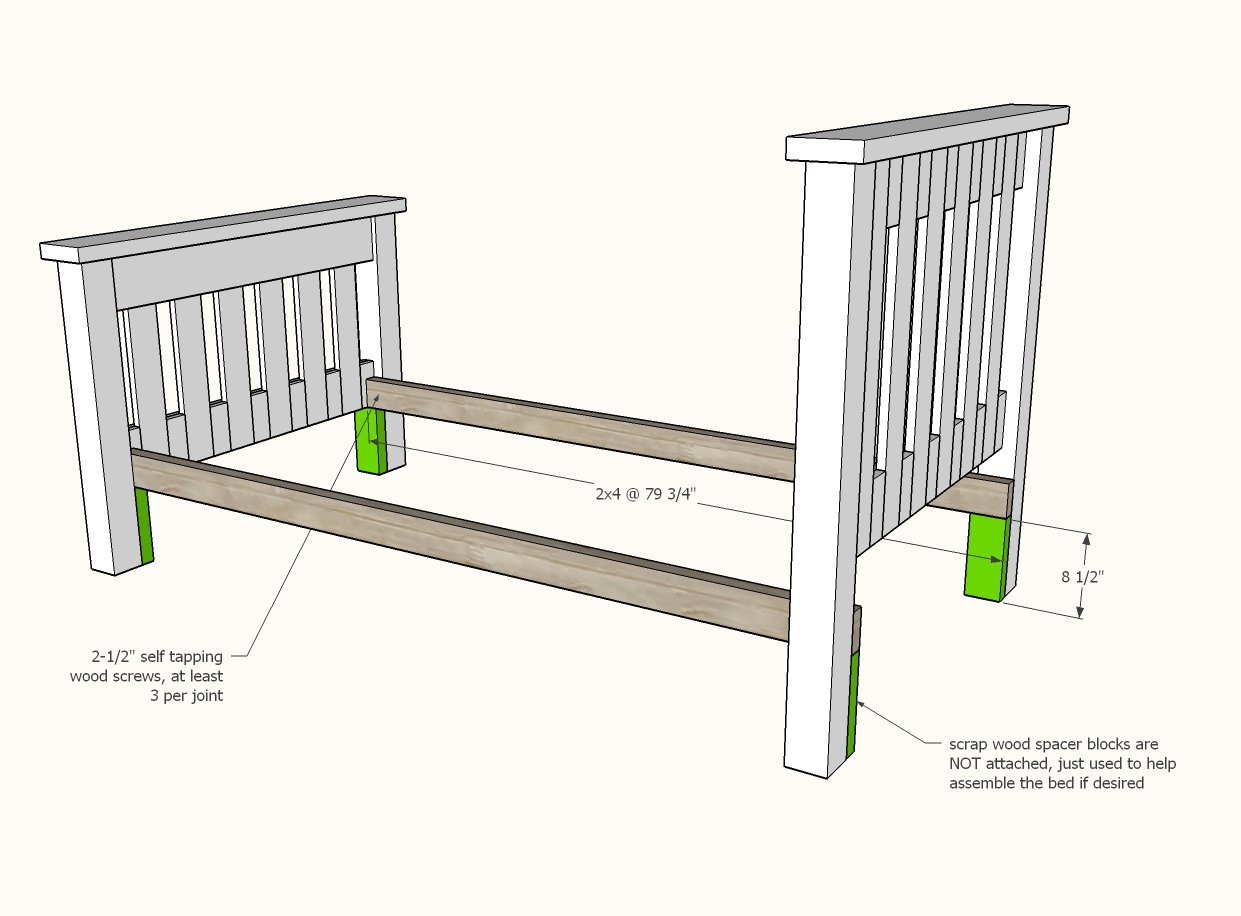
Siderail Construction
Attach 2x4 siderail cleats to the 4x4 legs with 2-1/2" screws. The green blocks shown in the diagram can be used to help assemble the bed but are NOT attached to the bed.
Step 6

Add the siderails to the cleats to finish the bed.
Step 7
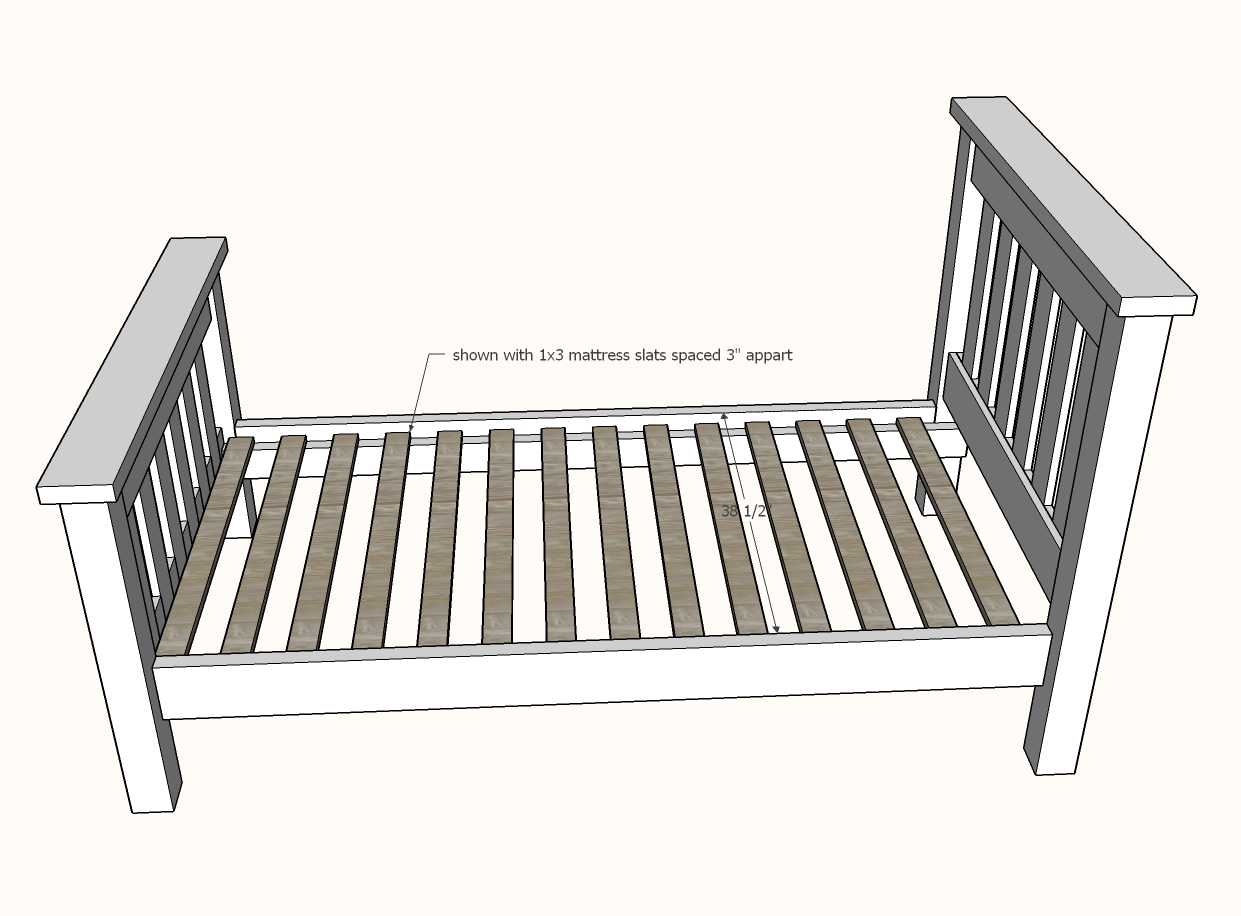
Slats should be per mattress recommendations. You can use scrap wood, plywood or other materials. As shown, we use 1x3s cut to fit.
Step 8
Fill all holes with putty and sand and finish as desired. You can choose to assemble the bed (as in step 6) after the bed is finished and moved into the room. Just make sure you do a test fit first.


Comments
In reply to Suggestion... Baby crib! by PedroAA
spiceylg
Tue, 03/27/2012 - 12:37
crib
Hi Pedro. I believe she chooses not to post plans for a baby crib because of liability issues. It was mentioned quite a while ago so I'm not sure where to find that comment to verify.
Guest (not verified)
Tue, 04/10/2012 - 07:07
4X4s
Menards has 4 X 4s. They actually have them in different woods (pine, oak, and something else too!) Very reasonable. We got enough material to made 2 beds (all pine) but we spend less than $100 on both beds.
hunter (not verified)
Sun, 04/15/2012 - 15:39
dimensions
Hi I am interested to build this bed.
However I am having a hard time to understand the dimension of this bed.
As an example, on the headboard, we use 7C+6B, which is 7 x 2.5" + 6x 4" = 41.5", which is greater than board A(38.5").
So how can sandwich those by A?
Also on step 3, "Then use long screws (at least 4") to screw into the center panel where it is sandwiched between the header boards." I think the center panel is not strong enough considering they are spacers?
Are those pictures available in bigger size? It is really hard to read those notes.
Thanks. Just want to make sure before I purchase the material and start working.
hunter (not verified)
Sun, 04/15/2012 - 15:53
material cost
I am in Ontario Canada and the material is really expensive if I want to avoid using Pressure-Treated Wood(contains harmful materials):
most expensive:
4 - 1x6 Boards 8' Length Lumber - Premium Knotty Cedar Lumber GENERIQUE, NOT AVAILABLE IN WESTERN CANADA. 1x6x8 7.17 4 28.68
4 - 1x4 Boards 8' Length Lumber - Premium Knotty Cedar Lumber GENERIQUE 1x4x8 6.95 4 27.8
2 - 4x4 Posts 8' Length CDR 4 IN. X 4 IN. X 16 FT. D4S GENERIQUE 4x4x16 52.99 1 52.99
2 - 2x4 Board 8' Length Lumber - Premium Knotty Cedar Lumber GENERIQUE 2x4x8 8.13 2 16.26
3 - 2x2 Boards 8' Length Lumber - Premium Knotty Cedar Lumber GENERIQUE 2x2x8 7.59 3 22.77
2 - 2x6 Boards 8' Length Lumber - Premium Knotty Cedar Lumber GENERIQUE 2x6x8 13.19 2 26.38
subtotal: 174.88
tax 22.73
total 197.61
medium:
dimension unit price quantity subtotal
4 - 1x6 Boards 8' Length Lumber - Premium Knotty Cedar Lumber GENERIQUE, NOT AVAILABLE IN WESTERN CANADA. 1x6x8 7.17 4 28.68
4 - 1x4 Boards 8' Length Lumber - Premium Knotty Cedar Lumber GENERIQUE 1x4x8 6.95 4 27.8
2 - 4x4 Posts 8' Length Lumber - Premium Knotty Cedar Lumber GENERIQUE 4x4x8 20.43 2 40.86
2 - 2x4 Board 8' Length Spruce - Kiln-Dried Spruce Lumber GENERIQUE 2x4x10 3.49 2 6.98
3 - 2x2 Boards 8' Length Lumber - Premium Knotty Cedar Lumber GENERIQUE 2x2x8 7.59 3 22.77
2 - 2x6 Boards 8' Length Spruce - Kiln-Dried Spruce Lumber GENERIQUE 2x6x16 9.12 1 9.12
subtotal: 136.21
tax 17.71
total 153.92
Cheapest(Pressure-Treated Wood)
dimension unit price quantity subtotal
4 - 1x6 Boards 8' Length Wood - Pressure-Treated Wood SELECT NOT AVAILABLE IN WESTERN CANADA 1x6x8 3.55 4 14.2
4 - 1x4 Boards 8' Length Wood - Pressure-Treated Wood SELECT 1x4x8 2.95 4 11.8
2 - 4x4 Posts 8' Length Wood - Pressure-Treated Wood SELECT 4x4x6 8.99 2 17.98
2 - 2x4 Board 8' Length Spruce - Kiln-Dried Spruce Lumber GENERIQUE 2x4x10 3.49 2 6.98
3 - 2x2 Boards 8' Length Spruce - Kiln-Dried Spruce Lumber GENERIQUE 2x2x8 2.13 3 6.39
2 - 2x6 Boards 8' Length Spruce - Kiln-Dried Spruce Lumber GENERIQUE 2x6x16 9.12 1 9.12
subtotal: 66.47
tax 8.64
total 75.11
hunter (not verified)
Sun, 04/15/2012 - 15:54
material cost
I am in Ontario Canada and the material is really expensive if I want to avoid using Pressure-Treated Wood(contains harmful materials):
most expensive:
4 - 1x6 Boards 8' Length Lumber - Premium Knotty Cedar Lumber GENERIQUE, NOT AVAILABLE IN WESTERN CANADA. 1x6x8 7.17 4 28.68
4 - 1x4 Boards 8' Length Lumber - Premium Knotty Cedar Lumber GENERIQUE 1x4x8 6.95 4 27.8
2 - 4x4 Posts 8' Length CDR 4 IN. X 4 IN. X 16 FT. D4S GENERIQUE 4x4x16 52.99 1 52.99
2 - 2x4 Board 8' Length Lumber - Premium Knotty Cedar Lumber GENERIQUE 2x4x8 8.13 2 16.26
3 - 2x2 Boards 8' Length Lumber - Premium Knotty Cedar Lumber GENERIQUE 2x2x8 7.59 3 22.77
2 - 2x6 Boards 8' Length Lumber - Premium Knotty Cedar Lumber GENERIQUE 2x6x8 13.19 2 26.38
subtotal: 174.88
tax 22.73
total 197.61
medium:
dimension unit price quantity subtotal
4 - 1x6 Boards 8' Length Lumber - Premium Knotty Cedar Lumber GENERIQUE, NOT AVAILABLE IN WESTERN CANADA. 1x6x8 7.17 4 28.68
4 - 1x4 Boards 8' Length Lumber - Premium Knotty Cedar Lumber GENERIQUE 1x4x8 6.95 4 27.8
2 - 4x4 Posts 8' Length Lumber - Premium Knotty Cedar Lumber GENERIQUE 4x4x8 20.43 2 40.86
2 - 2x4 Board 8' Length Spruce - Kiln-Dried Spruce Lumber GENERIQUE 2x4x10 3.49 2 6.98
3 - 2x2 Boards 8' Length Lumber - Premium Knotty Cedar Lumber GENERIQUE 2x2x8 7.59 3 22.77
2 - 2x6 Boards 8' Length Spruce - Kiln-Dried Spruce Lumber GENERIQUE 2x6x16 9.12 1 9.12
subtotal: 136.21
tax 17.71
total 153.92
Cheapest(Pressure-Treated Wood)
dimension unit price quantity subtotal
4 - 1x6 Boards 8' Length Wood - Pressure-Treated Wood SELECT NOT AVAILABLE IN WESTERN CANADA 1x6x8 3.55 4 14.2
4 - 1x4 Boards 8' Length Wood - Pressure-Treated Wood SELECT 1x4x8 2.95 4 11.8
2 - 4x4 Posts 8' Length Wood - Pressure-Treated Wood SELECT 4x4x6 8.99 2 17.98
2 - 2x4 Board 8' Length Spruce - Kiln-Dried Spruce Lumber GENERIQUE 2x4x10 3.49 2 6.98
3 - 2x2 Boards 8' Length Spruce - Kiln-Dried Spruce Lumber GENERIQUE 2x2x8 2.13 3 6.39
2 - 2x6 Boards 8' Length Spruce - Kiln-Dried Spruce Lumber GENERIQUE 2x6x16 9.12 1 9.12
subtotal: 66.47
tax 8.64
total 75.11
hunter (not verified)
Sun, 04/15/2012 - 15:56
material cost
I am in Ontario Canada and the material is really expensive if I want to avoid using Pressure-Treated Wood(contains harmful materials):
most expensive:
4 - 1x6 Boards 8' Length Lumber - Premium Knotty Cedar Lumber GENERIQUE, NOT AVAILABLE IN WESTERN CANADA. 1x6x8 7.17 4 28.68
4 - 1x4 Boards 8' Length Lumber - Premium Knotty Cedar Lumber GENERIQUE 1x4x8 6.95 4 27.8
2 - 4x4 Posts 8' Length CDR 4 IN. X 4 IN. X 16 FT. D4S GENERIQUE 4x4x16 52.99 1 52.99
2 - 2x4 Board 8' Length Lumber - Premium Knotty Cedar Lumber GENERIQUE 2x4x8 8.13 2 16.26
3 - 2x2 Boards 8' Length Lumber - Premium Knotty Cedar Lumber GENERIQUE 2x2x8 7.59 3 22.77
2 - 2x6 Boards 8' Length Lumber - Premium Knotty Cedar Lumber GENERIQUE 2x6x8 13.19 2 26.38
subtotal: 174.88
tax 22.73
total 197.61
medium:
dimension unit price quantity subtotal
4 - 1x6 Boards 8' Length Lumber - Premium Knotty Cedar Lumber GENERIQUE, NOT AVAILABLE IN WESTERN CANADA. 1x6x8 7.17 4 28.68
4 - 1x4 Boards 8' Length Lumber - Premium Knotty Cedar Lumber GENERIQUE 1x4x8 6.95 4 27.8
2 - 4x4 Posts 8' Length Lumber - Premium Knotty Cedar Lumber GENERIQUE 4x4x8 20.43 2 40.86
2 - 2x4 Board 8' Length Spruce - Kiln-Dried Spruce Lumber GENERIQUE 2x4x10 3.49 2 6.98
3 - 2x2 Boards 8' Length Lumber - Premium Knotty Cedar Lumber GENERIQUE 2x2x8 7.59 3 22.77
2 - 2x6 Boards 8' Length Spruce - Kiln-Dried Spruce Lumber GENERIQUE 2x6x16 9.12 1 9.12
subtotal: 136.21
tax 17.71
total 153.92
Cheapest(Pressure-Treated Wood)
dimension unit price quantity subtotal
4 - 1x6 Boards 8' Length Wood - Pressure-Treated Wood SELECT NOT AVAILABLE IN WESTERN CANADA 1x6x8 3.55 4 14.2
4 - 1x4 Boards 8' Length Wood - Pressure-Treated Wood SELECT 1x4x8 2.95 4 11.8
2 - 4x4 Posts 8' Length Wood - Pressure-Treated Wood SELECT 4x4x6 8.99 2 17.98
2 - 2x4 Board 8' Length Spruce - Kiln-Dried Spruce Lumber GENERIQUE 2x4x10 3.49 2 6.98
3 - 2x2 Boards 8' Length Spruce - Kiln-Dried Spruce Lumber GENERIQUE 2x2x8 2.13 3 6.39
2 - 2x6 Boards 8' Length Spruce - Kiln-Dried Spruce Lumber GENERIQUE 2x6x16 9.12 1 9.12
subtotal: 66.47
tax 8.64
total 75.11
hunter (not verified)
Sun, 04/15/2012 - 17:04
sorry for duplicate post
Please delete duplicates.
claydowling
Sun, 04/15/2012 - 19:10
Canadian lumber prices
I just checked a few classified ads around Toronto. The prices are about 2/3 of U.S. lumber prices to buy direct from the suppliers. You'll just need to shop around more to find better pricing. Check lumber yards in your area. My experience matches Ana's: the small mom and pop places have better material for the price.
Although I think I wouldn't mind taking a trip to Toronto to get some cheap lumber. $1.75/bdft for white oak is not a price I'm used to seeing.
hunter (not verified)
Mon, 04/16/2012 - 14:59
cost is not a major concern
Thanks I will go to check out local lumber yard.
But I am a newbie and do not have many tools, so maybe going to a store like HD is better option for me as they can cut for me.
My bigger concern is on the various size of each parts:
1. on step 2, 7C+6B = 7 x2.5 + 6x4 = 41.5", which is > board A (38.5")
2. on step 3, the space between the outside edge of the post/leg and the header board on both sides should be (4" - (1+1+1)) = 1/2", not 5/8";
3. on step 4, overhang = (board E 50.5" -(board A 38.5" + two legs 4" x2) ) / 2 = 2" , not 2.5"
4. on step 5, the width is board G 35.5 + F 2 + F 2 = 39.5"
5. on step 6, the width is 39.5 from above + H 2x2 = 43.5"
6. on step 7, frame is 43.5", headboard is 38.5(board A) + 4x2(two legs) = 46.5", so we have 1.5" on each side
So I guess we should change size of board C from 2.5" to 2.
Did I understand it correctly and the numbers do not add up in the plan, or I was totally wrong?
Thanks.
claydowling
Mon, 04/16/2012 - 19:23
Cutting Wood
The single most skill you need to learn is how to cut your own lumber. The lumber dealer isn't equipped to make cuts accurate enough for building furniture, and it's not fair to ask them to.
The good news is that you can make each of these cuts with a hand saw. Hand saws have a number of important properties for a beginner:
1. It's cheap. You can pick up a decent hand saw for under $20.
2. They're safe. You can't accidentally cut off a finger with a hand saw.
3. They are easy to use. There are good videos for free on the Internet about using hand saws.
4. Excellent for accuracy. A cheap saw from Lowes is good enough for fine joinery.
hunter (not verified)
Tue, 04/17/2012 - 19:03
ok i was wrong about the dimension
I did some homework and found out that actual size and nominal size are different.
So I was totally wrong.
However, another question would be:
We have 2 - 4x4 x 8' for legs, which are 2 x 41" +2 x 31" = 144", so can I buy one 4X4 X 12' instead?
Thanks.
hunter (not verified)
Tue, 04/17/2012 - 19:07
ok i was wrong about the dimension
I did some homework and found out that actual size and nominal size are different.
So I was totally wrong.
However, another question would be:
We have 2 - 4x4 x 8' for legs, which are 2 x 41" +2 x 31" = 144", so can I buy one 4X4 X 12' instead?
Thanks.
hunter (not verified)
Tue, 04/17/2012 - 19:11
ok i was wrong about the dimension
I did some homework and found out that actual size and nominal size are different.
So I was totally wrong.
However, another question would be:
We have 2 - 4x4 x 8' for legs, which are 2 x 41" +2 x 31" = 144", so can I buy one 4X4 X 12' instead?
Thanks.
Jason Lebo (not verified)
Thu, 07/19/2012 - 12:40
Step 3 question (Posts to head board)
I am very movie and I am so on the verge of firing this up, this weekend.
Quick question - Step 3
Now let's add the posts. Predrill 1/2 way through the posts on the outside.
I assume when you say outside - you man on the far left and right? Then do you cover the holes later with wood putty? Would I need a drill press for this step?
Is there a way to attach with pocket holes? Or would that not be as strong? I am making this for a 2 year old.
Will (not verified)
Sat, 08/18/2012 - 13:45
simple bed modify
Hello ana,
been looking for something to build for awhile and saw this thought it would be great. there is something that i need help changing though...well first im going to make it a bunk bed thats the easy part, just trade the foot board for a head board on the bottom bunk and a foot board for a head board on the top. but i wanted to make the side rails stronger so was going to glue two 2x6 and have one longer. i wanted to BOLT the side rail on the side of a bed instead of on the inside...to do this i would just cut out of the 4x4 legs a 2x6 deminsion so it was still flush, but im having troubles figuring out the measurement changes. is this worth it and would it actually make it stronger? OH and im kinda slow at this i dont understand how to do step three.
DaveyDaveDave (not verified)
Sat, 09/01/2012 - 19:19
For those thinking of
For those thinking of substituting plywood. Plywood often uses formaldehyde based glues in its production. You do not want that around the kids. Make sure your plywood is free of such glues. Don't rely on the sales guy at the big box store. Contact the manufacturer.
Alisha Copeland (not verified)
Fri, 12/21/2012 - 09:41
Not using a Boxspring
Can you please tell me what I would need to change if we are not using a boxspring? Thank you so much.
ccalderon83
Sun, 12/30/2012 - 14:22
Alternataive to planks
Hi Ana,
I was wondering if you could use beadboard or wainscot planking instead of the slats? Since youd want to see the plankinking on both sides could you attach it to a thin piece of plywood? How would you do this? Any suggestions??
Thank you,
Carissa
Ashley24256 (not verified)
Tue, 01/01/2013 - 09:15
Splitting wood
I've made two sets of simple bunk beds for my kids...I'm having problems with the wood splitting...like when I bump into the side of the post! I even had a 4x4 literally just fall off before assembly, which made me very nervous that these would not hold. Any tips?!
Caro
Sun, 03/17/2013 - 15:53
Expensive life in New Zealand
Hi Ana,
I've been looking at your plans on your website and your book, and was finally ready to build my first "real" project. My son needs a big bed and I wanted to make one for him.
After a lot of time spent to recalculate the measures to suit New Zealand bed sizes, I quickly calculated an average price for the bed (originally wanted a Farmhouse bed with storage) and I discovered that the price of wood is just too high here.
On the comments for this "simple bed" plan, you mentionned the cost of 1x3 in Alaska. The equivalent here is a bit over 5 US dollars.
Although I would love to build my own bed, it seems just not realistic as "ready made" beds are just more affordable.
I am SOOOOOOOOOOO disappointed, I even managed to find a Kreg Jig !
I think I will just build small items, unless I grow my own pine trees forest !!!
Thank you again for sharing your plans,
Caroline
ShaunSmith
Sat, 11/01/2014 - 21:03
Rookie Builder
Hi there,
I love the bed building so far, but am at a complete loss as to where the screws/nails go. Does anyone have any update or information on where to add screws, nails, and brackets? I've just begun this plan, but it seems like it falls apart right after the cut stage. Would so much appreciate the help on this.
kdwilson11201984
Fri, 11/28/2014 - 09:31
Screws, Nails, etc
Good afternoon ShaunSmith,
I just finished bulding this bed today. I build the basic headboard and footboard like the plans say (nail gun w/ 1 1/4" nails. I attached the 4 x 4s with 2 inch screws. I used a 1/4" spade bit to bor through the 4 x 4. I came back behind it with a 1/2" bit with a stopped to only go half way through the 4 x 4. I then put my 1/4" spade back on and drilled through the 4 x 4 hole and into the head/foot board a little. I then put on a 3/16" bit and drilled as far as it would go. I attached it with the screw and then filled it in with putty after the fact. For the 2 x 4 on top. Same deal except I used my (http://www.harborfreight.com/22-piece-carbon-steel-tapered-drill-bit-an…) counter sink but so that the screw would be below the surface. Attached two over the 4 x 4 and three along the length of the top. Once in place, I filled them in with putty, sand, paint. I also used 1/4", 5 inch lag bolts to secure the rails to the bed.
Keith
kdwilson11201984
Fri, 11/28/2014 - 09:21
Simple addition
First off, big fan of the site and love the plans. I built this bed over the past week (off and on due to work and a newborn). I made one change. I cut a 3 1/2" 2 x 2 and put it in the corner at the base of the 4 x 4. Basically, when I put the rails on the overlap of the 2 x 2 rests on this addition. That way you are not trying to put bolts in while holding up the bed. Also, it all lines up perfect everytime. Just a thought I had to make life easier since this bed can be quite dense. Thank you all.
Keith
Bigben102
Thu, 03/17/2016 - 14:15
Cant find any 4x4s
Ana, this is my first project . how will the dimensions change if I glue the 2x4s?
In reply to Cant find any 4x4s by Bigben102
anne_c
Fri, 03/18/2016 - 05:56
Lowe's
Lowe's carries untreated 4x4s. Maybe this will help
anne_c
Fri, 03/18/2016 - 05:56
BigBen, Lowe's carries
BigBen, Lowe's carries untreated 4x4s. Don't know if this will help, but thought I'd throw that out there
VanDenClan7
Sun, 04/10/2016 - 15:37
Wood Species
The only wood species readily available (and affordable) here in Northern California are doug fir, redwood, and "whitewood". I'm told by Lowe's that their whitewood is seagrape, and Home Depot's is something in the spruce/pine/fir range. We're hoping to stain the beds when they're done, and have heard that doug fir doesn't take stain well. As this will be a first project for us, can you recommend one of these wood species/types over another?
dangerdave757
Sat, 11/05/2016 - 14:39
What?
These are the worst. Why do I need to read all about your life mixed in with the plans? I'm glad you can fit in your jeans, but how is that relevant to the illegible diagrams?
bobbrger
Sat, 11/05/2016 - 15:21
Bed
Thats tough.
Letoria
Tue, 12/13/2016 - 23:43
Measurement Discrepancies
Hi! I'm new to the site, though I have built several of the projects here. I would consider myself a newbie woodworker on the cusp of becoming a novice. I need very clear, unambiguous directions or I get completely bamboozled. I've found some of the directions are very confusing for this project. The diagrams in Step 1 and 2 appear to be for the footboard, but it's unclear -- I'm assuming they're for the footboard because of the measurements that are shown on the diagram. Then the waters are further muddied when the cut list has the 1x4 rails for the footboard at 20 1/2 inches. However, the diagram shows the rails as 21 1/2 inches. I didn't notice this until I had finished doing the entire cut list. Which is the correct measurement? I'm stuck with 20 1/2" footboard rails, so if the correct length is in fact 21 1/2", will this discrepancy come back to haunt me? I know from hard-earned experience that small, seemingly insignificant errors of 1/4" will in very short order become magnified and throw off an entire project. It happened when I built the 2x4 Adirondack chair. The directions for the angle cuts were very confusing, and in frustration I went with "close enough", which seemed to be a very insignificant difference from what the plans intended. Wrong! It threw everything off so nothing fit properly and I had to scrap the whole thing and start over from scratch. I don't want to have that happen with this project, so I'd like to make sure I'm not totally messing things up. Will the discrepancy between the cut list directions and the diagram upset the whole apple cart?
Thanks!
In reply to Measurement Discrepancies by Letoria
Letoria
Fri, 12/16/2016 - 16:44
Follow up on "Measurement Discrepancies"
I found, much to my relief, that the 1" discrepancy between the cut list dimension and the one shown on the diagram did not have any noticeble impact (I used the cut list measurement). However...
For my purposes, the 4x4s for this project are waaayyyyy overkill. They headboard with just one post attached was so heavy I needed my wife to help me turn it over. It seemed doubtful we'd ever be able to move it to the spare bedroom without male help, and I hate asking my son to give up his spare time to help with things we should be able to do. Plus, the posts are so dense and "pitchy", the screws were binding when being drilled into place. It's time to cut my losses and come up with a Plan B.
In thinking it over, 2x4s should work just fine in place of the 4x4s, though I'm going to secure them with 3"x1/4" lag bolts. Even with 2x4s, this bed will be incredibly sturdy and able to withstand several very active grandkids (not all at once!) I definitely like the look of it, and it's really easy to build once you get passed the weight and bulkiness of the 4x4s.
One thing I really like about taking a basic design and making changes as the project progresses is that it forces me to think and problem solve. I'm really enjoying this project. I'll post photos when done.
miranda june
Sat, 12/23/2017 - 19:53
Siderail attachment question
Do the side rails (2x6s) get screwed into the 4x4s? Or is it just the 2x2s that are attached to the headboard? I was going to use lag bolts to secure the side rails to the 4x4s, but now I realize that the head of the bolts will stick out and obstruct the boxspring. The bed doesn't seem like it will be sturdy enough without attaching the 2x6 to 4x4s. A pocket screw would solve this of course, but I don't have that kind of equipment--and, according to the tools list for this plan, such a thing is not required for this plan. So....what do you use?? I have all the pieces ready to put together, and I want to do it right!
Carriganm
Mon, 12/10/2018 - 22:08
Couple of concerns....
I’ve started this build and two questions with attaching the 4x4 posts: 1. The 4x4 is not sitting flush with the headboard. Any tips to solve this? 2. When I’m drilling the 4” screw into the middle spacer it does not seem like the screw is long enough. Also, which board should I be screwing into? The spacer, or the 1x6 long board? The reason I ask is because when screwing into the 1x3 on one side part of the wood begins to split? Am I going to have to start over, or will it be sturdy enough? Thanks so much for any replies I really appreciate it.
In reply to Couple of concerns.... by Carriganm
Brian Famous
Tue, 12/11/2018 - 05:51
Addressing your concerns
I'm assuming both of your questions are around step 3?
For your first question, the 4x4 posts are typically actually around 3.5" X 3.5", whereas the 3 boards you sandwich together for the headboard are each going to actually only be around 0.75" for a total width of 2.25". This is expected. You should center the headboard in the middle of the 4x4 post, leaving about a 5/8" reveal both in front and back. This adds some dimensional interest to the piece.
For your 2nd question, note you are pre-drilling 1/2 way through the 4x4 - and here's the important part not clearly defined, that hole should be big enough for the head of your screw to go in so that your 4" screw sits 2" in your 4x4 and 2" in your headboard spacer. It's also a good idea to determine where the screw is going to go into the spacer so you can pre-drill this with a smaller bit (think 1/16") to help prevent splitting.
Best of luck and hope it comes out great for you!
Carriganm
Tue, 12/11/2018 - 08:30
Thank you!!
So on one side one of the spacers did split, from the sounds of it was because I didn’t pre drill. Am I going to have to disassemble and replace this spacer? And what about the 4x4 boards posts not sitting flush with the headboard? Is this normal? The gap isn’t substantial but I just want to make sure it’s sturdy enough.... thank you so much for responding. Helps a lot.
In reply to Thank you!! by Carriganm
Brian Famous
Tue, 12/11/2018 - 11:47
How bad was the split?
If the split is just superficial, you should be fine considering the screw should be going in at least 2".
For the headboard not sitting flush, do you mean the top of the headboard I'd touching but the bottom is not, or that both can touch but they are not touching the entire length of the side? If either of these are the case, that means either your 4x4 is warped (does it lay flat on a flat surface) or your headboard is out of square. If you take your headboard and pretty the floor is your 4x4, does it sit flush there?
Carriganm
Thu, 12/13/2018 - 08:32
All fixed
My boards were not square. And I ended up drilling pocket holes on the top and bottom on each side of the 1x6 boards. The boards seem way more secure now and sit perfectly flush. Thank you so much for taking the time to respond and helping me out!!!!!
celisotto
Mon, 01/20/2020 - 17:53
Love this plan
Hi Ana,
I love this plan and see that you have it in a full size, but would you happen to have it for a queen. I am thinking about trying this plan but for twin over queen bunk bed. Thank you for your time.
Respectfully,
Otto
Gurganus88
Sun, 12/27/2020 - 07:08
Plans for a Queen?
I love this bed and made a twin for my daughter. I love it so much that I want to make one for myself but I have a Queen size mattress. Do you have plans for a queen? id really love make thins for our bedroom. If not I'm gonna have to wing it.
emilys22
Tue, 01/26/2021 - 12:03
A few questions
Would there be any issue extending the side rails by 5 inches to make this fit a Twin XL? Also, I’m a little confused by the first step. The spacers and the 1x4 slats get nailed to the 1x6, but the spacers and slats don’t connect to each other in any way? How many nails should be used for each spacer and slat? Also, when screwing the 2x6 to the top of the headboard, do you just go right in the middle of the 2x6 and not worry where the screw ends up in the slat/spacer/1x6 sandwich? Or do you just screw the 2x6 into the 4x4 legs? Thank you for any help! I’m looking forward to getting started.