

Free tiny house plans by Ana-White, full ammenties.
Well, it took me forever, but I finally got it done!

After getting so much crap (hehehe no pun intended there) about creating a tiny house without a bathroom, I promised you a modified version with full ammenities.
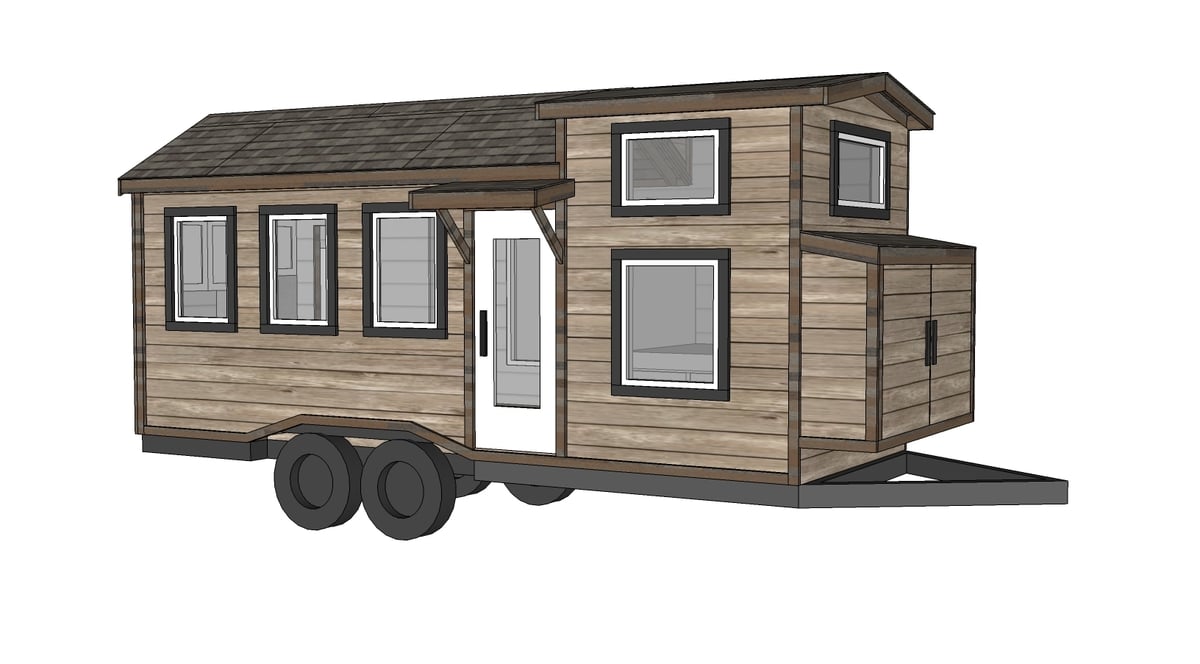
This proved to be a little more difficult than I thought, because I'm a stickler for things looking balanced on the inside and out. Changing the floor plan meant changing windows - windows that had been very carefully placed for maximum curb appeal. Here's what I finally came up with -
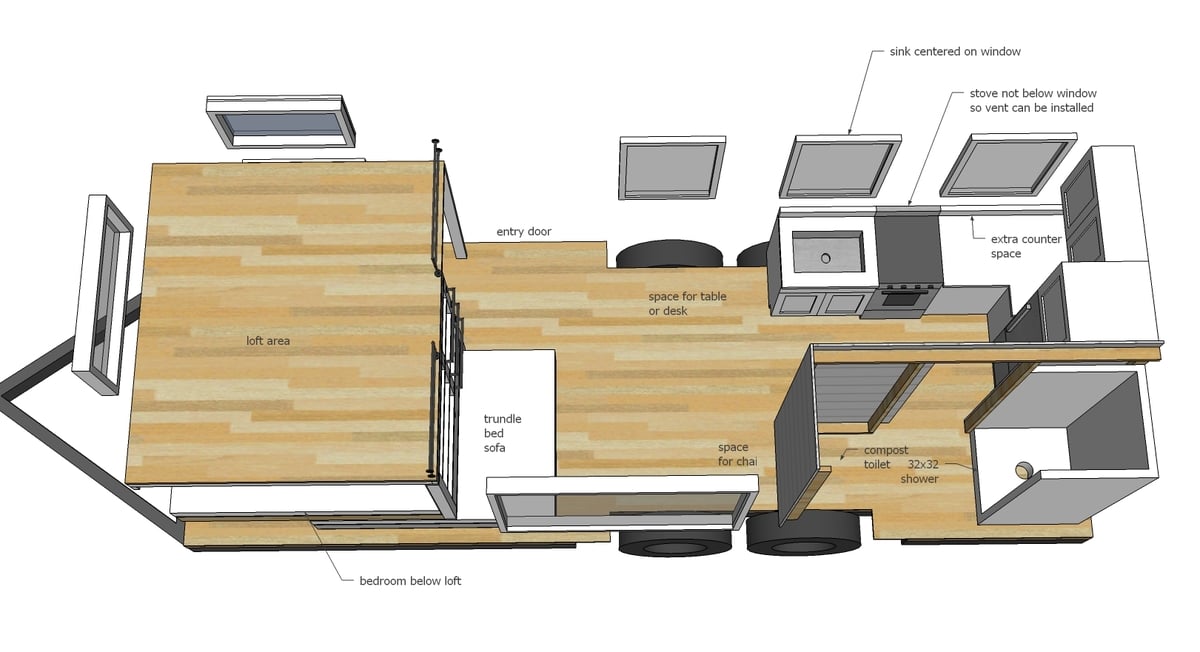
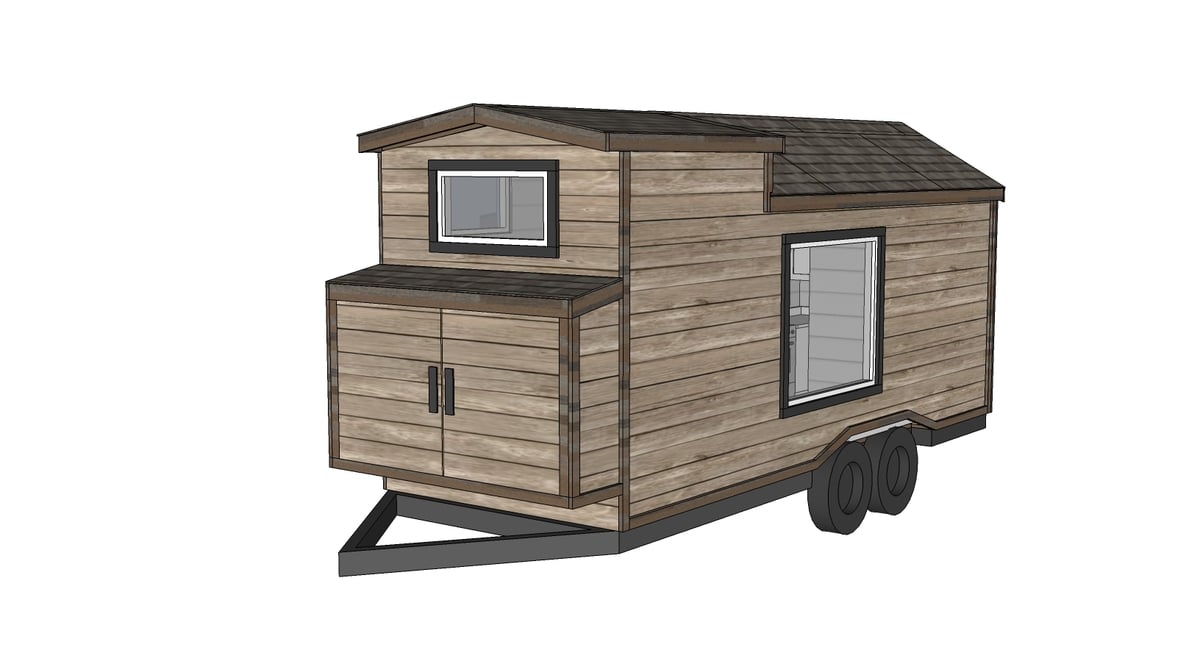
I moved the kitchen to the front wall, and placed the bathroom where the kitchen was. The windows on the front are carefully placed to allow a stove and sink to fit under and between. This does mean we loose the end door, and the desks that convert to a table, but you can still place a smaller desk under the remaining window. When you go tiny, you have to comprimise on some things. I feel like this is a good balance of keeping that open feeling, while adding all the ammenities. And did you notice the full size appartment fridge?
One thing I did not do is account for water tanks and utility storage. Depending on your climate, you can do a few different things. If it must be insulated, the corner of the kitchen could hold tanks, or there is storage on top of the bathroom. If freezing isn't an issue, tanks could be stored outside or underneath. I'd love to hear how you tackle that one, so if you do build, please share.
Well, here are the plans! Enjoy! Can't wait to see your tiny house!
XO Ana
DOWNLOAD FREE TINY HOUSE PLANS QUARTZ MODEL WITH BATHROOM
PS - Make sure you check out the original plans as they are very similar and there is alot of added information through videos and projects that you can find here.
Pin For Later!

Comments
ninarodriguez
Wed, 08/17/2016 - 16:30
Tiny House with bathroom
Thank you for sharing this with us. I am so inspired by what you do. I want to build one a bit longer "2*' and still have a door out the back and two sleeping lofts. Do you have any suggestions for doing this with your model ?
ninarodriguez
Wed, 08/17/2016 - 16:44
Tiny House with Bathroom
Sorry forgot to ask would you share the plans to build the exterior deck :-) from the original tiny house.
Ana White
Thu, 08/18/2016 - 09:39
Hi the easiest way to keep
Hi the easiest way to keep the door but add the bathroom is to take the fridge out and put the door where the fridge is. The fridge could go in the corner. If the tiny house is two feet longer, this would mean two more feet of counterspace, so you'd get it all.
You could easily add a loft above the kitchen and bath, but the ceiling height would be low without the added dormer like on the other half of the tiny house. I'd maybe just do taller walls and the lower pitch all the way down the tiny house.
We can share the deck plans - need to get more photos.
Thanks again! Ana
HockeySkates
Fri, 11/04/2016 - 15:16
Love, love, love what you've
Love, love, love what you've done! And thanks for sharing the plans, only wish I could do that myself (using SketchUp and the like).
Love the fact that there is only one loft, the kitchen is NOT under a loft (one of the areas where most of the standing is done would then become "cramped" under a loft) AND that you don't have to climb a loft to go to bed every night. And love that table -- how genious!
Gotta say I lean towards the model with the bathroom (kind of a deal breaker for us, in a more permanent use), but, as ninarodriguez said, I would be curious to see it in a larger size -- my idea would be a 28 ft plan (to get that second entrance, and the light coming from it, like in the Quartz model; that so opens up that end of the house). Similar to your reply to her, you could add a (more traditional) closet next to the shower, or maybe that's where the hot water heater/on-demand heater goes to keep the plumbing to a minimum?
Finally, I also think I like the 3 windows better than the one big one, but I do miss the openness of the shelves that were above the kitchen area, as opposed to the cabinets. The outside lights on the Quartz are a really nice touch though.
Thanks again for all of what you've done and shared. I'm going to have to learn how to use SketchUp.
All the best!
Daverrr
Wed, 09/28/2016 - 12:54
Tiny Home Build.
Hello,
Thank you for making this video series on the tiny home build. I think you will be helping a ton of people live a better life with this.
You could have easily added (smart home automation, solar, propane, generator) to this to make it off grid.
Any thoughts on doing a container home build?
I love your web site and have subscribed to your youtube channel.
I wish you and your family all the success, health and joy you can handle.
Sincerly DR. Paquette
whall
Wed, 11/02/2016 - 11:56
Weight
Have you ever weighed the tiny house? Have you towed the house?
gthomp
Mon, 11/28/2016 - 06:09
Weight
Same question. What is the weight of this project I have a trailer. I am going to start this build but am curious if the weight for towing purposes.
ksalyers
Mon, 11/07/2016 - 16:22
Cost for this build?
I was wondering how much this build cost you. I am very intersted in building something like this and not sure how much money I'll need.
matthew1344
Sat, 12/31/2016 - 05:09
Cost?
How much is the total cost for this?
jgioulis
Sat, 12/31/2016 - 06:05
I got all the wood free, so I
I got all the wood free, so I can't say. If you look at the plans I built from, that might give you a better idea
jgioulis
Sat, 12/31/2016 - 06:08
sorry this went on the wrong
sorry this went on the wrong thread
In reply to I got all the wood free, so I by jgioulis
Victoria.NotVicki
Sun, 01/01/2017 - 20:52
How to get wood for free
Hello,
I'm looking for discounted building material options. How did you get the wood for free? Do you have any ideas for getting lumber cheaply if not free?
Thaank you!
Thyri
Sun, 01/01/2017 - 19:00
Desks and table
You could have one desk where you suggested and a fold down desk attached to the outside of the bathroom wall by the sofa/trundle. As far as a dining room table, a folding table would work. Not as cool, but functional, and you have the option of taking it outside to eat on nice days. Might be able to store such a thing under the trundle; I can't remember if there's wheel(s) in the center.
Drag0nfly
Mon, 01/30/2017 - 03:10
Tiny House Build materials list
Love the Tiny house plans. Can you tell me where I can find the materials list for this tiny house build?
Thank you
Walker3030
Wed, 03/01/2017 - 05:23
New project
Could you guys do a "bar shed"? Would be cool to see how one turns out and what kind of cost is involved
In reply to New project by Walker3030
Ana White
Wed, 03/01/2017 - 13:30
Those look pretty sweet, we
Those look pretty sweet, we can't commit to anything at this time. Thanks
for your understanding! We will keep it in mind for the future!