
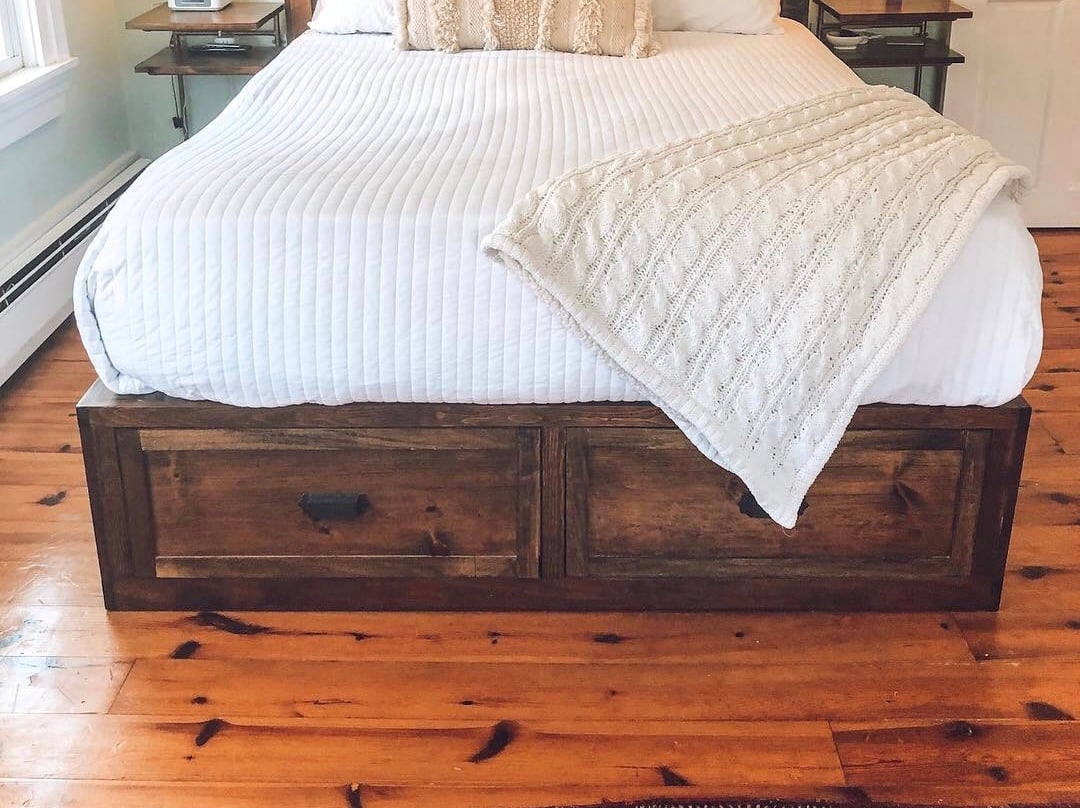

It's simple to build a storage bed! Just build three benches. Our free plans show you exactly how.
This plan is also available in a Standard King version.
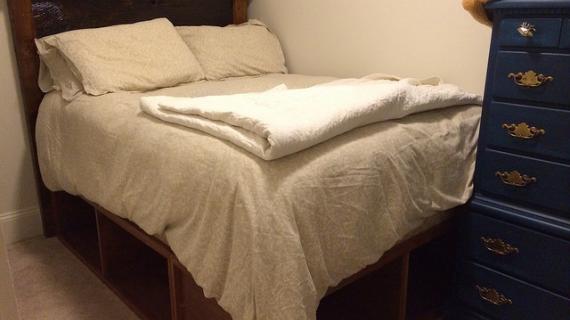
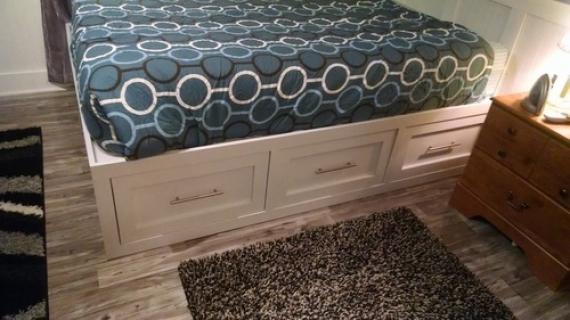
Reader submitted photo by One Delightful Home
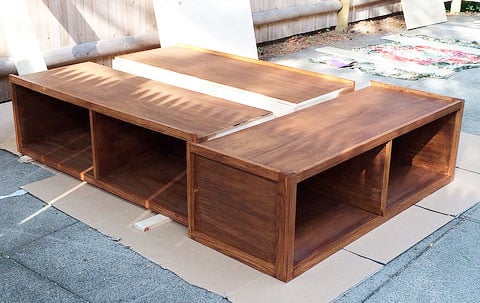
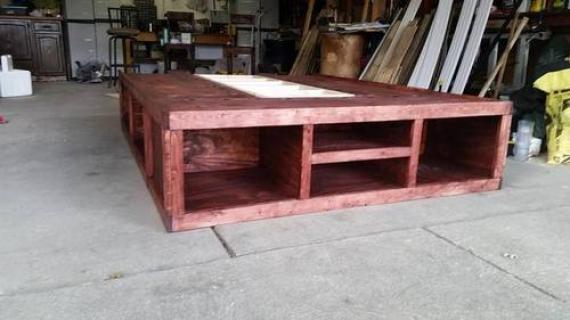
We love this simple to build storage bed! It's simply three benches that are easy to move into the room. The cubbies are nice and deep and oversized, perfect for baskets or bins.
This is an updated plan. The old plans are still available here.
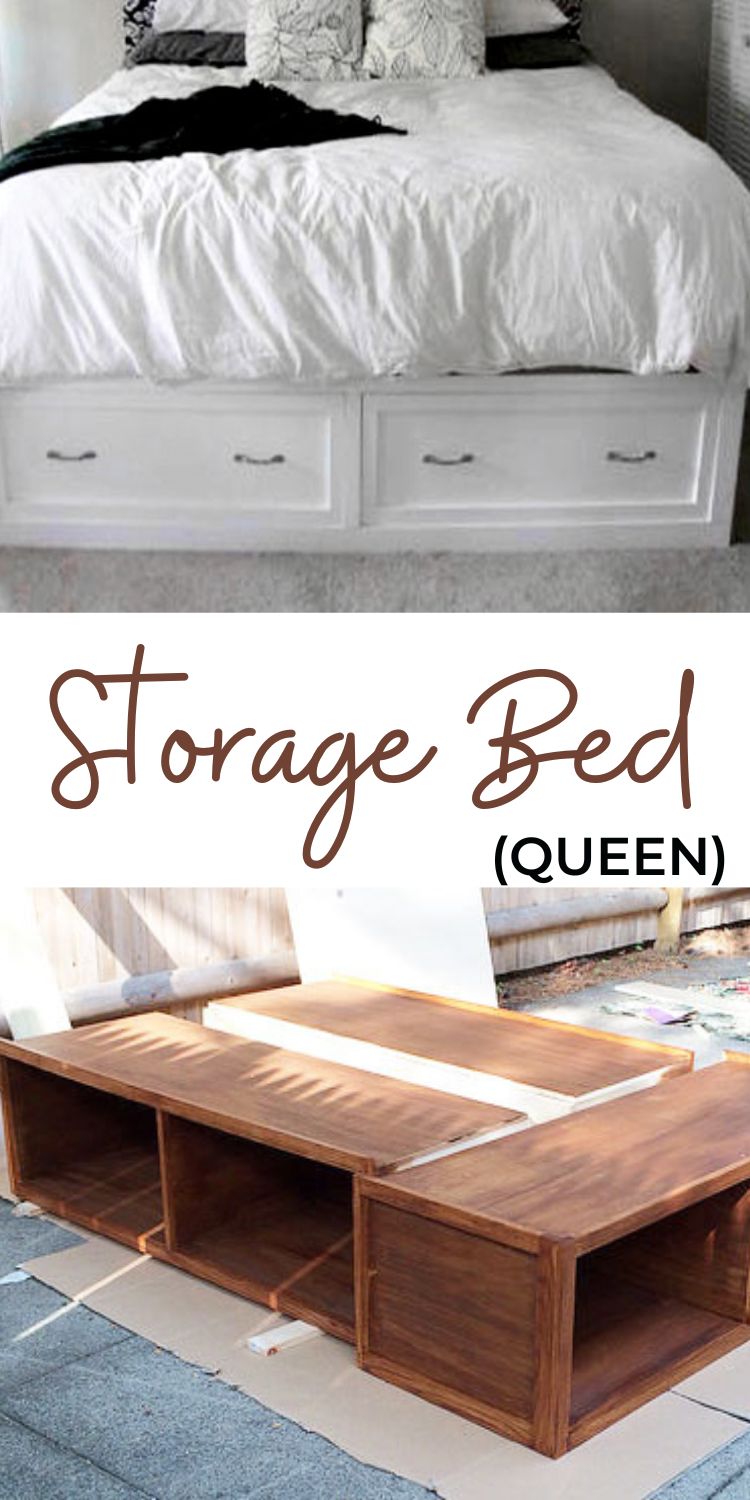
Pin For Later!
Preparation
- 3 - 4x8 Sheets of 3/4" Cabinet Grade Plywood, MDF or AC Plywood*
- 1 - 4x8 Sheet of 1/4" thick plywood
- 4 - 1x2 @ 8 feet long
- 3 - 1x4 @ 8 feet long
*For a stained finish, cabinet grade plywood is recommended. For a painted finish you can use MDF (not fun to work with but inexpensive) or AC Plywood (will need more sanding but also less expensive)
OPTIONAL DRAWERS SHOPPING LIST
- 3 - 1x4 @ 8 feet long
- 6 - 1x6 @ 8 feet long
- 1 - sheet of 1/4" thick plywood
- 6 - 18" drawer slides
- 2 - 1x12 @ 8 feet long
Carcasses
- 3 - 3/4" plywood @ 19-3/4" x 60"
- 9 - 3/4" plywood @ 19-3/4" x 14-3/4"
- 6 - 3/4" plywood @ 19-3/4" x 28-7/8"
- 3 - 1/4" plywood @ 15-1/2" x 60"
Face Frames
- 3 - 1x2 @ 60"
- 3 - 1x4 @ 60"
- 9 - 1x2 @ 11-1/4"
End Bench
- 2 - 1x4 @ 20-3/4"
- 2 - 1x2 @ 20-3/4"
- 4 - 1x2 @ 11-1/4"
Center Support
- 2 - Scrap plywood strip @ 60" x ~7-1/2"
- Scrap plywood pieces 20" long
OPTIONAL DRAWERS - Should be built to fit openings and drawer slides
- 12 - 1x4 @ 18" - drawer slide cleats
- 12 - 1x6 @ 18" - drawer box sides
- 12 - 1x6 @ ~24-7/8" - drawer box front and back - ADJUST TO FIT YOUR OPENINGS AND DRAWER SLIDES
- 6 - 1/4" plywood @ 18" x ~26-3/8" - drawer bottoms - cut to fit the drawer bottom
- 6 - 1x12 @ 27-1/2" - Drawer Faces
For three sheets of 3/4" plywood:
- Rip lengthwise into 6 strips, 8 feet long by 19-3/4" wide
- From these strips, first cut the 60" long pieces
- From scraps, cut remaining pieces
- There will be three scraps, 8 feet long by about 7-1/2" wide. Save this scrap piece and use as the cleat at the back of the side benches
For the 1/4" plywood
- Cut 60" x 48" piece
- From this piece, rip into three pieces, 60" x 15-1/2"
For the trim and face frame pieces, a compound miter saw is recommended for nice cuts.


When fastening, you can use 2" nails or 2" screws, unless otherwise directed. Always use glue. Remember, you need to make 3 benches.
Instructions
Step 1
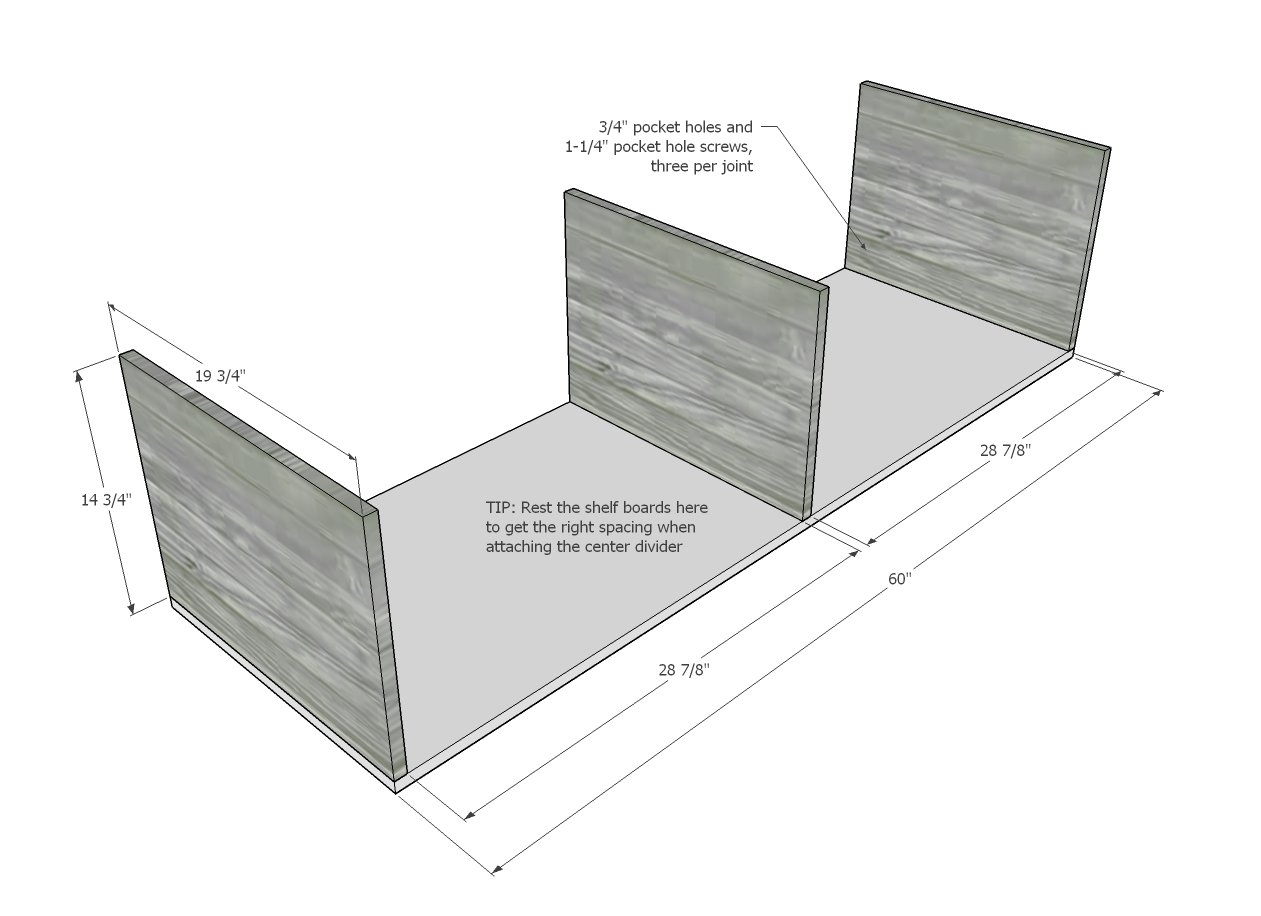
Attach the bench ends and divider to the bench top with 3/4" pocket holes and 1-1/4" pocket hole screws. Pocket holes should be placed about an inch from each edge and centered, three per joint is plenty.
TIP: Use the shelf boards (attached in next step) as a spacer to guide placing the divider perfectly centered.
BUILD THREE BENCHES.
Step 2
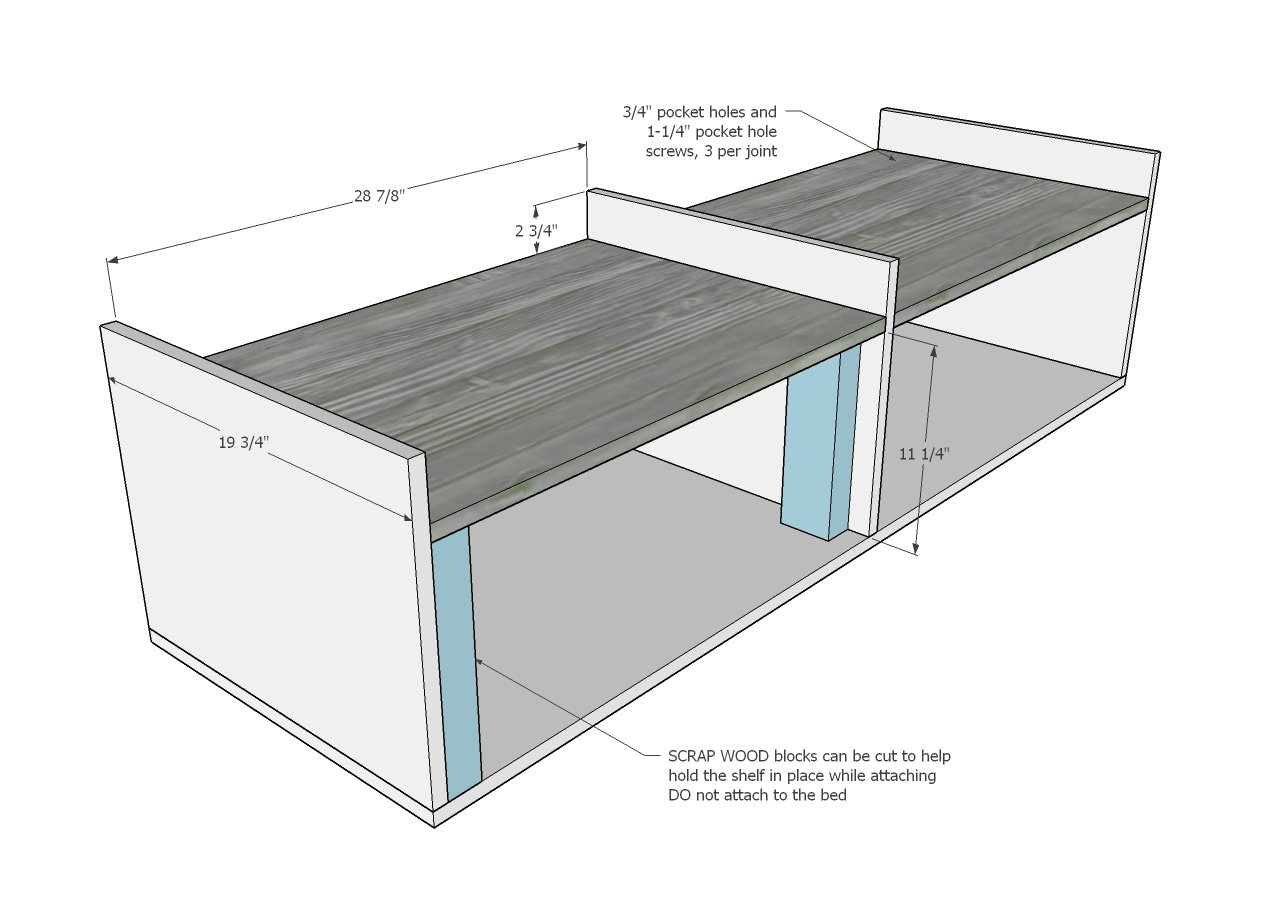
Drill 3/4" pocket holes on each end of the shelves.
Attach to the sides and dividers.
Scrap wood blocks can be cut to help with assembly as shown in diagram.
CONTINUE FOR ALL THREE BENCHES
Step 3
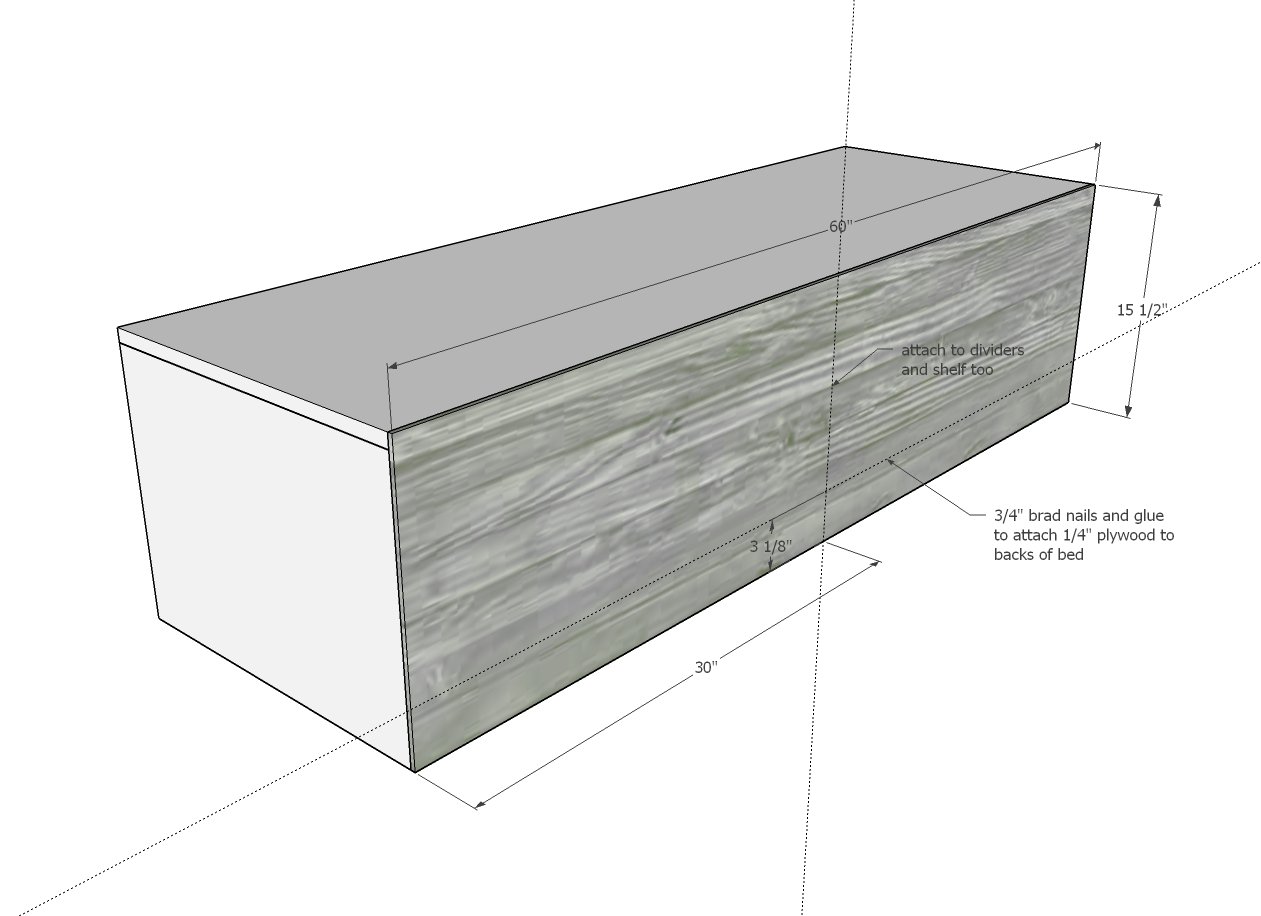
Nail and glue 1/4" plywood backs to all three benches.
CONTINUE FOR ALL THREE BENCHES
Step 4
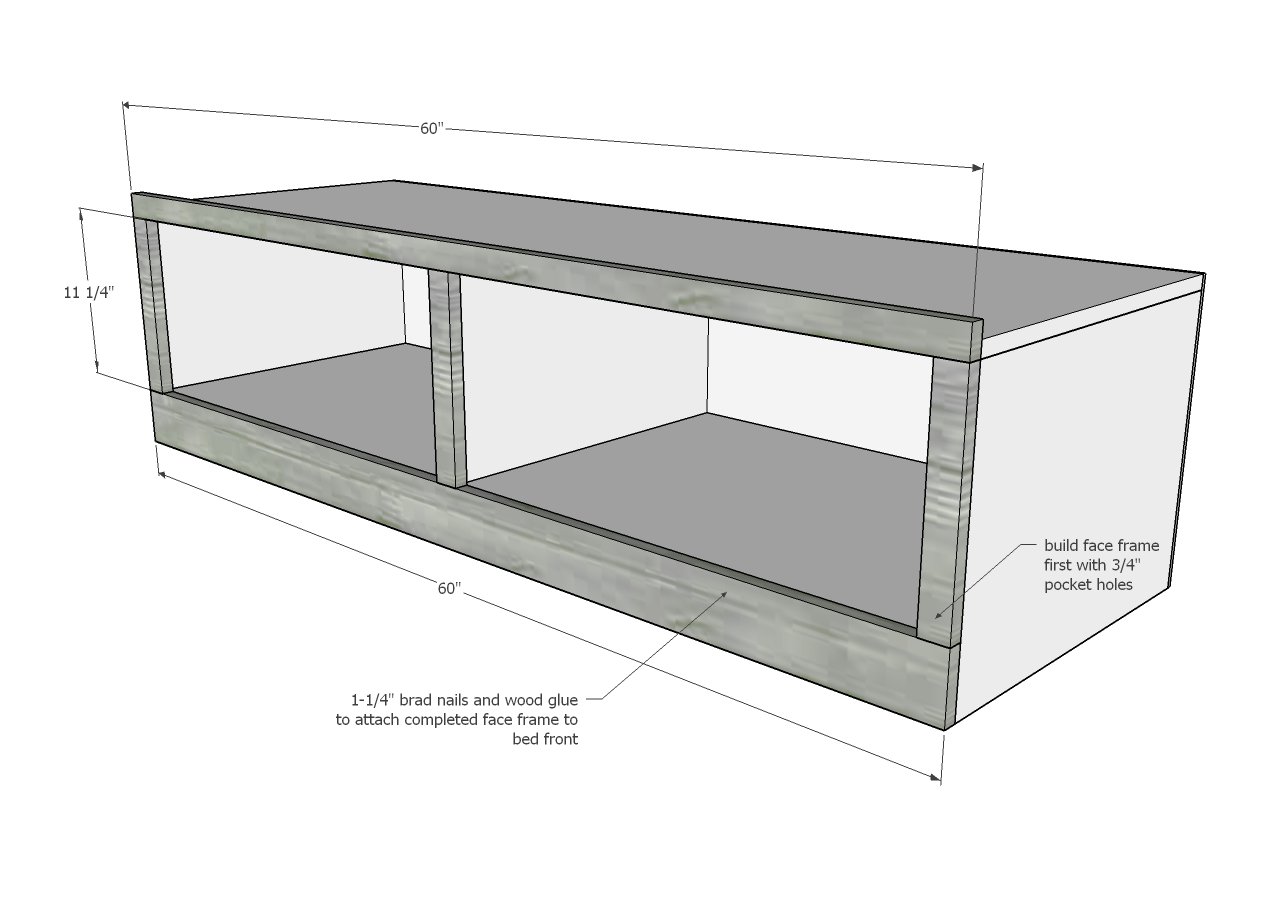
Cut the 1x boards with a miter saw. Build face frames on a flat workbench.
Nail completed face frames to all three benches.
Step 5

END BENCH ONLY
For just the end bench, build two face frames to trim out ends. Nail and glue to the ends of the end bench only.
Step 6
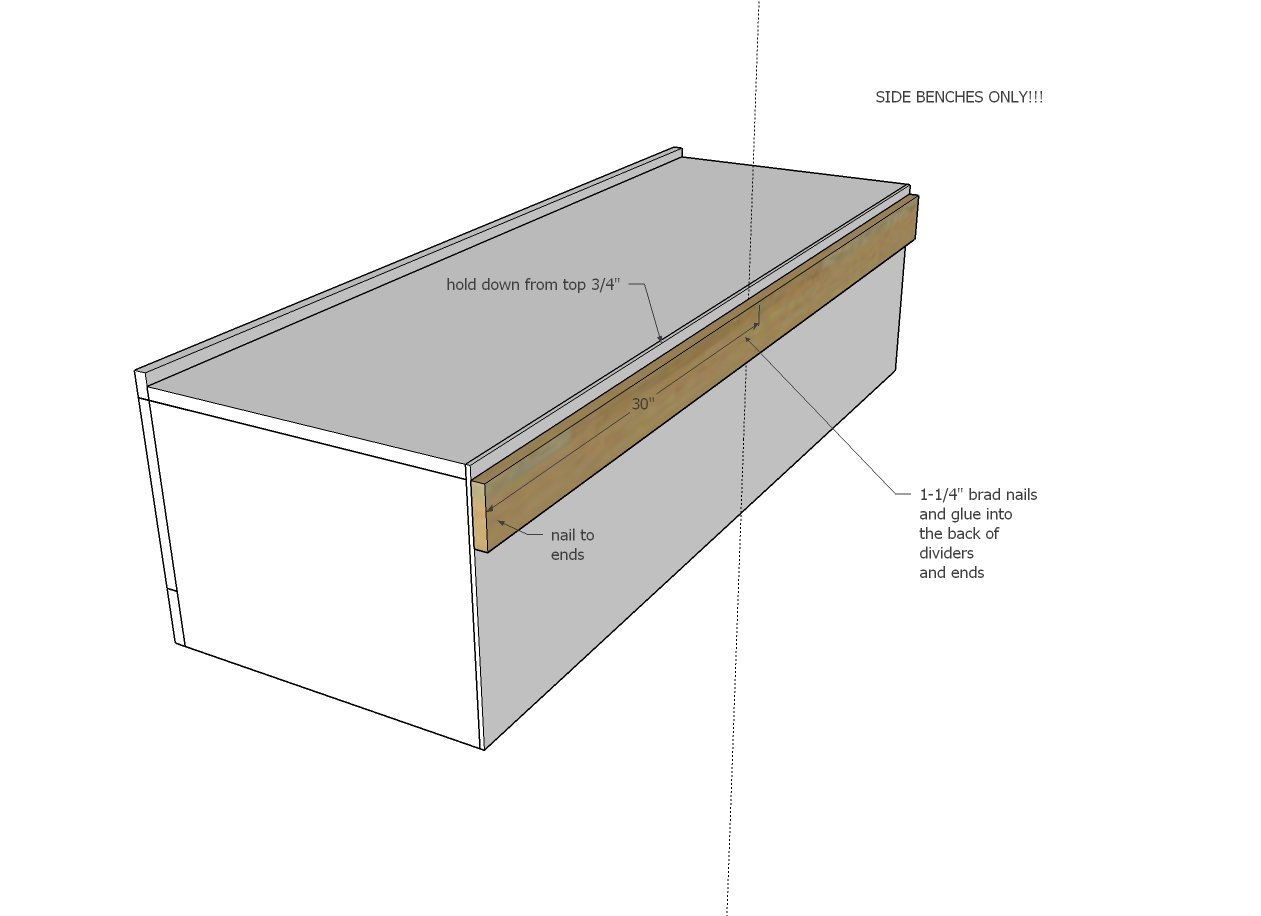
SIDE BENCHES ONLY
Attach 1x4 cleat to the back of the SIDE BENCHES ONLY, held down 3/4" from top of bed. Nail into the divider and end backs with glue.
Step 7
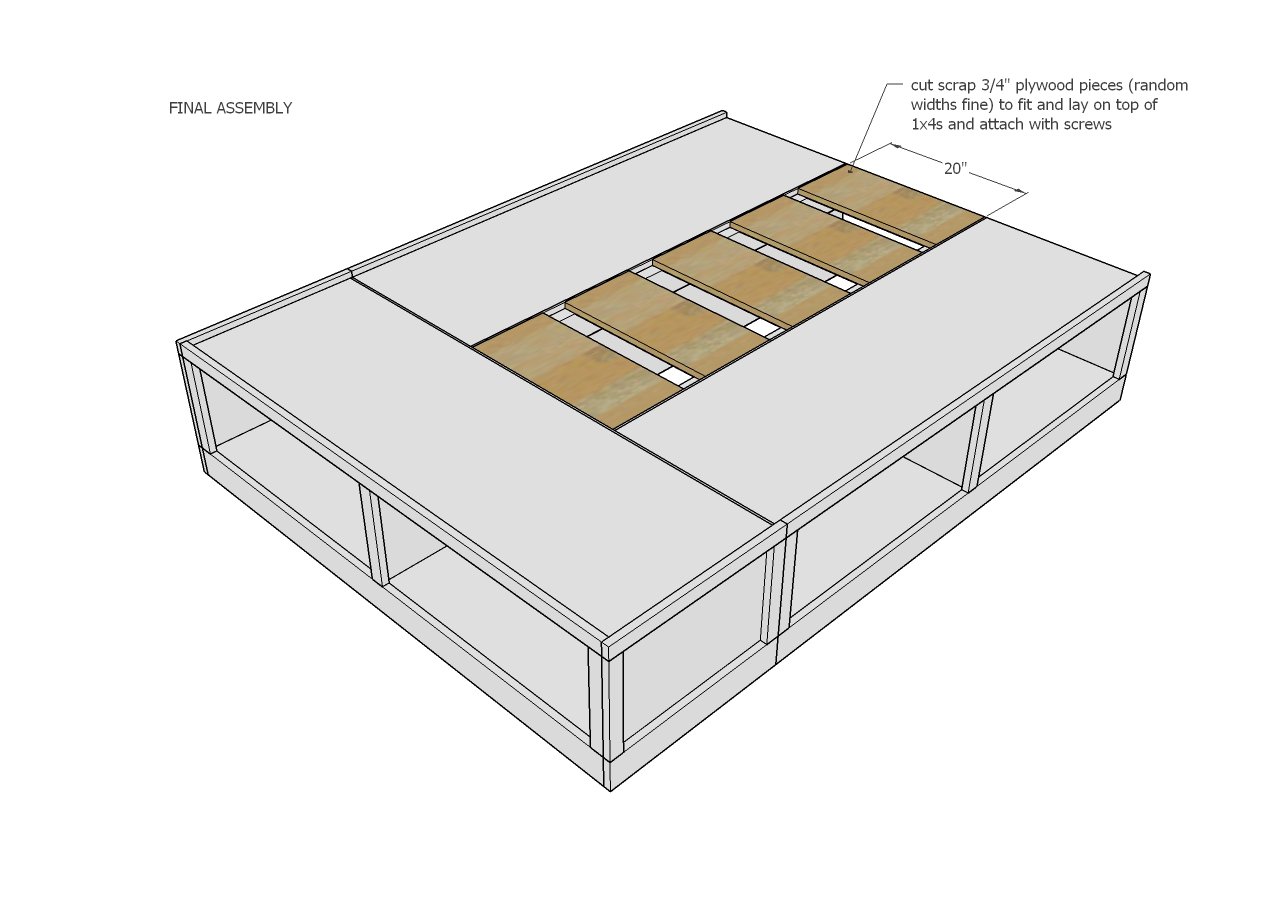
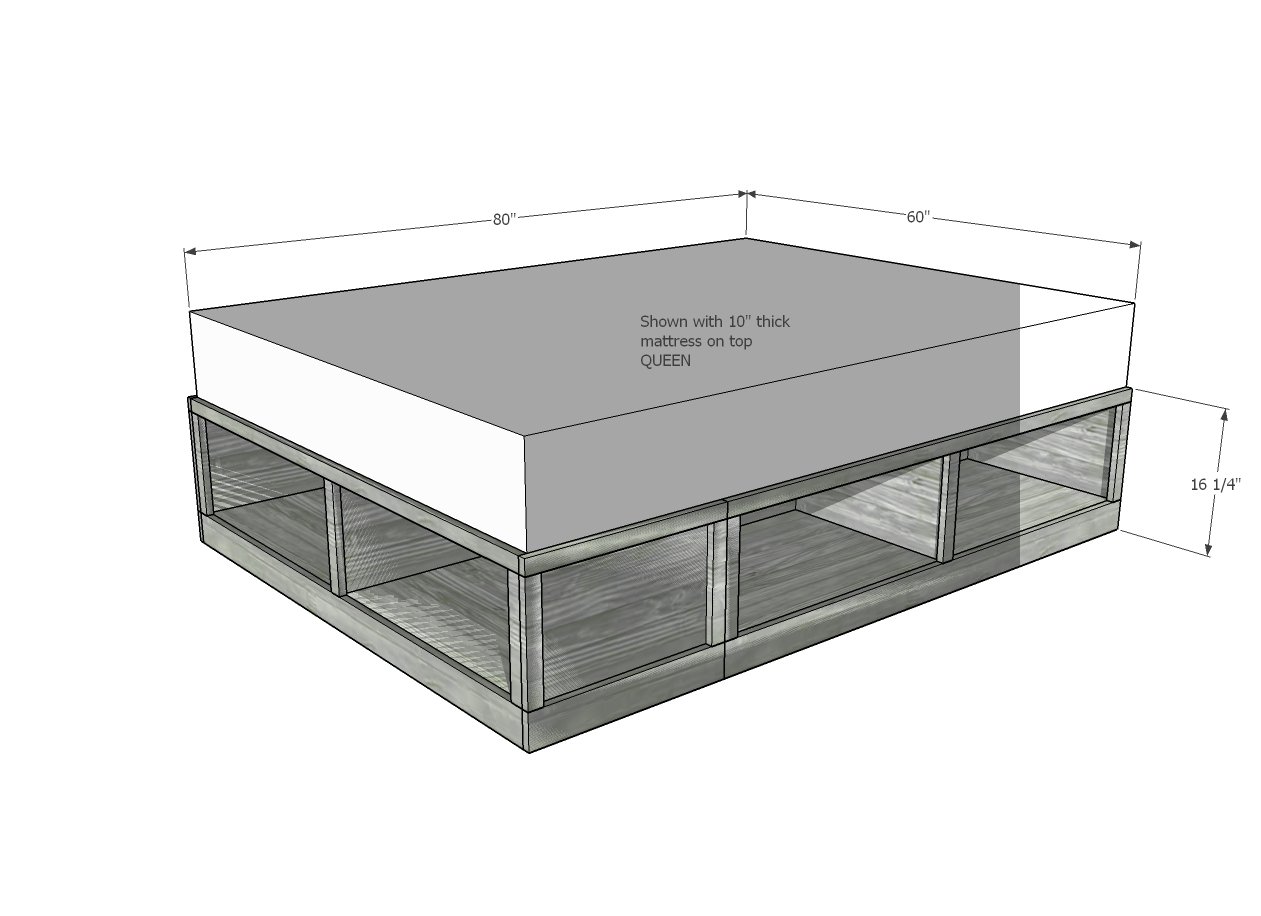
Arrange the three benches in room.
You can screw together if desired.
Lay scrap wood plywood (can be random sized) in the opening in the center of the bed. We recommend screwing down (so it's easy to disassemble the bed at a later time). You can use 1-1/4" pocket hole screws, 1-1/2" self tapping screws would be less expensive.
Step 8
OPTIONAL DRAWERS
Draw a line on 1x4s, 1" up from bottom edge of 1x4.
Attach drawer slides to the 1x4, with front edge of drawer slide cabinet member flush with front edge of 1x4.
The holes in the center of the drawer slide should line up with your pencil mark, 1" up from bottom edge of 1x4 - so you know your slides are being installed level.
Remember that the opposing drawer slide needs to be installed in mirror.
Set the 1x4s inside the cubbies and nail to the sides of the cubbies with 1-1/4" brad nails. The front edge should be lined up with the front edge of your plywood carcasses.
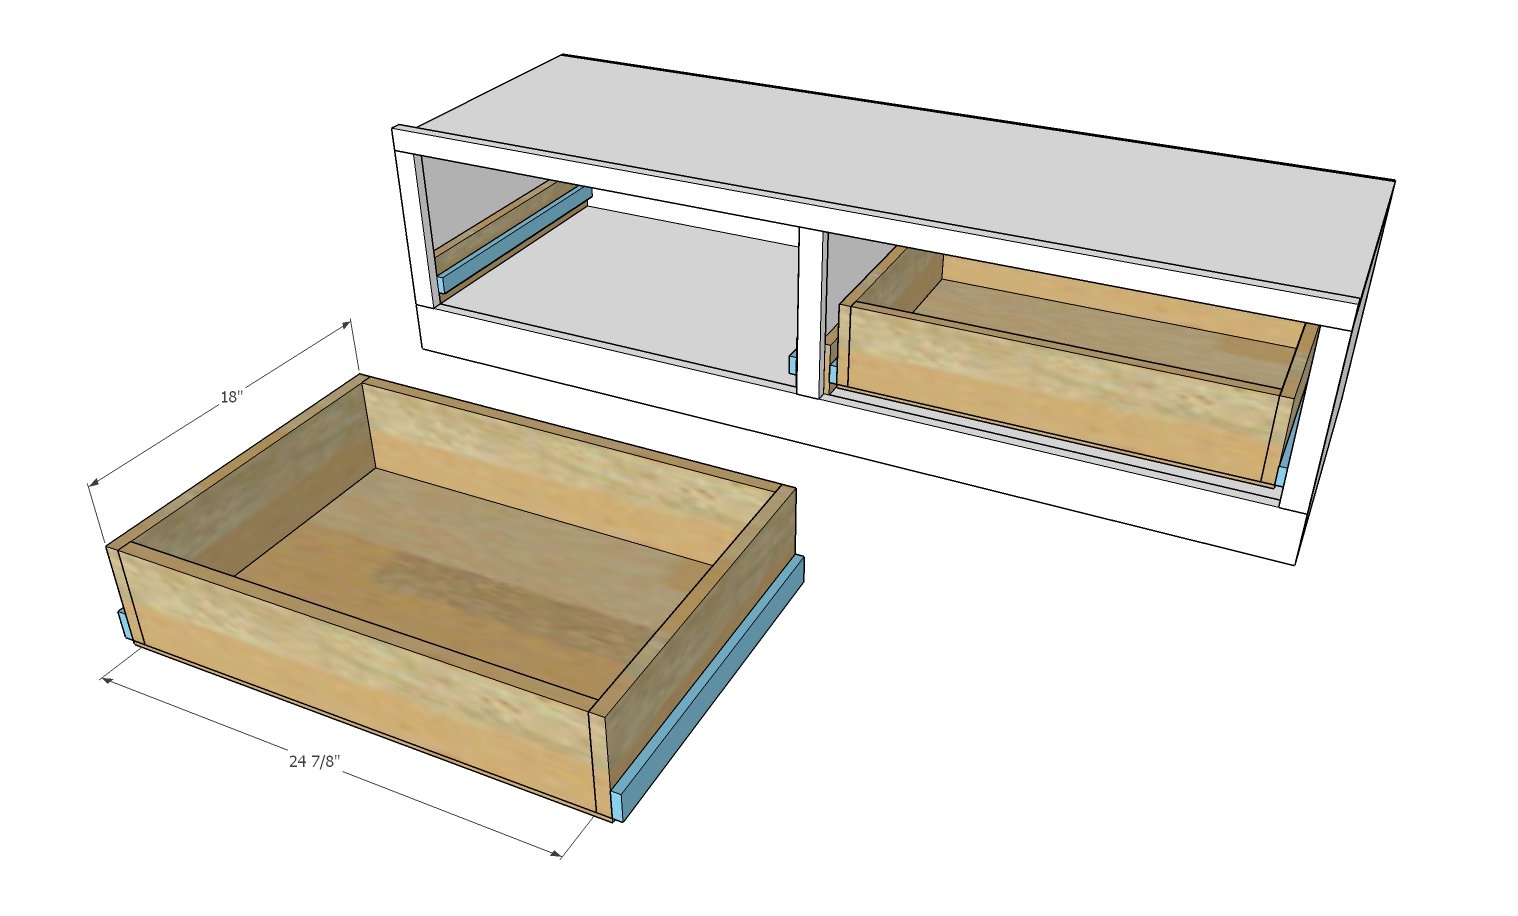
Build the drawer boxes from 1x6s as shown. The sides should always be 18" to match your drawer slides. The fronts and backs may need to be altered in length to fit your openings and your drawer slides.
Build the boxes with 3/4" pocket holes on the outsides and 1-1/4" pocket hole screws.
Nail 1/4" plywood to bottom of drawer box with glue and 3/4" brad nails.
Install the drawer member slides on the drawer boxes.
Fit drawers inside the drawer slides.
Step 9
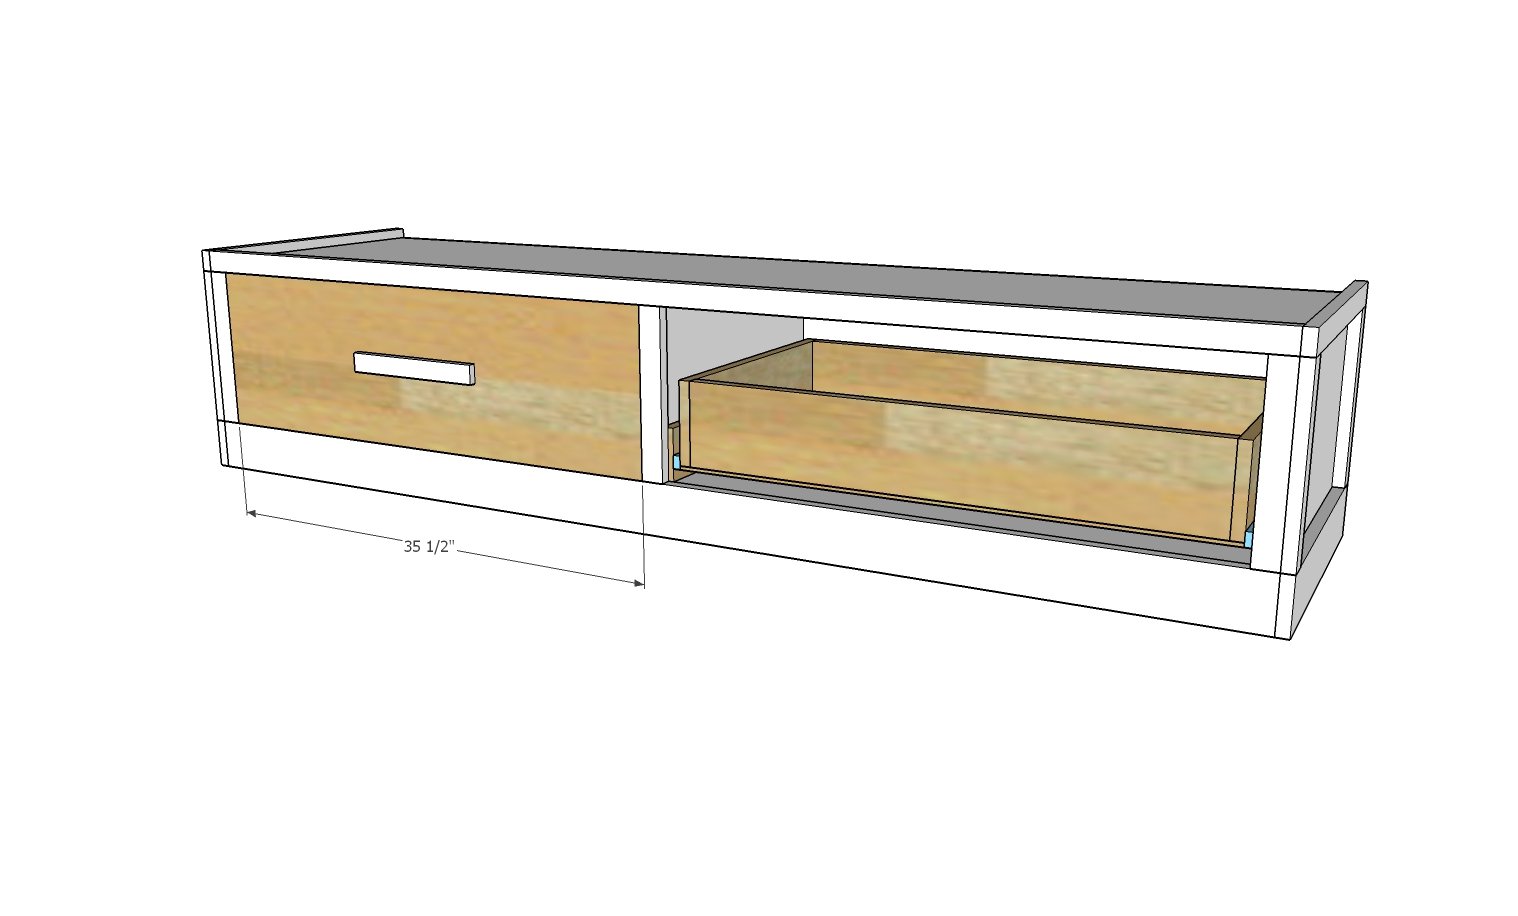
Measure and cut the drawer faces to fit.
You may need to cut the drawer down in size with a table saw.
Nail drawer face in a few places to front of drawer box with even gap around all four sides. Avoid nailing where hardware will be placed.
Remove drawer and further secure with 1-1/4" screws (you can use pocket hole screws) from inside of drawer. Avoid screws where hardware will be placed.


Comments
Sweettia
Wed, 02/19/2014 - 05:04
Pocket hole screws
I wanted to build this using my keg jig, but I don't know what size of the pocket hole screw would be best for me to use. Thanks in advance!
mnberumen
Sun, 04/13/2014 - 16:04
Estimated Cost?
Hi Ana, I was just wondering if you had an estimated cost for this project? I am very sorry if this has already been posted I just cant seem to find it anywhere. :)
Thanks!
mnberumen
Sun, 04/13/2014 - 16:04
Estimated Cost?
Hi Ana, I was just wondering if you had an estimated cost for this project? I am very sorry if this has already been posted I just cant seem to find it anywhere. :)
Thanks!
balloongal247
Mon, 04/14/2014 - 08:08
Tags say price estimate
One of the tags says the price estimate. I've found this is often the case, since one of her plan searches is by estimated price. This one says $150-$200.
mrs_sgt_myh
Sat, 07/04/2015 - 10:56
shoulda!
I definitely should have read EVERYTHING lol sorry!! It does say $150-$200! I was so excited, even at $200 that beats taking the time to find an antique platform frame and building storage anyways (my original plan!). But the plywood alone, before any of the 1bys, is pennies from $250! :/
honeywithahammer
Wed, 02/25/2015 - 07:49
Estimated cost
Sorry to be a pain but when reading your plans your estimated costs tend to vary greatly from the brag posts for the plan sometime they more than double? Do you know why that may be? I ask mores because if you budget for around say 300 dollars and the bed cost more around 600 to make it may leave you with a half finished bed. just food for thought
mrs_sgt_myh
Sat, 07/04/2015 - 00:15
Cost?
Seems like you made this a looong while ago, before or as I graduated high school! What did it cost you to make this bed? Im sure it was asked previously, but there are a TON of comments! I've noticed nice plywood costs $70 per sheet?! goodness! Still much cheaper than buying a new platform bed!
Also, what would you say the load limit is? I am around 180lbs, my husband is around 190lbs and we usually end up with one of our two children (2 & 4), a German Shepherd or any combination of the three in our bed! :) thanks!
mrs_sgt_myh
Sat, 07/04/2015 - 01:30
Cost, also!
Also, I am terribly confused about how you got this piece to even cost $200?! At Lowes, a 3/4in plywood board (4x8) is $49.99 x 5 = $249.95. Even with hubby's discount, its over $225 for the plywood ALONE :/ the lumber yard around here offers it for $40.99/4x8 board :/
Runnergale
Sun, 09/06/2015 - 04:33
Drawers
Great plans, thank you for posting! Are there plans for the drawers? The very reason i would make this bed is for the drawers, not crazy about baskets.
iluvdsney
Sun, 12/20/2015 - 20:55
Can't blow up pictures
Hi. First of all, I'd like to say that I love your plans and the fact that you make them free is so awesome! Thanks so much! I would really love to make the Queen Sized Storage Bed for my daughter, but I cannot seem to zoom in on the pictures. When I try, they are very grainey and I cannot read the dimensions. The pictures on both the Full size and King size are great, but unfortunately not the size I need to make. Please help! Thanks!
Denise CZ
Fri, 01/01/2016 - 15:41
Full Size Plans Requested
I love the Queen-sized storage bed depicted on this page! I saw that you have plans for the Queen and the King. Would you send me plans for the full-size bed? My email address is [email protected]
Thank you !
In reply to Full Size Plans Requested by Denise CZ
Ana White
Fri, 01/01/2016 - 19:00
Please take a look at this
Please take a look at this full size plan
http://www.ana-white.com/2010/05/furniture-plans-full-size-storage-bed…
sdpacenka
Wed, 01/13/2016 - 17:00
DRAWERS PLEASE
Is there a link for the plans to the drawers for this bed? I've been searching and can't seem to find them.
In reply to DRAWERS PLEASE by sdpacenka
Ana White
Thu, 01/14/2016 - 13:30
http://www.ana-white.com/2009
http://www.ana-white.com/2009/11/plans-by-your-request-drawers-for-quee…
EileenM
Sun, 01/08/2017 - 17:33
Double bed plans
Where can I get the plans for a double bed?
In reply to Double bed plans by EileenM
Ana White
Mon, 01/09/2017 - 14:00
http://www.ana-white.com/2016
http://www.ana-white.com/2016/02/free_plans/farmhouse-storage-bed-drawe…
Dina3
Fri, 01/20/2017 - 12:21
How to connect the bed benches to one another?
Thank you for providing the plan! I am planning on building this bed w/ the drawers and I wanted to know what number (#6, #8, #10 etc.) and size screws to use to connect the benches to one another. Also, what number (#6, #8, #10 etc.) screw to use to build the bench frames? Thank you!
Dina3
Thu, 02/02/2017 - 07:22
SCREWS TO USE FOR THE CUBBY DIVIDER?
What size and length screws to use to install the Cubby divider?
Dina3
Thu, 02/02/2017 - 07:24
SCREWS TO USE FOR THE CUBBY DIVIDER?
What size and length screws to use to install the Cubby divider?
In reply to SCREWS TO USE FOR THE CUBBY DIVIDER? by Dina3
Ana White
Thu, 02/02/2017 - 09:46
You can use 1-1/4" brad nails
You can use 1-1/4" brad nails and wood glue or 1-1/2" to 2" long trim screws (prefrably self tapping, try spax brand. There's not much structure in this joint, so there's leeway in what you use here to attach.
rfcalloway
Sat, 01/06/2018 - 16:21
Might be good for monks! (GOOD THING)
I am working on some furnishing ideas for a new monastery in the Houston area. I may be building a few of these for our monks, as well members who are on retreat. Smaller version, but the storage will be perfect.
:)
cp2002
Sun, 02/25/2018 - 09:50
Hi,
Hi,
I searched many pages of posts to find this answer, but was unable to locate it. Sorry if it has been answered. The face trim show says to apply flush to the edges. The height is 15 inches. The three trim pieces are 1x3 (2.5 inches), 1x2 (1.5 inches) and 11.75 inches. This is 15.75 inches. I will be adding the drawers after and was wondering where it is modified for the extra 3/4 inch.
Thanks
cp2002
Sun, 02/25/2018 - 10:15
I think I see now that they
I think I see now that they are not flush on the top. Is that it?
Thanks
Mother of Dobies
Thu, 09/24/2020 - 21:45
Too Difficult for Me?
I really want to build this bed as it is so hard to find storage beds with enclosed drawers. To date I have only assembled store bought furniture; however, I am very good at following directions 🙂 Are these directions specific enough that I should be able to build this with minimal assistance? My Dad (who has quite a bit of experience) said it is difficult to properly build drawers. I believe he said the difficulty has something to do with the drawer box & the floor both being level. Is it foolish for me to try this? Are there things I can do to improve my chance of success (i.e. some people mentioned having the store cut the pieces)? Any guidance is greatly appreciated!!
michael_b101
Thu, 03/11/2021 - 06:13
Doors not Drawers to cover the storage?
Hinge the bottom of the drawer fronts for a drop down door instead of adding a drawer? This should add your 1.5"+ extra room into each? It would be better for storing pillows and blankets too?
Although you need a magnet/clip to catch the top, and stub your toe if you don't close it well? Might get to replace or aluminum frame from 30 years ago...
Hertzya
Mon, 04/05/2021 - 05:09
Plan?
Is there a pdf of the updated plan?
gregsfritz
Wed, 02/16/2022 - 17:49
Step 2 Side benches diagram is confusing
I don’t understand the figure/picture in Step 2. For the side benches, it shows the cabinet ends and the divider with a 2 3/4” “relief” above the installed tops; but no subsequent diagrams show this relief (i.e., all subsequent figures/pictures show the tops laying on top of the sides and divider. What am I missing?