

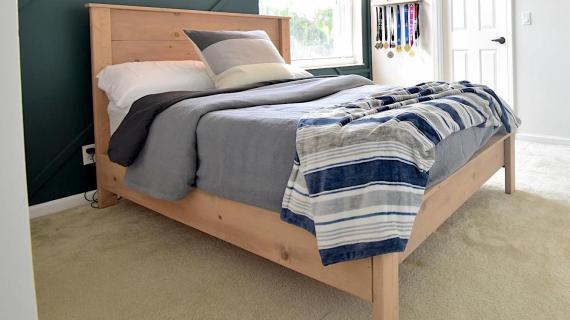
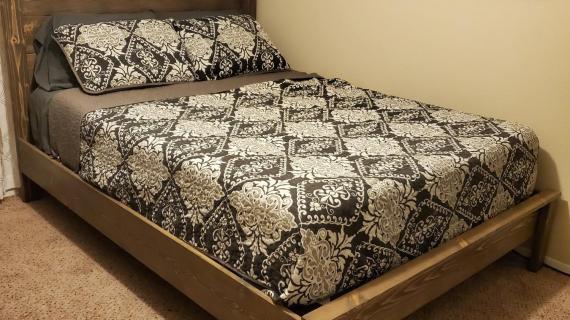
You can build this simple panel bed frame (or just the headboard) with just a circular saw and a drill for about $120 in materials. This free tutorial includes video, step by step diagrams, shopping list and a cut list for Twin, Full, Queen, King and California king mattress sizes.
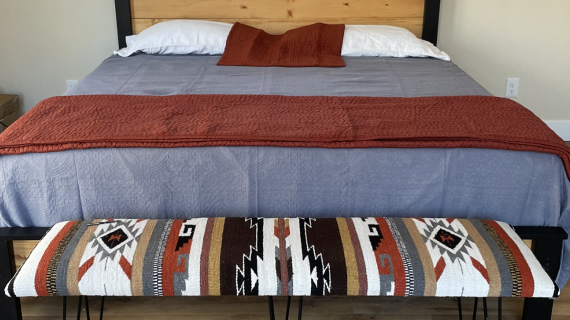
Also check out our nightstand plans, browse other bed plans, and read our wood finishing post.
A bed is the most important piece of furniture in a bedroom. Beds increase the comfort and functionality of a room, and add beauty and ground the room.
But bed can be expensive - hundreds if not thousands for a nice, not particle board, real wood bed. And if you add in box springs, and multiply that by four beds in a home - it's easy to see why many rooms just have mattresses on the floor.
Build Your Own Bed and Save
Have you considered building your own beds? My first project was a bed, and I highly recommend beds as a beginner project. You don't have to have perfect joints (like a tabletop) or deal with bulky plywood (for most storage projects)
And there's a big payoff for a small investment. Most of our DIY bed frames cost between $100 and $200 to build - INCLUDING the box spring built right in! That's right - for about the cost of the box spring, you can build the entire bed!
Beginner Friendly Bed Frame Plans
I've built ALOT of beds - loft beds, canopy beds, bunk beds, farmhouse beds - but in this plan, I wanted to create a VERY beginner friendly plan, with still a beautiful end result.
So only requiring two basic power tools (that everyone should own) - a drill and a saw - you can build this beautiful panel bed!
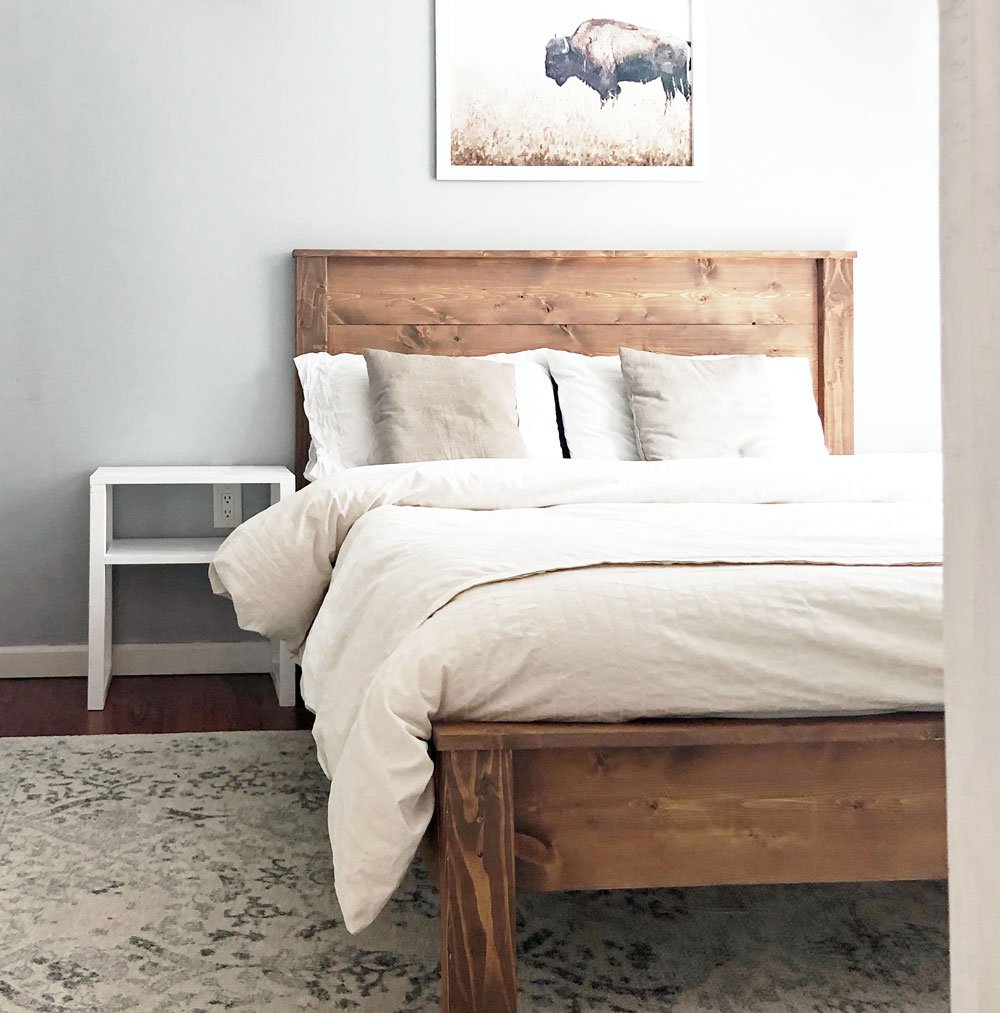
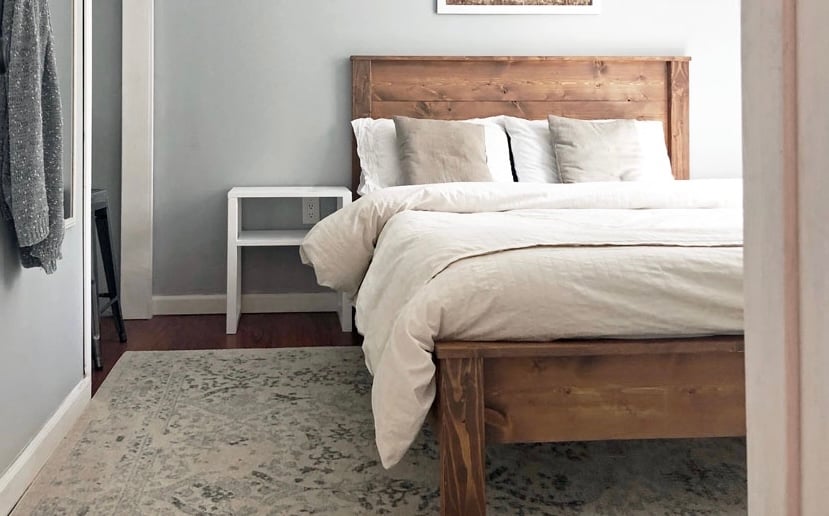
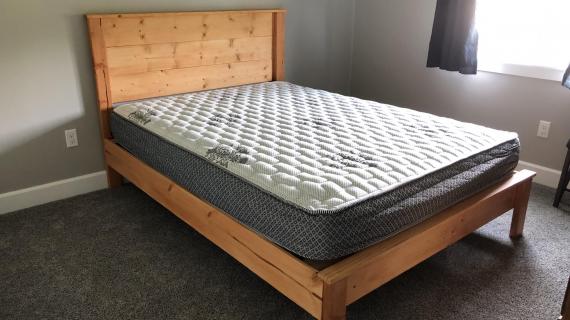
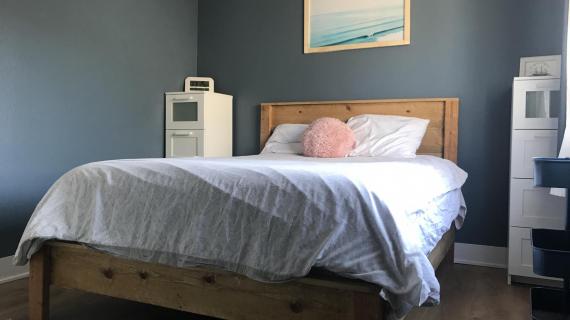
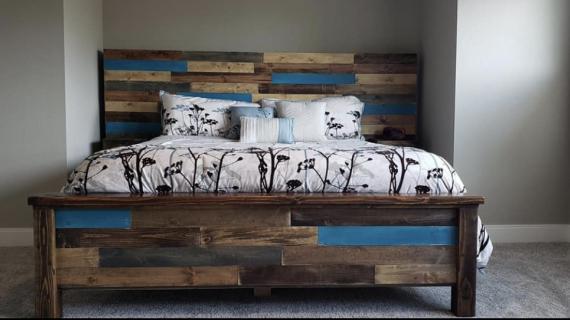
We love the solid wood texture. We love the sturdiness and proportions. It's a beautiful bed that transformed this room!
Full Room Tour
This diy panel bed was the star of one of our Airbnb room makeover videos. You can see the bed build and the entire room makeover in this video.
Most everything in this room is DIY! We'll be adding all the plans for your use.
- Modern Simple Nightstand Plans
- Floating Shelf Closet Plans
- Small Scrap Wood Coat Rack Plans
- Easiest Closet Desk Plans
- Buffalo Art Printable (etsy link) - the Frame is DIY
- Alaska Printable Art (etsy link)
- Rug from RugsUSA
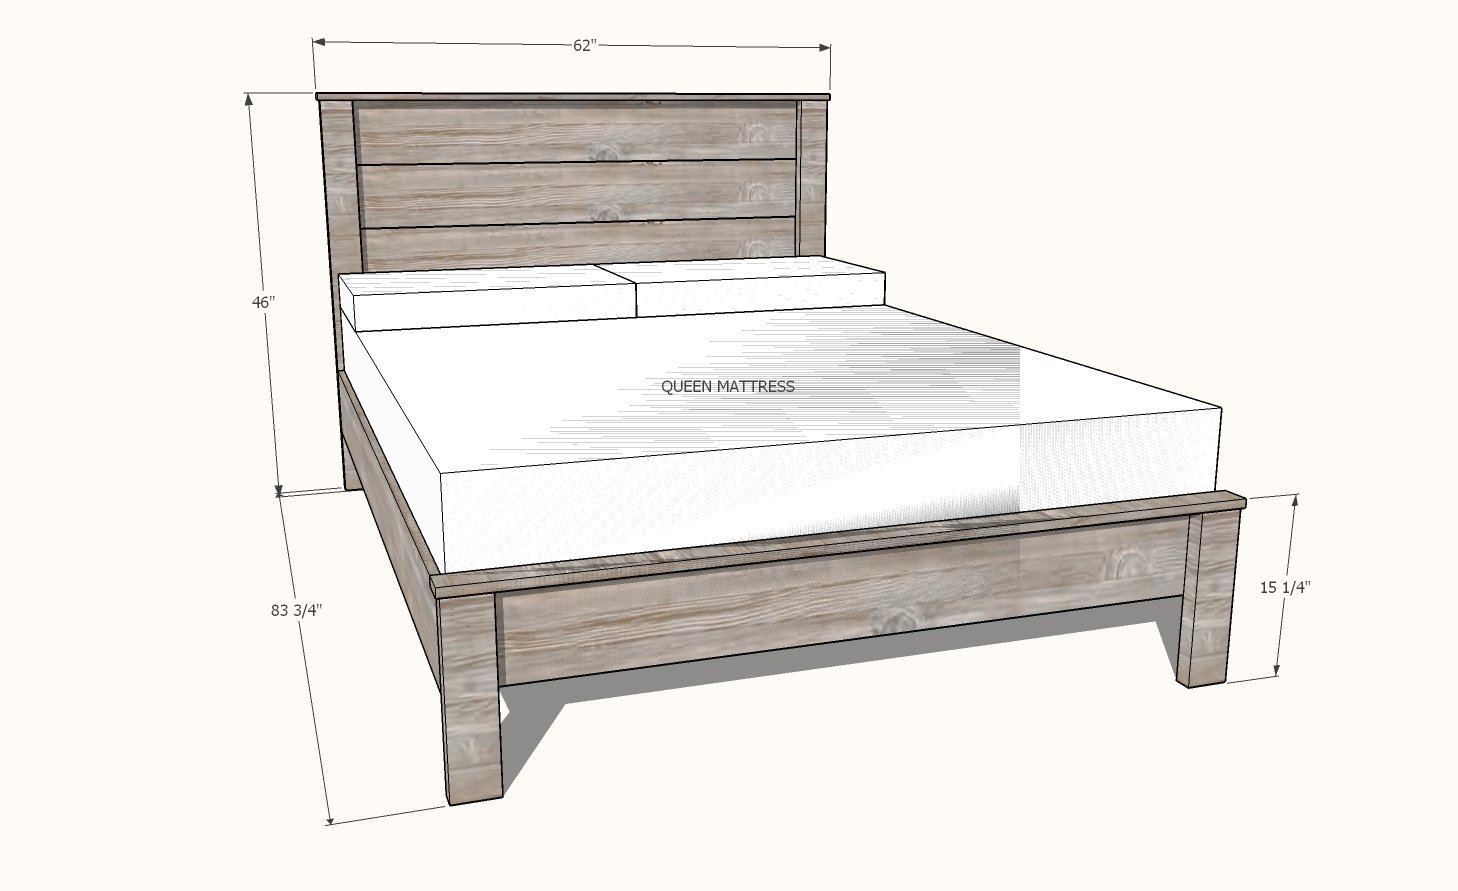
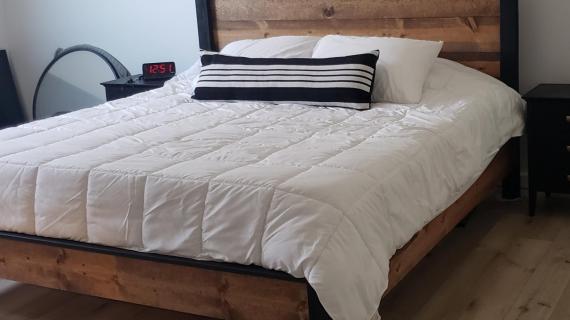
Simple Panel Bed Frame Plans
You'll find the queen sized plans for the Simple Panel bed below.
We also have the following size modifications:
- TWIN Simple Panel Bed Frame Plans (39x75)
- FULL Simple Panel Bed Frame Plans (54x75)
- STANDARD KING Simple Panel Bed Frame Plans (76x80)
- CALIFORNIA KING Simple Panel Bed Frame Plans (72x84)
When using the size modifications, follow the steps for the queen, but use the shopping list and cut list for the different sizes.
Preparation
SHOPPING LIST FOR QUEEN - for other sizes, see the downloaded PDFs above
2 - 1x8 @ 10 feet long (can cut in half for transport)
2 - 1x8 @ 8 feet long (use on siderails)
2 - 1x3 @ 6 feet long
11 - 2x4 @ 8 feet long (includes 6 2x4s used for the bed slats)
50 - 1-1/4" brad nails OR 2" self tapping wood screws
40 - 3" self tapping wood screws (can substitute for 2-1/2" or 2-3/4" lengths)
CUT LIST FOR QUEEN - for other sizes, see the downloaded PDFs above
4 - 1x8 @ 57" - panel boards
2 - 2x4 @ 45-1/4" - headboard legs
2 - 1x3 @ 62-1/2" - tops
2 - 2x4 @ 14-1/2" - footboard legs
2 - 1x8 @ 80-3/4" - sidrails
2 - 2x4 @ 80-3/4" - siderail cleats
1 - 2x4 @ ~57" - cut to fit - headboard bed frame
1 - 2x4 @ 78-1/2" - bed frame center
2 - 2x4 @ 12-1/2" - bed frame legs
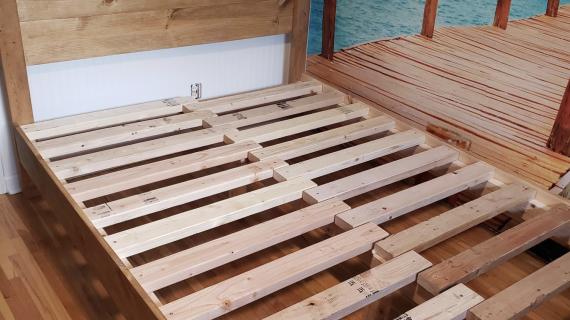
18 - 2x4 @ 31-1/2" - bed frame slats (can also use 1x4s or 1x3s or other materials if less expensive/have on hand)


This bed plan does not require a brad nailer, but having a brad nailer will make building this project easier. You can substitute screws for nails throughout this plan.
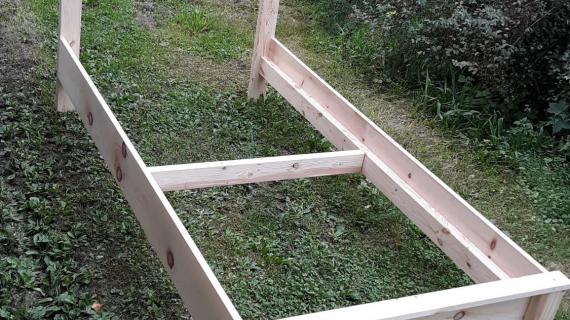
Instructions
Step 1
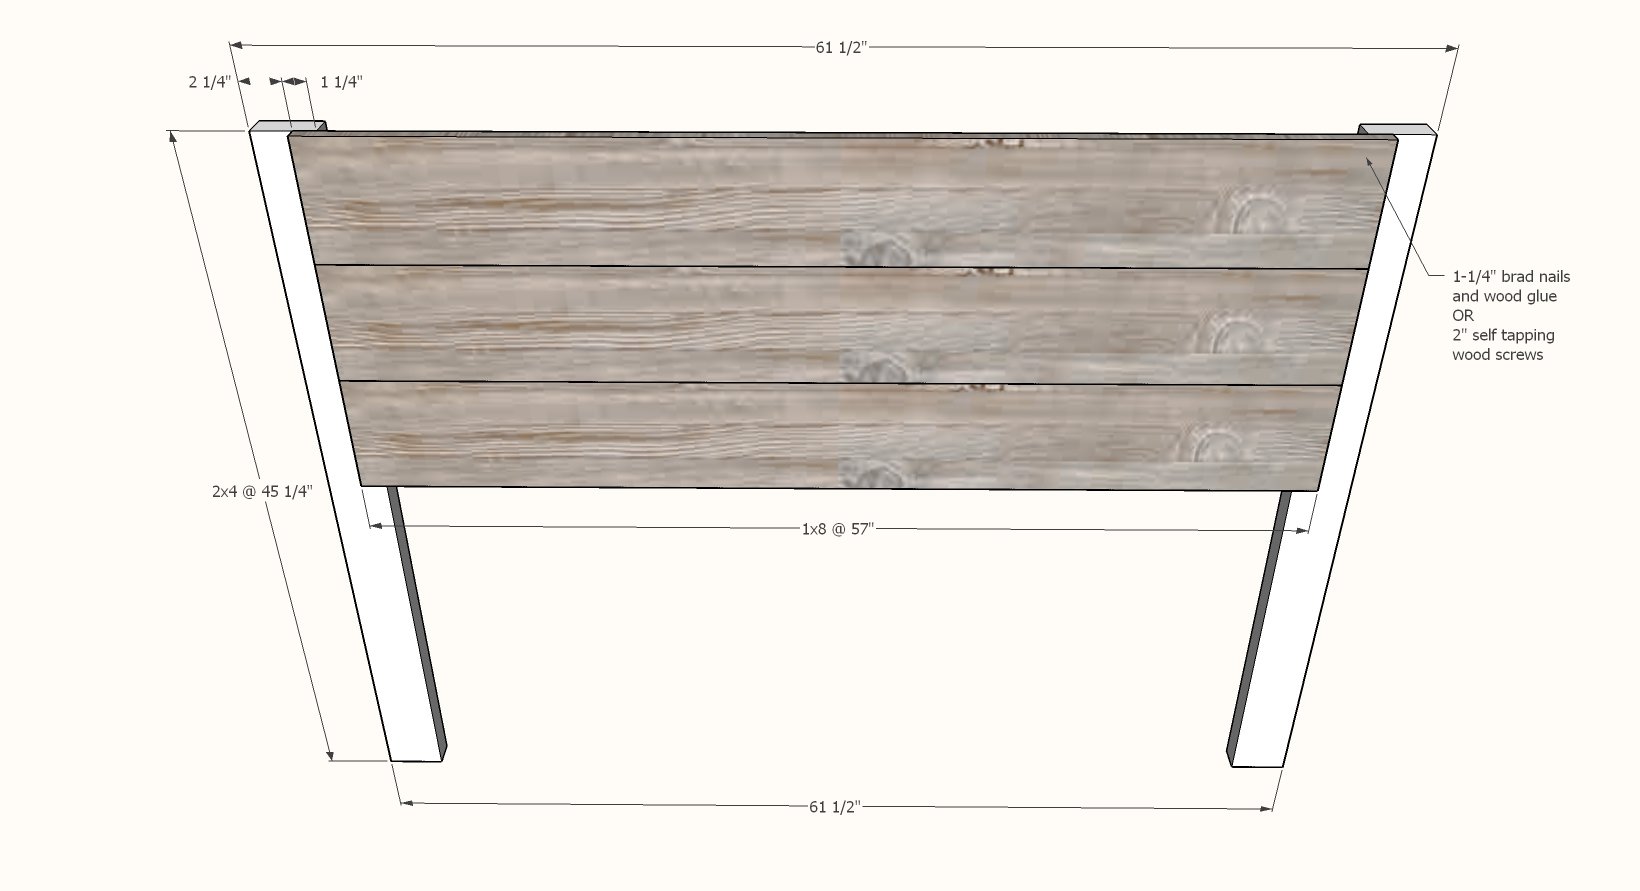
Layout the two headboard legs.
Mark a line all the way down each 2x4 leg, 2-1/4" in from the outsides.
Dryfit the panel boards for the headboard on the legs.
Then attach the top 1x8 to the legs, with glue and screws or nails.
Repeat, working downward, for all the 1x8s - just make sure you apply a bead of glue between the 1x8 boards as you go.
Step 2
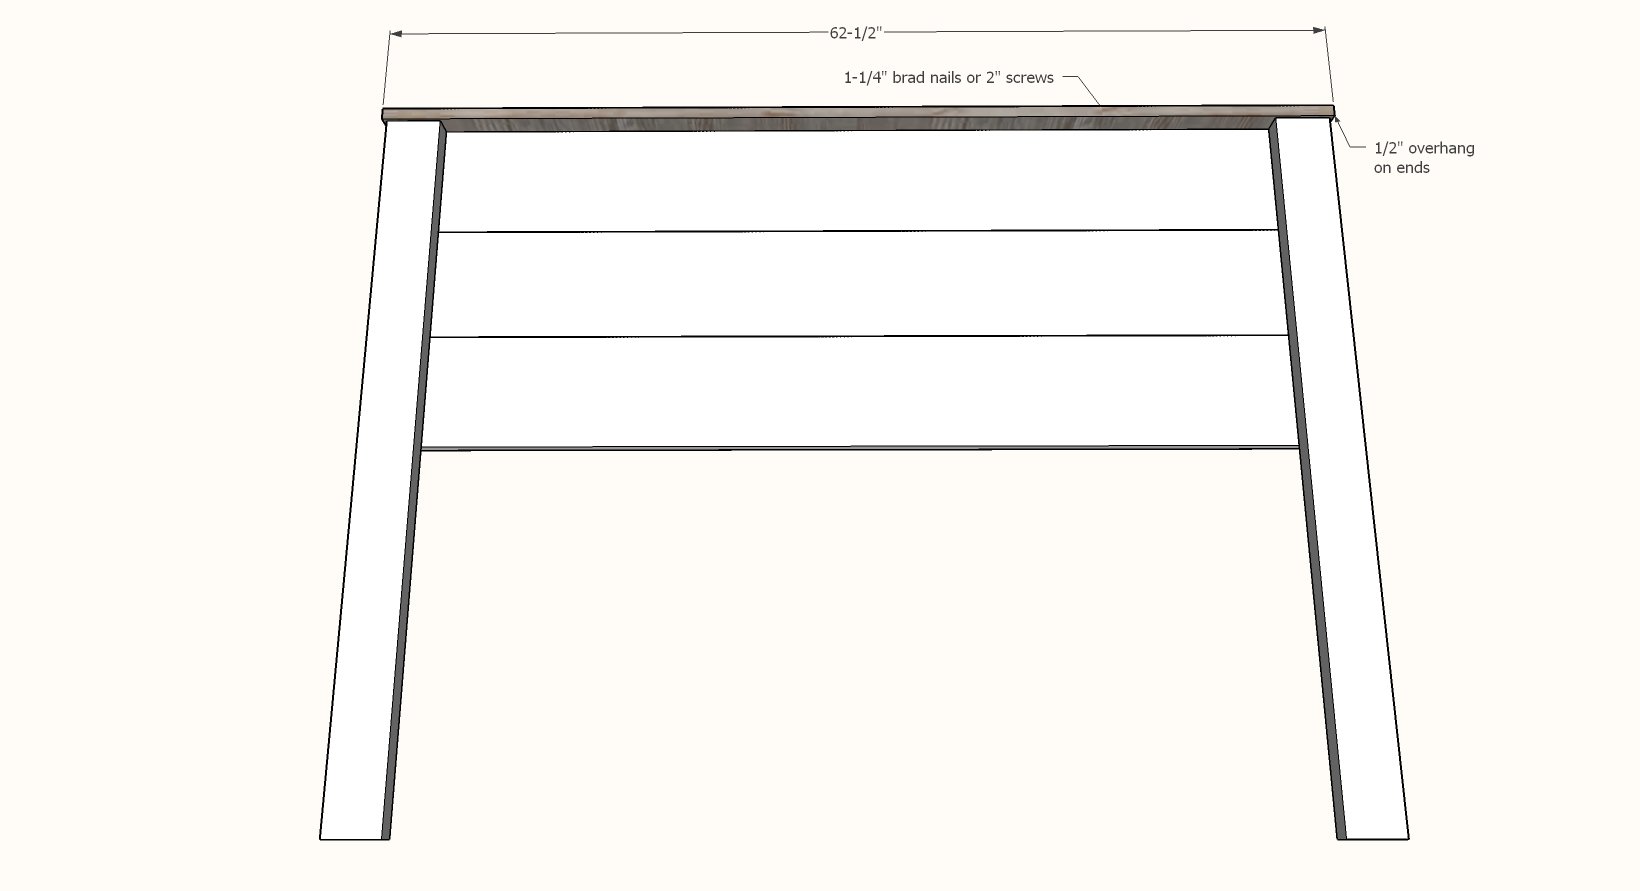
Apply glue to all top edges of the headboard.
Place 1x3 on top, even overhang on ends, flush to the back 1x8 on back.
Nail or screw down - nails are easier to hide, so use if you have a brad nailer.
Step 3
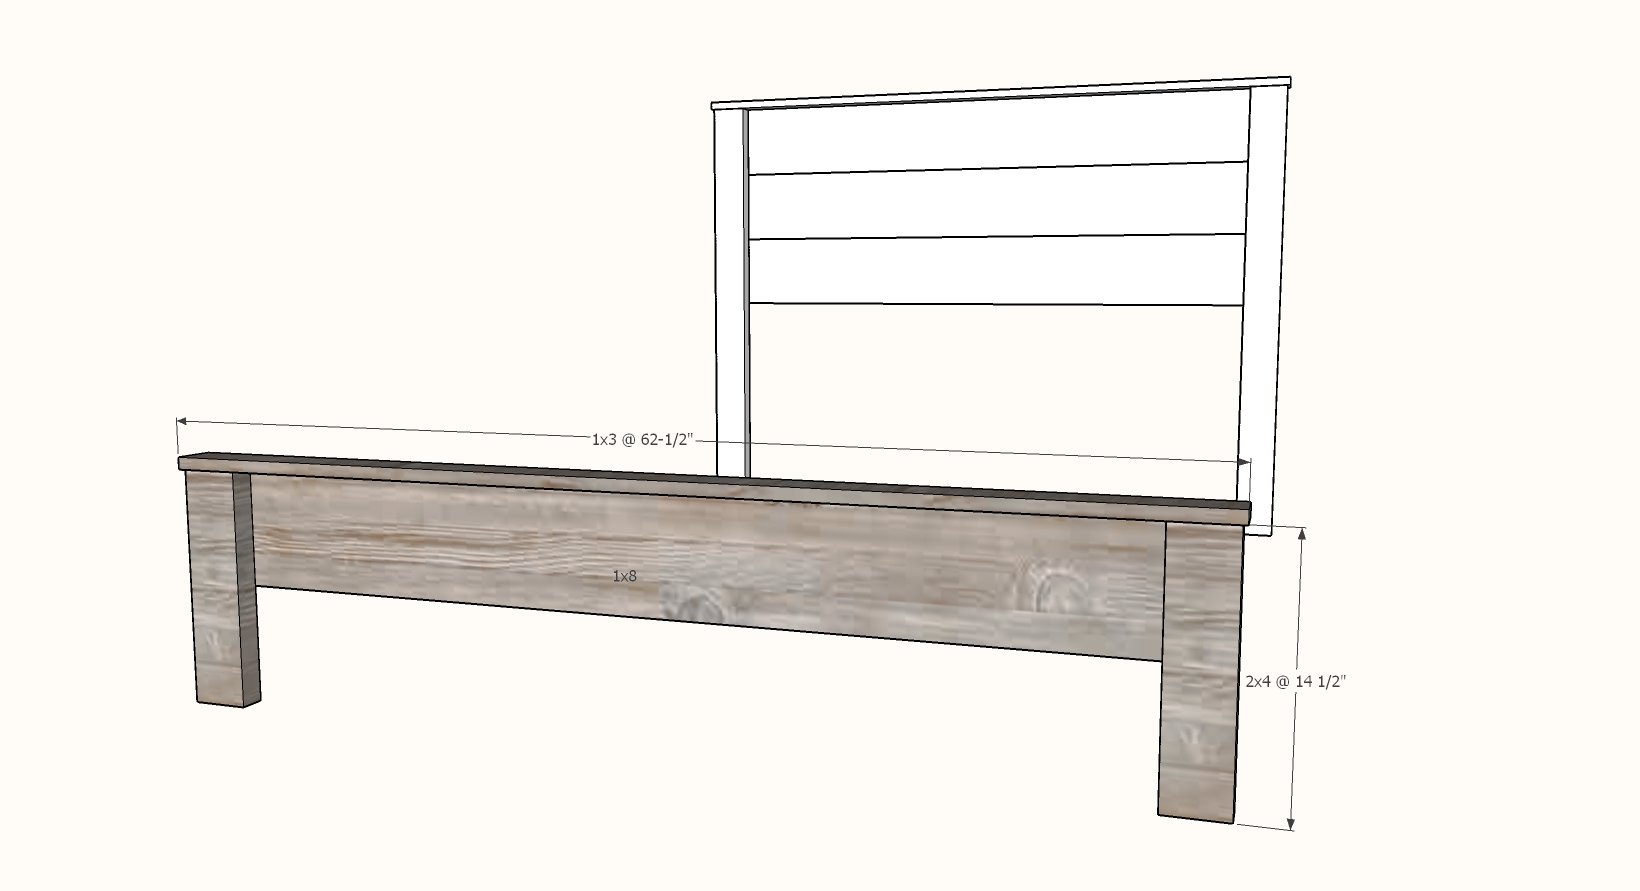
Repeat steps for footboard, with only one panel board used.
Step 4
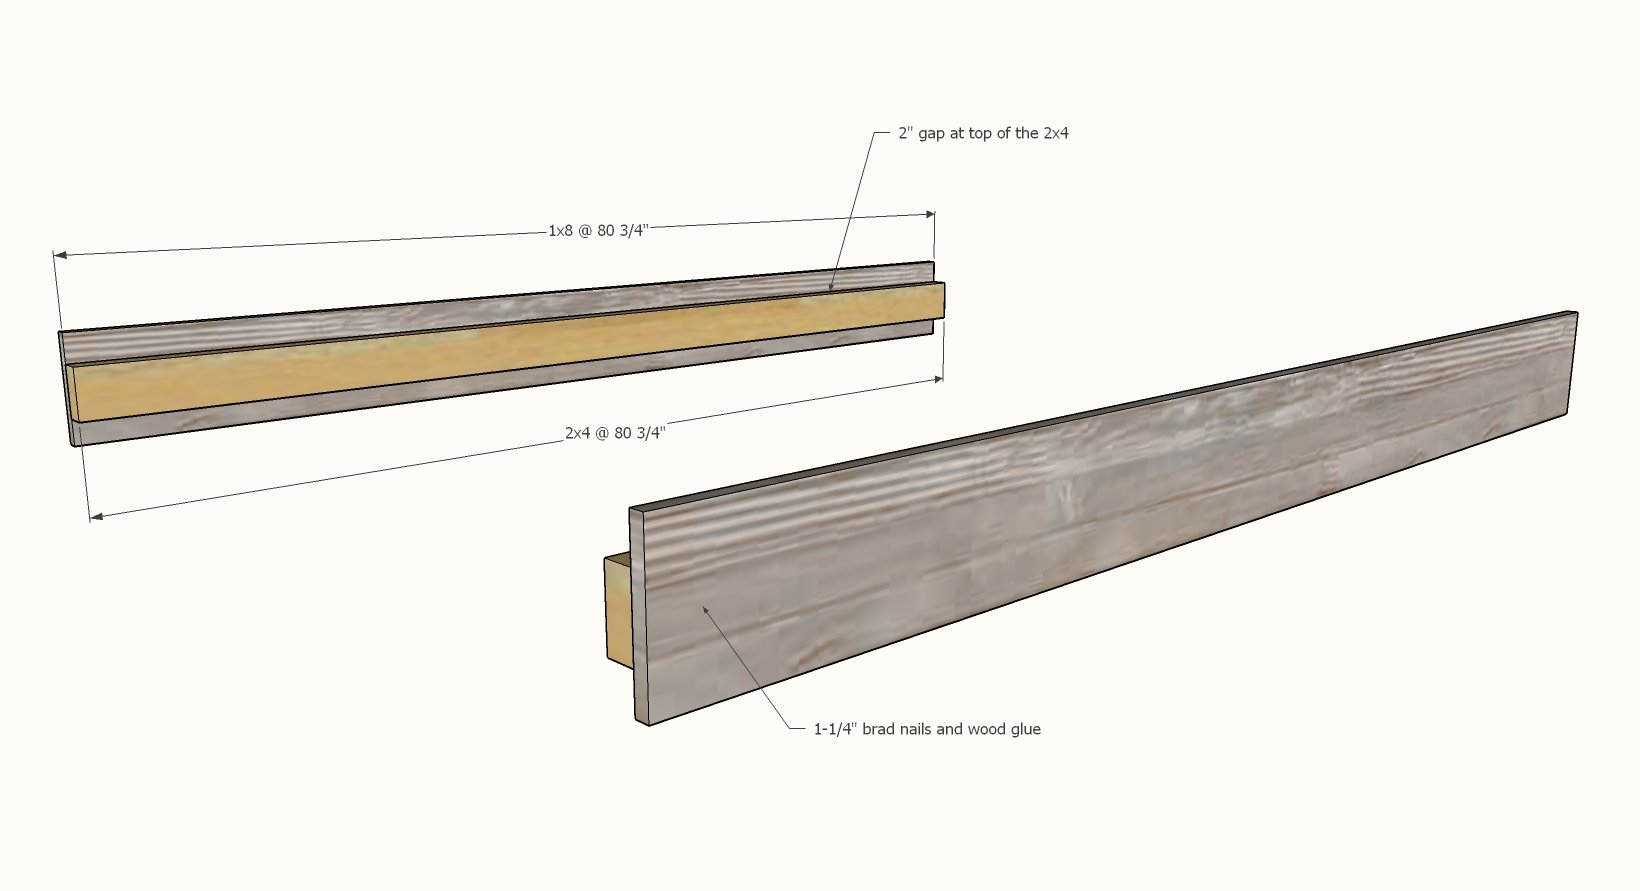
Apply glue to 2x4 cleats and place 1x8 siderail on top. Screw or nails siderail to cleat form outside.
Nails will be easier to hide, so use if you can.
Step 5
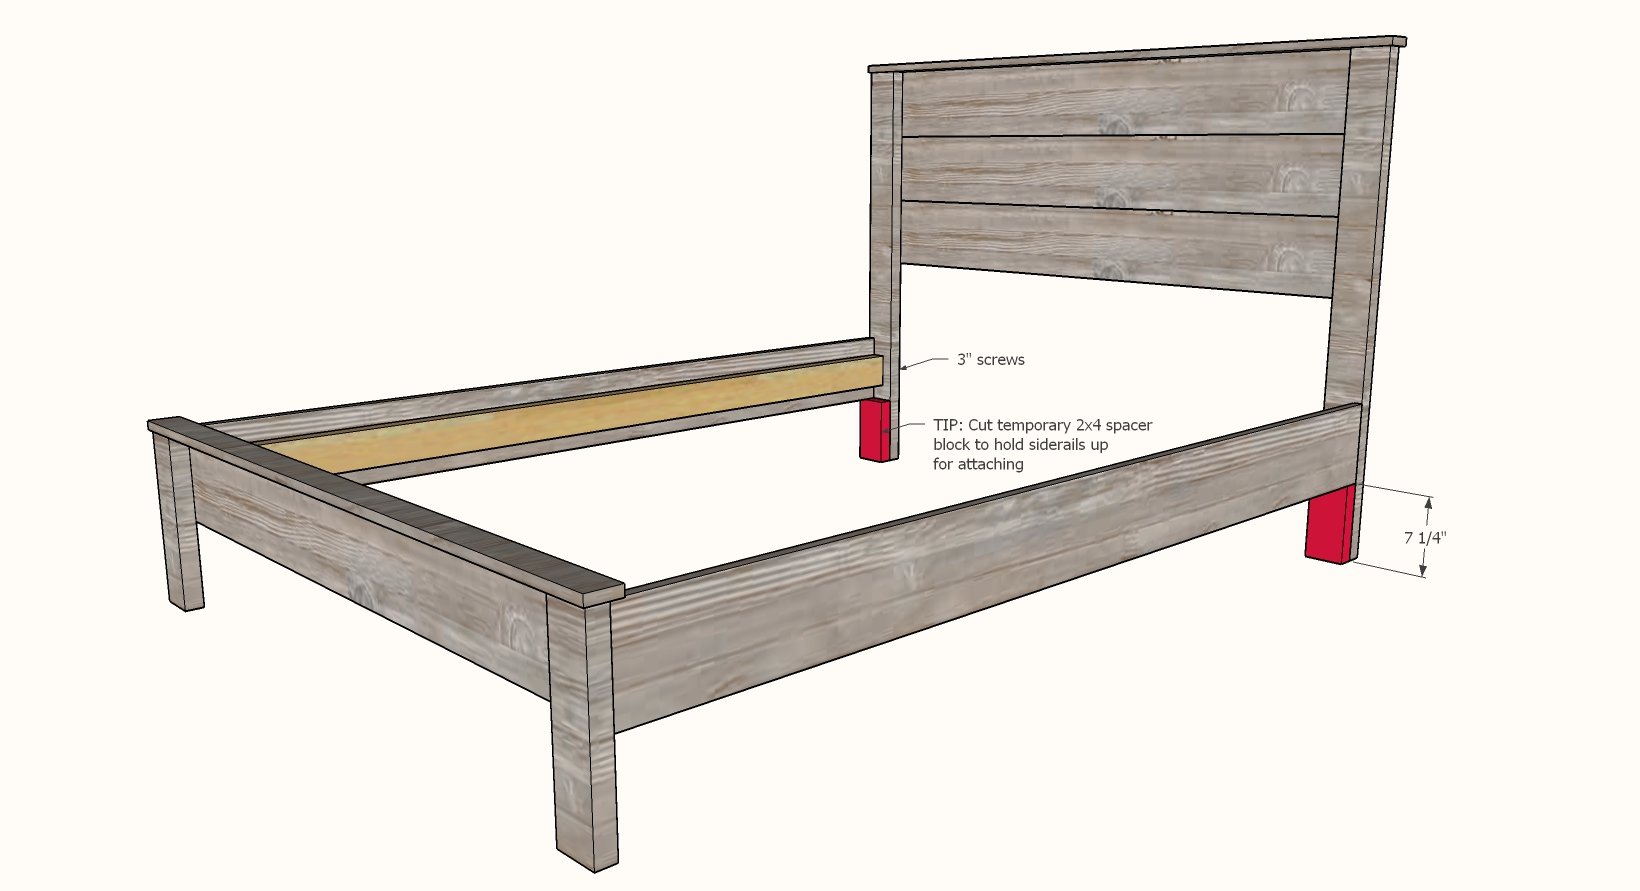
Attach the siderails to the headboard and footboard with 3" screws.
A spacer block cut from scrap 2x4s will make assembly much easier.
Step 6

Screw the headboard bed frame piece to the headboard.
Step 7
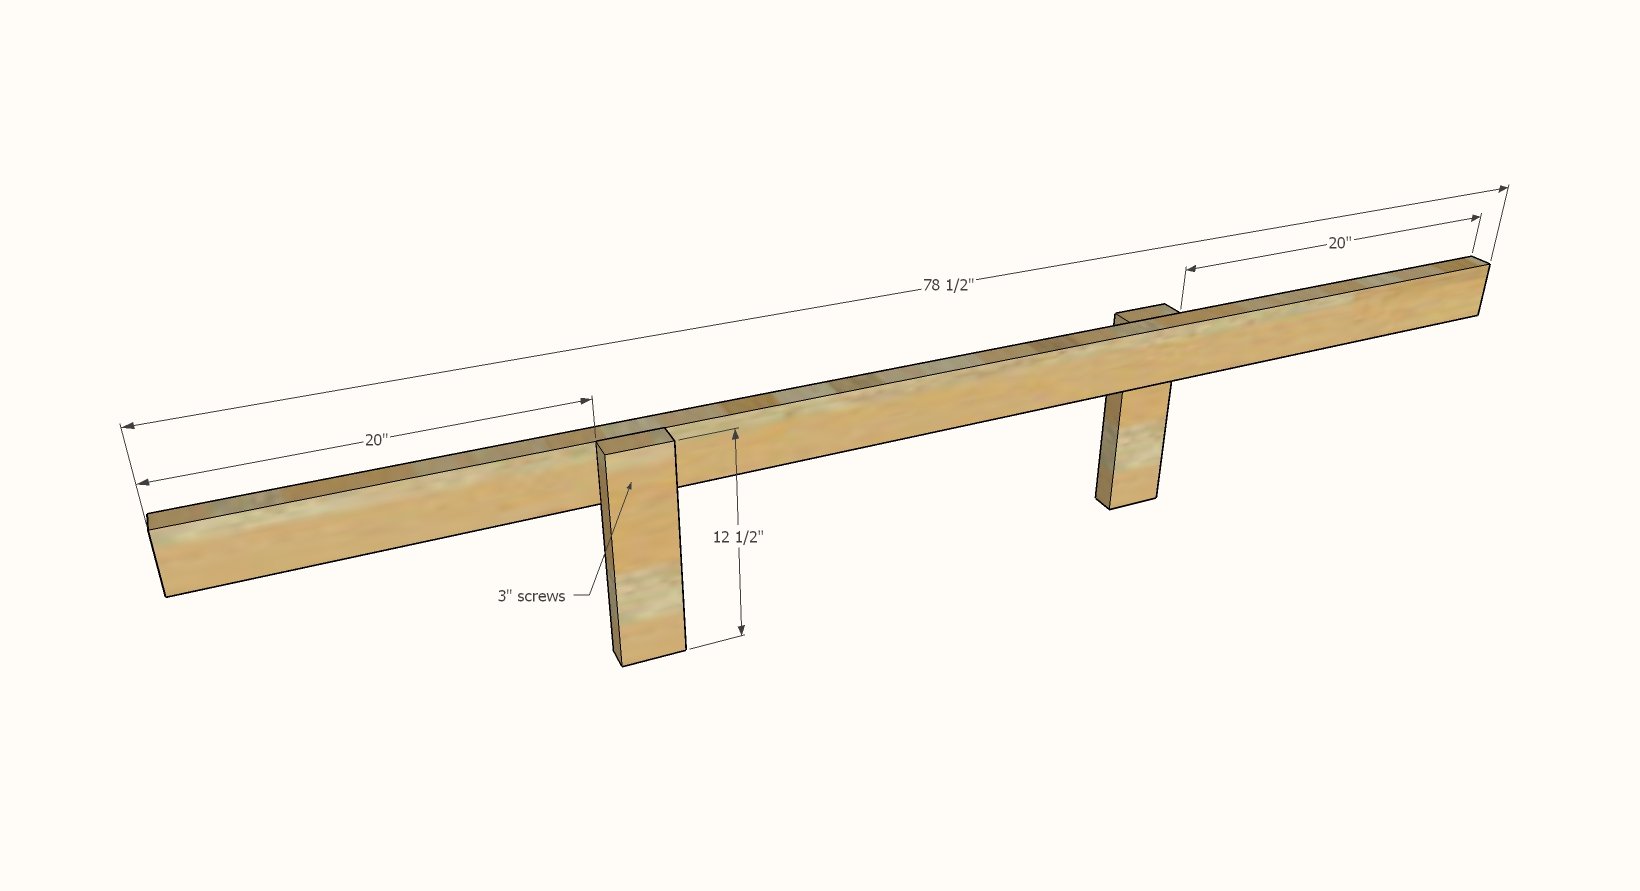
Attach bed frame legs to center bed frame support with 3" screws.
Step 8
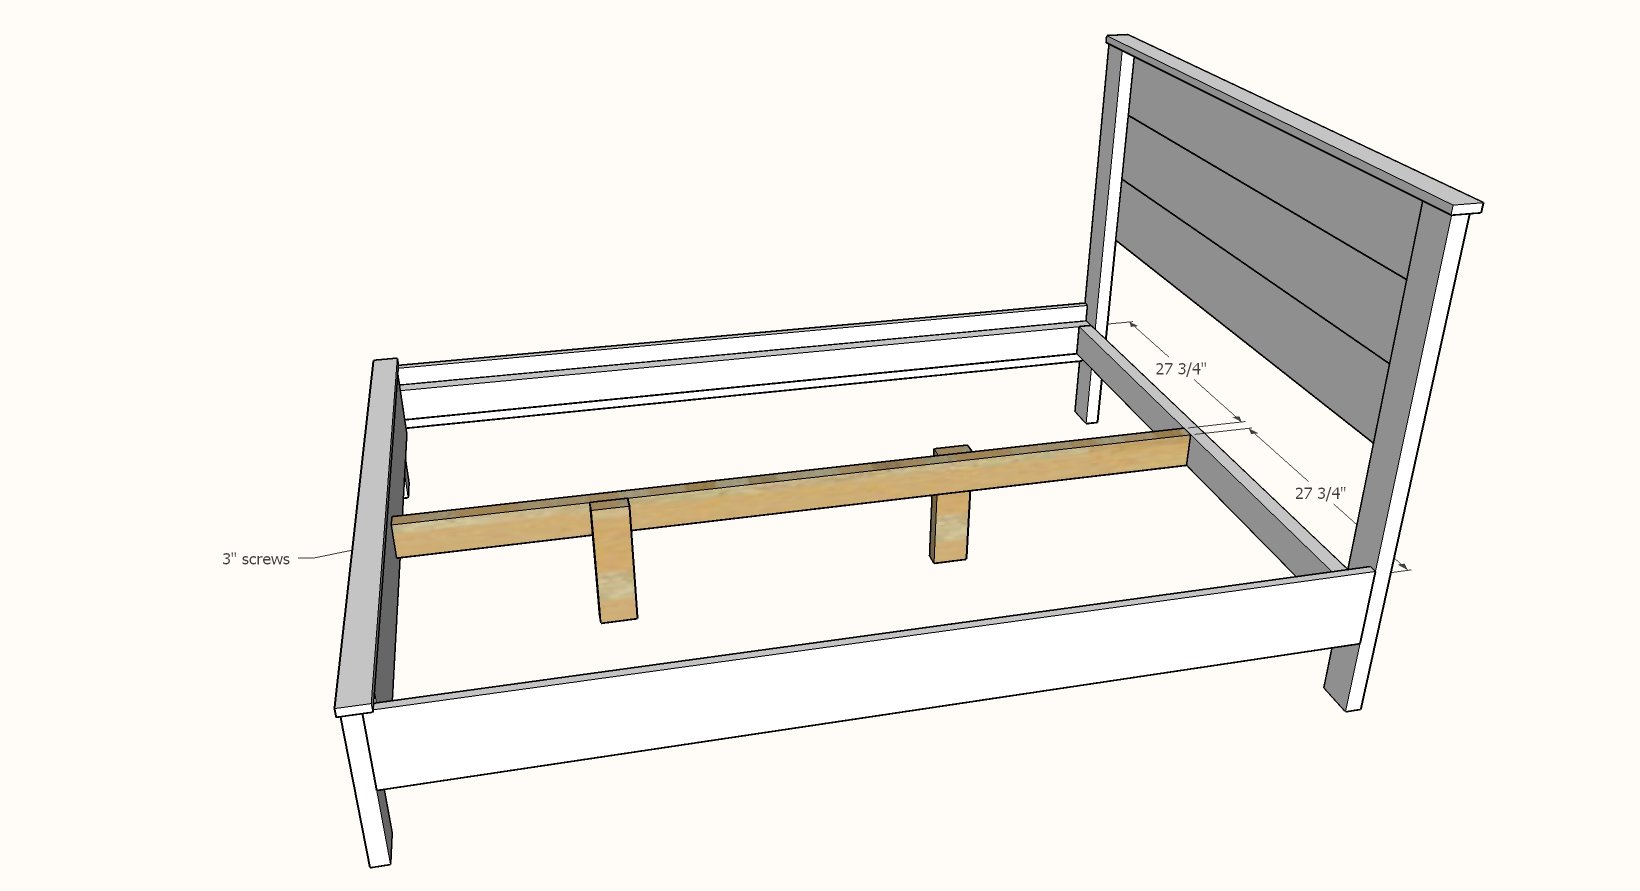
Screw bed frame center to the headboard and footboard with 3" screws, centered on the bed.
Step 9
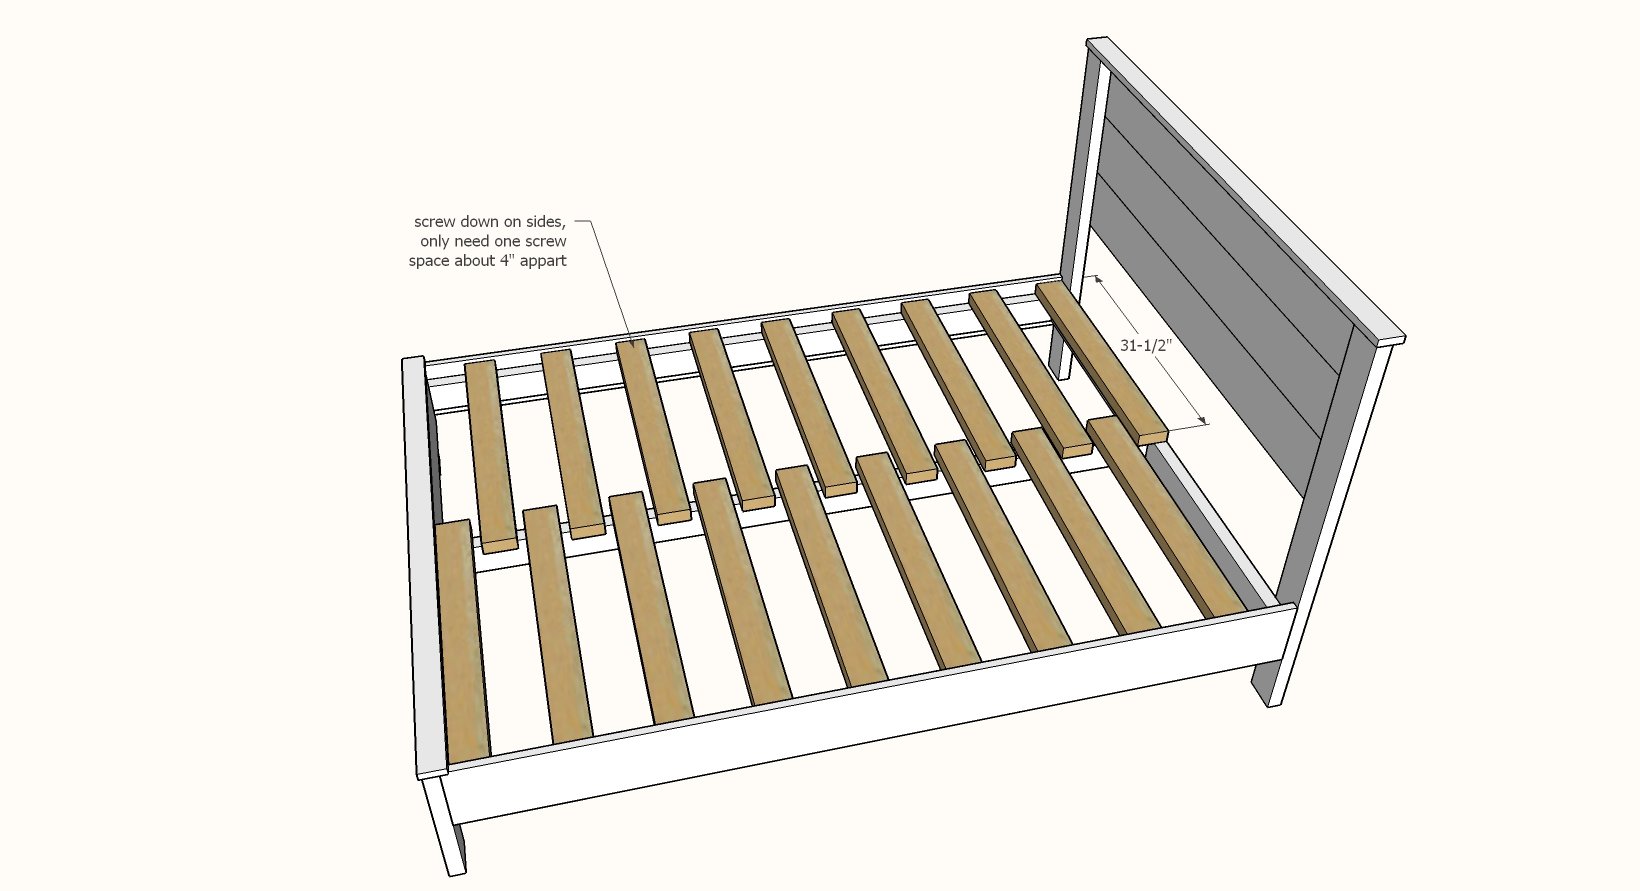
Place slats on bed frame, space about 4" apart.
Screw down using the 3" screws.

Comments
Chantcaps
Sun, 05/26/2019 - 13:47
Hi there! would there be a…
Hi there! would there be a cut list availible for a king size bed? Thank you!
In reply to Hi there! would there be a… by Chantcaps
Ana White
Sun, 05/26/2019 - 16:40
Yes of course I’d love to do…
Yes of course I’d love to do a king version for you
Standard or California?
thegirlwiththebook
Sun, 05/26/2019 - 18:26
May I request California…
May I request California King please? Where I live no one carries bed frames in this awesome size : )
In reply to May I request California… by thegirlwiththebook
Ana White
Tue, 05/28/2019 - 13:36
No problem! I updated the…
No problem! I updated the plans for a California King modification above
Nor
Mon, 05/27/2019 - 03:44
Please make a standard king…
Please make a standard king too
In reply to Please make a standard king… by Nor
Ana White
Tue, 05/28/2019 - 13:55
Here's the standard king…
Here's the standard king modification https://www.ana-white.com/sites/default/files/Untitled%20document%20%28…
Chantcaps
Tue, 05/28/2019 - 04:18
Just a standard for me would…
Just a standard for me would be great! Thanks so much
In reply to Just a standard for me would… by Chantcaps
Ana White
Tue, 05/28/2019 - 13:55
No problem! here's the…
No problem! here's the standard king modification https://www.ana-white.com/sites/default/files/Untitled%20document%20%28…
jwright88
Sun, 05/26/2019 - 17:02
Full size
Love this so much! Looks so easy. I’d love a plan for a full size bed.
In reply to Full size by jwright88
Ana White
Tue, 05/28/2019 - 14:09
No problem - here's the full…
No problem - here's the full size cut list and shopping list https://www.ana-white.com/sites/default/files/full%20simple%20panel%20b…
Wonderfullymad…
Sun, 05/26/2019 - 18:14
King plsns
Ooooh! I would love KING plans!
In reply to King plsns by Wonderfullymad…
Ana White
Tue, 05/28/2019 - 13:55
Thanks for asking - here's…
Thanks for asking - here's the king modification https://www.ana-white.com/sites/default/files/Untitled%20document%20%28…
mbelli
Sun, 05/26/2019 - 20:58
I would love this in a twin…
I would love this in a twin size bed! Is this possible?
In reply to I would love this in a twin… by mbelli
Ana White
Tue, 05/28/2019 - 14:09
No problem, here's the twin…
No problem, here's the twin mods https://www.ana-white.com/sites/default/files/twin%20simple%20panel%20b…
mbelli
Tue, 05/28/2019 - 22:02
Thank you!!!
Thank you!!!
[email protected]
Tue, 02/15/2022 - 18:57
Gap between mattress and headboard
I’ve almost completed this plan but I’m wondering if I should cut the legs off the headboard by about 6”, I won’t be using a box spring and I don’t want a gap between the headboard and mattress, does that sound reasonable?
I don’t want my toddler to fall through the gap or think crawling through there is a good idea lol
freakinhilarious
Sun, 05/26/2019 - 21:00
I would loooove plans for aa…
I would loooove plans for aa Ca King!
In reply to I would loooove plans for aa… by freakinhilarious
Ana White
Tue, 05/28/2019 - 14:10
Here's the California King…
Here's the California King Mods https://www.ana-white.com/sites/default/files/california%20king%20simpl…
lkepich
Mon, 05/27/2019 - 05:51
King
I would love King size as well!
In reply to King by lkepich
Ana White
Tue, 05/28/2019 - 14:07
Here you go! Here's the…
Here you go!
Here's the standard king size modification https://www.ana-white.com/sites/default/files/Untitled%20document%20%28…
Premorgan
Mon, 05/27/2019 - 06:51
I would love plans for a…
I would love plans for a twin size!
In reply to I would love plans for a… by Premorgan
Ana White
Tue, 05/28/2019 - 14:10
Of course, here's the twin…
Of course, here's the twin mods https://www.ana-white.com/sites/default/files/twin%20simple%20panel%20b…
Premorgan
Wed, 05/29/2019 - 12:40
Thank you so much!
Thank you so much!
mombuilds1123
Mon, 01/27/2020 - 07:36
Could you tell me what type…
Could you tell me what type of wood you used for this bed and the stain? I love it!
shellcrab75
Mon, 05/27/2019 - 07:11
Can I get the plans for a…
Can I get the plans for a standard king size please?
In reply to Can I get the plans for a… by shellcrab75
Ana White
Tue, 05/28/2019 - 14:07
Here's the standard king…
Here's the standard king size modification https://www.ana-white.com/sites/default/files/Untitled%20document%20%28…
rcamacho7
Mon, 05/27/2019 - 10:29
What color are the walls…
What color are the walls painted ?
In reply to What color are the walls… by rcamacho7
Ana White
Tue, 05/28/2019 - 13:56
The wall color is "grey…
The wall color is "grey screen" by Sherwin Williams
MaddyND
Mon, 05/27/2019 - 12:31
We too would love to see plans in TWIN size!
Great bed! We too would love to see plans in TWIN size!
In reply to We too would love to see plans in TWIN size! by MaddyND
Ana White
Tue, 05/28/2019 - 14:11
Thank you! Here's the twin…
Thank you! Here's the twin mods https://www.ana-white.com/sites/default/files/twin%20simple%20panel%20b…
cstephens
Mon, 05/27/2019 - 18:19
Can I get plans for a twin…
Can I get plans for a twin please?!
In reply to Can I get plans for a twin… by cstephens
Ana White
Tue, 05/28/2019 - 14:11
Yes, here you go https://www…
Yes, here you go https://www.ana-white.com/sites/default/files/twin%20simple%20panel%20b…
asl
Mon, 05/27/2019 - 19:25
Can I get the King size…
Can I get the King size plans as well? Thanks so much!
In reply to Can I get the King size… by asl
Ana White
Tue, 05/28/2019 - 14:07
Yep! Here's the standard…
Yep! Here's the standard king size modification https://www.ana-white.com/sites/default/files/Untitled%20document%20%28…
Smalltownbigdreams
Mon, 05/27/2019 - 20:48
Yes a Standard King size…
Yes a Standard King size plan please :)
In reply to Yes a Standard King size… by Smalltownbigdreams
Ana White
Tue, 05/28/2019 - 14:07
Here's the standard king…
Here's the standard king size modification https://www.ana-white.com/sites/default/files/Untitled%20document%20%28…
Sonoma47
Tue, 05/28/2019 - 08:51
king size bed
May I get the plans for a standard King size bed please.
Thanks so much!
In reply to king size bed by Sonoma47
Ana White
Tue, 05/28/2019 - 14:06
Here's the standard king…
Here's the standard king size modification https://www.ana-white.com/sites/default/files/Untitled%20document%20%28…
cabushey
Wed, 05/29/2019 - 20:08
Beautiful room and so…
Beautiful room and so functional! What color stain did you use on the bed? Thank you!
acnettles
Thu, 05/30/2019 - 14:24
Tall bed
Hi Ana - would it be possible to raise the bed? I want to make myself a bed, but I want to make it so I can get rid of the risers I need to store my sewing/quilting stuff under my bed. I would need about 9.25" clearance from the base of the bed to the floor. I'm thinking if I add a piece of wood as a brace would make that possible, but I'm not sure.
Jennifer823
Fri, 05/31/2019 - 05:00
How long will this build take
What is an approximate time frame for this project?
Jennifer823
Fri, 05/31/2019 - 05:04
ALSO could you use a…
ALSO could you use a boxspring with it?
nz231
Mon, 06/03/2019 - 10:45
I am wondering the same…
I am wondering the same thing. My bed has to have a box spring. Could you include the modifications to make a queen bed like this but with a box spring mattress? Thank you so much!! :)
Ralphyoder
Tue, 06/04/2019 - 03:43
Farmhouse bed color
Hi! Love the stain color. Would you mind sharing what brand and color was used for this bed? I am working on building one for our Air BNB. Thanks!
RubyJ15
Thu, 10/17/2019 - 13:34
Thanks so much for these…
Thanks so much for these plans! I'm excited to build this the bed. I have one question, are the 3 inch screws that attach the footboard to the bed frame center go through the footboard so that that are seen from the outside?
Thanks!
itrytodoitupnice
Thu, 01/02/2020 - 12:00
Cedar instead?
Our local hardware store has cedar on sale, the only cut they don't have is the 1x3. They do have a 1x4, do you think it would make an ok substitute? Would cedar even be a good idea?
marcalejo
Sat, 01/18/2020 - 11:51
Type of wood
Hi Ana. I would like to know what kind of wood do I use? Douglas fir? I want to build this for my son.
WoodworkingRachel
Mon, 01/20/2020 - 13:50
Type of wood
This is a beautiful bed! What type of wood are you using? Whatever it is I would like to use the same type of wood!
cwilks13
Thu, 03/05/2020 - 19:36
What colour stain did you…
What colour stain did you use on this bed?
i love it!
SEB11
Fri, 05/29/2020 - 05:22
Matching nightstands
Awesome bed!
Do you have the plan for the "Modern Simple Nightstand Plans" as well?
Thanks :)